reset SKODA OCTAVIA 2013 3.G / (5E) Columbus Navigation System Manual
[x] Cancel search | Manufacturer: SKODA, Model Year: 2013, Model line: OCTAVIA, Model: SKODA OCTAVIA 2013 3.G / (5E)Pages: 90, PDF Size: 5.21 MB
Page 13 of 90
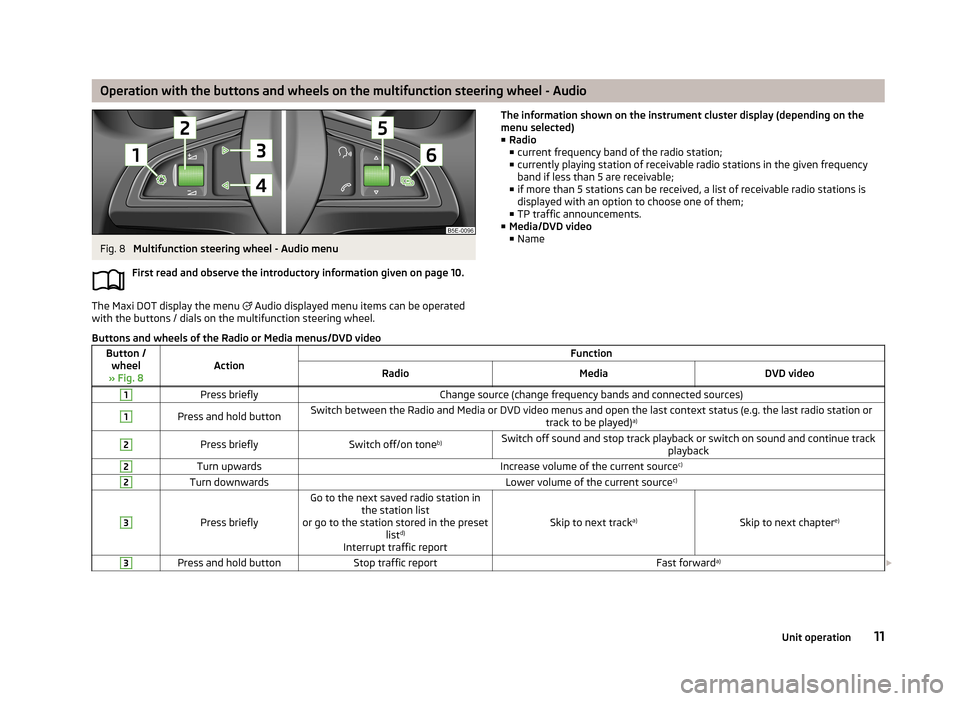
Operation with the buttons and wheels on the multifunction steering wheel - AudioFig. 8
Multifunction steering wheel - Audio menu
First read and observe the introductory information given on page 10.
The Maxi DOT display the menu
Audio displayed menu items can be operated
with the buttons / dials on the multifunction steering wheel.
The information shown on the instrument cluster display (depending on the
menu selected)
■ Radio
■ current frequency band of the radio station;
■ currently playing station of receivable radio stations in the given frequency
band if less than 5 are receivable;
■ if more than 5 stations can be received, a list of receivable radio stations is
displayed with an option to choose one of them;
■ TP traffic announcements.
■ Media/DVD video
■ NameButtons and wheels of the Radio or Media menus/DVD videoButton /
wheel
» Fig. 8ActionFunctionRadioMediaDVD video1Press brieflyChange source (change frequency bands and connected sources)1Press and hold buttonSwitch between the Radio and Media or DVD video menus and open the last context status (e.g. the last radio station or track to be played)a)2Press brieflySwitch off/on tone b)Switch off sound and stop track playback or switch on sound and continue track
playback2Turn upwardsIncrease volume of the current source c)2Turn downwardsLower volume of the current sourcec)3
Press briefly
Go to the next saved radio station in
the station list
or go to the station stored in the preset listd)
Interrupt traffic report
Skip to next track a)Skip to next chapter e)
3Press and hold buttonStop traffic reportFast forwarda)
11Unit operation
Page 14 of 90
Button /wheel
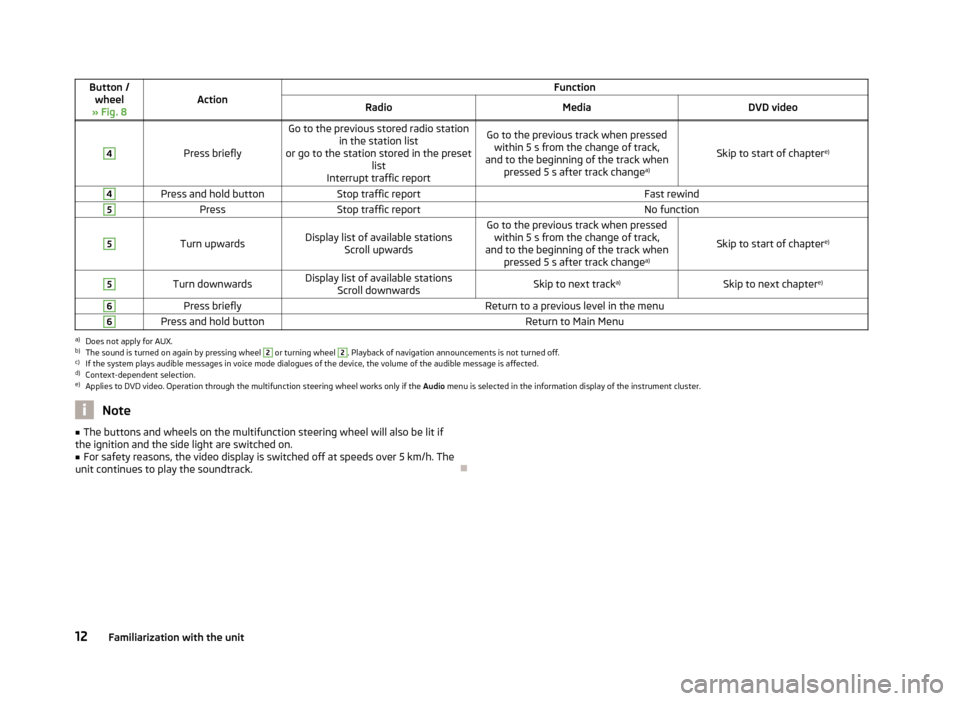
» Fig. 8ActionFunctionRadioMediaDVD video4
Press briefly
Go to the previous stored radio station in the station list
or go to the station stored in the preset list
Interrupt traffic reportGo to the previous track when pressed within 5 s from the change of track,
and to the beginning of the track when pressed 5 s after track change a)
Skip to start of chaptere)
4Press and hold buttonStop traffic reportFast rewind5PressStop traffic reportNo function5
Turn upwardsDisplay list of available stations
Scroll upwardsGo to the previous track when pressedwithin 5 s from the change of track,
and to the beginning of the track when pressed 5 s after track change a)
Skip to start of chaptere)
5Turn downwardsDisplay list of available stations
Scroll downwardsSkip to next track a)Skip to next chapter e)6Press brieflyReturn to a previous level in the menu6Press and hold buttonReturn to Main Menua)
Does not apply for AUX.
b)
The sound is turned on again by pressing wheel
2
or turning wheel
2
. Playback of navigation announcements is not turned off.
c)
If the system plays audible messages in voice mode dialogues of the device, the volume of the audible message is affected.
d)
Context-dependent selection.
e)
Applies to DVD video. Operation through the multifunction steering wheel works only if the
Audio menu is selected in the information display of the instrument cluster.
Note■
The buttons and wheels on the multifunction steering wheel will also be lit if
the ignition and the side light are switched on.■
For safety reasons, the video display is switched off at speeds over 5 km/h. The
unit continues to play the soundtrack.
12Familiarization with the unit
Page 24 of 90
■Temperature: - Temperature units
■ ° - Degrees Celsius
■ ° - Degrees Fahrenheit
■ Volume: - Volume units
■ l - Litres
■ gal (US) - Gallons (US)
■ gal (UK) - Gallons (UK)
■ Consumption: - Consumption units
■ l/100km - Litres per 100 kilometres
■ km/l - Kilometres per litre
■ mpg (US) - Miles per gallon (US)
■ mpg (UK) - Miles per gallon (UK)
■ Gas consumption: - Gas consumption units
■ kg/100km - Kilograms per 100 km
■ km/kg - Kilometres per kilogram
■ m³/100km - Cubic metres per 100 kilometres
■ km/m³ - Kilometres per cubic metre
■ Pressure: - Pressure units for tyre pressure
■ kPa - Kilopascal
■ bar - bar
■ psi - Pounds per square inch
Voice control settings
First read and observe the introductory information given on page 19.
›
Press the button Menu
→
→ Voice control
■ Dialogue style: Setting the dialogue style
■ Long - Long dialogue (the system plays complete acoustic messages)
■ Short - Short dialogue (the system shortens some acoustic messages or sub-
stitutes them with an acoustic signal)
■ Display available commands - Switch on/off the menus containing basic voice
commands when voice control is activated
■ Voice control session start tone - Switch on/off the audible signal that is out-
put when voice control is activated
■ Voice control session end tone - Switch on/off the audible signal that is output
when voice control is ended
■ Input tone in voice dialogue - Switch on/off the audible signal that is output to
signal that voice control is waiting for a command
Restore factory settings
First read and observe the introductory information given on page 19.›
Press the button Menu
→ → Factory settings
■ Reset all settings and data
■ Restore factory settings - Reset all factory settings
■ Reset individual settings/data
■ Sound - Restore default settings for sound
■ Radio - Restore default settings for radio
■ Vehicle - Restore default settings for the vehicle systems
■ Telephone - Restore default settings for phone
■ Media - Restore default settings for media
■ Voice control - Restore default settings for voice control
■ Navigation - Restore default settings for navigation
■ System - Restore the system default settings
Bluetooth ®
settings
First read and observe the introductory information given on page 19.
›
Press the button Menu
→
→ Bluetooth
■ Bluetooth - Switch on/off Bluetooth ®
function
■ Visibility: - Switch on/off the visibility of the Bluetooth ®
device for other devices
■ Visible - Visibility is always on
■ Hidden - Visibility is off
■ At start-up - Turns on visibility for 5 minutes after switching on the ignition or
until the driving speed has exceeded 5 km/h
■ Name: - Open the input screen with keyboard - Chang the device name
■ Paired devices - Display the list of paired Bluetooth ®
devices; connect or delete
a paired device; delete the list of paired devices ■ Delete all - Delete all paired Bluetooth ®
devices
■ - Delete the paired Bluetooth ®
device
■ Find devices - Searches for available external devices with enabled Bluetooth ®
functions and activated visibility » page 45
■ Bluetooth audio (A2DP/AVRCP) - Switch on/off the connection option for Blue-
tooth ®
profiles A2DP and AVRCP 1)
22Familiarization with the unit
Page 26 of 90
Audio/Video/Images
Radio
Operation
Introduction
This chapter contains information on the following subjects:
Mainmenu
24
List of available stations
25
Search for radio stations and store
25
Search available stations (Scan)
26
Station logos
26
Traffic programme
26
Station information DAB)
27
First and foremost, pay attention to the safety instructions » page 4 , Important
notes .
The device allows analogue radio reception of FM and AM frequency ranges as
well as DAB digital radio reception.
Radio reception DAB allows multiple stations to be transmitted in a single fre-
quency in the form of a so-called ensemble. It also allows for the transmission of
additional data and information (e.g. messages, sport, weather, warnings, etc.).
Note
■ Car parks, tunnels, tall buildings or mountains can interfere with the radio signal
even causing it to fail completely.■
In countries where the RDS function is not supported sufficiently, we recom-
mend turning off the AF and RDS settings. Otherwise, these settings can affect
the functionality of the radio.
■
For vehicles with window antennas, if the windows have foil stuck to them or
metal-coated stickers this may cause you to experience some interference.
MainmenuFig. 14
Radio: Main menu
First read and observe the introductory information given on page 24.
Information and function keys » Fig. 14
The selected radio station (frequency or identifier)
Station keys
Storage groups of the preset buttons Choice of radio range (FM / AM / DAB)
List of available stations » page 25
manual / semi-automatic station search » page 25
Changing channels either in the list of available stations or the station but-
tons depending on the settings of the menu Arrow buttons: » page 27 ,
Settings
Radio settings
Information for radio station (DAB) » page 27
For each broadcasting range (FM / AM / DAB) there are 18 preset buttons to store
the radio stations. These preset buttons are divided into three memory groups.
Call up the main menu
›
Press the button RADIO.
Choose broadcasting range
›
Press the button RADIO repeatedly.
or
›
Press the function button
D
» Fig. 14 , and select the desired range.
ABCD
24Audio/Video/Images
Page 27 of 90
Information symbols in the displaySymbolMeaningTraffic information station Traffic information signals are not available or the selected station
is not a traffic information station RDS function is switched off (FM) AF Alternative frequency is switched off (FM)
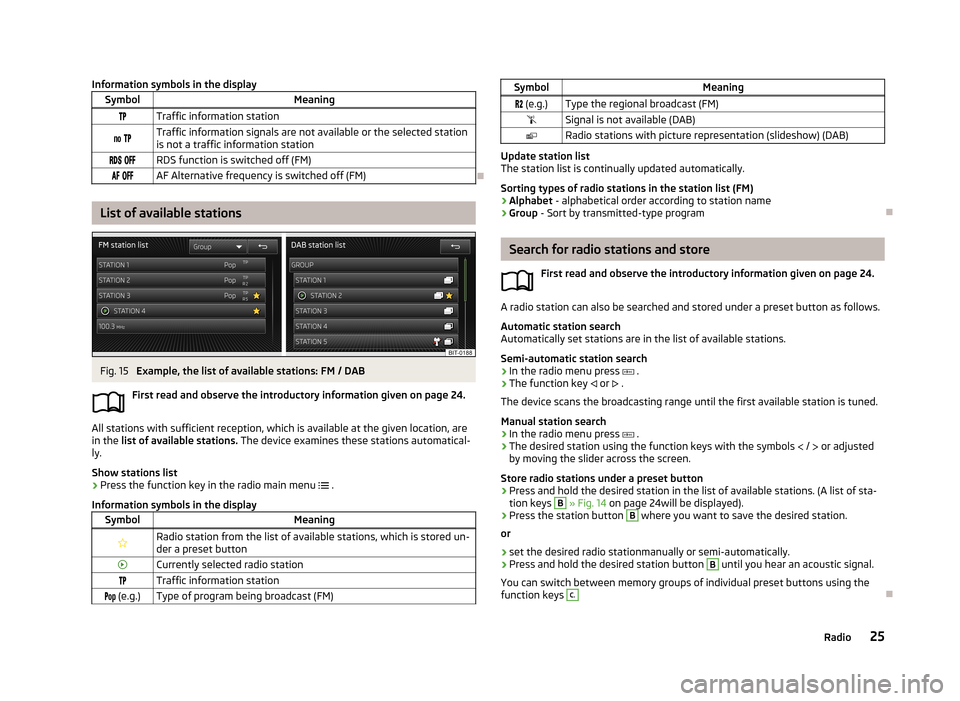
List of available stations
Fig. 15
Example, the list of available stations: FM / DAB
First read and observe the introductory information given on page 24.
All stations with sufficient reception, which is available at the given location, are in the list of available stations. The device examines these stations automatical-
ly.
Show stations list
›
Press the function key in the radio main menu
.
Information symbols in the display
SymbolMeaningRadio station from the list of available stations, which is stored un- der a preset buttonCurrently selected radio stationTraffic information station (e.g.)Type of program being broadcast (FM)SymbolMeaning (e.g.)Type the regional broadcast (FM)Signal is not available (DAB)Radio stations with picture representation (slideshow) (DAB)
Update station list
The station list is continually updated automatically.
Sorting types of radio stations in the station list (FM) › Alphabet
- alphabetical order according to station name
› Group
- Sort by transmitted-type program
Search for radio stations and store
First read and observe the introductory information given on page 24.
A radio station can also be searched and stored under a preset button as follows.
Automatic station search
Automatically set stations are in the list of available stations.
Semi-automatic station search
›
In the radio menu press
.
›
The function key
or
.
The device scans the broadcasting range until the first available station is tuned.
Manual station search
›
In the radio menu press
.
›
The desired station using the function keys with the symbols
/
or adjusted
by moving the slider across the screen.
Store radio stations under a preset button
›
Press and hold the desired station in the list of available stations. (A list of sta- tion keys
B
» Fig. 14 on page 24will be displayed).
›
Press the station button
B
where you want to save the desired station.
or
›
set the desired radio stationmanually or semi-automatically.
›
Press and hold the desired station button
B
until you hear an acoustic signal.
You can switch between memory groups of individual preset buttons using the
function keys
C.
25Radio
Page 28 of 90
Search available stations (Scan)First read and observe the introductory information given on page 24.
This function plays all the receivable stations in succession for a few seconds
each.
Switching on
›
Press the button
2
» Fig. 1 on page 5
or
›
press the → Scan button.
Switching off
›
Press the button
2
or
›
press any function key in the device screen.
After switching off the function, the device receives the stations at which the
function was canceled.
Station logos
First read and observe the introductory information given on page 24.
The preset buttons
(B
» Fig. 14 on page 24 ) can be associated with logos (im-
ages) of the radio station.
Store station logos automatically (FM / DAB)
›
Before you save the radio station to a station button function key
press →
Advanced setup
›
Activate the menu item Auto-save station logos » page 28 , Advanced Set-
tings (FM) and » page 28 , Advanced Settings (DAB) .
When you save the station to a station button, the station is assigned a logo from the device memory if the logo is available in the memory.
Storing station logos manually
A logo can be assigned manually for the previously stored stations.
›
The function key
→ Station logos
A menu with preset buttons for radio stations is displayed.›
Press the preset button for the station, which a logo is to be assigned to.
A menu of media (CD, SD card, USB) is displayed.
›
In the the relevant madia select the image you want to have.
By selection of the image it is assiagned to the relevant station button.
Note
■ The following image formats are supported: jpg, gif, png, bmp.■We recommend a resolution of up to 500 x 500 pixels.
Traffic programme
First read and observe the introductory information given on page 24.
During playback in the media menu the traffic information from the last selected
radio station is received.
Should this radio station not support traffic reports or the signal is not available,
then the device automatically searches for a TP station.
Switching on/off
›
The function key
.
›
Enable or disable the menu item Traffic programme (TP)
Traffic news
During a traffic announcement, the following menu is displayed:
›
Cancel - interruption of the current traffic report. The TP function remains acti-
vated.
›
Deactivate - Exit the current traffic report and turn off TP function.
Note
Some radio stations misleadingly identify themselves as traffic programs. It is
therefore not an error with the unit that there is no traffic news with these sta-
tions.
26Audio/Video/Images
Page 29 of 90
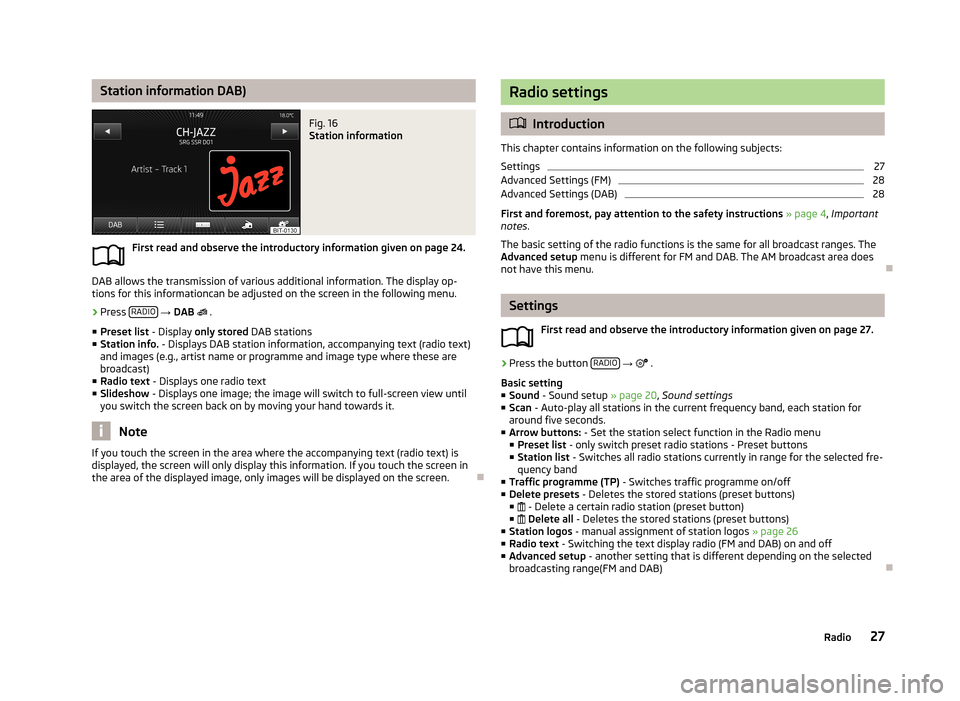
Station information DAB)Fig. 16
Station information
First read and observe the introductory information given on page 24.
DAB allows the transmission of various additional information. The display op-
tions for this informationcan be adjusted on the screen in the following menu.
›
Press RADIO
→ DAB
.
■ Preset list - Display only stored DAB stations
■ Station info. - Displays DAB station information, accompanying text (radio text)
and images (e.g., artist name or programme and image type where these are broadcast)
■ Radio text - Displays one radio text
■ Slideshow - Displays one image; the image will switch to full-screen view until
you switch the screen back on by moving your hand towards it.
Note
If you touch the screen in the area where the accompanying text (radio text) is
displayed, the screen will only display this information. If you touch the screen in
the area of the displayed image, only images will be displayed on the screen.
Radio settings
Introduction
This chapter contains information on the following subjects:
Settings
27
Advanced Settings (FM)
28
Advanced Settings (DAB)
28
First and foremost, pay attention to the safety instructions » page 4 , Important
notes .
The basic setting of the radio functions is the same for all broadcast ranges. The
Advanced setup menu is different for FM and DAB. The AM broadcast area does
not have this menu.
Settings
First read and observe the introductory information given on page 27.
›
Press the button RADIO
→
.
Basic setting ■ Sound - Sound setup » page 20, Sound settings
■ Scan - Auto-play all stations in the current frequency band, each station for
around five seconds.
■ Arrow buttons: - Set the station select function in the Radio menu
■ Preset list - only switch preset radio stations - Preset buttons
■ Station list - Switches all radio stations currently in range for the selected fre-
quency band
■ Traffic programme (TP) - Switches traffic programme on/off
■ Delete presets - Deletes the stored stations (preset buttons)
■ - Delete a certain radio station (preset button)
■ Delete all - Deletes the stored stations (preset buttons)
■ Station logos - manual assignment of station logos » page 26
■ Radio text - Switching the text display radio (FM and DAB) on and off
■ Advanced setup - another setting that is different depending on the selected
broadcasting range(FM and DAB)
27Radio
Page 34 of 90
■Bluetooth - Settings for the Bluetooth ®
function » page 22
■ Video setup (files) - Set the parameters of the video being played back from a
file
■ Format: - Set the screen width/height ratio
■ Automatic - adjust the picture to the screen size
■ 16:9
■ 4:3
■ 14:9
■ 47:20
■ Video (DVD) settings - Set the parameters of the video being played back from
a DVD source » page 35
■ Traffic programme (TP) - Switches traffic programme on/off
■ External AUX device - Activate/deactivate the input of the external AUX audio
source
■ Reset codec to system settings - Codec default settings
■ Remove safely - safe removal of the source connected
■ Select device
■ SD card 1
■ SD card 2
■ USB 1
signal sources
Introduction
This chapter contains information on the following subjects:
Sources and file formats supported
32
Requirements and restrictions
33
Jukebox
34
Bluetooth ®
player
35
CD/DVD
35
SD memory card
36
USB-, AUX inputs
36
First and foremost, pay attention to the safety instructions » page 4 , Important
notes .
WARNING■
Never place external signal sources close to the airbags. Loose objects could
hit a deployed airbag and injure occupants – danger of death!■
Never place external signal sources on the console panel. Loose objects can
be thrown forward during a sudden manoeuvre or in case of an accident and can injure the occupants or other road users.
■
Do not hold external sources while driving in your hand or on your knees.
Loose objects can be thrown forward during a sudden manoeuvre or in case of
an accident and can injure the occupants or other road users.
■
Always route the connection cable of the external signal source such that is
does not restrict you when driving in any way.
CAUTION
We recommend that you do not save any important data to the Jukebox, to CD /
DVD media, Bluetooth ®
players, to SD memory cards or connected external signal
sources. The ŠKODA Partner is not responsible for damage due to the loss of data
stored on these storage devices.
Note
With some signal sources, the output level can be changed at source.
Sources and file formats supported
First read and observe the introductory information and safety warn-
ings
on page 32.
Supported signal sources
Signal
sources
SD memory cardSD, SDHC, SDXCUSB devicesUSB stick, USB MP3 player, HDD (without spe- cial software)Other external sourcesPortable player (e.g., iPod ®
, iPad ®
, iPhone ®
,
MTP player, Bluetooth ®
playerCD/DVD drive:Audio CD (up to 80 min), CD-R and CD-RW (with
a capacity of up to 700 MB), DVD ± R / RW; con-
ventional DVD, DVD video and DVD audio 32Audio/Video/Images
Page 58 of 90
■ - The number located below the symbol indicates the elevation 1)
■ - Touch to increase the map scale for a few seconds before it resets to the
original scale (quick view)
■ - Displays the manually set map scale
■ - Displays the automatic map scale
■ - Switches the autozoom on/off during route guidance. Active autozoom is
indicated by a green symbol. If Autozoom is active, the map scale will change
automatically depending on the route travelled (motorway trip: large map scale
- city: small map scale)
The autozoom can be switched off by touching → or off by changing the
map scale. Touching again the (function key highlighted in green) turns the au-
tozoom on again. Autozoom can also be switched on/off in the navigation set-
tings » page 53
Autozoom is only functional when the map is aligned with the vehicle position
(the function key
with the symbol).
Traffic signs
First read and observe the introductory information given on page 54.
The system provides the option to display traffic signs
B
» Fig. 32 on page 55 in
the information display and on the unit screen that are:
› stored in the navigation data of the maps;
› recognised by the camera.
The information given by traffic signs that are recognized by the front camera al- ways takes precedence over stored navigation data.
If the Traffic signs split screen is not switched on, only one traffic sign is dis-
played on the unit screen.
Switching on the traffic sign display function » page 53.
Home address entry
First read and observe the introductory information given on page 54.›
In the navigation main menu, press → Manage memory → Define home ad-
dress .
If the home address has not been entered, an input window is displayed with the following message:
Please select as your home address: your current position or a new address.
The following function keys are displayed:
› Current position
- Entry of the home address via the acquisition of the current
location;
› Address
- Enter the home address in writing » page 60
Description of the adjustment or deletion process of the home address » page 54.
Extra window
Introduction
This chapter contains information on the following subjects:
Menus in the extra window
57
Audio
57
Compass
58
Man.
58
Traffic signs / Traffic
58
GPS
59
Map
59
First and foremost, pay attention to the safety instructions » page 4 , Important
notes .
1)
Display of elevation requires the reception of signals from at least five satellites. Route guidance
must not be running in demo mode.
56Navigation
Page 73 of 90
NoteMaking a diversion from a traffic jam based on TMC traffic reports may not always
offer a time advantage, e.g. if the diversion route is also congested.
Detailed traffic reports
First read and observe the introductory information given on page 70.
After pressing the TRAFFIC button, a screen appears with the following informa-
tion:
■ Function key All - Show all traffic information
■ Function key Route - only display the traffic information on the current route
■ A map showing the traffic obstruction
■ A window with a description of the traffic information
■ Location of event, the accuracy depends on the timeliness of the navigation
data
■ Description of up to three events related to the respective information
■ Description of the direction with respect to the event
■ probable duration of the event
■ Additional information, such as probable delay time
■ An information line, on how current the information is and on the provider of
the message
■ Symbol that specifies the type of information
■ - zoom in window with described traffic obstruction
■ - zoom out window with described traffic obstruction
■ - show previous traffic information
■ - show the following traffic information
■ - display list of all received traffic messages
My tour
Introduction
This chapter contains information on the following subjects:
New tour
71
Tour editing
72
Tour memory
72First and foremost, pay attention to the safety instructions » page 4 , Important
notes .
New tour
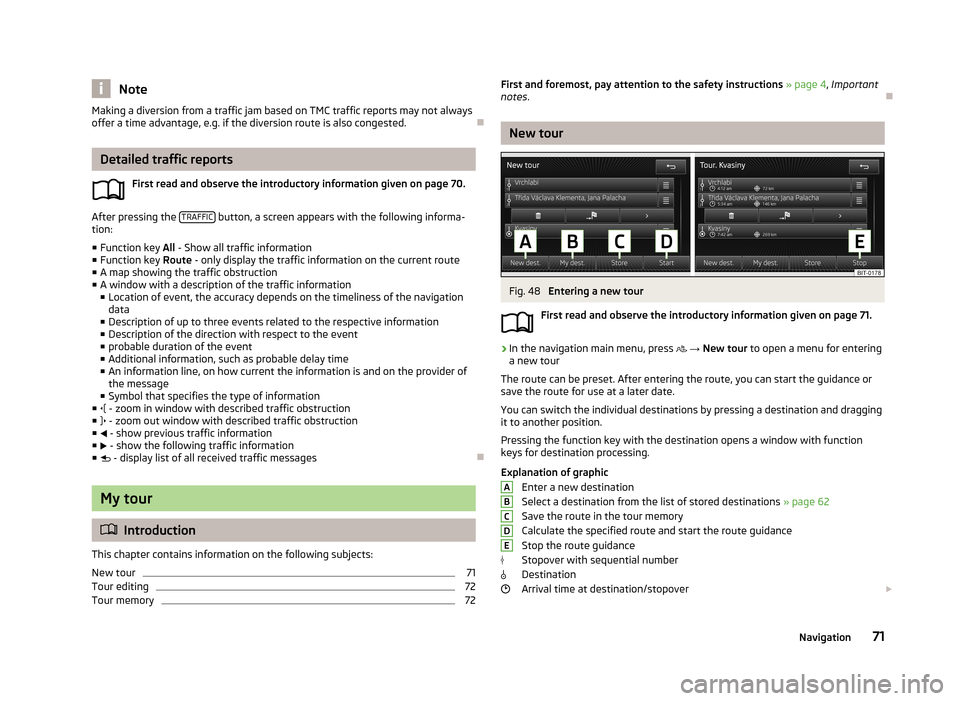
Fig. 48
Entering a new tour
First read and observe the introductory information given on page 71.
›
In the navigation main menu, press
→ New tour to open a menu for entering
a new tour
The route can be preset. After entering the route, you can start the guidance or
save the route for use at a later date.
You can switch the individual destinations by pressing a destination and dragging
it to another position.
Pressing the function key with the destination opens a window with function
keys for destination processing.
Explanation of graphic Enter a new destination
Select a destination from the list of stored destinations » page 62
Save the route in the tour memory
Calculate the specified route and start the route guidance Stop the route guidance
Stopover with sequential number Destination
Arrival time at destination/stopover
ABCDE71Navigation