reset SKODA OCTAVIA 2013 3.G / (5E) Columbus Navigation System Manual
[x] Cancel search | Manufacturer: SKODA, Model Year: 2013, Model line: OCTAVIA, Model: SKODA OCTAVIA 2013 3.G / (5E)Pages: 90, PDF Size: 5.21 MB
Page 76 of 90

Vehicle
Vehicle systems
Vehicle settings
Introduction
This chapter contains information on the following subjects:
Selecting driving mode
74
Vehicle data
75
Auxiliary heater and ventilation
76
ESC system
77
Tyre
77
Driver assistance
77
Parking and manoeuvring
78
Light
78
mirrors and wiper
79
Opening and closing
79
Seats
79
Multifunction display
79
Service
80
Restore factory settings
80
Climatronic settings
80
First and foremost, pay attention to the safety instructions
» page 4 , Important
notes .
Settings relating to the vehicle systems can only be made when the ignition is
switched on.
Note■ The individual systems are described in the » Vehicle Owner's Manual .■If the functions of some systems are disabled, some functions, such as parts of
the ESC system, are switched on again automatically for security reasons, after
switching the ignition off and on.■
When you press the button CAR, the system displays the last displayed menu
.
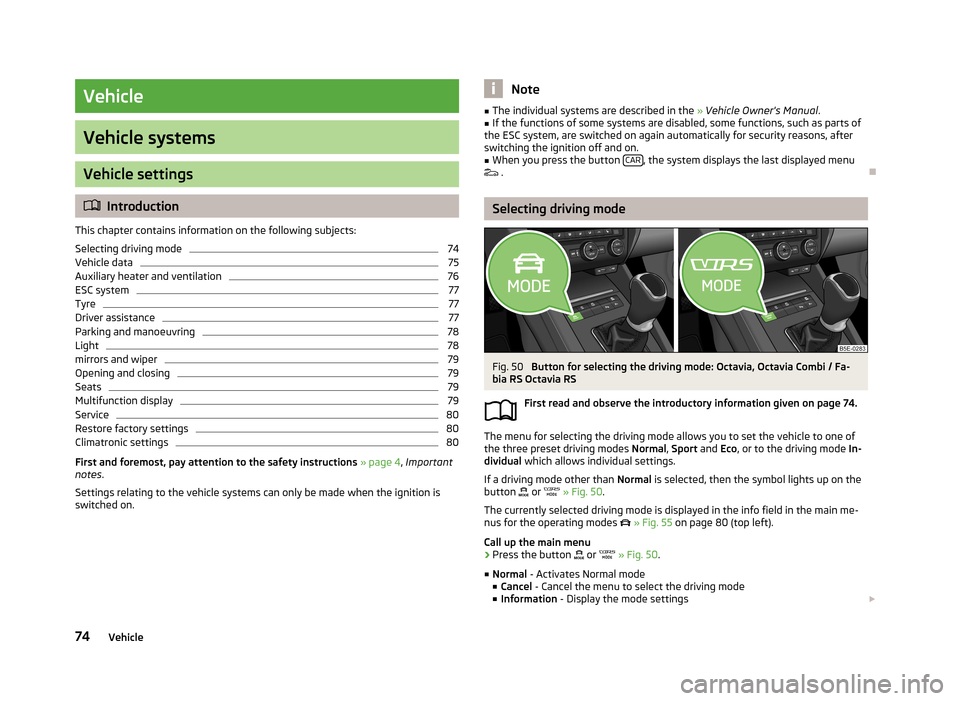
Selecting driving mode
Fig. 50
Button for selecting the driving mode: Octavia, Octavia Combi / Fa-
bia RS Octavia RS
First read and observe the introductory information given on page 74.
The menu for selecting the driving mode allows you to set the vehicle to one of
the three preset driving modes Normal, Sport and Eco, or to the driving mode In-
dividual which allows individual settings.
If a driving mode other than Normal is selected, then the symbol lights up on the
button
or
» Fig. 50 .
The currently selected driving mode is displayed in the info field in the main me- nus for the operating modes
» Fig. 55 on page 80 (top left).
Call up the main menu
›
Press the button
or
» Fig. 50 .
■ Normal - Activates Normal mode
■ Cancel - Cancel the menu to select the driving mode
■ Information - Display the mode settings
74Vehicle
Page 77 of 90

■Sport - Activates Sport mode
■ Cancel - Cancel the menu to select the driving mode
■ Information - Display the mode settings
■ Eco - Activates the fuel-saving mode
■ Cancel - Cancel the menu to select the driving mode
■ Information - Display the mode settings
■ Individual - Activates the Individual mode
■ Cancel - Cancel the menu to select the driving mode
■ Setup - Individual setting
■ Steering: - Set the power steering characteristics
■ Normal - Normal
■ Sport - Sports
■ Engine: - Set the engine (drive) characteristics
■ Normal - Normal
■ Sport - Sports
■ Eco - Economical
■ ACC: - Set the vehicle acceleration when adaptive cruise control is activated
■ Normal - Normal
■ Sport - Sports
■ Eco - Economical
■ Dynamic bend lighting: - Set the characteristics of the adaptive headlights
■ Normal - Normal
■ Sport - Sports
■ Eco - Economical
■ Air conditioning: - Sets the Climatronic characteristics
■ Normal - Normal
■ Eco - Economical
■ Reset mode - Sets the profile Normal
Note
If you do not operate the unit for longer than approx. 10 seconds in the "Select
driving mode" menu, it will switch to the last selected menu or switch itself off.
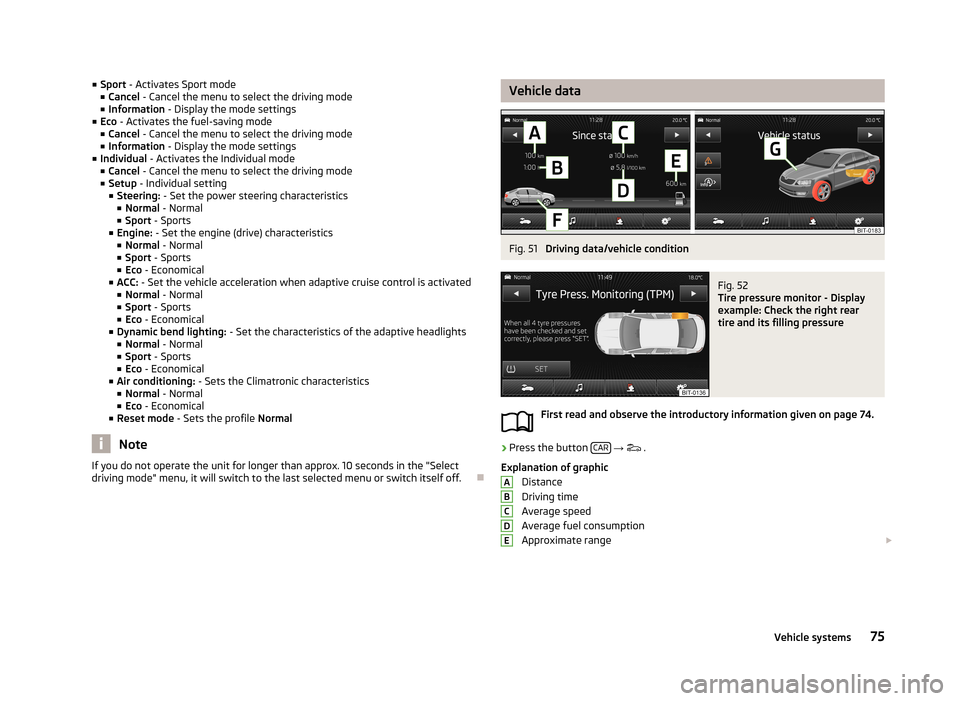
Vehicle dataFig. 51
Driving data/vehicle condition
Fig. 52
Tire pressure monitor - Display
example: Check the right rear
tire and its filling pressure
First read and observe the introductory information given on page 74.
›
Press the button CAR
→
.
Explanation of graphic Distance
Driving time
Average speed
Average fuel consumption
Approximate range
ABCDE75Vehicle systems
Page 78 of 90

Range (if the estimated range is less than 300 km, the vehicle starts to ap-
proach the symbol: )
Vehicle representation (the zones of the vehicle are shown in different col- ours, corresponding to any warning messages that occur. The warning mes-
sages are displayed once you touch vehicle)
■ Driving data - Display travel data » Fig. 51
You can display one of three trip memories on the screen:
■ Since start - Driving data for the individual trip
■ Long-term - Long-term driving data
■ Since refuelling - Data since last refuelling
Changing between the individual travel data storage locations can be done with /
.
■ Convenience consumers - Displays up to three devices which use the largest
share of fuel and displays the fuel consumption required to run all conv. con-
sumers » Vehicle Owner's Manual , chapter Commercial driving and environmen-
tal compatibility
■ Vehicle status - Displays vehicle status » Fig. 51 or tyre pressure monitoring in-
formation
■ Vehicle status - Displays vehicle status information
■ /
- No message/warning messages relating to vehicle status or number
of messages (if there is only one message, one warning message text is dis-
played)
■ - Display information about the status of the START-STOP system
■ TPMS - Tyre pressure monitoring function » Fig. 52
■ SET - Start a new calibration process
Changing between the individual menus can be done with
/
.
Note
For more information on the warning messages concerning the vehicle status and
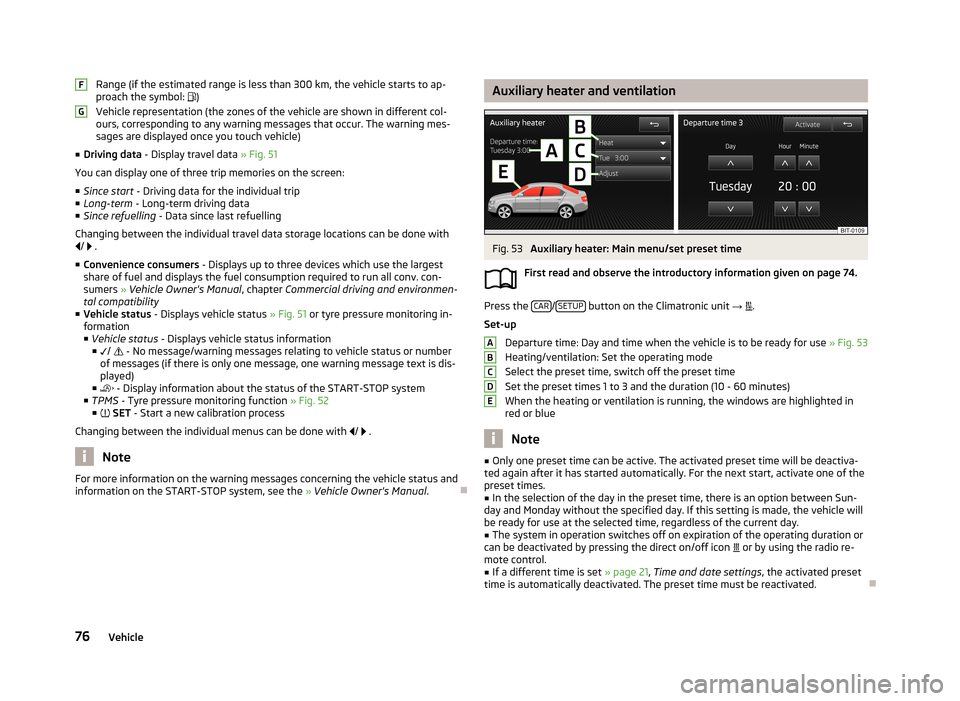
information on the START-STOP system, see the » Vehicle Owner's Manual .FGAuxiliary heater and ventilationFig. 53
Auxiliary heater: Main menu/set preset time
First read and observe the introductory information given on page 74.
Press the CAR/SETUP button on the Climatronic unit
→
.
Set-up Departure time: Day and time when the vehicle is to be ready for use » Fig. 53
Heating/ventilation: Set the operating mode
Select the preset time, switch off the preset timeSet the preset times 1 to 3 and the duration (10 - 60 minutes)
When the heating or ventilation is running, the windows are highlighted in
red or blue
Note
■ Only one preset time can be active. The activated preset time will be deactiva-
ted again after it has started automatically. For the next start, activate one of the preset times.■
In the selection of the day in the preset time, there is an option between Sun-
day and Monday without the specified day. If this setting is made, the vehicle will
be ready for use at the selected time, regardless of the current day.
■
The system in operation switches off on expiration of the operating duration or
can be deactivated by pressing the direct on/off icon or by using the radio re-
mote control.
■
If a different time is set » page 21, Time and date settings , the activated preset
time is automatically deactivated. The preset time must be reactivated.
ABCDE76Vehicle
Page 82 of 90

■Distance - Switch on/off the display of distance travelled in the display of the
instrument cluster
■ Average speed - Switch on/off the display of average speed in the display of
the instrument cluster
■ Digital speed display - Switch on/off the display of current speed in the display
of the instrument cluster
■ Speed warning - Switch on/off the display of speed warning in the display of
the instrument cluster
■ Oil temperature - Switch on/off the display of oil temperature in the display of
the instrument cluster
■ Coolant temperature - Switch on/off the display of coolant temperature in the
display of the instrument cluster
■ Reset "Since start" driving data - Reset the single-trip memory in the device
screen and in the display of the instrument cluster
■ Reset "Long-term" driving data - Reset the long-term memory in the device
screen and in the display of the instrument cluster
Service
First read and observe the introductory information given on page 74.
›
Press the button CAR
→
→ Service
■ Vehicle number: - Display the vehicle identification number
■ Inspection: --- / --- - Number of km/days remaining until the next service event
■ Oil change service: --- / --- - Number of km/days remaining until the next oil
change
Restore factory settings
First read and observe the introductory information given on page 74.
›
Press the button CAR
→
→ Factory settings
■ All settings - All menu items
■ Driver assistance - Menu Driver assistance
■ Parking and manoeuvring - Menu Parking and manoeuvring
■ Light - Menu Light
■ Mirrors and wipers - Menu Mirrors and wipers
■
Opening and closing - Menu Opening and closing
■ Multifunction display - Menu Multifunction display
If one of the above menu items is selected, the system will ask you whether you really want to reset the settings.
■ Cancel - Return to higher-level menu
■ Reset - Reset the settings
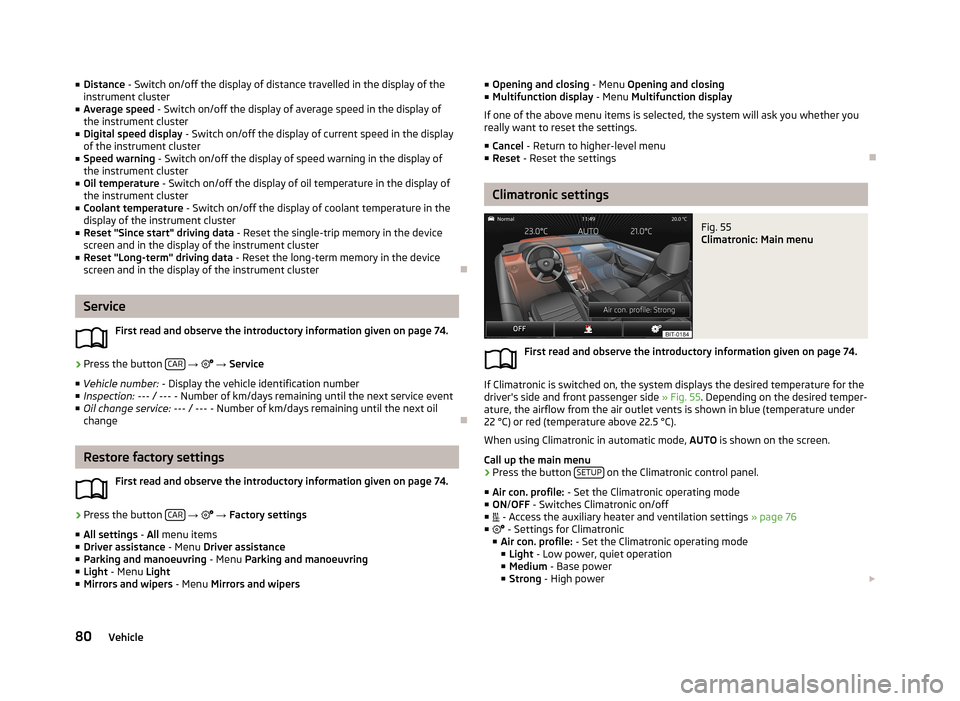
Climatronic settings
Fig. 55
Climatronic: Main menu
First read and observe the introductory information given on page 74.
If Climatronic is switched on, the system displays the desired temperature for the
driver's side and front passenger side » Fig. 55. Depending on the desired temper-
ature, the airflow from the air outlet vents is shown in blue (temperature under
22 °C) or red (temperature above 22.5 °C).
When using Climatronic in automatic mode, AUTO is shown on the screen.
Call up the main menu
›
Press the button SETUP on the Climatronic control panel.
■ Air con. profile: - Set the Climatronic operating mode
■ ON /OFF - Switches Climatronic on/off
■ - Access the auxiliary heater and ventilation settings » page 76
■ - Settings for Climatronic
■ Air con. profile: - Set the Climatronic operating mode
■ Light - Low power, quiet operation
■ Medium - Base power
■ Strong - High power
80Vehicle