lock SKODA OCTAVIA 2013 3.G / (5E) Columbus Navigation System Manual
[x] Cancel search | Manufacturer: SKODA, Model Year: 2013, Model line: OCTAVIA, Model: SKODA OCTAVIA 2013 3.G / (5E)Pages: 90, PDF Size: 5.21 MB
Page 5 of 90
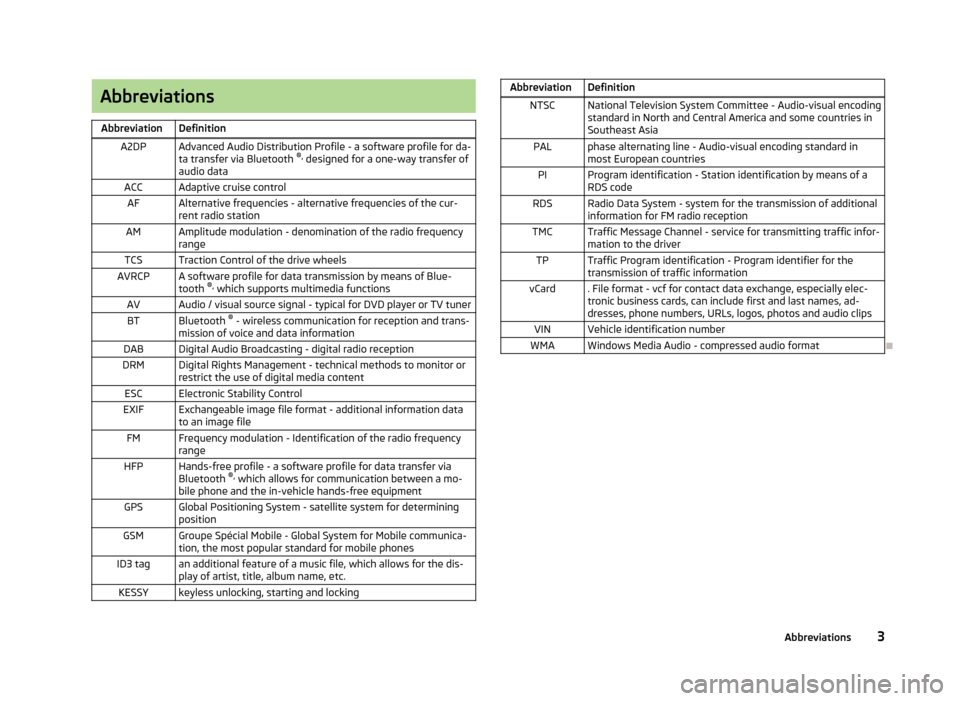
AbbreviationsAbbreviationDefinitionA2DPAdvanced Audio Distribution Profile - a software profile for da-ta transfer via Bluetooth ®,
designed for a one-way transfer of
audio dataACCAdaptive cruise controlAFAlternative frequencies - alternative frequencies of the cur-
rent radio stationAMAmplitude modulation - denomination of the radio frequency
rangeTCSTraction Control of the drive wheelsAVRCPA software profile for data transmission by means of Blue- tooth ®,
which supports multimedia functionsAVAudio / visual source signal - typical for DVD player or TV tunerBTBluetooth ®
- wireless communication for reception and trans-
mission of voice and data informationDABDigital Audio Broadcasting - digital radio receptionDRMDigital Rights Management - technical methods to monitor or
restrict the use of digital media contentESCElectronic Stability ControlEXIFExchangeable image file format - additional information data to an image fileFMFrequency modulation - Identification of the radio frequency rangeHFPHands-free profile - a software profile for data transfer via
Bluetooth ®,
which allows for communication between a mo-
bile phone and the in-vehicle hands-free equipmentGPSGlobal Positioning System - satellite system for determining
positionGSMGroupe Spécial Mobile - Global System for Mobile communica- tion, the most popular standard for mobile phonesID3 tagan additional feature of a music file, which allows for the dis-
play of artist, title, album name, etc.KESSYkeyless unlocking, starting and lockingAbbreviationDefinitionNTSCNational Television System Committee - Audio-visual encoding
standard in North and Central America and some countries in Southeast AsiaPALphase alternating line - Audio-visual encoding standard inmost European countriesPIProgram identification - Station identification by means of aRDS codeRDSRadio Data System - system for the transmission of additionalinformation for FM radio receptionTMCTraffic Message Channel - service for transmitting traffic infor- mation to the driverTPTraffic Program identification - Program identifier for the
transmission of traffic informationvCard. File format - vcf for contact data exchange, especially elec-
tronic business cards, can include first and last names, ad-
dresses, phone numbers, URLs, logos, photos and audio clipsVINVehicle identification numberWMAWindows Media Audio - compressed audio format
3Abbreviations
Page 8 of 90
Touch screenFirst read and observe the introductory information given on page 5.
The unit is equipped with a so-called touch screen
11
» Fig. 1 on page 5which can
only be operated by the touch of a finger.
CAUTION
■ The screen can be operated by a slight touch of a finger. Do not apply pressure
to the screen - risk of damage!■
Do not use any objects to operate the screen - risk of damage!
■
Do not use solvents such as benzene or turpentine for cleaning, since they may
damage the screen surface.
Note
■ Use a soft cloth and, if necessary, methylated spirits, to remove fingerprints
from the screen. When doing so, ensure that you do not cause damage to other parts of the interior.■
It is not possible to operate the screen with your fingernails or while wearing
gloves.
■
Do not affix anything to the area of the unit below the screen. This could affect
the functioning of the sensors for the zoom effect.
■
To protect the screen, you can use a suitable screen protector for touchpads
that does not affect its functionality.
■
The brightness of the screen is adjusted automatically depending on the bright-
ness of the interior lighting. The automatic setting can be adjusted manual-
ly » page 20 .
Switching the unit on/off
First read and observe the introductory information given on page 5.
›
Press the knob to switch the device on or off.
When the device is switched on, the audio source and operating mode that were active before switching off the device will be restored.
If telephone mode was active before you switched off the unit and the ignition
and Bluetooth ®
function is not switched on, the screen displays the mes-
sage » page 42 . Switch on the ignition or the Bluetooth ®
function » page 22 .
If the vehicle key is pulled out of the ignition lock while the unit is switched on, the unit will switch off automatically. After switching on the ignition, the unit isturned on automatically.
If the device was switched off using the
knob, then the device will not switch
on automatically after switching on the ignition.
The unit will switch off automatically after the engine is switched off and the
door is opened if your vehicle is fitted with the KESSY system. If you open the
driver's door before switching off the engine, the device will also switch off.
When the ignition is switched off, the device switches off automatically after ap-
prox. half an hour (discharge protection of the vehicle battery).
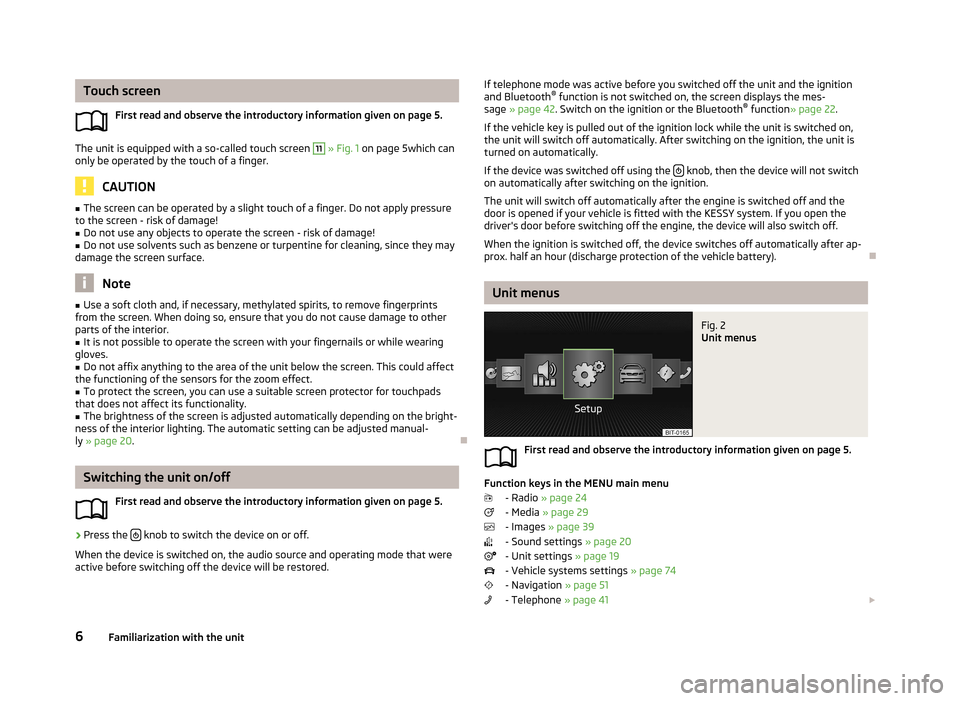
Unit menus
Fig. 2
Unit menus
First read and observe the introductory information given on page 5.
Function keys in the MENU main menu
- Radio » page 24
- Media » page 29
- Images » page 39
- Sound settings » page 20
- Unit settings » page 19
- Vehicle systems settings » page 74
- Navigation » page 51
- Telephone » page 41
6Familiarization with the unit
Page 23 of 90
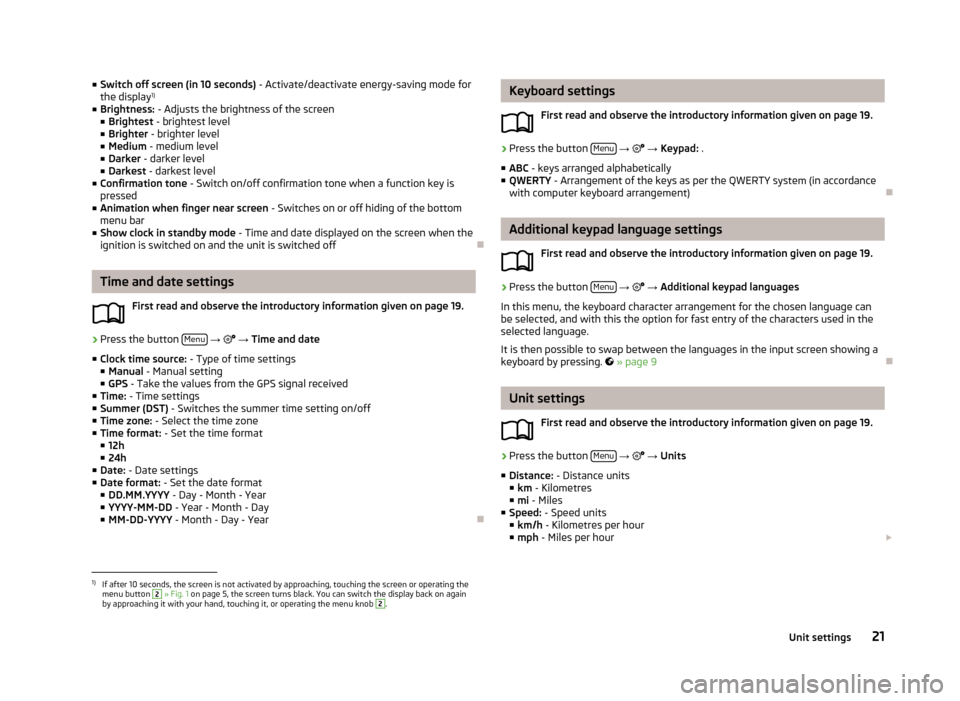
■Switch off screen (in 10 seconds) - Activate/deactivate energy-saving mode for
the display 1)
■ Brightness: - Adjusts the brightness of the screen
■ Brightest - brightest level
■ Brighter - brighter level
■ Medium - medium level
■ Darker - darker level
■ Darkest - darkest level
■ Confirmation tone - Switch on/off confirmation tone when a function key is
pressed
■ Animation when finger near screen - Switches on or off hiding of the bottom
menu bar
■ Show clock in standby mode - Time and date displayed on the screen when the
ignition is switched on and the unit is switched off
Time and date settings
First read and observe the introductory information given on page 19.
›
Press the button Menu
→
→ Time and date
■ Clock time source: - Type of time settings
■ Manual - Manual setting
■ GPS - Take the values from the GPS signal received
■ Time: - Time settings
■ Summer (DST) - Switches the summer time setting on/off
■ Time zone: - Select the time zone
■ Time format: - Set the time format
■ 12h
■ 24h
■ Date: - Date settings
■ Date format: - Set the date format
■ DD.MM.YYYY - Day - Month - Year
■ YYYY-MM-DD - Year - Month - Day
■ MM-DD-YYYY - Month - Day - Year
Keyboard settings
First read and observe the introductory information given on page 19.›
Press the button Menu
→ → Keypad: .
■ ABC - keys arranged alphabetically
■ QWERTY - Arrangement of the keys as per the QWERTY system (in accordance
with computer keyboard arrangement)
Additional keypad language settings
First read and observe the introductory information given on page 19.
›
Press the button Menu
→
→ Additional keypad languages
In this menu, the keyboard character arrangement for the chosen language can
be selected, and with this the option for fast entry of the characters used in the
selected language.
It is then possible to swap between the languages in the input screen showing a keyboard by pressing.
» page 9
Unit settings
First read and observe the introductory information given on page 19.
›
Press the button Menu
→
→ Units
■ Distance: - Distance units
■ km - Kilometres
■ mi - Miles
■ Speed: - Speed units
■ km/h - Kilometres per hour
■ mph - Miles per hour
1)
If after 10 seconds, the screen is not activated by approaching, touching the screen or operating the
menu button
2
» Fig. 1 on page 5, the screen turns black. You can switch the display back on again
by approaching it with your hand, touching it, or operating the menu knob
2
.
21Unit settings
Page 38 of 90
■If the CD/DVD is physically damaged, is not readable or is inserted incorrectly,
the following message is displayed: Error: CD/DVD. Check the CD/DVD and insert
properly into the drive.■
It is possible under certain circumstances that copyright-protected CD/DVDs
and home-burnt CD/DVDs will not be played back at all or only in a limited way.
■
The national copyright laws that apply in your country must be observed.
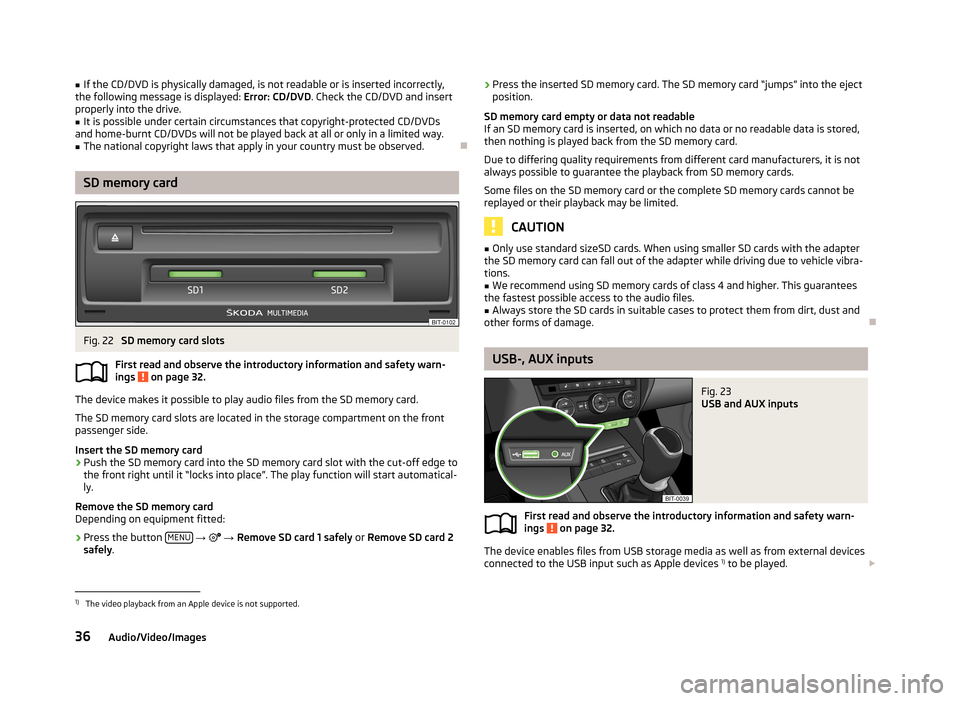
SD memory card
Fig. 22
SD memory card slots
First read and observe the introductory information and safety warn-
ings
on page 32.
The device makes it possible to play audio files from the SD memory card.
The SD memory card slots are located in the storage compartment on the front
passenger side.
Insert the SD memory card
›
Push the SD memory card into the SD memory card slot with the cut-off edge to
the front right until it “locks into place”. The play function will start automatical-
ly.
Remove the SD memory card
Depending on equipment fitted:
›
Press the button MENU
→
→ Remove SD card 1 safely or Remove SD card 2
safely .
›Press the inserted SD memory card. The SD memory card “jumps” into the eject
position.
SD memory card empty or data not readable
If an SD memory card is inserted, on which no data or no readable data is stored,
then nothing is played back from the SD memory card.
Due to differing quality requirements from different card manufacturers, it is not
always possible to guarantee the playback from SD memory cards.
Some files on the SD memory card or the complete SD memory cards cannot be
replayed or their playback may be limited.
CAUTION
■ Only use standard sizeSD cards. When using smaller SD cards with the adapter
the SD memory card can fall out of the adapter while driving due to vehicle vibra-
tions.■
We recommend using SD memory cards of class 4 and higher. This guarantees
the fastest possible access to the audio files.
■
Always store the SD cards in suitable cases to protect them from dirt, dust and
other forms of damage.
USB-, AUX inputs
Fig. 23
USB and AUX inputs
First read and observe the introductory information and safety warn-
ings on page 32.
The device enables files from USB storage media as well as from external devices connected to the USB input such as Apple devices 1)
to be played.
1)
The video playback from an Apple device is not supported.
36Audio/Video/Images
Page 42 of 90
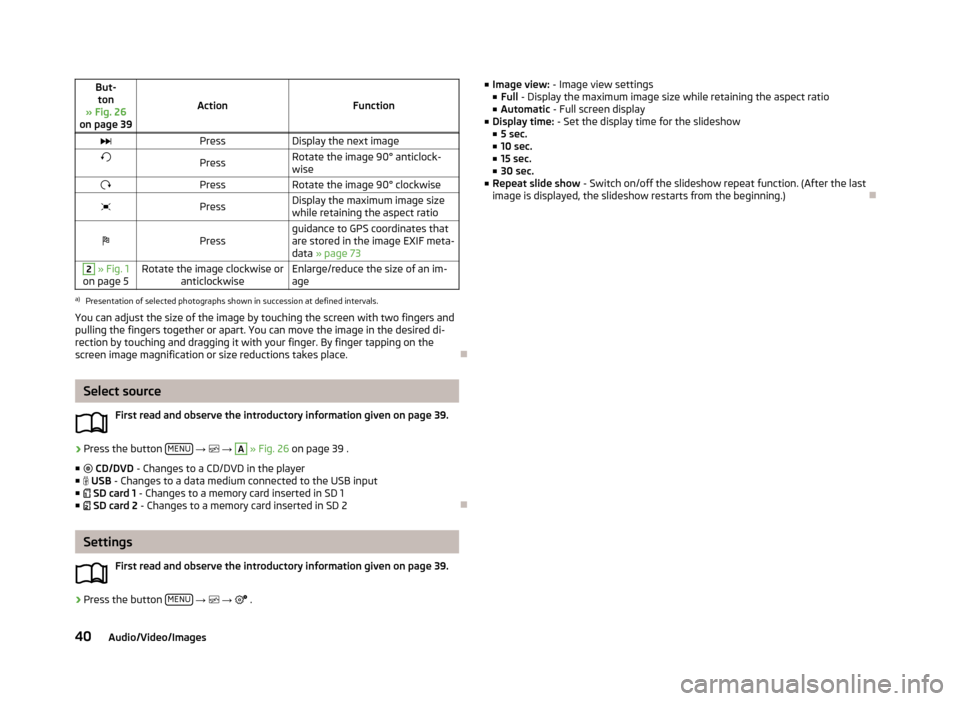
But-ton
» Fig. 26
on page 39
ActionFunction
PressDisplay the next imagePressRotate the image 90° anticlock-
wisePressRotate the image 90° clockwisePressDisplay the maximum image size
while retaining the aspect ratioPressguidance to GPS coordinates that
are stored in the image EXIF meta-
data » page 732 » Fig. 1
on page 5Rotate the image clockwise or anticlockwiseEnlarge/reduce the size of an im-
agea)
Presentation of selected photographs shown in succession at defined intervals.
You can adjust the size of the image by touching the screen with two fingers and
pulling the fingers together or apart. You can move the image in the desired di-
rection by touching and dragging it with your finger. By finger tapping on the
screen image magnification or size reductions takes place.
Select source
First read and observe the introductory information given on page 39.
›
Press the button MENU
→
→
A
» Fig. 26 on page 39 .
■ CD/DVD - Changes to a CD/DVD in the player
■ USB - Changes to a data medium connected to the USB input
■ SD card 1 - Changes to a memory card inserted in SD 1
■ SD card 2 - Changes to a memory card inserted in SD 2
Settings
First read and observe the introductory information given on page 39.
›
Press the button MENU
→
→
.
■
Image view: - Image view settings
■ Full - Display the maximum image size while retaining the aspect ratio
■ Automatic - Full screen display
■ Display time: - Set the display time for the slideshow
■ 5 sec.
■ 10 sec.
■ 15 sec.
■ 30 sec.
■ Repeat slide show - Switch on/off the slideshow repeat function. (After the last
image is displayed, the slideshow restarts from the beginning.)
40Audio/Video/Images
Page 45 of 90
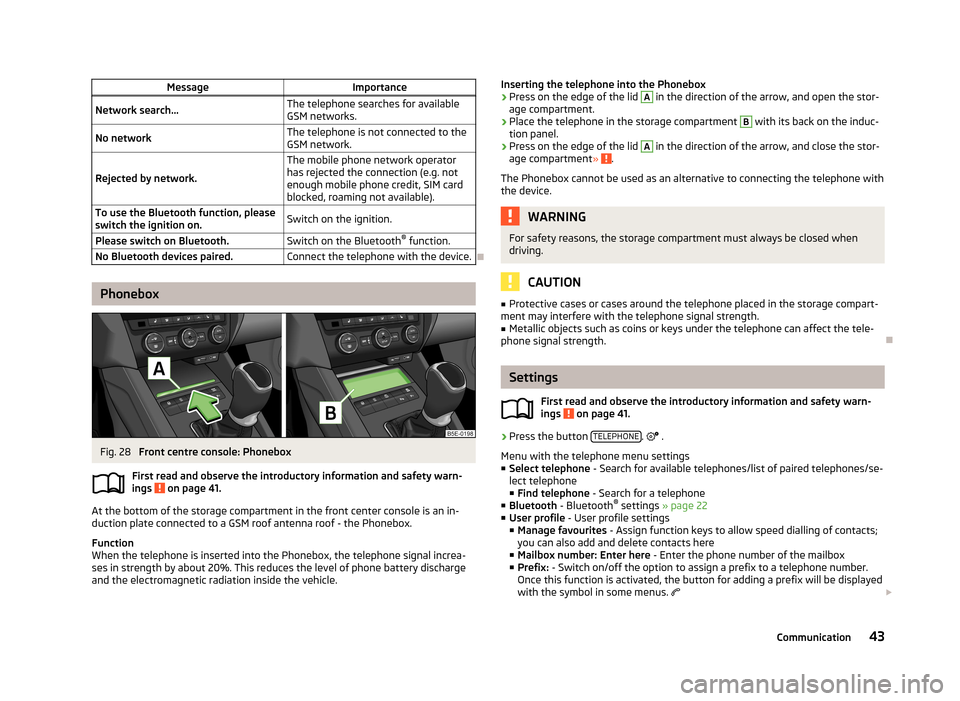
MessageImportanceNetwork search...The telephone searches for available
GSM networks.No networkThe telephone is not connected to the GSM network.
Rejected by network.
The mobile phone network operator
has rejected the connection (e.g. not
enough mobile phone credit, SIM card
blocked, roaming not available).To use the Bluetooth function, please
switch the ignition on.Switch on the ignition.Please switch on Bluetooth.Switch on the Bluetooth ®
function.No Bluetooth devices paired.Connect the telephone with the device.
Phonebox
Fig. 28
Front centre console: Phonebox
First read and observe the introductory information and safety warn-
ings
on page 41.
At the bottom of the storage compartment in the front center console is an in-
duction plate connected to a GSM roof antenna roof - the Phonebox.
Function
When the telephone is inserted into the Phonebox, the telephone signal increa-
ses in strength by about 20%. This reduces the level of phone battery discharge and the electromagnetic radiation inside the vehicle.
Inserting the telephone into the Phonebox›Press on the edge of the lid A in the direction of the arrow, and open the stor-
age compartment.›
Place the telephone in the storage compartment
B
with its back on the induc-
tion panel.
›
Press on the edge of the lid
A
in the direction of the arrow, and close the stor-
age compartment » .
The Phonebox cannot be used as an alternative to connecting the telephone with the device.
WARNINGFor safety reasons, the storage compartment must always be closed whendriving.
CAUTION
■ Protective cases or cases around the telephone placed in the storage compart-
ment may interfere with the telephone signal strength.■
Metallic objects such as coins or keys under the telephone can affect the tele-
phone signal strength.
Settings
First read and observe the introductory information and safety warn-
ings
on page 41.
›
Press the button TELEPHONE.
.
Menu with the telephone menu settings
■ Select telephone - Search for available telephones/list of paired telephones/se-
lect telephone
■ Find telephone - Search for a telephone
■ Bluetooth - Bluetooth ®
settings » page 22
■ User profile - User profile settings
■ Manage favourites - Assign function keys to allow speed dialling of contacts;
you can also add and delete contacts here
■ Mailbox number: Enter here - Enter the phone number of the mailbox
■ Prefix: - Switch on/off the option to assign a prefix to a telephone number.
Once this function is activated, the button for adding a prefix will be displayed
with the symbol in some menus.
43Communication
Page 72 of 90
traffic reports
Introduction
This chapter contains information on the following subjects:
Operation
70
Switching dynamic route on/off
70
Detailed traffic reports
71
The traffic is getting denser. For this reason, information on the current road and
traffic conditions will continue to gain in importance.
TMC traffic reports are used to optimise the route during route guidance whenthere are traffic disruptions.
The device can obtain this information from the following sources:
› Traffic programme TP in the FM frequency range
» page 26.
› Traffic programme in the DAB frequency range
› TMC traffic information with a dynamic adjustment for the current route
The following conditions are required for the correct TMC function:
The vehicle is within reception range of the FM RDS-TMC.
Adequate and uninterrupted signal reception of a traffic information station 1)
.
Current navigation data in the device.
Operation
First read and observe the introductory information given on page 70.
TMC (Traffic Message Channel) is a digital data service emitted by the radio sta-tion for continuous transmission of traffic information.
›
Press TRAFFIC to display a list of traffic reports
Traffic report …/….
Touch one of the traffic report entries to display traffic report details » page 71.
If a TMC traffic radio station is available for current location, the TMC traffic re-
ports are updated continuously in the background. The station you are listening
to does not have to be a TMC station.
The reception of TMC traffic reports is always switched on and cannot be turned
off.
The accuracy of the dynamic route guidance depends on the transmitted traffic reports. The radio stations broadcasting this information are responsible for thecontent.
TMC traffic reports can only be evaluated and saved by the radio navigation sys- tem when navigation data are available for the driven area.
Switching dynamic route on/off
First read and observe the introductory information given on page 70.
›
In the navigation main menu, press
Route options → → Dynamic route .
When the Dynamic route » page 53 function is switched on, the traffic reports in-
fluence the dynamic route guidance by means of TMC messages.
Dynamic route switched on
Information on traffic problems received via TMC which affect the route are dis-
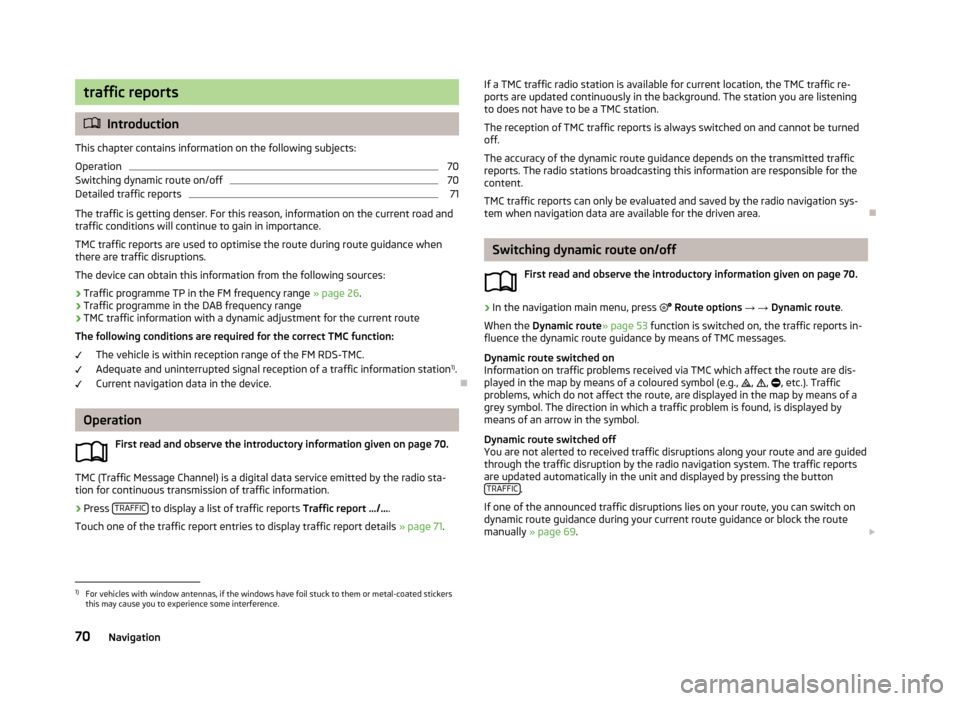
played in the map by means of a coloured symbol (e.g.,
,
,
, etc.). Traffic
problems, which do not affect the route, are displayed in the map by means of a
grey symbol. The direction in which a traffic problem is found, is displayed by
means of an arrow in the symbol.
Dynamic route switched off
You are not alerted to received traffic disruptions along your route and are guided through the traffic disruption by the radio navigation system. The traffic reports
are updated automatically in the unit and displayed by pressing the button TRAFFIC
.
If one of the announced traffic disruptions lies on your route, you can switch on
dynamic route guidance during your current route guidance or block the route
manually » page 69 .
1)
For vehicles with window antennas, if the windows have foil stuck to them or metal-coated stickers
this may cause you to experience some interference.
70Navigation
Page 81 of 90
■Coming/Leaving Home function - Setting the COMING HOME / LEAVING HOME-
function
■ Coming Home function - Sets the period that the lights remain on after you
leave the vehicle (0 - 30 seconds; 0 = function deactivated)
■ Leaving Home function - Sets the period that the lights remain on after you
unlock the vehicle (0 - 30 seconds; 0 = function deactivated)
mirrors and wiper
First read and observe the introductory information given on page 74.
›
Press the button CAR
→
→ Mirrors and wipers .
■ Mirrors - Adjusts the mirrors
■ Synchronous adjustment - Activate/deactivate synchronous mirror adjust-
ment
■ Lower while reversing - Activate/deactivate the lowering of the front passen-
ger mirror
■ Fold in when parked - Activate/deactivate folding the mirror via the remote
control or by using the sensor in the handle (KESSY)
■ Wipers - Adjusts the windscreen wipers
■ Automatic wiping in rain - Activate/deactivate automatic windscreen wiping
in rain
■ Automatic rear wiper - Activate/deactivate automatic rear window wiping
Opening and closing
First read and observe the introductory information given on page 74.
›
Press the button CAR
→
→ Opening and closing
■ Window operation - Window operation settings
■ Convenience opening: - Set the convenience opening feature
■ All windows - All windows
■ Driver window - Driver's window only
■ Off - Deactivates the convenience opening
■
Central locking - Settings for opening and closing of doors
■ Door unlocking: - Set the door unlocking feature
■ All doors - All doors
■ Single door - Driver's door or driver's or passenger door with KESSY system
■ Vehicle side - Doors on the driver's side or on the driver's or passenger's
side with KESSY system
■ Automatic locking - Activate/deactivate automatic locking when starting off
■ Acoustic confirmation - Activate/deactivate acoustic signals when locking/un-
locking the vehicle with an anti-theft alarm system
Seats
First read and observe the introductory information given on page 74.
›
Press the button CAR
→
→ Seats
■ Store seat position - Store the driver's seat position and exterior mirror position
in the remote control key when locking the vehicle
■ Vehicle key activated - Activate/deactivate storing the driver's seat position
and exterior mirror position when locking the vehicle
Multifunction display
First read and observe the introductory information given on page 74.
›
Press the button CAR
→
→ Multifunction display
■ Current consumption - Switch on/off the display of current fuel consumption in
the display of the instrument cluster
■ Average consumption - Switch on/off the display of average fuel consumption
in the display of the instrument cluster
■ Refuel quantity - Switch on/off the display of refuel quantity in the display of
the instrument cluster
■ Convenience consumers - Switch on/off the display of consumption by conven-
ience consumers on/off in the display of the instrument cluster
■ Eco tips - Switch on/off the display of tips for economical driving in the display
of the instrument cluster
■ Travelling time - Switch on/off the display of travelling time in the display of
the instrument cluster
79Vehicle systems
Page 84 of 90
Index
A
ACC
77
Additional keyboard languages21
Address60
Adjusting Volume
7
Advanced settings54
AM24
Anti-theft protection4
Apple devices36
ASR77
Audio24
Media29
Radio24
Automatic distance control77
Automatic front window wiping in rain79
Automatic headlight in rain78
Automatic locking79
Automatic rear window wiping79
Automatic scan25
AUX36, 37
Auxiliary heater and ventilation Settings
76
B
Bluetooth Connect telephone to the device
44
Settings22
Switch on/off22
Visibility22
Bluetooth audio35
Bluetooth player35
C
CD
35
Climatronic automatic air recirculation
80
Automatic operation80
mode80
COMING HOME78
Communication41
Phonebox43
Component protection4
Control lever10
Convenience consumer75
D
DAB
24
Settings28
Station information27
Data Convenience consumer
75
Travel75
Vehicle status75
Date21
Daytime running lights78
Declaration of conformity4
Description of the unit5
Destination details73
Destination entry Home address
56
Destination management72
Destination details73
Stopover72
Device operation Control lever
10
MAXI DOT display10
Multifunction steering wheel13, 14
Device pairing45
Device screen Operation
8
Digital radio receptionSettings28
Display6
Display in instrument cluster Telefon
13
Display in the instrument cluster11
Door release79
Driving mode74
DVD35
DVD video37
Main menu37
Menu38
Operation38
Settings39
DVD video menu38
DVD video playback38
Dynamic route Switch on/off
70
E
Eco tips
79
Edit tour72
Enter destination Address
60
From the list62
Home address63
Map61
Own destination63
POI63
Enter into map61
Explanation of graphic navigation instructions68
External input AUX
37
USB37
Extra window56, 57
Audio57
Compass58
Geographical coordinates59
GPS59
82Index