interior SKODA OCTAVIA 2013 3.G / (5E) Owner's Guide
[x] Cancel search | Manufacturer: SKODA, Model Year: 2013, Model line: OCTAVIA, Model: SKODA OCTAVIA 2013 3.G / (5E)Pages: 287, PDF Size: 18.55 MB
Page 113 of 287
Air conditioning system (manual air conditioningsystem)
Introduction
This chapter contains information on the following subjects: Control elements
110
adjusting
111
Recirculated air mode
111
The cooling system only operates if the following conditions are met. The cooling system is switched on » page 110, Control elements .
The engine is running.
The outside temperature above approx. +2 °C.
The blower switch is switched on (positions 1-6).
If the desired interior temperature can also be achieved without activating the cooling system, fresh air mode should be selected.
The cooling system is switched off at a high coolant temperature in order to pro-
vide cooling at a high load of the engine.
CAUTION
■ Under certain circumstances, air at a temperature of about 5 °C can flow out of
the vents when the cooling system is switched on.■
Lengthy and uneven distribution of the air flow out of the vents (especially
around the feet) and large differences in temperature, for example, when getting
out of the vehicle, can cause susceptible individuals to catch a cold.
Note
We recommend that you have the air conditioning system cleaned by a specialist
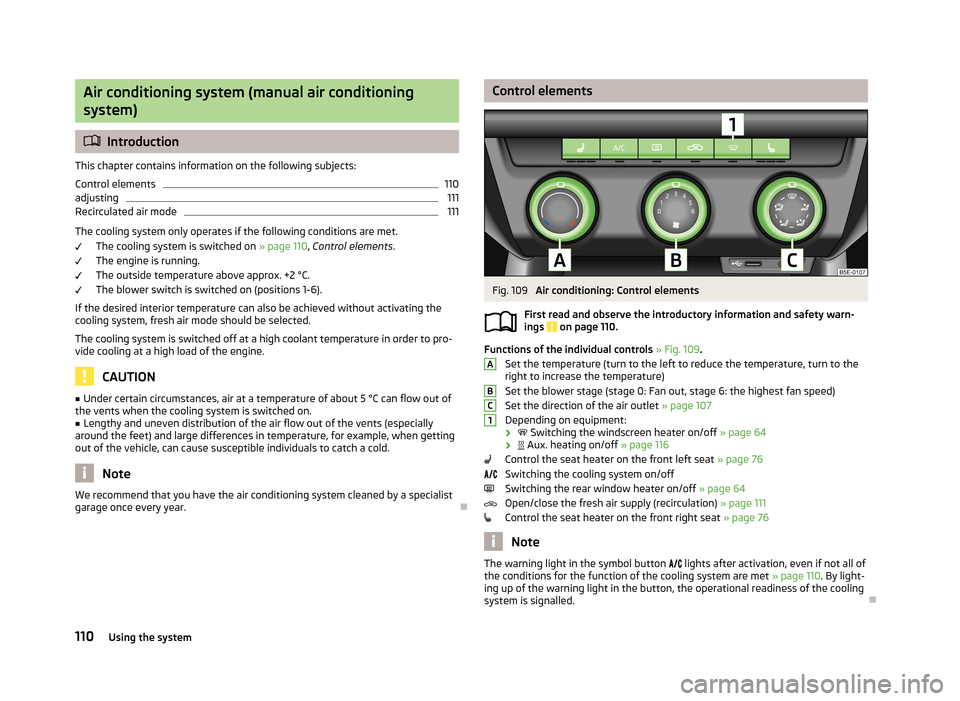
garage once every year.Control elementsFig. 109
Air conditioning: Control elements
First read and observe the introductory information and safety warn- ings
on page 110.
Functions of the individual controls » Fig. 109 .
Set the temperature (turn to the left to reduce the temperature, turn to the
right to increase the temperature)
Set the blower stage (stage 0: Fan out, stage 6: the highest fan speed)
Set the direction of the air outlet » page 107
Depending on equipment:
›
Switching the windscreen heater on/off » page 64
›
Aux. heating on/off » page 116
Control the seat heater on the front left seat » page 76
Switching the cooling system on/off
Switching the rear window heater on/off » page 64
Open/close the fresh air supply (recirculation) » page 111
Control the seat heater on the front right seat » page 76
Note
The warning light in the symbol button
lights after activation, even if not all of
the conditions for the function of the cooling system are met » page 110. By light-
ing up of the warning light in the button, the operational readiness of the cooling system is signalled.
ABC1110Using the system
Page 115 of 287
WARNINGNever leave recirculated air mode switched on over a longer period of time, as
“stale air” can cause driver and passenger fatigue, reduce attention levels and
also cause the windows to mist up. The risk of having an accident increases.
Switch off recirculated air mode as soon as the windows start to mist up.
Climatronic (automatic air conditioning system)
Introduction
This chapter contains information on the following subjects:
Control elements
112
Automatic mode
113
Switching the cooling system on/off
113
Setting temperature
113
Automatic recirculation mode
114
Controlling blower
114
Defrosting windscreen
115
The Climatronic in automatic mode ensures the best-possible setting of the tem-
perature of the outflowing air, the blower stage and air distribution.
The system also takes sunlight into account, which eliminates the need to alterthe settings manually.
The cooling system only operates if the following conditions are met. The cooling system is switched on » page 112, Control elements .
The engine is running.
The outside temperature above approx. +2 °C.
The cooling system is switched off at a high coolant temperature in order to pro-
vide cooling at a high load of the engine.
Note
We recommend that you have Climatronic cleaned by a specialist garage once ev-
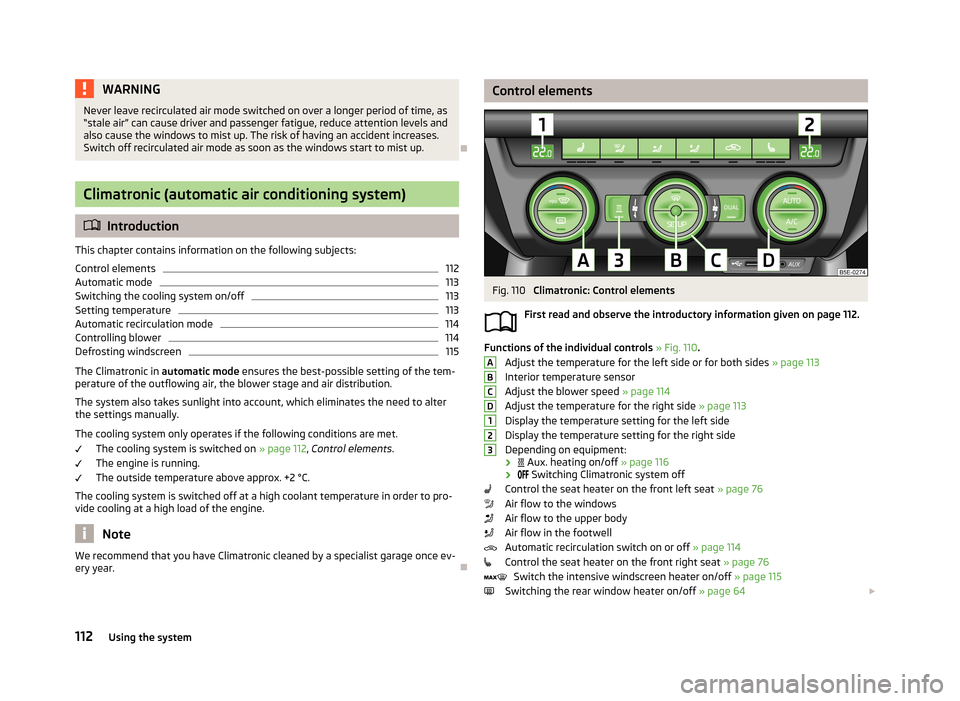
ery year.Control elementsFig. 110
Climatronic: Control elements
First read and observe the introductory information given on page 112.
Functions of the individual controls » Fig. 110 .
Adjust the temperature for the left side or for both sides » page 113
Interior temperature sensor
Adjust the blower speed » page 114
Adjust the temperature for the right side » page 113
Display the temperature setting for the left side
Display the temperature setting for the right side
Depending on equipment:
›
Aux. heating on/off » page 116
›
Switching Climatronic system off
Control the seat heater on the front left seat » page 76
Air flow to the windows
Air flow to the upper body
Air flow in the footwell
Automatic recirculation switch on or off » page 114
Control the seat heater on the front right seat » page 76
Switch the intensive windscreen heater on/off » page 115
Switching the rear window heater on/off » page 64
ABCD123112Using the system
Page 116 of 287
Switching the windscreen heater on/off » page 64
Climatronic set in the Infotainment » Operating instructions for Infotain-
ment
Switch the temperature setting in Dual mode on/off » page 113
Switching automatic mode on » page 113
Switching the cooling system on/off » page 113
Note
Do not stick anything onto or cover the interior temperature sensor 11 » Fig. 110
as this could impair the functioning of the Climatronic.
Automatic mode
First read and observe the introductory information given on page 112.
Automatic mode works in three modes - moderate, medium, and intensive.Setting the individual operating modes » Operating instructions for Infotainment ,
chapter Vehicle settings .
Climatronic is set to the medium setting at the factory.
Recommended setting for all periods of the year
›
Set the desired temperature, we recommend 22 °C.
›
Press the button
» Fig. 110 on page 112.
›
Set the air outlet vents 3 and 4 » Fig. 106 on page 107 so that the air flow is
directed slightly upwards.
After the automatic mode is switched on, Climatronic works in the last selected
mode.
The currently selected mode is displayed in the Infotainment display. Automatic mode can be switched off by pressing one of the buttons for the air
distribution or by increasing/decreasing the blower speed.
Switching the cooling system on/off
First read and observe the introductory information given on page 112.
›
Press the symbol button
.
The warning light in the button lights up.›
Press the symbol button
again.
The warning light in the button goes out.
After the cooling system is switched off, only the ventilation function remains ac-
tive whereby the minimum temperature that can be reached is the outside tem-
perature.
Setting temperature
First read and observe the introductory information given on page 112.
The interior temperature for the left and right side can be set separately or to-
gether.
For both sides
›
Turn the control dial
A
» Fig. 110 on page 112 to the left or right to increase or
decrease the temperature.
The warning light in the symbol button
does not light up.
For the right side
›
Turn the control dial
D
» Fig. 110 on page 112 to the left or right to increase or
decrease the temperature.
The warning light in the symbol button
lights up.
If the warning light in the symbol button
is lit, the temperature for both sides
cannot be set with the control dial
A
. This function can be resumed by pressing
the symbol button
. The warning light in the button goes out.
The interior temperature can be set between +16 ℃ and +29 ℃. The interior tem-
perature is regulated automatically within this range.
If a temperature lower than +16 ℃ is selected, a blue symbol lights up on the cor-
responding control dial.
If a temperature higher than +29 ℃ is selected, a red symbol lights up on the cor-
responding control dial.
At both end positions, Climatronic runs at maximum cooling/heating output and
the temperature is automatically not regulated.
113Heating and air-conditioning
Page 117 of 287
CAUTIONLengthy and uneven distribution of the air flow out of the vents (especially
around the feet) and large differences in temperature, for example, when getting
out of the vehicle, can cause susceptible individuals to catch a cold.
Automatic recirculation mode
First read and observe the introductory information given on page 112.
Recirculated air mode prevents polluted air outside the vehicle from getting into
the vehicle, for example when driving through a tunnel or when standing in a
traffic jam.
If a considerable increase in concentration of pollutants is recognised by the air
quality sensor, recirculated air mode will temporarily be switched off.
If the concentration of pollutants decreases to the normal level, the air distribu-
tion control is automatically switched off so that fresh air can be guided into the
vehicle interior.
In recirculated air mode air is sucked out of the interior of the vehicle and then
fed back into the interior. When the automatic air distribution control is switched on, an air quality sensor measures the concentration of pollutants in the drawn in
air.
If the air quality sensor does not switch on automatic recirculated air mode when
there is an unpleasant smell, you can switch in on manually.
Switching on/off
›
Press the symbol button
.
The warning light below the button lights up.
›
Press the symbol button
again; the warning light below the button goes out;
if necessary, press the symbol button
again.
Switching on and off is also possible in the Infotainment » Operating instructions
for Infotainment , chapter Vehicle settings .
WARNINGNever leave recirculated air mode switched on over a longer period of time, as
“stale air” can cause driver and passenger fatigue, reduce attention levels and
also cause the windows to mist up. The risk of having an accident increases.
Switch off recirculated air mode as soon as the windows start to mist up.
Note
■ If the windscreen mists up, press the symbol button . Press the symbol
button when the windscreen is demisted.■
The automatic air distribution control operates only if the outside temperature
is higher than approx. 2 °C.
Controlling blower
First read and observe the introductory information given on page 112.
The blower stage can be manually adapted to suit your particular needs.
›
Turn the control dial
C
» Fig. 110 on page 112 to the left or right to increase or
decrease the temperature.
If the blower speed is reduced to a minimum, Climatronic is switched off.
The set blower speed is displayed in the control dial
C
when the respective num-
ber of warning lights illuminate.
WARNING■ “Stale air” may result in fatigue in the driver and occupants, reduce attention
levels and also cause the windows to mist up. The risk of having an accident
increases.■
Do not switch off the Climatronic system for longer than necessary.
■
Switch on the Climatronic system as soon as the windows mist up.
114Using the system
Page 118 of 287
Defrosting windscreenFirst read and observe the introductory information given on page 112.
Switching on/off
›
Press the symbol button » Fig. 110 on page 112.
›
Press the symbol button again or press the symbol button .
More air flows out of the air outlet vents 1 » Fig. 106 on page 107. The tempera-
ture control is controlled automatically.
Auxiliary heating (auxiliary heating and ventilation)
Introduction
This chapter contains information on the following subjects:
Switching on/off
116
Radio remote control
116
Conditions for the functioning of auxiliary heating (Aux. heating and ventilation),
hereinafter referred to only as auxiliary heating (Aux. heating).
The charge state of the vehicle battery is sufficient.
The fuel supply is adequate (the warning icon
is not lit in the display of the
instrument cluster).
Auxiliary ventilation
The auxiliary ventilation enables fresh air to flow into the vehicle interior by
switching off the engine, whereby the interior temperature is effectively de-
creased (e.g. with the vehicle parked in the sun).
Auxiliary heating (parking heating)
The auxiliary heating (parking heating) can be used when stationary, when the engine is switched off to preheat the vehicle and while driving (e.g. during the
heating phase of the engine).
The auxiliary heater (parking heater) functions in connection with the air-condi-
tioning system or Climatronic.
The auxiliary heating (parking heating) also warms up the engine.
The auxiliary heating (parking heating) warms up the coolant by combusting fuel
from the vehicle tank. The coolant heats air flowing into the passenger compart- ment (as long as the blower fan speed B
» Fig. 108 on page 108 or
C
» Fig. 110
on page 112 is not set to zero).
WARNING■ The auxiliary heater (independent vehicle heater) must never be operated in
closed rooms (e.g. garages) – risk of poisoning!■
The auxiliary heating (parking heating) must not be running during refuelling
– risk of fire.
■
The exhaust pipe of the auxiliary heating is located underneath the vehicle.
Therefore, if you wish to operate the auxiliary heating (parking heating), do
not park the vehicle in such a way that the exhaust gases can come into con-
tact with highly flammable materials (e.g. dry grass) or easily inflammable sub-
stances (e.g. spilt fuel) – risk of fire.
CAUTION
■ The running auxiliary heating (parking heating) consumes fuel from the vehicle
tank and automatically controls the filling level. If only a low quantity of fuel is
present in the fuel tank, the auxiliary heater switches itself off.■
The exhaust pipe of the auxiliary heating, which is located underneath the vehi-
cle, must not be clogged up and the exhaust flow must not be blocked.
■
If the auxiliary heating is running, the vehicle battery discharges. If the auxiliary
heating and ventilation has been operated several times over a longer period, the
vehicle must be driven a few kilometres in order to recharge the vehicle battery.
Note
■ The auxiliary heating (aux. heating) switches on the blower B » Fig. 108 on
page 108 or C » Fig. 110 on page 112 only if it has achieved a coolant temperature
of approx. 50 °C.■
At low outside temperatures, this can result in a formation of water vapour in
the area of the engine compartment. This is quite normal and is not an operating problem.
■
The air inlet in front of the windscreen must be free of e.g. ice, snow or leaves
to ensure that the auxiliary heating and cooling system operates properly.
■
So that warm air can flow into the vehicle interior after switching on the auxili-
ary heating, you must maintain the comfort temperature normally selected by
you, leave the fan switched on and leave the air outlet vents in an open position.
It is recommended to put the air flow in the position or .
115Heating and air-conditioning
Page 119 of 287
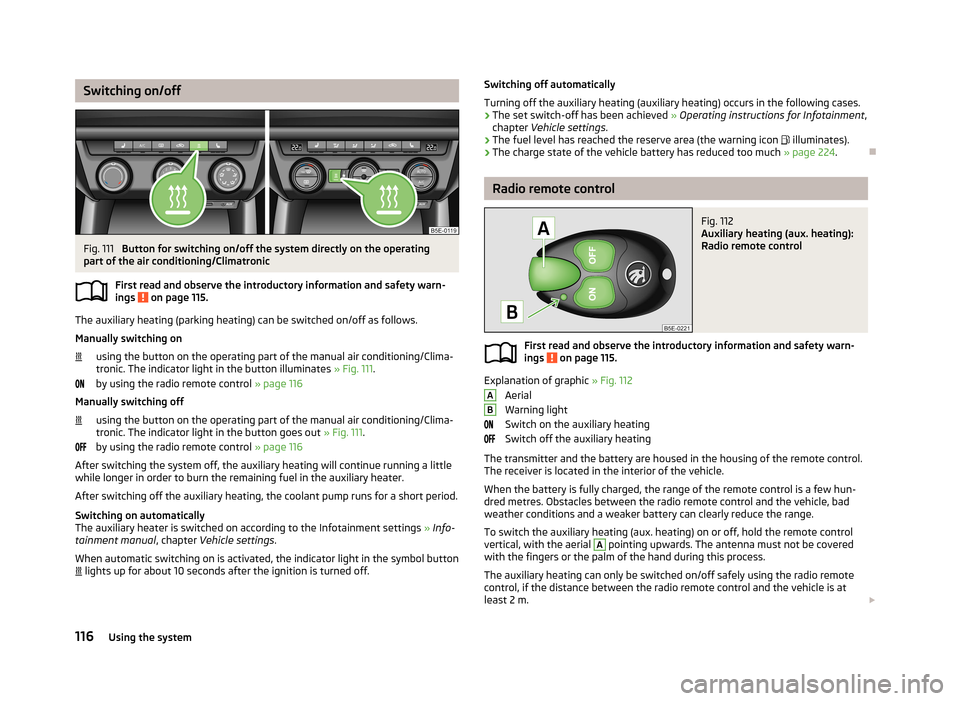
Switching on/offFig. 111
Button for switching on/off the system directly on the operating
part of the air conditioning/Climatronic
First read and observe the introductory information and safety warn-ings
on page 115.
The auxiliary heating (parking heating) can be switched on/off as follows.
Manually switching on using the button on the operating part of the manual air conditioning/Clima-
tronic. The indicator light in the button illuminates » Fig. 111.
by using the radio remote control » page 116
Manually switching off
using the button on the operating part of the manual air conditioning/Clima-
tronic. The indicator light in the button goes out » Fig. 111.
by using the radio remote control » page 116
After switching the system off, the auxiliary heating will continue running a little
while longer in order to burn the remaining fuel in the auxiliary heater.
After switching off the auxiliary heating, the coolant pump runs for a short period.
Switching on automatically
The auxiliary heater is switched on according to the Infotainment settings » Info-
tainment manual , chapter Vehicle settings .
When automatic switching on is activated, the indicator light in the symbol button lights up for about 10 seconds after the ignition is turned off.
Switching off automatically
Turning off the auxiliary heating (auxiliary heating) occurs in the following cases. › The set switch-off has been achieved
» Operating instructions for Infotainment ,
chapter Vehicle settings .
› The fuel level has reached the reserve area (the warning icon
illuminates).
› The charge state of the vehicle battery has reduced too much
» page 224.
Radio remote control
Fig. 112
Auxiliary heating (aux. heating):
Radio remote control
First read and observe the introductory information and safety warn-
ings on page 115.
Explanation of graphic » Fig. 112
Aerial
Warning light
Switch on the auxiliary heating
Switch off the auxiliary heating
The transmitter and the battery are housed in the housing of the remote control. The receiver is located in the interior of the vehicle.
When the battery is fully charged, the range of the remote control is a few hun-
dred metres. Obstacles between the radio remote control and the vehicle, bad
weather conditions and a weaker battery can clearly reduce the range.
To switch the auxiliary heating (aux. heating) on or off, hold the remote control
vertical, with the aerial
A
pointing upwards. The antenna must not be covered
with the fingers or the palm of the hand during this process.
The auxiliary heating can only be switched on/off safely using the radio remote control, if the distance between the radio remote control and the vehicle is at
least 2 m.
AB116Using the system
Page 163 of 287
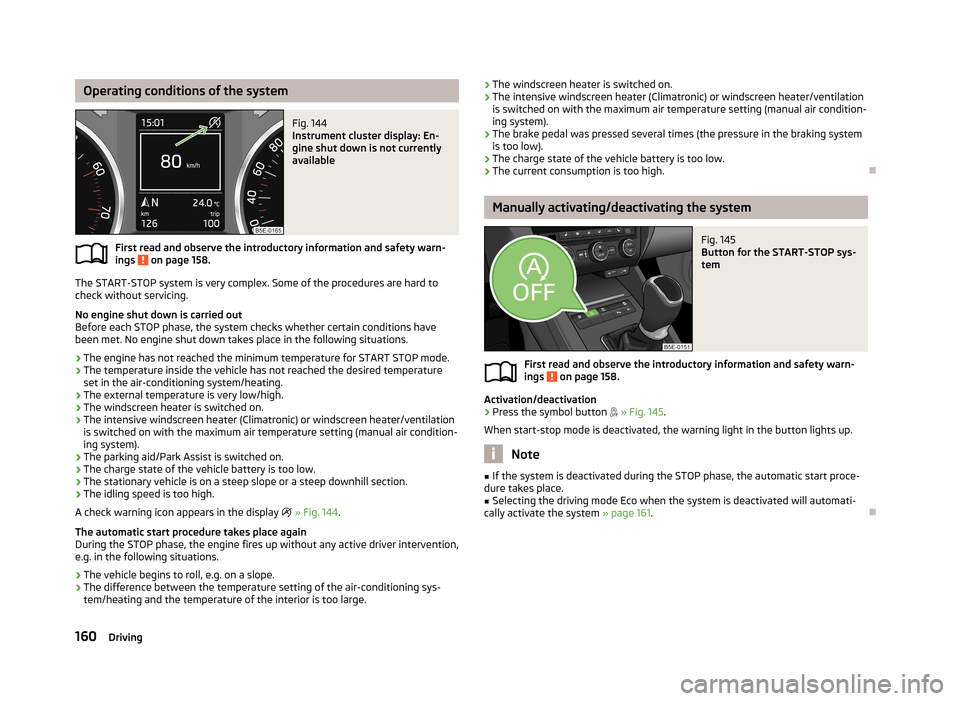
Operating conditions of the systemFig. 144
Instrument cluster display: En-
gine shut down is not currently
available
First read and observe the introductory information and safety warn-
ings on page 158.
The START-STOP system is very complex. Some of the procedures are hard to
check without servicing.
No engine shut down is carried out
Before each STOP phase, the system checks whether certain conditions have
been met. No engine shut down takes place in the following situations.
› The engine has not reached the minimum temperature for START STOP mode.
› The temperature inside the vehicle has not reached the desired temperature
set in the air-conditioning system/heating.
› The external temperature is very low/high.
› The windscreen heater is switched on.
› The intensive windscreen heater (Climatronic) or windscreen heater/ventilation
is switched on with the maximum air temperature setting (manual air condition-
ing system).
› The parking aid/Park Assist is switched on.
› The charge state of the vehicle battery is too low.
› The stationary vehicle is on a steep slope or a steep downhill section.
› The idling speed is too high.
A check warning icon appears in the display
» Fig. 144 .
The automatic start procedure takes place again
During the STOP phase, the engine fires up without any active driver intervention,
e.g. in the following situations.
› The vehicle begins to roll, e.g. on a slope.
› The difference between the temperature setting of the air-conditioning sys-
tem/heating and the temperature of the interior is too large.
› The windscreen heater is switched on.
› The intensive windscreen heater (Climatronic) or windscreen heater/ventilation
is switched on with the maximum air temperature setting (manual air condition-
ing system).
› The brake pedal was pressed several times (the pressure in the braking system
is too low).
› The charge state of the vehicle battery is too low.
› The current consumption is too high.
Manually activating/deactivating the system
Fig. 145
Button for the START-STOP sys-
tem
First read and observe the introductory information and safety warn-
ings on page 158.
Activation/deactivation
›
Press the symbol button
» Fig. 145 .
When start-stop mode is deactivated, the warning light in the button lights up.
Note
■ If the system is deactivated during the STOP phase, the automatic start proce-
dure takes place.■
Selecting the driving mode Eco when the system is deactivated will automati-
cally activate the system » page 161.
160Driving
Page 165 of 287
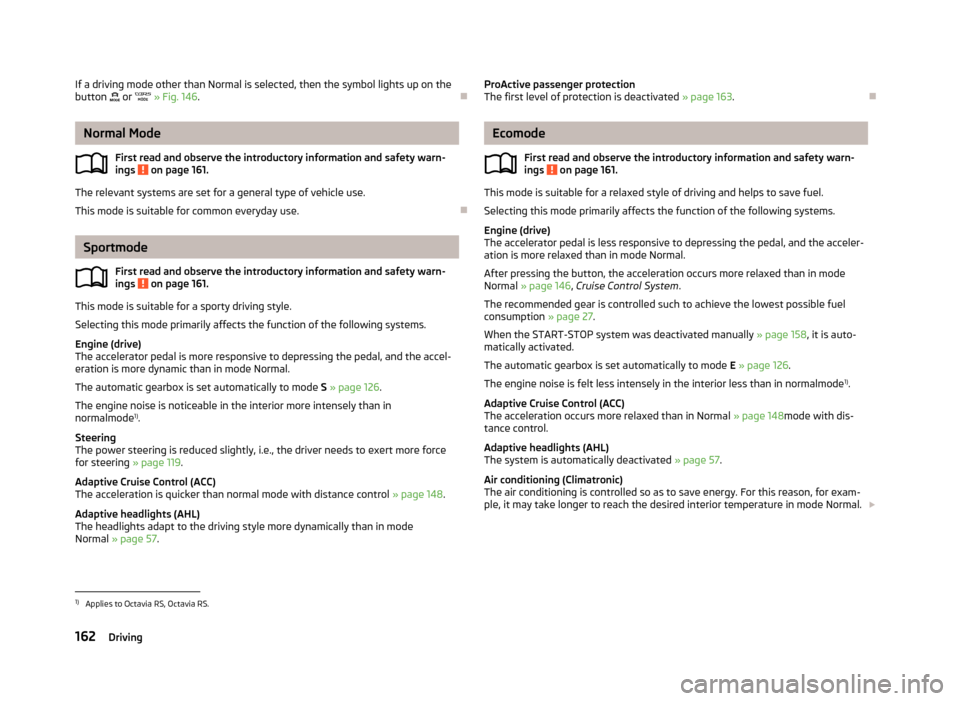
If a driving mode other than Normal is selected, then the symbol lights up on the
button or » Fig. 146 .
Normal Mode
First read and observe the introductory information and safety warn-ings
on page 161.
The relevant systems are set for a general type of vehicle use.
This mode is suitable for common everyday use.
Sportmode
First read and observe the introductory information and safety warn-ings
on page 161.
This mode is suitable for a sporty driving style.
Selecting this mode primarily affects the function of the following systems.
Engine (drive)
The accelerator pedal is more responsive to depressing the pedal, and the accel-
eration is more dynamic than in mode Normal.
The automatic gearbox is set automatically to mode S » page 126 .
The engine noise is noticeable in the interior more intensely than in
normalmode 1)
.
Steering
The power steering is reduced slightly, i.e., the driver needs to exert more force for steering » page 119.
Adaptive Cruise Control (ACC)
The acceleration is quicker than normal mode with distance control » page 148.
Adaptive headlights (AHL)
The headlights adapt to the driving style more dynamically than in mode
Normal » page 57 .
ProActive passenger protection
The first level of protection is deactivated » page 163.
Ecomode
First read and observe the introductory information and safety warn-
ings
on page 161.
This mode is suitable for a relaxed style of driving and helps to save fuel.
Selecting this mode primarily affects the function of the following systems.
Engine (drive)
The accelerator pedal is less responsive to depressing the pedal, and the acceler-
ation is more relaxed than in mode Normal.
After pressing the button, the acceleration occurs more relaxed than in mode
Normal » page 146 , Cruise Control System .
The recommended gear is controlled such to achieve the lowest possible fuel consumption » page 27.
When the START-STOP system was deactivated manually » page 158, it is auto-
matically activated.
The automatic gearbox is set automatically to mode E » page 126 .
The engine noise is felt less intensely in the interior less than in normalmode 1)
.
Adaptive Cruise Control (ACC)
The acceleration occurs more relaxed than in Normal » page 148mode with dis-
tance control.
Adaptive headlights (AHL)
The system is automatically deactivated » page 57.
Air conditioning (Climatronic)
The air conditioning is controlled so as to save energy. For this reason, for exam-
ple, it may take longer to reach the desired interior temperature in mode Normal.
1)
Applies to Octavia RS, Octavia RS.
162Driving
Page 184 of 287
WARNINGObserve the following instructions for the proper use of the seat belts.■Never use one seat belt to secure two people (including children). The seat-
belt must not be placed over a child who is sitting on the lap of another pas-
senger.■
The lock tongue should only be inserted into the lock which is the correct
one for your seat. Wrong use of the safety belt will reduce its capacity to pro-
tect and the risk of injury increases.
■
The slot of the belt tongue must not be blocked otherwise the belt tongue
will not lock in place properly.
■
Many layers of clothing and loose clothing (e. g. a winter coat over a jacket)
do not allow you to be correctly seated and impairs proper operation of the
seat belts.
■
It is prohibited to use clamps or other objects to adjust seat belts (e. g. for
shortening the belts for smaller persons).
■
The seat belts for the rear seats can only fulfil their function reliably when
the seat backrests are correctly locked into position » page 78.
WARNINGObserve the following instructions for proper use of the seat belts.■The belt webbing must always be kept clean. Soiled belt webbing may im-
pair proper operation of the inertia reel » page 211.■
The seat belts must not be removed or changed in any way. Do not attempt
to repair the seat belts yourself.
■
Check the condition of all the seat belts on a regular basis. If any damage to
the seat belts, seat belt connections, inertia reel or the lock is detected, the
relevant seat belt must be replaced by a specialist garage.
■
Damaged seat belts which have been subjected to stress in an accident and
were therefore stretched, must be replaced – this is best done by a specialist
garage. The anchorage points for the belts should also be checked.
Note
The national legal requirements must be observed when using seat belts.
The physical principle of a head-on collisionFig. 160
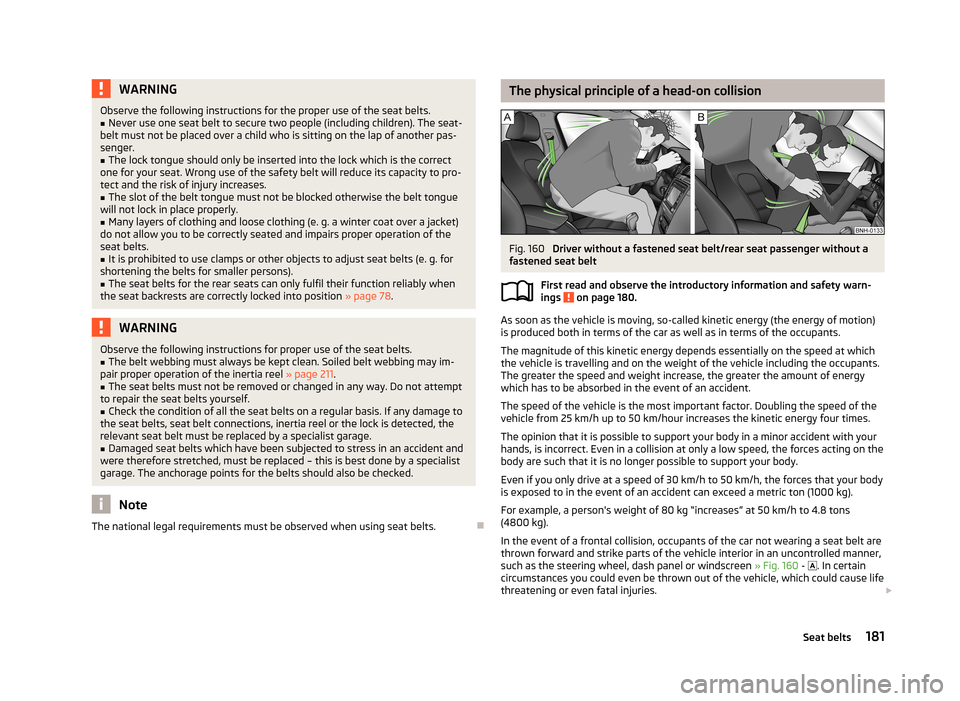
Driver without a fastened seat belt/rear seat passenger without a
fastened seat belt
First read and observe the introductory information and safety warn-
ings
on page 180.
As soon as the vehicle is moving, so-called kinetic energy (the energy of motion)
is produced both in terms of the car as well as in terms of the occupants.
The magnitude of this kinetic energy depends essentially on the speed at which
the vehicle is travelling and on the weight of the vehicle including the occupants.
The greater the speed and weight increase, the greater the amount of energy
which has to be absorbed in the event of an accident.
The speed of the vehicle is the most important factor. Doubling the speed of the
vehicle from 25 km/h up to 50 km/hour increases the kinetic energy four times.
The opinion that it is possible to support your body in a minor accident with your
hands, is incorrect. Even in a collision at only a low speed, the forces acting on the body are such that it is no longer possible to support your body.
Even if you only drive at a speed of 30 km/h to 50 km/h, the forces that your body is exposed to in the event of an accident can exceed a metric ton (1000 kg).
For example, a person's weight of 80 kg “increases” at 50 km/h to 4.8 tons
(4800 kg).
In the event of a frontal collision, occupants of the car not wearing a seat belt are thrown forward and strike parts of the vehicle interior in an uncontrolled manner, such as the steering wheel, dash panel or windscreen » Fig. 160 -
. In certain
circumstances you could even be thrown out of the vehicle, which could cause life
threatening or even fatal injuries.
181Seat belts
Page 185 of 287
It is also important that rear seat occupants fasten their seat belts as they willotherwise be thrown through the vehicle in an uncontrolled manner in the eventof an accident.
Rear seat passengers who have not fastened their seat belts are a danger not only to themselves but also to those seated at the front » Fig. 160 – .
Fastening and unfastening seat belts
Fig. 161
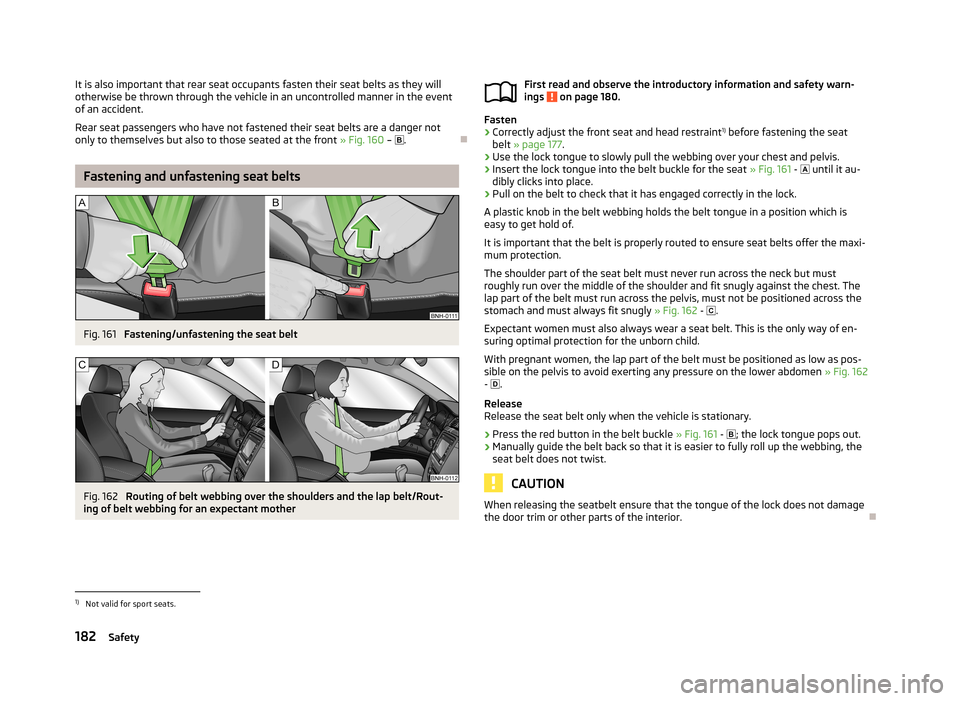
Fastening/unfastening the seat belt
Fig. 162
Routing of belt webbing over the shoulders and the lap belt/Rout-
ing of belt webbing for an expectant mother
First read and observe the introductory information and safety warn-
ings on page 180.
Fasten
›
Correctly adjust the front seat and head restraint 1)
before fastening the seat
belt » page 177 .
›
Use the lock tongue to slowly pull the webbing over your chest and pelvis.
›
Insert the lock tongue into the belt buckle for the seat » Fig. 161 - until it au-
dibly clicks into place.
›
Pull on the belt to check that it has engaged correctly in the lock.
A plastic knob in the belt webbing holds the belt tongue in a position which is
easy to get hold of.
It is important that the belt is properly routed to ensure seat belts offer the maxi- mum protection.
The shoulder part of the seat belt must never run across the neck but must
roughly run over the middle of the shoulder and fit snugly against the chest. The
lap part of the belt must run across the pelvis, must not be positioned across the
stomach and must always fit snugly » Fig. 162 -
.
Expectant women must also always wear a seat belt. This is the only way of en-
suring optimal protection for the unborn child.
With pregnant women, the lap part of the belt must be positioned as low as pos-sible on the pelvis to avoid exerting any pressure on the lower abdomen » Fig. 162
-
.
Release
Release the seat belt only when the vehicle is stationary.
›
Press the red button in the belt buckle » Fig. 161 -
; the lock tongue pops out.
›
Manually guide the belt back so that it is easier to fully roll up the webbing, the
seat belt does not twist.
CAUTION
When releasing the seatbelt ensure that the tongue of the lock does not damage
the door trim or other parts of the interior.
1)
Not valid for sport seats.
182Safety