interior SKODA OCTAVIA 2013 3.G / (5E) User Guide
[x] Cancel search | Manufacturer: SKODA, Model Year: 2013, Model line: OCTAVIA, Model: SKODA OCTAVIA 2013 3.G / (5E)Pages: 287, PDF Size: 18.55 MB
Page 61 of 287
The mode is active at speeds of 15 – 70 km/h and if the rear fog light is switchedon for a period of time longer than 10 seconds. The mode is deactivated when the
rear fig light is switched off for longer than 5 seconds.
Dynamic cornering lights
The cone of light in front of the vehicle is adjusted to the steering angle so that the road in the curve is illuminated. This function is active at speeds greater than
10 km.h and in all AFS modes.
Tourist light (Travel mode)
This mode makes it possible to drive in countries with opposing traffic system (driving on the left/right) without dazzling the oncoming vehicles.
When the “tourist light” mode is active, the above-mentioned modes and the side
swivel of the headlights is deactivated.
The "Tourist light" mode can be configured in the Infotainment » Operating in-
structions for Infotainment , chapter Vehicle settings (CAR button) .WARNINGIf the AFS system is defective, the headlights are automatically lowered to the
emergency position, which prevents a possible dazzling of oncoming traffic. This reduces the cone of light in front of the vehicle. Drive carefully and visit a
specialist garage as soon as possible.
Note
If the Eco driving mode is selected, the AFS system is deactivated » page 161.
Headlight assist
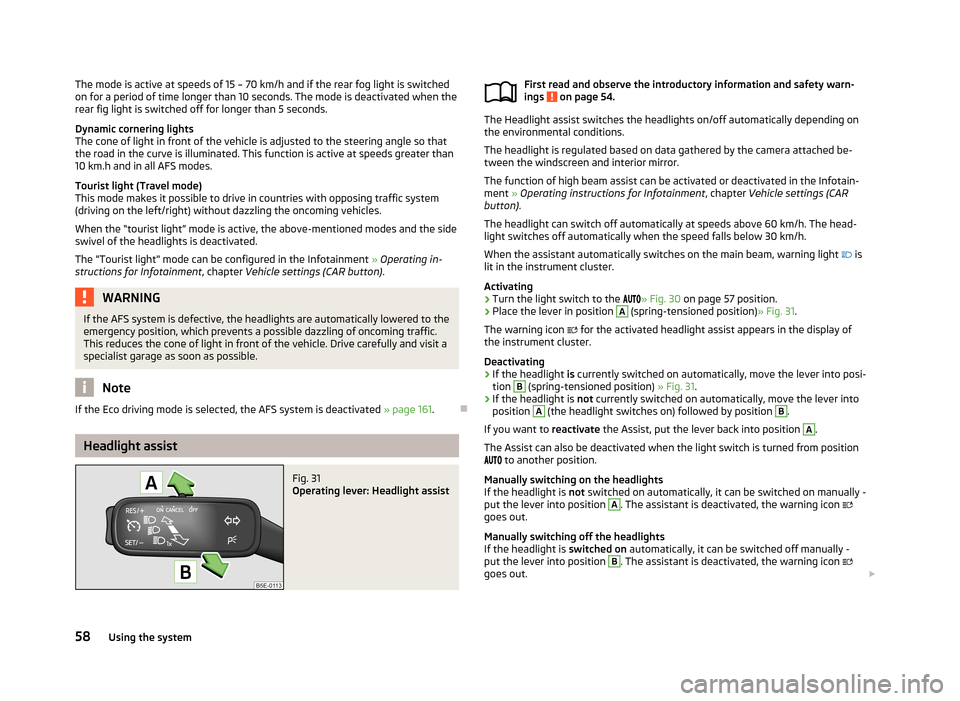
Fig. 31
Operating lever: Headlight assist
First read and observe the introductory information and safety warn-
ings on page 54.
The Headlight assist switches the headlights on/off automatically depending on
the environmental conditions.
The headlight is regulated based on data gathered by the camera attached be-
tween the windscreen and interior mirror.
The function of high beam assist can be activated or deactivated in the Infotain-ment » Operating instructions for Infotainment , chapter Vehicle settings (CAR
button) .
The headlight can switch off automatically at speeds above 60 km/h. The head-
light switches off automatically when the speed falls below 30 km/h.
When the assistant automatically switches on the main beam, warning light
is
lit in the instrument cluster.
Activating
›
Turn the light switch to the
» Fig. 30 on page 57 position.
›
Place the lever in position
A
(spring-tensioned position) » Fig. 31.
The warning icon
for the activated headlight assist appears in the display of
the instrument cluster.
Deactivating
›
If the headlight is currently switched on automatically, move the lever into posi-
tion
B
(spring-tensioned position) » Fig. 31.
›
If the headlight is not currently switched on automatically, move the lever into
position
A
(the headlight switches on) followed by position
B
.
If you want to reactivate the Assist, put the lever back into position
A
.
The Assist can also be deactivated when the light switch is turned from position
to another position.
Manually switching on the headlights
If the headlight is not switched on automatically, it can be switched on manually -
put the lever into position
A
. The assistant is deactivated, the warning icon
goes out.
Manually switching off the headlights
If the headlight is switched on automatically, it can be switched off manually -
put the lever into position
B
. The assistant is deactivated, the warning icon
goes out.
58Using the system
Page 63 of 287
The vehicle is stopped or moves at a speed of no more than 40 km/h.
The low beam is switched on or the light switch is in the position and the
low beam is switched on.
The daytime running lights are not switched on. The fog lights are not switched on.
The CORNER light is mainly intended to be used for illuminating the nearby envi-
ronment at a broad angle in front of and beside the vehicle. It lights up and goes out gradually.
Note
The two fog lights are switched on when you shift into the reverse gear.
Rear fog light
First read and observe the introductory information and safety warn-
ings
on page 54.
Switching on/off
›
Turn the light switch into position
or
» Fig. 32 on page 59.
›
Pull the light switch to position
2
.
The rear fog light is switched off in the reverse order.
If the vehicle is not fitted with fog lights, the rear fog light is switched on by pull-
ing out the light switch directly to the position
2
. This switch can only be put in-
to one position.
The warning light
lights up in the instrument cluster when the rear fog light is
switched on » page 15.
Only the rear fog light on the trailer lights up if the vehicle has a factory-fitted towing device or a towing device from ŠKODA original accessories and it is driven
with a trailer.
COMING HOME / LEAVING HOME
First read and observe the introductory information and safety warn-ings
on page 54.
COMING HOME/LEAVING HOME (hereafter referred to only as function) makes it possible to automatically switch on the lights for a short time after leaving the
vehicle or when approaching the vehicle in poor visibility.
The function is switched on automatically if the following conditions are met: The light switch is in position » Fig. 30 on page 57.
The visibility in the vehicle environment is reduced.
The ignition is switched off.
The function and duration of the lighting can be activated or deactivated in the Infotainment » Operating instructions for Infotainment , chapter Vehicle settings
(button CAR) .
The light is regulated based on data gathered by the light sensor attached be-
tween the windscreen and the interior mirror » page 57.
The function switches on the parking and low beam lights, the entry lighting in
the exterior mirrors and the licence plate light.
COMING HOME
The light turns on automatically when you open the driver's door.
The light turns off after the preset time when you close all the doors and the boot
lid.
If a door or the boot lid remains open, the light goes out after 60 seconds.
LEAVING HOME
The light turns on automatically after the vehicle is unlocked with the remote
control.
The light turns off after a preset time or after the vehicle is locked.
CAUTION
Do not affix any stickers or similar objects in front of the light sensor on the wind-
screen, so that its functionality is not impaired or disabled. 60Using the system
Page 64 of 287
NoteIf this function is activated constantly, the battery will be heavily discharged par-
ticularly in short-haul traffic.
Hazard warning light system
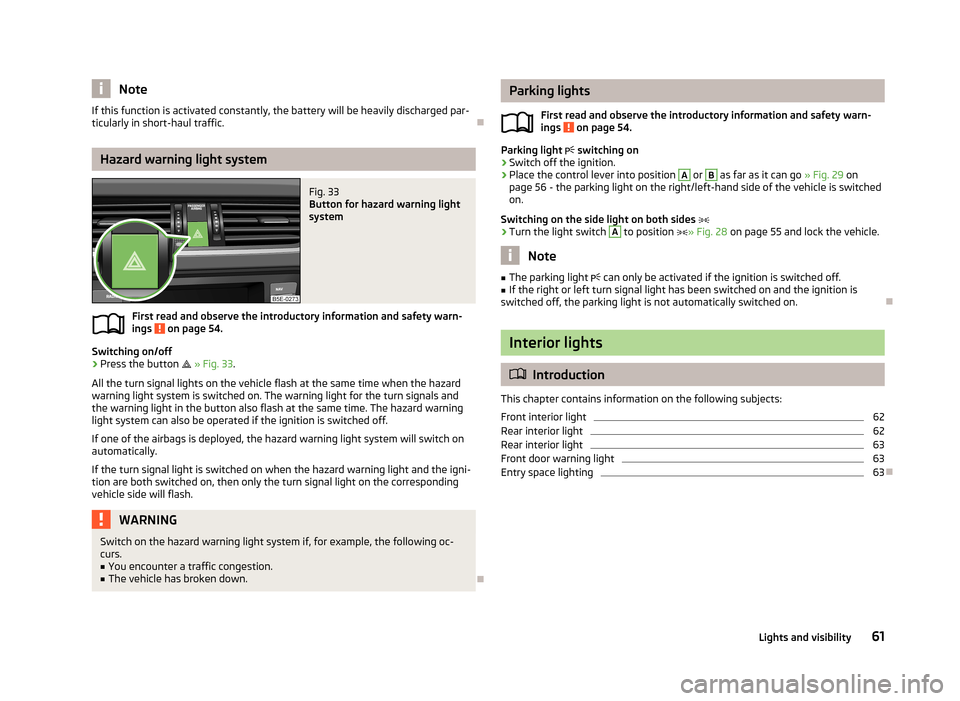
Fig. 33
Button for hazard warning light
system
First read and observe the introductory information and safety warn-
ings on page 54.
Switching on/off
›
Press the button
» Fig. 33 .
All the turn signal lights on the vehicle flash at the same time when the hazard
warning light system is switched on. The warning light for the turn signals and
the warning light in the button also flash at the same time. The hazard warning
light system can also be operated if the ignition is switched off.
If one of the airbags is deployed, the hazard warning light system will switch on
automatically.
If the turn signal light is switched on when the hazard warning light and the igni- tion are both switched on, then only the turn signal light on the corresponding
vehicle side will flash.
WARNINGSwitch on the hazard warning light system if, for example, the following oc-
curs.■
You encounter a traffic congestion.
■
The vehicle has broken down.
Parking lights
First read and observe the introductory information and safety warn-ings
on page 54.
Parking light switching on
›
Switch off the ignition.
›
Place the control lever into position
A
or
B
as far as it can go » Fig. 29 on
page 56 - the parking light on the right/left-hand side of the vehicle is switched
on.
Switching on the side light on both sides
›
Turn the light switch
A
to position » Fig. 28 on page 55 and lock the vehicle.
Note
■
The parking light can only be activated if the ignition is switched off.■If the right or left turn signal light has been switched on and the ignition is
switched off, the parking light is not automatically switched on.
Interior lights
Introduction
This chapter contains information on the following subjects:
Front interior light
62
Rear interior light
62
Rear interior light
63
Front door warning light
63
Entry space lighting
63
61Lights and visibility
Page 65 of 287

Front interior lightFig. 34
Switch for front interior light - 2 versions
Fig. 35
Switch for reading lights - 2 versions
First read and observe the introductory information given on page 61.
Rocker switch positions » Fig. 34 .
switching on
switching off
Operation using the door contact switch (middle position)
For vehicles with interior monitoring there is no icon for the center position (oper-
ation with the door contact switch) » Fig. 34 -
.
Reading lights Switch the reading light on/off » Fig. 35
If light operation with the door contact switch is enabled, the light will come on
when one of the following events occurs:
› The vehicle is unlocked.
› One of the doors or the luggage compartment lid is being opened.
› The ignition key is removed.
If light operation with the door contact switch is enabled, the light will go off
when one of the following events occurs:
› The vehicle is locked.
› The ignition is switched on.
› About 30 seconds after all the doors have been closed.
Note
■
If the interior light remains switched on when the ignition is switched off or if
one of the doors is open, the light will automatically go out after around 10 mi- nutes.■
Two diffuse lights are integrated in the front interior lighting, that illuminate
the gearshift lever and the middle of the dash panel. These are switched on auto-
matically when the parking light is activated. Also, after switching on the ignition when the parking lights are switched on, the door handle lighting comes on.
Rear interior light
Applies to vehicles without a panoramic sliding roof.
Fig. 36
Interior light without reading lights/interior light with reading lights
First read and observe the introductory information given on page 61.
The rear interior light is operated together with the front interior light » page 62.
62Using the system
Page 66 of 287
Switching lamp without reading lights on/off›Press the button » Fig. 36 - .
Switching the reading light on/off›
Press the button or
» Fig. 36 - .
Rear interior light
Applies to vehicles with a panoramic sliding roof.
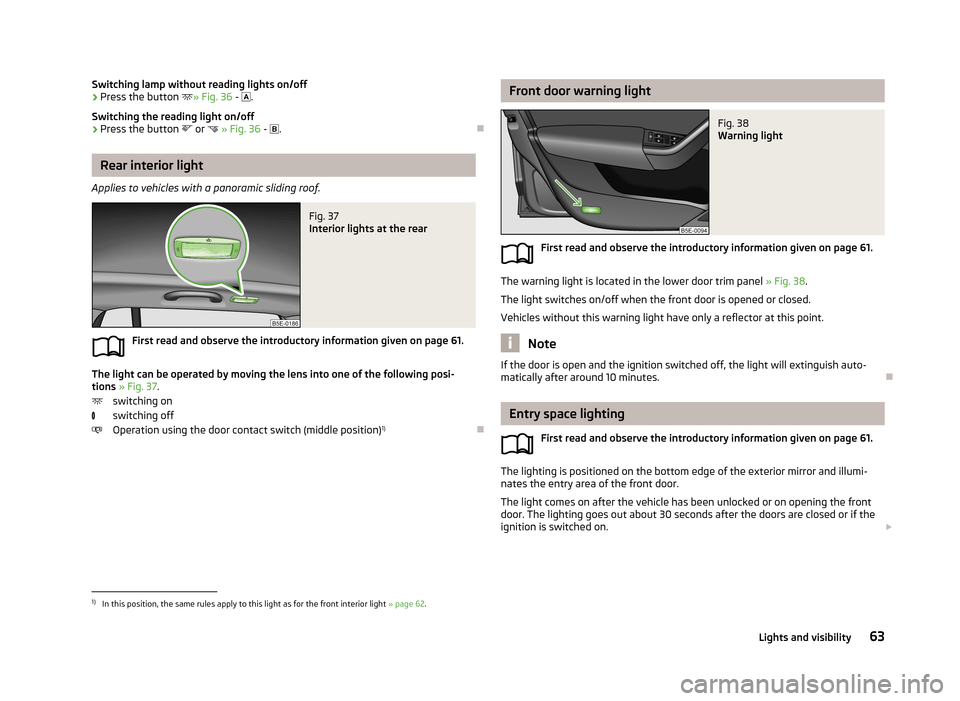
Fig. 37
Interior lights at the rear
First read and observe the introductory information given on page 61.
The light can be operated by moving the lens into one of the following posi-
tions » Fig. 37 .
switching on
switching off
Operation using the door contact switch (middle position) 1)
Front door warning lightFig. 38
Warning light
First read and observe the introductory information given on page 61.
The warning light is located in the lower door trim panel
» Fig. 38.
The light switches on/off when the front door is opened or closed.
Vehicles without this warning light have only a reflector at this point.
Note
If the door is open and the ignition switched off, the light will extinguish auto-
matically after around 10 minutes.
Entry space lighting
First read and observe the introductory information given on page 61.
The lighting is positioned on the bottom edge of the exterior mirror and illumi-
nates the entry area of the front door.
The light comes on after the vehicle has been unlocked or on opening the front
door. The lighting goes out about 30 seconds after the doors are closed or if the
ignition is switched on.
1)
In this position, the same rules apply to this light as for the front interior light
» page 62.
63Lights and visibility
Page 71 of 287
Rear mirror
Introduction
This chapter contains information on the following subjects:
Interior mirror
69
Exterior mirrors
69WARNING■ Make sure that the mirror is not covered by ice, snow, mist or other objects.■Convex (curved outward) or aspheric exterior mirrors increase the field of vi-
sion. They do, however, make objects appear smaller in the mirror. These mir-
rors are therefore only of limited use for estimating distances to the following
vehicles.■
Whenever possible use the interior mirror for estimating the distances to
the following vehicles.
■
The illuminated display of an external navigation unit can lead to operation-
al faults to the automatic dimming interior mirror – risk of accident.
WARNINGAutomatic dimming mirrors contain an electrolytic fluid which may leak should
the mirror glass break.■
The leaking electrolytic fluid can irritate the skin, eyes and breath apparatus.
Immediately seek out fresh air and leave the vehicle. If this is not possible,
open all windows and doors.
■
If you swallow electrolytic fluid, seek medical assistance immediately.
■
If your eyes or skin come into contact with the electrolytic fluid, immediately
wash the affected area for a few minutes long with a lot of water. Then con-
sult a doctor immediately.
CAUTION
Never mechanically fold in or fold back the exterior mirrors with the fold-in func-
tion by hand as this will damage the electric drive.Note■
Automatic mirror dimming operates only properly if the sun screen for the rear
window in the housing on the boot cover is not in use or the light striking the in- terior rear-view mirror is not affected by other objects.■
If the automatic interior mirror dimming is switched off, the exterior mirror dim-
ming is also switched off.
■
The mirror heater only operates when the engine is running and up to an out-
side temperature of +35 ℃.
■
Do not touch the surface of the exterior mirrors if the exterior mirror heater is
switched on.
■
If the electrical exterior mirror setting fails at any time, the mirrors can be adjus-
ted by hand by pressing on the edge of the mirror surface.
■
Contact a specialist garage if there is a fault with the power setting function for
the exterior mirrors.
68Using the system
Page 72 of 287
Interior mirrorFig. 43
Manual dimming mirror
Fig. 44
Automatic dimming mirror
First read and observe the introductory information and safety warn-
ings
on page 68.
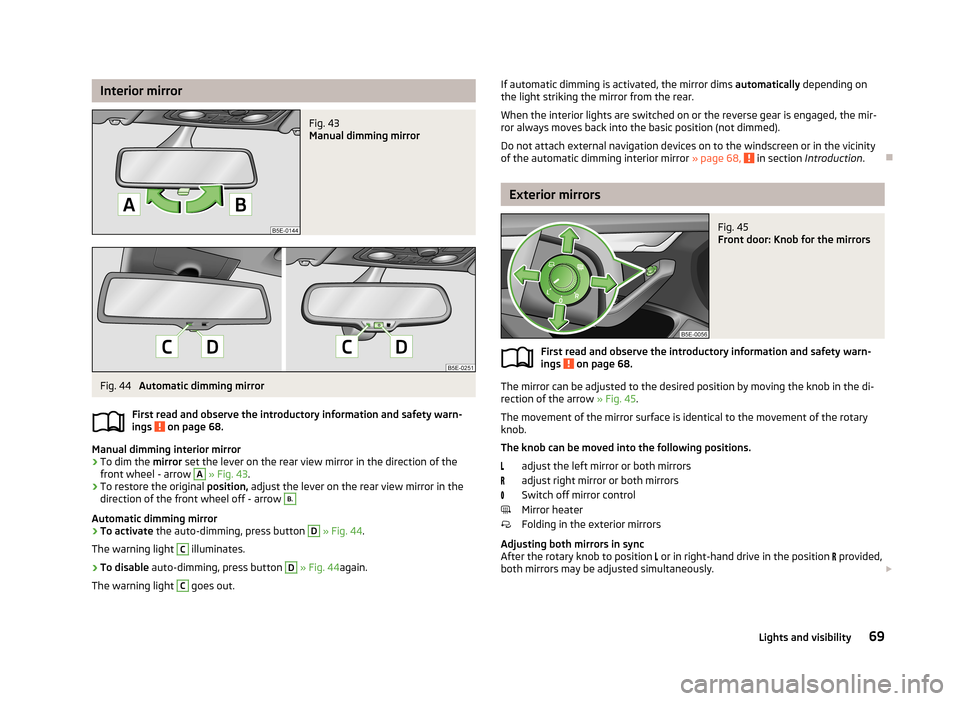
Manual dimming interior mirror
›
To dim the mirror set the lever on the rear view mirror in the direction of the
front wheel - arrow
A
» Fig. 43 .
›
To restore the original position, adjust the lever on the rear view mirror in the
direction of the front wheel off - arrow
B.
Automatic dimming mirror
›
To activate the auto-dimming, press button
D
» Fig. 44 .
The warning light
C
illuminates.
›
To disable auto-dimming, press button
D
» Fig. 44 again.
The warning light
C
goes out.
If automatic dimming is activated, the mirror dims automatically depending on
the light striking the mirror from the rear.
When the interior lights are switched on or the reverse gear is engaged, the mir- ror always moves back into the basic position (not dimmed).
Do not attach external navigation devices on to the windscreen or in the vicinity
of the automatic dimming interior mirror » page 68,
in section Introduction .
Exterior mirrors
Fig. 45
Front door: Knob for the mirrors
First read and observe the introductory information and safety warn-
ings on page 68.
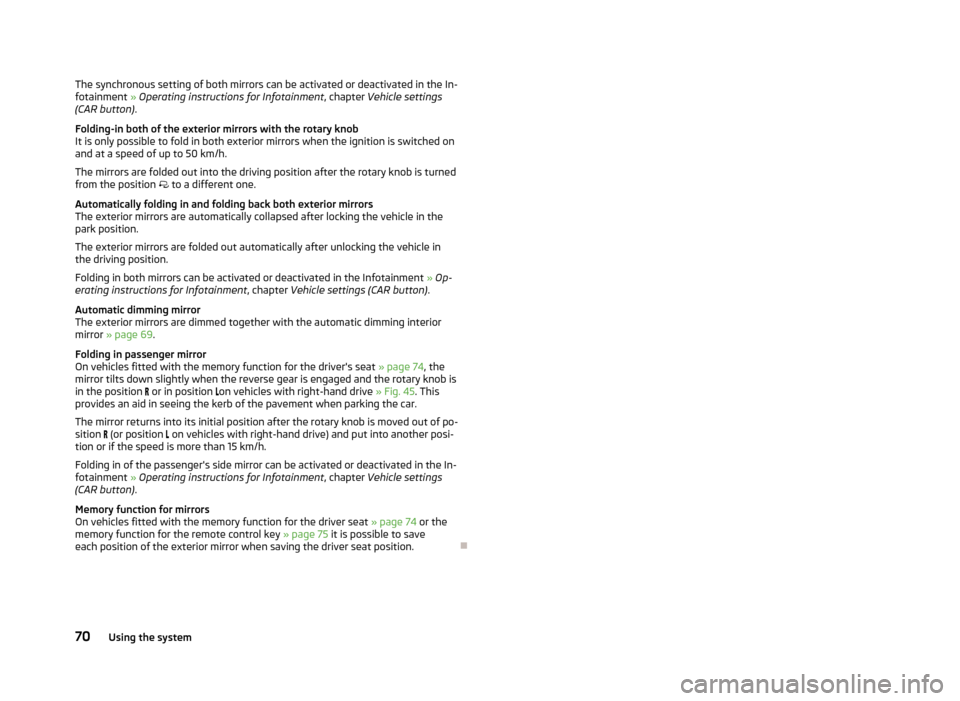
The mirror can be adjusted to the desired position by moving the knob in the di-
rection of the arrow » Fig. 45.
The movement of the mirror surface is identical to the movement of the rotary knob.
The knob can be moved into the following positions.
adjust the left mirror or both mirrors
adjust right mirror or both mirrors
Switch off mirror control
Mirror heater
Folding in the exterior mirrors
Adjusting both mirrors in sync
After the rotary knob to position or in right-hand drive in the position
provided,
both mirrors may be adjusted simultaneously.
69Lights and visibility
Page 73 of 287
The synchronous setting of both mirrors can be activated or deactivated in the In-fotainment » Operating instructions for Infotainment , chapter Vehicle settings
(CAR button) .
Folding-in both of the exterior mirrors with the rotary knob It is only possible to fold in both exterior mirrors when the ignition is switched onand at a speed of up to 50 km/h.
The mirrors are folded out into the driving position after the rotary knob is turned from the position to a different one.
Automatically folding in and folding back both exterior mirrors
The exterior mirrors are automatically collapsed after locking the vehicle in the
park position.
The exterior mirrors are folded out automatically after unlocking the vehicle in
the driving position.
Folding in both mirrors can be activated or deactivated in the Infotainment » Op-
erating instructions for Infotainment , chapter Vehicle settings (CAR button) .
Automatic dimming mirror
The exterior mirrors are dimmed together with the automatic dimming interior
mirror » page 69 .
Folding in passenger mirror
On vehicles fitted with the memory function for the driver's seat » page 74, the
mirror tilts down slightly when the reverse gear is engaged and the rotary knob is
in the position
or in position
on vehicles with right-hand drive » Fig. 45. This
provides an aid in seeing the kerb of the pavement when parking the car.
The mirror returns into its initial position after the rotary knob is moved out of po-
sition
(or position
on vehicles with right-hand drive) and put into another posi-
tion or if the speed is more than 15 km/h.
Folding in of the passenger's side mirror can be activated or deactivated in the In-
fotainment » Operating instructions for Infotainment , chapter Vehicle settings
(CAR button) .
Memory function for mirrors
On vehicles fitted with the memory function for the driver seat » page 74 or the
memory function for the remote control key » page 75 it is possible to save
each position of the exterior mirror when saving the driver seat position.
70Using the system
Page 92 of 287
230-volt powerFig. 76
Centre console at rear: 230-Volt
power socket
First read and observe the introductory information and safety warn-
ings on page 79.
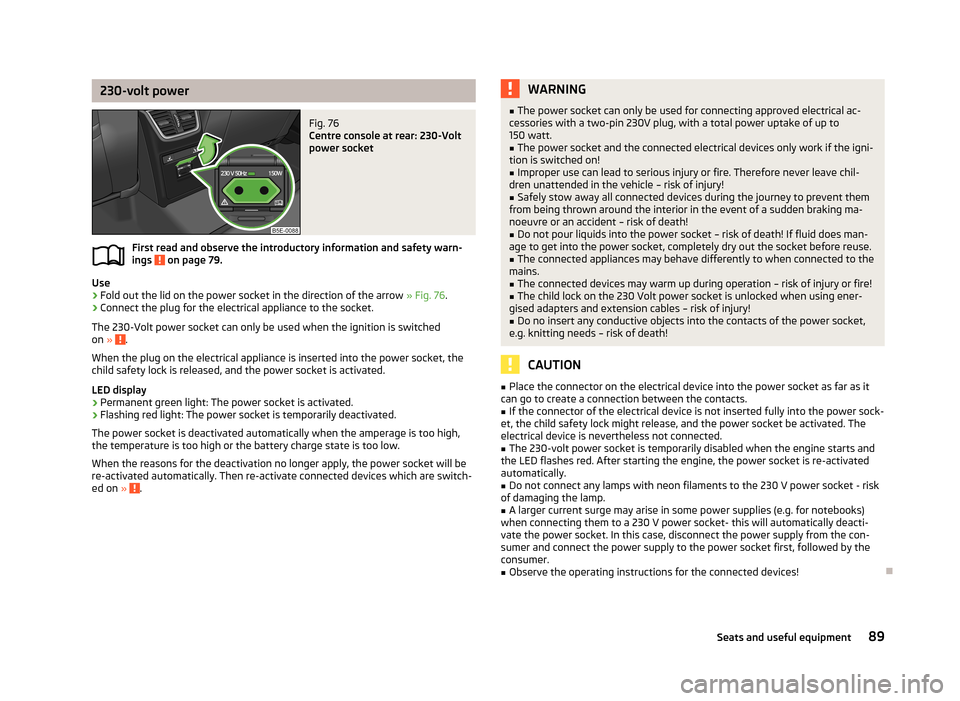
Use
›
Fold out the lid on the power socket in the direction of the arrow » Fig. 76.
›
Connect the plug for the electrical appliance to the socket.
The 230-Volt power socket can only be used when the ignition is switched on »
.
When the plug on the electrical appliance is inserted into the power socket, the
child safety lock is released, and the power socket is activated.
LED display › Permanent green light: The power socket is activated.
› Flashing red light: The power socket is temporarily deactivated.
The power socket is deactivated automatically when the amperage is too high, the temperature is too high or the battery charge state is too low.
When the reasons for the deactivation no longer apply, the power socket will be
re-activated automatically. Then re-activate connected devices which are switch-
ed on »
.
WARNING■
The power socket can only be used for connecting approved electrical ac-
cessories with a two-pin 230V plug, with a total power uptake of up to 150 watt.■
The power socket and the connected electrical devices only work if the igni-
tion is switched on!
■
Improper use can lead to serious injury or fire. Therefore never leave chil-
dren unattended in the vehicle – risk of injury!
■
Safely stow away all connected devices during the journey to prevent them
from being thrown around the interior in the event of a sudden braking ma- noeuvre or an accident – risk of death!
■
Do not pour liquids into the power socket – risk of death! If fluid does man-
age to get into the power socket, completely dry out the socket before reuse.
■
The connected appliances may behave differently to when connected to the
mains.
■
The connected devices may warm up during operation – risk of injury or fire!
■
The child lock on the 230 Volt power socket is unlocked when using ener-
gised adapters and extension cables – risk of injury!
■
Do no insert any conductive objects into the contacts of the power socket,
e.g. knitting needs – risk of death!
CAUTION
■ Place the connector on the electrical device into the power socket as far as it
can go to create a connection between the contacts.■
If the connector of the electrical device is not inserted fully into the power sock-
et, the child safety lock might release, and the power socket be activated. The
electrical device is nevertheless not connected.
■
The 230-volt power socket is temporarily disabled when the engine starts and
the LED flashes red. After starting the engine, the power socket is re-activated
automatically.
■
Do not connect any lamps with neon filaments to the 230 V power socket - risk
of damaging the lamp.
■
A larger current surge may arise in some power supplies (e.g. for notebooks)
when connecting them to a 230 V power socket- this will automatically deacti-
vate the power socket. In this case, disconnect the power supply from the con-
sumer and connect the power supply to the power socket first, followed by the
consumer.
■
Observe the operating instructions for the connected devices!
89Seats and useful equipment
Page 95 of 287
WARNING (Continued)■When transporting objects in the luggage compartment that has been en-
larged by folding the rear seats forward, ensure the safety of the passengers
transported on the other rear seats » page 178, Correct seated position for
the passengers in the rear seats .■
Do not drive with the luggage compartment lid fully opened or slightly ajar
otherwise exhaust gases may get into the interior of the vehicle – risk of poi-
soning!
■
Do not exceed the permissible axle loads and permissible gross weight of
the vehicle – risk of accident!
■
Do not transport people in the boot!
CAUTION
Make sure that transported objects with sharp edges do not damage the threads
of the following devices.■
Rear window heater.
■
Rear window with an integrated antenna.
■
Integrated antenna in the rear side windows (Octavia Estate).
Note
Tyre pressure must be adjusted to the load » page 229, Service life of tyres .
Class N1 vehicles
First read and observe the introductory information and safety warn-
ings
on page 91.
In class N1 vehicles that are not fitted with a protective grille, a lashing set that complies with the EN 12195 standard (1-4) must be used for fastening the load.
Proper functioning of the electrical installation is essential for safe vehicle opera- tion. It is important to ensure that the electrical installation is not damaged dur-ing the adjustment process or when the storage area is being loaded and unloa-
ded.
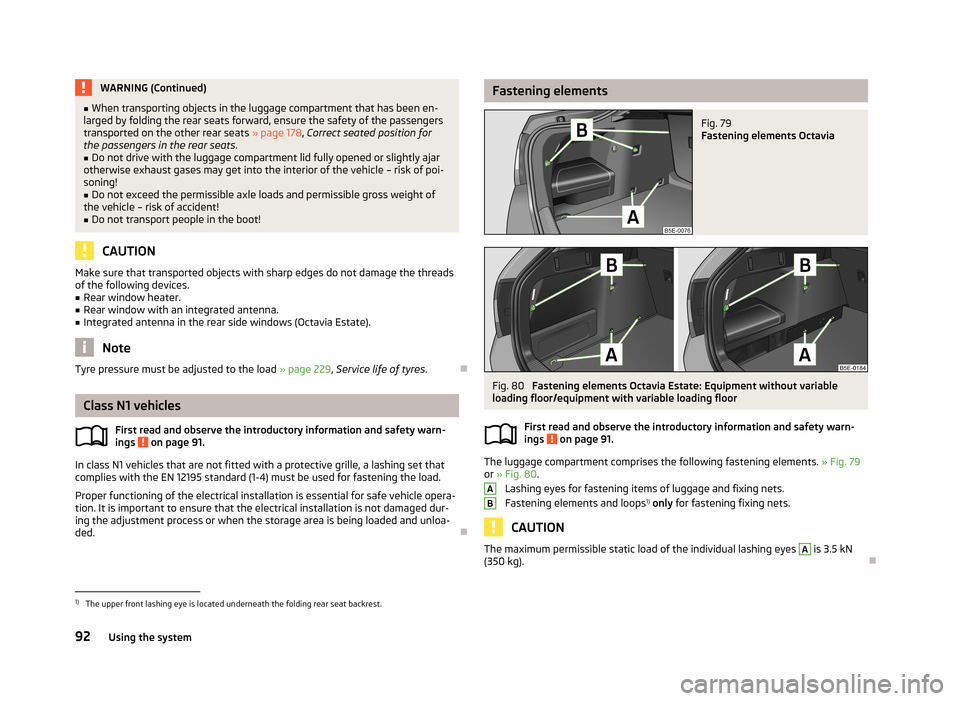
Fastening elementsFig. 79
Fastening elements Octavia
Fig. 80
Fastening elements Octavia Estate: Equipment without variable
loading floor/equipment with variable loading floor
First read and observe the introductory information and safety warn-
ings
on page 91.
The luggage compartment comprises the following fastening elements. » Fig. 79
or » Fig. 80 .
Lashing eyes for fastening items of luggage and fixing nets.
Fastening elements and loops 1)
only for fastening fixing nets.
CAUTION
The maximum permissible static load of the individual lashing eyes A is 3.5 kN
(350 kg).
AB1)
The upper front lashing eye is located underneath the folding rear seat backrest.
92Using the system