roof rack SKODA OCTAVIA 2013 3.G / (5E) Owner's Manual
[x] Cancel search | Manufacturer: SKODA, Model Year: 2013, Model line: OCTAVIA, Model: SKODA OCTAVIA 2013 3.G / (5E)Pages: 287, PDF Size: 18.55 MB
Page 6 of 287
Table of Contents
Materials defect liability and ŠKODA warranty for
new cars5
Mobility warranty and ŠKODA extended
warranty
6
Abbreviations
Using the system
Cockpit
9
Overview
8
Instruments and warning lights
11
Instrument cluster
11
Warning lights
15
Warning icons in the display
21
Information system
26
Driver information system
26
Driving data (Multifunction display)
29
MAXI DOT display
31
Service interval display
33
Unlocking and opening
35
Unlocking and locking
35
KESSY
41
Anti-theft alarm system
42
Luggage compartment lid
43
Electric luggage compartment lid (Octavia
Estate)
44
Electrical power windows
47
Panoramic sliding/tilting roof (Octavia)
50
Panoramic sliding/tilting roof (Octavia Estate)
51
Lights and visibility
54
Lights
54
Interior lights
61Visibility64Windscreen wipers and washers65
Rear mirror
68
Seats and useful equipment
71
Adjusting the seats
71
Seat features
76
Practical equipment
79
Luggage compartment
91
Variable loading floor in the luggage
compartment (Estate)
99
Net partition (Octavia Estate)
101
Roof rack system
103
Heating and air-conditioning
106
Heating, ventilation, cooling
106
Heating
108
Air conditioning system (manual air conditioning
system)
110
Climatronic (automatic air conditioning system)
112
Auxiliary heating (auxiliary heating and ventilation)
115
Driving
Starting-off and Driving
118
Steering
118
Starting and stopping the engine using the key
119
Starting and stopping the engine - KESSY
121
Brakes
124
Manual shifting of gears and pedals
126
Automatic transmission
126
Running in
130
Economical driving and environmental
sustainability
131
Avoiding damage to your vehicle
135
Driving abroad
136Assist systems137Brake assist systems137
Parking aid
140
Park assist
142
Cruise Control System
146
Adaptive Cruise Control (ACC)
148
Area monitoring system (Front Assist)
154
START-STOP
158
Driving mode
161
ProActive passenger protection
163
Lane Assist
164
Traffic sign recognition
166
Fatigue detection (break recommendation)
168
Towing a trailer
169
Towing device
169
Trailer
172
Safety
Passive Safety
176
General information
176
Correct seated position
177
Seat belts
180
Using seat belts
180
Inertia reel and belt pretensioners
183
Airbag system
185
Description of the airbag system
185
Airbag overview
186
Deactivating airbags
190
Transporting children safely
193
Child seat
193
Fastening elements
1963Table of Contents
Page 48 of 287
If you rapidly enter the vehicle during the opening or closing process of the boot
lid, the whole vehicle may jerk and as a result the movement of the lid can be in-
terrupted.
Manual operation
Manually opening and closing the lid is only possible in exceptional cases. It must
be completed slowly and without sudden movements as close to the centre of
the lid as possible »
.
WARNING■
Ensure that the lock is properly engaged after closing the lid. Otherwise, the
lid might open suddenly while the vehicle is moving, even if the lid was locked
– risk of accident!■
Never drive with the lid open or unlatched, as otherwise exhaust gases may
get into the interior of the vehicle – risk of poisoning!
CAUTION
■ The movement of the lid can be stopped by applying an abrupt and quick force
against the lid.■
Do not try to close the lid manually during the electrical closing process. Dam-
age can occur to the system of the electric boot lid.
■
If the lid is closed manually, it must be ensured that when moving the lid into
the lock, pressure is applied to the centre edge of the lid above the ŠKODA logo. Handling the sides of the lid can damage the electric lid.
CAUTION
■ Before opening or closing the lid, check if there are any objects in the opening
or closing range which could obstruct the movement (e.g. a load on the roof rack
or on the trailer, etc.) – risk of causing damage to the lid!■
Ensure that there is at least 10 cm of clearance above the opened lid (e.g. dis-
tance from the garage ceiling). Otherwise, it may happen that the clearance
above the opened lid is no longer sufficient after relieving the vehicle of a load
(e.g. after unloading) – risk of causing damage to the lid.
■
In certain circumstances, if the lid is loaded (e.g by a thick layer of snow), the
opening process of the lid can be interrupted. Remove the load on the lid to re-
enable the electrical operation.
■
If the lid closes automatically (e.g. under load of snow), you will hear an inter-
mittent beep.
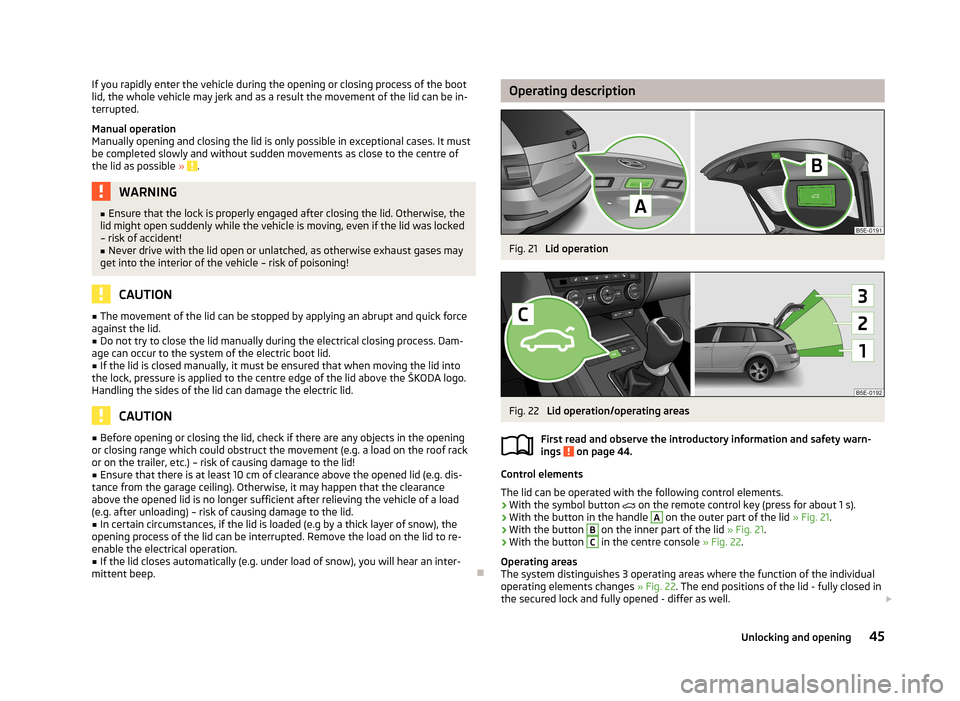
Operating descriptionFig. 21
Lid operation
Fig. 22
Lid operation/operating areas
First read and observe the introductory information and safety warn-
ings
on page 44.
Control elements
The lid can be operated with the following control elements. › With the symbol button
on the remote control key (press for about 1 s).
› With the button in the handle
A
on the outer part of the lid
» Fig. 21.
› With the button
B
on the inner part of the lid
» Fig. 21.
› With the button
C
in the centre console
» Fig. 22.
Operating areas
The system distinguishes 3 operating areas where the function of the individual operating elements changes » Fig. 22. The end positions of the lid - fully closed in
the secured lock and fully opened - differ as well.
45Unlocking and opening
Page 94 of 287
WARNING (Continued)■Make sure that the strap A holds the skis in front of the binding (also refer
to imprint on the removable through-loading bag).■
The total weight of the skis which are transported must not exceed 24 kg.
Note
■ The through-loading bag is foreseen for four pairs of skis.■Place the skis with the tips facing to the front and the sticks with the tips facing
to the rear. into the removable through-loading bag.■
If there are several pairs of skis in the removable through-loading bag, ensure
that the bindings are positioned at the same height.
■
The removable through-loading bag must never be folded together or stowed
when moist.
Luggage compartment
Introduction
This chapter contains information on the following subjects:
Class N1 vehicles
92
Fastening elements
92
Fixing nets
93
Folding double hooks
93
Foldable hooks (Octavia Estate)
94
Floor covering
94
Double sided floor covering
94
Luggage net
95
Luggage compartment cover
95
Roll-up luggage compartment cover (Octavia Estate)
96
Stowing roll-up luggage compartment cover and roof racks
97
Storage compartment in the luggage compartment
98
Storage compartments under the floor covering
98
Multifunction box (Octavia Estate)
99
Please observe the following for the purpose of maintaining good handling char-
acteristics of your vehicle:
› Distribute loads as evenly as possible.›Place heavy objects as far forward as possible.›
Attach the items of luggage to the lashing eyes or using the nets
» page 92.
In the event of an accident, even small and light objects gain so much kinetic en-
ergy that they can cause severe injuries.
The magnitude of the kinetic energy is dependent on the speed at which the ve-
hicle is travelling and the weight of the object.
Example: In the event of a frontal collision at a speed of 50 km/h, an object with a
weight of 4.5 kg produces an energy, which corresponds to 20 times its own
weight. This means that it results in a weight of approx. 90 kg “ ”.
Luggage compartment light
The light switches on/off when the boot lid is opened or closed.
If the boot lid is open and the ignition switched off, the light will extinguish auto-
matically after around 10 minutes.
WARNING■ Store the objects in the luggage compartment and attach them to the lash-
ing eyes.■
Loose objects can be thrown forward during a sudden manoeuvre or in case
of an accident and can injure the occupants or other road users.
■
Loose objects could hit a deployed airbag and injure occupants – danger of
death!
■
Please note that the handling properties of the vehicle may be affected
when transporting heavy objects as the centre of gravity can be displaced –
risk of accident! The speed and style of driving must be adjusted accordingly.
■
If the items of luggage or objects are attached to the lashing eyes with un-
suitable or damaged lashing straps, injuries can occur in the event of braking
manoeuvres or accidents. To prevent items of luggage from moving around,
always use suitable lashing straps which must be firmly attached to the lash-
ing eyes.
■
The items carried in the luggage compartment must be stored in such a way
that no objects are able to slip forward if any sudden driving or braking ma-
noeuvres are undertaken – risk of injury!
91Seats and useful equipment
Page 99 of 287
WARNINGNo objects should be placed on the luggage compartment cover, the vehicle
occupants could be endangered if there is sudden braking or the vehicle col-
lides with something.
CAUTION
■ Please ensure that the heating elements for the rear window heater are not
damaged as a result of objects placed in this area.■
When closing the boot lid, jamming and damage to the luggage compartment
cover or the side trim panel can occur if handled in an unprofessional way. The following guidelines must be observed. ■ The recesses in the cover
3
» Fig. 87 must lock in the holders in the side trim
panel
2
.
■ The items which are transported must not exceed the height of the luggage
compartment cover. ■ The cover must not be jammed in the surrounding seal of the luggage com-
partment lid when it is in the opened position. ■ There must be no object in the gap between the opened cover and the rear
backrest.
Note
Opening the boot lid also lifts up the boot cover.
Roll-up luggage compartment cover (Octavia Estate)
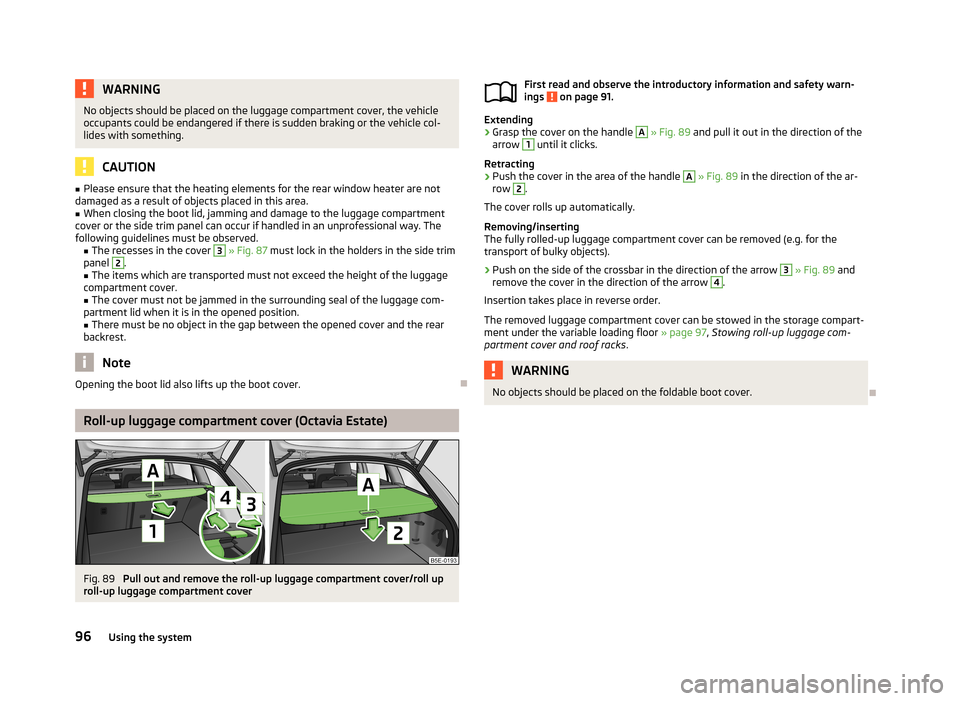
Fig. 89
Pull out and remove the roll-up luggage compartment cover/roll up
roll-up luggage compartment cover
First read and observe the introductory information and safety warn-
ings on page 91.
Extending
›
Grasp the cover on the handle
A
» Fig. 89 and pull it out in the direction of the
arrow
1
until it clicks.
Retracting
›
Push the cover in the area of the handle
A
» Fig. 89 in the direction of the ar-
row
2
.
The cover rolls up automatically.
Removing/inserting
The fully rolled-up luggage compartment cover can be removed (e.g. for the
transport of bulky objects).
›
Push on the side of the crossbar in the direction of the arrow
3
» Fig. 89 and
remove the cover in the direction of the arrow
4
.
Insertion takes place in reverse order.
The removed luggage compartment cover can be stowed in the storage compart- ment under the variable loading floor » page 97, Stowing roll-up luggage com-
partment cover and roof racks .
WARNINGNo objects should be placed on the foldable boot cover.
96Using the system
Page 100 of 287
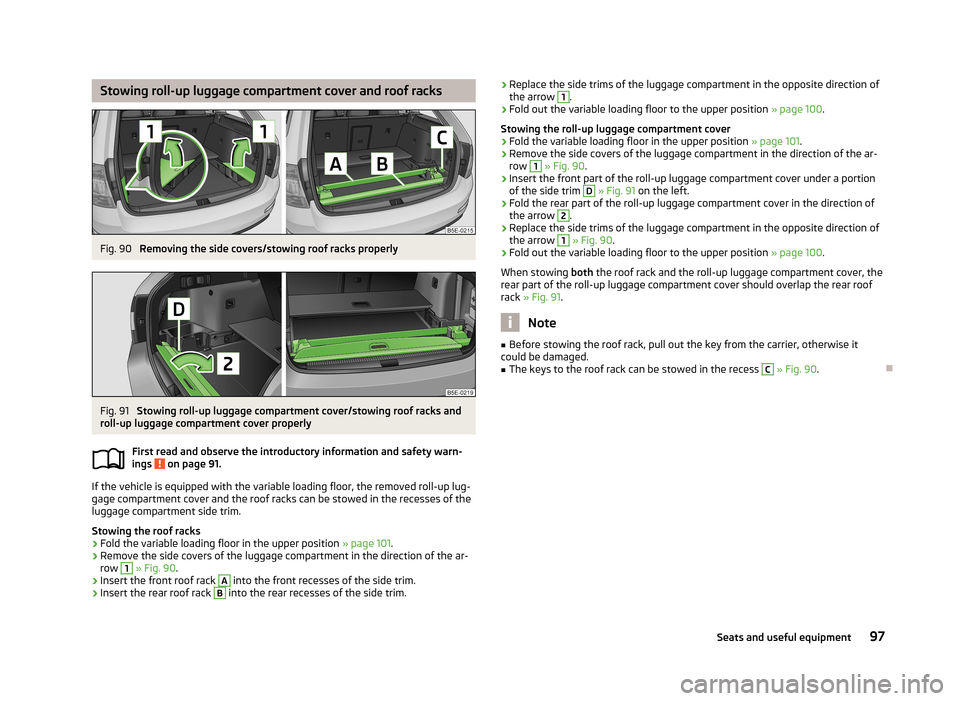
Stowing roll-up luggage compartment cover and roof racksFig. 90
Removing the side covers/stowing roof racks properly
Fig. 91
Stowing roll-up luggage compartment cover/stowing roof racks and
roll-up luggage compartment cover properly
First read and observe the introductory information and safety warn-
ings
on page 91.
If the vehicle is equipped with the variable loading floor, the removed roll-up lug-
gage compartment cover and the roof racks can be stowed in the recesses of the
luggage compartment side trim.
Stowing the roof racks
›
Fold the variable loading floor in the upper position » page 101.
›
Remove the side covers of the luggage compartment in the direction of the ar-
row
1
» Fig. 90 .
›
Insert the front roof rack
A
into the front recesses of the side trim.
›
Insert the rear roof rack
B
into the rear recesses of the side trim.
›Replace the side trims of the luggage compartment in the opposite direction of
the arrow 1.›
Fold out the variable loading floor to the upper position » page 100.
Stowing the roll-up luggage compartment cover
›
Fold the variable loading floor in the upper position » page 101.
›
Remove the side covers of the luggage compartment in the direction of the ar-
row
1
» Fig. 90 .
›
Insert the front part of the roll-up luggage compartment cover under a portion
of the side trim
D
» Fig. 91 on the left.
›
Fold the rear part of the roll-up luggage compartment cover in the direction of
the arrow
2
.
›
Replace the side trims of the luggage compartment in the opposite direction of
the arrow
1
» Fig. 90 .
›
Fold out the variable loading floor to the upper position » page 100.
When stowing both the roof rack and the roll-up luggage compartment cover, the
rear part of the roll-up luggage compartment cover should overlap the rear roof
rack » Fig. 91 .
Note
■
Before stowing the roof rack, pull out the key from the carrier, otherwise it
could be damaged.■
The keys to the roof rack can be stowed in the recess
C
» Fig. 90 .
97Seats and useful equipment
Page 106 of 287
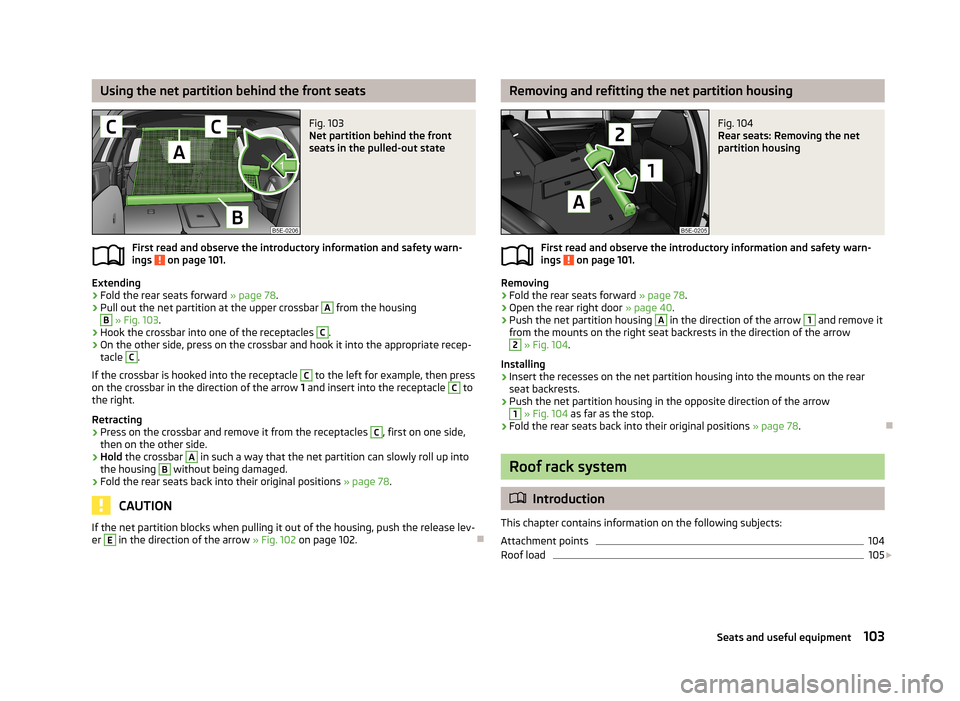
Using the net partition behind the front seatsFig. 103
Net partition behind the front
seats in the pulled-out state
First read and observe the introductory information and safety warn-
ings on page 101.
Extending
›
Fold the rear seats forward » page 78.
›
Pull out the net partition at the upper crossbar
A
from the housing
B
» Fig. 103 .
›
Hook the crossbar into one of the receptacles
C
.
›
On the other side, press on the crossbar and hook it into the appropriate recep-
tacle
C
.
If the crossbar is hooked into the receptacle
C
to the left for example, then press
on the crossbar in the direction of the arrow 1 and insert into the receptacle
C
to
the right.
Retracting
›
Press on the crossbar and remove it from the receptacles
C
, first on one side,
then on the other side.
›
Hold the crossbar
A
in such a way that the net partition can slowly roll up into
the housing
B
without being damaged.
›
Fold the rear seats back into their original positions » page 78.
CAUTION
If the net partition blocks when pulling it out of the housing, push the release lev-
er E in the direction of the arrow » Fig. 102 on page 102.
Removing and refitting the net partition housingFig. 104
Rear seats: Removing the net
partition housing
First read and observe the introductory information and safety warn-
ings on page 101.
Removing
›
Fold the rear seats forward » page 78.
›
Open the rear right door » page 40.
›
Push the net partition housing
A
in the direction of the arrow
1
and remove it
from the mounts on the right seat backrests in the direction of the arrow
2
» Fig. 104 .
Installing
›
Insert the recesses on the net partition housing into the mounts on the rear seat backrests.
›
Push the net partition housing in the opposite direction of the arrow
1
» Fig. 104 as far as the stop.
›
Fold the rear seats back into their original positions » page 78.
Roof rack system
Introduction
This chapter contains information on the following subjects:
Attachment points
104
Roof load
105
103Seats and useful equipment
Page 107 of 287
WARNING■The items which you transport on the roof rack must be reliably attached –
risk of accident!■
Always secure the load with appropriate and undamaged lashing straps or
tensioning straps.
■
Distribute the load evenly over the roof rack system.
■
When transporting heavy objects or objects which take up a large area on
the roof rack system, the handling of the car may change as a result of the displacement of the centre of gravity. The style of driving and speed musttherefore be adapted to the current circumstances.
■
Avoid abrupt and sudden driving/braking manoeuvres.
■
Adjust the speed and driving style to the visibility, weather, road and traffic
conditions.
■
The permissible roof load, permissible axle loads and gross permissible
weight of the vehicle must not be exceeded under any circumstances – risk of
accident!
CAUTION
■ Only use roof rack systems approved by ŠKODA AUTO a.s.■When dealing with roof rack systems, the installation instructions supplied with
the roof luggage rack system must be observed.■
On models fitted with a sliding/tilting roof, ensure that the sliding/tilting roof
does not strike any items of luggage transported on the roof.
■
Ensure that the luggage compartment lid does not hit the roof load when
opened.
■
The height of the vehicle changes after mounting a roof luggage rack system
and the load that is secured to it. Compare the vehicle height with available clear-
ances, such as underpasses and garage doors.
■
Always remove the roof luggage rack system before entering an automated car
wash.
■
Ensure the roof aerial is not impaired by the secured load.
For the sake of the environment
The increased aerodynamic drag results in a higher fuel consumption.NoteThe removed roof rack for the Octavia Estate can be stowed in the stowage com-
partment under the variable loading floor » page 97, Stowing roll-up luggage
compartment cover and roof racks .
Attachment points
Does not apply to the Octavia Estate.
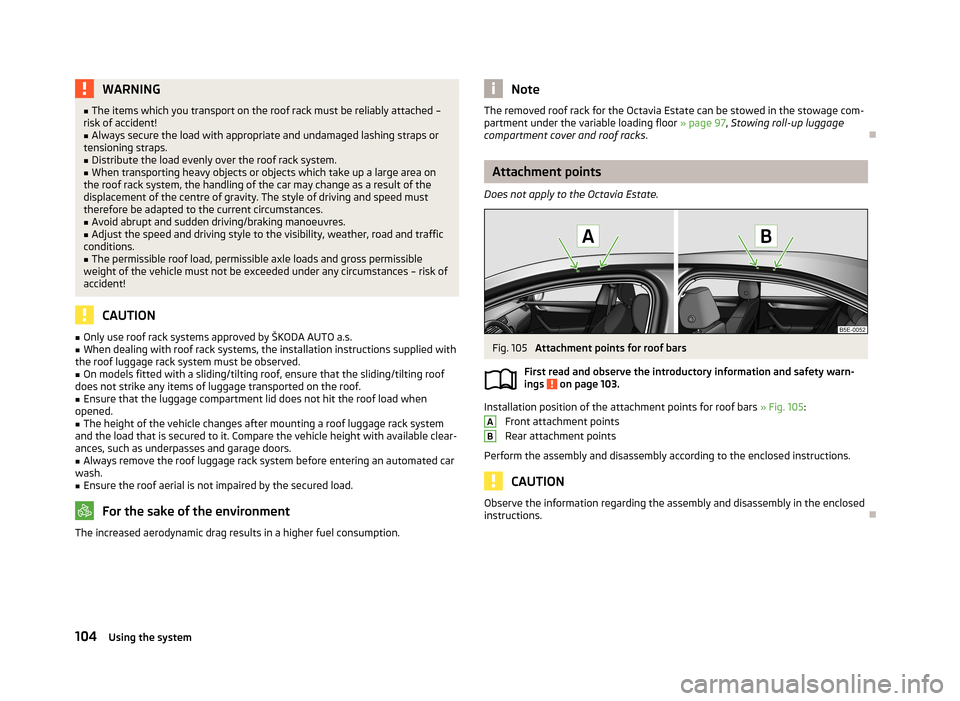
Fig. 105
Attachment points for roof bars
First read and observe the introductory information and safety warn- ings
on page 103.
Installation position of the attachment points for roof bars » Fig. 105:
Front attachment points
Rear attachment points
Perform the assembly and disassembly according to the enclosed instructions.
CAUTION
Observe the information regarding the assembly and disassembly in the enclosed
instructions.
AB104Using the system
Page 108 of 287
Roof loadFirst read and observe the introductory information and safety warn-
ings
on page 103.
The maximum permissible roof load (including roof rack system) of 75 kg and the
maximum permissible total weight of the vehicle should not be exceeded.
The full permissible roof load cannot be used if a roof rack system with a lower
load carrying capacity is used. In this case, the roof rack system must only be loa-
ded up to the maximum weight limit specified in the fitting instructions.
105Seats and useful equipment
Page 137 of 287
Avoiding unnecessary ballastFirst read and observe the introductory information and safety warn-
ings
on page 131.
Transporting ballast costs fuel.
Each kilogramme of weight increases the fuel consumption. Therefore, we rec-
ommend to carry no unnecessary weight.
It is particularly in town traffic, when one is accelerating quite often, that the ve-
hicle weight will have a significant effect upon the fuel consumption. A rule of
thumb here is that an increase in weight of 100 kilograms will cause an increase
in fuel consumption of about 1 litre/100 kilometres.
At a speed of 100 - 120 km/h, a vehicle fitted with a roof rack cross member with-
out a load will use about 10 % more fuel than normal due to the increased aero-
dynamic drag.
Regular maintenance
First read and observe the introductory information and safety warn-
ings
on page 131.
A poorly tuned engine uses an unnecessarily high amount of fuel.
By having your vehicle regularly maintained by a specialist garage, you create the conditions needed for economical driving. The maintenance state of your vehicle has a positive effect on traffic safety and value retention.
A poorly tuned engine can result in a fuel consumption which is 10 % higher thannormal!
Check the oil at regular intervals, e.g. when filling up. Oil consumption is depend-
ent to a considerable extent on the load and speed of the engine. Oil consump-
tion could be as high as 0.5 litres/1000 km depending on your style of driving.
It is quite normal that a new engine has a higher oil consumption at first, and rea- ches its lowest level only after a certain running in time. The oil consumption of anew vehicle can therefore only be correctly assessed after driving about 5000 km.
For the sake of the environment■ Additional improvements to the fuel economy can be made by using synthetic
high-lubricity oils.■
Regularly check the ground under the vehicle. Have your vehicle inspected by a
specialist garage if you find any stains caused by oil or other fluids on the ground.
Note
We recommend that your vehicle be serviced on a regular basis by a ŠKODA serv- ice partner.
Saving electrical energy
First read and observe the introductory information and safety warn-ings
on page 131.
When the engine is running, the alternator generates and supplies electrical pow- er. If more electrical components of the electrical system are switched on, more
fuel is needed to operate the alternator. We therefore recommend switching off
electrical components if these are no longer required.
Environmental compatibility
First read and observe the introductory information and safety warn-ings
on page 131.
Environmental protection has played a major role in the design, selection of mate-
rials, and manufacture of your new ŠKODA. Particular emphasis has been placed
on the following points.
Design measures › Joints designed to be easily detached.
› Simplified disassembly due to the modular structure system.
› Improved purity of different classes of materials.
› Identification of all plastic parts in accordance with VDA Recommendation 260.
› Reduced fuel consumption and exhaust emission CO
2.
› Minimum fuel leakage during accidents.
› Reduced noise.
134Driving
Page 207 of 287
The longer insect residues, bird droppings, tree sap, road and industrial dust, tar,
soot particles, road salt and other aggressive deposits remain adhering to the
paintwork of your vehicle, the more detrimental their destructive effect can be.
High temperatures, such as those caused by intensive sun's rays, accentuate this
caustic effect.
It is essential to also thoroughly clean the underside of the vehicle at the end of
the winter.WARNING■ When washing your vehicle in the winter: Water and ice in the braking sys-
tem can affect the braking efficiency – risk of accident!■
Only wash the vehicle when the ignition is switched off – risk of accident!
CAUTION
Do not wash your vehicle in bright sunlight – risk of paint damage.
For the sake of the environment
Only wash the vehicle at washing bays intended for this purpose.
Washing by hand
First read and observe the introductory information and safety warn-
ings
on page 203.
Soak the dirt with plenty of water and rinse as well as possible.
Clean the vehicle with a soft sponge, a washing glove or a washing brush . Work
from the top to the bottom – starting with the roof.
Only use a car shampoo for stubborn dirt.
Wash out the sponge or washing glove thoroughly at short intervals.
Clean wheels, door sills and similar parts last. Use a second sponge for such
areas.
Give the vehicle a good rinse after washing it and dry it off using a chamois leath- er.
CAUTION■ When washing the car by hand, protect your hands and arms from sharp-edged
metal parts (e.g. when cleaning the underfloor, the inside of the wheel housings
or the wheel trims, etc.) - There is a risk of cuts!■
Only apply slight pressure when cleaning the vehicle's paintwork.
Automatic car wash systems
First read and observe the introductory information and safety warn-
ings
on page 203.
The usual precautionary measures must be taken before washing the vehicle in
an automatic car wash system (e.g. closing the windows and the sliding/tilting
roof etc.).
If your vehicle is fitted with any particular attached parts, such as a spoiler, roof
rack system, two-way radio aerial etc., it is best to consult the operator of the car
wash system beforehand.
After an automatic wash with wax treatment, the lips of the wipers should be cleaned with cleaning agents specially designed for the purpose, and then de-
greased.
WARNINGFold in the exterior mirrors to prevent damage before washing the vehicle in
an automatic car wash system. Never manually fold in electric exterior mirrors
- always use the electric controls.
Washing with a high-pressure cleaner
First read and observe the introductory information and safety warn-
ings
on page 203.
When washing the vehicle with a high-pressure cleaner, the instructions for use
of the equipment must be observed. This applies in particular to the pressure
used and to the spraying distance .
Maintain a sufficiently large distance to the parking aid sensors and soft materials
such as rubber hoses or insulation material.
204General Maintenance