bonnet SKODA OCTAVIA 2013 3.G / (5E) Owner's Manual
[x] Cancel search | Manufacturer: SKODA, Model Year: 2013, Model line: OCTAVIA, Model: SKODA OCTAVIA 2013 3.G / (5E)Pages: 287, PDF Size: 18.55 MB
Page 12 of 287
Using the system
Cockpit
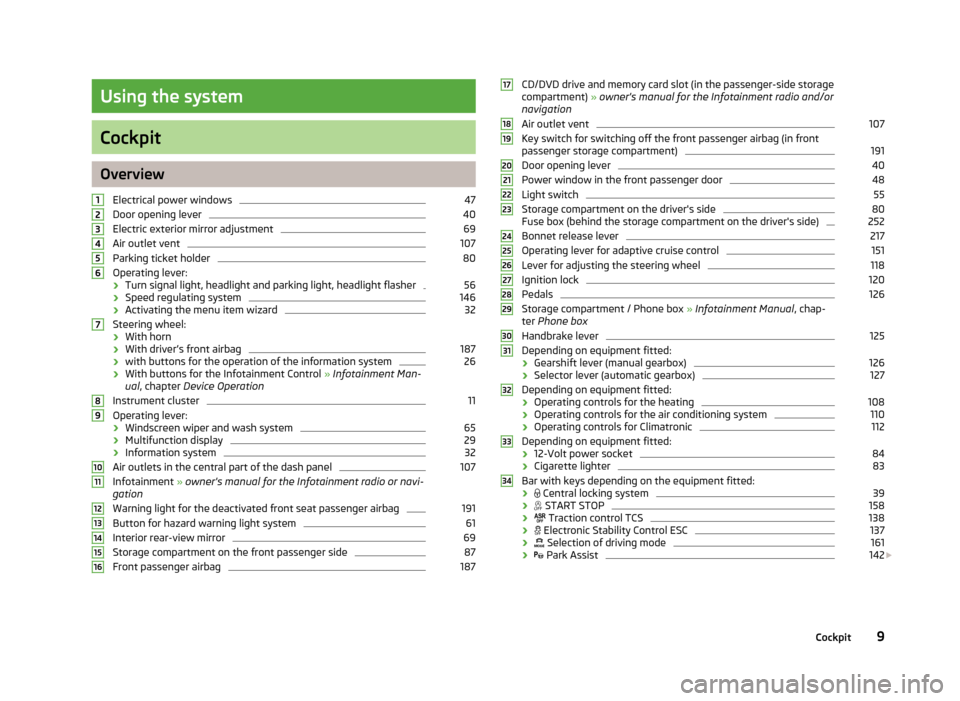
OverviewElectrical power windows
47
Door opening lever
40
Electric exterior mirror adjustment
69
Air outlet vent
107
Parking ticket holder
80
Operating lever:
› Turn signal light, headlight and parking light, headlight flasher
56
›
Speed regulating system
146
›Activating the menu item wizard
32
Steering wheel:
› With horn
› With driver’s front airbag
187
›
with buttons for the operation of the information system
26
›With buttons for the Infotainment Control
» Infotainment Man-
ual , chapter Device Operation
Instrument cluster
11
Operating lever:
› Windscreen wiper and wash system
65
›Multifunction display
29
›
Information system
32
Air outlets in the central part of the dash panel
107
Infotainment
» owner's manual for the Infotainment radio or navi-
gation
Warning light for the deactivated front seat passenger airbag
191
Button for hazard warning light system
61
Interior rear-view mirror
69
Storage compartment on the front passenger side
87
Front passenger airbag
18712345678910111213141516CD/DVD drive and memory card slot (in the passenger-side storage compartment) » owner's manual for the Infotainment radio and/or
navigation
Air outlet vent107
Key switch for switching off the front passenger airbag (in front passenger storage compartment)
191
Door opening lever
40
Power window in the front passenger door
48
Light switch
55
Storage compartment on the driver's side
80
Fuse box (behind the storage compartment on the driver's side)
252
Bonnet release lever
217
Operating lever for adaptive cruise control
151
Lever for adjusting the steering wheel
118
Ignition lock
120
Pedals
126
Storage compartment / Phone box » Infotainment Manual , chap-
ter Phone box
Handbrake lever
125
Depending on equipment fitted:
› Gearshift lever (manual gearbox)
126
›
Selector lever (automatic gearbox)
127
Depending on equipment fitted:
› Operating controls for the heating
108
›
Operating controls for the air conditioning system
110
›Operating controls for Climatronic
112
Depending on equipment fitted:
› 12-Volt power socket
84
›
Cigarette lighter
83
Bar with keys depending on the equipment fitted:
›
Central locking system
39
›
START STOP
158
›
Traction control TCS
138
›
Electronic Stability Control ESC
137
›
Selection of driving mode
161
›
Park Assist
142
1718192021222324252627282930313233349Cockpit
Page 26 of 287
WARNING■If you have to stop for technical reasons, then park the vehicle at a safe dis-
tance from the traffic, switch off the engine and switch on the hazard warning lights » page 61 . The warning triangle must be set up at the prescribed dis-
tance - observe the national legal provisions when doing so.■
Carefully open the coolant expansion bottle. If the engine is hot, the cooling
system is pressurized – risk of scalding! It is therefore best to allow the engine
to cool down before removing the cap.
■
Do not touch the radiator fan. The radiator fan may switch itself on auto-
matically even if the ignition is off.
Engine oil pressure
First read and observe the introductory information and safety warn-
ings
on page 21.
When the warning icon
flashes, the engine oil pressure is too low.
The following message is shown in the information cluster display. Oil pressure: Stop! Owner's manual!
STOP VEHICLE OIL PRESSURE
Stop the vehicle, switch off the engine, and check the level of the engine
oil » page 220 , Checking the oil level .
Even if the oil level is correct, do not drive any further if the warning icon
is
flashing! Also do not leave the engine running at an idling speed.
Seek help from a specialist garage.
WARNINGIf you have to stop for technical reasons, then park the vehicle at a safe dis-
tance from the traffic, switch off the engine and switch on the hazard warning
lights » page 61 . The warning triangle must be set up at the prescribed dis-
tance - observe the national legal provisions when doing so.
Engine oil level
First read and observe the introductory information and safety warn-
ings
on page 21.
Engine oil level too low
If the warning icons and are lit , the engine oil level is too low.
The following message is shown in the information cluster display. Oil level: top up oil!
TOP UP OIL
Stop the vehicle, switch off the engine, and check the level of the engine
oil » page 220 .
The warning icon will go out if the bonnet is left open for more than 30 seconds.
If no engine oil has been replenished, the warning icon will come on again after
driving about 100 km.
Engine oil level too high
If the warning icons
and
are lit in conjunction with the following message on
the display, the engine oil level is too high.
Reduce oil level!
OIL LEVEL TOO HIGH
Stop the vehicle, switch off the engine, and check the level of the engine
oil » page 220 .
Engine oil level sensor
If the warning icons
and
are lit in conjunction with the following message on
the display, the engine oil level sensor is defective.
Oil sensor: workshop!
OIL SENSOR WORKSHOP
Seek assistance from a specialist garage immediately.
23Instruments and warning lights
Page 29 of 287
Information system
Driver information system
Introduction
This chapter contains information on the following subjects:
Using the information system
26
Outside temperature
27
Gear recommendation
27
Door, luggage compartment or bonnet warning
28
Eco tips
28
Compass point display
28
The information system provides the driver with alerts and messages about in-
dividual vehicle systems. These alerts and messages appear in the instrument
cluster display
2
» Fig. 2 on page 11 (hereafter only in the display).
The information system provides the following information. › Outside temperature
» page 27.
› Recommended gear
» page 27.
›Door, boot lid and bonnet warning
» page 28.
› Eco tips
» page 28 .
› Compass display
» page 28.
› Driving data (multifunction display)
» page 29.
› Warning against excessive speeds
» page 31.
› Data relating to the Maxi DOT display
» page 32.
› To the lap timer function (stopwatch)
» page 32 .
› Service interval display
» page 33.
› Auto Check Control
» page 14.
› Warning icons
» page 21.
› Traffic sign recognition
» page 166.
› Fatigue detection
» page 168.
› Selector lever positions for an automatic gearbox
» page 127.
› Information and alerts in the Assist systems
» page 137.WARNINGConcentrate fully at all times on your driving! As the driver, you are fully re-
sponsible for the operation of your vehicle.
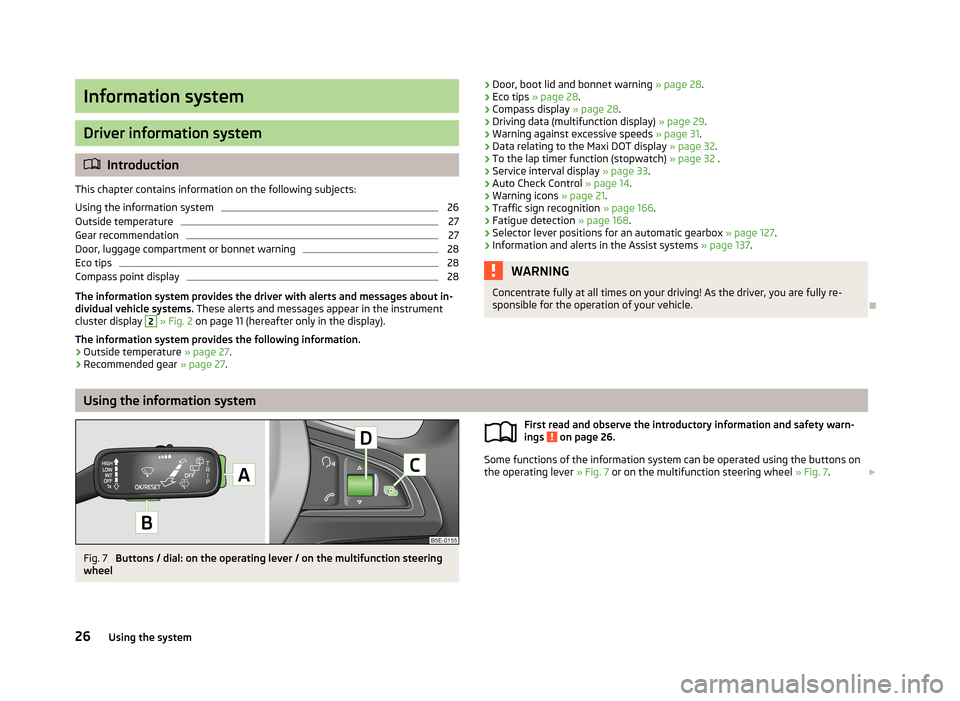
Using the information system
Fig. 7
Buttons / dial: on the operating lever / on the multifunction steering
wheel
First read and observe the introductory information and safety warn-
ings on page 26.
Some functions of the information system can be operated using the buttons on
the operating lever » Fig. 7 or on the multifunction steering wheel » Fig. 7.
26Using the system
Page 31 of 287
When the system determines that a change in gear is required, the arrow symboland the recommended gear appear next to the current gear indication » Fig. 8 -
.
For instance, if appears in this display, this means it is recommended that
you shift from 4th into 5th gear.
The gear recommendation is intended only for vehicles with a manual transmis-
sion or for vehicles with an automatic transmission in manual shift mode (Tiptron-
ic).WARNINGThe driver is always responsible for selecting the correct gear in different driv- ing situations, such as overtaking.
For the sake of the environment
Correct shifting up has the following advantages.■It helps to reduce fuel consumption.■
It reduces the operating noise.
■
It protects the environment.
■
It benefits the durability and reliability of the engine.
Door, luggage compartment or bonnet warning
First read and observe the introductory information and safety warn-ings
on page 26.
If at least one door is open, or the boot or bonnet is open, the display indicates
the relevant open door or boot/bonnet.
An acoustic signal will also sound if you drive the vehicle above 6 km/h when a
door is opne.
Eco tips
First read and observe the introductory information and safety warn-ings
on page 26.
To minimise fuel consumption, fuel economy tips can appear in the display 1)
.
Eco tips are indicated next to the letters ECO-TIP.
For instance, if the air-condition is on and a window is open, the following mes- sage appears ECO TIP Air conditioning switched on: close windows.
Eco tips display must be activated in the Infotainment » operating instructions for
Infotainment , chapter Vehicle settings (CAR button) .
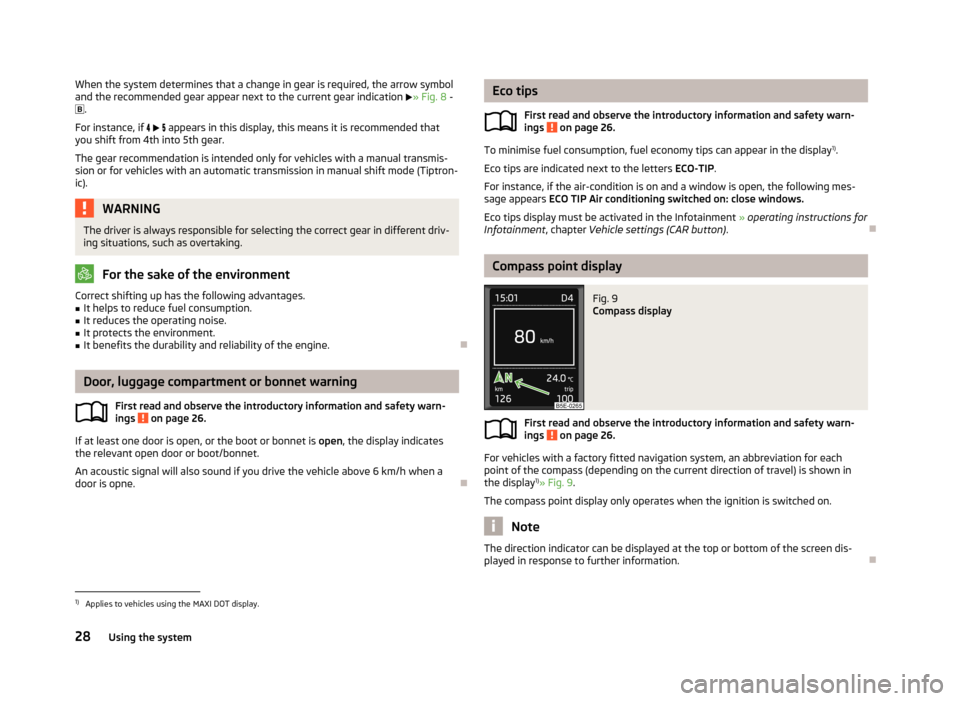
Compass point display
Fig. 9
Compass display
First read and observe the introductory information and safety warn-
ings on page 26.
For vehicles with a factory fitted navigation system, an abbreviation for each
point of the compass (depending on the current direction of travel) is shown in the display 1)
» Fig. 9 .
The compass point display only operates when the ignition is switched on.
Note
The direction indicator can be displayed at the top or bottom of the screen dis-
played in response to further information.
1)
Applies to vehicles using the MAXI DOT display.
28Using the system
Page 37 of 287
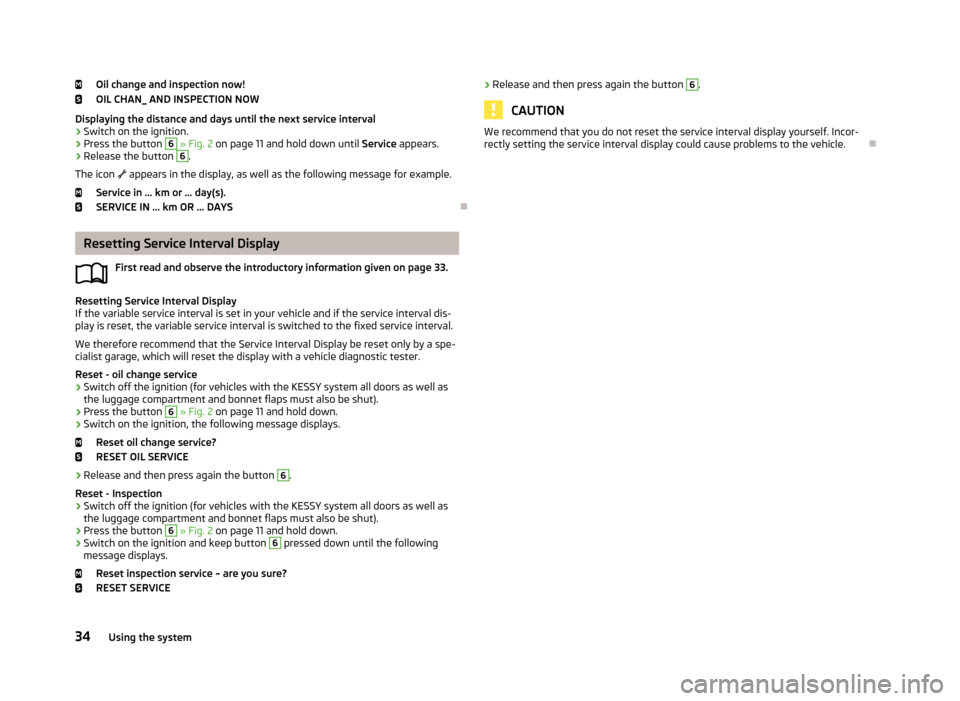
Oil change and inspection now!
OIL CHAN_ AND INSPECTION NOW
Displaying the distance and days until the next service interval
› Switch on the ignition.
› Press the button 6
» Fig. 2 on page 11 and hold down until Service appears.
› Release the button
6
.
The icon appears in the display, as well as the following message for example.
Service in … km or … day(s). SERVICE IN … km OR … DAYS
Resetting Service Interval Display
First read and observe the introductory information given on page 33.
Resetting Service Interval Display
If the variable service interval is set in your vehicle and if the service interval dis- play is reset, the variable service interval is switched to the fixed service interval.
We therefore recommend that the Service Interval Display be reset only by a spe-
cialist garage, which will reset the display with a vehicle diagnostic tester.
Reset - oil change service
› Switch off the ignition (for vehicles with the KESSY system all doors as well as
the luggage compartment and bonnet flaps must also be shut).
› Press the button
6
» Fig. 2 on page 11 and hold down.
› Switch on the ignition, the following message displays.
Reset oil change service?
RESET OIL SERVICE
› Release and then press again the button
6
.
Reset - Inspection
› Switch off the ignition (for vehicles with the KESSY system all doors as well as
the luggage compartment and bonnet flaps must also be shut).
› Press the button
6
» Fig. 2 on page 11 and hold down.
› Switch on the ignition and keep button
6
pressed down until the following
message displays.
Reset inspection service – are you sure?
RESET SERVICE
›
Release and then press again the button 6.
CAUTION
We recommend that you do not reset the service interval display yourself. Incor-
rectly setting the service interval display could cause problems to the vehicle.
34Using the system
Page 45 of 287
Activation after 90 hours›Unlock the vehicle using the symbol button on the remote control key.›
Unlocking the driver's door in an emergency » page 248.
Anti-theft alarm system
Introduction
This chapter contains information on the following subjects:
Activating/deactivating
42
Interior monitor and towing protection
43
The anti-theft alarm system increases the level of protection against people
seeking to break into the vehicle. The system triggers audible and visual warning
signals if an attempt is made to break into the vehicle (hereafter referred to only
as alarm).
An alarm is triggered when the following monitored areas of the vehicle have a
fault.
› Bonnet.
› Boot lid.
› Doors.
› Ignition lock.
› Vehicle inclination
» page 43.
› Interior of car
» page 43.
› A drop in voltage of the on-board power supply.
› Socket of the factory-fitted towing device
» page 173, Driving with a trailer .
An alarm is immediately triggered if either of the two battery terminals is discon-
nected while the anti-theft alarm system is activated.
The alarm is switched off by unlocking the vehicle or switching on the ignition.
CAUTION
Before leaving the vehicle, it must be checked that all of the windows, doors and
the sliding/tilting roof are locked in order to ensure the full functionality of the
anti-theft alarm system.
Note
The working life of the alarm siren is 5 years.
Activating/deactivating
First read and observe the introductory information and safety warn-ings
on page 42.
Activating
The anti-theft alarm system is activated automatically approximately 30 seconds
after the vehicle is locked.
If you unlock the vehicle and do not open a door or the boot lid within the next
45 seconds, the vehicle will lock again automatically and the safelock system or
anti-theft alarm system will be switched on. This function is intended to prevent
the car being unlocked unintentionally.
Deactivating
The anti-theft alarm system is deactivated automatically after the vehicle is un-
locked. If the vehicle is not opened within 45 seconds, the anti-theft alarm sys-
tem is automatically activated again.
The alarm system is also deactivated if you unlock the driver door using the key
within 45 seconds of locking the vehicle.
Note
When the Vehicle is unlocked using the key on the driver's door, insert the key
into the ignition and switch on the ignition in order to deactivate the alarm sys-
tem.
42Using the system
Page 68 of 287
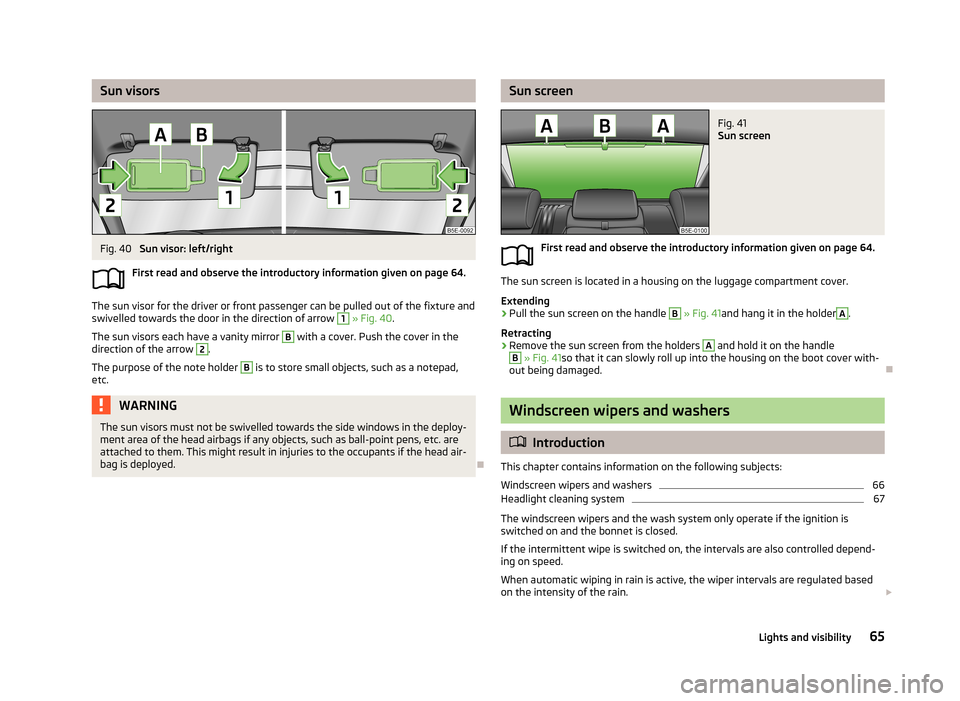
Sun visorsFig. 40
Sun visor: left/right
First read and observe the introductory information given on page 64.
The sun visor for the driver or front passenger can be pulled out of the fixture and
swivelled towards the door in the direction of arrow
1
» Fig. 40 .
The sun visors each have a vanity mirror
B
with a cover. Push the cover in the
direction of the arrow
2
.
The purpose of the note holder
B
is to store small objects, such as a notepad,
etc.
WARNINGThe sun visors must not be swivelled towards the side windows in the deploy-
ment area of the head airbags if any objects, such as ball-point pens, etc. are attached to them. This might result in injuries to the occupants if the head air-
bag is deployed.
Sun screenFig. 41
Sun screen
First read and observe the introductory information given on page 64.
The sun screen is located in a housing on the luggage compartment cover.
Extending
›
Pull the sun screen on the handle
B
» Fig. 41 and hang it in the holder
A
.
Retracting
›
Remove the sun screen from the holders
A
and hold it on the handle
B
» Fig. 41 so that it can slowly roll up into the housing on the boot cover with-
out being damaged.
Windscreen wipers and washers
Introduction
This chapter contains information on the following subjects:
Windscreen wipers and washers
66
Headlight cleaning system
67
The windscreen wipers and the wash system only operate if the ignition is
switched on and the bonnet is closed.
If the intermittent wipe is switched on, the intervals are also controlled depend-
ing on speed.
When automatic wiping in rain is active, the wiper intervals are regulated based
on the intensity of the rain.
65Lights and visibility
Page 69 of 287
The rear window is wiped once automatically if the windscreen wipers are onwhen reverse gear is selected.
Automatic rear window wiping can be activated or deactivated in the Infotain-
ment » Operating instructions for Infotainment , chapter Vehicle settings (CAR
button) .
Top up with windscreen wiper fluid » page 218.WARNING■
Properly maintained windscreen wiper blades are essential for clear visibility
and safe driving » page 250.■
Replace the windscreen wiper blades once or twice a year for safety rea-
sons. These can be purchased from a ŠKODA Partner.
■
Do not use the windscreen washer system at low temperatures, without
heating the windscreen beforehand. Otherwise the window cleaner could
freeze on the windscreen and restrict the view to the front.
■
Automatic wiping in rain only operates as a support. The driver is not re-
leased from the responsibility to set the function of the windscreen wipers
manually depending on the visibility conditions.
CAUTION
■ In cold temperatures and during the winter, check before the journey or before
switching on the ignition that the wiper blades are not frozen to the windscreen. If the windscreen wipers are switched on when the blades are frozen to the
windscreen, this may damage both the blades and windscreen wiper motor!■
If the ignition is switched off while the windscreen wipers are switched on, the
windscreen wipers will continue wiping in the same mode after the ignition is
turned back on. The windscreen wipers could freeze up in cold temperatures be- tween the time the ignition was turned off and when it was turned back on again.
■
Carefully detach frozen wiper blades from the front or rear window.
■
Remove snow and ice from the windscreen wipers before driving.
■
If the windscreen wipers are handled carelessly, there is a risk of damage to the
windscreen.
■
Do not switch on the ignition if the front wiper arms are retracted. The wiper
blades would move back into their rest position and while doing so damage the
paintwork of the bonnet.
■
If there is an obstacle on the windscreen, the wiper will try to push away the
obstacle. The wiper stops automatically after 5 attempts to eliminate the obsta-
cle, in order to avoid a damage to the wiper. Remove the the obstacle and switch
the wiper on again.
Note■ Each time the ignition switches off for the third time, the position of the wind-
screen wipers changes. This counteracts an early fatigue of the wiper rubbers.■
The rear window wiper only operates if the boot lid is closed.
■
Keep the wiper blades clean. They may become soiled, e.g., with wax residues
after washing in automatic car wash systems » page 204.
■
The windscreen washer nozzles for the windscreen are heated when the en-
gine is running and the outside temperature is less than approx. +10 °C.
Windscreen wipers and washers
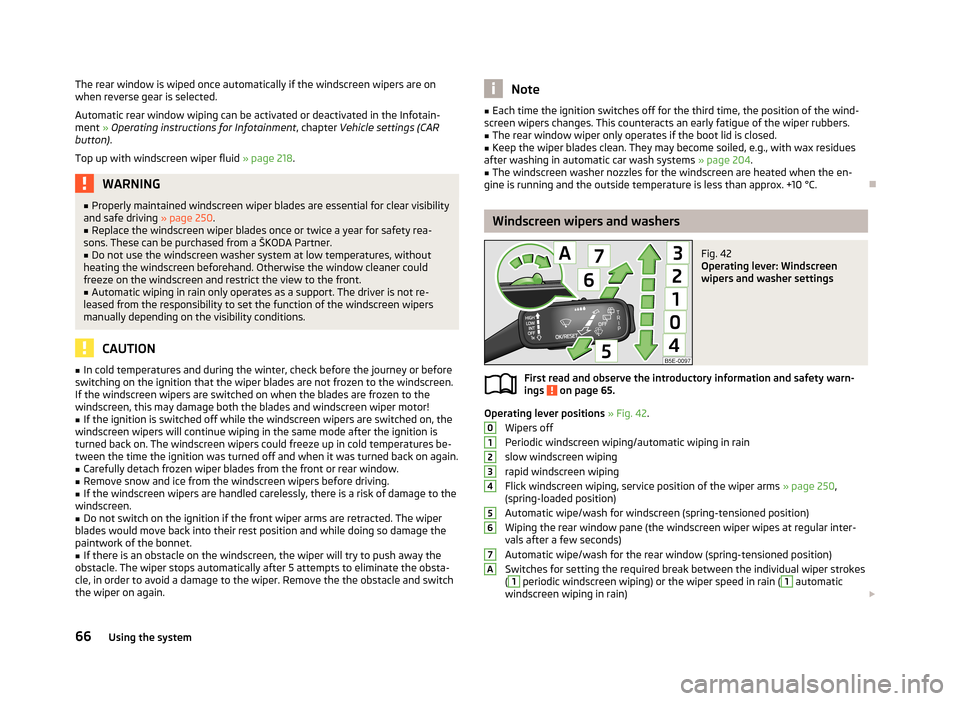
Fig. 42
Operating lever: Windscreen
wipers and washer settings
First read and observe the introductory information and safety warn-
ings on page 65.
Operating lever positions » Fig. 42 .
Wipers off
Periodic windscreen wiping/automatic wiping in rain
slow windscreen wiping
rapid windscreen wiping
Flick windscreen wiping, service position of the wiper arms » page 250,
(spring-loaded position)
Automatic wipe/wash for windscreen (spring-tensioned position)
Wiping the rear window pane (the windscreen wiper wipes at regular inter- vals after a few seconds)
Automatic wipe/wash for the rear window (spring-tensioned position)
Switches for setting the required break between the individual wiper strokes
(
1
periodic windscreen wiping) or the wiper speed in rain (
1
automatic
windscreen wiping in rain)
01234567A66Using the system
Page 161 of 287
The emergency brake function is automatically activated or deactivated togetherwith the Front Assist system.
If the emergency brake function triggers an automatic brake action, the display of
the instrument cluster shows the symbol » Fig. 142 on page 156 - .WARNINGThe emergency brake function can slow down the vehicle to a complete
standstill. If the vehicle continues to roll forward after stopping, then it should
be stopped with the footbrake.
CAUTION
Automatic braking interventions by the emergency brake function can be termi-
nated by pressing the clutch or the accelerator, or by moving the steering wheel.
Note
If an automatic brake intervention is triggered by the emergency brake function,
the pressure in the brake system increases and the brake pedal cannot be oper-
ated with the normal pedal stroke.
Information messages
First read and observe the introductory information and safety warn-
ings
on page 154.
The messages and information are indicated in the instrument cluster display.
Front Assist: no sensor view.
The sensor is dirty or has no “visibility”. Stop the car, switch off the engine and clean the sensor or remove the obstacle causing the lack of “visibility” » Fig. 135
on page 149 . If the message appears again after starting the engine, the system
should be disabled » page 157. Seek help from a specialist garage.
Front Assist not available.
Stop the vehicle, switch off the engine and then start it again. If the message ap-
pears again after starting the engine, the system should be disabled » page 157.
Seek help from a specialist garage.
START-STOP
Introduction
This chapter contains information on the following subjects:
Starting/shutting down the engine
159
Operating conditions of the system
160
Manually activating/deactivating the system
160
Information messages
161
The START-STOP system helps you to save fuel while at the same time reducing
harmful exhaust emissions and CO 2 emissions.
The function is automatically activated each time the ignition is switched on.
In the start-stop mode, the engine automatically switches to the vehicle's idle phase, e.g. when stopped at traffic lights. The engine restarts automatically
where necessary.
Information about the current status of the system can be displayed in the Info-
tainment display » operating instructions for Infotainment , chapter Vehicle set-
tings (CAR button) .
The system can work only if the following basic conditions are met. The driver's door is closed.
The driver has fastened the seat belt. The bonnet is closed.
The driving speed was higher than 4 km.h after the last stop.
No trailer is coupled.
WARNING■ The brake servo unit and power steering only operate if the engine is run-
ning.■
Never let the vehicle roll with the engine switched off.
CAUTION
Always deactivate the START-STOPsystem before driving through wa-
ter » page 135 . 158Driving
Page 218 of 287
CAUTION■Just filling the tank once with diesel fuel that does not comply with the stand-
ard, can cause severe damage to parts of the engine, the fuel and exhaust sys-
tem!■
If a different fuel other than diesel fuel, which complies to the above mentioned
standards (e.g. petrol) is used by mistake do not start the engine or switch on the
ignition! Extensive damage to engine parts can occur! We recommend that you
have the fuel system cleaned by a specialist garage.
■
Water which has collected in the fuel filter can cause engine faults.
CAUTION
■ Your vehicle cannot be operated with biofuel RME, therefore this fuel must not
be refuelled and driven. The use of biofuel RME can cause considerable damage
to parts of the engine or fuel system.■
Do not mix any fuel additives, so-called “flow improvers” (petrol and similar
agents) into the diesel. This can result in considerable damage to parts of the en-
gine or the exhaust system.
Engine compartment
Introduction
This chapter contains information on the following subjects:
Opening and closing the bonnet
217
Engine compartment overview
218
Radiator fan
218
Windscreen washer system
218WARNINGWhen working in the engine compartment, injuries, scolding, accident or fire
hazards may arise. For this reason, it is essential to comply with the warning
instructions stated below and with the general applicable rules of safety. The
engine compartment of your car is a hazardous area!WARNINGBefore beginning work in the engine compartment, please read the following
advice.■
Turn off the engine and withdraw the ignition key.
■
Firmly apply the handbrake.
■
If the vehicle is fitted with a manual gearbox, move the gearshift lever into
Neutral, or if the vehicle is fitted with an automatic gearbox, move the selec-
tor lever into position P.
■
Allow the engine to cool.
■
Never open the bonnet if you can see steam or coolant flowing out of the
engine compartment – risk of scalding! Wait until the steam or coolant has
stopped escaping.
WARNINGWhile working in the engine compartment, please read the following advice.■Keep children clear of the engine compartment.■
Never touch the radiator fan while the engine is still warm. The fan might
suddenly start running!
■
Do not touch any hot engine parts – risk of burns!
■
The coolant additive and thus all of the coolant is harmful to your health.
■
Avoid contact with the coolant.
■
Coolant vapours are harmful to health.
■
Never open the end cover of the coolant expansion reservoir while the en-
gine is still warm. The cooling system is pressurized!
■
When opening the end cover of the coolant expansion reservoir, cover it
with a cloth to protect your face, hands and arms from hot steam or hot cool-
ant.
■
If any coolant splashes into your eyes, immediately rinse out your eyes with
clear water and contact a doctor as soon as possible.
■
Always safely store the coolant additive in its original container out of the
reach of children – risk of poisoning!
■
If coolant is swallowed, consult a doctor immediately.
■
Do not leave any items (e.g. cloths or tools) in the engine compartment.
■
Never spill fluids on the hot engine. Such fluids (e.g. the antifreeze con-
tained in the coolant) may ignite!
215Inspecting and replenishing