key SKODA OCTAVIA 2013 3.G / (5E) Swing Car Radio Manual
[x] Cancel search | Manufacturer: SKODA, Model Year: 2013, Model line: OCTAVIA, Model: SKODA OCTAVIA 2013 3.G / (5E)Pages: 45, PDF Size: 2.93 MB
Page 5 of 45
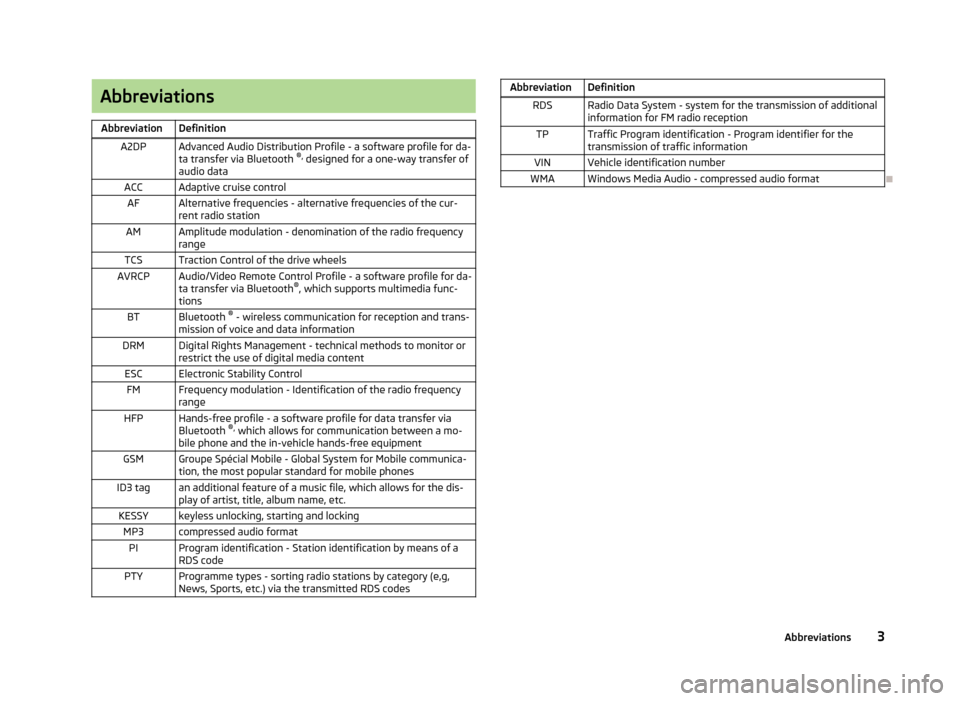
AbbreviationsAbbreviationDefinitionA2DPAdvanced Audio Distribution Profile - a software profile for da-ta transfer via Bluetooth ®,
designed for a one-way transfer of
audio dataACCAdaptive cruise controlAFAlternative frequencies - alternative frequencies of the cur-
rent radio stationAMAmplitude modulation - denomination of the radio frequency
rangeTCSTraction Control of the drive wheelsAVRCPAudio/Video Remote Control Profile - a software profile for da-
ta transfer via Bluetooth ®
, which supports multimedia func-
tionsBTBluetooth ®
- wireless communication for reception and trans-
mission of voice and data informationDRMDigital Rights Management - technical methods to monitor or restrict the use of digital media contentESCElectronic Stability ControlFMFrequency modulation - Identification of the radio frequencyrangeHFPHands-free profile - a software profile for data transfer via
Bluetooth ®,
which allows for communication between a mo-
bile phone and the in-vehicle hands-free equipmentGSMGroupe Spécial Mobile - Global System for Mobile communica-
tion, the most popular standard for mobile phonesID3 tagan additional feature of a music file, which allows for the dis- play of artist, title, album name, etc.KESSYkeyless unlocking, starting and lockingMP3compressed audio formatPIProgram identification - Station identification by means of a
RDS codePTYProgramme types - sorting radio stations by category (e,g,
News, Sports, etc.) via the transmitted RDS codesAbbreviationDefinitionRDSRadio Data System - system for the transmission of additional
information for FM radio receptionTPTraffic Program identification - Program identifier for the
transmission of traffic informationVINVehicle identification numberWMAWindows Media Audio - compressed audio format
3Abbreviations
Page 7 of 45
›impairment of control units, fitted at the factory or specialist workshop, follow-
ing installation in another vehicle (for example, after a theft);
› impairment of components operated outside of the vehicle;
› the possibility of a legitimate installation or change of control units for repairs
at a specialist garage.
When component protection is activated, the following message appears on the device display screen: Component theft protection - Restricted function. Switch
on ignition.
If the component protection does not activate by switching on the ignition,
please contact a specialist garage.
Description and operation of the device
Introduction
This chapter contains information on the following subjects:
Description of the device
5
Switching the unit on/off
6
Adjusting the volume
6
First and foremost, pay attention to the safety instructions » page 4 , Important
notes .
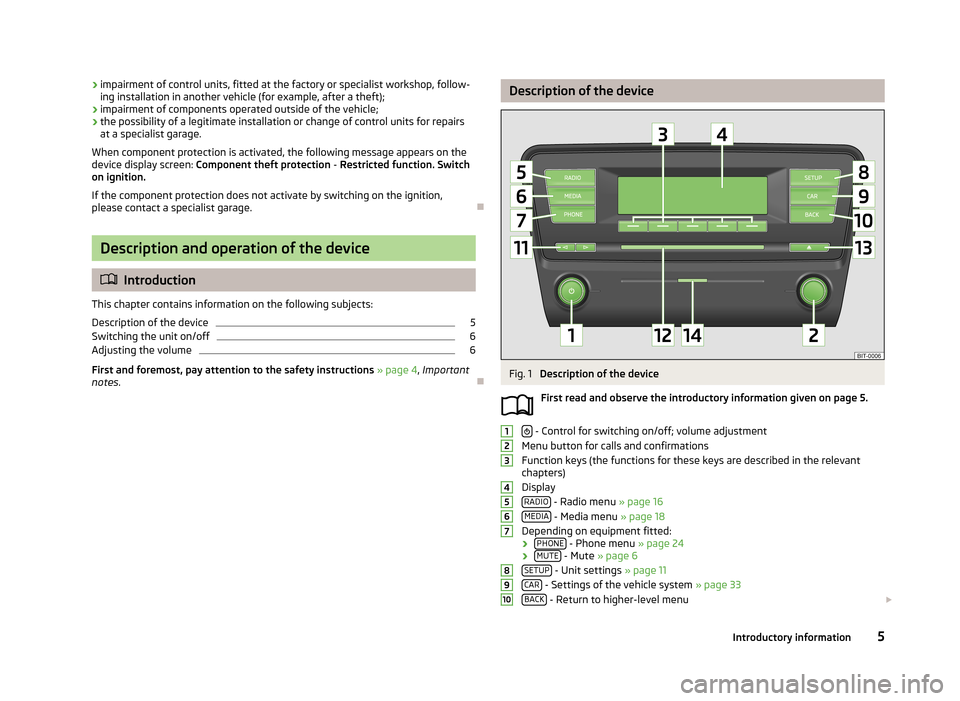
Description of the deviceFig. 1
Description of the device
First read and observe the introductory information given on page 5.
- Control for switching on/off; volume adjustment
Menu button for calls and confirmations
Function keys (the functions for these keys are described in the relevant
chapters)
Display RADIO
- Radio menu » page 16
MEDIA - Media menu » page 18
Depending on equipment fitted: › PHONE
- Phone menu
» page 24
› MUTE - Mute
» page 6
SETUP - Unit settings » page 11
CAR - Settings of the vehicle system » page 33
BACK - Return to higher-level menu
123456789105Introductory information
Page 8 of 45
- Backward and forward menu navigation (the key functions are descri-
bed in the relevant chapters)
CD slot
- Eject CD
SD memory card slot
Switching the unit on/off
First read and observe the introductory information given on page 5.
›
Press the knob to switch the device on or off.
When the device is switched on, the audio source and operating mode that were active before switching off the device will be restored.
If telephone mode was active before the device was switched off and if the igni-tion or the Bluetooth ®
function are not switched on, the following message is dis-
played: Please connect a mobile telephone. Switch on the ignition or the Blue-
tooth ®
function » page 13.
If the vehicle key is pulled out of the ignition lock while the unit is switched on, the unit will switch off automatically. After switching on the ignition, the unit is
turned on automatically.
If the device was switched off using the
knob, then the device will not switch
on automatically after switching on the ignition.
If your vehicle is fitted with the KESSY system, the device will switch off automat- ically after the engine has been turned off and the door opened.
When the ignition is switched off, the system switches off automatically after ap-
prox. half an hour (discharge protection of the vehicle battery).
Adjusting the volume
First read and observe the introductory information given on page 5.
Increase the volume
›
Turn the knob to the right.
11121314
Reduce the volume›Turn the
knob to the left.
Muting›
Press the MUTE button
or
›
Set the volume to 0 using the knob.
CAUTION
The car speakers may be damaged if the volume is set too loud or is distorted.
Note
■
The change in volume is displayed on the device display screen.■The following symbol appears in the display when the sound is muted : .■
Some connected sources allow the volume to be changed directly at the source.
■
Excessively high volumes can cause sound resonance in the vehicle.
■
The loudspeakers in the vehicle are designed for a power output of the device
of 4x20 W.
Unit operation
Introduction
This chapter contains information on the following subjects: Operate via the device display screen
7
Operate using the buttons on the operating lever
8
Operation via the buttons / wheels on the multifunction steering wheel -
Audio menu
8
Operation via the buttons / wheels on the multifunction steering wheel -
Telephone menu
10
First and foremost, pay attention to the safety instructions » page 4 , Important
notes .
Some of the device's features are also displayed in the MAXI DOT display 1)
. De-
pending on the equipment, these features can be operated as follows.
1)
The display in the MAXI DOT is described in the
» Manual , chapter Information system
6Introductory information
Page 9 of 45
■With the buttons on the operating lever » page 8
■ With the buttons and wheels on the multifunction steering wheel » page 8
Note
The buttons and wheels on the multifunction steering wheel will also be lit if the
ignition and the side light are switched on.
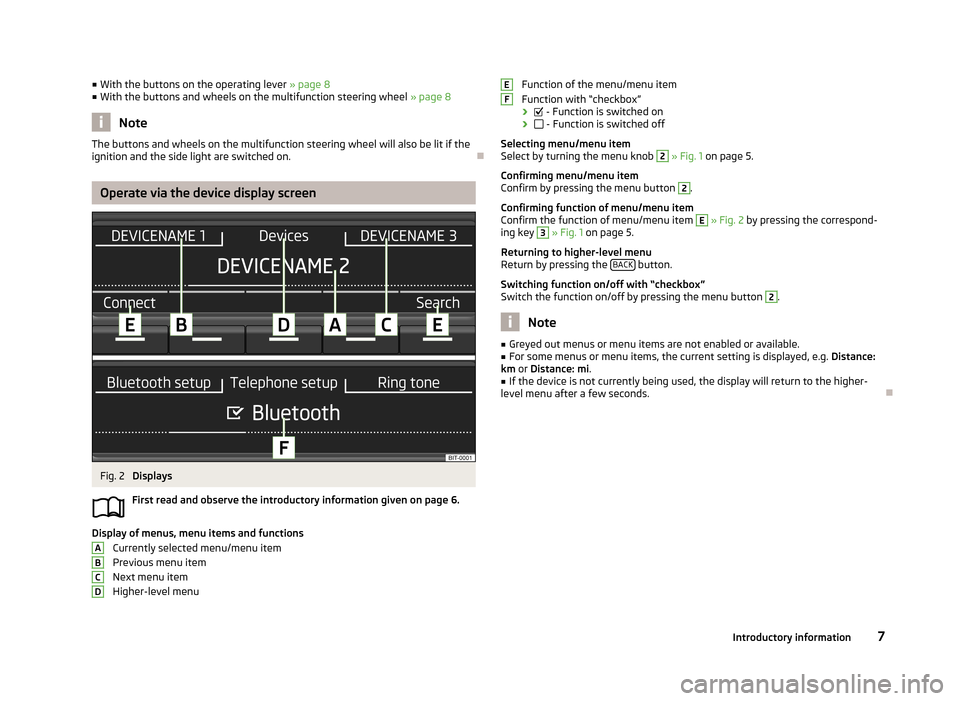
Operate via the device display screen
Fig. 2
Displays
First read and observe the introductory information given on page 6.
Display of menus, menu items and functions Currently selected menu/menu item
Previous menu item
Next menu item
Higher-level menu
ABCDFunction of the menu/menu item
Function with “checkbox”
›
- Function is switched on
›
- Function is switched off
Selecting menu/menu item
Select by turning the menu knob 2
» Fig. 1 on page 5.
Confirming menu/menu item
Confirm by pressing the menu button
2
.
Confirming function of menu/menu item
Confirm the function of menu/menu item
E
» Fig. 2 by pressing the correspond-
ing key
3
» Fig. 1 on page 5.
Returning to higher-level menu
Return by pressing the BACK
button.
Switching function on/off with “checkbox” Switch the function on/off by pressing the menu button
2
.
Note
■ Greyed out menus or menu items are not enabled or available.■For some menus or menu items, the current setting is displayed, e.g. Distance:
km or Distance: mi .■
If the device is not currently being used, the display will return to the higher-
level menu after a few seconds.
EF7Introductory information
Page 14 of 45
■Speed-dependent vol. adjustment - Speed-dependent volume increase
■ AUX volume - Sets playback volume via an external source
■ Quiet - Low volume
■ Medium - Medium volume
■ Loud - High volume
■ Bluetooth audio - Sets the playback volume via Bluetooth ®
■ Quiet - Low volume
■ Medium - Medium volume
■ Loud - High volume
Radio settings
First read and observe the introductory information given on page 11.
›
Press the button SETUP
→ Radio setup .
■ Radio text - Radio text display on/off
■ Alternative frequency (AF) - Search for alternative frequencies of the station
currently being listened to on/off
■ Arrow keys - Sets the station selection function in RADIO mode
■ Station list - Switches all stations currently in range for the selected fre-
quency band
■ Preset list - Switches only stored stations in the selected frequency band
■ RDS regional - Switches the automatic tracking of related regional stations on/
off ■ Fixed - The selected regional station is kept permanently (another regional
station must be set manually if signal is lost)
■ Automatic - Automatic tracking of regional stations (the device will automati-
cally switch to another available regional station if reception is lost in the re-
gion in question)
■ PTY filter - Selects radio stations by programme type
■ Off - Switches off
■ News - News
■ Music - Music
■ Sport - Sports
■ Culture - Culture
■ Special - Other
■
Station list sort - Sorts the sorted stations
■ Default - by the programme identification (PI code)
■ A-Z - In alphabetical order and also based on the frequency number (if the sta-
tion name changes during the programme, it can be displayed just at the end
of the list)
■ Name of station - Displays the station name
■ Variable - Allows changes to the station name
■ Fixed - The station name is fixed (for the A-Z listing)
■ Delete presets - Deletes the stored stations
Note
■
The Radio Data System (RDS) is used to transfer additional information. The
RDS enables program identification, program type identification (PTY), the recep-
tion of traffic reports (TP) or automatic station tracking, for example. If there is
sufficient reception, RDS-compatible radio stations will be displayed by station
name rather than station frequency.■
The Alternative frequency (AF) function ensures that the best receivable fre-
quency for the selected station is set automatically.
■
The device may not be fully functional in countries where RDS is not adequately
supported. We therefore recommend switching off the RDS regional setting as
well as the Alternative frequency (AF) setting, f applicable. Otherwise, these set-
tings can affect the functionality of the radio.
Media settings
First read and observe the introductory information given on page 11.
›
Press the button SETUP
→ Media .
■ Activate AUX - Switches activation of AUX input on/off
■ Mix/Repeat including subfolders - Switches on/off playback of the tracks in Mix
and Repeat modes including subfolders
■ Display ID3 tags - Switches on/off display of the artist, album and track name in
the device display screen 1)
■ Bluetooth audio - Switches on/off activation of the external audio source via
Bluetooth ®
1)
Regardless of the setting, the ID3 tag is always displayed in the Audio menu in the MAXI DOT display.
12Introductory information
Page 16 of 45
■Language - Set the unit language 1)
■ Time/date - Time and date settings
■ Time - Time settings
■ Date - Date settings
■ Summer (DST) - Switches summer time adjustment on/off
■ Time format - Sets the time format
■ 24h
■ 12h
■ Date format - sets up the date format
■ DD.MM.YYYY - Day - Month - Year
■ YYYY-MM-DD - Year - Month - Day
■ MM.DD.YYYY - Month - Day - Year
■ Units - Unit settings
■ Distance - Distance units
■ km - Kilometres
■ mi - Miles
■ Temperature - Temperature units
■ °C - Degrees Celsius
■ °F - Degrees Fahrenheit
■ Volume - Volume units
■ l - Litres
■ gall. (UK) - Gallons (UK)
■ gall. (US) - Gallons (US)
■ Speed - Speedunits
■ km/h - Kilometres per hour
■ mph - Miles per hour
■ Consumption - Consumption units
■ l/100km - Litres per 100 kilometres
■ km/l - Kilometres per litre
■ mpg (US) - Miles per gallon (US)
■ mpg (UK) - Miles per gallon (UK)
■ Gas consumption - Gas consumption units
■ kg/100km - Kilograms per 100 km
■ km/kg - Kilometres per kilogram
■ Bluetooth - Activating/deactivating Bluetooth ®■
Display - screen setting
■ Brightness - Adjusts the brightness of the screen
■ Brightest - brightest level
■ Brighter - brighter level
■ Medium - medium level
■ Darker - darker level
■ Darkest - darkest level
■ Clock in standby mode - Time display on the screen when the ignition is
switched on and the device switched off
■ Remove SD card safely - Safe removal of the SD memory card 2)
■ Remove USB device safely - Safe removal of USB device 3)
■ Factory settings - Restore to factory settings
■ All - All doors
■ Sound - Sound setup
■ Radio setup - Radio settings
■ Vehicle - Vehicle system settings
■ Telephone - Phone settings
■ Media - Media settings
■ System - System settings
■ Driving profile - Choice of driving mode
■ Display off - Activates/deactivates the screen's power-saving mode, where the
screen is black (the screen can be switched on again by pressing any key)
■ System information - Displays system information
■ Software update - Updates the Bluetooth ®
firmware » page 15
■ Versions data - Displays version information
■ Bluetooth software: ... - Version of the Bluetooth ®
firmware
■ Device part number: ... - Part number of the unit
■ Hardware: ... - Version of the hardware used
■ Software version: ... - Version of the software used
■ Copyright - Information on licences and copyrights used1)
The correct display of country-specific characters (e.g. ID3 tag information) can not always be guaran-
teed.
2)
If a sound is currently played from the SD memory card, this function is not active.
3)
If a sound is currently played from the USB data carrier, this function is not active.
14Introductory information
Page 18 of 45
Audio
Radio
Introduction
This chapter contains information on the following subjects:
Main menu
16
Find and store radio station
16
Select frequency band and radio station
17
Switching traffic programme TP on/off
18
First and foremost, pay attention to the safety instructions » page 4 , Important
notes .
The device allows reception of radio stations in from FM or AM frequency ranges
as well as additional information from RDS broadcasts in the FM range.
Main menu
First read and observe the introductory information given on page 16.
Accessing radio mode in main menu
›
Press the RADIO button.
The most recently tuned radio station plays.
Symbols in the display
SymbolMeaningSound is mutedTraffic information station Station without traffic information , , , Currently selected frequency band and memory group a)Radio station is selected based on desired station top-
ic » page 12 , Radio settingsSymbolMeaningRadio station from the station list is a station from the
preset list Auto-play function for available radio stations for 10 sec-
ondsa)
PTY (programme type) - Refers to the type of the programme transmitted by the radio station.
Find and store radio station
First read and observe the introductory information given on page 16.
If no memory group is displayed for the frequency bands,
›
press the RADIO button
→ menu button
2
» Fig. 1 on page 5.
Station searches are affected by selection of the PTY filter » page 12 and by
switching on/off of the TP function.
Search options
■ TP - Switches traffic programme on/off » page 18
■ Manual - Manual station search
■ Scan - Successive play of all receivable stations in the current frequency band or
the current station buttons for five seconds each ■ OK - Stops auto-play function at the current radio station
■ Skip - Selects another radio station
■ Auto store - Automatic station search
Manual station search
Pressing the Manual button starts a manual station search.
Manual tuning is performed by turning the menu button
2
» Fig. 1 on page 5 or
the keys .
Pressing the OK button stops the manual station search at the currently tuned
radio station.
Automatic station search
Pressing the Auto store key starts an automatic station search.
Auto store... is displayed on the device display screen when searching and stor-
ing.
At the end of the automatic search, the five radio stations with the strongest sig- nal are stored in the memory group for the current frequency band.
16Audio
Page 19 of 45
If some radio stations have already been stored under the station buttons, then
these station buttons will be overwritten with newly located stations after the
automatic station search.
Store station
Set the desired radio station and press and hold the corresponding key 3
» Fig. 1
on page 5 until a beep is heard. The station is stored in the device memory and its
name appears above the corresponding key
3
.
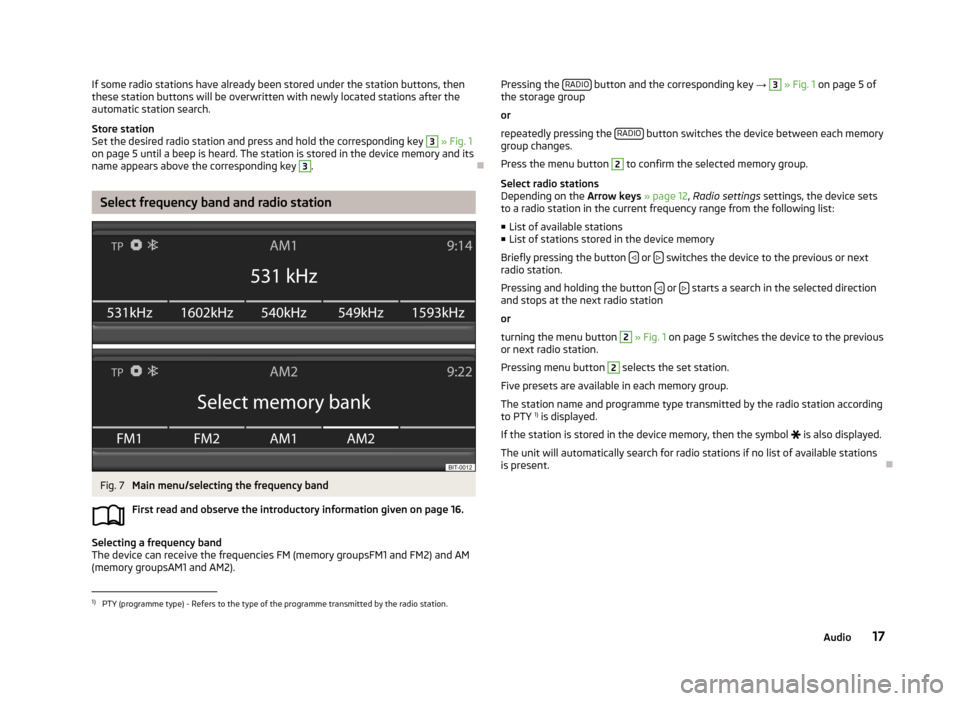
Select frequency band and radio station
Fig. 7
Main menu/selecting the frequency band
First read and observe the introductory information given on page 16.
Selecting a frequency band
The device can receive the frequencies FM (memory groupsFM1 and FM2) and AM
(memory groupsAM1 and AM2).
Pressing the RADIO button and the corresponding key
→ 3 » Fig. 1 on page 5 of
the storage group
or
repeatedly pressing the RADIO
button switches the device between each memory
group changes.
Press the menu button
2
to confirm the selected memory group.
Select radio stations
Depending on the Arrow keys » page 12 , Radio settings settings, the device sets
to a radio station in the current frequency range from the following list:
■ List of available stations
■ List of stations stored in the device memory
Briefly pressing the button
or switches the device to the previous or next
radio station.
Pressing and holding the button
or starts a search in the selected direction
and stops at the next radio station
or
turning the menu button
2
» Fig. 1 on page 5 switches the device to the previous
or next radio station.
Pressing menu button
2
selects the set station.
Five presets are available in each memory group. The station name and programme type transmitted by the radio station according
to PTY 1)
is displayed.
If the station is stored in the device memory, then the symbol
is also displayed.
The unit will automatically search for radio stations if no list of available stations
is present.
1)
PTY (programme type) - Refers to the type of the programme transmitted by the radio station.
17Audio
Page 22 of 45
The name of the artist, the album and the title of the played file can be displayed
if the information is available as a so-called ID3 tag. If no ID3 tag is available, only the folder name is displayed.
To ensure good quality sound, we recommend a minimum compressed bitrate of
160 kb/s for MP3 files. For audio files with variable bitrates, the indicated remain-
ing playback time does not correspond to the actual remaining playback time.
WMA files can only be played when not copyrighted by DRM. These kinds of WMAfiles are not supported by the device.
The more files, folders or playlists on one source, the longer it will take to read
the source. It is a good idea to create subfolders with files (e.g. by artist or album
names) in order to save time.
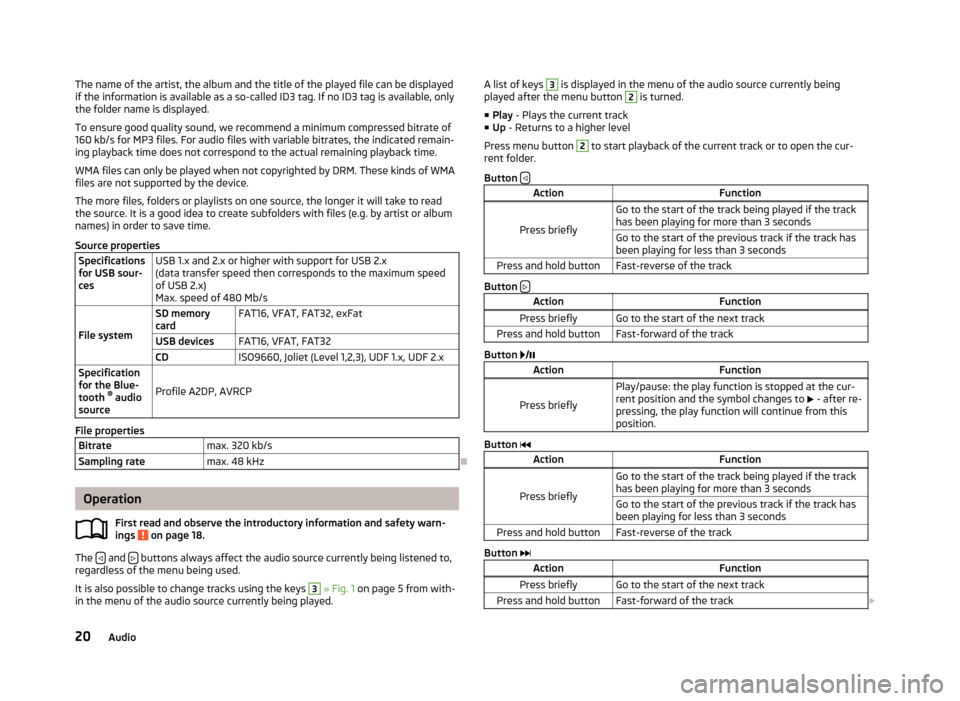
Source propertiesSpecifications
for USB sour-
cesUSB 1.x and 2.x or higher with support for USB 2.x
(data transfer speed then corresponds to the maximum speed of USB 2.x)
Max. speed of 480 Mb/s
File system
SD memory
cardFAT16, VFAT, FAT32, exFatUSB devicesFAT16, VFAT, FAT32CDISO9660, Joliet (Level 1,2,3), UDF 1.x, UDF 2.xSpecification
for the Blue-
tooth ®
audio
source
Profile A2DP, AVRCP
File properties
Bitratemax. 320 kb/sSampling ratemax. 48 kHz
Operation
First read and observe the introductory information and safety warn-
ings
on page 18.
The and buttons always affect the audio source currently being listened to,
regardless of the menu being used.
It is also possible to change tracks using the keys
3
» Fig. 1 on page 5 from with-
in the menu of the audio source currently being played.
A list of keys 3 is displayed in the menu of the audio source currently being
played after the menu button 2 is turned.
■ Play - Plays the current track
■ Up - Returns to a higher level
Press menu button 2
to start playback of the current track or to open the cur-
rent folder.
Button
ActionFunction
Press briefly
Go to the start of the track being played if the track
has been playing for more than 3 secondsGo to the start of the previous track if the track has been playing for less than 3 secondsPress and hold buttonFast-reverse of the track
Button
ActionFunctionPress brieflyGo to the start of the next trackPress and hold buttonFast-forward of the track
Button
/
ActionFunction
Press briefly
Play/pause: the play function is stopped at the cur-
rent position and the symbol changes to - after re-
pressing, the play function will continue from this position.
Button
ActionFunction
Press briefly
Go to the start of the track being played if the track
has been playing for more than 3 secondsGo to the start of the previous track if the track has been playing for less than 3 secondsPress and hold buttonFast-reverse of the track
Button
ActionFunctionPress brieflyGo to the start of the next trackPress and hold buttonFast-forward of the track 20Audio
Page 28 of 45
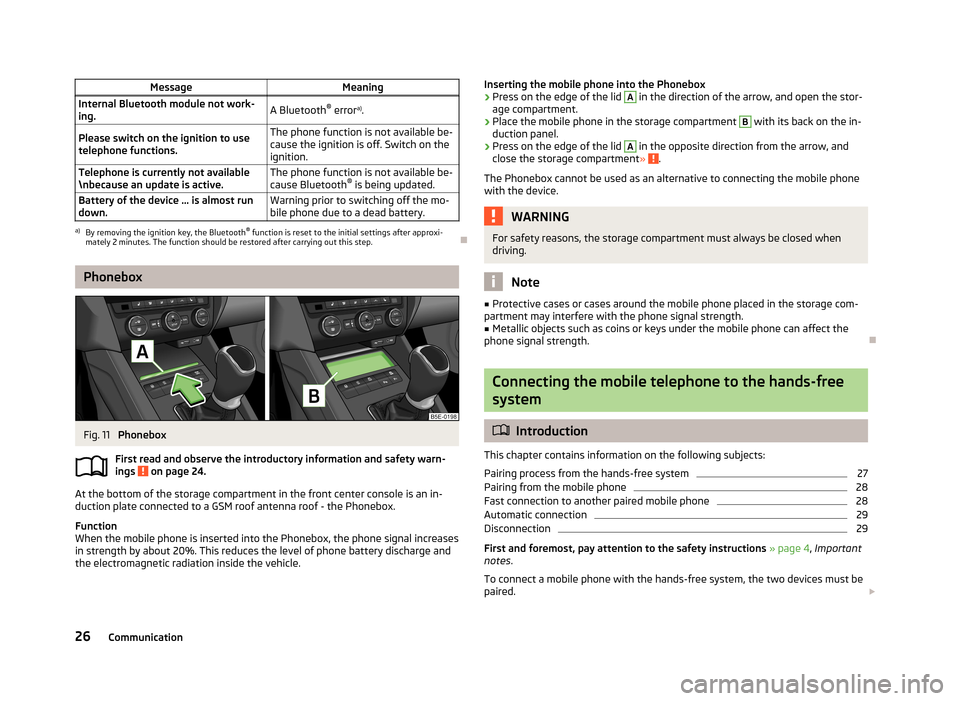
MessageMeaningInternal Bluetooth module not work-
ing.A Bluetooth ®
error a)
.Please switch on the ignition to use
telephone functions.The phone function is not available be-
cause the ignition is off. Switch on the
ignition.Telephone is currently not available
\nbecause an update is active.The phone function is not available be-
cause Bluetooth ®
is being updated.Battery of the device … is almost run
down.Warning prior to switching off the mo-
bile phone due to a dead battery.a)
By removing the ignition key, the Bluetooth ®
function is reset to the initial settings after approxi-
mately 2 minutes. The function should be restored after carrying out this step.
Phonebox
Fig. 11
Phonebox
First read and observe the introductory information and safety warn- ings
on page 24.
At the bottom of the storage compartment in the front center console is an in-
duction plate connected to a GSM roof antenna roof - the Phonebox.
Function
When the mobile phone is inserted into the Phonebox, the phone signal increases in strength by about 20%. This reduces the level of phone battery discharge and
the electromagnetic radiation inside the vehicle.
Inserting the mobile phone into the Phonebox›Press on the edge of the lid A in the direction of the arrow, and open the stor-
age compartment.›
Place the mobile phone in the storage compartment
B
with its back on the in-
duction panel.
›
Press on the edge of the lid
A
in the opposite direction from the arrow, and
close the storage compartment » .
The Phonebox cannot be used as an alternative to connecting the mobile phone
with the device.
WARNINGFor safety reasons, the storage compartment must always be closed when
driving.
Note
■ Protective cases or cases around the mobile phone placed in the storage com-
partment may interfere with the phone signal strength.■
Metallic objects such as coins or keys under the mobile phone can affect the
phone signal strength.
Connecting the mobile telephone to the hands-free
system
Introduction
This chapter contains information on the following subjects:
Pairing process from the hands-free system
27
Pairing from the mobile phone
28
Fast connection to another paired mobile phone
28
Automatic connection
29
Disconnection
29
First and foremost, pay attention to the safety instructions » page 4 , Important
notes .
To connect a mobile phone with the hands-free system, the two devices must be paired.
26Communication