format SKODA OCTAVIA 2014 3.G / (5E) Amundsen Infotainment Navigation System Manual
[x] Cancel search | Manufacturer: SKODA, Model Year: 2014, Model line: OCTAVIA, Model: SKODA OCTAVIA 2014 3.G / (5E)Pages: 77, PDF Size: 4.64 MB
Page 30 of 77
First and foremost, pay attention to the safety instructions » page 4 , Impor-
tant notes .WARNING■
Never place signal sources close to airbags. Loose objects could hit a de-
ployed airbag and injure occupants – danger of death!■
Never place signal sources on the dashboard. Loose objects can be
thrown forward during a sudden manoeuvre or in case of an accident and
can injure the occupants.
■
Do not have signal sources in your hand or on your knees while driving.
Loose objects can be thrown forward during a sudden manoeuvre or in
case of an accident and can injure the occupants.
■
Always route the connection cable of the external signal source such that
does not restrict you when driving.
CAUTION
We recommend that you do not store any important data on CD media, Blue-
tooth ®
players, to an SD memory card or connected external devices. The
ŠKODA Partner is not responsible for losses resulting from the loss of data
stored on these media.
Note
For some external devices, the setting of the output volume can be changed.
Supported sources and file formats
Read and observe
and on page 28 first.
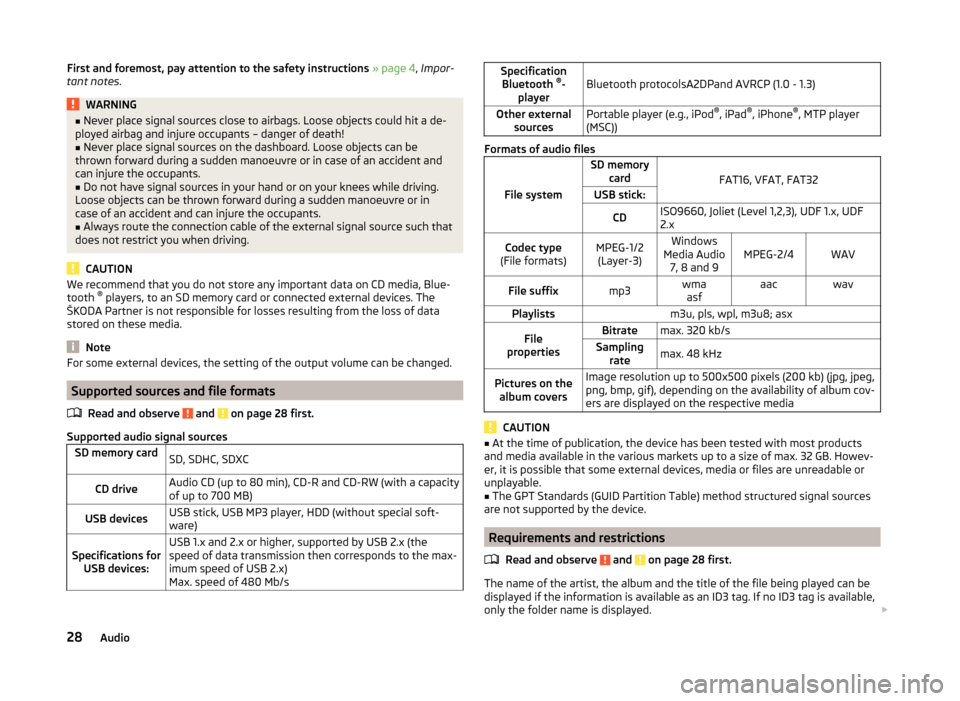
Supported audio signal sources
SD memory cardSD, SDHC, SDXCCD driveAudio CD (up to 80 min), CD-R and CD-RW (with a capacity
of up to 700 MB)USB devicesUSB stick, USB MP3 player, HDD (without special soft-
ware)Specifications for USB devices:USB 1.x and 2.x or higher, supported by USB 2.x (the
speed of data transmission then corresponds to the max-
imum speed of USB 2.x)
Max. speed of 480 Mb/sSpecification Bluetooth ®
-
playerBluetooth protocolsA2DPand AVRCP (1.0 - 1.3)Other external sourcesPortable player (e.g., iPod ®
, iPad ®
, iPhone ®
, MTP player
(MSC))
Formats of audio files
File system
SD memory card
FAT16, VFAT, FAT32
USB stick:CDISO9660, Joliet (Level 1,2,3), UDF 1.x, UDF
2.xCodec type
(File formats)MPEG-1/2 (Layer-3)Windows
Media Audio 7, 8 and 9MPEG-2/4WAVFile suffixmp3wmaasfaacwavPlaylistsm3u, pls, wpl, m3u8; asxFile
propertiesBitratemax. 320 kb/sSampling ratemax. 48 kHzPictures on thealbum coversImage resolution up to 500x500 pixels (200 kb) (jpg, jpeg,
png, bmp, gif), depending on the availability of album cov-
ers are displayed on the respective media
CAUTION
■ At the time of publication, the device has been tested with most products
and media available in the various markets up to a size of max. 32 GB. Howev-
er, it is possible that some external devices, media or files are unreadable or
unplayable.■
The GPT Standards (GUID Partition Table) method structured signal sources
are not supported by the device.
Requirements and restrictions
Read and observe
and on page 28 first.
The name of the artist, the album and the title of the file being played can be
displayed if the information is available as an ID3 tag. If no ID3 tag is available,
only the folder name is displayed.
28Audio
Page 33 of 77
USB input
External audio sources connected to the USB input cannot be operated from
your 1)
device.
Proceed as follows before removing the USB device:›
Press the button
→
→ Remove USB device safely .
Charge USB audio source
With the ignition on after connecting the USB audio source, the charging proc-
ess is automatically started (applies for audio sources where charging via the
USB connector is possible).
The charging efficiency can be different compared to the charging from the
usual mains power supply. Connected audio sources can be supplied / loaded
with a current of max. 500 mA.
Some connected audio sources may not be recognised and cannot be charged.
The charging of the connected audio source is automatically stopped after
switching off the ignition.
CAUTION
■ The AUX input must only be used for audio devices!■If an external device is connected to the AUX input, which is equipped with
an adapter for external power supply, the sound may be impaired. This de-
pends on the quality of the adapter which is used.■
USB extension cables or adapters may affect the operation of the connected
external device.
■
USB hubs are not supported.
Note
When operating as well as connecting the external device, the respective op-
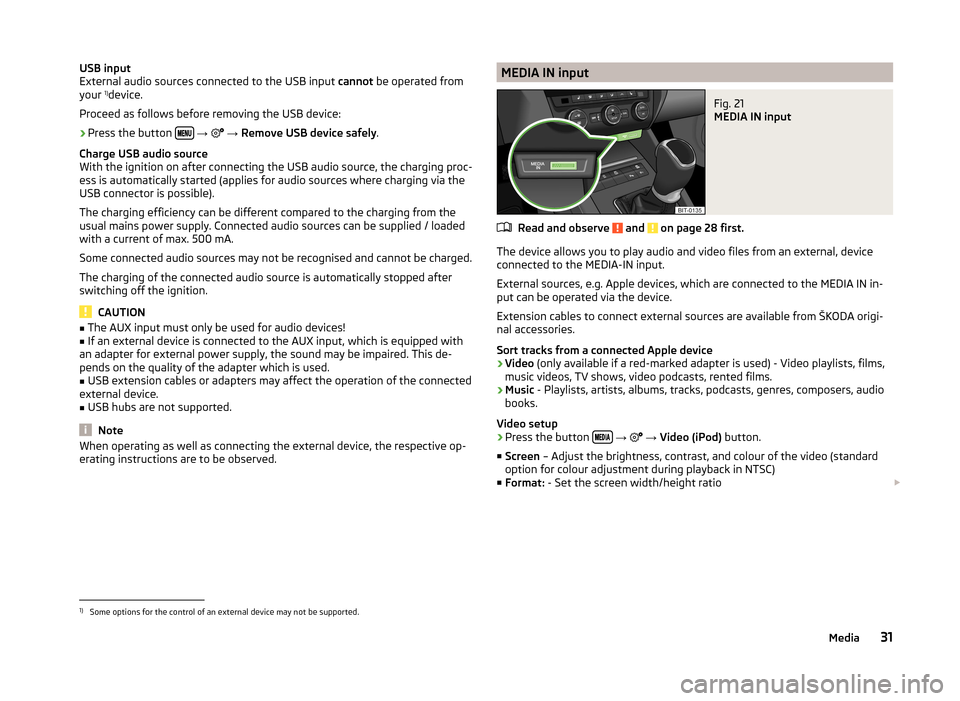
erating instructions are to be observed.MEDIA IN inputFig. 21
MEDIA IN input
Read and observe and on page 28 first.
The device allows you to play audio and video files from an external, device
connected to the MEDIA-IN input.
External sources, e.g. Apple devices, which are connected to the MEDIA IN in-
put can be operated via the device.
Extension cables to connect external sources are available from ŠKODA origi-
nal accessories.
Sort tracks from a connected Apple device
› Video
(only available if a red-marked adapter is used) - Video playlists, films,
music videos, TV shows, video podcasts, rented films.
› Music
- Playlists, artists, albums, tracks, podcasts, genres, composers, audio
books.
Video setup
› Press the button
→
→ Video (iPod) button.
■ Screen – Adjust the brightness, contrast, and colour of the video (standard
option for colour adjustment during playback in NTSC)
■ Format: - Set the screen width/height ratio
1)
Some options for the control of an external device may not be supported.
31Media
Page 35 of 77
Phone
Communication
Telephones and two-way radio systems
Introduction
This chapter contains information on the following subjects:
Introductory information
33
Main menu
34
Problems with the Telephone function
34
Phonebox
35
Settings
35
The Telephone menu is available when the following conditions are met.
The ignition is switched on.
The Bluetooth ®
function on the device is switched on.
After the device is switched on, the system attempts to connect to the most
recently connected mobile phone 1)
.
If a telephone is connected to the device and the device is turned off, the con-
nection to the phone is not dropped. The connection is lost after switching off
the ignition (for vehicles with KESSY system after switching off the ignition
and opening the driver's door).
WARNING■ The national regulations for using a mobile phone in a vehicle must be
observed.■
If a mobile phone or a two-way radio system is operated in a vehicle with-
out an external aerial or an external aerial which has been installed incor-
rectly, this can increase the strength of the electromagnetic field inside the
vehicle.
■
Two-way radio systems, mobile phones or mounts must not be installed
on airbag covers or within the immediate deployment range of the airbags.
WARNING (Continued)■ Never leave a mobile phone on a seat, on the dashboard or anywhere,
from which it can be thrown during a sudden braking manoeuvre, an acci-
dent or a collision - risk of injury. Use storage compartments with lid or the
multimedia holder for safe storage » Vehicle Owner's Manual , chap-
ter Practical equipment.■
Before transport of the vehicle by air, the Bluetooth ®
function must be
switched off by a specialist company.
CAUTION
■ In areas with no signal and possibly in tunnels, garages and subways a tele-
phone conversation can be interrupted and no telephone connection can be
established - not even in an emergency!■
The range of the Bluetooth ®
connection to the hands-free system is limited
to the vehicle interior. The range is dependent on local factors, e.g. obstacles
between the devices and mutual interferences with other devices. If your mo-
bile phone is in a jacket pocket, for example, this can lead to difficulties when
establishing a connection with the device or transferring data.
Introductory information
Read and observe
and on page 33 first.
The device allows for a wireless connection to the mobile phone. Your mobile
phone can be operated from this unit.
ŠKODA permits the operation of mobile phones and two-way radio systems
with a professionally installed external aerial and a maximum transmission
power of up to 10 watts.
Please ask at a specialist workshop about installing and operating mobile
phones and two-way radio systems that have a transmission power of more
than 10 W.
Operating mobile phones or two-way radio systems may interfere with the
functionality of the electronic systems in your vehicle.
1)
With some phones, it is necessary to set the connection to the device as "authorised" in order for the
automatic connection to be successful. If this is not set, the system will prompt you for a confirmation
each time you attempt to connect to the mobile phone.
33Communication
Page 36 of 77
The reasons for this are as follows:
› no external aerial;
› external aerial incorrectly installed;
› transmission power greater than 10 watts.
Note
■
We recommend that the installation of mobile phones and two-way radio
systems in a vehicle be carried out by a specialist garage.■
The phone features depend on the mobile network operators and on the
phone being used. Further information is available from the mobile network
operator or refer to your phone manual
■
In signal-free areas reception can be interrupted or the call disconnected.
■
Most modern electronic equipment is shielded from RF signals. In exceptional
cases, electronic equipment may not be shielded against the RF signals and
telephone service may be disrupted.
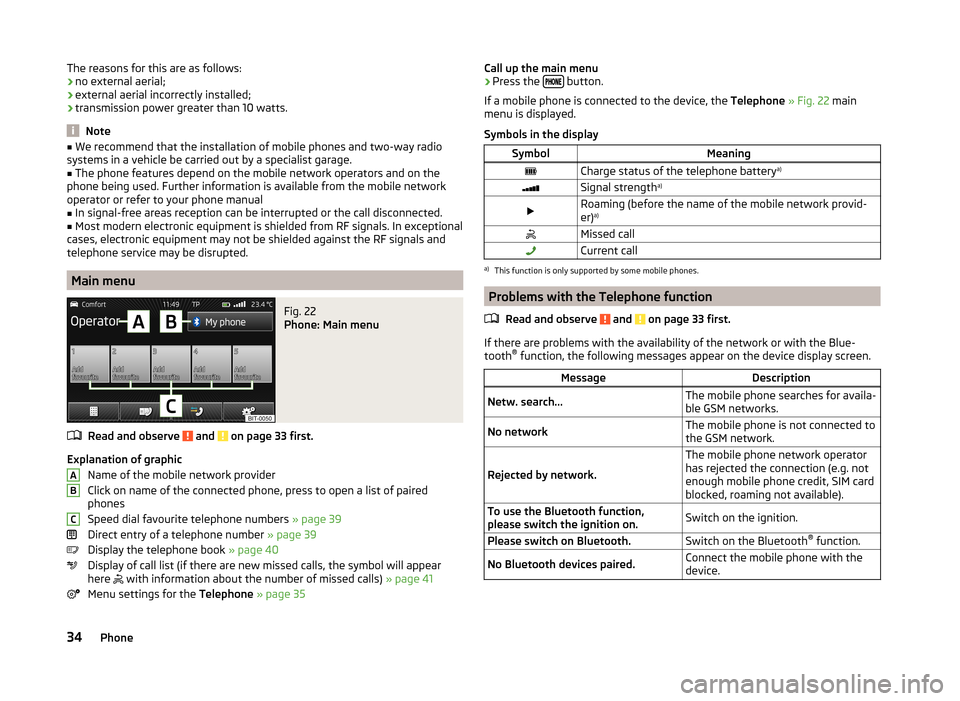
Main menu
Fig. 22
Phone: Main menu
Read and observe and on page 33 first.
Explanation of graphic
Name of the mobile network provider
Click on name of the connected phone, press to open a list of paired
phones
Speed dial favourite telephone numbers » page 39
Direct entry of a telephone number » page 39
Display the telephone book » page 40
Display of call list (if there are new missed calls, the symbol will appear
here
with information about the number of missed calls) » page 41
Menu settings for the Telephone » page 35
ABCCall up the main menu›Press the button.
If a mobile phone is connected to the device, the Telephone » Fig. 22 main
menu is displayed.
Symbols in the displaySymbolMeaningCharge status of the telephone battery a)Signal strengtha)Roaming (before the name of the mobile network provid-
er) a)Missed callCurrent calla)
This function is only supported by some mobile phones.
Problems with the Telephone function
Read and observe
and on page 33 first.
If there are problems with the availability of the network or with the Blue-
tooth ®
function, the following messages appear on the device display screen.
MessageDescriptionNetw. search...The mobile phone searches for availa-
ble GSM networks.No networkThe mobile phone is not connected to
the GSM network.
Rejected by network.
The mobile phone network operator
has rejected the connection (e.g. not
enough mobile phone credit, SIM card
blocked, roaming not available).To use the Bluetooth function,
please switch the ignition on.Switch on the ignition.Please switch on Bluetooth.Switch on the Bluetooth ®
function.No Bluetooth devices paired.Connect the mobile phone with the
device.34Phone
Page 38 of 77
■Select ring tone - Select the ring tone if the connected mobile phone does
not support the in-band ringing function 1)
■ Show pictures for contacts - Switch on/off the display of the image assigned
to the contact in the telephone 2)
Connect to the mobile phone
Introduction
This chapter contains information on the following subjects:
Conditions for successful pairing
36
Connect device with your mobile phone
36
Pairing mobile phone with device
37
Connection with another paired mobile phone
38
Switch Bluetooth ®
profile on/off
38
Clear mobile phone from the list of paired devices
38
Disconnection
39
First and foremost, pay attention to the safety instructions » page 4 , Impor-
tant notes .
The device is displayed in the telephone to be connected to as SKODA BT ...
... is replaced with the last four symbols of the VIN code of your vehicle.
You can change the name of the device » page 19.
WARNINGThe unit may require confirmation of certain features in the mobile phone
when pairing. The pairing process therefore does not take place while driv-
ing - danger of accident!
Note
■ The maximum number of phones registered is 20. When the maximum num-
ber of coupled telephones has been reached, the next one will cause the
paired telephone that has not been used for the longest to be automatically
deleted.■
In some countries, the use of phones with the Bluetooth ®
function may be
restricted. Further information can be obtained from local authorities.
■ The range of the Bluetooth ®
connection to the hands-free system is restric-
ted to the vehicle interior. This depends on local conditions and on interfer-
ence with other devices.■
When pairing from the mobile phone, follow the instructions in the owner's
manual of the mobile phone.
Conditions for successful pairing
Read and observe
on page 36 first.
To connect a mobile phone with the device, the two devices must be paired.
Prerequisites for successful pairing: The ignition is switched on.
The Bluetooth ®
function for the mobile phone » page 19 is switched on.
The visibility of the mobile phone is switched on » page 19.
The visibility of the mobile phone is switched on.
The mobile phone to which the connection is being made must have no
active connection to another mobile phone.
The pairing can be initiated from the device or from the mobile phone.
Connect device with your mobile phone
Read and observe
on page 36 first.
A phone is paired with the device
After switching on the unit, the system automatically attempts to connect to
the last connected mobile phone .
While the connection is being created, the message in the device screen may
vary depending on the phone type ... Would you like to connect? And a menu
will appear with the following function keys.
› Connect
- Pairing confirmation
› Cancel
- Cancel the pairing process
If the connection cannot be established the system will attempt to connect to
other previously connected phones one by one.
If there is still no connection, start a phone search.
1)
The in-band ringing function makes it possible to use the ring tone of your phone as the ring tone.
2)
This function is only supported by some mobile phones.
36Phone
Page 41 of 77
DisconnectionRead and observe
on page 36 first.
The connection of a mobile phone to the device can be disconnected in one of
the following ways.
› By removing the ignition key (or switching off the ignition and opening the
driver's door in vehicles with the KESSY system).
› By disconnecting the device or switching off the Bluetooth ®
function on the
mobile phone.
› By switching off the Bluetooth ®
function in the device » page 19, Bluetooth ®
settings .
› By removing the phone from the list of paired devices
» page 38, Clear mo-
bile phone from the list of paired devices .
› By switching off the Bluetooth ®
HFP profile » page 38, Switch Bluetooth ®
profile on/off .
Telephone functions
Introduction
This chapter contains information on the following subjects:
Speed dialling a phone number
39
Direct entry of a phone number
39
Phone book
40
Call-lists
41
Telephone conversation
41
Conference
41
First and foremost, pay attention to the safety instructions » page 4 .
Speed dialling a phone number
You can use the speed dial function keys
C
» Fig. 22 on page 34 to dial previ-
ously assigned telephone numbers instantly.
There are five function keys available.
Assign telephone number to a contact
›
Press a speed dial function key
C
» Fig. 22 on page 34 that is not assigned.
The unit displays the phone book.
› Tap one of the contact numbers for the desired telephone contact.
The assignment of the contact telephone number to a function key for the
speed dialling is also possible in the telephone menu settings » page 35.
Select assigned telephone number for a contact›
Press the desired function key to speed dial the phone number of a contact
C
» Fig. 22 on page 34 .
Change assigned telephone number of a contact
›
Press and hold down the desired speed dial function key
C
» Fig. 22 on
page 34 .
The unit displays the phone book.
›
Tap one of the contact numbers for the desired telephone contact.
The telephone number of a contact is assigned to the selected function key for
speed dialling.
You can also make the change in the Telephone menu » page 35 .
Remove phone number of a contact
›
Press the symbol button
→ User profile → Press Manage favourites .
›
Press the function key for the speed dial. Confirm the Deletemenu item to
remove the telephone number of a contact from the selected quick-dial func-
tion key.
Direct entry of a phone number
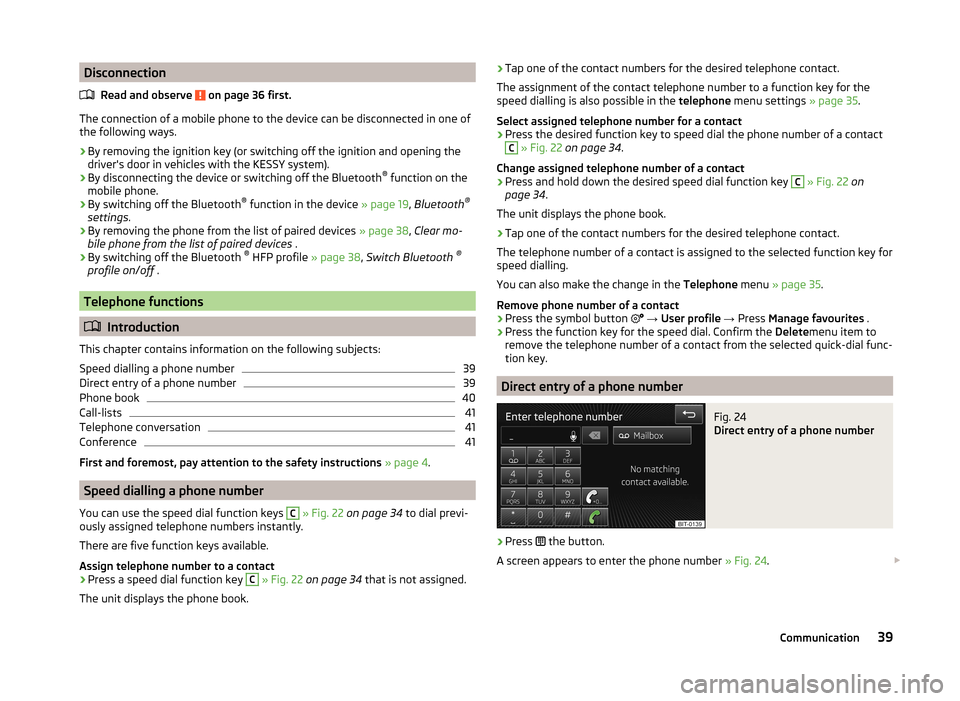
Fig. 24
Direct entry of a phone number
›
Press the button.
A screen appears to enter the phone number » Fig. 24.
39Communication
Page 43 of 77
Call-listsFig. 25
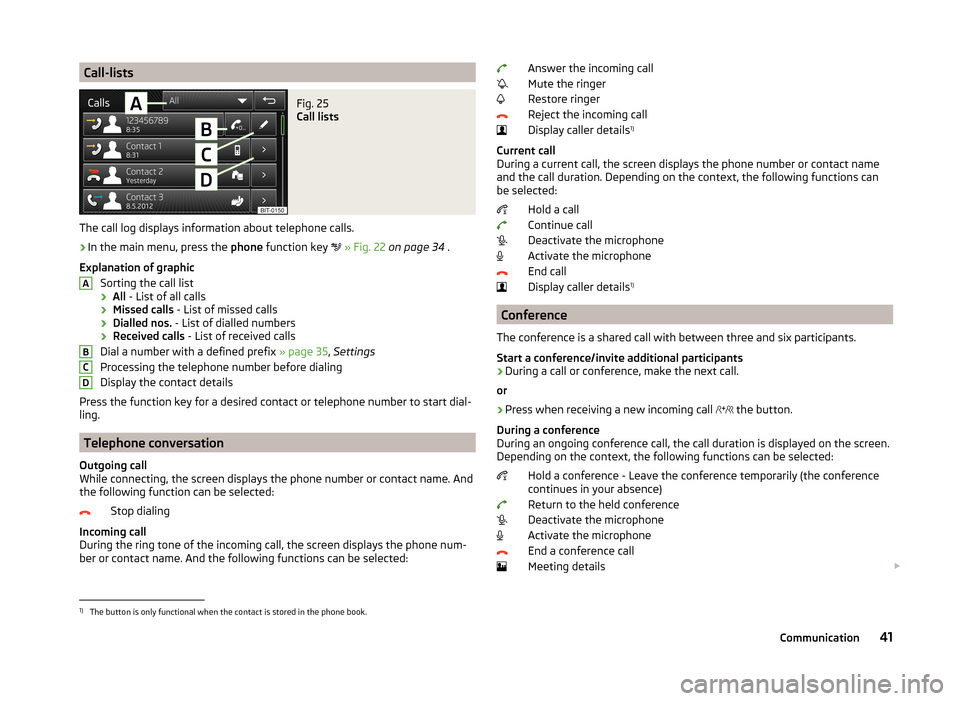
Call lists
The call log displays information about telephone calls.
›
In the main menu, press the phone function key
» Fig. 22 on page 34 .
Explanation of graphic Sorting the call list› All
- List of all calls
› Missed calls
- List of missed calls
› Dialled nos.
- List of dialled numbers
› Received calls
- List of received calls
Dial a number with a defined prefix » page 35, Settings
Processing the telephone number before dialing
Display the contact details
Press the function key for a desired contact or telephone number to start dial-
ling.
Telephone conversation
Outgoing call
While connecting, the screen displays the phone number or contact name. And
the following function can be selected:
Stop dialing
Incoming call
During the ring tone of the incoming call, the screen displays the phone num-
ber or contact name. And the following functions can be selected:
ABCDAnswer the incoming call
Mute the ringer
Restore ringer
Reject the incoming call
Display caller details 1)
Current call
During a current call, the screen displays the phone number or contact name
and the call duration. Depending on the context, the following functions can
be selected:
Hold a call
Continue call
Deactivate the microphone
Activate the microphone
End call
Display caller details 1)
Conference
The conference is a shared call with between three and six participants.
Start a conference/invite additional participants
›
During a call or conference, make the next call.
or
›
Press when receiving a new incoming call the button.
During a conference
During an ongoing conference call, the call duration is displayed on the screen.
Depending on the context, the following functions can be selected:
Hold a conference - Leave the conference temporarily (the conference
continues in your absence)
Return to the held conference
Deactivate the microphone
Activate the microphone
End a conference call
Meeting details
1)
The button is only functional when the contact is stored in the phone book.
41Communication
Page 45 of 77
Navigation
Description of the navigation system
Preface to navigation
Introduction
This chapter contains information on the following subjects:
Main menu
43
Navigation data
44
First and foremost, pay attention to the safety instructions » page 4 , Impor-
tant notes .
The unit uses the GPS (Global Positioning System) satellite system for naviga-
tion. The satellite signal allows you to determine your current vehicle position.
If the unit is outside the range of the GPS satellite signal (e.g. in dense vegeta-
tion, in tunnels, parking garages, etc.), the unit navigates only with restrictions
using on-vehicle sensors.
Navigation is done:
› by graphical instructions in the device screen and Maxi DOT display;
› via voice guidance.
The navigation unit can be operated: › using the buttons on the unit
» page 43;
› using the function keys in the unit screen
» page 43;
› using voice control
» page 13.
› on the MAXI DOT display
» page 12 .
WARNING■
Information about traffic lights, stop and right of way signs, parking and
stopping restrictions as well as lane constrictions and speed restrictions is
not taken into account for navigation by the unit.■
Always adjust the driving speed to the road, traffic and weather condi-
tions.
■
The navigation announcement provided may vary from current situations,
e.g. due to road works or out-of-date navigation data.
■
The volume should be adjusted to ensure that acoustic signals from out-
side, e.g. sirens from vehicles which have the right of way, such as police,
ambulance and fire brigade vehicles, can be heard at all time.
CAUTIONIn some countries, some unit features can no longer be selected when the ve-
hicle is running faster than a certain speed. This is not a malfunction, but com-
plies with the national legal regulations.
Main menu
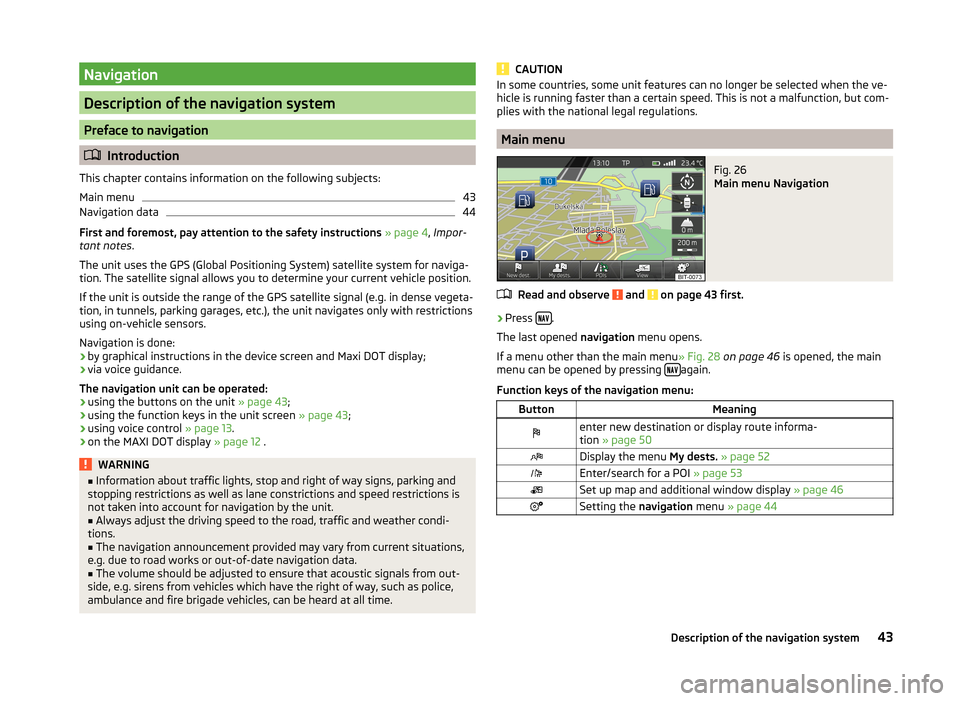
Fig. 26
Main menu Navigation
Read and observe and on page 43 first.
›
Press .
The last opened navigation menu opens.
If a menu other than the main menu » Fig. 28 on page 46 is opened, the main
menu can be opened by pressing
again.
Function keys of the navigation menu:
ButtonMeaningenter new destination or display route informa-
tion » page 50Display the menu My dests. » page 52Enter/search for a POI » page 53Set up map and additional window display » page 46Setting the navigation menu » page 4443Description of the navigation system
Page 46 of 77
Navigation dataFig. 27
SD memory card slot
Read and observe
and on page 43 first.
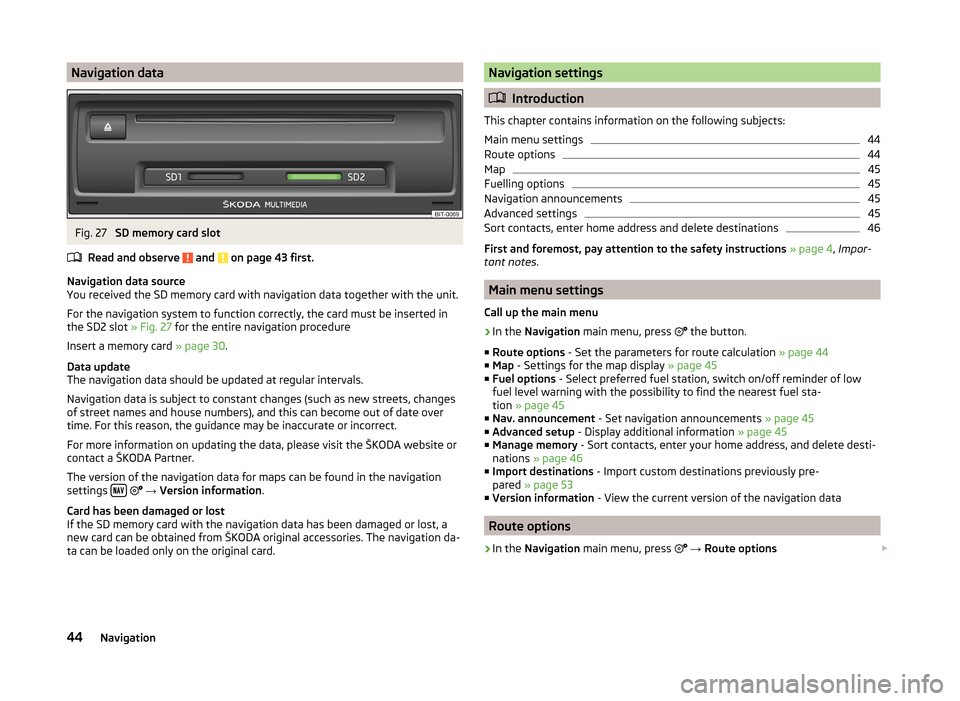
Navigation data source
You received the SD memory card with navigation data together with the unit.
For the navigation system to function correctly, the card must be inserted in
the SD2 slot » Fig. 27 for the entire navigation procedure
Insert a memory card » page 30.
Data update
The navigation data should be updated at regular intervals.
Navigation data is subject to constant changes (such as new streets, changes
of street names and house numbers), and this can become out of date over
time. For this reason, the guidance may be inaccurate or incorrect.
For more information on updating the data, please visit the ŠKODA website or contact a ŠKODA Partner.
The version of the navigation data for maps can be found in the navigation
settings
→ Version information .
Card has been damaged or lost
If the SD memory card with the navigation data has been damaged or lost, a
new card can be obtained from ŠKODA original accessories. The navigation da-
ta can be loaded only on the original card.
Navigation settings
Introduction
This chapter contains information on the following subjects:
Main menu settings
44
Route options
44
Map
45
Fuelling options
45
Navigation announcements
45
Advanced settings
45
Sort contacts, enter home address and delete destinations
46
First and foremost, pay attention to the safety instructions » page 4 , Impor-
tant notes .
Main menu settings
Call up the main menu
›
In the Navigation main menu, press
the button.
■ Route options - Set the parameters for route calculation » page 44
■ Map - Settings for the map display » page 45
■ Fuel options - Select preferred fuel station, switch on/off reminder of low
fuel level warning with the possibility to find the nearest fuel sta-
tion » page 45
■ Nav. announcement - Set navigation announcements » page 45
■ Advanced setup - Display additional information » page 45
■ Manage memory - Sort contacts, enter your home address, and delete desti-
nations » page 46
■ Import destinations - Import custom destinations previously pre-
pared » page 53
■ Version information - View the current version of the navigation data
Route options
›
In the Navigation main menu, press
→ Route options
44Navigation
Page 47 of 77
■Suggest 3 alternative routes - Switch on/off manual selection of the route
type (economical, fast, short) » page 57
■ Route: - Automatic selection of the preferred route type (manual route selec-
tion is switched off)
■ Economical - Calculate the most economical route with shortest travelling
time and distance travelled – displayed in green
■ Fast - Calculate the fastest route to the destination, even if a detour is nec-
essary - displayed in red
■ Short - Calculate the shortest route to the destination, even if a longer
travelling time is required - displayed in orange
■ Dynamic route - Switch on/off dynamic route calculation using TMC traffic
reports » page 59
■
Avoid motorways - Switch on/off the use of motorways in the route calcu-
lation
■
Avoid ferries and motorail trains - Switch on/off avoidance of ferries and
motorail trains
■
Avoid toll roads - Switch on/off the use of toll roads in the route calcula-
tion
■
Avoid tunnels - Switch on/off the use of tunnels for which tolls have to
paid in the route calculation
■
Avoid routes requiring toll stickers - Switch on/off the use of roads re-
quiring road tax disk display (with a valid road tax disk) in the route calcula-
tion
■ Available toll stickers - Displays the list of roads requiring road tax disk dis-
play
Map
›
In the Navigation main menu, press
→ Map .
■ Day/night: -Selection of map display colour
■ Day - coloured
■ Night - in shades of grey
■ Automatic - Map with light or dark coloured background; the background
changes once you turn on the lights (does not apply to daytime running
lights)
■ Autozoom - Switch on/off the automatic zoom in/out of the map display
while driving » page 47
■ Show traffic signs - Switch on/off the display of traffic signs
■ Select categories for POIs - Select POIs to be displayed in the map from a list
of available POIs (max. 10 POIs) » page 55
■ Show brands for POIs - Switch on/off the display company logos at the POIs
■
Show favourites - Switch on/off the display of favourites
■ Lane guidance - Switch on/off the display of a window with the recommen-
ded lane for complicated intersections » page 58
Fuelling options
›
In the Navigation main menu, press
Fuel options .
■ Select preferred fuel station - Selects your preferred fuel station brand (the
selected station brand will be displayed on the first positions of the list of
nearest fuel stations found)
■ Fuel warning - Switch on/off the display of the warning message for low on
fuel Warning: fuel tank almost empty. Would you like to find a fuel station
nearby? If the message appears in the unit screen, the system offers the fol-
lowing features: ■ Cancel - Close the window with the warning
■ Find - Search for the nearest fuel station
Navigation announcements
›
In the Navigation main menu, press
→ Nav. announcement .
■ Volume - Set the volume of the navigation announcements
■ No voice guidance during call - Switch on/off navigation announcements
during a telephone call (using a phone connected to the hands-free sys-
tem » page 33 )
Advanced settings
›
In the Navigation main menu, press
→ Advanced setup .
■ Time display: - Select the time to be displayed in the status line
■ Time of arrival - displays the expected time to destination
■ Travelling time - Display the expected travelling time to the destination
■ Status line: Status line - Display information about your selected destination
in the status line ■ Destination - Display information about the length and duration of the
guidance to the destination
■ Stopover - Displays information about the length and duration of the guid-
ance to the stopover
■ Note: national border crossed - Switch on/off the display of the information
window with speed limits when crossing the national border
■ Demo mode - Switch on/off guidance in demo mode
45Description of the navigation system