audio SKODA OCTAVIA 2014 3.G / (5E) Amundsen Infotainment Navigation System Manual
[x] Cancel search | Manufacturer: SKODA, Model Year: 2014, Model line: OCTAVIA, Model: SKODA OCTAVIA 2014 3.G / (5E)Pages: 77, PDF Size: 4.64 MB
Page 4 of 77
Table of Contents
Abbreviations
Familiarization with the unit
Introductory information
4
Important notes
4
Equipment overview
5
Unit operation
7
In the unit screen
7
operation via the MAXI DOT display
8
Voice control
13
Device settings
16
Setup menu
16
Audio
Radio
21
Operation
21
Radio settings
24
Media
26
Operation
26
Signal sources
27
Phone
Communication
33
Telephones and two-way radio systems
33
Connect to the mobile phone
36
Telephone functions
39
Navigation
Description of the navigation system
43
Preface to navigation
43
Navigation settings
44Map operation46Extra window47
Navigation
50
New destination entry
50
Entry of saved destinations
52
POI
53
POI categories
55
Route guidance
56
Traffic reports
58
Destination management
60
Vehicle
Vehicle systems
62
Vehicle settings
62
Index
2Table of Contents
Page 5 of 77
AbbreviationsAbbreviationDefinitionA2DP- a software profile for data transfer via Bluetooth ®,
de-
signed for a one-way transfer of audio dataACCAdaptive cruise controlAFThe function ensures that the best receivable frequency of
the selected station is automatically and precisely set.AMIdentification of the radio-frequency rangeTCSTraction control for the drive wheelsAVRCPA software profile for data transfer via Bluetooth ®
, which
supports multimedia functionsAVAudio / visual source signal - typical for DVD player or TV tu-
nerBTBluetooth ®
- wireless communication for reception and
transmission of voice and data informationDABDigital radio receptionDRM- technical methods to monitor or restrict the use of digital
media contentESCElectronic Stability ControlFMIdentification of the radio-frequency rangeHFP- a software profile for data transfer via Bluetooth ®,
which
allows for communication between a mobile phone and the
in-vehicle hands-free equipmentGPSSatellite system for position determinationGSMGlobal System for Mobile communication, the most popular
standard for mobile phonesID3 tagAn additional feature of a music file that allows for the dis-
play of artist, title, album name etc.KESSYKey-less unlocking, starting and lockingNTSCCoding standard of the audiovisual signal in North and Cen-
tral America and some countries in South East AsiaPALCoding standard of the audiovisual signal in most European
countriesAbbreviationDefinitionPIStation identification by a single RDS code, for example,
when setting a different radio stationRDSSystem for the transmission of additional information for FM
radio receptionTMCService for transmitting traffic information to the driverTPProgram identifier for the transmission of traffic informationvCardFile format .vcf for contact data exchange, especially elec-
tronic business cards, can include first and last names, ad-
dresses, phone numbers, URLs, logos, photos and audio clipsVINVehicle identification numberWMAcompressed audio format3Abbreviations
Page 8 of 77
When the unit is switched on, the audio source last active and the most re-
cently selected menu before the unit was switched off will be restored.
If Telephone mode was active before you switched off the unit and the igni-
tion and Bluetooth ®
function is not switched on, the screen displays the mes-
sage » page 34 . Switch on the ignition or the Bluetooth ®
func-
tion » page 19 .
If the vehicle key is pulled out of the ignition lock while the unit is switched on,
the unit will switch off automatically. After switching on the ignition, the unit
is turned on automatically.
The unit will not be switched on automatically when the ignition is switched
on if the unit was switched off using the
knob.
The unit will switch off automatically after the engine is switched off and the
door is opened if your vehicle is fitted with the KESSY system. The unit will
switch off if you open the driver's door before switching off the engine.
When the ignition is switched off, the unit switches itself off automatically af-
ter approximately half an hour (prevents the vehicle battery being drained).
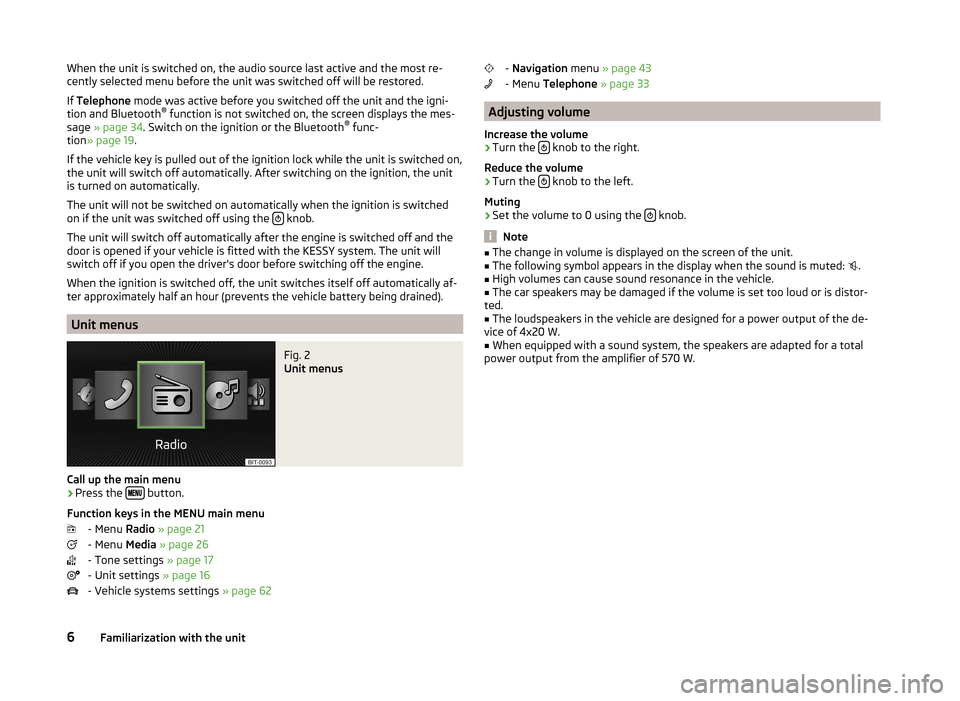
Unit menus
Fig. 2
Unit menus
Call up the main menu
›
Press the button.
Function keys in the MENU main menu - Menu Radio » page 21
- Menu Media » page 26
- Tone settings » page 17
- Unit settings » page 16
- Vehicle systems settings » page 62
- Navigation menu » page 43
- Menu Telephone » page 33
Adjusting volume
Increase the volume
›
Turn the knob to the right.
Reduce the volume
›
Turn the knob to the left.
Muting
›
Set the volume to 0 using the knob.
Note
■
The change in volume is displayed on the screen of the unit.■The following symbol appears in the display when the sound is muted: .■
High volumes can cause sound resonance in the vehicle.
■
The car speakers may be damaged if the volume is set too loud or is distor-
ted.
■
The loudspeakers in the vehicle are designed for a power output of the de-
vice of 4x20 W.
■
When equipped with a sound system, the speakers are adapted for a total
power output from the amplifier of 570 W.
6Familiarization with the unit
Page 10 of 77
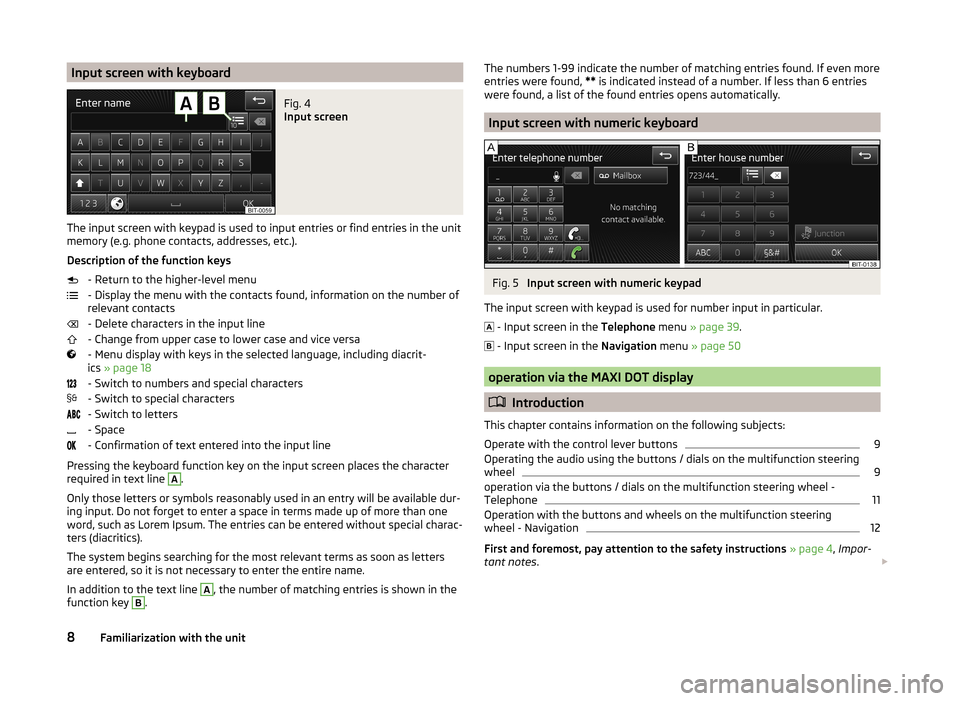
Input screen with keyboardFig. 4
Input screen
The input screen with keypad is used to input entries or find entries in the unit
memory (e.g. phone contacts, addresses, etc.).
Description of the function keys - Return to the higher-level menu
- Display the menu with the contacts found, information on the number of
relevant contacts
- Delete characters in the input line
- Change from upper case to lower case and vice versa
- Menu display with keys in the selected language, including diacrit-
ics » page 18
- Switch to numbers and special characters
- Switch to special characters
- Switch to letters
- Space
- Confirmation of text entered into the input line
Pressing the keyboard function key on the input screen places the character required in text line
A
.
Only those letters or symbols reasonably used in an entry will be available dur-
ing input. Do not forget to enter a space in terms made up of more than one
word, such as Lorem Ipsum. The entries can be entered without special charac-
ters (diacritics).
The system begins searching for the most relevant terms as soon as letters
are entered, so it is not necessary to enter the entire name.
In addition to the text line
A
, the number of matching entries is shown in the
function key
B
.
The numbers 1-99 indicate the number of matching entries found. If even more
entries were found, ** is indicated instead of a number. If less than 6 entries
were found, a list of the found entries opens automatically.
Input screen with numeric keyboard
Fig. 5
Input screen with numeric keypad
The input screen with keypad is used for number input in particular.
- Input screen in the
Telephone menu » page 39 .
- Input screen in the
Navigation menu » page 50
operation via the MAXI DOT display
Introduction
This chapter contains information on the following subjects:
Operate with the control lever buttons
9
Operating the audio using the buttons / dials on the multifunction steering
wheel
9
operation via the buttons / dials on the multifunction steering wheel -
Telephone
11
Operation with the buttons and wheels on the multifunction steering
wheel - Navigation
12
First and foremost, pay attention to the safety instructions » page 4 , Impor-
tant notes .
8Familiarization with the unit
Page 11 of 77
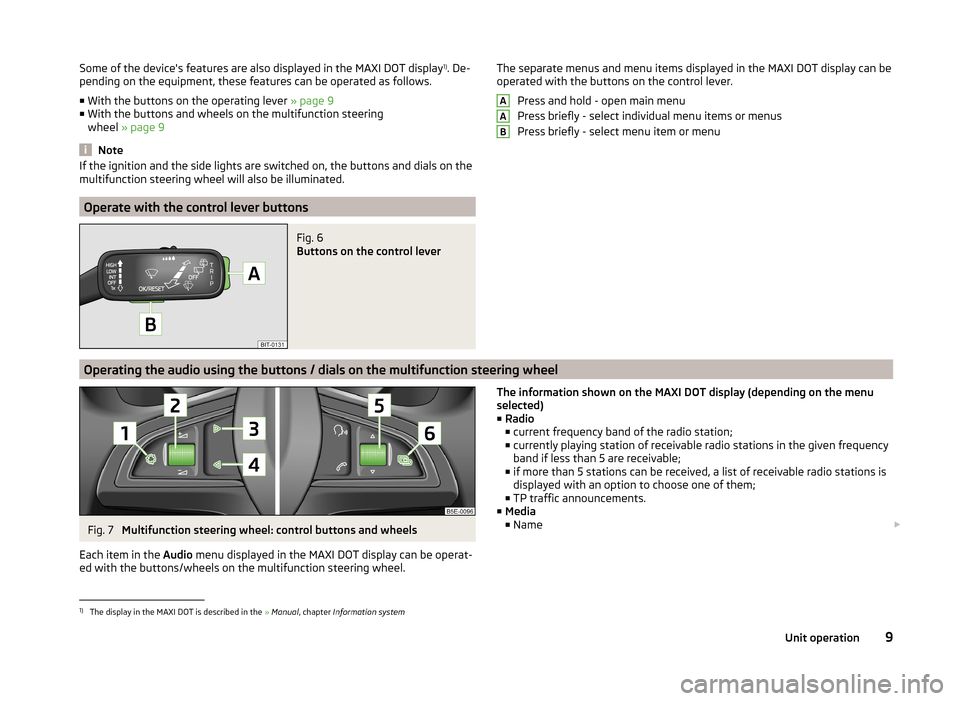
Some of the device's features are also displayed in the MAXI DOT display1)
. De-
pending on the equipment, these features can be operated as follows.
■ With the buttons on the operating lever » page 9
■ With the buttons and wheels on the multifunction steering
wheel » page 9
Note
If the ignition and the side lights are switched on, the buttons and dials on the
multifunction steering wheel will also be illuminated.
Operate with the control lever buttons
Fig. 6
Buttons on the control lever
The separate menus and menu items displayed in the MAXI DOT display can be operated with the buttons on the control lever.
Press and hold - open main menu
Press briefly - select individual menu items or menus
Press briefly - select menu item or menuAAB
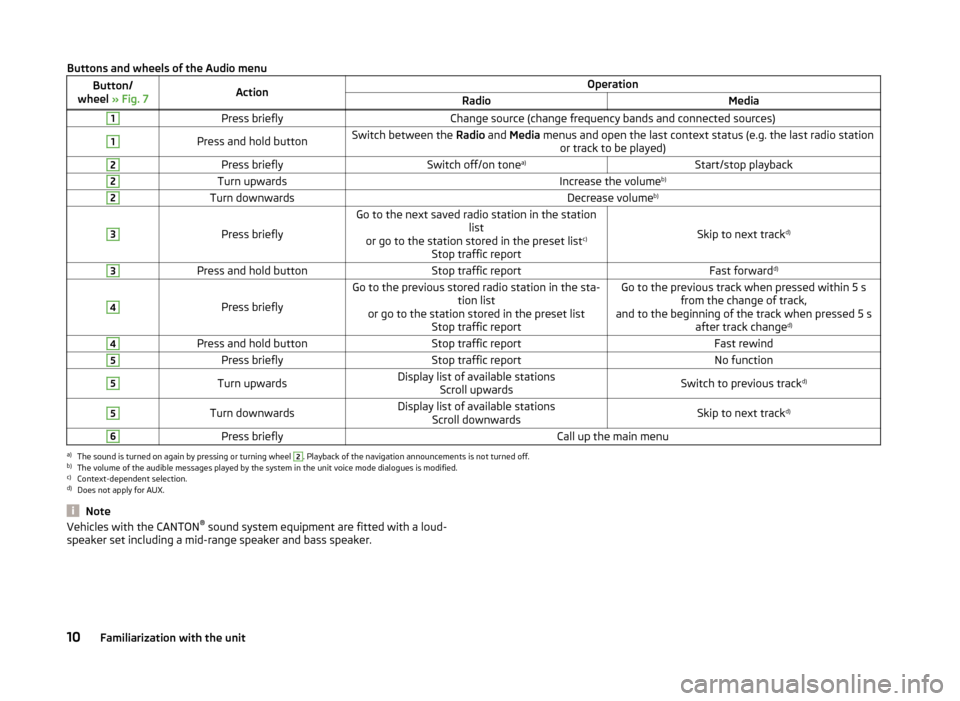
Operating the audio using the buttons / dials on the multifunction steering wheel
Fig. 7
Multifunction steering wheel: control buttons and wheels
Each item in the Audio menu displayed in the MAXI DOT display can be operat-
ed with the buttons/wheels on the multifunction steering wheel.
The information shown on the MAXI DOT display (depending on the menu
selected) ■ Radio
■ current frequency band of the radio station;
■ currently playing station of receivable radio stations in the given frequency
band if less than 5 are receivable;
■ if more than 5 stations can be received, a list of receivable radio stations is
displayed with an option to choose one of them;
■ TP traffic announcements.
■ Media
■ Name 1)
The display in the MAXI DOT is described in the
» Manual , chapter Information system
9Unit operation
Page 12 of 77
Buttons and wheels of the Audio menuButton/
wheel » Fig. 7ActionOperationRadioMedia1Press brieflyChange source (change frequency bands and connected sources)1Press and hold buttonSwitch between the Radio and Media menus and open the last context status (e.g. the last radio station
or track to be played)2Press brieflySwitch off/on tone a)Start/stop playback2Turn upwardsIncrease the volume b)2Turn downwardsDecrease volumeb)3
Press briefly
Go to the next saved radio station in the station
list
or go to the station stored in the preset list c)
Stop traffic report
Skip to next track d)
3Press and hold buttonStop traffic reportFast forward
d)4
Press briefly
Go to the previous stored radio station in the sta-
tion list
or go to the station stored in the preset list Stop traffic reportGo to the previous track when pressed within 5 sfrom the change of track,
and to the beginning of the track when pressed 5 s after track change d)4Press and hold buttonStop traffic reportFast rewind5Press brieflyStop traffic reportNo function5Turn upwardsDisplay list of available stations
Scroll upwardsSwitch to previous track d)5Turn downwardsDisplay list of available stations
Scroll downwardsSkip to next track d)6Press brieflyCall up the main menua)
The sound is turned on again by pressing or turning wheel
2
. Playback of the navigation announcements is not turned off.
b)
The volume of the audible messages played by the system in the unit voice mode dialogues is modified.
c)
Context-dependent selection.
d)
Does not apply for AUX.
NoteVehicles with the CANTON ®
sound system equipment are fitted with a loud-
speaker set including a mid-range speaker and bass speaker.10Familiarization with the unit
Page 19 of 77
The basic parameters for the unit can be set from the Main menu.
Call up the main menu›
Press
→ the function key with the symbol
.
Menus in the main menu for unit setup
■ Sound - Sound settings » page 17
■ Screen - Screen settings » page 18
■ Time and date - Time and date settings » page 18
■ Language - Set the device language 1)
■ Keypad: - Keypad display for text entry » page 18
■ More keypad languages - Enables you to enter characters other than those
available for the selected language » page 18
■ Units - Unit settings » page 19
■ Voice control - Voice control settings » page 19
■ Remove SD card 1 safely - Safe removal of the SD card from slot 1
■ Remove SD card 2 safely - Safe removal of the SD card from slot 2
■ Remove USB device safely - Safe removal of USB device
■ Factory settings - Reset to factory settings » page 19
■ Bluetooth - Settings for the Bluetooth ®
function » page 19
■ System information - Displays system information
■ Device part number: ... - Part number of the unit
■ Hardware: ... - Hardware used
■ Software: ... - Software version
■ Navigation database: ... - Version of the navigation data
■ Media Codec: … ... - Media codec version
■ Update software - manual software upgrade
■ Copyright - Information on licences and copyrights are only available in Eng-
lish
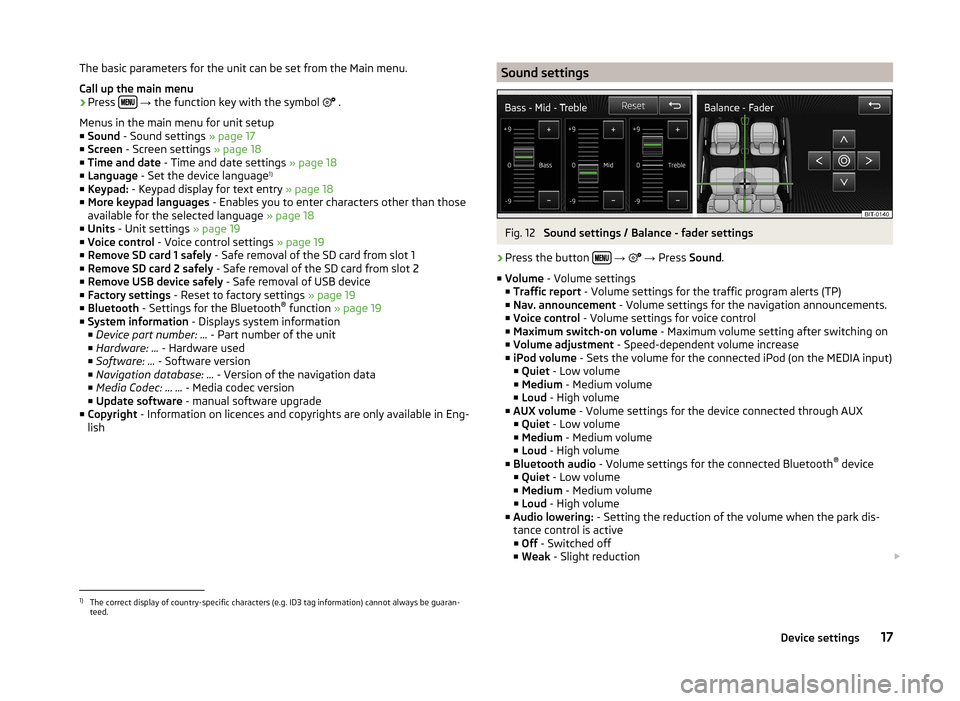
Sound settingsFig. 12
Sound settings / Balance - fader settings
›
Press the button
→
→ Press Sound .
■ Volume - Volume settings
■ Traffic report - Volume settings for the traffic program alerts (TP)
■ Nav. announcement - Volume settings for the navigation announcements.
■ Voice control - Volume settings for voice control
■ Maximum switch-on volume - Maximum volume setting after switching on
■ Volume adjustment - Speed-dependent volume increase
■ iPod volume - Sets the volume for the connected iPod (on the MEDIA input)
■ Quiet - Low volume
■ Medium - Medium volume
■ Loud - High volume
■ AUX volume - Volume settings for the device connected through AUX
■ Quiet - Low volume
■ Medium - Medium volume
■ Loud - High volume
■ Bluetooth audio - Volume settings for the connected Bluetooth ®
device
■ Quiet - Low volume
■ Medium - Medium volume
■ Loud - High volume
■ Audio lowering: - Setting the reduction of the volume when the park dis-
tance control is active ■ Off - Switched off
■ Weak - Slight reduction
1)
The correct display of country-specific characters (e.g. ID3 tag information) cannot always be guaran-
teed.
17Device settings
Page 21 of 77
Unit settings›
Press the button
→
→ Units .
■ Distance: - Distance units
■ km - Kilometres
■ mi - Miles
■ Speed: - Speed units
■ km/h - Kilometres per hour
■ mph - Miles per hour
■ Temperature: - Temperature units
■ °
- Degrees Celsius
■ ° - Degrees Fahrenheit
■ Volume: - Volume units
■ l - Litres
■ gal (US) - Gallons (US)
■ gal (UK) - Gallons (UK)
■ Consumption: - Consumption units
■ l/100km - Litres per 100 kilometres
■ km/l - Kilometres per litre
■ mpg (US) - Miles per gallon (US)
■ mpg (UK) - Miles per gallon (UK)
■ Gas consumption: - Gas consumption units
■ kg/100km - Kilograms per 100 km
■ km/kg - Kilometres per kilogram
■ m³/100 km - Cubic metres per 100 kilometres
■ km/m³ - Kilometres per cubic metre
■ Pressure: - Pressure units for tyre pressure
■ kPa - Kilopascal
■ bar - bar
■ psi - Pounds per square inch
Voice control settings
›
Press the button
→
→ Voice control .
■ Dialogue style: Setting the dialogue style
■ Long - Long dialogue (the system plays complete acoustic messages)
■ Short - Short dialogue (the system shortens some acoustic messages or
substitutes them with an acoustic signal)
■ Display available commands - Switch on/off the menus containing basic
voice commands when voice control is activated
■ Voice control session start tone - Switch on/off the audible signal that is
output when voice control is activated
■ Voice control session end tone - Switch on/off the audible signal that is out-
put when voice control is ended
■ Input tone in voice dialogue - Switch on/off the audible signal that is output
to signal that voice control is waiting for a command
Restore factory settings
›
Press the button
→
→ Factory settings .
■ Restore factory settings - Reset all factory settings
■ Sound - Restore default settings for sound
■ Radio - Restore default settings for radio
■ Vehicle - Restore default settings for the vehicle systems
■ Telephone - Restore default settings for phone
■ Media - Restore default settings for media
■ Voice control - Restore default settings for voice control
■ Navigation - Restore default settings for navigation
■ Bluetooth - Restore default settings for the Bluetooth ®
function
■ System - Restore the system default settings
Bluetooth ®
settings
›
Press the button
→
→ Bluetooth .
■ Bluetooth - Switch on/off Bluetooth ®
function
■ Visibility: - Switch on/off the visibility of the Bluetooth ®
device for other de-
vices
■ Visible - Visibility is always on
■ Hidden - Visibility is off
■ At start-up - Turns on visibility for 5 minutes after switching on the ignition
or until the driving speed has exceeded 5 km/h
■ Name: - Open the input screen with keyboard - Chang the device name
■ Paired devices - Display the list of paired Bluetooth ®
devices; connect or de-
lete a paired device; delete the list of paired devices ■ Delete all - Delete all paired Bluetooth ®
devices
■ - Delete the paired Bluetooth ®
device
■ Find devices - Searches for available external devices with enabled Blue-
tooth ®
functions and activated visibility
■ Bluetooth audio (A2DP/AVRCP) - Switch on/off the connection option for
Bluetooth ®
profiles A2DP and AVRCP 1)
19Device settings
Page 23 of 77
Audio
Radio
Operation
Introduction
This chapter contains information on the following subjects:
Main Menu
21
List of available stations
22
Search for radio stations and save
22
Search available stations (Scan)
23
Station logos
23
Traffic information
23
Station information (DAB)
24
First and foremost, pay attention to the safety instructions » page 4 , Impor-
tant notes .
The device allows analogue radio reception of FM and AM frequency ranges as
well as DAB digital radio reception.
DAB digital radio reception allows multiple stations to be transmitted in a sin-
gle frequency in the form of a so-called ensemble. It also allows for the trans-
mission of additional data and information (e.g. messages, sport, weather,
warnings, etc.).
CAUTION
■ Car parks, tunnels, tall buildings or mountains can disrupt the radio signal
even causing it to fail completely.■
For vehicles with disc antennas, if the discs are obscured with film or metal-
coated stickers, you may experience interference.
■
In countries where the RDS function is not supported sufficiently, we recom-
mend turning off the RDS and AF functions. Otherwise, these settings can af-
fect the functionality of the radio.
Main MenuFig. 13
Radio: Main menu
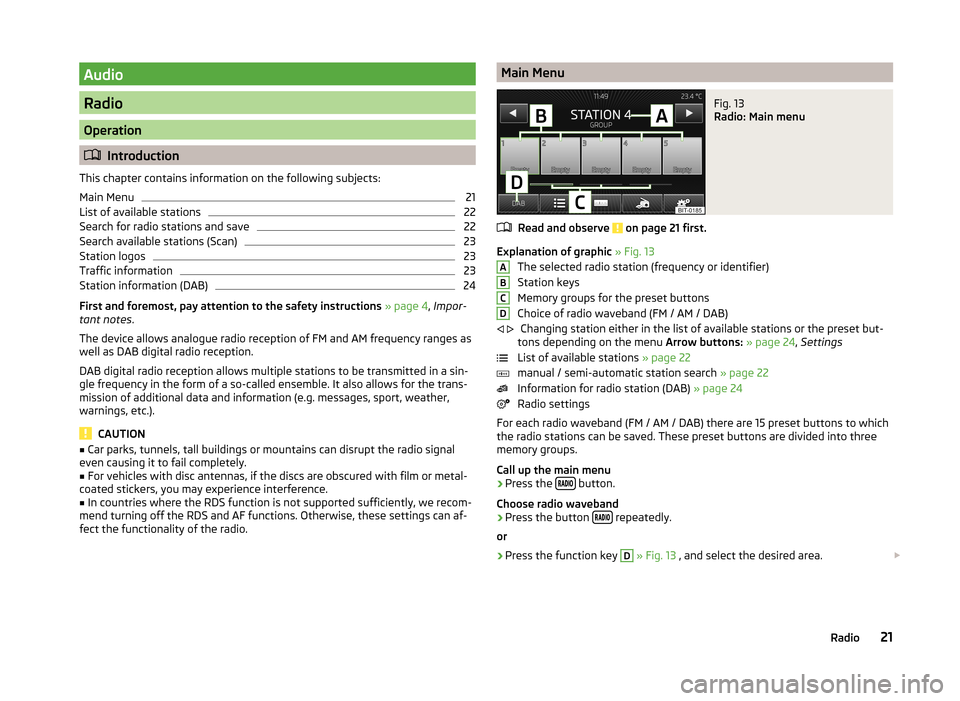
Read and observe on page 21 first.
Explanation of graphic » Fig. 13
The selected radio station (frequency or identifier)
Station keys
Memory groups for the preset buttons
Choice of radio waveband (FM / AM / DAB) Changing station either in the list of available stations or the preset but-
tons depending on the menu Arrow buttons: » page 24 , Settings
List of available stations » page 22
manual / semi-automatic station search » page 22
Information for radio station (DAB) » page 24
Radio settings
For each radio waveband (FM / AM / DAB) there are 15 preset buttons to which
the radio stations can be saved. These preset buttons are divided into three
memory groups.
Call up the main menu
›
Press the button.
Choose radio waveband
›
Press the button repeatedly.
or
›
Press the function key
D
» Fig. 13 , and select the desired area.
ABCD
21Radio
Page 24 of 77
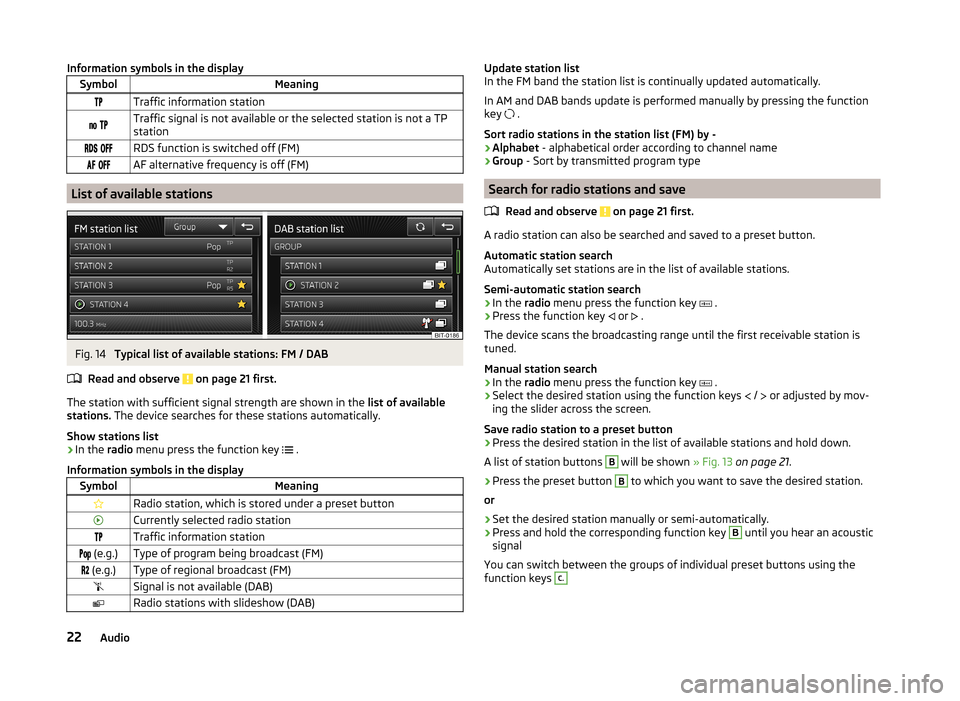
Information symbols in the displaySymbolMeaningTraffic information station Traffic signal is not available or the selected station is not a TPstation RDS function is switched off (FM) AF alternative frequency is off (FM)
List of available stations
Fig. 14
Typical list of available stations: FM / DAB
Read and observe on page 21 first.
The station with sufficient signal strength are shown in the list of availablestations. The device searches for these stations automatically.
Show stations list
›
In the radio menu press the function key .
Information symbols in the display
SymbolMeaningRadio station, which is stored under a preset buttonCurrently selected radio stationTraffic information station (e.g.)Type of program being broadcast (FM) (e.g.)Type of regional broadcast (FM)Signal is not available (DAB)Radio stations with slideshow (DAB)Update station listIn the FM band the station list is continually updated automatically.
In AM and DAB bands update is performed manually by pressing the functionkey .
Sort radio stations in the station list (FM) by -›Alphabet - alphabetical order according to channel name›Group - Sort by transmitted program type
Search for radio stations and save
Read and observe on page 21 first.
A radio station can also be searched and saved to a preset button.
Automatic station searchAutomatically set stations are in the list of available stations.
Semi-automatic station search
›
In the radio menu press the function key .
›
Press the function key or .
The device scans the broadcasting range until the first receivable station istuned.
Manual station search
›
In the radio menu press the function key .
›
Select the desired station using the function keys / or adjusted by mov-ing the slider across the screen.
Save radio station to a preset button
›
Press the desired station in the list of available stations and hold down.
A list of station buttons
B
will be shown » Fig. 13 on page 21.
›
Press the preset button
B
to which you want to save the desired station.
or
›
Set the desired station manually or semi-automatically.
›
Press and hold the corresponding function key
B
until you hear an acousticsignal
You can switch between the groups of individual preset buttons using thefunction keys
C.22Audio