buttons SKODA OCTAVIA 2014 3.G / (5E) Columbus Infotinment Navigation System Manual
[x] Cancel search | Manufacturer: SKODA, Model Year: 2014, Model line: OCTAVIA, Model: SKODA OCTAVIA 2014 3.G / (5E)Pages: 83, PDF Size: 5.16 MB
Page 26 of 83

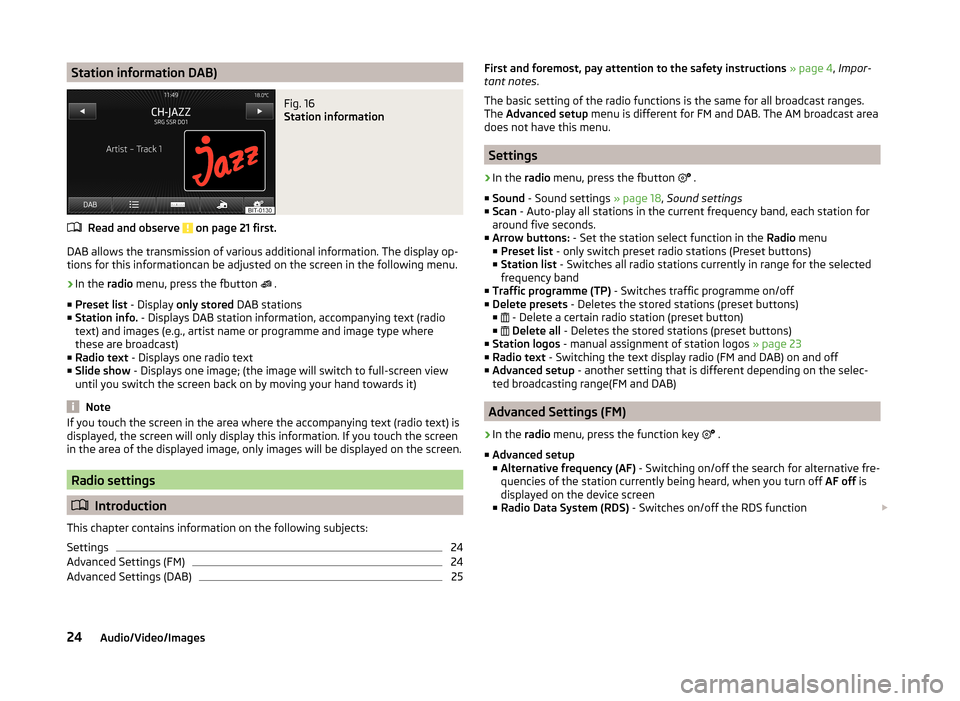
Station information DAB)Fig. 16
Station information
Read and observe on page 21 first.
DAB allows the transmission of various additional information. The display op-
tions for this informationcan be adjusted on the screen in the following menu.
›
In the radio menu, press the fbutton
.
■ Preset list - Display only stored DAB stations
■ Station info. - Displays DAB station information, accompanying text (radio
text) and images (e.g., artist name or programme and image type where
these are broadcast)
■ Radio text - Displays one radio text
■ Slide show - Displays one image; (the image will switch to full-screen view
until you switch the screen back on by moving your hand towards it)
Note
If you touch the screen in the area where the accompanying text (radio text) is
displayed, the screen will only display this information. If you touch the screen
in the area of the displayed image, only images will be displayed on the screen.
Radio settings
Introduction
This chapter contains information on the following subjects:
Settings
24
Advanced Settings (FM)
24
Advanced Settings (DAB)
25First and foremost, pay attention to the safety instructions » page 4 , Impor-
tant notes .
The basic setting of the radio functions is the same for all broadcast ranges.
The Advanced setup menu is different for FM and DAB. The AM broadcast area
does not have this menu.
Settings
›
In the radio menu, press the fbutton
.
■ Sound - Sound settings » page 18, Sound settings
■ Scan - Auto-play all stations in the current frequency band, each station for
around five seconds.
■ Arrow buttons: - Set the station select function in the Radio menu
■ Preset list - only switch preset radio stations (Preset buttons)
■ Station list - Switches all radio stations currently in range for the selected
frequency band
■ Traffic programme (TP) - Switches traffic programme on/off
■ Delete presets - Deletes the stored stations (preset buttons)
■ - Delete a certain radio station (preset button)
■
Delete all - Deletes the stored stations (preset buttons)
■ Station logos - manual assignment of station logos » page 23
■ Radio text - Switching the text display radio (FM and DAB) on and off
■ Advanced setup - another setting that is different depending on the selec-
ted broadcasting range(FM and DAB)
Advanced Settings (FM)
›
In the radio menu, press the function key
.
■ Advanced setup
■ Alternative frequency (AF) - Switching on/off the search for alternative fre-
quencies of the station currently being heard, when you turn off AF off is
displayed on the device screen
■ Radio Data System (RDS) - Switches on/off the RDS function
24Audio/Video/Images
Page 42 of 83

■Import contacts - Start the update of the phone book; the number of im-
ported contacts and number of contacts stored in the phone is displayed
■ Delete other user profiles - Delete up to three previous user profiles (con-
tacts, order of calls, call lists, speed dial buttons assigned to contacts)
■ Reminder: remember your mobile phone - Switch on/off the reminder for a
connected telephone; the reminder is output when the ignition is switched
off and the ignition key is removed (or the ignition is turned off and the driv-
er's door opened in the case of vehicles with the KESSY system)
■ Select ring tone - Selects the ring tone if the connected telephone does not
support the in-band ringing function 1)
■ Show pictures for contacts - Switch on/off the display of the image assigned
to the contact in the telephone 2)
Connect to the device to the mobile telephone
Introduction
This chapter contains information on the following subjects:
Conditions for successful pairing
40
Connect device with your telephone
41
Pair the mobile telephone withe the device
41
Connection to another paired telephone
42
Switching on/off the Bluetooth ®
profile
42
Delete the mobile telephone from the list of paired devices
43
Disconnection
43
First and foremost, pay attention to the safety instructions » page 4 , Impor-
tant notes .
The device is displayed in the telephone to be connected to as SKODA_BT_.
... is replaced with the last four symbols of the VIN vehicle identification num-
ber of your vehicle.
You can change the name of the device » page 20.
WARNINGThe device may require confirmation of certain features in the telephone
when pairing. Therefore do not carry out the pairing process while driving -
there is danger of accidents!
Note
■ The maximum number of phones registered is 20. When the maximum num-
ber of paired telephones has been reached, the next one will cause the paired
telephone that has not been used for the longest to be automatically deleted.■
In some countries the connection via the Bluetooth ®
function, may be limi-
ted. Further information can be obtained from local authorities.
■
The range of the Bluetooth ®
connection to the system is restricted to the ve-
hicle interior. This depends on local conditions and of interference with other
devices.
■
When pairing from the mobile telephone, follow the instructions in the own-
er's manual of the telephone.
Conditions for successful pairing
Read and observe
on page 40 first.
To connect a telephone with the device, the two devices must be paired.
Prerequisites for successful pairing: The ignition is switched on.
The Bluetooth ®
function of the device » page 20 and the mobile telephone
is switched on.
The visibility of the mobile phone is switched on » page 20.
The visibility of the mobile phone is switched on.
The telephone that is to be connected to must have an active connection
to another telephone.
The phone is within range of the Bluetooth ®
signal.
The phone is supported by the device.
The pairing can be initiated from the device or from the mobile telephone.
1)
The in-band ringing function makes it possible to use the ring tone of your telephone as the ring tone.
2)
This function is only supported by some telephones.
40Phone
Page 49 of 83

Navigation
Description of the navigation system
Preface to navigation
Introduction
This chapter contains information on the following subjects:
Main menu
47
Navigation data
48
First and foremost, pay attention to the safety instructions » page 4 , Impor-
tant notes .
The unit uses the GPS (Global Positioning System) satellite system for naviga-
tion. The satellite signal allows you to determine your current vehicle position.
If the unit is outside the range of the GPS satellite signal (e.g. in dense vegeta-
tion, in tunnels, parking garages, etc.), the unit navigates only with restrictions
using on-vehicle sensors.
Navigation is done: › by graphical instructions in device display screen and in the display of the in-
strument cluster;
› by announcements.
The navigation unit can be operated:
› using the buttons on the unit
» page 47;
› using the function keys in the unit screen
» page 47;
› using voice control
» page 16.
› via the display of the instrument cluster
» page 12 .
WARNING■
E.g. information about traffic lights, stop and right of way signs, parking
and stopping restrictions as well as lane constrictions or speed restrictions
is not detected for navigation by the device.■
Always adjust the driving speed to the road, traffic and weather condi-
tions.
WARNING (Continued)■ The nav. announcements provided may vary from the actual situations,
e.g. due to road works or out-of-date navigation data.■
The volume should be adjusted to ensure that acoustic signals from out-
side, e.g. sirens from vehicles which have the right of way, such as police,
ambulance and fire brigade vehicles, can be heard at all time.
CAUTION
In some countries, some unit features can no longer be selected when the ve-
hicle is running faster than a certain speed. These limitations comply with na-
tional legal requirements.
Main menu
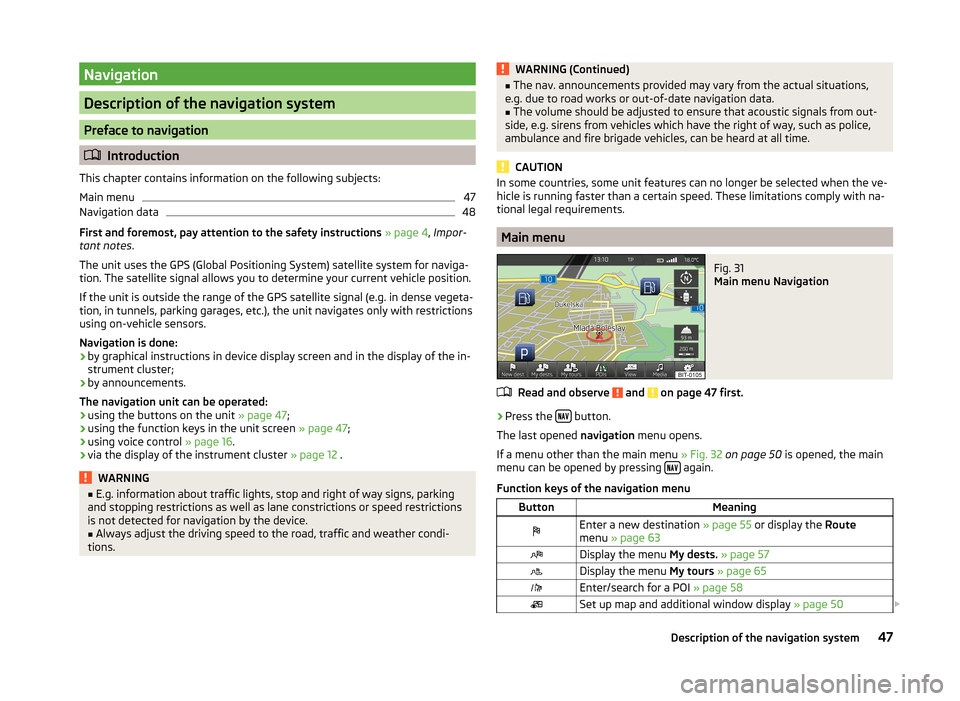
Fig. 31
Main menu Navigation
Read and observe and on page 47 first.
›
Press the button.
The last opened navigation menu opens.
If a menu other than the main menu » Fig. 32 on page 50 is opened, the main
menu can be opened by pressing
again.
Function keys of the navigation menu
ButtonMeaningEnter a new destination » page 55 or display the Route
menu » page 63Display the menu My dests. » page 57Display the menu My tours » page 65Enter/search for a POI » page 58Set up map and additional window display » page 5047Description of the navigation system