warning lights SKODA OCTAVIA 2014 3.G / (5E) Owner's Guide
[x] Cancel search | Manufacturer: SKODA, Model Year: 2014, Model line: OCTAVIA, Model: SKODA OCTAVIA 2014 3.G / (5E)Pages: 280, PDF Size: 35.53 MB
Page 50 of 280
For instance, if appears in this display, this means it is recommended that
you shift from 3rd into 4th gear.
The gear recommendation is intended only for vehicles with a manual trans-
mission or for vehicles with an automatic transmission in manual shift mode
(Tiptronic).WARNINGThe driver is always responsible for selecting the correct gear in different
driving situations, such as overtaking.
For the sake of the environment
A suitably selected gear has the following advantages.■It helps to reduce fuel consumption.■
It reduces the operating noise.
■
It protects the environment.
■
It benefits the durability and reliability of the engine.
Door, luggage compartment or bonnet warning
Read and observe
on page 45 first.
If at least one door is open, or the boot or bonnet is open, the display indicates
the relevant open door or boot/bonnet.
An acoustic signal will also sound if you drive the vehicle above 6 km/h when a
door is opne.
Auto-check control
Read and observe
on page 45 first.
Certain functions and conditions of individual vehicle systems are checked
continuously when the ignition is switched on.
Error messages and other information appears on the display.
Some messages are displayed simultaneously with the warning
lights » page 34 or warning icons in the display » page 40.
While the operational faults remain unrectified, the messages are always indi- cated again. After the message is displayed for the first time, the symbols
or
continue to be displayed without any extra messages for the driver.
SymbolMeaningDangerWarning
Driving data (Multifunction display)
Introduction
This chapter contains information on the following subjects:
Memory
48
Information overview
48
Warning at excessive speeds
50
The driving data display is only possible with the ignition switched on.
After the ignition is switched on, the function that was last selected before
switching off the ignition is displayed.
Individual information can be shown or hidden in the infotainment sys-
tem » Infotainment operating instructions , chapter Vehicle settings (CAR but-
ton) .
WARNINGConcentrate fully at all times on your driving! As the driver, you are fully re-
sponsible for the operation of your vehicle.
Note
In some national versions the displays appear in the Imperial system of meas-
urement.47Information system
Page 57 of 280
Unlocking and opening
Unlocking and locking
Introduction
This chapter contains information on the following subjects:
Locking/unlocking using the key via the lock cylinder
55
Unlocking/locking with the remote control key
55
Opening/closing a door
56
Unlocking / locking - KESSY
56
Safe securing system
57
Individual settings
57
Locking and unlocking the vehicle with the central locking button
58
Child safety lock
58
Malfunctions
58
Your car is equipped with a central locking system.
The central locking system allows you to lock and unlock all doors, the fuel fill-
er flap and the boot lid at the same time.
Depending on the equipment configuration, the following applies after
unlocking
› The turn signal lights flash twice as confirmation that the vehicle has been
unlocked.
› The doors, the boot lid and the fuel filler flap are unlocked.
› The interior light operated via the door contact illuminates.
› The SafeLock system is switched off.
› The indicator light in the driver door stops flashing.
› The exterior mirrors are folded back into the driving position.
› The anti-theft alarm system is deactivated.
If the vehicle is unlocked and a door or the boot lid not opened within the next
45 seconds, the vehicle will lock again automatically and the safe securing sys-
tem or anti-theft alarm system will be switched back on. This function is inten-
ded to prevent the car being unlocked unintentionally.
The seat and mirror are adjusted after the vehicle is unlocked » page 89.
Depending on the equipment configuration, the following applies after
locking
› The turn signal lights flash once as confirmation that the vehicle has been
locked.
› The doors, the boot lid and the fuel filler flap are locked.
› The interior light operated via the door contact goes out.
› The SafeLock system is switched on.
› The warning light in the driver door begins flashing.
› The exterior mirrors are folded back into the park position.
› The anti-theft alarm system is activated.
If the doors or the luggage compartment lid remain open after the vehicle has
been locked, the turn signal lights do not flash until they have been closed.
The current position of the seat and mirror after the vehicle is
locked » page 89 .WARNING■
Never leave the key in the vehicle when you exit the vehicle. Unauthor-
ized persons, such as children, for example, could lock the car, turn on the
ignition or start the engine - there is a danger of injury and accidents!■
When leaving the vehicle, never leave persons who are not completely in-
dependent, such as children, unattended in the vehicle. The children might,
for example, release the handbrake or take the vehicle out of gear. The ve-
hicle could then start to move – risk of injury and accidents! These individu-
als might also not be able to leave the vehicle on their own or to help
themselves. Can be fatal at very high or very low temperatures!
CAUTION
■ Each key contains electronic components; therefore it must be protected
against moisture and severe shocks.■
Keep the groove of the keys absolutely clean. Impurities (textile fibres, dust,
etc.) have a negative effect on the functionality of the locking cylinder and ig-
nition lock.
■
The battery must be replaced if the central locking or anti-theft alarm system
does react to the remote control at less than approx. 3 metres
away » page 224 .
■
When leaving the vehicle, always check if it is locked.
■
If the driver's door has been opened, the vehicle cannot be locked.
54Using the system
Page 59 of 280
Opening/closing a doorFig. 35
Door handle/door opening lever
Read and observe
and on page 54 first.
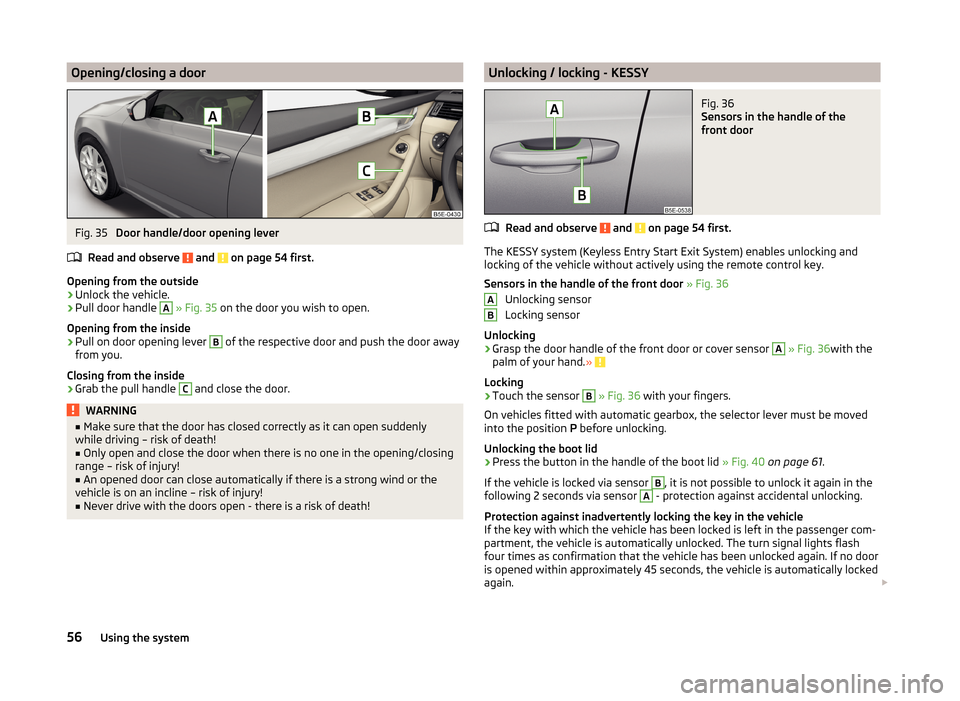
Opening from the outside
›
Unlock the vehicle.
›
Pull door handle
A
» Fig. 35 on the door you wish to open.
Opening from the inside
›
Pull on door opening lever
B
of the respective door and push the door away
from you.
Closing from the inside
›
Grab the pull handle
C
and close the door.
WARNING■ Make sure that the door has closed correctly as it can open suddenly
while driving – risk of death!■
Only open and close the door when there is no one in the opening/closing
range – risk of injury!
■
An opened door can close automatically if there is a strong wind or the
vehicle is on an incline – risk of injury!
■
Never drive with the doors open - there is a risk of death!
Unlocking / locking - KESSYFig. 36
Sensors in the handle of the
front door
Read and observe and on page 54 first.
The KESSY system (Keyless Entry Start Exit System) enables unlocking and
locking of the vehicle without actively using the remote control key.
Sensors in the handle of the front door » Fig. 36
Unlocking sensor
Locking sensor
Unlocking
›
Grasp the door handle of the front door or cover sensor
A
» Fig. 36 with the
palm of your hand. »
Locking
›
Touch the sensor
B
» Fig. 36 with your fingers.
On vehicles fitted with automatic gearbox, the selector lever must be moved
into the position P before unlocking.
Unlocking the boot lid
›
Press the button in the handle of the boot lid » Fig. 40 on page 61 .
If the vehicle is locked via sensor
B
, it is not possible to unlock it again in the
following 2 seconds via sensor
A
- protection against accidental unlocking.
Protection against inadvertently locking the key in the vehicle
If the key with which the vehicle has been locked is left in the passenger com-
partment, the vehicle is automatically unlocked. The turn signal lights flash
four times as confirmation that the vehicle has been unlocked again. If no door
is opened within approximately 45 seconds, the vehicle is automatically locked
again.
AB56Using the system
Page 60 of 280
If the key with which the vehicle was locked remains in the boot, the boot lid is
released (partially opened). The turn-signal lights flash four times as an indica-
tion that the boot lid has been released again. The boot lid remains re-
leased (partially opened). The other doors remain locked.
The following message is shown in the information cluster display. Key in vehicle.
KEY IN VEHICLE
Additionally, on vehicles which are fitted with the anti-theft alarm system, an audible signal sounds.
System fault
If there is a fault in the system, the following message will appear in the dis- play of the instrument cluster.
Keyless access system faulty.
KEYLESS ACCESS SYSTEM FAULTY
CAUTION
■ Do not use objects which might prevent direct contact between the hand
and the grip sensor.■
Some types of gloves can impair the function of the grip sensor.
■
There is no automatic locking after leaving the car.
■
The vehicle cannot be locked from the outside if the ignition has not been
turned off.
Safe securing system
Read and observe
and on page 54 first.
The door locks are blocked automatically if the vehicle is locked from the out-
side. The vehicle can not be opened from the inside any more.
This fact is pointed out by the following message on the display of the instru-
ment cluster after switching out the ignition.
Check SAFELOCK! Owner's manual!
CHECK SAFELOCK
Switching off
The safe lock can be switched off in one of the following ways.
›
By locking twice within 2 seconds.
›
By disabling the interior monitoring » page 60, Interior monitor and towing
protection .
If the vehicle is locked and the safe securing system is switched off, the door
can be opened separately from the inside by a single pull on opening lever.
Switching on
Safelock switches on automatically the next time the vehicle is locked.
Switch-off display
The indicator light in the driver door flashes for about 2 seconds fast, goes out
and starts to flash at longer intervals after about 30 seconds.
Switch-on display
The warning light flashes for around 2 seconds in quick succession, afterwards
it begins to flash evenly at longer intervals.WARNINGIf the car is locked and the safe securing system activated, no people must
remain in the car as it will then not be possible to either unlock a door or
open a window from the inside. The locked doors make it more difficult for
rescuers to get into the vehicle in an emergency – risk to life!
Individual settings
Read and observe
and on page 54 first.
The following functions of the central locking system can be set individual-
ly » owner's manual of Infotainment , chapter Vehicle settings (button CAR) .
Opening a single door
This function allows you to unlock only the driver's door and the fuel filler flap.
The other doors and the boot lid remain locked and are only unlocked after be-
ing opened again.
Unlocking a vehicle side door
This function enables you to unlock both doors on the driver's side and the
fuel filler flap. The other doors and the boot lid remain locked and are only un-
locked after being opened again.
Unlock all doors
This function allows you to unlock all doors, the boot lid and the fuel filler flap.
Automatic locking/unlocking
All doors are locked from a speed of around 15 km/h. The button in the handle
of the boot lid is deactivated.
57Unlocking and opening
Page 62 of 280
Displaying an error
If the warning light in the driver's door initially flashes quickly for around 2 sec-
onds, and then lights up for 30 seconds without interruption before flashing
again slowly, you will need to seek the assistance of a specialist garage.
Discharged battery in the remote control key
If the red indicator light B
» Fig. 34 on page 55 does not flash when you press
a button on the remote control key, the battery is empty.
If the voltage of the battery in the remote control key is too low, the following
message appears in the display of the instrument cluster.
Change the key battery!
KEY BATTERY PLEASE CHANGE
Replace the battery » page 224.
Anti-theft alarm system
Introduction
This chapter contains information on the following subjects:
Activating/deactivating
59
Interior monitor and towing protection
60
The anti-theft alarm system increases the level of protection against people
trying to break into the vehicle.
The alarm system triggers audible and visual signals if an attempt is made to
break into the vehicle (hereafter referred to only as alarm).
Triggering the alarm
The alarm is triggered when the following unauthorized actions are carried out
on the locked vehicle.
› Opening the bonnet.
› Opening the boot lid.
› Opening the doors.
› Manipulation of the ignition lock.
› Towing the vehicle
» page 60.
› Movement in the vehicle
» page 60.
› Sudden and significant voltage drop of the electrical system.
› Uncoupling the trailer
» page 174, Attaching and detaching trailers .
If the driver's door of a vehicle with a remote control is unlocked and opened
by the lock cylinder, then the alarm is triggered.
Switching off the alarm
The alarm is turned off by pressing the button on the remote control key or
switching on the ignition.
CAUTION
Before leaving the vehicle, it must be checked that all of the windows, doors
and the sliding/tilting roof are locked in order to ensure the full functionality of
the anti-theft alarm system.
Note
The working life of the alarm siren is 5 years.
Activating/deactivating
Read and observe
on page 59 first.
Activating
The anti-theft alarm system is activated automatically approximately 30 sec-
onds after the vehicle is locked.
If you unlock the vehicle and do not open a door or the boot lid within the next
45 seconds, the vehicle will lock again automatically and the safelock system
or anti-theft alarm system will be switched on. This function is intended to
prevent the car being unlocked unintentionally.
Deactivating
The anti-theft alarm system is deactivated automatically after the vehicle is
unlocked. If the vehicle is not opened within 45 seconds, the anti-theft alarm
system is automatically activated again.
The alarm system is also deactivated if you unlock the driver door using the
key within 45 seconds of locking the vehicle.
59Unlocking and opening
Page 74 of 280
Lights and visibility
Lights
Introduction
This chapter contains information on the following subjects:
Operating the lights
71
Daylight running lights (DAY LIGHT)
72
Turn signal and main beam
73
Automatic driving lamp control
73
Adaptive headlights (AFS)
74
High Beam assistant
75
Fog lights
76
Fog lights with the CORNER function
76
Rear fog light
76
COMING HOME / LEAVING HOME
77
Hazard warning light system
77
Parking lights
78
Driving abroad
78
The lights work only with the ignition on, unless otherwise stated.
The arrangement of the controls right-hand drive models may differ from the layout shown in » Fig. 50 on page 71 . The symbols that mark the individual
positions of the controls are identical.
Keep the headlights lenses clean. The following guidelines must be ob-
served » page 184 , Headlight glasses .
WARNING■
The activation of the lights should only be undertaken in accordance with
national legal requirements.■
The driver is always responsible for the correct settings and use of the
lights.
WARNING (Continued)■ The automatic driving lamp control only operates as a support and
does not release the driver from his responsibility to check the light and, if
necessary, to switch on the light depending on the light conditions. The
light sensor cannot, for example, detect rain or snow. Under these condi-
tions we recommend switching on the low beam or fog lights!■
Never drive with only the side lights on! The side lights are not bright
enough to light up the road sufficiently in front of you or to be seen by oth-
er oncoming traffic. Therefore always switch on the low beam when it is
dark or if visibility is poor.
Note
■ The headlights may mist up temporarily. When the driving lights are switched
on, the light outlet surfaces are free from mist after a short period, although
the headlight lenses may still be misted up in the peripheral areas. This mist
has no influence on the life of the lighting system.■
The instruments are also illuminated when the side light, low or high beam
light is switched on. The brightness of the instrument lighting can be activated
or deactivated in the Infotainment » Operating instructions for Infotainment ,
chapter Vehicle settings (CAR button) .
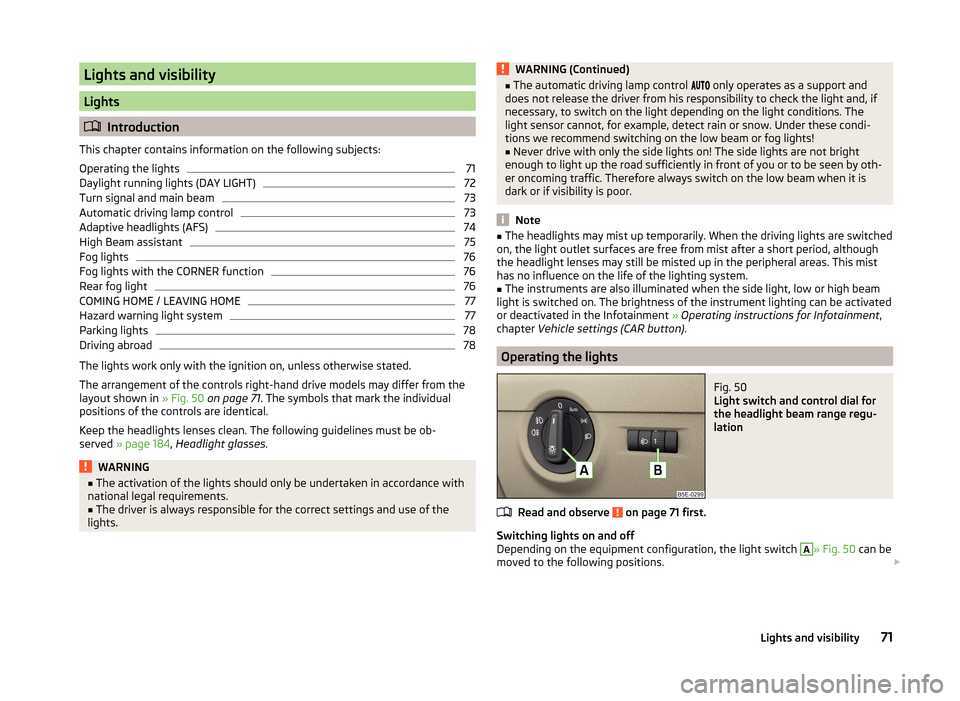
Operating the lights
Fig. 50
Light switch and control dial for
the headlight beam range regu-
lation
Read and observe on page 71 first.
Switching lights on and off
Depending on the equipment configuration, the light switch
A
» Fig. 50 can be
moved to the following positions.
71Lights and visibility
Page 75 of 280

Turn switchSwitching off lights (except daytime running lights)Switching lights on and off automatically » page 73
Switching on the parking light or parking lights » page 78
Switching on the low beam
Pull switch Switching on the front fog light » page 76
Switching on the rear fog light » page 76
Headlight beam range regulation
Turning the dial B
» Fig. 50 from the position
in
means the headlight
beam range is gradually adjusted, thereby shortening the beam of light.
The positions of the width of illumination correspond approximately to the fol-
lowing car load.
Front seats occupied, boot empty
All seats occupied, boot empty
All seats occupied, boot loaded
Driver seat occupied, boot loaded
We recommend you adjust the headlight beam when the low beam is switched
on.
Bi-Xenon headlights
The Bi-Xenon bulbs adapt automatically to the load and driving state of the
vehicle when the ignition is switched on and when driving. Vehicles that are
equipped with Bi-Xenon headlights do not have a manual headlight range ad-
justment control.
WARNINGAlways adjust the headlight beam to satisfy the following conditions.■The vehicle does not dazzle other road users, especially oncoming vehi-
cles.■
The beam range is sufficient for safe driving.
Note
■ The light switch is in position or and the ignition is turned off, the low
beam is switched off automatically and the status light is lit. The side light
goes out after the ignition key is removed.■
If there is a fault in the light switch, the low beam comes on automatically.
Daylight running lights (DAY LIGHT)
Read and observe
on page 71 first.
The daytime running lights (the only function) provides the lighting of the front
vehicle range.
The daytime running lights are switched on automatically if the following
conditions are met.
The light switch is in the position
or
» Fig. 50 on page 71 .
The ignition is switched on.
The parking aid is activated.
Activating/deactivating daytime operation on vehicles with Infotainment
The function can be activated/deactivated in the Infotainment » Infotainment
manual , chapter Vehicle settings (CAR button) .
Deactivating on vehicles without Infotainment
›
Switch off the ignition.
›
Pull the turning signal and main beam lever ( » Fig. 51 on page 73 ) towards
the steering wheel, push down and hold in this position.
›
Switch on the ignition.
›
Hold the lever in this position for at least. 3 seconds after switching on the
ignition.
Activating on vehicles without Infotainment
›
Switch off the ignition.
›
Pull the turning signal and main beam lever towards the steering wheel,
push it up and hold it in this position.
›
Switch on the ignition.
›
Hold the lever in this position for at least. 3 seconds after switching on the
ignition.
WARNINGWhen the daytime running light is switched on, the side lights (neither at
the front or rear) and the number plate lights are not lit. Therefore always
switch on the low beam when the visibility is poor.72Using the system
Page 76 of 280
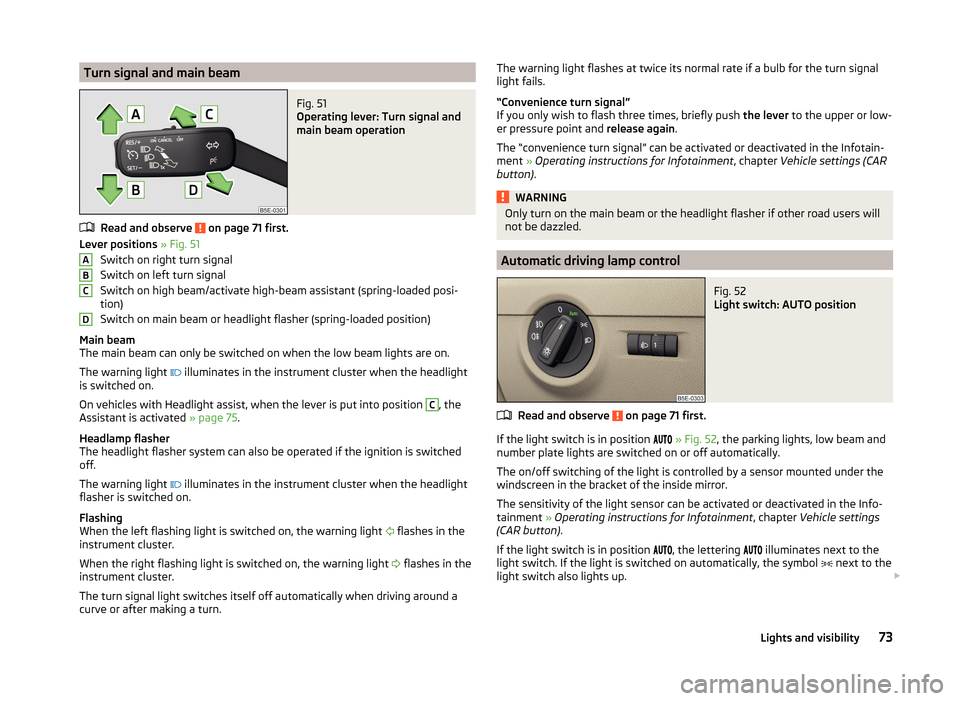
Turn signal and main beamFig. 51
Operating lever: Turn signal and
main beam operation
Read and observe on page 71 first.
Lever positions » Fig. 51
Switch on right turn signal
Switch on left turn signal
Switch on high beam/activate high-beam assistant (spring-loaded posi-
tion)
Switch on main beam or headlight flasher (spring-loaded position)
Main beam
The main beam can only be switched on when the low beam lights are on.
The warning light illuminates in the instrument cluster when the headlight
is switched on.
On vehicles with Headlight assist, when the lever is put into position
C
, the
Assistant is activated » page 75.
Headlamp flasher
The headlight flasher system can also be operated if the ignition is switched
off.
The warning light illuminates in the instrument cluster when the headlight
flasher is switched on.
Flashing
When the left flashing light is switched on, the warning light flashes in the
instrument cluster.
When the right flashing light is switched on, the warning light flashes in the
instrument cluster.
The turn signal light switches itself off automatically when driving around a
curve or after making a turn.
ABCDThe warning light flashes at twice its normal rate if a bulb for the turn signal
light fails.
“Convenience turn signal”
If you only wish to flash three times, briefly push the lever to the upper or low-
er pressure point and release again.
The “convenience turn signal” can be activated or deactivated in the Infotain- ment » Operating instructions for Infotainment , chapter Vehicle settings (CAR
button) .WARNINGOnly turn on the main beam or the headlight flasher if other road users will
not be dazzled.
Automatic driving lamp control
Fig. 52
Light switch: AUTO position
Read and observe on page 71 first.
If the light switch is in position
» Fig. 52 , the parking lights, low beam and
number plate lights are switched on or off automatically.
The on/off switching of the light is controlled by a sensor mounted under the
windscreen in the bracket of the inside mirror.
The sensitivity of the light sensor can be activated or deactivated in the Info-
tainment » Operating instructions for Infotainment , chapter Vehicle settings
(CAR button) .
If the light switch is in position
, the lettering
illuminates next to the
light switch. If the light is switched on automatically, the symbol
next to the
light switch also lights up.
73Lights and visibility
Page 77 of 280

Automatic driving light control during rain
The daytime running lights are switched on automatically if the following con-
ditions are met.
The light switch is in the position
» Fig. 52 .
Automatic wiping with rain - position 1
or wiping - position
2
or
3
is
turned on » page 82, Windscreen wipers and washers .
The windscreen wipers are on for more than 30 s.
The light turns off about 4 minutes after turning off the wipers.
The function can be activated/deactivated in the Infotainment » Infotainment
manual , chapter Vehicle settings (CAR button) .
CAUTION
Do not attach any stickers or similar objects in front of the light sensor on the
windscreen to avoid impairing the function or its reliability.
Adaptive headlights (AFS)
Read and observe
on page 71 first.
The AFS system makes sure the street remains lit up depending on the traffic
and weather situation.
The AFS system automatically adjusts the cone of light in front of the vehicle
based on the vehicle speed, whether the windscreen wipers are in use, the
rear fog lights, and data from Infotainment Navigation.
The AFS system works as long as the light switch is in position
» page 73 .
The AHL system operates in the following modes.
Out of town mode
The cone of light in front of the vehicle is similar to the low beam.
City mode
The cone of light in front of the vehicle is adjusted so that it illuminates the
adjacent pavement, crossings, etc. The mode is active at speeds of 15-50 km/h.
Motorway mode
The cone of light in front of the vehicle is adjusted so that the driver can re-
spond in time to an obstruction or other hazard in time. The mode is active at
speeds above 110 km/h.
Rain mode
The cone of light in front of the vehicle is adjusted so that the driver can re-
duce the glare from oncoming vehicles in rain.
The mode is active at speeds of 50 – 90 km/h and if the windscreen wipers
continuously operate for a period of time longer than 2 minutes. The mode is
deactivated when the windscreen wipers are switched off for longer than 8
minutes.
Fog mode
The cone of light in front of the vehicle is adjusted so that the driver is not
dazzled by the reflection of the cone of light by fog in front of the vehicle.
The mode is active at speeds of 15 – 70 km/h and if the rear fog light is switch-
ed on for a period of time longer than 10 seconds. The mode is deactivated
when the rear fig light is switched off for longer than 5 seconds.
Dynamic cornering lights
The cone of light in front of the vehicle is adjusted to the steering angle so
that the road in the curve is illuminated. This function is active at speeds
greater than 10 km.h and in all AFS modes.
travel mode (“tourist light”)
This mode makes it possible to drive in countries with opposing traffic system
(driving on the left/right) without dazzling the oncoming vehicles.
When this mode is active, the above-mentioned modes and the side swivel of
the headlights is deactivated.
This mode can be activated/deactivated in the Infotainment » Infotainment
operating instructions , chapter Vehicle settings (CAR button) .WARNINGIf the AFS system is defective, the headlights are automatically lowered to
the emergency position, which prevents a possible dazzling of oncoming
traffic. This reduces the cone of light in front of the vehicle. Drive carefully
and visit a specialist garage as soon as possible.
Note
If the Eco driving mode is selected, the AFS system is deactivated » page 160.74Using the system
Page 78 of 280
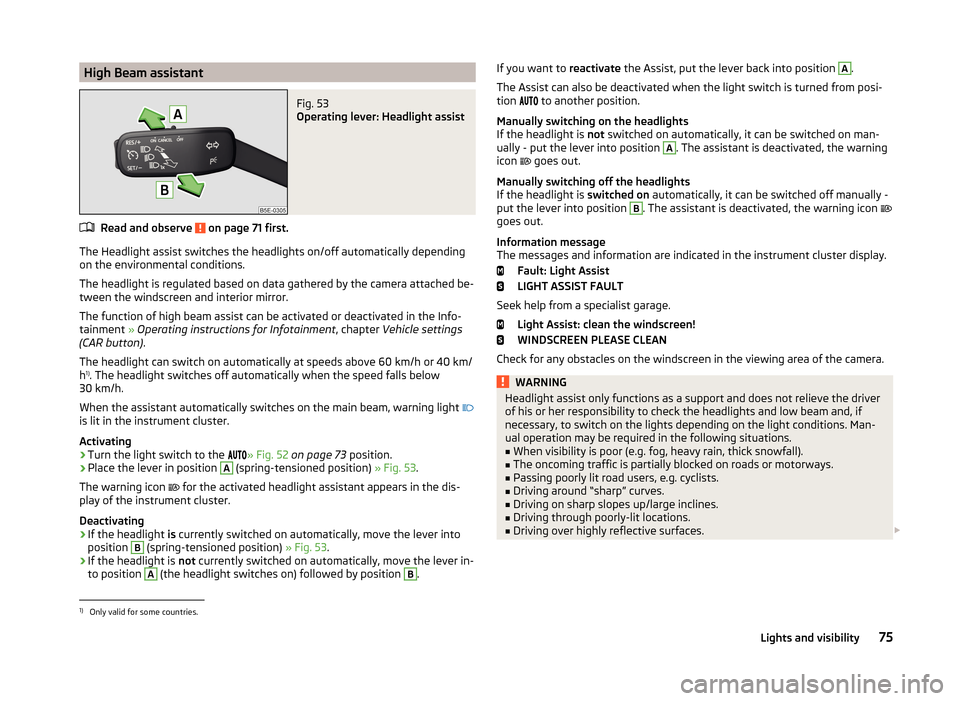
High Beam assistantFig. 53
Operating lever: Headlight assist
Read and observe on page 71 first.
The Headlight assist switches the headlights on/off automatically depending
on the environmental conditions.
The headlight is regulated based on data gathered by the camera attached be-
tween the windscreen and interior mirror.
The function of high beam assist can be activated or deactivated in the Info- tainment » Operating instructions for Infotainment , chapter Vehicle settings
(CAR button) .
The headlight can switch on automatically at speeds above 60 km/h or 40 km/
h 1)
. The headlight switches off automatically when the speed falls below
30 km/h.
When the assistant automatically switches on the main beam, warning light
is lit in the instrument cluster.
Activating
›
Turn the light switch to the » Fig. 52
on page 73 position.
›
Place the lever in position
A
(spring-tensioned position) » Fig. 53.
The warning icon for the activated headlight assistant appears in the dis-
play of the instrument cluster.
Deactivating
›
If the headlight is currently switched on automatically, move the lever into
position
B
(spring-tensioned position) » Fig. 53.
›
If the headlight is not currently switched on automatically, move the lever in-
to position
A
(the headlight switches on) followed by position
B
.
If you want to reactivate the Assist, put the lever back into position A.
The Assist can also be deactivated when the light switch is turned from posi-
tion
to another position.
Manually switching on the headlights
If the headlight is not switched on automatically, it can be switched on man-
ually - put the lever into position A
. The assistant is deactivated, the warning
icon
goes out.
Manually switching off the headlights
If the headlight is switched on automatically, it can be switched off manually -
put the lever into position
B
. The assistant is deactivated, the warning icon
goes out.
Information message
The messages and information are indicated in the instrument cluster display.
Fault: Light Assist
LIGHT ASSIST FAULT
Seek help from a specialist garage. Light Assist: clean the windscreen!
WINDSCREEN PLEASE CLEAN
Check for any obstacles on the windscreen in the viewing area of the camera.
WARNINGHeadlight assist only functions as a support and does not relieve the driver
of his or her responsibility to check the headlights and low beam and, if
necessary, to switch on the lights depending on the light conditions. Man-
ual operation may be required in the following situations.■
When visibility is poor (e.g. fog, heavy rain, thick snowfall).
■
The oncoming traffic is partially blocked on roads or motorways.
■
Passing poorly lit road users, e.g. cyclists.
■
Driving around “sharp” curves.
■
Driving on sharp slopes up/large inclines.
■
Driving through poorly-lit locations.
■
Driving over highly reflective surfaces.
1)
Only valid for some countries.
75Lights and visibility