seats SKODA OCTAVIA 2014 3.G / (5E) Service Manual
[x] Cancel search | Manufacturer: SKODA, Model Year: 2014, Model line: OCTAVIA, Model: SKODA OCTAVIA 2014 3.G / (5E)Pages: 280, PDF Size: 35.53 MB
Page 214 of 280
Do-it-yourself
Emergency equipment, and self-help
Emergency equipment
Introduction
This chapter contains information on the following subjects:
Location of the first-aid kit and warning triangle
211
Location of the reflective vest
211
Fire extinguisher
211
Vehicle tool kit
212
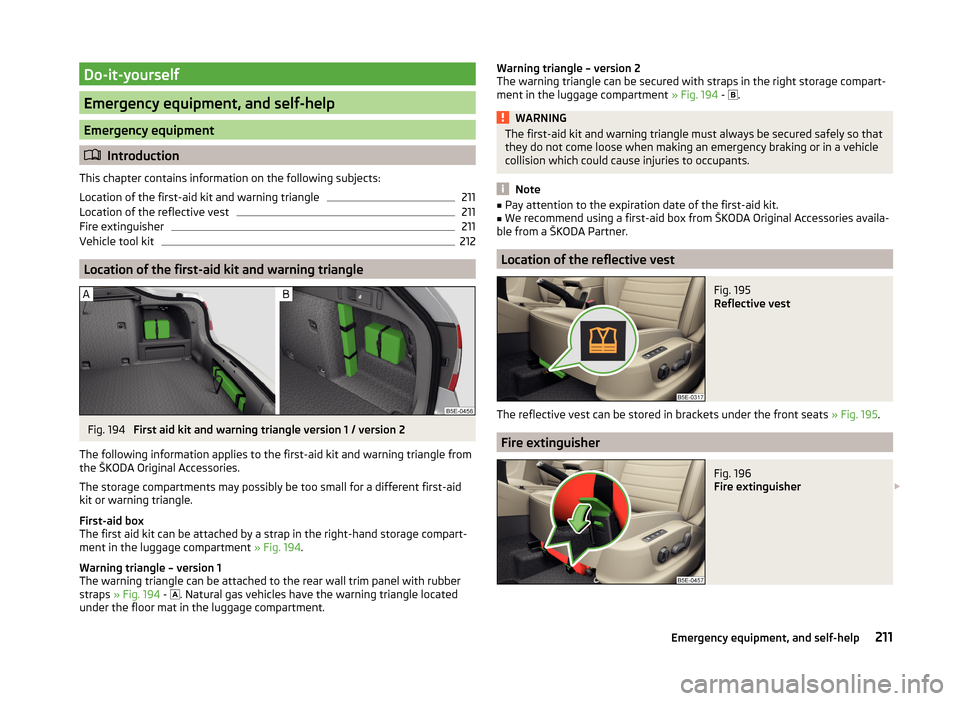
Location of the first-aid kit and warning triangle
Fig. 194
First aid kit and warning triangle version 1 / version 2
The following information applies to the first-aid kit and warning triangle from the ŠKODA Original Accessories.
The storage compartments may possibly be too small for a different first-aid
kit or warning triangle.
First-aid box
The first aid kit can be attached by a strap in the right-hand storage compart-
ment in the luggage compartment » Fig. 194.
Warning triangle – version 1
The warning triangle can be attached to the rear wall trim panel with rubber
straps » Fig. 194 -
. Natural gas vehicles have the warning triangle located
under the floor mat in the luggage compartment.
Warning triangle – version 2
The warning triangle can be secured with straps in the right storage compart-
ment in the luggage compartment » Fig. 194 -
.WARNINGThe first-aid kit and warning triangle must always be secured safely so that
they do not come loose when making an emergency braking or in a vehicle
collision which could cause injuries to occupants.
Note
■ Pay attention to the expiration date of the first-aid kit.■We recommend using a first-aid box from ŠKODA Original Accessories availa-
ble from a ŠKODA Partner.
Location of the reflective vest
Fig. 195
Reflective vest
The reflective vest can be stored in brackets under the front seats » Fig. 195.
Fire extinguisher
Fig. 196
Fire extinguisher
211Emergency equipment, and self-help
Page 218 of 280
CAUTION■Use the pressure of your hand only, do not strike the full wheel trim. The
cover could be damaged.■
If wheel trims are fitted, an adequate flow of air must be assured in order to
cool the brake system.
Note
We recommend that you use child seats from ŠKODA Original Accessories.
Wheel bolts
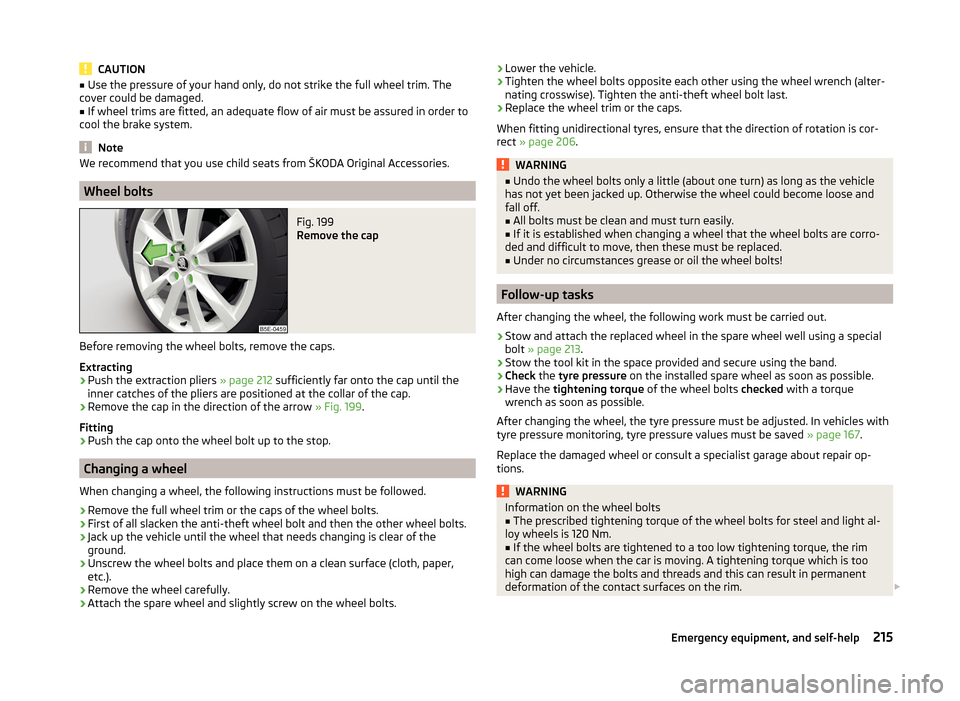
Fig. 199
Remove the cap
Before removing the wheel bolts, remove the caps.
Extracting
›
Push the extraction pliers » page 212 sufficiently far onto the cap until the
inner catches of the pliers are positioned at the collar of the cap.
›
Remove the cap in the direction of the arrow » Fig. 199.
Fitting
›
Push the cap onto the wheel bolt up to the stop.
Changing a wheel
When changing a wheel, the following instructions must be followed.
›
Remove the full wheel trim or the caps of the wheel bolts.
›
First of all slacken the anti-theft wheel bolt and then the other wheel bolts.
›
Jack up the vehicle until the wheel that needs changing is clear of the
ground.
›
Unscrew the wheel bolts and place them on a clean surface (cloth, paper, etc.).
›
Remove the wheel carefully.
›
Attach the spare wheel and slightly screw on the wheel bolts.
› Lower the vehicle.›Tighten the wheel bolts opposite each other using the wheel wrench (alter-
nating crosswise). Tighten the anti-theft wheel bolt last.›
Replace the wheel trim or the caps.
When fitting unidirectional tyres, ensure that the direction of rotation is cor-
rect » page 206 .
WARNING■
Undo the wheel bolts only a little (about one turn) as long as the vehicle
has not yet been jacked up. Otherwise the wheel could become loose and
fall off.■
All bolts must be clean and must turn easily.
■
If it is established when changing a wheel that the wheel bolts are corro-
ded and difficult to move, then these must be replaced.
■
Under no circumstances grease or oil the wheel bolts!
Follow-up tasks
After changing the wheel, the following work must be carried out.
›
Stow and attach the replaced wheel in the spare wheel well using a special
bolt » page 213 .
›
Stow the tool kit in the space provided and secure using the band.
›
Check the tyre pressure on the installed spare wheel as soon as possible.
›
Have the tightening torque of the wheel bolts checked with a torque
wrench as soon as possible.
After changing the wheel, the tyre pressure must be adjusted. In vehicles with
tyre pressure monitoring, tyre pressure values must be saved » page 167.
Replace the damaged wheel or consult a specialist garage about repair op-
tions.
WARNINGInformation on the wheel bolts■The prescribed tightening torque of the wheel bolts for steel and light al-
loy wheels is 120 Nm.■
If the wheel bolts are tightened to a too low tightening torque, the rim
can come loose when the car is moving. A tightening torque which is too
high can damage the bolts and threads and this can result in permanent
deformation of the contact surfaces on the rim.
215Emergency equipment, and self-help
Page 231 of 280
Fuses and light bulbs
Fuses
Introduction
This chapter contains information on the following subjects:
Fuses in the dash panel – LHD
228
Fuses in the dash panel – RHD
229
Assignment of the fuses in the dash panel
229
Fuses in the engine compartment
230
Assignment of fuses in the engine compartment
231
Individual electrical circuits are protected by fuses.
Switch off the ignition and the corresponding power consuming device before
replacing a fuse.
Find out which fuse belongs to the component that is not operat-
ing » page 229 , Assignment of the fuses in the dash panel or » page 231 , As-
signment of fuses in the engine compartment .
Electrically adjustable seats are protected by automatic circuit breakers, which
switch on again automatically after a few seconds after the overload has been
eliminated.
Fuse colourMaximum amperagelight brown5dark brown7.5red10blue15yellow/blue20white25green/pink30orange/green40red50WARNINGAlways read and observe the warnings before completing any work in the
engine compartment » page 192.CAUTION■
“Never repair” fuses, and do not replace them with fuses of a higher amper-
age – risk of fire! This may also cause damage at other points in the electrical
system.■
If a newly inserted fuse blows again after a short time, have the electrical
system checked as quickly as possible by a specialist garage.
■
A blown fuses is recognisable by the molten metal strip. Replace the faulty
fuse with a new one of the same amperage.
Note
■
We recommend always carrying replacement fuses in the vehicle. A box of
replacement fuses can be purchased from ŠKODA Original Accessories.■
There can be several power consuming devices for one fuse.
■
Multiple fuses may exist for a single power consuming device.
Fuses in the dash panel – LHD
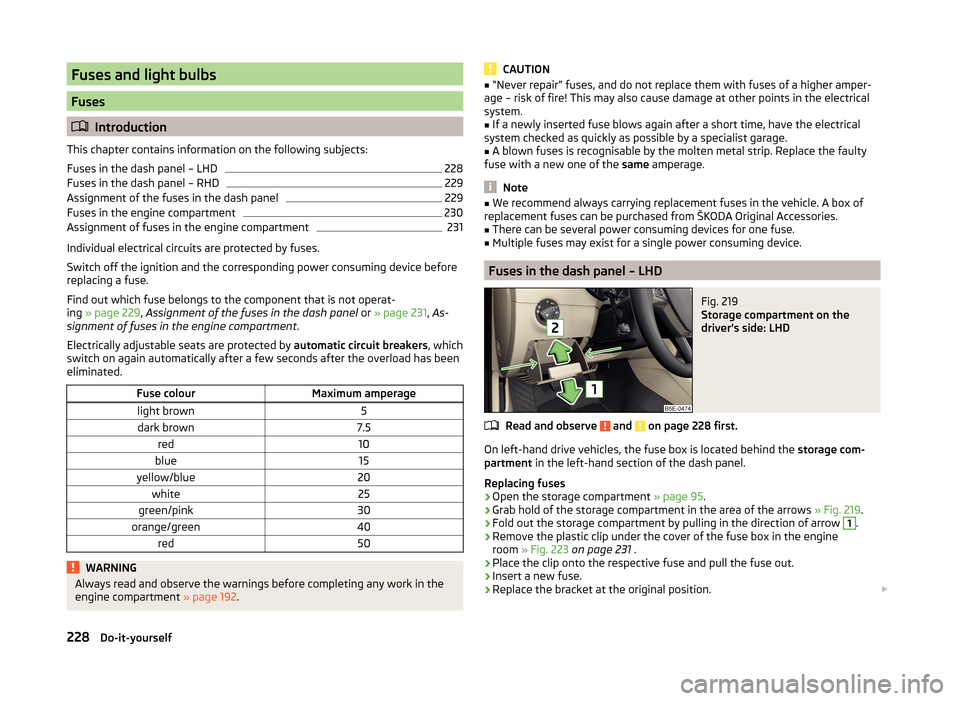
Fig. 219
Storage compartment on the
driver's side: LHD
Read and observe and on page 228 first.
On left-hand drive vehicles, the fuse box is located behind the storage com-
partment in the left-hand section of the dash panel.
Replacing fuses
›
Open the storage compartment » page 95.
›
Grab hold of the storage compartment in the area of the arrows » Fig. 219.
›
Fold out the storage compartment by pulling in the direction of arrow
1
.
›
Remove the plastic clip under the cover of the fuse box in the engine
room » Fig. 223 on page 231 .
›
Place the clip onto the respective fuse and pull the fuse out.
›
Insert a new fuse.
›
Replace the bracket at the original position.
228Do-it-yourself
Page 232 of 280
›Fold back the storage compartment by pressing into the secured position in
the dash panel in the direction of the arrow 2.›
Close the storage compartment.
Fuses in the dash panel – RHD
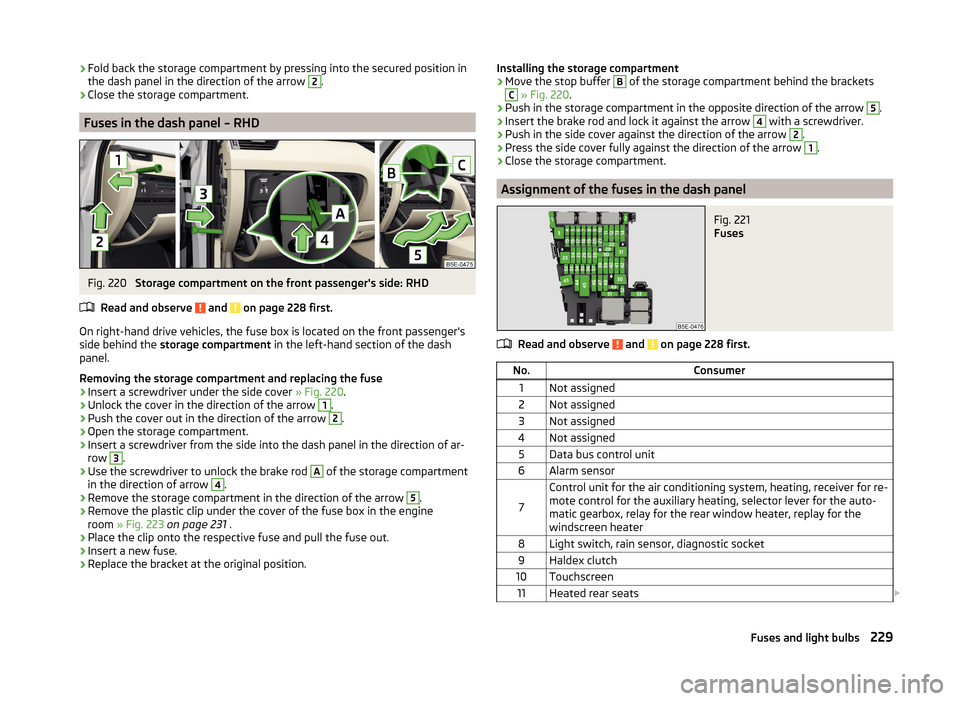
Fig. 220
Storage compartment on the front passenger's side: RHD
Read and observe
and on page 228 first.
On right-hand drive vehicles, the fuse box is located on the front passenger's
side behind the storage compartment in the left-hand section of the dash
panel.
Removing the storage compartment and replacing the fuse
›
Insert a screwdriver under the side cover » Fig. 220.
›
Unlock the cover in the direction of the arrow
1
.
›
Push the cover out in the direction of the arrow
2
.
›
Open the storage compartment.
›
Insert a screwdriver from the side into the dash panel in the direction of ar-
row
3
.
›
Use the screwdriver to unlock the brake rod
A
of the storage compartment
in the direction of arrow
4
.
›
Remove the storage compartment in the direction of the arrow
5
.
›
Remove the plastic clip under the cover of the fuse box in the engine
room » Fig. 223 on page 231 .
›
Place the clip onto the respective fuse and pull the fuse out.
›
Insert a new fuse.
›
Replace the bracket at the original position.
Installing the storage compartment›Move the stop buffer B of the storage compartment behind the bracketsC
» Fig. 220 .
›
Push in the storage compartment in the opposite direction of the arrow
5
.
›
Insert the brake rod and lock it against the arrow
4
with a screwdriver.
›
Push in the side cover against the direction of the arrow
2
.
›
Press the side cover fully against the direction of the arrow
1
.
›
Close the storage compartment.
Assignment of the fuses in the dash panel
Fig. 221
Fuses
Read and observe and on page 228 first.
No.Consumer1Not assigned2Not assigned3Not assigned4Not assigned5Data bus control unit6Alarm sensor
7
Control unit for the air conditioning system, heating, receiver for re-
mote control for the auxiliary heating, selector lever for the auto-
matic gearbox, relay for the rear window heater, replay for the
windscreen heater8Light switch, rain sensor, diagnostic socket9Haldex clutch10Touchscreen11Heated rear seats 229Fuses and light bulbs
Page 233 of 280
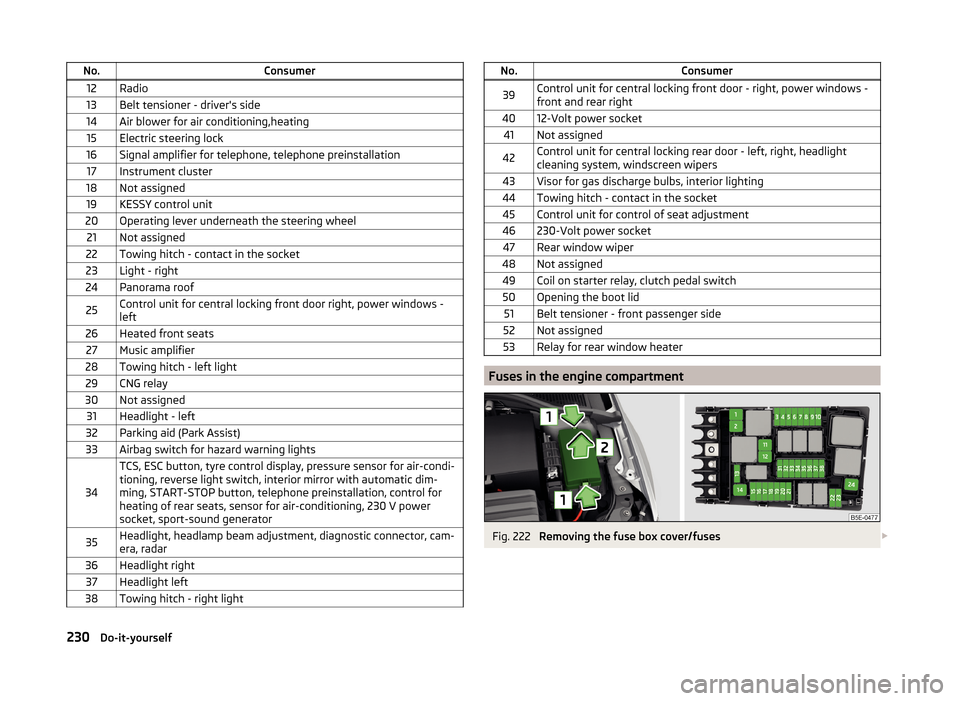
No.Consumer12Radio13Belt tensioner - driver's side14Air blower for air conditioning,heating15Electric steering lock16Signal amplifier for telephone, telephone preinstallation17Instrument cluster18Not assigned19KESSY control unit20Operating lever underneath the steering wheel21Not assigned22Towing hitch - contact in the socket23Light - right24Panorama roof25Control unit for central locking front door right, power windows -
left26Heated front seats27Music amplifier28Towing hitch - left light29CNG relay30Not assigned31Headlight - left32Parking aid (Park Assist)33Airbag switch for hazard warning lights
34
TCS, ESC button, tyre control display, pressure sensor for air-condi-
tioning, reverse light switch, interior mirror with automatic dim-
ming, START-STOP button, telephone preinstallation, control for
heating of rear seats, sensor for air-conditioning, 230 V power
socket, sport-sound generator35Headlight, headlamp beam adjustment, diagnostic connector, cam-
era, radar36Headlight right37Headlight left38Towing hitch - right lightNo.Consumer39Control unit for central locking front door - right, power windows -
front and rear right4012-Volt power socket41Not assigned42Control unit for central locking rear door - left, right, headlight
cleaning system, windscreen wipers43Visor for gas discharge bulbs, interior lighting44Towing hitch - contact in the socket45Control unit for control of seat adjustment46230-Volt power socket47Rear window wiper48Not assigned49Coil on starter relay, clutch pedal switch50Opening the boot lid51Belt tensioner - front passenger side52Not assigned53Relay for rear window heater
Fuses in the engine compartment
Fig. 222
Removing the fuse box cover/fuses
230Do-it-yourself
Page 263 of 280
Index
A
abroad lead-free petrol
189
Abroad Headlights
78
ABS Function
138
Warning light37
ACC149
Control symbols44
Warning light36
Acceptance and recycling of used vehicles180
Accessories177
Adaptive cruise control149
automatic stop-start152
Information messages155
Operation151
Operation Overview152
Radar sensor150
Set/change the desired speed.153
Set time interval level153
special driving conditions154
Start control152
Stop/resume control153
Adaptive headlights (AFS)
74
Adjust Auxiliary heating (auxiliary heating and ventila-tion)
122
Adjusting Belt height
15
Exterior mirrors85
head restraints88
Interior mirror84
seats87
Steering wheel10
the seats electronically87
Adjusting the seats9
Adjusting the seats electronically87
Adjustment Headlight beam
71
Advance warning/emergency brake Warning symbol
45
AFS74
Air-conditioning system Air outlet vents
116
Airbag16
Deactivating21
Deactivating the front passenger airbag21
Deployment16
Front airbag17
Head airbag20
Knee airbag18
Modifications and damage to the airbag system 179
Side airbag
19
Air bag Warning light
38
Airbag system16
Air conditioning116
Air distribution control117
Climatronic119
manual air conditioning119
Air distribution control117
Air outlet vents116
Alarm Switching off
59
Triggering59
Alcantara cleaning
187
Anti-theft alarm system Activating/deactivating
59
Trailer176
Anti-theft wheel bolts217
Antilock Braking System138
Armrest Front
91
Rear91
artificial leather187
Ashtray97
ASR warning light
37
Assistance systems ACC
36
Driving mode160
ESC138
Front Assistant155
High beam assistant75
Lane Assist162
MCB140
TSA140
Assist system ABS
138
Assist systems138
ABS37
Adaptive cruise control149
ASR37
Cruise Control System148
DSR139
EDL139
ESC37
HBA140
HHC140
Park assist144
Parking aid140
ProActive passenger protection161
START-STOP158
TCS139
XDS139
Audio see radio/navigation system
4
Auto-check control47
Automatic driving lamp control73
Automatic gearbox133
Selector lever-emergency unlocking226
Selector lever lock134
Starting-off and driving135
Tiptronic134
Using the selector lever133
260Index
Page 265 of 280
CheckingBattery electrolyte level201
Brake fluid199
Coolant198
Engine oil196
Oil level196
Windscreen washer fluid195
Checks Statutory checks
177
Children and safety22
Child safety Side airbag
24
Child safety lock58
Child safety seat Use of child safety seats
25
Child seat Classification
25
ISOFIX25
on the front passenger seat23
TOP TETHER27
Use of ISOFIX child seats26
Chrome parts see vehicle care
183
Cigarette lighter97
cleaning chrome parts
183
Cleaning Alcantara
187
and maintaining belts187
artificial leather187
headlight glasses184
materials187
natural leather186
plastic parts182
seats covers of the electrically heated seats187
wheels185
Cleaning safety belt
187
Cleaning seat covers
187
Cleaning the interiorartificial leather187
Seat covers187
Cleaning the outside of the vehicle Decorative films
183
Cleaning the vehicle exterior Camera lens
184
Cavity protection184
Door locking cylinder184
Headlight glasses184
Under-body protection185
wheels185
Windows and external mirrors183
Cleaning vehicle180
Cleaning vehicle exterior181
Plastic parts182
Rubber seals183
Vehicle paint work182
Wiper blades185
Clean interior Safety belt
187
clean outside of vehicle chrome parts
183
Climatronic air distribution control
117
Operating elements119
Closing sun roof - Version 1
67
- Version 269
Clothes hook101
CNG192
Indicator light40
Natural gas reserve display32
refuelling191
Refuelling191
Sticker192
Cockpit 12-Volt power outlet
98
Ashtray97
Cigarette lighter97
General view29
Lighting78
storage compartments94
useful equipment94
Comfort control window
66
comfort controls sun roof - Version 1
68
sun roof - Version 270
COMING HOME77
compartments94
Component protection179
Components of the puncture repair kit218
Compressed natural gas see CNG
192
Computer see multifunction display
47
convenience turn signal73
Coolant197
Checking198
Indicator symbol41
Information messages41
Replenishing198
Temperature gauge32
Cooling system cost-effective use
121
malfunctions121
CORNER See Fog lights with CORNER function
76
Correct seated position9
Driver9
Front passenger10
Instructions11
Rear seats11
Counter for distance driven33
cruise control operation
148
operation Description149
Cruise control system Warning light
40
262Index
Page 267 of 280
Engine number238
engine oil specification
196
Engine oil195
Changing195
Checking196
Indicator symbol42
Replenishing197
Warning icon42
EPC Warning light
38
ESC Functioning
138
Warning light37
ESC Sport138
Estate instrument Natural gas reserve display
32
Estate Instrument panel Petrol / Diesel reserve display
33
Exhaust inspection system Warning light
38
F
Fastening elements
104
Fatigue detection166
Function166
Information messages167
Films183
Fire extinguisher211
First-aid kit 211
Floor covering Fixing
106
in the luggage compartment106
Fog lights76
Warning light40
Fog lights with CORNER function76
Fold in passenger's mirror85
Footmats132
see footmats132
Force limit Electric boot lid61
Power windows65
Front airbag17
Front Assistant155
Activating/deactivating157
Information messages157
Operation156
Radar sensor155
Warning symbol44, 45
Front door warning light79
fuel lead-free petrol
189
Fuel188
CNG192
Diesel190
Natural gas reserve display32
Petrol / Diesel reserve display33
refer to Fuel188
Refuelling188
Refuelling - natural gas191
Warning icon43
Fuel consumption239
Fuel filter Information messages
44
Fuses Assignment
228
Assignment of fuses in the dash panel229
Colour coding228
Fuse assignment in the engine compartment231
Plastic clip230
Replacing228
G
Gear change Gear recommendation
46
Information on the selected gear46
Gear changing Gear stick
132
General viewCockpit29
Genuine parts178
Glasses compartment100
Glow plug system Warning light
38
H
Handbrake
131
Warning light35
Hazard warning light system77
HBA140
Head airbag20
Headlight assist Warning symbol
44
Headlight cleaning system Headlight cleaning system
83
Headlights Bulb arrangement
232
Driving abroad78
Headlight cleaning system83
Headrest Removing and installing
88
Head restraints88
Adjust height88
Heater Windscreen and rear window
80
Heating116
Air distribution control117
Control elements118
Exterior mirrors85
Seats90
HHC140
High beam assistant75
Hill Hold Control (HHC)140
Hitch169
Drawback load169
Hook106
Horn29
264Index
Page 269 of 280
lock steering lock / unlockkey126
Long cargo channel94
Low beam71
Low tyre pressure warning See tyre pressure monitoring
167
Luggage compartment103
Compartment with cargo element108
Cover107
Emergency unlocking226
Fastening elements104
Fix floor covering106
Fixing nets105
floor covering on both sides106
foldable hook106
Folding double hooks105
Lighting103
Luggage net106
Net partition112
roll-up cargo cover108
Storage compartments under the floor cover- ing
109
Stowing the roof rack115
Unlocking the tailgate226
Variable loading floor110
Luggage compartment cover107
Luggage compartment lid60
Luggage net106
Luggage storage Multi-function pocket
110
M
Main beam
73
Warning light40
Maintenance see vehicle care
182
Manual air conditioning Air distribution control
117
Operating elements119
Manual gear changing see gear changing132
Manually adjusting seats
87
Manually adjusting seats87
MAXI DOT display50
Lap timer51
Main menu51
Operation46
Stop watch51
MAXI DOT see MAXI DOT display
50
Maximum permissible weights
238
Mechanical windows66
opening and closing67
Media see radio/navigation system
4
Memory48
Memory Function for the seat89
Mirror Exterior mirrors
85
Make-up81
Mirrors Interior mirror
84
MODE button see driving mode selection
160
Modifications177
Modifications and technical alterations Airbags
179
Service178
Spoiler179
Multi-collision brake140
Multi-function pocket110
Multifunction display Functions
47
Information48
Memory48
Operation46
Multimedia holder99
N
N1
110
Nameplate238
Natural gas operation Indicator light
40
Natural gas vehicles See CNG
192
Navigation system4
Net partition112
behind the front seats112
behind the rarer seats112
Removing and refitting the housing113
Nets105
Notes for driving with a repaired tyre220
Notes on using wheels204
O
Oil Information messages
42
See Engine oil196
Oil pressure Information messages
42
Onboard computer see multifunction display
47
Opening and closing sun roof - Version 1
67
sun roof - Version 269
Operate roller blind - Version 1
68
Operating weight239
Operation in winter Diesel fuel
190
Vehicle battery201
Optical Parking Assistant143
Function keys144
Operation143
Orientation lines144
266Index
Page 270 of 280
Original accessories178
Outside temperature46
Overview Engine compartment
194
Warning icons40
Warning lights34
P
Park assist
144
Departing from a parallel parking space147
Finding a parking space145
Information messages147
Parking146
Park Assist automatic emergency braking
147
Operation145
Parking132
Park assist144
Parking aid140
Parking aid140
Automatic system activation when moving for- ward
143
Function141
Road display142
Parking lights71
Park the vehicle see Parking
132
Part replacement177
Passive safety Before setting off
8
Driving safety8
Safety equipment8
Passive Safety8
Payload239
Pedals132
Footmats132
Petrol see fuel
189
Phonebox96
Plastic parts182
Polishing vehicle paint work see vehicle care
182
Positioning the jack
216
Power limit Sun roof - Version 1
67
Sun roof - Version 269
Power outlet 12 V
98
Power steering Warning light
36
Power windows64
Button in the front passenger door65
Button in the rear doors65
Buttons in the driver's door64
Practical equipment Reflective vest
211
Practical features 12-Volt power outlet
98
Storage pockets on the front seats101
Waste container98
Proactive passenger protection Indicator light
38
ProActive passenger protection161
Function162
Puncture repair kit218
R
Radiator fan
195
Radio4
Radio remote control Auxiliary heating
123
Raising the vehicle216
Rear-view mirror Exterior mirrors
85
Fold in passenger mirror85
Synchronous adjustment of the rear-view mir- ror
85
Rear fog light76
Warning light38
Rear mirror83
Interior mirror84
Rear view camera143
Rear window - heater80
Refuelling188
Fuel188
Fuel - natural gas191
Remote control Locking
55
Replacing the battery224
Synchronisation process224
Unlocking55
Remote control key Replacing the battery
224
Removable through-loading bag102
Repairs and technical alterations177
Replace the battery in the auxiliary heating (auxiliary heating) in the remote control
225
Replacing Bulb for the licence plate light
235
Bulbs231
Fuses228
Fuses – engine compartment230
Fuses – LHD228
Fuses – RHD229
Low beam bulb233
Rear window wiper blade227
Vehicle battery202
windscreen wiper blades227
Replenishing Coolant
198
Engine oil197
Windscreen washer fluid195
Retraction and economical driving136
Reversing camera143
Lens care184
Revolutions counter31
267Index