combi SKODA OCTAVIA 2014 3.G / (5E) Owner's Manual
[x] Cancel search | Manufacturer: SKODA, Model Year: 2014, Model line: OCTAVIA, Model: SKODA OCTAVIA 2014 3.G / (5E)Pages: 280, PDF Size: 35.53 MB
Page 11 of 280
Safety
Passive Safety
General information
Introduction
This chapter contains information on the following subjects:
Before setting off
8
Driving safety
8
Safety equipment
8
In this section you will find important information, tips and notes on the sub-
ject of passive safety in your vehicle.
We have combined everything here which you should be familiar with, for ex-
ample, regarding seat belts, airbags, child seats and safety of children.
WARNING■ This chapter contains important information on how to use the vehicle for
the driver and his occupants.■
You will find further information on safety, which concerns you and those
travelling with you, in the following chapters of this Owner's Manual.
■
The complete on-board literature should always be in the vehicle. This
applies in particular, if you rent out or sell the vehicle.
Before setting off
Read and observe
on page 8 first.
For your own safety and the safety of the people travelling with you, please
pay attention to the following points before setting off.
Ensure that the lighting and the turn signal system are functioning proper-
ly.
Ensure that the function of the wipers and the condition of the wiper
blades are free of any defects.
Ensure that all of the windows offer good visibility to the outside.
Adjust the rear-view mirror so that vision to the rear is guaranteed.
Ensure that the mirrors are not covered.
Check the tyre inflation pressure.
Check the engine oil, brake fluid and coolant level.
Secure all items of luggage.
Do not exceed the permissible axle loads and permissible gross weight of
the vehicle.
Close all doors as well as the bonnet and boot lid.
Ensure that no objects can obstruct the pedals.
Protect children in suitable child seats with correctly fastened seat
belts » page 22 , Transporting children safely .
Adopt the correct seated position » page 9, Correct and safe seated
position . Tell your passengers to assume the correct seated position.
Driving safety
Read and observe
on page 8 first.
The driver is fully responsible for himself and his occupants. If your driving
safety is effected, you place yourself and the oncoming traffic at risk.
The following guidelines must therefore be observed. Do not get distracted from concentrating on the traffic situation, e.g. by
your passengers or mobile phone calls.
Never drive when your driving ability is impaired, e.g. through medication,
alcohol or drugs.
Keep to the traffic regulations and the permissible speed limit.
Always adjust the driving speed to the road, traffic and weather condi-
tions.
Take regular breaks on long journeys – at least every two hours.
Safety equipment
Read and observe
on page 8 first.
The following list contains only part of the safety equipment in your vehicle.
› Three-point seat belts for all the seats.
› Belt force limiters for the front seats.
› Belt tensioners for the front seats.
› Seat belt height adjusters for front seats.
› Front airbag for the driver and the front passenger.
› Driver’s knee airbag.
› Front side airbags.
› Rear side airbags.
8Safety
Page 19 of 280
Airbag system
Description of the airbag system
Introduction
This chapter contains information on the following subjects:
System description
16
Airbag deployment
16WARNING■ An airbag can only offer you optimal protection in combination with a
fastened seat belt .■
The airbag is not a substitute for the seat belt, but instead forms part of
the complete passive vehicle safety concept.
■
To ensure passengers are protected with the greatest possible effect
when the airbag is deployed, the front seats must be correctly adjusted to
match the body size » page 9, Correct and safe seated position .
■
If you do not fasten the seat belts when driving, lean too far forward or
adopt an incorrect seated position, you are exposing yourself to increased
risk of injury in the event of an accident.
WARNINGInformation on the use of the airbag system■If there is a fault, the airbag system must be checked by a specialist ga-
rage immediately. Otherwise, there is a risk of the airbag not being activa-
ted in the event of an accident.■
No modifications of any kind must be made to parts of the airbag system.
■
Any work on the airbag system including the installation and removal of
system components due to other repair work (e.g. removal of the steering
wheel) must only be carried out by a specialist garage.
■
Never make any changes to the front bumper or bodywork.
■
It is prohibited to manipulate individual parts of the airbag system as this
might result in the airbag being deployed.
■
The protective function of the airbag system is sufficient for only one ac-
cident. The airbag system must then be replaced if the airbag has been de-
ployed.
System description
Read and observe
on page 16 first.
The functional status of the airbag system is indicated by the indicator light
in the instrument cluster » page 38.
When the airbags are deployed they fill with gas and inflate.
A grey white or red, non-harmful gas is released when the airbag is inflated.
This is perfectly normal and is not an indication of a fire in the vehicle.
The airbag system consists – depending on the vehicle equipment – of the
following modules.
› Electronic control unit.
› Front airbag for the driver and the front passenger
» page 17.
› Driver’s knee airbag
» page 18.
› Side airbags
» page 19.
› Head airbags
» page 20.
› Airbag warning light in the instrument cluster
» page 38.
› Key switch for the front passenger airbag
» page 21.
› Warning light for the front passenger airbag/activation in dash panel cen-
tre » page 21 .
Note
■
The airbag system needs no maintenance during its working life.■If you sell your vehicle, provide the complete vehicle documentation to the
new owner. Please note that the information relating to the possibility of de-
activating the front passenger airbag must be included!■
When disposing of vehicle or parts of the airbag system, it is important to
comply with the national legal requirements.
Airbag deployment
Read and observe
on page 16 first.
The airbags inflate in fractions of a second and at a high speed in order to beable to offer that additional protection in the event of an accident.
The airbag system is only functional when the ignition is switched on.
In certain accident situations, the several airbags may be deployed simultane-
ously.
16Safety
Page 33 of 280
Depending on equipment fitted:› USB/AUX input
» Infotainment Manual , chapter USB/AUX In-
puts
› MEDIA IN input
» Infotainment Manual , chapter MEDIA IN in-
put
Depending on equipment fitted: › Operating controls for the heating118
›Operating controls for the air conditioning system
119
›Operating controls for Climatronic
119
Note
The position of some of the controls on right-hand drive models may differ
from that shown in » Fig. 21. The symbols on the controls and switches are the
same as for left-hand drive models.3435Instruments and warning lights
Instrument cluster
Introduction
This chapter contains information on the following subjects:
Overview
31
Revolutions counter
31
Display
31
Speedometer
32
Coolant temperature gauge
32
Fuel reserve display - Natural gas
32
Fuel reserve display - Petrol / Diesel
33
Counter for distance driven
33
33
Viewing the charge level vehicle battery
34
The instrument cluster gives the driver basic information such as the current
speed, engine speed, the state of some vehicle systems and the like.
Fault display
If there is a fault in the instrument cluster, the following message will appear
in the display.
Error: instrument cluster. Workshop!
COMBINED INSTRUM_WORKSHOP
Seek help from a specialist garage.
WARNINGConcentrate fully at all times on your driving! As the driver you are fully re-
sponsible for road safety.
Note
If the message SAFE CP appears in the instrument cluster display, the compo-
nent protection for the instrument cluster is active. Further informa-
tion » page 179 , Component protection .30Using the system
Page 143 of 280
Hydraulic Brake Assist (HBA)Read and observe
on page 138 first.
HBA increases the braking effect and helps to shorten the braking distance.
The HBA is activated by the very quick operation of the brake pedal. To ach-
ieve the shortest possible braking distance, the brake pedal must be applied
firmly until the vehicle has come to a complete standstill.
The HBA is automatically switched off when the brake pedal is released.
Hill Hold Control (HHC)
Read and observe
on page 138 first.
HHC allows you, when driving on slopes, to move your foot from the brake
pedal to the accelerator pedal without having to use the handbrake.
The system holds the brake pressure produced by the activation of the brake pedal for approx. 2 seconds after the brake pedal is released.
The brake pressure drops gradually the more you operate the accelerator ped-
al. If the vehicle does not start off within 2 seconds, it starts to roll back.
The HHC is active from a 5% slope if the driver's door is closed. HHC is always active on slopes when in forward or reverse start off.
Multi-collision brake (MCB)
Read and observe
on page 138 first.
The MCB helps to decrease speed after a collision through automatic braking
interventions and to stabilize the vehicle. This reduces the risk of a subse-
quent crash due to uncontrolled vehicle movement.
The automatic brake interventions can take place only if the following condi-
tions are met.
A head-on or side collision occurred.
The impact speed was higher than approx. 10 km/h.
The brakes, the ESL and other required electrical systems remain function-
al after impact.
The accelerator pedal is not actuated.
Trailer stabilisation (TSA)
Read and observe
on page 138 first.
The TSA helps the combination stable in situations where the trailer sways
and then the whole trailer combination.
TSA brakes the individual wheels of the towing vehicle in order to damp the
rocking motion of the entire vehicle combination.
The following conditions are required for the correct TSA function. The trailer was shipped from the factory or purchased from the ŠKODA
genuine accessories.
The trailer is electrically connected to the towing vehicle by means of the
trailer socket.
The parking aid is activated.
The speed is higher than approx. 60 km/h.
The activated TSA is shown by the fact that after switching on the ignition, the
indicator light in the instrument cluster lights up for about 2 seconds longer
than the indicator light .
Further information » page 169, Hitch and trailer .
Parking aid
Introduction
This chapter contains information on the following subjects:
Function
141
Activation/deactivation
142
Road display
142
Automatic system activation when moving forward
143
The parking aid (hereinafter referred to only as system) draws attention via
acoustic signals or the Infotainment display when manoeuvring around obsta-
cles in the vicinity of the vehicle.
The system uses ultrasound waves to calculate the distance between the
bumper and an obstacle. Depending on the vehicle equipment, the ultrasonic
sensors are located in the back or in the front bumper » Fig. 139 on page 141 .
140Driving
Page 165 of 280
NoteThe system component service life is monitored electronically. Further infor-
mation » page 38 , Security systems .
Function
Read and observe
on page 161 first.
The system is activated whenever the ignition is switched on, and is ready tointervene automatically under the following conditions.
The engine is running.
The vehicle moves at a speed of more than 30 km/h.
In critical driving situations (e.g. during emergency braking or a sudden change
in direction), the following steps can be taken separately or combined in order
to reduce the risk of serious injury.
› The front passenger's and driver's seatbelts, if worn, are automatically
ten-
sioned closely over the body.
› The windows in the side doors (if open) are automatically closed up to a gap
of about 5 cm from the edge.
› The sliding/tilting roof is closed.
Once the critical driving situation has passed, the tension on the seatbelts will
be released again.
The system operates at two levels of protection.
The first level of protection
The system already intervenes in situations that may occur during dynamic
driving. As a result, this primarily helps to keep the driver and the passenger in
the correct seated position.
The first level of protection can be deactivated by one of the following meas-
ures.
› Deactivation of the system in Infotainment
» Operating instructions for Info-
tainment , chapter Vehicle settings (CAR button) .
› Deactivation of TCS
» page 139.
› Selecting the driving mode Sport
» page 160.
Provided that the driving mode Sports is not selected, the system is activated over the two levels of protection after switching the ignition off and on again.
The second level of protection
The system intervenes only if the situation is evaluated as critical, such as in
panic braking at high speeds.
This level of protection cannot be deactivated.
Note
If the front passenger front airbag is deactivated » page 21 the belt tensioning
function for the front passenger seat is switched off.
Lane Assist
Introduction
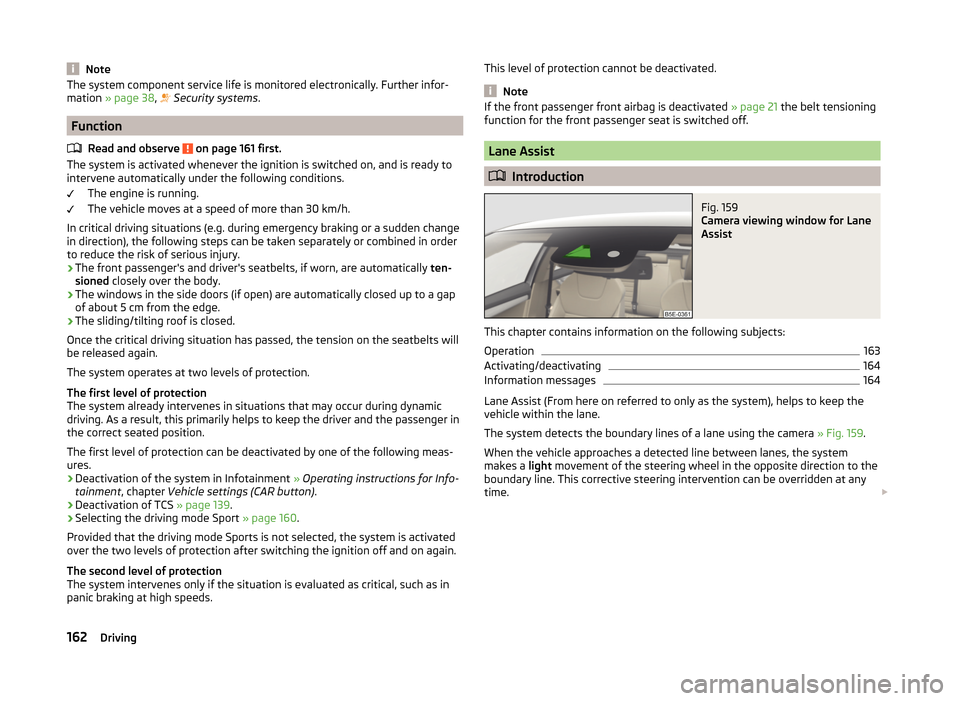
Fig. 159
Camera viewing window for Lane
Assist
This chapter contains information on the following subjects:
Operation
163
Activating/deactivating
164
Information messages
164
Lane Assist (From here on referred to only as the system), helps to keep the
vehicle within the lane.
The system detects the boundary lines of a lane using the camera » Fig. 159.
When the vehicle approaches a detected line between lanes, the system
makes a light movement of the steering wheel in the opposite direction to the
boundary line. This corrective steering intervention can be overridden at any
time.
162Driving
Page 178 of 280
Detaching›Unhook the breakaway cable of the trailer from the security eyeletB
» Fig. 178.
›
Pull the trailer cable connected out of the 13-pin socket.
›
Remove the trailer from the ball head.
›
Place cap
5
on to the ball head » Fig. 166 on page 169 .
›
Grip the 13-pin socket at point
A
and swivel in the opposite direction to the
arrow » Fig. 178 .
Exterior mirrors
You have to have additional exterior mirrors fitted if you are not able to see
the traffic behind the trailer with the standard rear-view mirrors. The national
legal requirements must be observed.
Headlights
The front of the vehicle may lift up when a trailer is being towed and the head-
lights may dazzle other road users.
Adjust the headlights using the headlight beam control » page 71, Operating
the lights 1)
.
Power to the trailer power grid
For the electrical connection between the vehicle and trailer, the trailer's pow-
er supply is provided by the vehicle.
The power supply works with ignition on or off.
WARNING■ Incorrectly or improperly connected electrical installations may cause the
entire vehicle electronics to malfunction, and may lead to accidents and se-
rious injury from electric shock.■
Work on the electrical system must only be carried out by specialist ga-
rages.
■
Never directly connect the trailer's electrical system with the electrical
connections for the tail lights or other current sources.
■
After attaching the trailer and connecting the power socket, check that
the rear lights on the trailer are working correctly.
■
The handbrake on the vehicle must be applied when attaching and dis-
connecting the trailer.
■
Never use the safety eye to tow a vehicle!
Loading a trailer
The vehicle/trailer combination must be balanced. whereby the maximum per-
missible drawbar load must be utilised. If the drawbar load is too low, it jeop-
ardises the performance of the vehicle/trailer combination.
Distribution of the load
Distribute the load in the trailer in such a way that heavy items are located as
close to the trailer axle as possible. Secure the items from slipping.
The distribution of the weight is very poor if your vehicle is unladen and the
trailer is laden. Drive at a particularly low speed if you cannot avoid driving
with this combination.
Tyre pressure
Correct the tyre inflation pressure on the vehicle for a “full load” » page 204.
Towing capacity and trailer weight
The permissible trailer load must not be exceeded under any circumstan-
ces » page 238 , Technical data .
The details given in the vehicle's technical documentation always take prece-
dence over the details in the Owner's Manual.
The trailer loads specified apply only to altitudes up to 1 000 metres above
mean sea level.
The engine output falls as the height increases, as does the ability to climb.
Therefore, for every additional 1000 m in height (or part), the maximum per-
missible towed weight must be reduced by 10%.
The towed weight is made up of the actual weights of the loaded towing vehi-
cle and the loaded trailer.
The trailer and drawbar load information on the type plate of the towing de-
vice are merely test data for the towing device. The vehicle-specific values are
detailed in the vehicle documents.WARNING■ The maximum permissible axle and drawbar load and the permissible
weight of the trailer must not be exceeded - risk of accident!■
Sliding cargo can significantly adversely affect stability and driving safety
- risk of accident!
1)
Applies to vehicles with bi-xenon headlights.
175Hitch and trailer
Page 182 of 280
ŠKODA Service Partners are liable for any defects of ŠKODA Genuine Accesso-
ries for a period of 2 years after installation or delivery in accordance with the
materials defect liability, unless agreed otherwise in the purchase agreement
or any other agreements. You should keep the approved warranty certificate
and the invoices for these accessories for this period of time, so that the com-
mencement of the term can be verified.
ŠKODA Service Partners also stock a range of suitable car care products and all
parts that are subject to natural wear-and-tear, such as tyres, batteries, bulbs
and wiper blades.
Note
The accessories authorized by the company ŠKODA AUTO a.s. will be offered
by the ŠKODA Partners in all countries where the company ŠKODA AUTO a.s.
has a sales and after-sales service network. This will usually be in the form of a
printed catalogue of ŠKODA Genuine Accessories, in the form of separate prin-
ted brochures or in the form of ŠKODA Genuine Accessories on the ŠKODA
Partner websites.
Spoiler
Read and observe
on page 177 first.
If your new vehicle is fitted with a spoiler on the front bumper in combination
with the spoiler on the luggage compartment lid, the following instructions
must be adhered to.
› For safety reasons, the vehicle must only be fitted with a spoiler on the front
bumper in combination with the associated spoiler on the luggage compart-
ment lid.
› This kind of spoiler cannot be left on the front bumper either on its own, in
combination with another spoiler not on the luggage compartment lid or in
combination with an unsuitable spoiler on the luggage compartment lid.
› We recommend that you consult the ŠKODA Service Partner for any repairs
to or replacement, addition or removal of spoilers.
WARNING■ If work on your vehicle's spoilers is not carried out properly, this can lead
to operational faults - risk of accident and serious injuries.■
If a front spoiler, full wheel trim, etc. is mounted retrospectively, it must
be ensured that the air supply to the front wheel brakes is not reduced.
The front brakes may overheat which can have a negative impact on the
functioning of the braking system – risk of accident!
Component protection
Read and observe
on page 177 first.
Some electronic vehicle components (such as the instrument cluster) are fac-
tory-equipped with component protection.
Component protection has been developed as a protection mechanism for the
following situations.
› Impairment of factory- or garage-fitted electronic components after installa-
tion in another vehicle (for example, after a theft).
› Impairment of electronic components used outside the vehicle.
› The possibility of a legitimate installation or change of electronic compo-
nents for repairs at a specialist garage.
The activated component protection can be realized by functional limitations
of the specific electronic component. Seek help from a specialist garage.
Airbags
Read and observe
on page 177 first.
The system components of the airbag system can be situated in the front
bumper, doors, front seats, roof lining or body.
WARNINGAny work on the airbag system including the installation and removal of
system components due to other repair work (e.g. removal of the steering
wheel) must only be carried out by a specialist garage.■
Modifications, repairs and technical alterations that have been carried out
unprofessionally can cause damage and operational faults, and can also se-
riously impair the effectiveness of the airbag system – risk of accident and
fatal injury!
■
The airbag system must then be replaced if the airbag has been deployed.
Airbag modules cannot be repaired.
WARNINGInformation on the use of the airbag system■It is prohibited to manipulate individual parts of the airbag system, as this
might result in the airbag being deployed. 179Care and maintenance
Page 183 of 280
WARNING (Continued)■Never install any airbag parts into the vehicle that have been removed
from old cars or have been recycled.■
Never install damaged airbag parts in the vehicle. The airbags may then
not be triggered properly or not at all in the event of an accident.
■
No modifications of any kind must be made to parts of the airbag system.
WARNING■ A change to the vehicle's wheel suspension, including the use of non-ap-
proved wheels and tire combinations, can alter the functioning of the air-
bag system - risk of accident and fatal injury!■
Never make any changes to the front bumper or the bodywork.
WARNINGThe airbag control unit operates using pressure sensors located in the front
doors. For this reason, no adjustments may be carried out to the doors or
door panels (e.g. installation of additional loudspeakers). Resulting damage
can have a negative impact on the function of the airbag system. Any work
on the front doors and door panels must be carried out by a specialist ga-
rage. The following guidelines must be observed.■
Never drive with inner door panels removed.
■
Never drive if parts of the inner door panel have been removed and the
resulting openings have not been properly sealed.
■
Never drive if the loudspeakers in the doors have been removed, unless
the loudspeaker openings have been properly sealed.
■
Always make sure that the openings are covered or filled if additional
loudspeakers or other equipment parts have been installed in the inner
door panels.
Acceptance and recycling of used vehicles
Read and observe
on page 177 first.
ŠKODA meets the requirements of the brand and its products with regard to
protecting the environment and the preserving resources. All new ŠKODAvehi-
cles can be recycled by up to 95 % and can always 1)
be returned free of charge.
In a lot of countries sufficient trade-in networks have been created, where you
can trade-in your vehicle. After you trade-in your vehicle, you will receive a
confirmation stating the recycling in accordance with environmental regula-
tions.
Note
You can find more detailed information about the trade-in and recycling of old
cars from a specialist garage.
Washing vehicle
Introduction
This chapter contains information on the following subjects:
Washing by hand
181
Automatic car wash systems
181
Washing with a high-pressure cleaner
181
The best way to protect your vehicle against harmful environmental influences
is frequent washing.
The longer insect residues, bird droppings, tree sap, road and industrial dust,
tar, soot particles, road salt and other aggressive deposits remain adhering to
the paintwork of your vehicle, the more detrimental their destructive effect
can be. High temperatures, such as those caused by intensive sun's rays, ac-
centuate this caustic effect.
It is essential to also thoroughly clean the underside of the vehicle at the end
of the winter.
WARNINGWhen washing your vehicle in the winter: Water and ice in the braking sys-
tem can affect the braking efficiency – risk of accident!
CAUTION
The temperature of the water used for cleaning must not exceed 60 °C – risk
of damaging the vehicle.
For the sake of the environment
Only wash the vehicle at washing bays intended for this purpose.1)
Subject to fulfilment of the national legal requirements.
180General Maintenance
Page 210 of 280
Manufacturer-approved tyre variants
Introduction
This chapter contains information on the following subjects:
Explanation of the tyre labelling
207
Octavia
208
Octavia GreenLine
208
Octavia G-TEC
209
Octavia Scout
209
Octavia RS
209
Approved tyre variants must be selected firstly for the model variant (Octavia
GreenLine, Octavia Scout etc.) and then according to the engine size of your
vehicle. If the model variant of your vehicle cannot be found in a separate
module, then the approved tyre variants must be selected according to the en-
gine size of your vehicle in module » page 208, Octavia .
Only fit radial tyres of the same type, size (rolling circumference) and the same
tread pattern on one axle on all 4 wheels.
When fitting new tyres, the tyres must be replaced axle by axle.
The information listed in the table corresponds to the information available at
the time of going to press.
The approved tyre/rim combinations for your vehicle can be found in the sales
and technical vehicle documentation.
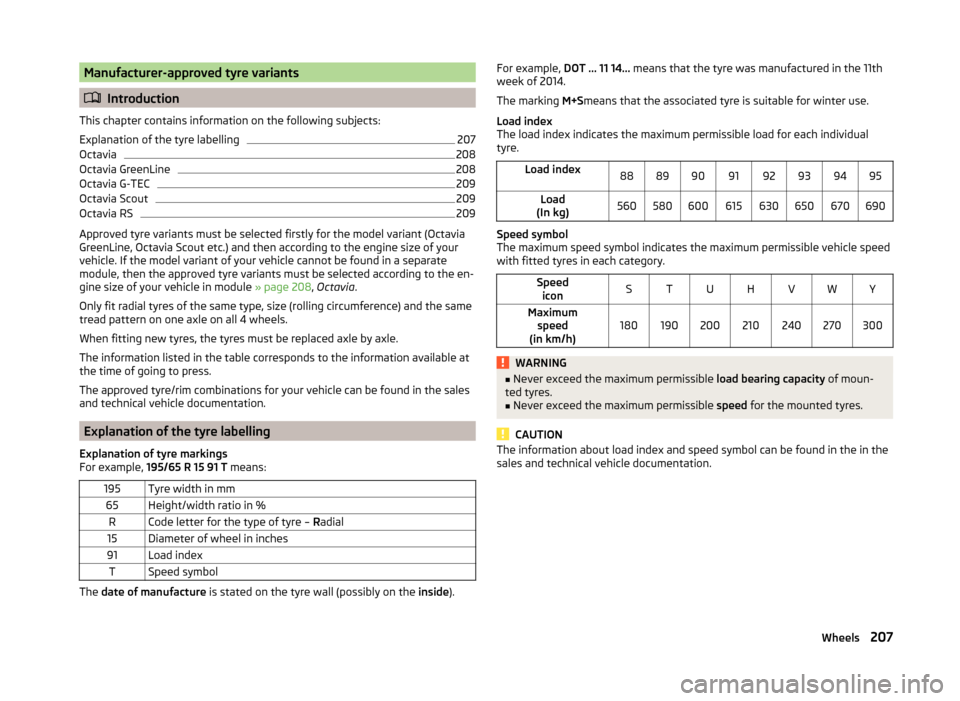
Explanation of the tyre labelling
Explanation of tyre markings
For example, 195/65 R 15 91 T means:
195Tyre width in mm65Height/width ratio in %RCode letter for the type of tyre – Radial15Diameter of wheel in inches91Load indexTSpeed symbol
The date of manufacture is stated on the tyre wall (possibly on the inside).
For example, DOT ... 11 14... means that the tyre was manufactured in the 11th
week of 2014.
The marking M+Smeans that the associated tyre is suitable for winter use.
Load index
The load index indicates the maximum permissible load for each individual
tyre.Load index8889909192939495Load
(In kg)560580600615630650670690
Speed symbol
The maximum speed symbol indicates the maximum permissible vehicle speed
with fitted tyres in each category.
Speed iconSTUHVWYMaximum speed
(in km/h)180190200210240270300WARNING■ Never exceed the maximum permissible load bearing capacity of moun-
ted tyres.■
Never exceed the maximum permissible speed for the mounted tyres.
CAUTION
The information about load index and speed symbol can be found in the in the
sales and technical vehicle documentation.207Wheels
Page 213 of 280
On vehicles with the Infotainment system with button , the speed limit can
be set for winter tyres » Infotainment operating instructions , chapter Adjust
vehicle systems (CAR button) .
For other vehicles, there is the possibility to set the speed limit for winter tyres
at a specialist garage.
Only use winter tyres or rims that have been approved by ŠKODA for your mod- el of vehicle.
For the sake of the environment
Fit the summer tyres on again in good time as they provide better handling
properties, a shorter braking distance, less tyre noise, and reduced tyre wear
on roads which are free of snow and ice as well as at temperatures above 7 °C.
The fuel consumption is also lower.
Snow chains
When driving on wintry roads, snow chains improve not only traction, but also
the braking performance.
Snow chains must only be mounted on the front wheels.
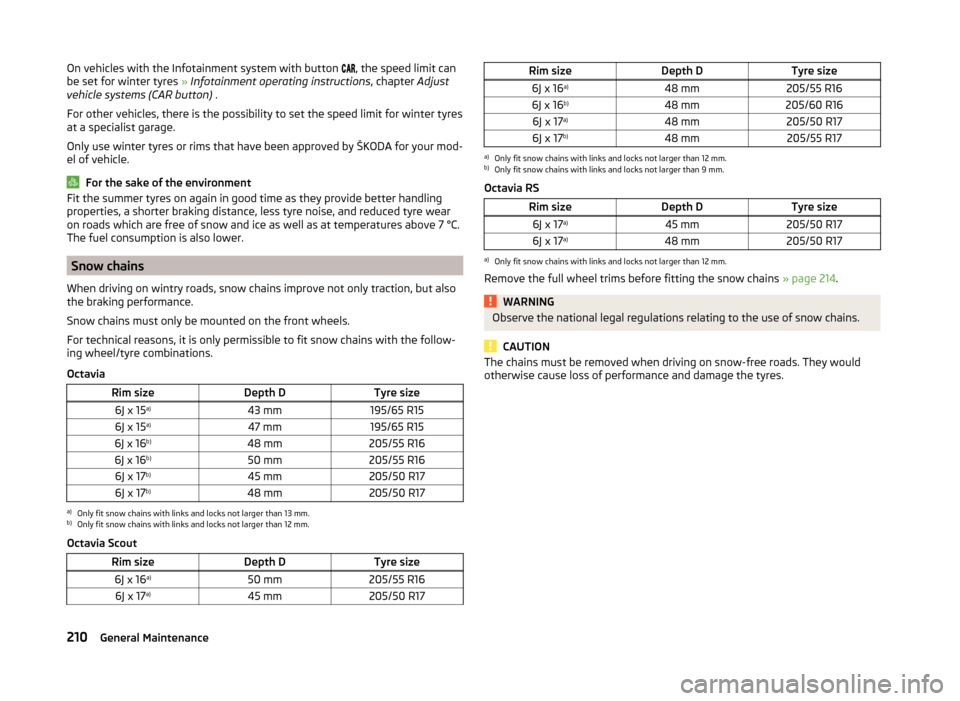
For technical reasons, it is only permissible to fit snow chains with the follow-
ing wheel/tyre combinations.
Octavia
Rim sizeDepth DTyre size6J x 15 a)43 mm195/65 R156J x 15a)47 mm195/65 R156J x 16 b)48 mm205/55 R166J x 16b)50 mm205/55 R166J x 17b)45 mm205/50 R176J x 17 b)48 mm205/50 R17a)
Only fit snow chains with links and locks not larger than 13 mm.
b)
Only fit snow chains with links and locks not larger than 12 mm.
Octavia Scout
Rim sizeDepth DTyre size6J x 16 a)50 mm205/55 R166J x 17a)45 mm205/50 R17Rim sizeDepth DTyre size6J x 16 a)48 mm205/55 R166J x 16b)48 mm205/60 R166J x 17a)48 mm205/50 R176J x 17b)48 mm205/55 R17a)
Only fit snow chains with links and locks not larger than 12 mm.
b)
Only fit snow chains with links and locks not larger than 9 mm.
Octavia RS
Rim sizeDepth DTyre size6J x 17 a)45 mm205/50 R176J x 17 a)48 mm205/50 R17a)
Only fit snow chains with links and locks not larger than 12 mm.
Remove the full wheel trims before fitting the snow chains » page 214.
WARNINGObserve the national legal regulations relating to the use of snow chains.
CAUTION
The chains must be removed when driving on snow-free roads. They would
otherwise cause loss of performance and damage the tyres.210General Maintenance