load capacity SKODA OCTAVIA 2014 3.G / (5E) Owner's Manual
[x] Cancel search | Manufacturer: SKODA, Model Year: 2014, Model line: OCTAVIA, Model: SKODA OCTAVIA 2014 3.G / (5E)Pages: 280, PDF Size: 35.53 MB
Page 118 of 280
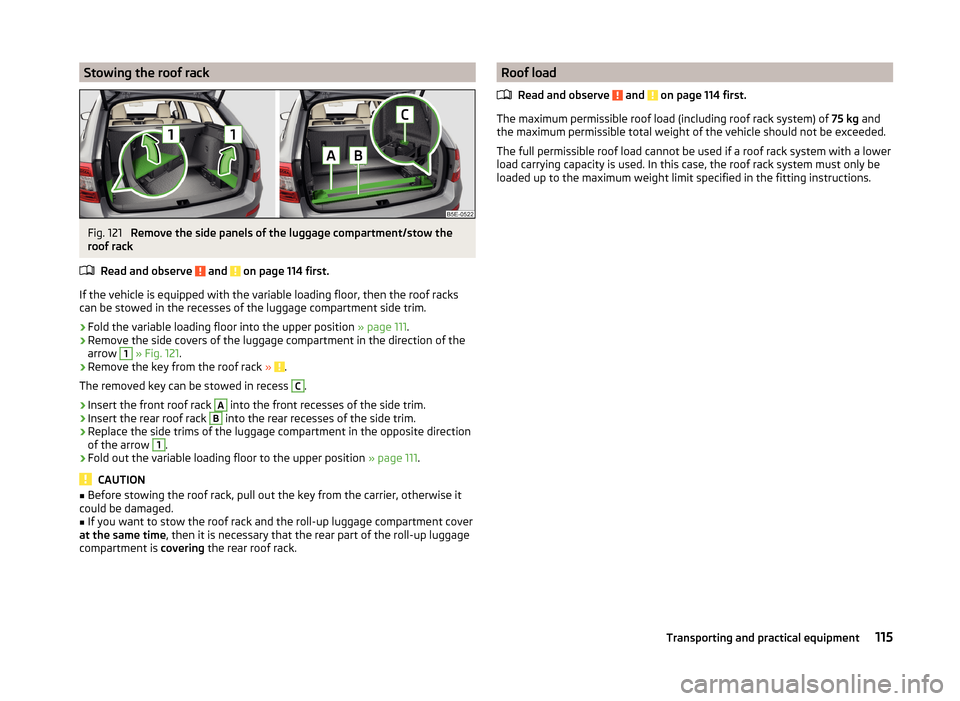
Stowing the roof rackFig. 121
Remove the side panels of the luggage compartment/stow the
roof rack
Read and observe
and on page 114 first.
If the vehicle is equipped with the variable loading floor, then the roof racks
can be stowed in the recesses of the luggage compartment side trim.
›
Fold the variable loading floor into the upper position » page 111.
›
Remove the side covers of the luggage compartment in the direction of the
arrow
1
» Fig. 121 .
›
Remove the key from the roof rack » .
The removed key can be stowed in recess
C
.
›
Insert the front roof rack
A
into the front recesses of the side trim.
›
Insert the rear roof rack
B
into the rear recesses of the side trim.
›
Replace the side trims of the luggage compartment in the opposite direction
of the arrow
1
.
›
Fold out the variable loading floor to the upper position » page 111.
CAUTION
■
Before stowing the roof rack, pull out the key from the carrier, otherwise it
could be damaged.■
If you want to stow the roof rack and the roll-up luggage compartment cover
at the same time , then it is necessary that the rear part of the roll-up luggage
compartment is covering the rear roof rack.
Roof load
Read and observe
and on page 114 first.
The maximum permissible roof load (including roof rack system) of 75 kg and
the maximum permissible total weight of the vehicle should not be exceeded.
The full permissible roof load cannot be used if a roof rack system with a lower
load carrying capacity is used. In this case, the roof rack system must only be
loaded up to the maximum weight limit specified in the fitting instructions.
115Transporting and practical equipment
Page 178 of 280
Detaching›Unhook the breakaway cable of the trailer from the security eyeletB
» Fig. 178.
›
Pull the trailer cable connected out of the 13-pin socket.
›
Remove the trailer from the ball head.
›
Place cap
5
on to the ball head » Fig. 166 on page 169 .
›
Grip the 13-pin socket at point
A
and swivel in the opposite direction to the
arrow » Fig. 178 .
Exterior mirrors
You have to have additional exterior mirrors fitted if you are not able to see
the traffic behind the trailer with the standard rear-view mirrors. The national
legal requirements must be observed.
Headlights
The front of the vehicle may lift up when a trailer is being towed and the head-
lights may dazzle other road users.
Adjust the headlights using the headlight beam control » page 71, Operating
the lights 1)
.
Power to the trailer power grid
For the electrical connection between the vehicle and trailer, the trailer's pow-
er supply is provided by the vehicle.
The power supply works with ignition on or off.
WARNING■ Incorrectly or improperly connected electrical installations may cause the
entire vehicle electronics to malfunction, and may lead to accidents and se-
rious injury from electric shock.■
Work on the electrical system must only be carried out by specialist ga-
rages.
■
Never directly connect the trailer's electrical system with the electrical
connections for the tail lights or other current sources.
■
After attaching the trailer and connecting the power socket, check that
the rear lights on the trailer are working correctly.
■
The handbrake on the vehicle must be applied when attaching and dis-
connecting the trailer.
■
Never use the safety eye to tow a vehicle!
Loading a trailer
The vehicle/trailer combination must be balanced. whereby the maximum per-
missible drawbar load must be utilised. If the drawbar load is too low, it jeop-
ardises the performance of the vehicle/trailer combination.
Distribution of the load
Distribute the load in the trailer in such a way that heavy items are located as
close to the trailer axle as possible. Secure the items from slipping.
The distribution of the weight is very poor if your vehicle is unladen and the
trailer is laden. Drive at a particularly low speed if you cannot avoid driving
with this combination.
Tyre pressure
Correct the tyre inflation pressure on the vehicle for a “full load” » page 204.
Towing capacity and trailer weight
The permissible trailer load must not be exceeded under any circumstan-
ces » page 238 , Technical data .
The details given in the vehicle's technical documentation always take prece-
dence over the details in the Owner's Manual.
The trailer loads specified apply only to altitudes up to 1 000 metres above
mean sea level.
The engine output falls as the height increases, as does the ability to climb.
Therefore, for every additional 1000 m in height (or part), the maximum per-
missible towed weight must be reduced by 10%.
The towed weight is made up of the actual weights of the loaded towing vehi-
cle and the loaded trailer.
The trailer and drawbar load information on the type plate of the towing de-
vice are merely test data for the towing device. The vehicle-specific values are
detailed in the vehicle documents.WARNING■ The maximum permissible axle and drawbar load and the permissible
weight of the trailer must not be exceeded - risk of accident!■
Sliding cargo can significantly adversely affect stability and driving safety
- risk of accident!
1)
Applies to vehicles with bi-xenon headlights.
175Hitch and trailer
Page 210 of 280
Manufacturer-approved tyre variants
Introduction
This chapter contains information on the following subjects:
Explanation of the tyre labelling
207
Octavia
208
Octavia GreenLine
208
Octavia G-TEC
209
Octavia Scout
209
Octavia RS
209
Approved tyre variants must be selected firstly for the model variant (Octavia
GreenLine, Octavia Scout etc.) and then according to the engine size of your
vehicle. If the model variant of your vehicle cannot be found in a separate
module, then the approved tyre variants must be selected according to the en-
gine size of your vehicle in module » page 208, Octavia .
Only fit radial tyres of the same type, size (rolling circumference) and the same
tread pattern on one axle on all 4 wheels.
When fitting new tyres, the tyres must be replaced axle by axle.
The information listed in the table corresponds to the information available at
the time of going to press.
The approved tyre/rim combinations for your vehicle can be found in the sales
and technical vehicle documentation.
Explanation of the tyre labelling
Explanation of tyre markings
For example, 195/65 R 15 91 T means:
195Tyre width in mm65Height/width ratio in %RCode letter for the type of tyre – Radial15Diameter of wheel in inches91Load indexTSpeed symbol
The date of manufacture is stated on the tyre wall (possibly on the inside).
For example, DOT ... 11 14... means that the tyre was manufactured in the 11th
week of 2014.
The marking M+Smeans that the associated tyre is suitable for winter use.
Load index
The load index indicates the maximum permissible load for each individual
tyre.Load index8889909192939495Load
(In kg)560580600615630650670690
Speed symbol
The maximum speed symbol indicates the maximum permissible vehicle speed
with fitted tyres in each category.
Speed iconSTUHVWYMaximum speed
(in km/h)180190200210240270300WARNING■ Never exceed the maximum permissible load bearing capacity of moun-
ted tyres.■
Never exceed the maximum permissible speed for the mounted tyres.
CAUTION
The information about load index and speed symbol can be found in the in the
sales and technical vehicle documentation.207Wheels
Page 242 of 280
Operating weight and payload
Operating weight
This value represents the minimum operating weight without additional
weight-increasing equipment such as air conditioning system, spare wheel, or
trailer hitch.
The specified operating weight is for orientation purposes only.
The operating weight also contains the weight of the driver (75 kg), the weight
of the operating fluids, the tool kit, and a fuel tank filled to 90 % capacity.
Operating weight of the vehicle » page 246, Vehicle-specific information de-
pending on engine type .
Payload
It is possible to calculate the approximate maximum payload from the differ-
ence between the permissible total weight and the operating weight.
The payload consists of the following weights.
› The weight of the passengers.
› The weight of all items of luggage and other loads.
› The weight of the roof, including the roof rack system.
› The weight of the equipment that is excluded from the operating weight.
› The trailer drawbar load with trailer operation (max. 75 kg or 80 kg for vehi-
cles with 4-wheel drive or 56 kg for G-TEC vehicles).
Note
If required, you can find out the precise weight of your vehicle at a specialist
garage.
Measurement of fuel consumption and CO 2 emissions according to
ECE Regulations and EU Directives
The data on fuel consumption and CO 2 emissions were not available at the
time of going to press.
The data on fuel consumption and CO 2 emissions are given on the ŠKODA
websites or in the sales and technical vehicle documentation.
The measurement of the intra-urban cycle begins with a cold start of the en-
gine. Afterwards urban driving is simulated.
In the extra-urban driving cycle, the vehicle is accelerated and decelerated in
all gears, corresponding to daily routine driving conditions. The driving speed
varies between 0 and 120 km/h.
The calculation of the combined fuel consumption considers a weighting of
about 37 % for the intra-urban cycle and 63 % for the extra-urban cycle.
Note
■ The fuel consumption and emission levels given on the ŠKODA websites or in
the commercial and technical vehicle documentation have been established in
accordance with rules and under conditions that are set out by legal or techni-
cal rules for the determination of operational and technical data of motor vehi-
cles.■
Depending on the extent of the equipment, the driving style, traffic condi-
tions, weather influences and vehicle condition, consumption values can in
practice result in fuel economy figures in the use of the vehicle that differ from
the fuel consumption values listed on the ŠKODA websites or in the commer-
cial and technical vehicle documentation.
239Technical data
Page 272 of 280
Starting the engineKey127
Starter button129
START STOP Information messages
160
Steering lock (KESSY system) Warning light
36
Steering wheel10
Stop see Parking
132
Stopping the engine Key
127
Stop watch51
Storage94
Storage compartment Glasses compartment
100
in the front centre console96
in the rear centre console101
on the driver's side95
on the front passenger side100
under the front arm rest99
Storage compartments94
Storage pockets on the front seats101
Storing seats
89
Storing skis94
Stowage compartments in the doors
95
Sun roof Closing roller blind - Version 2
69
Opening roller blind - Version 269
operation - Version 167
operation - Version 269
Roller blind - Version 168
Sun screen81
sun visors81
Switching lights on and off71
Switching off the engine Starter button
129
Switching off the ignition Key127
Starter button129
Switching on the ignition Key
127
Starter button129
Synchronous adjustment of the rear-view mir- ror
85
T
Taking care of your vehicle Automatic car wash system
181
High-pressure cleaner181
Washing by hand181
Wash system181
TCS Operation
139
Warning light37
Technical data238
Through-loading bag102
Tiptronic134
Tools212
TOP TETHER27
Tow hitch Accessories
173
Towing221
Towing device Description
169
Towing eye front
222
Rear223
Towing hitch Operation and maintenance
185
Towing protection60
Traction Control System (TCS)139
Traffic sign recognition164
Function165
Information messages166
Traffic signs see Traffic sign recognition164
Trailer174
13-pin socket174
Attaching and detaching174
loading175
Safety eyelet174
Trailer operation176
Trailer operation169, 176
Trailer stabilisation (TSA)140
Transmission Warning messages
35
Transport Luggage compartment
103
Roof rack113
Transporting94
Transporting children safely22
Triangle211
TSA140
Turn signal73
Turn signal system Warning light
39, 40
Tyrea Damage
206
Tyre load-bearing capacity see Wheels
207
Tyre pressure204
Warning light39
Tyre pressure monitoring167
Display39
Infotainment display168
Saving tyre pressure values167
Saving tyre pressure values - button168
Saving tyre pressure values - Infotainment168
Tyre repair General information
219
Preparations219
Pressure test220
Sealing and inflating the tyre219
269Index