SKODA OCTAVIA 2014 3.G / (5E) Swing Infotinment Car Radio Manual
Manufacturer: SKODA, Model Year: 2014, Model line: OCTAVIA, Model: SKODA OCTAVIA 2014 3.G / (5E)Pages: 50, PDF Size: 4.34 MB
Page 31 of 50

■Sort by: - Options for the arrangement of the phone book 1)
■ Surname - Sort by contact name
■ 1st name - Sort by contact first name
■ Imp. contacts - Start the update the phone book 2)
» page 34 , Invite list
■ Select ringtone - Selection the ring tone is available if the connected tele-
phone does not support the in-band ringing function 3)
■ Remember your mobile - Switch on/off the reminder for a connected tele-
phone; the reminder is output when the ignition is switched off and the igni-
tion key is removed (or the ignition is turned off and the driver's door opened
in the case of vehicles with the KESSY system)
Connect to the device to the mobile telephone
Introduction
This chapter contains information on the following subjects:
conditions for coupling
29
Connect the device to the telephone
29
Connect the mobile telephone with the device
30
Connection with another paired mobile telephone
31
Bluetooth ®
- connection profile
31
Delete the telephone from the list of paired devices
32
Disconnection
32
First and foremost, pay attention to the safety instructions » page 4 , Impor-
tant notes .
The device is displayed in the telephone to be connected to as SKODA BT ...
... is replaced with the last four characters of the vehicle identification number
of your vehicle.
You can change the name of the device » page 14, Bluetooth ®
settings .
WARNINGThe device may require confirmation of certain features in the telephone
when pairing. Therefore do not carry out the pairing process while driving -
there is danger of accidents!Note■ The maximum number of phones registered is 20 Coupling a new phone after
reaching the maximum number causes the least recently used coupled tele-
phone to be automatically replaced.■
In some countries the connection via the Bluetooth ®
function, may be limi-
ted. Further information can be obtained from local authorities.
■
The range of the Bluetooth ®
signal to the system is restricted to the vehicle
interior. The signal can be affected by other equipment or obstacles, such as
luggage.
conditions for coupling
Read and observe
on page 29 first.
To connect a telephone with the device, the two devices must be paired.
Prerequisites for successful pairing: The ignition is switched on.
The Bluetooth ®
function of the device » page 14 and the telephone is
switched on.
The visibility of the device is switched on » page 14.
The visibility of the telephone is switched on.
The phone is within range of the Bluetooth ®
signal.
The pairing can be initiated from the device or from the telephone.
Connect the device to the telephone
Read and observe
on page 29 first.
A telephone is paired with the device
After switching on the ignition, the device attempts to automatically connect
to the last connected telephone.
During the connection setup and depending on the telephone type the device
screen displays may show ... Would you like to connect? and a menu will ap-
pear with the following function keys.
1)
This function is only supported by some telephones.
2)
Some telephones do not support downloading of contacts from the SIM card.
3)
The in-band ringing function makes it possible to use the ring tone of your telephone as the ring tone.
29Telephone
Page 32 of 50

›Connect
- pairing confirmation
› Cancel
- stops the coupling process
If the connection cannot be established, the device will then attempt to con- nect to other previously paired telephones one by one.
If there is also no connection, then a telephone search is to be started.
If the telephone to be connected has an active connection to another device,
then coupling occurs, but no connection is made.
No telephone is paired with the device
After switching on the ignition, on the device screen the message Please con-
nect a mobile telephone. appears and a menu with the following function
keys.
› Find telephone
- search for available telephones with activated Bluetooth ®
function and visibility
› Paired devices
- Opens a list of paired phones when a phone was already
paired with the device
›
- Opening of the settings menu
» page 28, Settings
After pressing the function key Find telephone the list is incrementally upda-
ted and displayed until the search for Bluetooth ®
devices is completed (after
about 1 min.).
Select the telephone you want from the list BT devices.
If the search fails, check that the conditions for successful pairing are
met » page 29 , conditions for coupling and repeat the whole process. Press
the function key Find.
Pairing confirmation
Depending on the telephone's Bluetooth ®
, conformation is in one of the fol-
lowing ways.
› Confirm the 6-digit PIN code 1)
displayed on the device screen and the tele-
phone display within 30 seconds on both the device and the telephone.
or› Confirm the connection request in the telephone.
› Enter the 4 digit PIN code shown on the unit display into the telephone with-
in 30 seconds 2)
.
Connection
After successful connection, the main menu Telephone appears » Fig. 16 on
page 27 .
In some phones, a confirmation regarding the downloading of the contacts in
the device memory is necessary. If no confirmation takes place on the phone
regarding the downloading of the contacts, then is no downloading of con-
tacts takes place.
Note
■ During the pairing process the option in the phone to remember the pass-
word for the next automatic connection can be selected 3)
.■
If the telephone supports the Bluetooth ®
profile A2DP or AVRCP 4)
, your tele-
phone display may prompt you to pair the telephone as a Bluetooth ®
player.
Connect the mobile telephone with the device
Read and observe
on page 29 first.
When pairing from the telephone, follow the instructions in the owner's man-
ual of the telephone.
›
Have the telephone search for available Bluetooth ®
devices.
›
Select the device in the list of Bluetooth ®
devices 5)
.
The following message is shown in the device screen during pairing ... Would
you like to connect? , and the following function keys are displayed.
› Connect
- confirmation of the coupling process
› Cancel
- stops the coupling process
Depending on the telephone's Bluetooth ®
, conformation is in one of the fol-
lowing ways.
1)
For devices with Bluetooth ®
v2.1 and later the telephone quick pairing procedure (SSP Secure Simple
Pairing) is used for pairing. This pairing method does not require the user to enter a PIN.
2)
The input and confirmation of the PIN code is not possible while driving.
3)
This function is only supported by some telephones.
4)
A2DP and AVRCP are Bluetooth ®
profiles that support multimedia functions.
5)
For the name of the device refer to the Bluetooth ®
settings » page 14 .
30Telephone
Page 33 of 50
›Confirm the 6-digit PIN code 1)
displayed on the device screen and the tele-
phone display within 30 seconds on both the device and the telephone.
If required select the option in the telephone for automatically connecting the
telephone to the device.
or
› Enter the 4 - 16 digit PIN code into the device.
› Enter the PIN code shown on the device display into the telephone within 30
seconds 2)
.
› If required acknowledge the confirmation request with the telephone.
After successful connection, the main menu Telephone appears » Fig. 16 on
page 27 .
If the device is connected to another phone via the HPP-profile, then only the
coupling of the new phone takes place. The original phone remains connected.
With free connection via the A2DP and AVRCP 3)
profile the phone with the de-
vice connects automatically with this profile as a Bluetooth ®
player » page 24 .
Connection with another paired mobile telephone
Read and observe
on page 29 first.
If you want to connect the device to another paired telephone, the current
connection does not have to be terminated. The connection to the existing tel-
ephone is automatically terminated by connecting to another telephone.
›
In the menu press the Telephone function key
B
» Fig. 16 on page 27 .
It displays a list of previously paired telephones.
›
Select the paired telephone to be connected with the device.
If the coupling conditions » page 29 for the selected phone are met, the mes-
sage in the device screen … Replace this connection with …? appears along
with the following function keys.
› Cancel
- stops the menu for telephone change
› Replace
- connection to the selected telephone
After successful connection, the main menu Telephone appears » Fig. 16 on
page 27 .
If the desired telephone is not in the list of previously paired telephones then
the telephone is to be paired with the device » page 29, Connect the device to
the telephone .
Bluetooth®
- connection profile
Read and observe
on page 29 first.
Profile types
The device can be paired with several telephones (or Bluetooth ®
devices), but
only one can be actively connected on the HFP 4)
profile and one on the A2DP
audio profile or AVRCP 5)
.
› Hands-free phone (HFP)
- Devices that support the connection via the
HFP profile
› Bluetooth audio (A2DP)
- Devices that support the connection via the au-
dio profile
Connection switch on / replace
Press in the menu the Telephone function key
→ Bluetooth → Paired devi-
ces .
A list of paired devices is displayed.
By pressing the function key with the name of the connected device a menu
opens with the supported profiles.
By pressing the white profile icon in the menu with supported profiles, the
message … - connection with … connecting… appears on the device screen
and the device connects using the selected profile.
If the device is already connected to another device, the message in device
screen ... Replace this connection with ...? appears along with the following
function keys.
1)
For devices with Bluetooth ®
v2.1 and later the device quick pairing procedure (SSP Secure Simple Pair-
ing) is used for pairing. This connection method does not require the user to enter a PIN.
2)
The input and confirmation of the PIN code is not possible while driving.
3)
A2DP and AVRCP are Bluetooth ®
profiles that support multimedia functions.
4)
HFP is a Bluetooth ®
profile that supports the functionality of the hands-free system.
5)
A2DP and AVRCP are Bluetooth ®
audio profiles that support multimedia functions.
31Telephone
Page 34 of 50

›Replace
- replace the connection with the new device to be connected
› Cancel
- Cancel the replacement connection
After confirming the connection is made to the selected device. Only the newly
selected profile will be replaced the other profiles remain connected to the
original device.
Fast switching of the HFP connection
By pressing the function key B
» Fig. 16 on page 27 a list of paired devices is
displayed.
After pressing the function key with the name of the paired device, the mes-
sage in device screen ... Replace this connection with ...? appears along with
the following function keys.
› Replace
- replace the connection by the selected paired device (when availa-
ble)
› Cancel
- Cancel the replacement connection
After confirming the connection is made to the selected device via the HFP
profile. The connection via the audio profile remains unchanged.
Disconnection
Press in the menu the Telephone function key
→ Bluetooth → Paired devi-
ces .
A list of paired devices is displayed.
By pressing the green icon for the profile, the message in the device screen ...
Disconnect the profile - are you sure? is displayed along with the following
function keys.
› Disconnect
- Disconnect connection
› Cancel
- Cancel the disconnection
Delete the telephone from the list of paired devices
Read and observe
on page 29 first.
›
Press in the menu the Telephone function key
→ Bluetooth → Paired de-
vices .
A list of paired devices and the following function keys are displayed.
›
All - Delete all the telephones in the list of paired devices
›
- Delete the desired telephone
After selecting one of the function keys, the function keys are displayed.
› Delete
- delete confirmation
› Cancel
- Cancels the deletion
Disconnection
Read and observe
on page 29 first.
The connection of a telephone to the device can be disconnected in one of the
following ways.
› By removing the ignition key (or switching off the ignition and opening the
driver's door in vehicles with the KESSY system).
› By switching off the Bluetooth ®
function on the device » page 14, Bluetooth ®
settings .
› By switching off the Bluetooth ®
function on the telephone.
› By the separation of the connection in the telephone.
› By removing the telephone from the list of paired devices
» page 32, Delete
the telephone from the list of paired devices .
› By turning off the Bluetooth ®
HFP profile » page 31, Bluetooth ®
- connection
profile .
› By turning off the connected phone.
› By the moving of the phone outside the Bluetooth ®
signal range.
If a telephone is connected to the device and the device is turned off, the con-
nection to the telephone is not lost. The connection is only lost after switching
off the ignition (for vehicles with the system KESSY after switching off the ig-
nition and opening the driver's door).
Telephone functions
Introduction
This chapter contains information on the following subjects:
Speed dialling a phone number
33
Directly enter a telephone number
33
List of telephone contacts
34
Call lists
35
Telephone conversation
35
First and foremost, pay attention to the safety instructions » page 4 .
32Telephone
Page 35 of 50

Speed dialling a phone number
By pressing a function key for speed dialling C
» Fig. 16 on page 27 an imme-
diate choice of pre-assigned phone number is possible.
There are four function keys for speed dialling available.
The management of the shortcut keys can be done in the Telephone menu →
→ User profile → Manage favourites .
Assigning a phone number
›
Operate a function key for the speed dial
C
» Fig. 16 on page 27 that is not
assigned.
The unit displays the telephone book.
›
If necessary, enter one of the contact numbers for the desired telephone
contact.
The selected phone number is assigned to a function key for speed dialling.
Selecting a stored speed dial
›
Operate the desired function key for the speed dial telephone number
C
» Fig. 16 on page 27 .
Changing a stored speed dial
›
The assigned function key for speed dialling
C
» Fig. 16 on page 27 for about
2 s.
The unit displays the telephone book.
›
If necessary, enter one of the contact numbers for the desired telephone
contact.
The selected phone number is assigned to a function key for speed dialling.
Removing a phone number
›
In the Telephone menu →
→ User profile → Manage favourites .
›
Press the function key for the relevant speed dial.
By confirming the function Delete the phone number is removed.
Directly enter a telephone numberFig. 17
Direct entry of a phone number
›
Press in the menu the Telephone function key
» Fig. 16 on page 27 .
A screen appears for the entry of the telephone number » Fig. 17.
Menu for entering the phone number Input line
Delete characters in the entry line
Dial the entered number
Entering a prefix: 1)
The function key with the symbol (Mailbox option) is not supported by the
device.
Entering a phone number
Entering the phone number follows, whereby the function keys with the num-
ber are operated sequentially.
By pressing the function key the telephone number is dialled.
By pressing the function key the telephone number is dialled using the pre-
fix.
Enter the last number dialled
If there are no figures entered for the phone number, the function key is
displayed or the last number dialled.
By pressing the function key the telephone number is dialled.
By pressing the function key the telephone number is dialled using the pre-
fix.
A1)
The function key for the code appears only with active preset function
» page 28, Settings .
33Telephone
Page 36 of 50
Search for a contact in the list
The input screen » Fig. 17 also functions as an alphanumeric keypad that you
can use to search for contacts in the phonebook.
For example, if you enter 32, the unit will display contacts with the letter se-
quence DA, FA, EB, etc.
On the right side next to the numerical keyboard a list of contacts found from
the directory appears according to the lettered specified. By pressing the cor-
responding function key for the respective contact the dialling starts.
Enter the code
Typing the prefix can be performed in the following ways.
› By pressing the function key
(the dialling of the entered phone number
with the prefix starts).
› By entering of characters or numbers (e.g.
or 00 and the like a prefix char-
acter is inserted in line A
).
The prefix may, for example be for international calls, phone calls via a virtual
mobile network operator, or distinguishing between business and private calls.
If the contact number contains a prefix, pressing the function key causes a
further prefix to be added before the number and the connection starts. The
phone number contains at this time two prefixes and a phone call is not initi-
ated.
List of telephone contacts
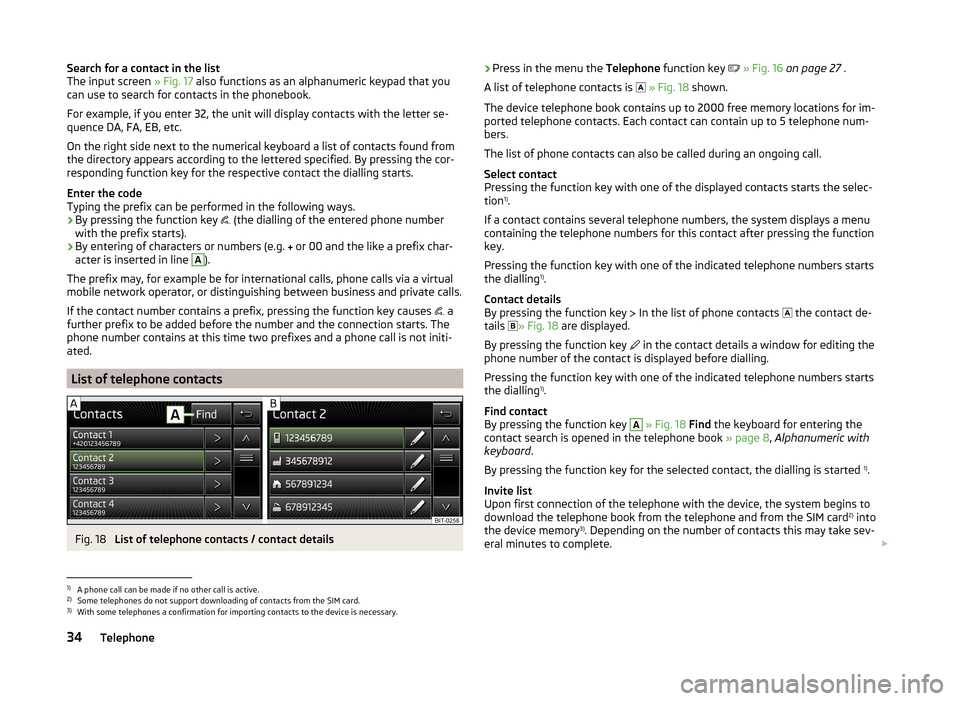
Fig. 18
List of telephone contacts / contact details
› Press in the menu the
Telephone function key » Fig. 16 on page 27 .
A list of telephone contacts is
» Fig. 18 shown.
The device telephone book contains up to 2000 free memory locations for im-
ported telephone contacts. Each contact can contain up to 5 telephone num-
bers.
The list of phone contacts can also be called during an ongoing call.
Select contact
Pressing the function key with one of the displayed contacts starts the selec-
tion 1)
.
If a contact contains several telephone numbers, the system displays a menu
containing the telephone numbers for this contact after pressing the function
key.
Pressing the function key with one of the indicated telephone numbers starts
the dialling 1)
.
Contact details
By pressing the function key In the list of phone contacts
the contact de-
tails » Fig. 18
are displayed.
By pressing the function key in the contact details a window for editing the
phone number of the contact is displayed before dialling.
Pressing the function key with one of the indicated telephone numbers starts
the dialling 1)
.
Find contact
By pressing the function key A
» Fig. 18 Find the keyboard for entering the
contact search is opened in the telephone book » page 8, Alphanumeric with
keyboard .
By pressing the function key for the selected contact, the dialling is started 1)
.
Invite list Upon first connection of the telephone with the device, the system begins to
download the telephone book from the telephone and from the SIM card 2)
into
the device memory 3)
. Depending on the number of contacts this may take sev-
eral minutes to complete.
1)
A phone call can be made if no other call is active.
2)
Some telephones do not support downloading of contacts from the SIM card.
3)
With some telephones a confirmation for importing contacts to the device is necessary.
34Telephone
Page 37 of 50
The number of imported contacts can be checked in the function
key » page 28 Imp. contacts .
Depending on the context, the number for the number of contacts imported
has the following meaning.
› During the import - xxxx / yyyy - Number of currently imported contacts into
the device memory / number of contacts in the phone.
› After importing - xxxx/2000 - number of contacts imported, that include at
least one telephone number / 2000 (highest possible number of imported
contacts in the device memory).
If the imported list of telephone contacts from the telephone contains more
than 2000 contacts, loading is stopped and the message Contacts not fully
imported. appears on the screen. Only the already downloaded contacts will
be available.
If an error occurs while loading the list, the message Import failed. Please try
again and check whether … allows connections.
Refresh list
Each time the telephone has established a new connection with the device,
the relevant telephone contacts will be updated.
During the update, the list which was stored after the last completed update
will be available. Newly stored telephone numbers are only shown after the
updating has ended.
The update can be done manually » page 28, Settings by pressing the function
key Imp. contacts .
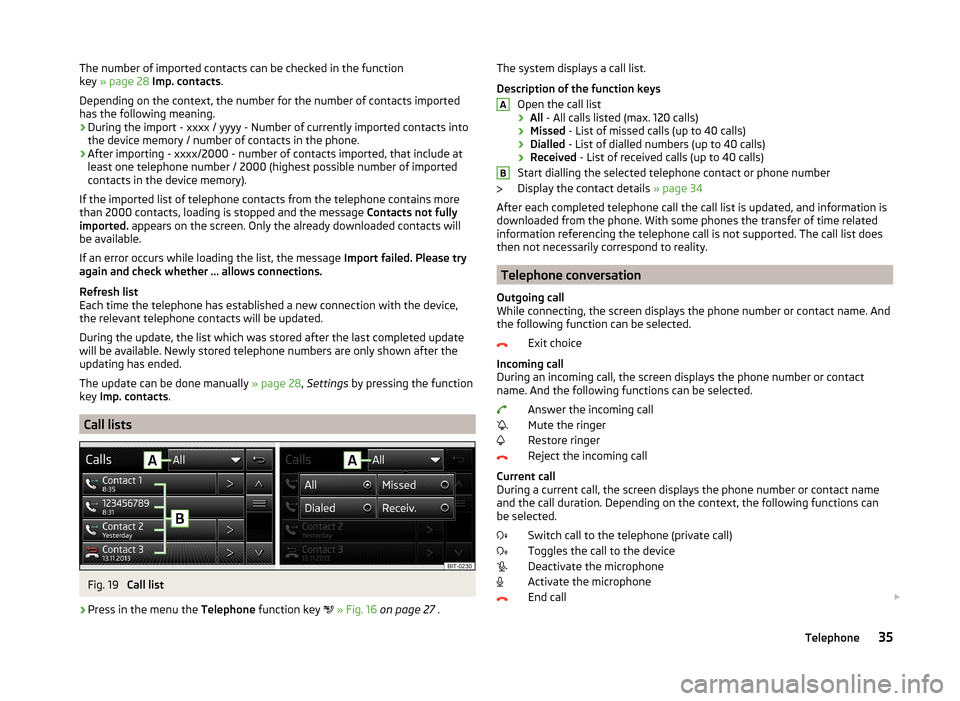
Call lists
Fig. 19
Call list
›
Press in the menu the Telephone function key
» Fig. 16 on page 27 .
The system displays a call list.
Description of the function keys Open the call list
› All
- All calls listed (max. 120 calls)
› Missed
- List of missed calls (up to 40 calls)
› Dialled
- List of dialled numbers (up to 40 calls)
› Received
- List of received calls (up to 40 calls)
Start dialling the selected telephone contact or phone number
Display the contact details » page 34
After each completed telephone call the call list is updated, and information is
downloaded from the phone. With some phones the transfer of time related
information referencing the telephone call is not supported. The call list does
then not necessarily correspond to reality.
Telephone conversation
Outgoing call
While connecting, the screen displays the phone number or contact name. And
the following function can be selected.
Exit choice
Incoming call
During an incoming call, the screen displays the phone number or contact
name. And the following functions can be selected.
Answer the incoming call
Mute the ringer
Restore ringer
Reject the incoming call
Current call
During a current call, the screen displays the phone number or contact name
and the call duration. Depending on the context, the following functions can
be selected.
Switch call to the telephone (private call)
Toggles the call to the device
Deactivate the microphone
Activate the microphone
End call
AB35Telephone
Page 38 of 50

During an ongoing call, it is possible by pressing the function key to send
the key tone (DTMF), if required the contact can be sent by key tone by press-
ing the function key Contact as DTMF. After confirmation a list of available
contacts is opened.36Telephone
Page 39 of 50
Vehicle systems
Vehicle settings
Introduction
This chapter contains information on the following subjects:
Selection of travel mode (Driving Mode Selection)
37
Vehicle data
38
Auxiliary heater and ventilation
39
ESC-and ASR systems
39
Tyre
39
Assistance systems
39
Parking and manoeuvring
40
Light
40
Mirrors and wiper
41
Opening and closing
41
Seats
41
Instrument cluster (multifunction display)
41
Time, date and unit setting
42
Service
42
Restore factory settings
42
Climatronic settings
42
First and foremost, pay attention to the safety instructions » page 4 , Impor-
tant notes .
Settings relating to the vehicle systems can only be made when the ignition is
switched on.
Note
■ The individual systems are described in the » Vehicle Owner's Manual .■For safety reasons, if any system functions are disabled, then some func-
tions, such as parts of the ESC system, are automatically enabled again after
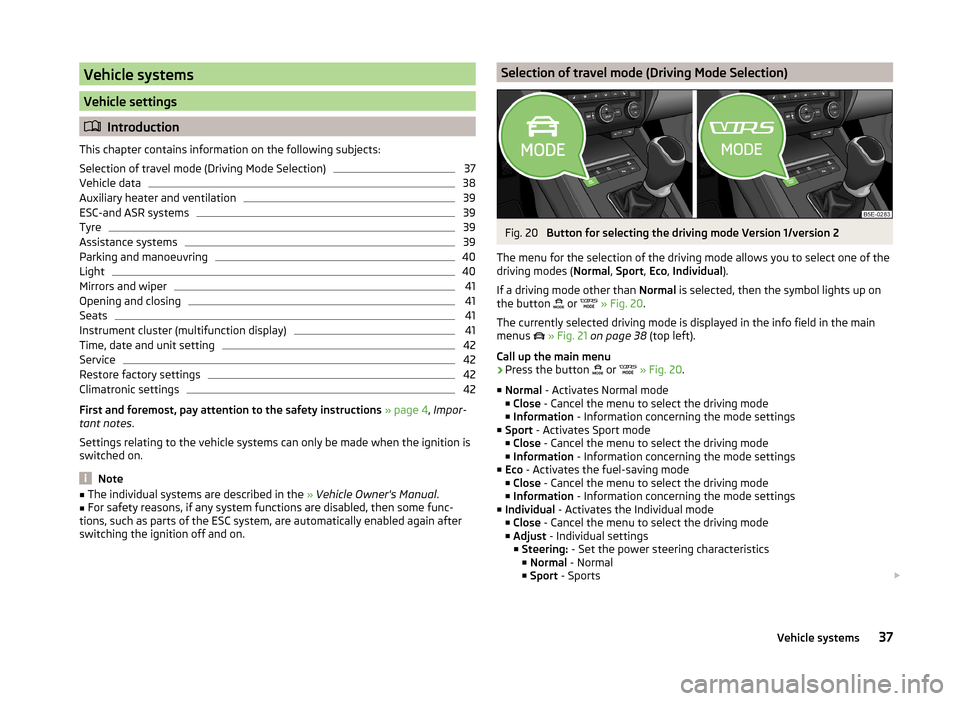
switching the ignition off and on.Selection of travel mode (Driving Mode Selection)Fig. 20
Button for selecting the driving mode Version 1/version 2
The menu for the selection of the driving mode allows you to select one of the
driving modes ( Normal, Sport , Eco , Individual ).
If a driving mode other than Normal is selected, then the symbol lights up on
the button or
» Fig. 20 .
The currently selected driving mode is displayed in the info field in the main
menus
» Fig. 21 on page 38 (top left).
Call up the main menu
›
Press the button or
» Fig. 20 .
■ Normal - Activates Normal mode
■ Close - Cancel the menu to select the driving mode
■ Information - Information concerning the mode settings
■ Sport - Activates Sport mode
■ Close - Cancel the menu to select the driving mode
■ Information - Information concerning the mode settings
■ Eco - Activates the fuel-saving mode
■ Close - Cancel the menu to select the driving mode
■ Information - Information concerning the mode settings
■ Individual - Activates the Individual mode
■ Close - Cancel the menu to select the driving mode
■ Adjust - Individual settings
■ Steering: - Set the power steering characteristics
■ Normal - Normal
■ Sport - Sports
37Vehicle systems
Page 40 of 50
■Engine: - Set the engine (drive) characteristics
■ Normal - Normal
■ Sport - Sports
■ Eco - Economical
■ ACC: - Set the vehicle acceleration when adaptive cruise control is activa-
ted
■ Normal - Normal
■ Sport - Sports
■ Eco - Economical
■ Cornering light: - Set the characteristics of the adaptive headlights
■ Normal - Normal
■ Sport - Sports
■ Eco - Economical
■ Air conditioning - Sets the characteristics of Climatronic
■ Normal - Normal
■ Eco - Economical
■ Reset mode - Setting for all menu items in the Individual mode to Normal
■ Cancel - Keep the current settings
■ Reset - Set all menu items to Normal
Note
If you do not operate the unit for longer than approx. 10 seconds in the "Select
driving mode" menu, it will switch to the last selected menu or switch itself off.
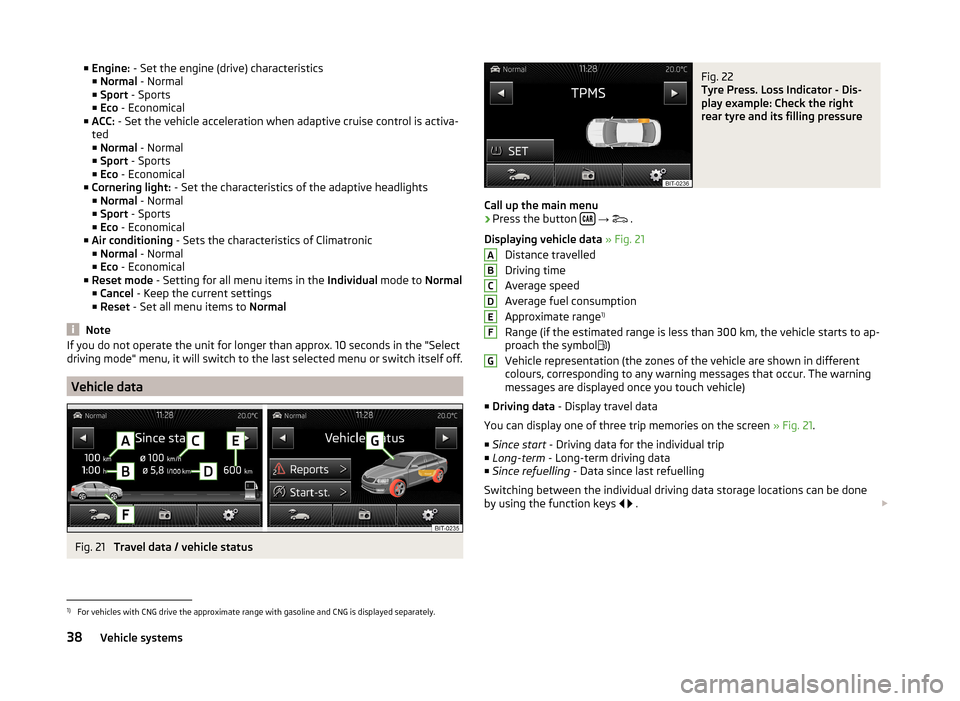
Vehicle data
Fig. 21
Travel data / vehicle status
Fig. 22
Tyre Press. Loss Indicator - Dis-
play example: Check the right
rear tyre and its filling pressure
Call up the main menu
›
Press the button
→
.
Displaying vehicle data » Fig. 21
Distance travelled
Driving time
Average speed
Average fuel consumption
Approximate range 1)
Range (if the estimated range is less than 300 km, the vehicle starts to ap-
proach the symbol )
Vehicle representation (the zones of the vehicle are shown in different
colours, corresponding to any warning messages that occur. The warning
messages are displayed once you touch vehicle)
■ Driving data - Display travel data
You can display one of three trip memories on the screen » Fig. 21.
■ Since start - Driving data for the individual trip
■ Long-term - Long-term driving data
■ Since refuelling - Data since last refuelling
Switching between the individual driving data storage locations can be done
by using the function keys
.
ABCDEFG1)
For vehicles with CNG drive the approximate range with gasoline and CNG is displayed separately.
38Vehicle systems