SKODA OCTAVIA 2014 3.G / (5E) Swing Infotinment Car Radio Manual
Manufacturer: SKODA, Model Year: 2014, Model line: OCTAVIA, Model: SKODA OCTAVIA 2014 3.G / (5E)Pages: 50, PDF Size: 4.34 MB
Page 41 of 50
■Conv. cons. Displays up to three consumers which have the largest share of
fuel consumption and displays the fuel consumption to run all convenience
systems
■ Veh. status - Displays vehicle status » Fig. 21 or tyre pressure monitoring in-
formation
■ Veh. status - Displays vehicle status information
■ - No message /
Announcements - warning messages relating to ve-
hicle status or number of messages (if there is only one message, one
warning message text is displayed)
■ Start-st. - Display information about the status of the START-STOP
system
■ Tyre Press. Loss Indicator - Tyre pressure monitoring function » Fig. 22
■
SET - Start a new calibration process
Switching between the individual menus can be done by using the function
keys
.
Note
After pressing the button the last displayed view from the menu is shown
.
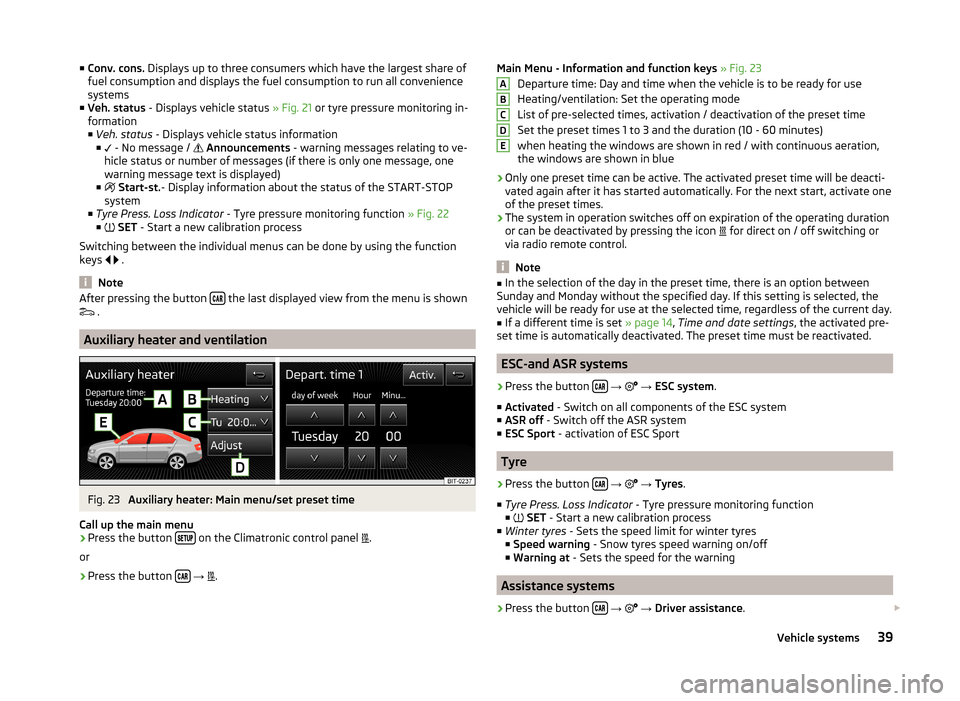
Auxiliary heater and ventilation
Fig. 23
Auxiliary heater: Main menu/set preset time
Call up the main menu
›
Press the button on the Climatronic control panel
.
or
›
Press the button
→
.
Main Menu - Information and function keys
» Fig. 23
Departure time: Day and time when the vehicle is to be ready for use
Heating/ventilation: Set the operating mode
List of pre-selected times, activation / deactivation of the preset time
Set the preset times 1 to 3 and the duration (10 - 60 minutes) when heating the windows are shown in red / with continuous aeration,the windows are shown in blue
› Only one preset time can be active. The activated preset time will be deacti-
vated again after it has started automatically. For the next start, activate one
of the preset times.
› The system in operation switches off on expiration of the operating duration
or can be deactivated by pressing the icon for direct on / off switching or
via radio remote control.
Note
■ In the selection of the day in the preset time, there is an option between
Sunday and Monday without the specified day. If this setting is selected, the
vehicle will be ready for use at the selected time, regardless of the current day.■
If a different time is set » page 14, Time and date settings , the activated pre-
set time is automatically deactivated. The preset time must be reactivated.
ESC-and ASR systems
›
Press the button
→
→ ESC system .
■ Activated - Switch on all components of the ESC system
■ ASR off - Switch off the ASR system
■ ESC Sport - activation of ESC Sport
Tyre
›
Press the button
→
→ Tyres .
■ Tyre Press. Loss Indicator - Tyre pressure monitoring function
■
SET - Start a new calibration process
■ Winter tyres - Sets the speed limit for winter tyres
■ Speed warning - Snow tyres speed warning on/off
■ Warning at - Sets the speed for the warning
Assistance systems
›
Press the button
→
→ Driver assistance .
ABCDE39Vehicle systems
Page 42 of 50
■ACC (adaptive cruise control) - Sets the adaptive cruise control
■ Driving program: - Set the vehicle acceleration when adaptive cruise con-
trol is activated 1)
■ Normal - Normal
■ Sport - Sports
■ Eco - Economical
■ Last distance selected - Switch last selected distance on/off
■ Distance: - Set the distance monitoring to the vehicles ahead
■ Very close - Very small distance
■ Close - Small distance
■ Medium - Medium distance
■ Far - Large distance
■ Very far - Very large distance
■ Front Assist - Sets the assistant for monitoring the distance to the vehicles
ahead
■ Active - Activate/deactivate the assistant
■ Advance warning - Activate/deactivate advance warning
■ Display distance warning - Activate/deactivate distance warnings
■ Lane Assist - Settings for Lane Assist
■ Active - Activate/deactivate the assistant
■ Adaptive lane guidance - Activate/deactivate adaptive lane guidance
■ Driver Alert System - Activate/deactivate the driver alert system
■ Proactive pass. protection - Activate/deactivate proactive passenger protec-
tion
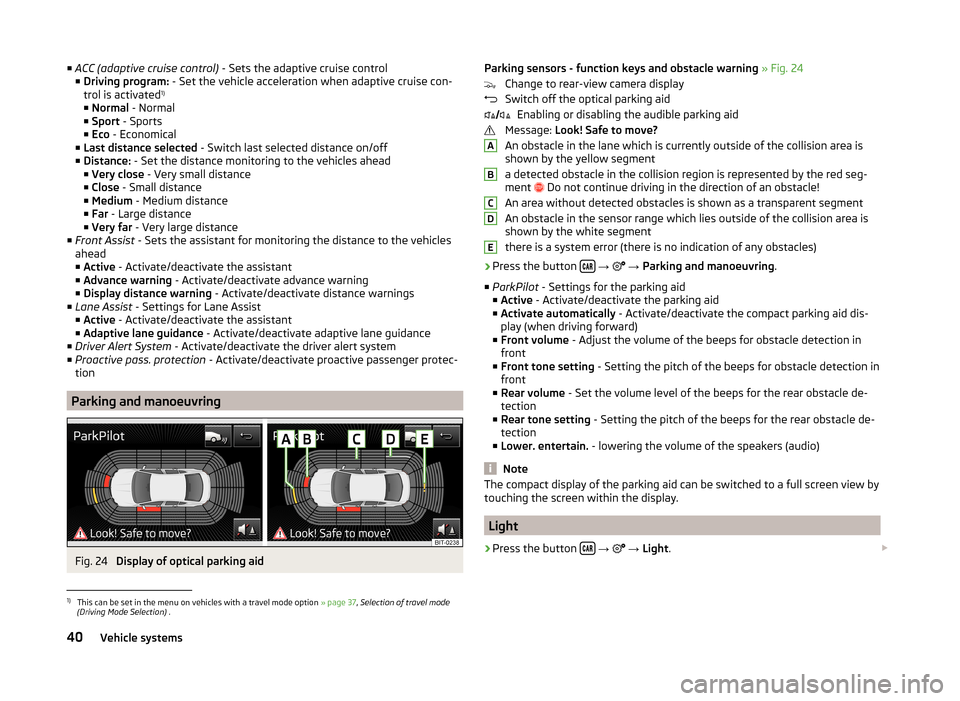
Parking and manoeuvring
Fig. 24
Display of optical parking aid
Parking sensors - function keys and obstacle warning » Fig. 24
Change to rear-view camera display
Switch off the optical parking aid Enabling or disabling the audible parking aid
Message: Look! Safe to move?
An obstacle in the lane which is currently outside of the collision area is
shown by the yellow segment
a detected obstacle in the collision region is represented by the red seg-
ment
Do not continue driving in the direction of an obstacle!
An area without detected obstacles is shown as a transparent segment An obstacle in the sensor range which lies outside of the collision area is
shown by the white segment
there is a system error (there is no indication of any obstacles)›
Press the button
→
→ Parking and manoeuvring .
■ ParkPilot - Settings for the parking aid
■ Active - Activate/deactivate the parking aid
■ Activate automatically - Activate/deactivate the compact parking aid dis-
play (when driving forward)
■ Front volume - Adjust the volume of the beeps for obstacle detection in
front
■ Front tone setting - Setting the pitch of the beeps for obstacle detection in
front
■ Rear volume - Set the volume level of the beeps for the rear obstacle de-
tection
■ Rear tone setting - Setting the pitch of the beeps for the rear obstacle de-
tection
■ Lower. entertain. - lowering the volume of the speakers (audio)
Note
The compact display of the parking aid can be switched to a full screen view by
touching the screen within the display.
Light
›
Press the button
→
→ Light .
ABCDE1)
This can be set in the menu on vehicles with a travel mode option » page 37, Selection of travel mode
(Driving Mode Selection) .
40Vehicle systems
Page 43 of 50
■Background lighting - Sets the interior lighting
■ Instrument lighting - Set the brightness of the instrument/switch lighting
■ Footwell lighting - Sets the brightness of the footwell light
■ Light assistance - Setting of outdoor lighting
■ Light Assist - Switch on/off the head light assist
■ Switch-on time: - Set the sensibility of the light sensor against the change
in intensity of the ambient light ■ Early - High sensibility
■ Medium - Medium sensibility
■ Late - Low sensibility
■ Aut. headlight contr. (rain) - Activate/deactivate automatic headlight con-
trol in rain
■ Daytime running lights - Activate/deactivate daytime running lights
■ Comfort turn signal - Activate/deactivate lane change flashing
■ Travel mode: - Travel mode on/off
■ Left - For right-hand traffic
■ Right - For left-hand traffic
■ “Coming/leaving home ” - Setting the COMING HOME / LEAVING HOME-func-
tion ■ “Coming home funct. ” - Set the period that the lights remain on after you
leave the vehicle (0 - 30 seconds; 0 = function deactivated)
■ “Leaving home fnct. ” Set the period that the lights remain on after you un-
lock the vehicle (0 - 30 seconds; 0 = function deactivated)
Mirrors and wiper
›
Press the button
→
→ Mirrors and wipers .
■ Mirrors - Adjusts the mirrors
■ Synchronous adjustment - Activate/deactivate synchronous mirror adjust-
ment
■ Lowering (reverse) - Activation / deactivation of the lowering of the pas-
senger's side mirror
■ Fold in (when parked) - Activate/deactivate folding the mirror via the re-
mote control key or by using the sensor in the handle (KESSY)
■ Wipers - Adjusts the windscreen wipers
■ Automatic wiping (rain) - Activate/deactivate automatic windscreen wiping
in rain
■ Automatic rear wiper - Activate/deactivate automatic rear window wiping
Opening and closing›
Press the button
→
→ Opening and closing .
■ Window operation - Window operation settings
■ Conven. open.: - Set the convenience opening feature
■ All - All windows
■ Driver - Driver's window only
■ Off - Deactivates the convenience opening
■ Central locking - Settings for opening and closing of doors
■ Door unlock.: - Set the door unlocking feature
■ All - All doors
■ Single door - Driver's door or driver's or passenger door with KESSY sys-
tem
■ Side - Doors on the driver's side or on the driver's or passenger's side
with KESSY system
■ Automatic locking - Activate/deactivate automatic locking when starting
off
■ Acoustic confirmation - Activate/deactivate acoustic signals when locking/
unlocking the vehicle with an anti-theft alarm system
Seats
›
Press the button
→
→ Seats .
■ Store seat position - Store the driver's seat position and exterior mirror posi-
tion in the remote control key when locking the vehicle ■ Vehicle key activated - Activate/deactivate storing the driver's seat posi-
tion and exterior mirror position when locking the vehicle
Instrument cluster (multifunction display)
›
Press the button
→
→ Instrument cluster
In this menu it is possible to hide/show the appearance of the menu items in
the instrument cluster multifunction display and reset the trip data.
■ Current consumption - Display of current fuel consumption on/off
■ Average consumption - Display of average fuel consumption on/off
■ Refuel quantity - Display of refuel quantity on/off
■ Convenience consumers - Display of fuel consumption of convenience con-
sumers on/off
■ Eco tips - Display of tips for economical driving on/off
■ Travelling time - Display of travelling time on/off
41Vehicle systems
Page 44 of 50
■Distance - Display of distance travelled on/off
■ Average speed - Display of average speed on/off
■ Digital speed display - Display of current speed on/off
■ Speed warning - Winter tyres warning on/off
■ Oil temperature - Oil temperature on/off
■ Coolant temperature - Coolant temperature on/off
■ Reset Since start data - Reset the single-trip memory in the device screen
and in the display of the instrument cluster
■ Reset Long-term data - Reset the long-term memory in the device screen
and in the display of the instrument cluster
Time, date and unit setting
›
Press
→ Time and date .
Description of the time and date settings » page 14 .
›
Press the button
→ Units .
Description of unit settings » page 14.
Service
›
Press the button
→
→ Service button.
■ VIN: ... - Display the vehicle identification number
■ Inspection: --- or --- - Number of km/days remaining until the next service
event
■ Oil change service: --- or --- - Number of km/days remaining until the next oil
change
Restore factory settings
›
Press the button
→
→ Factory settings .
In this menu you have the possibility to reset the menu items in the settings of the vehicle systems to factory settings.
■ All settings
■ All settings - Restoration of the settings all menu items
■ Individual settings
■ Driver assistance - Restoration of the driver assistance menus
■ Parking and manoeuvring - Restoration of the Parking and manoeuvring
menu items
■ Light - Restoration of the light menus
■
Mirrors and wipers - Restoration of the Mirrors and wipers menu
■ Opening and closing - Restoration of the Opening/closing menu items
■ Instrument cluster - Restoration of the instrument cluster menu
If one of the above menu items is selected, the system will ask you whether
you really want to restore the settings.
■ Cancel - Return to higher-level menu
■ Reset - Restore the settings
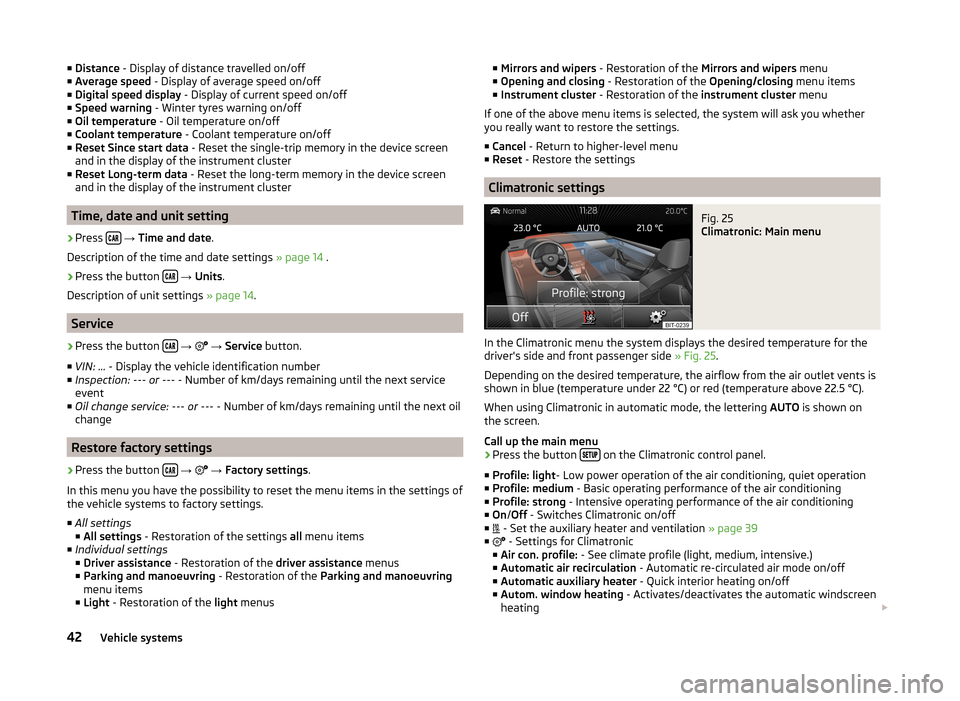
Climatronic settings
Fig. 25
Climatronic: Main menu
In the Climatronic menu the system displays the desired temperature for the
driver's side and front passenger side » Fig. 25.
Depending on the desired temperature, the airflow from the air outlet vents is
shown in blue (temperature under 22 °C) or red (temperature above 22.5 °C).
When using Climatronic in automatic mode, the lettering AUTO is shown on
the screen.
Call up the main menu
›
Press the button on the Climatronic control panel.
■ Profile: light - Low power operation of the air conditioning, quiet operation
■ Profile: medium - Basic operating performance of the air conditioning
■ Profile: strong - Intensive operating performance of the air conditioning
■ On /Off - Switches Climatronic on/off
■ - Set the auxiliary heater and ventilation
» page 39
■ - Settings for Climatronic
■ Air con. profile: - See climate profile (light, medium, intensive.)
■ Automatic air recirculation - Automatic re-circulated air mode on/off
■ Automatic auxiliary heater - Quick interior heating on/off
■ Autom. window heating - Activates/deactivates the automatic windscreen
heating
42Vehicle systems
Page 45 of 50
Note■If you do not operate the unit for longer than 10 seconds in the "Climatronic"
menu and Climatronic was not switched on before the menu was opened, the
unit will switch itself off.■
If you switch off the automatic mode of Climatronic by increasing or reducing
the fan speed, the coloured display of the airflow from the air outlets will not
be displayed.
43Vehicle systems
Page 46 of 50
Index
A
ACC
39
Additional keyboard languages14
Adjusting Volume
6
Adjust vehicle systems ESC system
39
AM16
Anti-theft device4
ASR39
Audio Media
20
Radio16
Audio source23
Automatic device switch off4
Automatic distance control39
Automatic front window wiping in rain41
Automatic headlight in rain40
Automatic locking41
Automatic rear window wiping41
AUX26
Auxiliary heater and ventilation Settings
39
B
Bluetooth Connect telephone to the device
29
Settings14
Switch on/off14
Visibility14
Bluetooth - profile31
Bluetooth audio24
Bluetooth player24
C
Call lists
35
Climatronic automatic air recirculation
42
Automatic operation42
mode42
COMING HOME40
Communication27
Component protection4
Conditions for coupling29
Connect the device to the telephone29
Connect the telephone with the device30
Control lever9
Convenience consumer38
D
DAB
16
Settings20
Data Convenience consumer
38
Travel38
Vehicle status38
Date14
Daytime running lights40
Declaration of Conformity4
Delete the telephone from the list of paired de- vices
32
Description of the device5
Device operation Control lever
9
MAXI DOT display8
Multifunction steering wheel9, 11
device screen keyboard
8
numerical keyboard8
Device screen13
Important notice6
Maintenance6
Operation7
Device Settings12
Digital radio reception Settings
20
Display6, 7
Door release41
Driving mode37
Driving Mode Selection37
DTMF35
E
Eco tips
41
ESC sport39
F
Factory settings
14 , 42
Fatigue detection39
File formats24
Prerequisites and restrictions24
FM16
Settings19
Folding down the exterior mirrors - folding in while parking
41
Frequency range See main menu
16
Front Assist39
Function keys7
H
Head Light Assist
40
I
Important notes
4
Important notice Touch screen
6
44Index
Page 47 of 50
Input screenLanguage characters14
Input screen with keyboard8
Input screen with numeric keyboard8
Instrument cluster41
Instrument lighting40
Introductory information4
Component protection4
Declaration of Conformity4
K
keyboard
8
Keyboard14
L
Lane Assist
39
Lane change flash40
LEAVING HOME40
Light sensor - light switch-on time40
List Media
21
List of available stations Radio
17
List of telephone contacts34
M
Main menu Media
20
Telephone27
MAXI DOT-Display Telephone
11
MAXI DOT display Media
9
operation8
Radio9
Media20
Audio source23
AUX26
Bluetooth audio24
Browser21
File formats24
List21
Main menu20
Multifunction steering wheel9
Multimedia database22
Operation20
Playback22
Prerequisites and restrictions24
SD memory card25
Select audio source24
Settings23
Supported media24
USB25
Memory function of the remote control key41
Menu Media
20
Radio16
Setup12
Telephone27
Unit settings12
Multi-media AUX
26
Multifunction display41
Multifunction steering wheel Media
9
Radio9
Telephone11
Multimedia USB
25
Multimedia database Media
22
Mute6
O
Operation Radio
16
P
Parking aid
40
Phone Speed dialling a phone number33
Playback Media
22
Proactive passenger protection39
PTY - filter17
R
Radio
16
DAB - settings20
FM - settings19
List of available stations17
Main menu16
Multifunction steering wheel9
Operation16
Preface16
Save station18
Search for station18
Select station18
Settings19
Traffic programme (TP)19
Radio station Save station
18
Search for station18
Select station18
S
Save radio station
18
Screen6
SD memory card25
Seats Settings
41
Select audio source Media
24
Select frequency range See main menu
16
Selection of travel mode37
Select radio station See main menu
16
45Index
Page 48 of 50

Service42
Settings Additional keyboard languages
14
Bluetooth14
DAB20
Device screen13
Driving mode37
FM19
Keyboard14
Language12
Manage favourites33
Media23
Menus12
Radio19
Restore factory settings14
Sound13
System Information15
Telephone28
Time and date14
Unit12
Units14
User profile33
Volume6
Setting vehicle systems Auxiliary heater and ventilation
39
Parking and manoeuvring40
Restore factory settings42
Setup12
Set vehicle systems Multifunction display
41
Tyre39
Sound13
Speed limit for snow tyres39
START-STOP38
Station See main menu
16
Status line7
Switching off Volume
6
Switching the unit off6
Switching the unit on6
Synchronous adjustment of both mirrors41
System Information15
T
telephone conditions for coupling
29
Telephone27
Bluetooth - profile31
Bluetooth profile29
Call lists35
Connect the device to the telephone29
Connect the telephone with the device30
Connect to the device29
Delete the telephone from the list of paired devices
32
Disconnection32
Enter telephone number33
Functions32
Main menu27
Multifunction steering wheel11
On screen messages28
Quick connection to the telephone31
Select telephone31
Settings28
Telephone book34
Telephone conversation35
Telephone number prefix33
Telephone book34
Telephone conversation35
DTMF35
Telephone functions32
Telephone number33
Telephone number prefix33
Tilting the mirror surface - lowering in reverse41
Time14
Touch screen6
Traffic programme (TP)19
Travel light - travel mode40
Trip data41
Tyre pressure monitor38, 39
U
Unit operation
7
Device screen7
Unit screen7
Unit overview5
Units14
Unit screen Operation
7
USB25
V
Vehicle Equipment Declaration of Conformity
4
Vehicle identification number42
Vehicle settings37
Vehicle systems37
Vehicle system settings Assistance systems
39
vehicle systems settings mirrors and wiper
41
Opening and closing41
Vehicle systems settings Climatronic
42
Light40
Seats41
VIN number42
W
Warning messages
4, 38
Window open41
46Index
Page 49 of 50
ŠKODA AUTO a.s. pursues a policy of constant product and model develop-
ment. We trust that you will understand that changes to models in terms of
shape, equipment and engineering, may be introduced at any time. The infor-
mation about appearance, performances, dimensions, weight, standards and
functions of the vehicle is correct at the time of publication. Some equipment
might only be introduced at a later date, or might only be offered in certain
markets; information is provided by ŠKODA Partners. It is therefore not possi-
ble for legal claims to be made based on the data, illustrations and descrip-
tions contained in this Owner's Manual.Reprinting, reproduction, translation, or any other use, either in whole or in
part, is not permitted without the written consent of ŠKODA AUTO a.s..
ŠKODA AUTO a.s. expressly reserves all rights relating to copyright laws.
Subject to change.
Issued by: ŠKODA AUTO a.s.
© ŠKODA AUTO a.s. 2014
Page 50 of 50

www.skoda-auto.com
Swing: Octavia
Infotainment anglicky 05.2014
S00.5614.28.20
5E0 012 720 DE
SIMPLY CLEVER
Infotainment Radio Swing
Operating instructions