change time SKODA OCTAVIA 2014 3.G / (5E) Swing Infotinment Car Radio Manual
[x] Cancel search | Manufacturer: SKODA, Model Year: 2014, Model line: OCTAVIA, Model: SKODA OCTAVIA 2014 3.G / (5E)Pages: 50, PDF Size: 4.34 MB
Page 6 of 50
Introductory information
Important notes
Introduction
This chapter contains information on the following subjects:
Declaration of Conformity
4
4
Warning messages
4
This Owner's Manual describes all possible equipment variants without identi-fying them as special equipment, model variants or market-dependent equip-ment.
Consequently, this vehicle does not need to contain all of the equipment com-ponents described in this Owner's Manual.
The level of equipment of your vehicle refers to your purchase contract of thevehicle. More information is available from the ŠKODA Partner1) where youbought the vehicle.
This guide is meant only as a supplement to the information contained in theoperating instructions of the vehicle. Therefore, they can be used only in con-junction with the latest manual for this vehicle. For a detailed description ofsome functions listed in these instructions, see the Vehicle Manual for your ve-hicle.
The illustrations can differ in minor details from your unit; they are only inten-ded for general information.
WARNING■Concentrate fully at all times on your driving! As the driver you are fullyresponsible for the operation of your vehicle.■
Only use the device in a way that ensures that you are in full control ofyour vehicle in every traffic situation - there is a risk of accident!
■
Adjust the volume to ensure that acoustic signals from outside, e.g. sirensfrom vehicles which have the right of way, such as police, ambulance andfire brigade vehicles, can be heard at all time.
■
High volumes can cause hearing damage.
Declaration of Conformity
Read and observe on page 4 first.
ŠKODA AUTO a.s. hereby declares that the ŠKODA Infotainment systems meetthe basic requirements and additional provisions of Directive 1999/5/EC.
ŠKODA AUTO a.s. hereby declares that the “connection and use of thiscommunications equipment is permitted by the Nigerian Communications
Read and observe on page 4 first.
Some electronic control units are factory-equipped with component protec-tion.
Component protection serves as a protection mechanism for the following:
›for the impairment of factory- or garage-fitted control units after installationin another vehicle (for example, after a theft);›for the impairment of components operated outside of the vehicle.›for the possibility of a legitimate installation or change of control units for re-pairs at a ŠKODA1) specialist garage.
When component protection is enabled, the following message appears on theunit display Component theft protection: the infotainment system is not fullyavailable at present. Please switch on the ignition.
If the component protection does not activate by switching on the ignition,please contact a ŠKODA specialist garage.
Warning messages
Read and observe on page 4 first.
The device turns off automatically under certain circumstances. The device in-forms you for a few seconds by means of a text message on the device screen.
1)
Terms used » manual, chapter Preface.
4Introductory information
Commision.”
Page 8 of 50
Touch screen
The unit is equipped with the so-called resistive (pressure / resistance) touch
screen.
The function keys on the screen can be operated by a light finger pressure to
the screen surface.
CAUTION
■ The screen can only be operated by a slight touch of a finger. With too much
pressure, the screen can be damaged.■
Do not use any objects to operate the screen, which could damage the
screen surface.
■
Solvent based cleaners can damage the screen surface.
■
Use a soft cloth and, if necessary, methylated spirits, to remove fingerprints
from the screen. When doing so, ensure that you do not cause damage to oth-
er parts of the interior.
Note
■ To protect the screen, a suitable protective film for touch screens can be
used.■
The brightness level can be set » page 13, Screen settings .
Switching the unit on/off
›
The unit is switched on or off by briefly pressing the on/off knob .
When the device is switched on, the audio source and operating mode that
were active before switching off the device will be restored.
If Telephone mode was active before you switched off the unit and the igni-
tion and Bluetooth ®
function is not switched on, the screen displays the mes-
sage » page 28 , Problems with the Telephone function . Switch on the igni-
tion or the Bluetooth ®
function » page 14 , Bluetooth ®
settings .
If the vehicle key is pulled out of the ignition lock while the unit is switched on,
the unit will switch off automatically. After switching on the ignition, the unit
is turned on automatically.
If the device was switched off using the
knob, then the device will not
switch on automatically after switching on the ignition.
The unit will switch off automatically after the engine is switched off and the
door is opened if the vehicle is fitted with the KESSY system. If you open the
driver's door before switching off the engine, the device will also switch off.
When the ignition is switched off, the device switches off automatically after
approx. half an hour (discharge protection of the vehicle battery).
Adjusting volume
Increase the volume
›
Turn the knob to the right.
Reduce the volume
›
Turn the knob to the left.
Muting
›
Press the key or turn the knob to the left and set the volume to 0.
If something is being played over the media at the time of reducing the volume
with the adjustment knob
to 0 then what is being played over the media is
paused.
CAUTION
■ High volumes can cause sound resonance and sound distortion in the vehi-
cle.■
The car speakers may be damaged if the volume is set too loud.
Note
■ The change in volume is displayed on the screen.■The following symbol appears in the display when the sound is muted : .■
The speakers in the vehicle are matched for the power output of the device.
6Introductory information
Page 22 of 50
■Alternative frequency (AF) - Search for alternative frequencies of the station
currently being listened to on/off
■ Radio Data System (RDS) - Switches on/off the RDS function 1)
■ Sort stations: - Sort types of radio stations in the station list (FM)
■ Group - Sort by transmitted program type
■ ABC - alphabetical order according to station name
Advanced Settings (DAB)
›
In the main menu press the DAB Radio range and the function key
→ Ad-
vanced settings .
■ DAB traffic messages - Switch on/off DAB announcements
■ Other DAB messages - Switch on/off other announcements (e.g., warnings,
regional weather, sports reports, financial news)
■ DAB station tracking - Switching the DAB Automatic program tracking in
other station groups (Ensemble)
■ Auto. DAB - FM switching - switches on/off auto-switching from DAB to the
FM frequency band if the DAB signal is lost
DAB station tracking
If a DAB station is a member of several sender groups, when the signal is poor,
the same station is searched in a different sender groups (Ensemble).
Auto-change DAB -FM
If the DAB signal is poor, the unit will try to find a preset FM station for the
DAB station you are currently listening to.
For auto-change to work, the DAB and FM stations must send a sender ID.
› While the station is being received on the FM band, (
) is displayed after the
station name. The () marker disappears when the relevant DAB station can
be received again ).
› If a DAB station is also not available in the FM band due to poor reception,
the device will be switched to mute.
› If you do not want automatic station change (e.g. when driving through tun-
nels, when reception may be lost temporarily), you can deactivate this func-
tion.
Media
Operation
Introduction
This chapter contains information on the following subjects:
Main menu
20
Folder list / Title list - Browser
21
Multimedia database
22
Playback
22
Media settings
23
First and foremost, pay attention to the safety instructions » page 4 , Impor-
tant notes .
The device allows you to play audio files from different media and connected
devices (hereinafter referred to only as “audio sources)” » page 23.
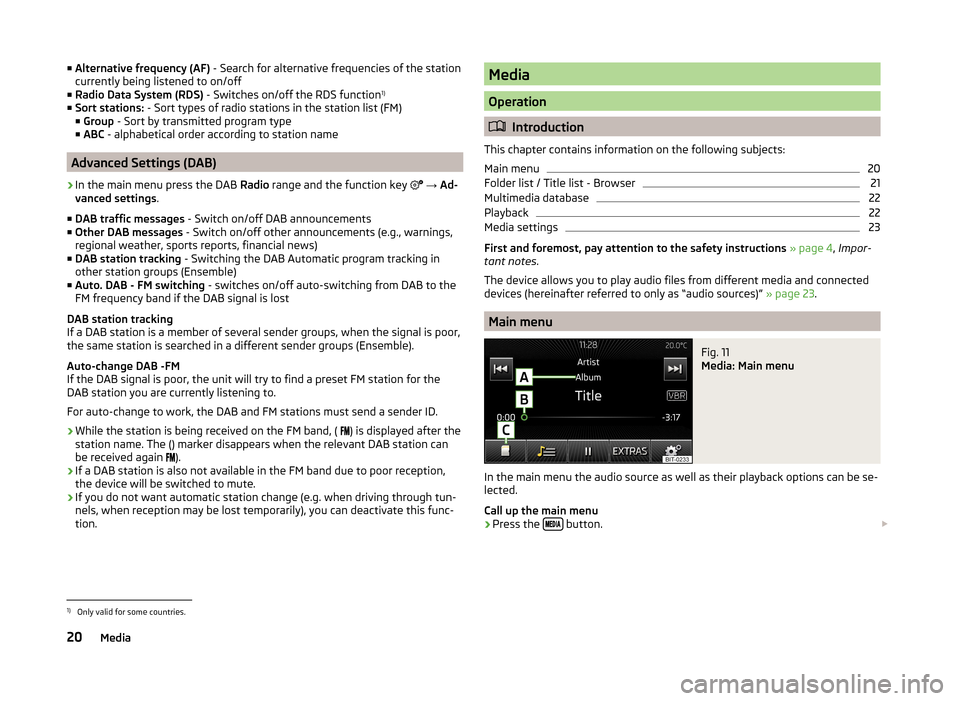
Main menu
Fig. 11
Media: Main menu
In the main menu the audio source as well as their playback options can be se-
lected.
Call up the main menu
›
Press the button.
1)
Only valid for some countries.
20Media
Page 24 of 50
Note■In the folders and title lists a directory max. of 1000 entries is displayed de-
pending on the date of creation. The entries are arranged alphabetically.■
The availability of folders and title lists depends on the connection speed
and the size of the audio source to be connected.
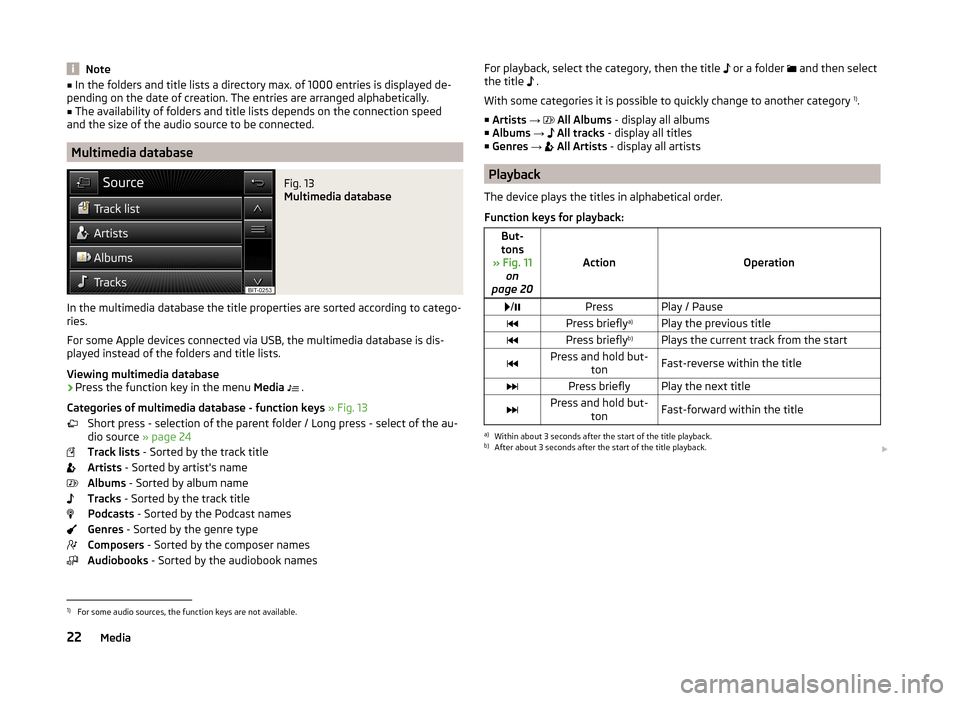
Multimedia database
Fig. 13
Multimedia database
In the multimedia database the title properties are sorted according to catego-
ries.
For some Apple devices connected via USB, the multimedia database is dis-
played instead of the folders and title lists.
Viewing multimedia database
›
Press the function key in the menu Media
.
Categories of multimedia database - function keys » Fig. 13
Short press - selection of the parent folder / Long press - select of the au-
dio source » page 24
Track lists - Sorted by the track title
Artists - Sorted by artist's name
Albums - Sorted by album name
Tracks - Sorted by the track title
Podcasts - Sorted by the Podcast names
Genres - Sorted by the genre type
Composers - Sorted by the composer names
Audiobooks - Sorted by the audiobook names
For playback, select the category, then the title or a folder and then select
the title .
With some categories it is possible to quickly change to another category 1)
.
■ Artists →
All Albums - display all albums
■ Albums →
All tracks - display all titles
■ Genres →
All Artists - display all artists
Playback
The device plays the titles in alphabetical order.
Function keys for playback:
But-
tons
» Fig. 11 on
page 20
ActionOperation
/PressPlay / PausePress briefly a)Play the previous titlePress briefly b)Plays the current track from the startPress and hold but-
tonFast-reverse within the titlePress brieflyPlay the next titlePress and hold but-tonFast-forward within the titlea)
Within about 3 seconds after the start of the title playback.
b)
After about 3 seconds after the start of the title playback.
1)
For some audio sources, the function keys are not available.
22Media
Page 28 of 50
If an Apple device is connected as a Bluetooth®
player at the same time as a
USB device the Bluetooth ®
- player will then be separated » page 24.
Disconnect USB device›
Press the function key in the menu Media
→ Remove USB safely .
After disconnecting the USB audio source, playback will start from the last
played audio source. If this source is not available, the device switches to the
Radio menu.
Loading USB device
With the ignition on after connecting the USB device, the charging process is
automatically started (applies for devices where charging via the USB connec-
tor is possible).
The charging efficiency can be different compared to the charging from the
usual mains power supply.
Some connected devices may not be recognised and cannot be charged.
The charging of the connected device is automatically stopped after switching
off the ignition.
CAUTION
■ USB extension cables or reducers may affect the operation of the connected
external device.■
A video playback is not supported.
Note
When operating as well as connecting the external device, the respective op-
erating instructions are to be observed.
AUX - input
Read and observe
and on page 23 first.
The AUX input is located above the storage box of the front centre con-
sole » Fig. 15 on page 25 .
The AUX input can be an external device and can be connected via a connec- tion cable from the ŠKODA original accessories.
A external device connected to the AUX input cannot be operated from this
unit.
Connecting AUX audio sources
The standard 3.5 mm stereo jack plug is used for the AUX input. If the external
devices do not have this jack plug, you must use an adapter.
After connecting the AUX audio source, the source must be manually selected
for playback from this source » page 24.
Disconnect AUX audio source
After disconnecting the auxiliary audio source is no automatic change to an-
other audio source takes place.
CAUTION
■ The AUX input must only be used for audio devices!■If an external device is connected to the AUX input, which is equipped with
an adapter for external power supply, the sound may be impaired. This de-
pends on the quality of the adapter which is used.
Note
■ The volume can be adjusted by setting the input sensitivity of the connected
AUX audio source » page 13, Sound settings .■
The AUX input can be used for the enabled / disabled selection of the
source » page 23 , Media settings .
26Media
Page 33 of 50
›Confirm the 6-digit PIN code 1)
displayed on the device screen and the tele-
phone display within 30 seconds on both the device and the telephone.
If required select the option in the telephone for automatically connecting the
telephone to the device.
or
› Enter the 4 - 16 digit PIN code into the device.
› Enter the PIN code shown on the device display into the telephone within 30
seconds 2)
.
› If required acknowledge the confirmation request with the telephone.
After successful connection, the main menu Telephone appears » Fig. 16 on
page 27 .
If the device is connected to another phone via the HPP-profile, then only the
coupling of the new phone takes place. The original phone remains connected.
With free connection via the A2DP and AVRCP 3)
profile the phone with the de-
vice connects automatically with this profile as a Bluetooth ®
player » page 24 .
Connection with another paired mobile telephone
Read and observe
on page 29 first.
If you want to connect the device to another paired telephone, the current
connection does not have to be terminated. The connection to the existing tel-
ephone is automatically terminated by connecting to another telephone.
›
In the menu press the Telephone function key
B
» Fig. 16 on page 27 .
It displays a list of previously paired telephones.
›
Select the paired telephone to be connected with the device.
If the coupling conditions » page 29 for the selected phone are met, the mes-
sage in the device screen … Replace this connection with …? appears along
with the following function keys.
› Cancel
- stops the menu for telephone change
› Replace
- connection to the selected telephone
After successful connection, the main menu Telephone appears » Fig. 16 on
page 27 .
If the desired telephone is not in the list of previously paired telephones then
the telephone is to be paired with the device » page 29, Connect the device to
the telephone .
Bluetooth®
- connection profile
Read and observe
on page 29 first.
Profile types
The device can be paired with several telephones (or Bluetooth ®
devices), but
only one can be actively connected on the HFP 4)
profile and one on the A2DP
audio profile or AVRCP 5)
.
› Hands-free phone (HFP)
- Devices that support the connection via the
HFP profile
› Bluetooth audio (A2DP)
- Devices that support the connection via the au-
dio profile
Connection switch on / replace
Press in the menu the Telephone function key
→ Bluetooth → Paired devi-
ces .
A list of paired devices is displayed.
By pressing the function key with the name of the connected device a menu
opens with the supported profiles.
By pressing the white profile icon in the menu with supported profiles, the
message … - connection with … connecting… appears on the device screen
and the device connects using the selected profile.
If the device is already connected to another device, the message in device
screen ... Replace this connection with ...? appears along with the following
function keys.
1)
For devices with Bluetooth ®
v2.1 and later the device quick pairing procedure (SSP Secure Simple Pair-
ing) is used for pairing. This connection method does not require the user to enter a PIN.
2)
The input and confirmation of the PIN code is not possible while driving.
3)
A2DP and AVRCP are Bluetooth ®
profiles that support multimedia functions.
4)
HFP is a Bluetooth ®
profile that supports the functionality of the hands-free system.
5)
A2DP and AVRCP are Bluetooth ®
audio profiles that support multimedia functions.
31Telephone
Page 43 of 50
■Background lighting - Sets the interior lighting
■ Instrument lighting - Set the brightness of the instrument/switch lighting
■ Footwell lighting - Sets the brightness of the footwell light
■ Light assistance - Setting of outdoor lighting
■ Light Assist - Switch on/off the head light assist
■ Switch-on time: - Set the sensibility of the light sensor against the change
in intensity of the ambient light ■ Early - High sensibility
■ Medium - Medium sensibility
■ Late - Low sensibility
■ Aut. headlight contr. (rain) - Activate/deactivate automatic headlight con-
trol in rain
■ Daytime running lights - Activate/deactivate daytime running lights
■ Comfort turn signal - Activate/deactivate lane change flashing
■ Travel mode: - Travel mode on/off
■ Left - For right-hand traffic
■ Right - For left-hand traffic
■ “Coming/leaving home ” - Setting the COMING HOME / LEAVING HOME-func-
tion ■ “Coming home funct. ” - Set the period that the lights remain on after you
leave the vehicle (0 - 30 seconds; 0 = function deactivated)
■ “Leaving home fnct. ” Set the period that the lights remain on after you un-
lock the vehicle (0 - 30 seconds; 0 = function deactivated)
Mirrors and wiper
›
Press the button
→
→ Mirrors and wipers .
■ Mirrors - Adjusts the mirrors
■ Synchronous adjustment - Activate/deactivate synchronous mirror adjust-
ment
■ Lowering (reverse) - Activation / deactivation of the lowering of the pas-
senger's side mirror
■ Fold in (when parked) - Activate/deactivate folding the mirror via the re-
mote control key or by using the sensor in the handle (KESSY)
■ Wipers - Adjusts the windscreen wipers
■ Automatic wiping (rain) - Activate/deactivate automatic windscreen wiping
in rain
■ Automatic rear wiper - Activate/deactivate automatic rear window wiping
Opening and closing›
Press the button
→
→ Opening and closing .
■ Window operation - Window operation settings
■ Conven. open.: - Set the convenience opening feature
■ All - All windows
■ Driver - Driver's window only
■ Off - Deactivates the convenience opening
■ Central locking - Settings for opening and closing of doors
■ Door unlock.: - Set the door unlocking feature
■ All - All doors
■ Single door - Driver's door or driver's or passenger door with KESSY sys-
tem
■ Side - Doors on the driver's side or on the driver's or passenger's side
with KESSY system
■ Automatic locking - Activate/deactivate automatic locking when starting
off
■ Acoustic confirmation - Activate/deactivate acoustic signals when locking/
unlocking the vehicle with an anti-theft alarm system
Seats
›
Press the button
→
→ Seats .
■ Store seat position - Store the driver's seat position and exterior mirror posi-
tion in the remote control key when locking the vehicle ■ Vehicle key activated - Activate/deactivate storing the driver's seat posi-
tion and exterior mirror position when locking the vehicle
Instrument cluster (multifunction display)
›
Press the button
→
→ Instrument cluster
In this menu it is possible to hide/show the appearance of the menu items in
the instrument cluster multifunction display and reset the trip data.
■ Current consumption - Display of current fuel consumption on/off
■ Average consumption - Display of average fuel consumption on/off
■ Refuel quantity - Display of refuel quantity on/off
■ Convenience consumers - Display of fuel consumption of convenience con-
sumers on/off
■ Eco tips - Display of tips for economical driving on/off
■ Travelling time - Display of travelling time on/off
41Vehicle systems
Page 44 of 50
■Distance - Display of distance travelled on/off
■ Average speed - Display of average speed on/off
■ Digital speed display - Display of current speed on/off
■ Speed warning - Winter tyres warning on/off
■ Oil temperature - Oil temperature on/off
■ Coolant temperature - Coolant temperature on/off
■ Reset Since start data - Reset the single-trip memory in the device screen
and in the display of the instrument cluster
■ Reset Long-term data - Reset the long-term memory in the device screen
and in the display of the instrument cluster
Time, date and unit setting
›
Press
→ Time and date .
Description of the time and date settings » page 14 .
›
Press the button
→ Units .
Description of unit settings » page 14.
Service
›
Press the button
→
→ Service button.
■ VIN: ... - Display the vehicle identification number
■ Inspection: --- or --- - Number of km/days remaining until the next service
event
■ Oil change service: --- or --- - Number of km/days remaining until the next oil
change
Restore factory settings
›
Press the button
→
→ Factory settings .
In this menu you have the possibility to reset the menu items in the settings of the vehicle systems to factory settings.
■ All settings
■ All settings - Restoration of the settings all menu items
■ Individual settings
■ Driver assistance - Restoration of the driver assistance menus
■ Parking and manoeuvring - Restoration of the Parking and manoeuvring
menu items
■ Light - Restoration of the light menus
■
Mirrors and wipers - Restoration of the Mirrors and wipers menu
■ Opening and closing - Restoration of the Opening/closing menu items
■ Instrument cluster - Restoration of the instrument cluster menu
If one of the above menu items is selected, the system will ask you whether
you really want to restore the settings.
■ Cancel - Return to higher-level menu
■ Reset - Restore the settings
Climatronic settings
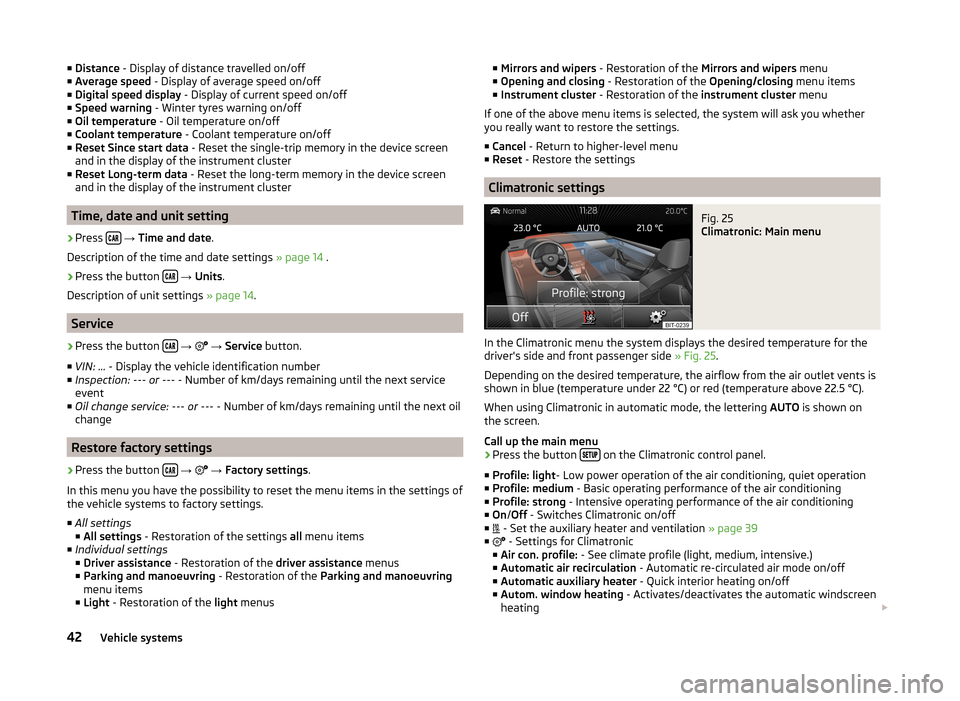
Fig. 25
Climatronic: Main menu
In the Climatronic menu the system displays the desired temperature for the
driver's side and front passenger side » Fig. 25.
Depending on the desired temperature, the airflow from the air outlet vents is
shown in blue (temperature under 22 °C) or red (temperature above 22.5 °C).
When using Climatronic in automatic mode, the lettering AUTO is shown on
the screen.
Call up the main menu
›
Press the button on the Climatronic control panel.
■ Profile: light - Low power operation of the air conditioning, quiet operation
■ Profile: medium - Basic operating performance of the air conditioning
■ Profile: strong - Intensive operating performance of the air conditioning
■ On /Off - Switches Climatronic on/off
■ - Set the auxiliary heater and ventilation
» page 39
■ - Settings for Climatronic
■ Air con. profile: - See climate profile (light, medium, intensive.)
■ Automatic air recirculation - Automatic re-circulated air mode on/off
■ Automatic auxiliary heater - Quick interior heating on/off
■ Autom. window heating - Activates/deactivates the automatic windscreen
heating
42Vehicle systems
Page 47 of 50
Input screenLanguage characters14
Input screen with keyboard8
Input screen with numeric keyboard8
Instrument cluster41
Instrument lighting40
Introductory information4
Component protection4
Declaration of Conformity4
K
keyboard
8
Keyboard14
L
Lane Assist
39
Lane change flash40
LEAVING HOME40
Light sensor - light switch-on time40
List Media
21
List of available stations Radio
17
List of telephone contacts34
M
Main menu Media
20
Telephone27
MAXI DOT-Display Telephone
11
MAXI DOT display Media
9
operation8
Radio9
Media20
Audio source23
AUX26
Bluetooth audio24
Browser21
File formats24
List21
Main menu20
Multifunction steering wheel9
Multimedia database22
Operation20
Playback22
Prerequisites and restrictions24
SD memory card25
Select audio source24
Settings23
Supported media24
USB25
Memory function of the remote control key41
Menu Media
20
Radio16
Setup12
Telephone27
Unit settings12
Multi-media AUX
26
Multifunction display41
Multifunction steering wheel Media
9
Radio9
Telephone11
Multimedia USB
25
Multimedia database Media
22
Mute6
O
Operation Radio
16
P
Parking aid
40
Phone Speed dialling a phone number33
Playback Media
22
Proactive passenger protection39
PTY - filter17
R
Radio
16
DAB - settings20
FM - settings19
List of available stations17
Main menu16
Multifunction steering wheel9
Operation16
Preface16
Save station18
Search for station18
Select station18
Settings19
Traffic programme (TP)19
Radio station Save station
18
Search for station18
Select station18
S
Save radio station
18
Screen6
SD memory card25
Seats Settings
41
Select audio source Media
24
Select frequency range See main menu
16
Selection of travel mode37
Select radio station See main menu
16
45Index
Page 49 of 50
ŠKODA AUTO a.s. pursues a policy of constant product and model develop-
ment. We trust that you will understand that changes to models in terms of
shape, equipment and engineering, may be introduced at any time. The infor-
mation about appearance, performances, dimensions, weight, standards and
functions of the vehicle is correct at the time of publication. Some equipment
might only be introduced at a later date, or might only be offered in certain
markets; information is provided by ŠKODA Partners. It is therefore not possi-
ble for legal claims to be made based on the data, illustrations and descrip-
tions contained in this Owner's Manual.Reprinting, reproduction, translation, or any other use, either in whole or in
part, is not permitted without the written consent of ŠKODA AUTO a.s..
ŠKODA AUTO a.s. expressly reserves all rights relating to copyright laws.
Subject to change.
Issued by: ŠKODA AUTO a.s.
© ŠKODA AUTO a.s. 2014