ESP SKODA OCTAVIA 2015 3.G / (5E) Service Manual
[x] Cancel search | Manufacturer: SKODA, Model Year: 2015, Model line: OCTAVIA, Model: SKODA OCTAVIA 2015 3.G / (5E)Pages: 268, PDF Size: 37.54 MB
Page 158 of 268
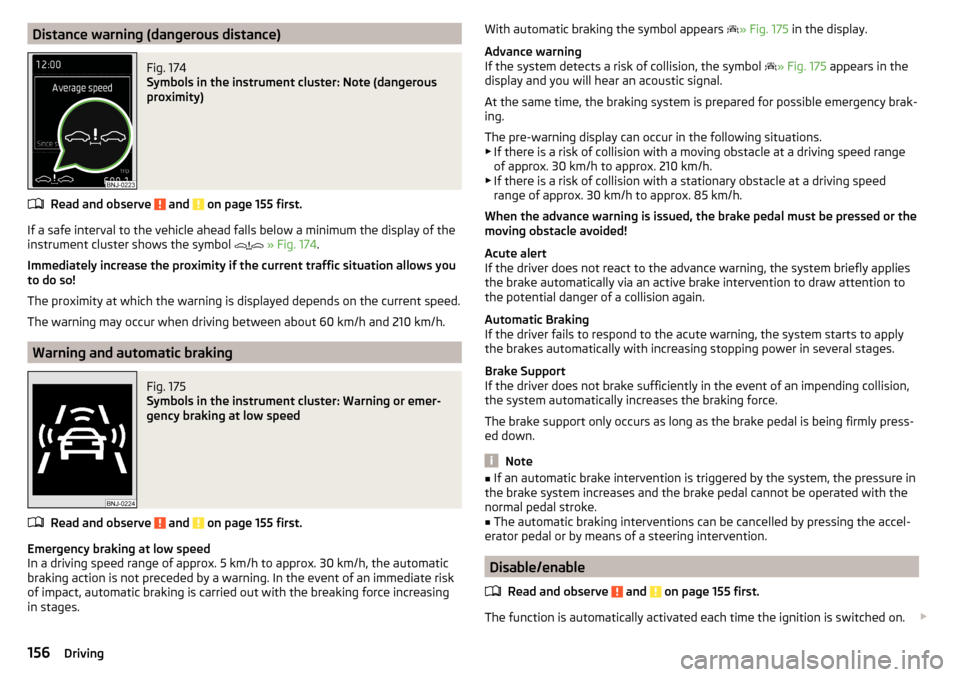
Distance warning (dangerous distance)Fig. 174
Symbols in the instrument cluster: Note (dangerous
proximity)
Read and observe and on page 155 first.
If a safe interval to the vehicle ahead falls below a minimum the display of the
instrument cluster shows the symbol
» Fig. 174 .
Immediately increase the proximity if the current traffic situation allows you to do so!
The proximity at which the warning is displayed depends on the current speed.
The warning may occur when driving between about 60 km/h and 210 km/h.
Warning and automatic braking
Fig. 175
Symbols in the instrument cluster: Warning or emer-
gency braking at low speed
Read and observe and on page 155 first.
Emergency braking at low speed
In a driving speed range of approx. 5 km/h to approx. 30 km/h, the automatic braking action is not preceded by a warning. In the event of an immediate risk
of impact, automatic braking is carried out with the breaking force increasing
in stages.
With automatic braking the symbol appears » Fig. 175 in the display.
Advance warning
If the system detects a risk of collision, the symbol
» Fig. 175 appears in the
display and you will hear an acoustic signal.
At the same time, the braking system is prepared for possible emergency brak-
ing.
The pre-warning display can occur in the following situations.
▶ If there is a risk of collision with a moving obstacle at a driving speed range
of approx. 30 km/h to approx. 210 km/h.
▶ If there is a risk of collision with a stationary obstacle at a driving speed
range of approx. 30 km/h to approx. 85 km/h.
When the advance warning is issued, the brake pedal must be pressed or the
moving obstacle avoided!
Acute alert
If the driver does not react to the advance warning, the system briefly applies
the brake automatically via an active brake intervention to draw attention to
the potential danger of a collision again.
Automatic Braking
If the driver fails to respond to the acute warning, the system starts to apply
the brakes automatically with increasing stopping power in several stages.
Brake Support
If the driver does not brake sufficiently in the event of an impending collision,
the system automatically increases the braking force.
The brake support only occurs as long as the brake pedal is being firmly press-
ed down.
Note
■ If an automatic brake intervention is triggered by the system, the pressure in
the brake system increases and the brake pedal cannot be operated with the
normal pedal stroke.■
The automatic braking interventions can be cancelled by pressing the accel-
erator pedal or by means of a steering intervention.
Disable/enable
Read and observe
and on page 155 first.
The function is automatically activated each time the ignition is switched on.
156Driving
Page 161 of 268
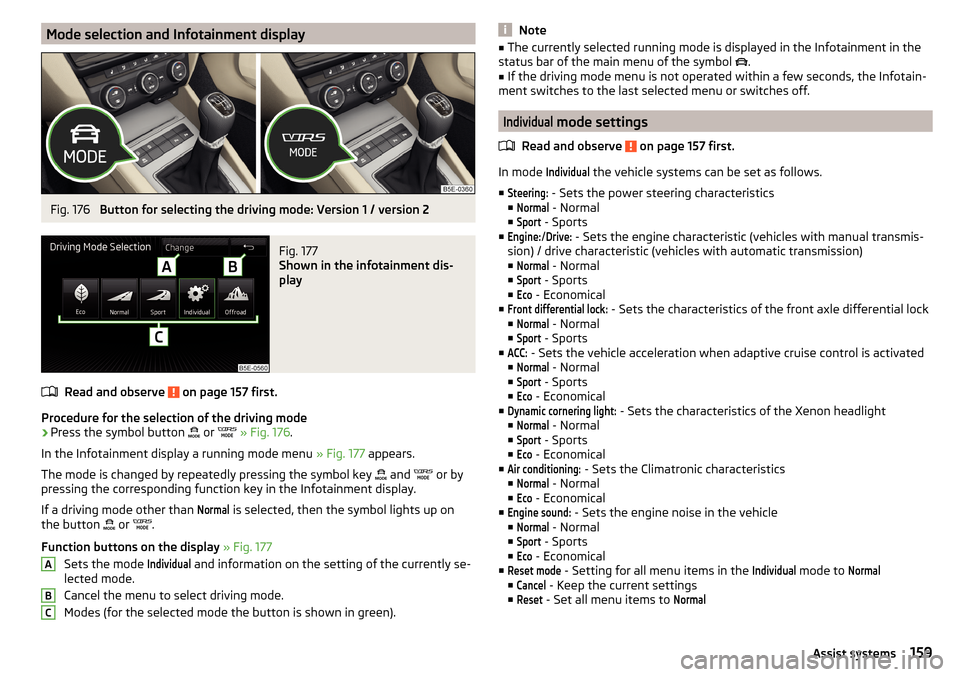
Mode selection and Infotainment displayFig. 176
Button for selecting the driving mode: Version 1 / version 2
Fig. 177
Shown in the infotainment dis-
play
Read and observe on page 157 first.
Procedure for the selection of the driving mode
›
Press the symbol button or
» Fig. 176 .
In the Infotainment display a running mode menu » Fig. 177 appears.
The mode is changed by repeatedly pressing the symbol key and
or by
pressing the corresponding function key in the Infotainment display.
If a driving mode other than
Normal
is selected, then the symbol lights up on
the button or
.
Function buttons on the display » Fig. 177
Sets the mode
Individual
and information on the setting of the currently se-
lected mode.
Cancel the menu to select driving mode.
Modes (for the selected mode the button is shown in green).
ABCNote■ The currently selected running mode is displayed in the Infotainment in the
status bar of the main menu of the symbol .■
If the driving mode menu is not operated within a few seconds, the Infotain-
ment switches to the last selected menu or switches off.
Individual
mode settings
Read and observe
on page 157 first.
In mode
Individual
the vehicle systems can be set as follows.
■
Steering:
- Sets the power steering characteristics
■
Normal
- Normal
■
Sport
- Sports
■
Engine:
/
Drive:
- Sets the engine characteristic (vehicles with manual transmis-
sion) / drive characteristic (vehicles with automatic transmission)
■
Normal
- Normal
■
Sport
- Sports
■
Eco
- Economical
■
Front differential lock:
- Sets the characteristics of the front axle differential lock
■
Normal
- Normal
■
Sport
- Sports
■
ACC:
- Sets the vehicle acceleration when adaptive cruise control is activated
■
Normal
- Normal
■
Sport
- Sports
■
Eco
- Economical
■
Dynamic cornering light:
- Sets the characteristics of the Xenon headlight
■
Normal
- Normal
■
Sport
- Sports
■
Eco
- Economical
■
Air conditioning:
- Sets the Climatronic characteristics
■
Normal
- Normal
■
Eco
- Economical
■
Engine sound:
- Sets the engine noise in the vehicle
■
Normal
- Normal
■
Sport
- Sports
■
Eco
- Economical
■
Reset mode
- Setting for all menu items in the
Individual
mode to
Normal
■
Cancel
- Keep the current settings
■
Reset
- Set all menu items to
Normal159Assist systems
Page 163 of 268
When the vehicle approaches a detected line between lanes, the system
makes a light movement of the steering wheel in the opposite direction to the
boundary line. This corrective steering intervention can be manually overrid-
den at any time.WARNING■ The general information relating to the use of assistance systems must
be observed » page 135, in section Introduction .■
Lane Assist can help you keep the vehicle within the lane. However, it
does not steer the vehicle for you. The driver retains full responsibility for
steering at all times.
■
Some objects on the road may be incorrectly detected as lines. As a re-
sult, an incorrect steering intervention may take place.
WARNINGThe detection capability of the camera may be limited by various external
influences. In such cases, the assistant may not detect the line between
two lanes at all or not properly. The detection capability of the camera may
be restricted in the following situations, for example.■
When visibility is poor, (e.g. fog, heavy rain, thick snowfall).
■
When driving around “sharp” bends.
■
The camera is blinded by the sun.
■
The camera is blinded by the oncoming traffic.
■
The viewing range of the camera is impeded by a vehicle travelling ahead.
■
The camera viewing range is obstructed by an obstacle.
CAUTION
Do not attach any stickers or similar objects to the windscreen to avoid impair-
ing the functions of the systems.
Note
■ The system is designed for driving on motorways and roads with adequate
longitudinal markings.■
The system can detect both continuous and broken lines.
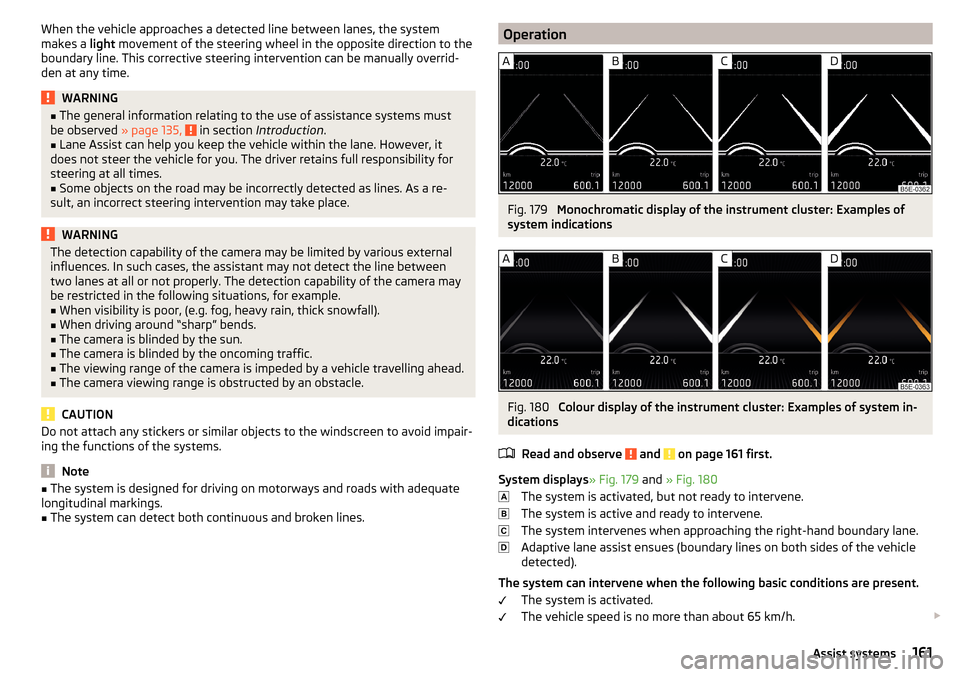
OperationFig. 179
Monochromatic display of the instrument cluster: Examples of
system indications
Fig. 180
Colour display of the instrument cluster: Examples of system in-
dications
Read and observe
and on page 161 first.
System displays » Fig. 179 and » Fig. 180
The system is activated, but not ready to intervene.
The system is active and ready to intervene.
The system intervenes when approaching the right-hand boundary lane.
Adaptive lane assist ensues (boundary lines on both sides of the vehicle
detected).
The system can intervene when the following basic conditions are present. The system is activated.
The vehicle speed is no more than about 65 km/h.
161Assist systems
Page 165 of 268
WARNING■The general information relating to the use of assistance systems must
be observed » page 135, in section Introduction .■
Vertical traffic signs must always take precedence over the traffic signs
shown in the display. The driver is always responsible for correctly assess-
ing the traffic situation.
■
Traffic signs may not be recognised at all by the system, or may be recog-
nised incorrectly. As a result, the traffic signs may not be displayed at all, or
the wrong one may appear.
■
On the system side, only a traffic sign display is undertaken, neither a
warning when limit is exceeded or driving speed adjustment is undertaken!
■
Speed specifications on the displayed road signs refer to the country-spe-
cific speed units. For example, the display
on the display can therefore
refer to km/h or mph depending on the country.
Note
The system is only available in some countries.
Function
Fig. 181
Camera viewing range for traffic
sign recognition
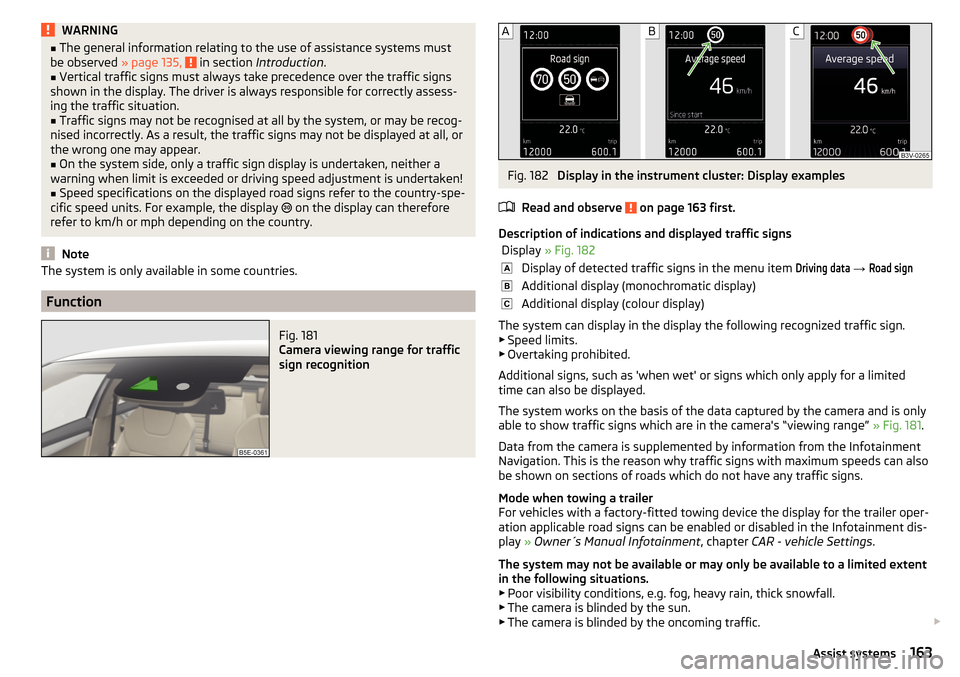
Fig. 182
Display in the instrument cluster: Display examples
Read and observe
on page 163 first.
Description of indications and displayed traffic signs
Display » Fig. 182Display of detected traffic signs in the menu item Driving data → Road signAdditional display (monochromatic display)Additional display (colour display)
The system can display in the display the following recognized traffic sign.
▶ Speed limits.
▶ Overtaking prohibited.
Additional signs, such as 'when wet' or signs which only apply for a limited
time can also be displayed.
The system works on the basis of the data captured by the camera and is only
able to show traffic signs which are in the camera's “viewing range” » Fig. 181.
Data from the camera is supplemented by information from the Infotainment
Navigation. This is the reason why traffic signs with maximum speeds can also
be shown on sections of roads which do not have any traffic signs.
Mode when towing a trailer
For vehicles with a factory-fitted towing device the display for the trailer oper- ation applicable road signs can be enabled or disabled in the Infotainment dis-
play » Owner´s Manual Infotainment , chapter CAR - vehicle Settings .
The system may not be available or may only be available to a limited extent
in the following situations.
▶ Poor visibility conditions, e.g. fog, heavy rain, thick snowfall.
▶ The camera is blinded by the sun.
▶ The camera is blinded by the oncoming traffic.
163Assist systems
Page 166 of 268
▶The camera “viewing range” is obstructed by an obstacle.
▶ Travelling at high speed.
▶ The traffic signs are fully or partially obscured (e.g. by trees, snow, dirt or
other vehicles).
▶ The traffic signs are not standard (round with a red border).
▶ The traffic signs are damaged or bent.
▶ The traffic signs are attached to flashing neon signs.
▶ The traffic signs were changed (the navigation data are out of date).
Additional display
Read and observe
on page 163 first.
If the menu item
Road sign
is currently not shown » Fig. 182 on page 163 -
, the
road sign with the speed limit will appear in the upper display area of the in-
strument cluster » Fig. 182 on page 163 -
,
.
If several traffic signs are detected simultaneously, the next traffic sign will al- so in some cases be displayed in the colour display - . All detected traffic
signs can be displayed in the menu item
Road sign
- .
The additional display can be enabled or disabled in the Infotainment » Owner
´s Manual Infotainment , chapter CAR - vehicle settings .
Information messages
Read and observe
on page 163 first.
The information messages are shown in the instrument cluster display.
No road signs available.
No maximum speeds were recognised (e.g. on German motorways where there
is no speed limit).
Error: Road sign recognition
A system error has occurred. Seek help from a specialist garage.
Road sign recognition: clean the windscreen!
The windscreen is dirty, iced over or misted up in the camera viewing range.
Clean the windscreen or remove the obstacles.
Dynamic Road Sign Display currently restricted.Infotainment Navigation is not currently providing any data. Check whether
the maps are up-to-date or the whether the vehicle is currently in a location
for which no navigation data are available.
Fatigue detection
Introduction
This chapter contains information on the following subjects:
Function
164
Information messages
165
The fatigue detection system (hereinafter referred to as system) recommends
the driver takes a break from driving when driver fatigue can be detected due
to the driver's steering behaviour.
WARNING■ The general information relating to the use of assistance systems must
be observed » page 135, in section Introduction .■
For the driving ability is always the driver's responsibility. Never drive if
you feel tired.
■
The system may not detect all cases where a break is needed.
■
Therefore, take regular, sufficient breaks during long trips.
■
There will be no system warning during the so-called micro-sleep.
Note
■ In some situations, the system may evaluate the driving incorrectly and thus
mistakenly recommend a break (e.g. sporty driving, adverse weather condi-
tions or poor road conditions).■
The system is designed primarily for use on motorways.
Function
Read and observe
on page 164 first.
From the start of the journey, the system evaluates steering behaviour. If,
while driving, there have been changes in the steering behaviours that are
evaluated by the system as indicating possible fatigue, a break recommenda-
tion is issued.
The system evaluates steering behaviour and recommends a break at speeds
of 65-200 km / h.
164Driving
Page 167 of 268
The system detects a break from driving when one of the following condi-
tions is met.
▶ The vehicle is stopped and the ignition is turned off.
▶ The vehicle is stopped, the seat belt is taken off and the driver's door is
opened.
▶ The vehicle is stopped for more than 15 minutes.
If none of these conditions are met or if the driving style is not changed, the system recommends a driving break again after 15 minutes.
The system can be activated or deactivated in the Infotainment » Owner´s
Manual Infotainment , chapter CAR - vehicle settings .
Information messages
Read and observe
on page 164 first.
The icon appears and the following message for a few seconds in the display
of the instrument cluster and the following message.
Driver alert.
Take a break!DRIVER ALERT TAKE A BREAK
An audible signal is also emitted.
Tyre pressure monitoring
Introduction
This chapter contains information on the following subjects:
Saving tyre pressure values
165
Saving tyre pressure values and infotainment display
166
Saving tyre pressure values by pressing a button
166
The tyre pressure monitoring function (hereinafter referred to as the system)
monitors the tyre pressure while driving.
If the tyre inflation pressure changes, the warning light lights up in the in-
strument cluster and an audible signal is heard.
Information on the procedure for the notification of a change in tyre inflation
pressure » page 35 .
The system can only function properly if the tyres have the prescribed inflation
pressure and these pressure values are stored in the system.
WARNING■ The general information relating to the use of assistance systems must
be observed » page 135, in section Introduction .■
Having the correct tyre inflation pressure is always the driver's responsi-
bility. Tyre inflation pressure must be checked regularly » page 205.
■
The system cannot warn in case of very rapid tyre inflation pressure loss,
e.g. in case of sudden tyre damage.
Saving tyre pressure values
Read and observe
on page 165 first.
The tyre pressure values are always stored in the system if one of the follow-
ing events occurs.
▶ Change of tyre inflation pressure.
▶ Change one or more wheels.
▶ Change in position of a wheel on the vehicle.
▶ The warning light lights up in the instrument cluster.
Depending on the vehicle equipment, the tyre pressure values are stored ei-
ther in Infotainment or by pressing a button.
WARNINGBefore storing the pressure values, the tyres must be inflated to the speci-
fied inflation pressure » page 205. If incorrect pressure values are saved,
the system may also not issue a warning even if the tyre inflation pressure
is too low.l
CAUTION
The tyre pressure values must be saved every 10,000 km or once annually in
order to ensure correct system functioning.165Assist systems
Page 181 of 268
The ŠKODA Service Partners are up-to-date on the legally required tests and
will prepare the vehicle for the tests as part of a service operation if required,
or will be responsible for carrying out these tests. The specialist garages can
carry out the specified tests directly if required by the customer if they are au-
thorised to do so. This saves you time and money.
Even if you want to take your vehicle to an officially approved test centre for
prior checking in preparation of a legally required test, we recommend that you
consult the service consultant of your ŠKODA Service Partner beforehand.
Based on their appraisal, the service consultant will tell you which areas you
should focus on in order to ensure that your vehicle will pass the technical test
without any problems. This allows you to avoid additional expenses resulting
from a possible subsequent test.
ŠKODA Service Partners
Read and observe
on page 178 first.
ŠKODA Service Partners feature modern, specially developed tools and equip-
ment. Here, trained specialists have access to a comprehensive range of
ŠKODA Original Parts and ŠKODA Original Accessories for carrying out modifi-
cations, repairs and technical alterations.
All ŠKODA service partners operate according to the most recent guidelines
and instructions from ŠKODA AUTO a.s. All service and repair work is therefore
carried out on time and at the appropriate quality. Adhering to these instruc-
tions and guidelines helps ensure road safety and helps keep your vehicle in a
good technical condition.
ŠKODA Service Partners are therefore properly prepared to service your vehicle
and to provide quality work. We therefore advise you to have all modifications,
repairs and technical alterations to your vehicle carried out by a ŠKODA Service
Partner.
ŠKODA Original parts
Read and observe
on page 178 first.
We recommend the use of ŠKODA Genuine Parts for your vehicle, as these
parts are approved by ŠKODA AUTO a.s.. They correspond precisely to the
ŠKODA AUTO a.s. regulations with regard to design, dimensional accuracy and
material, and are identical to the components used in series production.
ŠKODA AUTO a.s. is able to vouch for the safety, suitability and long service life of these products. We therefore recommend that you only use ŠKODA Genuine
Parts.
ŠKODA AUTO a.s. supplies the market with a complete range of ŠKODA Genu-
ine Parts - not only while the model is still in production but for at least 15
years after the end of series production for wear parts and at least 10 years
after the end of series production for all other vehicle parts.
ŠKODA Service Partners are liable for any defects of ŠKODA Genuine Parts for a period of 2 years after sale in accordance with the materials defect liability,
unless agreed otherwise in the purchase agreement. You should keep the ap-
proved warranty certificate and the invoices for these components for this pe-
riod of time, so that the commencement of the term can be verified.
Body repairs
ŠKODA vehicles are designed such that if any damage occurs to the body, it is
only necessary to replace those parts that are actually damaged.
However, before you decide to have damaged body parts replaced, you should
first of all contact your specialist garage to determine whether or not the parts
can also be repaired. Repairs to body parts are usually cheaper.
ŠKODA Original accessories
Read and observe
on page 178 first.
If you wish to fit accessories to your vehicle, you should remember the follow-ing:
We recommend that you use ŠKODA Genuine Accessories in your vehicle.
ŠKODA AUTO a.s. has selected these accessories to ensure that they are relia-
ble, safe and suitable for your particular vehicle. Although we constantly moni-
tor the market, we are not able to assess or vouch for other products even
though in some instances such parts may have operational approval or may
have been approved by a nationally recognised testing laboratory.
All accessory products are subjected to a challenging process in the areas of technical development (technical testing) and quality inspection (customer
testing), and the product only becomes a ŠKODA Genuine Accessory if all tests
are passed.
Our ŠKODA Genuine Accessories service also includes expert advice and pro-
fessional fitting if required by the customer.
179Care and maintenance
Page 189 of 268
WARNING■Vehicle care products may be harmful to your health if not used according
to the instructions.■
Always keep the vehicle care products safe from people who are not com-
pletely independent, e.g. children - there is a danger of poisoning!
■
Air fresheners and scents can be hazardous to heath when the tempera-
ture inside the vehicle is high.
CAUTION
■ Be sure to check clothing for colour-fastness to avoid any damage or visible
stains on the material (leather), panels and textiles.■
Remove fresh stains such as those from ball-point pens, ink, lipstick, shoe
polish, etc., from the material (leather), panels and textiles as quickly as possi-
ble.
■
Do not attach scents or air fresheners to the dash panel – there is a risk of
damage to the dash panel.
■
Do not attach any stickers to the filaments or glass antenna - there is risk of
damage.
■
Do not clean the roof panelling with a brush – risk of damage to the surface
of the panelling.
■
Cleaner that contain solvents can damage the material being cleaned.
■
Apply only a small amount of the cleaning and care product.
Note
Due to the special tools and knowledge required, and to avoid any potential
problems with the cleaning and care of the interior of your vehicle, we recom-
mend that cleaning and care of the interior of your vehicle be carried out by a
ŠKODA service partner.
Natural leather
Read and observe
and on page 187 first.
The leather needs, depending on the strain placed on it, regular cleaning andmaintenance.
Dust and dirt in pores and creases cause abrasions on the surface and lead to
premature embrittlement of the leather surface. Therefore, they must be re-
moved regularly at short intervals with a cloth or vacuum cleaner.
Clean soiled leather surfaces with a water-dampened cotton or woollen cloth
and then dry with a clean, dry cloth »
.
Clean severely soiled areas with a cloth soaked in a mild soap solution (2 ta-
blespoons of neutral soap to 1 litre of water).
To remove stains , use a cleaning agent specially designed for this purpose.
Treat the leather periodically with a suitable leather protector and use a skin care cream with light blocker and impregnation after each cleaning.
CAUTION
■ Ensure that no part of the leather is soaked through during cleaning and that
no water gets into the seams. Otherwise, the leather could become brittle or
cracked.■
Avoid leaving the vehicle for lengthy periods in bright sunlight to avoid the
leather from bleaching. If the vehicle is parked in the open for lengthy periods,
protect the leather from direct sunlight by covering it.
■
The use of an additional mechanical steering wheel lock may damage the
leather surface of the steering wheel.
■
Some clothing materials, e.g. dark denim, do not have sufficient colour fast-
ness. This can cause damage or clearly visible discolouration to seat covers,
even when used correctly. This applies particularly to light-coloured seat cov-
ers. This does not relate to a fault in the seat cover, but rather to poor colour
fastness of the clothing textiles.
■
Sharp-edged objects on items of clothing such as zip fasteners, rivets, sharp-
edged belts etc may leave permanent scratches or signs of rubbing on the sur-
face or damage these. Such damage cannot be subsequently recognised as a
justified complaint.
Note
During the use of the vehicle, minor visible changes can occur on the leather
parts of the covers (e. g wrinkles or creases as a result of the stress of the cov-
ers).
Artificial leather, materials and Alcantara ®
Read and observe
and on page 187 first.
Artificial leather
Clean artificial leather with a damp cloth.
If this method does not completely clean the artificial leather, use a mild soap solution or cleaning products specially designed for this purpose.
187Care and maintenance
Page 191 of 268
Inspecting and replenishing
Fuel
Introduction
This chapter contains information on the following subjects:
Petrol and diesel refuelling
189
Lead-free petrol
190
Diesel fuel
191
Refuelling with CNG (compressed natural gas)
192
CNG
193
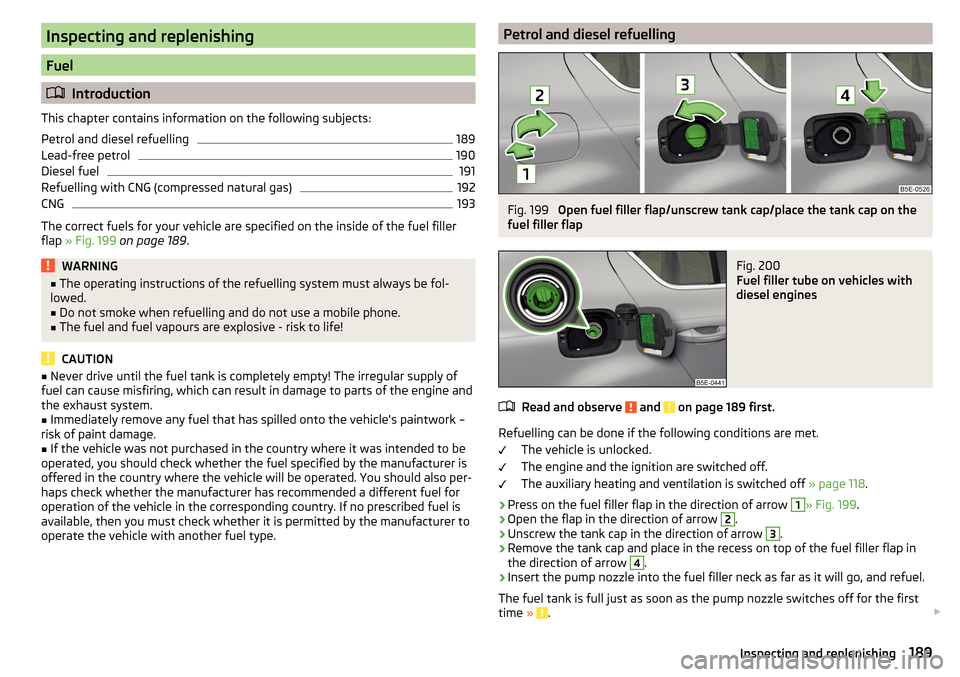
The correct fuels for your vehicle are specified on the inside of the fuel filler
flap » Fig. 199 on page 189 .
WARNING■
The operating instructions of the refuelling system must always be fol-
lowed.■
Do not smoke when refuelling and do not use a mobile phone.
■
The fuel and fuel vapours are explosive - risk to life!
CAUTION
■ Never drive until the fuel tank is completely empty! The irregular supply of
fuel can cause misfiring, which can result in damage to parts of the engine and
the exhaust system.■
Immediately remove any fuel that has spilled onto the vehicle's paintwork –
risk of paint damage.
■
If the vehicle was not purchased in the country where it was intended to be
operated, you should check whether the fuel specified by the manufacturer is
offered in the country where the vehicle will be operated. You should also per-
haps check whether the manufacturer has recommended a different fuel for
operation of the vehicle in the corresponding country. If no prescribed fuel is
available, then you must check whether it is permitted by the manufacturer to
operate the vehicle with another fuel type.
Petrol and diesel refuellingFig. 199
Open fuel filler flap/unscrew tank cap/place the tank cap on the
fuel filler flap
Fig. 200
Fuel filler tube on vehicles with
diesel engines
Read and observe and on page 189 first.
Refuelling can be done if the following conditions are met.
The vehicle is unlocked.
The engine and the ignition are switched off.
The auxiliary heating and ventilation is switched off » page 118.
›
Press on the fuel filler flap in the direction of arrow
1
» Fig. 199.
›
Open the flap in the direction of arrow
2
.
›
Unscrew the tank cap in the direction of arrow
3
.
›
Remove the tank cap and place in the recess on top of the fuel filler flap in
the direction of arrow
4
.
›
Insert the pump nozzle into the fuel filler neck as far as it will go, and refuel.
The fuel tank is full just as soon as the pump nozzle switches off for the first
time »
.
189Inspecting and replenishing
Page 193 of 268
Fuel additives
Unleaded petrol in accordance with the EN 228 standard 1)
meets all the condi-
tions for a smooth-running engine. We therefore recommend that no fuel ad-
ditives are used. This can result in considerable damage to parts of the engine
or the exhaust system.
CAUTION
■ Even one filling of the tank with petrol that does not meet the standards can
lead to serious damage to parts of the exhaust system!■
If a fuel other than unleaded fuel which complies to the above mentioned
standards (e.g. leaded petrol) is put in the tank by mistake, do not start the en-
gine or switch on the ignition. Extensive damage to engine parts can occur.
CAUTION
■ If petrol with a lower octane number than the one prescribed is used do not
drive with a high engine speed. A high engine load can severely damage en-
gine components.■
Even in the event of an emergency, petrol of a lower octane number than 91
RON must not be used, otherwise the engine can be severely damaged.
CAUTION
In no case may fuel additives with metal components be used, especially not
with manganese or iron content. There is a risk of causing severe damage to
parts of the engine or exhaust system.
CAUTION
Do not use fuels with metal components, such as LRP (lead replacement
petrol) . There is a risk of causing severe damage to parts of the engine or ex-
haust system.Note■ Unleaded petrol that has a higher octane number than that required by the
engine can be used without limitations.■
The use of petrol with an octane rating higher than 95 RON in does not re-
sult in either a noticeable increase in power nor lower fuel consumption in ve-
hicles for which unleaded petrol 95/min 92 or 93 RON is specified.
■
On vehicles using prescribed unleaded petrol of min. 95 RON, the use of pet-
rol with a higher octane number than 95 RON can increase the power and re-
duce fuel consumption.
Diesel fuel
The correct fuel grades for your vehicle are specified on the inside of the fuel
filler flap.
Read and observe
and on page 189 first.
The vehicle can only be operated with diesel fuel that meets the EN 5902)
standard.
All diesel engines can be operated using diesel fuel with at most 7% biodiesel
(B7) 3)
.
On the Indian market, your vehicle will only be able to run on diesel fuel com-
pliant with standard IS 1460/Bharat IV. If diesel fuel which complies with this
standard is not available, you can refuel with diesel fuel according to standard
IS 1460/Bharat III in case of emergency.
Operation in winter – Winter-grade diesel fuel
In the cold season, only use “winter-grade diesel fuel” which will still operate
properly even at a temperature of -20 °C.
It is often the case in countries with different climatic conditions that diesel
fuels available have a different temperature characteristic. The ŠKODA Part-
ners and filling stations in the relevant country will be able to provide you with
information regarding the diesel fuels available.
1)
In Germany also DIN 51626-1 or E10 for unleaded petrol with octane number 91 or 95 or DIN 51626-2 or E5
for unleaded petrol with octane number 95 and 98.
2)
In Germany also DIN 51628, in Austria ÖNORM C 1590, in Russia GOST R 52368-2005 / EN 590:2004.
3)
In Germany according to the DIN 52638 standard, in Austria ÖNORM C 1590, in France EN 590.
191Inspecting and replenishing