ESP SKODA OCTAVIA 2015 3.G / (5E) Workshop Manual
[x] Cancel search | Manufacturer: SKODA, Model Year: 2015, Model line: OCTAVIA, Model: SKODA OCTAVIA 2015 3.G / (5E)Pages: 268, PDF Size: 37.54 MB
Page 195 of 268
when the engine is restarted. This is not due to any system leakages but a
drop in pressure in the natural gas fuel tank due to technical reasons after a
cooling phase directly after refuelling.
The maximum lifetime of the gas tank is 20 years.
The capacity of the natural gas fuel tank is approximately 15 kg.
The capacity of the gasoline fuel tank is about 50 litres, of which about 6
lighters are in reserve.WARNING■
When refuelling, never get into the vehicle. If you have to get into your
vehicle in exceptional cases, touch a metal surface before you touch the
filling coupling again. This will avoid electrostatic discharges, which may
generate sparks. Sparks can cause a fire during refuelling.■
Natural gas is highly explosive and highly flammable.
Note
During the filling process sounds are heard which are harmless. If you are un-
sure which service station staff to use, ask the petrol station staff.
CNG
Fig. 202
Position of the CNG label(s).
Read and observe
and on page 189 first.
A G-TEC-vehicle may be operated with CNG and petrol.
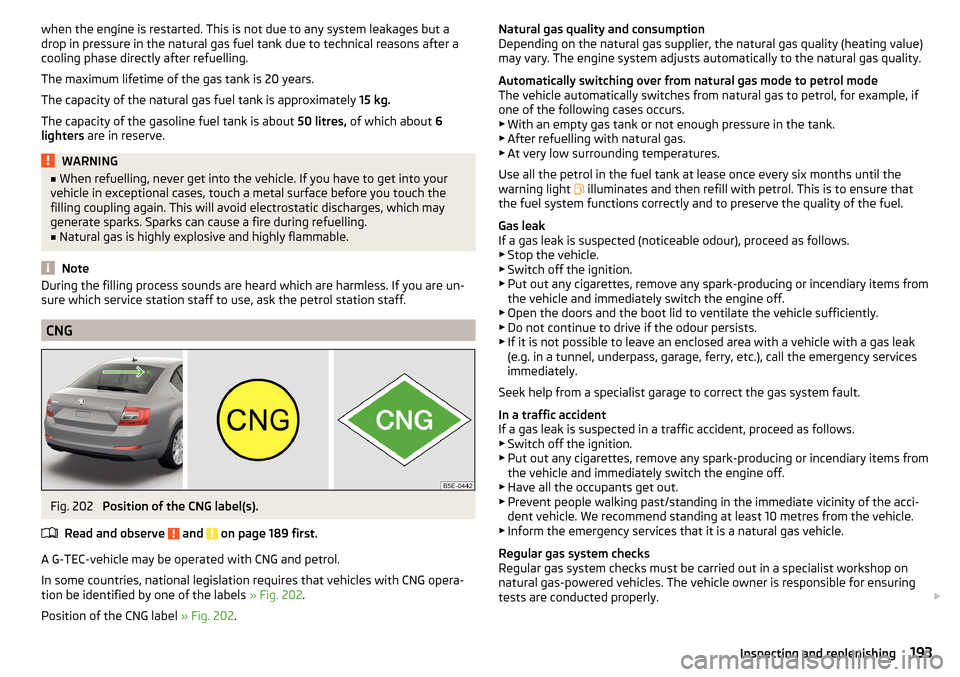
In some countries, national legislation requires that vehicles with CNG opera-
tion be identified by one of the labels » Fig. 202.
Position of the CNG label » Fig. 202.
Natural gas quality and consumption
Depending on the natural gas supplier, the natural gas quality (heating value) may vary. The engine system adjusts automatically to the natural gas quality.
Automatically switching over from natural gas mode to petrol mode
The vehicle automatically switches from natural gas to petrol, for example, if
one of the following cases occurs. ▶ With an empty gas tank or not enough pressure in the tank.
▶ After refuelling with natural gas.
▶ At very low surrounding temperatures.
Use all the petrol in the fuel tank at lease once every six months until the
warning light
illuminates and then refill with petrol. This is to ensure that
the fuel system functions correctly and to preserve the quality of the fuel.
Gas leak
If a gas leak is suspected (noticeable odour), proceed as follows. ▶ Stop the vehicle.
▶ Switch off the ignition.
▶ Put out any cigarettes, remove any spark-producing or incendiary items from
the vehicle and immediately switch the engine off.
▶ Open the doors and the boot lid to ventilate the vehicle sufficiently.
▶ Do not continue to drive if the odour persists.
▶ If it is not possible to leave an enclosed area with a vehicle with a gas leak
(e.g. in a tunnel, underpass, garage, ferry, etc.), call the emergency services
immediately.
Seek help from a specialist garage to correct the gas system fault.
In a traffic accident
If a gas leak is suspected in a traffic accident, proceed as follows.
▶ Switch off the ignition.
▶ Put out any cigarettes, remove any spark-producing or incendiary items from
the vehicle and immediately switch the engine off.
▶ Have all the occupants get out.
▶ Prevent people walking past/standing in the immediate vicinity of the acci-
dent vehicle. We recommend standing at least 10 metres from the vehicle.
▶ Inform the emergency services that it is a natural gas vehicle.
Regular gas system checks
Regular gas system checks must be carried out in a specialist workshop on
natural gas-powered vehicles. The vehicle owner is responsible for ensuring
tests are conducted properly. 193Inspecting and replenishing
Page 196 of 268
Every 2 years
▶ Check the filler cap.
▶ Check the condition of fuel filler tubes and the sealing ring in the fuel filler
tubes, and clean the sealing ring if necessary.
▶ Check the gas system for leaks.
Every 4 years
▶ Inspect the gas tank.
Every 20 years ▶ Replace the gas tank.WARNING■ Do not underestimate the smell of gas in the car or when refuelling - risk
of fire, explosion and injury.■
The natural gas tanks in the vehicle must not be exposed to unwanted
heat sources.
Engine compartment
Introduction
This chapter contains information on the following subjects:
Opening and closing the bonnet
195
Engine compartment overview
196
Radiator fan
196
Windscreen washer system
196WARNINGWhen working in the engine compartment, injuries, scolding, accident or
fire hazards may arise. For this reason, it is essential to comply with the
warning instructions stated below and with the general applicable rules of
safety. The engine compartment of your car is a hazardous area!WARNINGInstructions before beginning work in the engine compartment■Turn off the engine and remove the ignition key.■
Firmly apply the handbrake.
■
For vehicles with manual transmission the lever into the neutral position.
WARNING (Continued)■ On vehicles with automatic transmission, shift the selector lever into the
P position.■
Allow the engine to cool.
■
Never open the bonnet if you can see steam or coolant flowing out of the
engine compartment – risk of scalding! Wait until the steam or coolant has
stopped escaping.
WARNINGInformation for working in the engine compartment■Keep all people, especially children, away from the engine compartment.■
Never touch the radiator fan. The fan might suddenly start running!
■
Do not touch any hot engine parts – risk of burns!
WARNINGInformation for working in the engine compartment with the engine run-
ning■
Pay particular attention to moving engine parts, e.g. V-ribbed belt, gener-
ator, radiator fan - danger to life!
■
Never touch the electric wiring on the ignition system.
■
Avoid short circuits in the electrical system, particularly on the vehicle's
battery.
■
Always make sure that no jewellery, loose clothing or long hair can get
caught in rotating engine parts – risk of death! Always remove any jewel-
lery, tie back long hair and wear tight fitting clothing before completing any
work.
WARNINGInformation for working on the fuel system or the electrical system■Always disconnect the vehicle battery from the electrical system.■
Do not smoke.
■
Never work near open flames.
■
Always have a functioning fire extinguisher nearby.
WARNING■ Read the information and warning instructions on the fluid containers.■Keep the working fluids in sealed original containers and safe from peo-
ple who are not completely independent, e.g. children. 194General Maintenance
Page 201 of 268
The coolant additive percentage in the coolant must be at least 40%.
The coolant additive may be increased to a maximum of 60%.
The correct mixing ratio of water and coolant additive is to be checked if nec-
essary by a specialist garage or is to be restored if necessary.
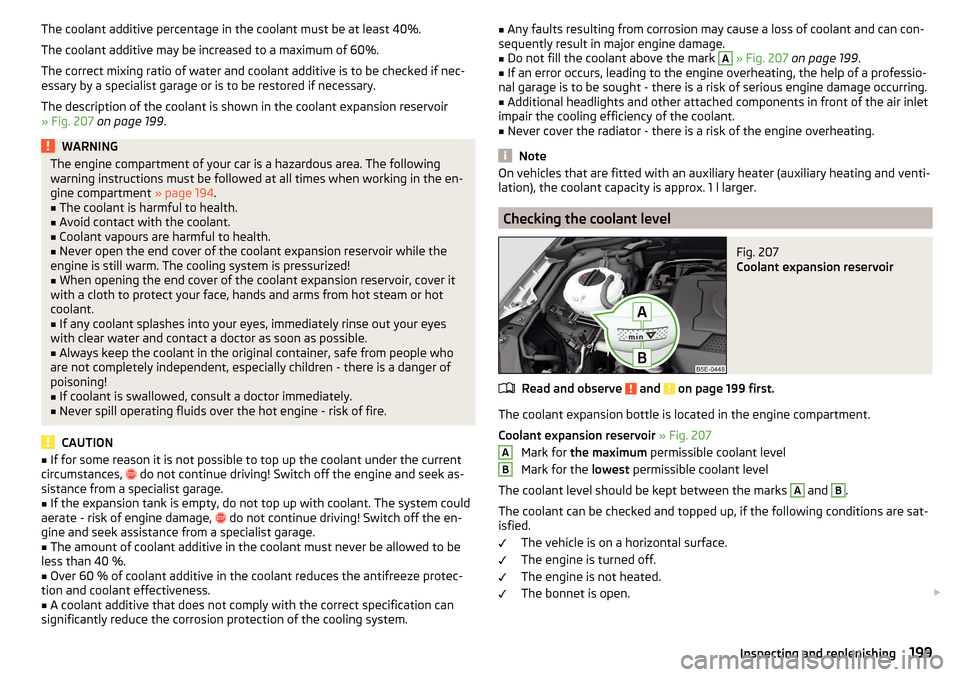
The description of the coolant is shown in the coolant expansion reservoir
» Fig. 207 on page 199 .WARNINGThe engine compartment of your car is a hazardous area. The following
warning instructions must be followed at all times when working in the en-
gine compartment » page 194.■
The coolant is harmful to health.
■
Avoid contact with the coolant.
■
Coolant vapours are harmful to health.
■
Never open the end cover of the coolant expansion reservoir while the
engine is still warm. The cooling system is pressurized!
■
When opening the end cover of the coolant expansion reservoir, cover it
with a cloth to protect your face, hands and arms from hot steam or hot
coolant.
■
If any coolant splashes into your eyes, immediately rinse out your eyes
with clear water and contact a doctor as soon as possible.
■
Always keep the coolant in the original container, safe from people who
are not completely independent, especially children - there is a danger of
poisoning!
■
If coolant is swallowed, consult a doctor immediately.
■
Never spill operating fluids over the hot engine - risk of fire.
CAUTION
■ If for some reason it is not possible to top up the coolant under the current
circumstances, do not continue driving! Switch off the engine and seek as-
sistance from a specialist garage.■
If the expansion tank is empty, do not top up with coolant. The system could
aerate - risk of engine damage,
do not continue driving! Switch off the en-
gine and seek assistance from a specialist garage.
■
The amount of coolant additive in the coolant must never be allowed to be
less than 40 %.
■
Over 60 % of coolant additive in the coolant reduces the antifreeze protec-
tion and coolant effectiveness.
■
A coolant additive that does not comply with the correct specification can
significantly reduce the corrosion protection of the cooling system.
■ Any faults resulting from corrosion may cause a loss of coolant and can con-
sequently result in major engine damage.■
Do not fill the coolant above the mark
A
» Fig. 207 on page 199 .
■
If an error occurs, leading to the engine overheating, the help of a professio-
nal garage is to be sought - there is a risk of serious engine damage occurring.
■
Additional headlights and other attached components in front of the air inlet
impair the cooling efficiency of the coolant.
■
Never cover the radiator - there is a risk of the engine overheating.
Note
On vehicles that are fitted with an auxiliary heater (auxiliary heating and venti-
lation), the coolant capacity is approx. 1 l larger.
Checking the coolant level
Fig. 207
Coolant expansion reservoir
Read and observe and on page 199 first.
The coolant expansion bottle is located in the engine compartment.
Coolant expansion reservoir » Fig. 207
Mark for the maximum permissible coolant level
Mark for the lowest permissible coolant level
The coolant level should be kept between the marks
A
and
B
.
The coolant can be checked and topped up, if the following conditions are sat-
isfied.
The vehicle is on a horizontal surface.
The engine is turned off.
The engine is not heated.
The bonnet is open.
AB199Inspecting and replenishing
Page 203 of 268
A slight drop in the fluid level results when driving due to normal wear-and-
tear and automatic adjustment of the brake pads.
There may be an indication of a leak in the brake system, however, if the fluid
level drops significantly within a short time or if it drops below the “MIN” mark-
ing.
Too low brake fluid level is indicated by the warning light
being shown on
the display of the instrument cluster as well as the corresponding message
» page 32 .
Specification
Read and observe
and on page 200 first.
To ensure the optimal functioning of the braking system, only use a brake fluid
meeting the standard VW 501 14 (this standard meets the requirements of
FMVSS 116 DOT4).
Note
We recommend using brake fluids from the ŠKODA Original Accessories range.
Vehicle battery
Introduction
This chapter contains information on the following subjects:
Opening the cover
202
Checking the battery electrolyte level
202
Charging
203
Replacing
203
Disconnecting and reconnecting
203
Automatic load deactivation
204
The vehicle battery represents a power source for the motor to start and for
the supply of electrical consumers in the car.
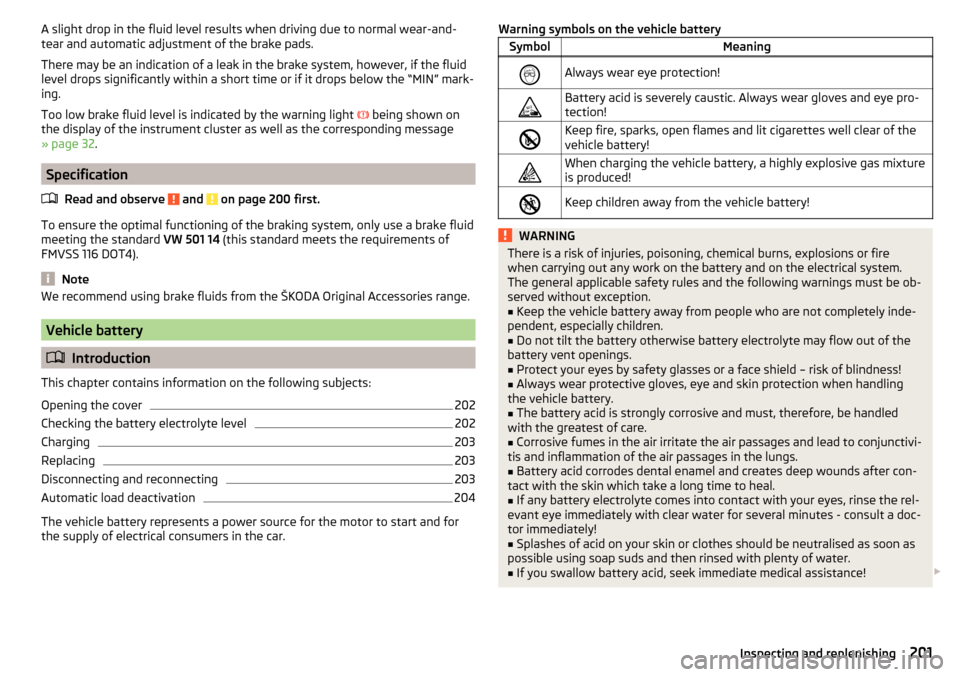
Warning symbols on the vehicle batterySymbolMeaningAlways wear eye protection!Battery acid is severely caustic. Always wear gloves and eye pro-
tection!Keep fire, sparks, open flames and lit cigarettes well clear of the
vehicle battery!When charging the vehicle battery, a highly explosive gas mixture
is produced!Keep children away from the vehicle battery!WARNINGThere is a risk of injuries, poisoning, chemical burns, explosions or fire
when carrying out any work on the battery and on the electrical system.
The general applicable safety rules and the following warnings must be ob-
served without exception.■
Keep the vehicle battery away from people who are not completely inde-
pendent, especially children.
■
Do not tilt the battery otherwise battery electrolyte may flow out of the
battery vent openings.
■
Protect your eyes by safety glasses or a face shield – risk of blindness!
■
Always wear protective gloves, eye and skin protection when handling
the vehicle battery.
■
The battery acid is strongly corrosive and must, therefore, be handled
with the greatest of care.
■
Corrosive fumes in the air irritate the air passages and lead to conjunctivi-
tis and inflammation of the air passages in the lungs.
■
Battery acid corrodes dental enamel and creates deep wounds after con-
tact with the skin which take a long time to heal.
■
If any battery electrolyte comes into contact with your eyes, rinse the rel-
evant eye immediately with clear water for several minutes - consult a doc-
tor immediately!
■
Splashes of acid on your skin or clothes should be neutralised as soon as
possible using soap suds and then rinsed with plenty of water.
■
If you swallow battery acid, seek immediate medical assistance!
201Inspecting and replenishing
Page 204 of 268
WARNING■The use of open flames and light should be avoided.■Smoking and radio triggering activities should be avoided.■
Never use a damaged vehicle battery – risk of explosion!
■
Never charge a frozen or thawed vehicle battery – risk of explosion and
caustic burns!
■
Replace a frozen vehicle battery.
■
Never jump-start vehicle batteries with an electrolyte level that is too low
– risk of explosion and caustic burns.
CAUTION
■ Improper handling of the vehicle battery may cause damage.■Ensure that battery acid does not come into contact with the bodywork – risk
of damage to the paintwork.■
If the vehicle has not been driven for more than 3 to 4 weeks, the battery will
discharge. Prevent the battery from discharging by disconnecting the battery's
negative terminal
or continuously charging the battery with a very low
charging current.
■
Do not place the battery in direct daylight in order to protect the vehicle bat-
tery housing from the effects of ultra-violet light.
■
If the vehicle is frequently used for making short trips, the vehicle battery
will not have time to charge up sufficiently and may discharge.
Note
■ We recommend having all work on the vehicle battery carried out by a spe-
cialist garage.■
You should replace batteries older than 5 years.
Opening the cover
Fig. 209
Polyester cover of vehicle bat-
tery
Read and observe and on page 201 first.
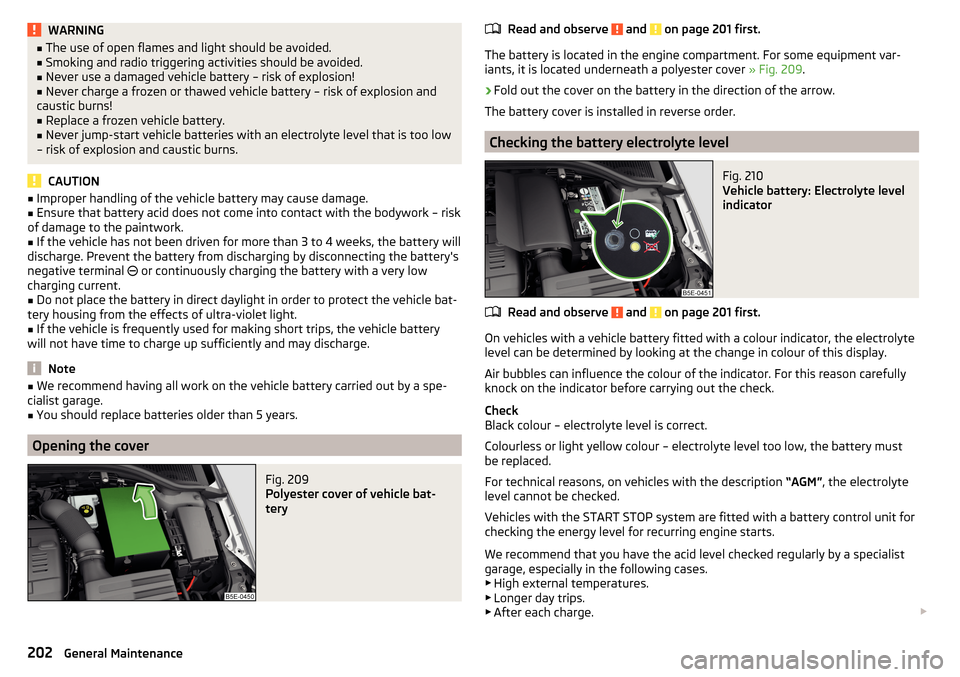
The battery is located in the engine compartment. For some equipment var- iants, it is located underneath a polyester cover » Fig. 209.
›
Fold out the cover on the battery in the direction of the arrow.
The battery cover is installed in reverse order.
Checking the battery electrolyte level
Fig. 210
Vehicle battery: Electrolyte level
indicator
Read and observe and on page 201 first.
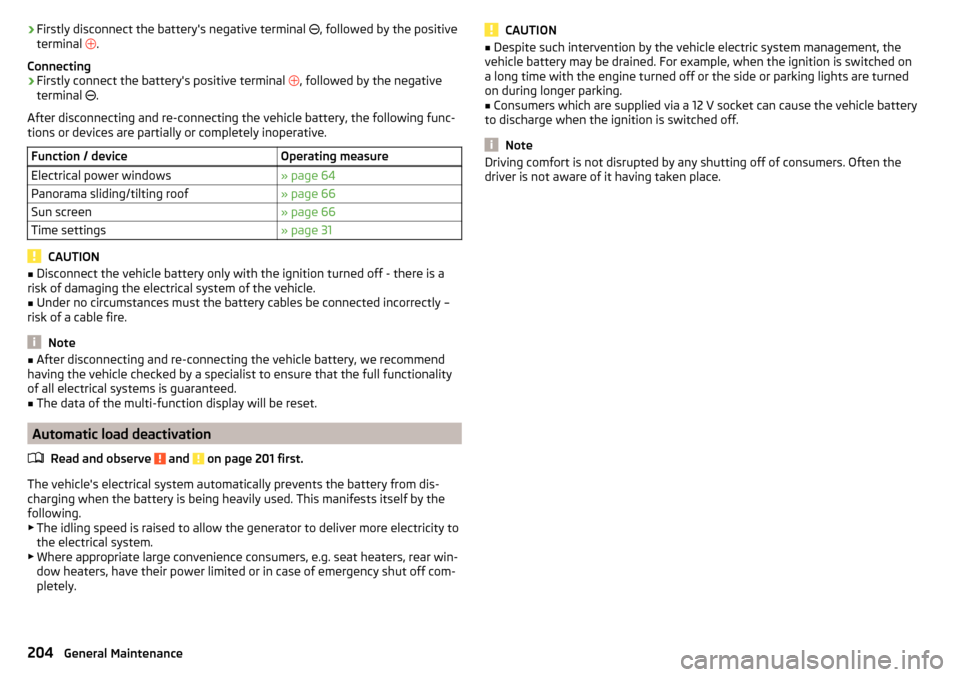
On vehicles with a vehicle battery fitted with a colour indicator, the electrolyte
level can be determined by looking at the change in colour of this display.
Air bubbles can influence the colour of the indicator. For this reason carefully
knock on the indicator before carrying out the check.
Check
Black colour – electrolyte level is correct.
Colourless or light yellow colour – electrolyte level too low, the battery must
be replaced.
For technical reasons, on vehicles with the description “AGM”, the electrolyte
level cannot be checked.
Vehicles with the START STOP system are fitted with a battery control unit for
checking the energy level for recurring engine starts.
We recommend that you have the acid level checked regularly by a specialist
garage, especially in the following cases. ▶ High external temperatures.
▶ Longer day trips.
▶ After each charge.
202General Maintenance
Page 206 of 268
›Firstly disconnect the battery's negative terminal
, followed by the positive
terminal .
Connecting›
Firstly connect the battery's positive terminal
, followed by the negative
terminal
.
After disconnecting and re-connecting the vehicle battery, the following func- tions or devices are partially or completely inoperative.
Function / deviceOperating measureElectrical power windows» page 64Panorama sliding/tilting roof» page 66Sun screen» page 66Time settings» page 31
CAUTION
■ Disconnect the vehicle battery only with the ignition turned off - there is a
risk of damaging the electrical system of the vehicle.■
Under no circumstances must the battery cables be connected incorrectly –
risk of a cable fire.
Note
■ After disconnecting and re-connecting the vehicle battery, we recommend
having the vehicle checked by a specialist to ensure that the full functionality
of all electrical systems is guaranteed.■
The data of the multi-function display will be reset.
Automatic load deactivation
Read and observe
and on page 201 first.
The vehicle's electrical system automatically prevents the battery from dis-
charging when the battery is being heavily used. This manifests itself by the
following. ▶ The idling speed is raised to allow the generator to deliver more electricity to
the electrical system.
▶ Where appropriate large convenience consumers, e.g. seat heaters, rear win-
dow heaters, have their power limited or in case of emergency shut off com-
pletely.
CAUTION■ Despite such intervention by the vehicle electric system management, the
vehicle battery may be drained. For example, when the ignition is switched on
a long time with the engine turned off or the side or parking lights are turned
on during longer parking.■
Consumers which are supplied via a 12 V socket can cause the vehicle battery
to discharge when the ignition is switched off.
Note
Driving comfort is not disrupted by any shutting off of consumers. Often the
driver is not aware of it having taken place.204General Maintenance
Page 208 of 268
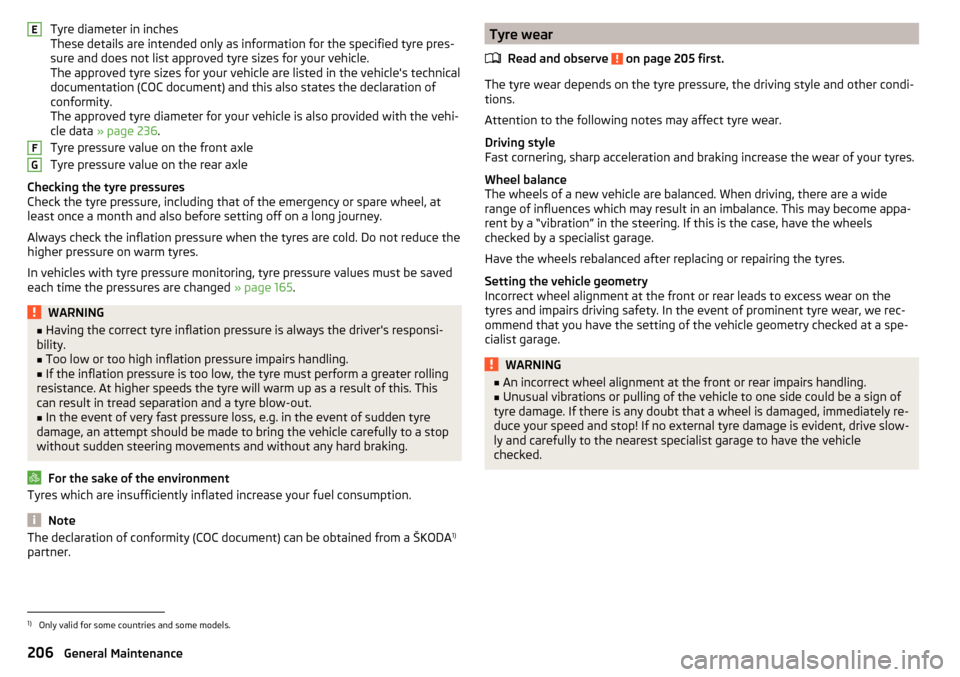
Tyre diameter in inches
These details are intended only as information for the specified tyre pres-
sure and does not list approved tyre sizes for your vehicle.
The approved tyre sizes for your vehicle are listed in the vehicle's technical
documentation (COC document) and this also states the declaration of
conformity.
The approved tyre diameter for your vehicle is also provided with the vehi-
cle data » page 236 .
Tyre pressure value on the front axle
Tyre pressure value on the rear axle
Checking the tyre pressures
Check the tyre pressure, including that of the emergency or spare wheel, at
least once a month and also before setting off on a long journey.
Always check the inflation pressure when the tyres are cold. Do not reduce the
higher pressure on warm tyres.
In vehicles with tyre pressure monitoring, tyre pressure values must be saved
each time the pressures are changed » page 165.WARNING■
Having the correct tyre inflation pressure is always the driver's responsi-
bility.■
Too low or too high inflation pressure impairs handling.
■
If the inflation pressure is too low, the tyre must perform a greater rolling
resistance. At higher speeds the tyre will warm up as a result of this. This
can result in tread separation and a tyre blow-out.
■
In the event of very fast pressure loss, e.g. in the event of sudden tyre
damage, an attempt should be made to bring the vehicle carefully to a stop
without sudden steering movements and without any hard braking.
For the sake of the environment
Tyres which are insufficiently inflated increase your fuel consumption.
Note
The declaration of conformity (COC document) can be obtained from a ŠKODA 1)
partner.EFGTyre wear
Read and observe
on page 205 first.
The tyre wear depends on the tyre pressure, the driving style and other condi-
tions.
Attention to the following notes may affect tyre wear.
Driving style
Fast cornering, sharp acceleration and braking increase the wear of your tyres.
Wheel balance
The wheels of a new vehicle are balanced. When driving, there are a wide
range of influences which may result in an imbalance. This may become appa-
rent by a “vibration” in the steering. If this is the case, have the wheels
checked by a specialist garage.
Have the wheels rebalanced after replacing or repairing the tyres.
Setting the vehicle geometry
Incorrect wheel alignment at the front or rear leads to excess wear on the
tyres and impairs driving safety. In the event of prominent tyre wear, we rec-
ommend that you have the setting of the vehicle geometry checked at a spe-
cialist garage.
WARNING■ An incorrect wheel alignment at the front or rear impairs handling.■Unusual vibrations or pulling of the vehicle to one side could be a sign of
tyre damage. If there is any doubt that a wheel is damaged, immediately re-
duce your speed and stop! If no external tyre damage is evident, drive slow-
ly and carefully to the nearest specialist garage to have the vehicle
checked.1)
Only valid for some countries and some models.
206General Maintenance
Page 228 of 268
Replacing the rear window wiper bladeFig. 237
Rear window wiper blade
Read and observe
on page 225 first.
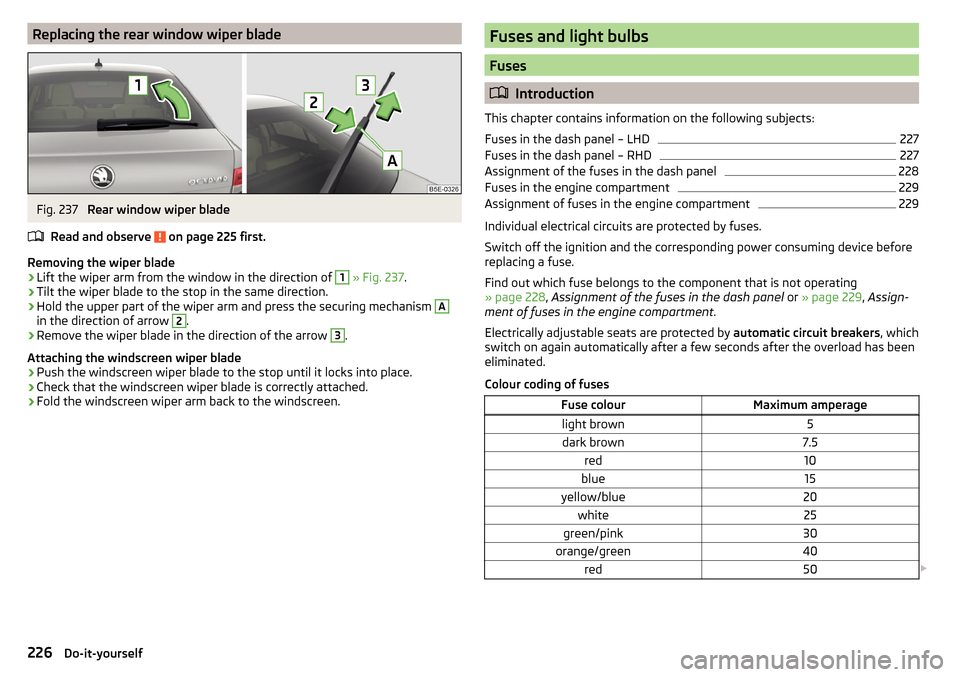
Removing the wiper blade
›
Lift the wiper arm from the window in the direction of
1
» Fig. 237 .
›
Tilt the wiper blade to the stop in the same direction.
›
Hold the upper part of the wiper arm and press the securing mechanism
A
in the direction of arrow
2
.
›
Remove the wiper blade in the direction of the arrow
3
.
Attaching the windscreen wiper blade
›
Push the windscreen wiper blade to the stop until it locks into place.
›
Check that the windscreen wiper blade is correctly attached.
›
Fold the windscreen wiper arm back to the windscreen.
Fuses and light bulbs
Fuses
Introduction
This chapter contains information on the following subjects:
Fuses in the dash panel – LHD
227
Fuses in the dash panel – RHD
227
Assignment of the fuses in the dash panel
228
Fuses in the engine compartment
229
Assignment of fuses in the engine compartment
229
Individual electrical circuits are protected by fuses.
Switch off the ignition and the corresponding power consuming device before
replacing a fuse.
Find out which fuse belongs to the component that is not operating
» page 228 , Assignment of the fuses in the dash panel or » page 229 , Assign-
ment of fuses in the engine compartment .
Electrically adjustable seats are protected by automatic circuit breakers, which
switch on again automatically after a few seconds after the overload has been
eliminated.
Colour coding of fuses
Fuse colourMaximum amperagelight brown5dark brown7.5red10blue15yellow/blue20white25green/pink30orange/green40red50 226Do-it-yourself
Page 229 of 268
WARNINGAlways read and observe the warnings before completing any work in the
engine compartment » page 194.
CAUTION
■
“Never repair” fuses, and do not replace them with fuses of a higher amper-
age – risk of fire! This may also cause damage at other points in the electrical
system.■
If a newly inserted fuse blows again after a short time, have the electrical
system checked as quickly as possible by a specialist garage.
■
A blown fuses is recognisable by the molten metal strip. Replace the faulty
fuse with a new one of the same amperage.
Note
■
We recommend always carrying replacement fuses in the vehicle. A box of
replacement fuses and bulbs can be purchased from ŠKODA Original Accesso-
ries.■
There can be several power consuming devices for one fuse.
■
Multiple fuses may exist for a single power consuming device.
Fuses in the dash panel – LHD
Fig. 238
Storage compartment on the
driver's side: LHD
Read and observe and on page 227 first.
On left-hand drive vehicles, the fuse box is located behind the storage com- partment in the left-hand section of the dash panel.
Replacing fuses
›
Open the storage compartment » page 90.
›
Grab hold of the storage compartment in the area of the arrows » Fig. 238.
›
Fold out the storage compartment by pulling in the direction of arrow
1
.
›Remove the plastic clip under the cover of the fuse box in the engine room
» Fig. 242 on page 229 .›
Place the clip onto the respective fuse and pull the fuse out.
›
Insert a new fuse.
›
Replace the bracket at the original position.
›
Fold back the storage compartment by pressing into the secured position in
the dash panel in the direction of the arrow
2
.
›
Close the storage compartment.
Fuses in the dash panel – RHD
Fig. 239
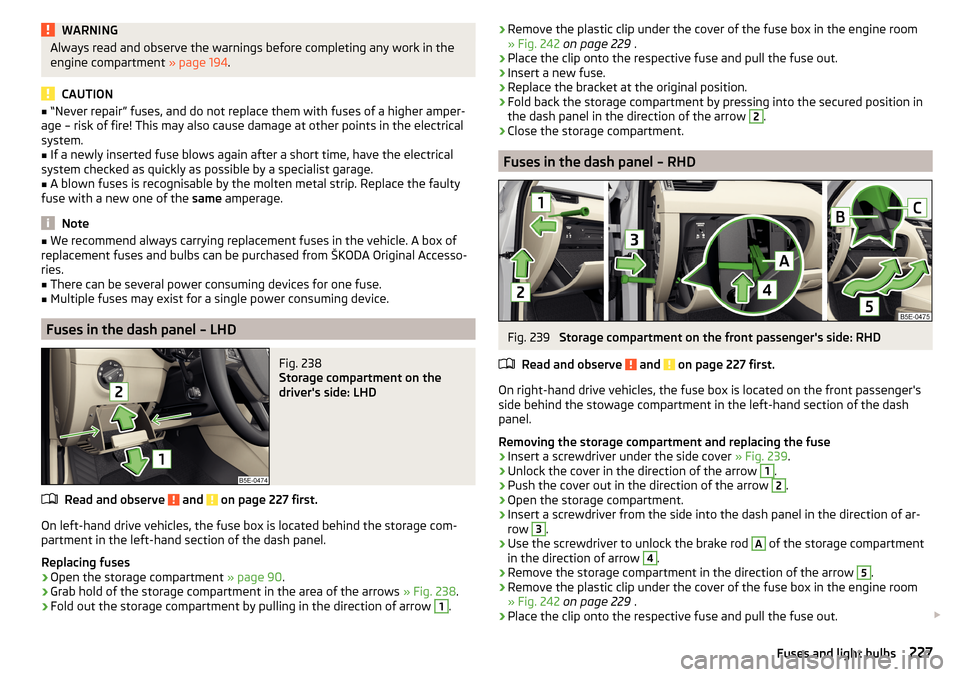
Storage compartment on the front passenger's side: RHD
Read and observe
and on page 227 first.
On right-hand drive vehicles, the fuse box is located on the front passenger's side behind the stowage compartment in the left-hand section of the dash
panel.
Removing the storage compartment and replacing the fuse
›
Insert a screwdriver under the side cover » Fig. 239.
›
Unlock the cover in the direction of the arrow
1
.
›
Push the cover out in the direction of the arrow
2
.
›
Open the storage compartment.
›
Insert a screwdriver from the side into the dash panel in the direction of ar-
row
3
.
›
Use the screwdriver to unlock the brake rod
A
of the storage compartment
in the direction of arrow
4
.
›
Remove the storage compartment in the direction of the arrow
5
.
›
Remove the plastic clip under the cover of the fuse box in the engine room
» Fig. 242 on page 229 .
›
Place the clip onto the respective fuse and pull the fuse out.
227Fuses and light bulbs
Page 237 of 268
Replacing bulbs in the rear light - Variant 1Fig. 251
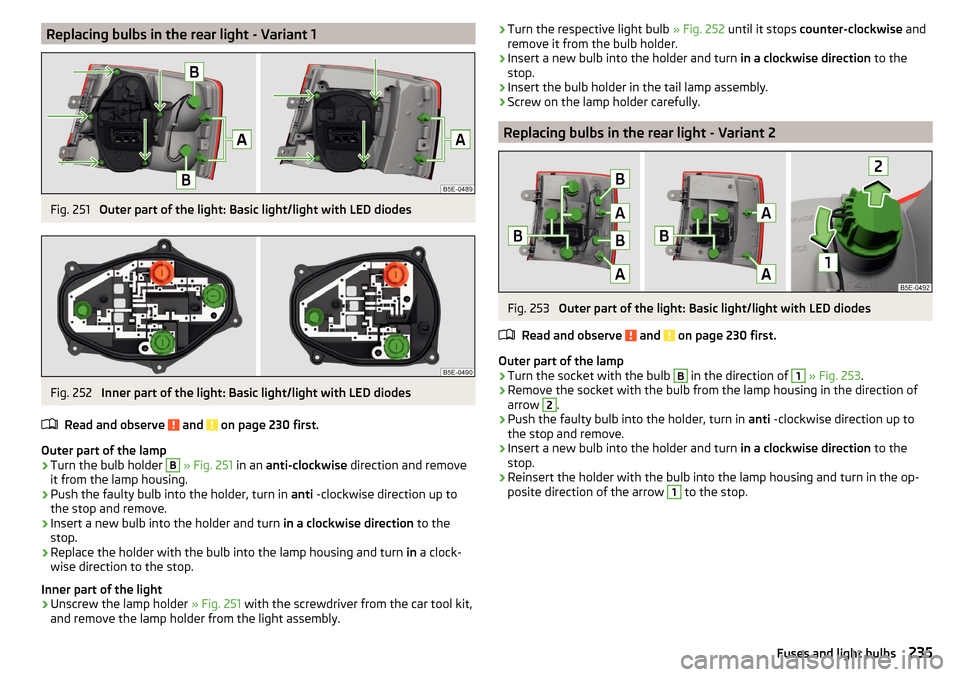
Outer part of the light: Basic light/light with LED diodes
Fig. 252
Inner part of the light: Basic light/light with LED diodes
Read and observe
and on page 230 first.
Outer part of the lamp
›
Turn the bulb holder
B
» Fig. 251 in an anti-clockwise direction and remove
it from the lamp housing.
›
Push the faulty bulb into the holder, turn in anti -clockwise direction up to
the stop and remove.
›
Insert a new bulb into the holder and turn in a clockwise direction to the
stop.
›
Replace the holder with the bulb into the lamp housing and turn in a clock-
wise direction to the stop.
Inner part of the light
›
Unscrew the lamp holder » Fig. 251 with the screwdriver from the car tool kit,
and remove the lamp holder from the light assembly.
› Turn the respective light bulb
» Fig. 252 until it stops counter-clockwise and
remove it from the bulb holder.›
Insert a new bulb into the holder and turn in a clockwise direction to the
stop.
›
Insert the bulb holder in the tail lamp assembly.
›
Screw on the lamp holder carefully.
Replacing bulbs in the rear light - Variant 2
Fig. 253
Outer part of the light: Basic light/light with LED diodes
Read and observe
and on page 230 first.
Outer part of the lamp
›
Turn the socket with the bulb
B
in the direction of
1
» Fig. 253 .
›
Remove the socket with the bulb from the lamp housing in the direction of
arrow
2
.
›
Push the faulty bulb into the holder, turn in anti -clockwise direction up to
the stop and remove.
›
Insert a new bulb into the holder and turn in a clockwise direction to the
stop.
›
Reinsert the holder with the bulb into the lamp housing and turn in the op-
posite direction of the arrow
1
to the stop.
235Fuses and light bulbs