snow chains SKODA OCTAVIA 2015 3.G / (5E) Owner's Manual
[x] Cancel search | Manufacturer: SKODA, Model Year: 2015, Model line: OCTAVIA, Model: SKODA OCTAVIA 2015 3.G / (5E)Pages: 268, PDF Size: 37.54 MB
Page 38 of 268
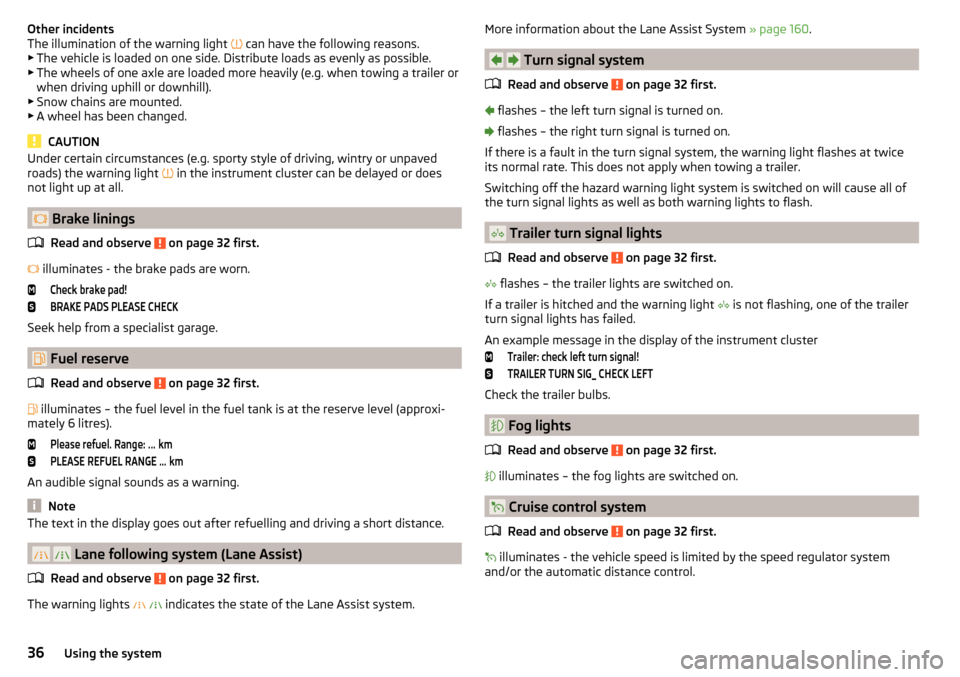
Other incidents
The illumination of the warning light can have the following reasons.
▶ The vehicle is loaded on one side. Distribute loads as evenly as possible.
▶ The wheels of one axle are loaded more heavily (e.g. when towing a trailer or
when driving uphill or downhill).
▶ Snow chains are mounted.
▶ A wheel has been changed.
CAUTION
Under certain circumstances (e.g. sporty style of driving, wintry or unpaved
roads) the warning light in the instrument cluster can be delayed or does
not light up at all.
Brake linings
Read and observe
on page 32 first.
illuminates - the brake pads are worn.
Check brake pad!BRAKE PADS PLEASE CHECK
Seek help from a specialist garage.
Fuel reserve
Read and observe
on page 32 first.
illuminates – the fuel level in the fuel tank is at the reserve level (approxi-
mately 6 litres).
Please refuel. Range: ...
kmPLEASE REFUEL RANGE …
km
An audible signal sounds as a warning.
Note
The text in the display goes out after refuelling and driving a short distance.
Lane following system (Lane Assist)
Read and observe
on page 32 first.
The warning lights
indicates the state of the Lane Assist system.
More information about the Lane Assist System » page 160.
Turn signal system
Read and observe
on page 32 first.
flashes – the left turn signal is turned on.
flashes – the right turn signal is turned on.
If there is a fault in the turn signal system, the warning light flashes at twice
its normal rate. This does not apply when towing a trailer.
Switching off the hazard warning light system is switched on will cause all of
the turn signal lights as well as both warning lights to flash.
Trailer turn signal lights
Read and observe
on page 32 first.
flashes – the trailer lights are switched on.
If a trailer is hitched and the warning light is not flashing, one of the trailer
turn signal lights has failed.
An example message in the display of the instrument cluster
Trailer: check left turn signal!TRAILER TURN SIG_ CHECK LEFT
Check the trailer bulbs.
Fog lights
Read and observe
on page 32 first.
illuminates – the fog lights are switched on.
Cruise control system
Read and observe
on page 32 first.
illuminates - the vehicle speed is limited by the speed regulator system
and/or the automatic distance control.
36Using the system
Page 139 of 268
During a TCS intervention, the indicator light flashes in the instrument clus-
ter.
Activating/deactivating TCS
The activation or deactivation of TCS can be done, depending on equipment, in
one of the following ways. ▶ Infotainment » Owner´s Manual Infotainment , chapter CAR - vehicle set-
tings .
▶ By briefly pressing the symbol key
» Fig. 155 .
▶ By briefly pressing the symbol key
» Fig. 155 .
Upon deactivation, in the instrument cluster the indicator light
lights up and
the display shows the following message.Traction control (ASR) deactivated.ASR OFF
Upon activation, in the instrument cluster the indicator turns and the display
shows the following message.
Traction control (ASR) activated.ASR ON
The TCS should normally always be enabled. The system should be deactivated
only in the following situations, for example. ▶ When driving with snow chains.
▶ When driving in deep snow or on a very loose surface.
▶ When it is necessary to “rock” a car free when it has become stuck.
Note
On vehicles without the ESC system, the warning light does not illuminate
upon deactivation of the TCS system, but a message is only displayed on the
display of the instrument cluster.
Electronic differential lock (EDL and XDS)
Read and observe
on page 136 first.
EDL
EDL prevents the turning of the respective wheel of the driven axle. EDL
brakes the spinning wheel, if necessary, and transmits the driving force to the
other driving wheel. Driving becomes easier on road surfaces with different
traction under each wheel of the driven axle.
EDL switches off automatically to avoid excessive heat generation on the
brake of the wheel being braked. Once the brakes have cooled down, there is
an automatic re-activation of EDL.
XDS
XDS is an extension to the electronic differential lock. XDS does not respond to
traction, but to the load relief of the inner front wheel of the driving axle dur-
ing fast cornering.
The automatic brake intervention on the brake of the wheel with reduced load
prevents the wheel from spinning. Thus, the traction is improved and the vehi-
cle can continue to follow the desired track.
Driver Steering Recommendation (DSR)
Read and observe
on page 136 first.
The DSR indicates to the driver in critical situations a steering recommenda-
tion in order to stabilise the vehicle. The DSR is activated, for example, on the
right and left vehicle side when braking sharply on different road surfaces.
Brake Assist (HBA)
Read and observe
on page 136 first.
HBA increases the braking effect and helps to shorten the braking distance.
The HBA is activated by the very quick operation of the brake pedal. To ach-
ieve the shortest possible braking distance, the brake pedal must be applied
firmly until the vehicle has come to a complete standstill.
The HBA is automatically switched off when the brake pedal is released.
Hill Start Assist (HHC)
Read and observe
on page 136 first.
HHC allows you, when driving on slopes, to move your foot from the brake
pedal to the accelerator pedal without having to use the handbrake.
The system holds the brake pressure produced by the activation of the brake pedal for approx. 2 seconds after the brake pedal is released.
The HHC is active from a 5% slope if the driver's door is closed. HHC is always
active on slopes when in forward or reverse start off.
137Assist systems
Page 147 of 268
The state in which the steering wheel is operated by the system, is referred to
as parking operation.
The Park Assist is an extension of the parking aid » page 140 and operates on
the basis of data collected by the ultrasonic sensors.
For this reason, the chapter on the parking aid is to be read carefully and the safety notes are to be observed.WARNING■ The general information relating to the use of assistance systems must
be observed » page 135, in section Introduction .■
During the parking process, the system automatically performs rapid
steering movements. While it is doing so, do not place your hands between
the steering wheel – risk of injury!
■
During a parking manoeuvre on loose or slippery surfaces (gravel, snow,
ice, etc.) you may stray from the calculated road. Therefore, do not use the
system in such situations.
CAUTION
The correct evaluation of the parking space and the parking procedure de-
pends on the circumference of the wheels on the vehicle.■
The system only works correctly if the vehicle is fitted with the wheel size
approved by the manufacturer.
■
Abstain from using the system when the vehicle is fitted with snow chains or
a temporary spare wheel.
■
If wheels other than those approved by the manufacturer are mounted, the
resulting position of the vehicle in the parking space can differ slightly. This
can be avoided by readjusting the system at a specialist garage.
CAUTION
If other vehicles are parked behind the kerb or on it, the system can also guide
your vehicle beyond the kerb or onto it. Ensure that the wheels or the wheel
rims of your vehicle are not damaged and if necessary intervene in time.
Note
■ We recommend performing the parking at a safe speed to about 5 km / h.■The driver can stop the parking process at any time by pressing the symbol
key
» Fig. 164 on page 146 or by a driver steering intervention.Functioning
Read and observe
and on page 145 first.
The system support is provided in the following manner.▶ While the parking space search is going on, a measurement and evaluation of
the parking space size is completed.
▶ Suitable parking spaces are shown in the display of the instrument cluster
(hereinafter only in the display).
▶ The display shows instructions and information before the start and during
the parking.
▶ The road way is calculated that the vehicle uses during the parking.
▶ The front wheels are automatically rotated during the parking.
Conditions for the system function
The system can look for a parking space only if the following basic conditions
are met.
The system is activated.
The vehicle speed is less than 40 km / h (parallel parking).
The vehicle speed is less than 20 km / h (transverse parking). The distance to a number of parked vehicles is approximately 0.5 - 1.5 m.
The TCS is activated » page 135, Braking and stabilisation systems .
The system can only carry out the parking if the following basic conditions are
met.
The vehicle is travelling less than about 7 km/h.
The parking procedure takes less than 6 minutes.
There is no driver intervention in the automatic steering operation.
Activation/deactivation
The system can be enabled or disabled by pressing the symbol key
» Fig. 164
on page 146 -
.
When the system is activated, the symbol illuminates.
145Assist systems
Page 207 of 268
Wheels
Tyres and wheel rims
Introduction
This chapter contains information on the following subjects:
Notes on using wheels
205
Tyre pressure
205
Tyre wear
206
Tyre wear indicator and wheel replacement
207
Tyre damage
207
Unidirectional tyres
207
Spare wheel
207
Spare wheel
208
Tyre label
208
Only use those tyres or wheel rims which have been approved by ŠKODA for
your model of vehicle.
WARNINGFor safety reasons, do no replace tyres individually.
Note
■ We recommend that any work on the wheels or tyres be carried out by a spe-
cialist garage.■
We recommend that you use wheel rims, tyres, full wheel trims and snow
chains from ŠKODA Original Accessories.
Notes on using wheels
Read and observe
on page 205 first.
During the first 500 km, new tyres do not offer optimum grip and appropriate
care should therefore be taken when driving.
Always fit the tyres with the deeper tread depth to the front wheels.
Tyre storage
Mark them previously used tyres so that you are able to fit them on again to
run in the same direction.
Always store wheels or tyres in a cool, dry and, where possible, dark place.
Tyres which are not fixed to a wheel trim should be stored upright.
Tyre age
Tyres age losing their original characteristics, even if they are not used. The
service life of the tyres is 6 years. Therefore, we recommend not using tyres
that are more than 6 years old.
Wheel bolts
Wheels and wheel bolts are matched to each other in terms of design. We rec-
ommend that you use wheel rims and wheel bolts from ŠKODA Original Acces-
sories.WARNINGNever use tyres if you do not know anything about the condition and age.
Tyre pressure
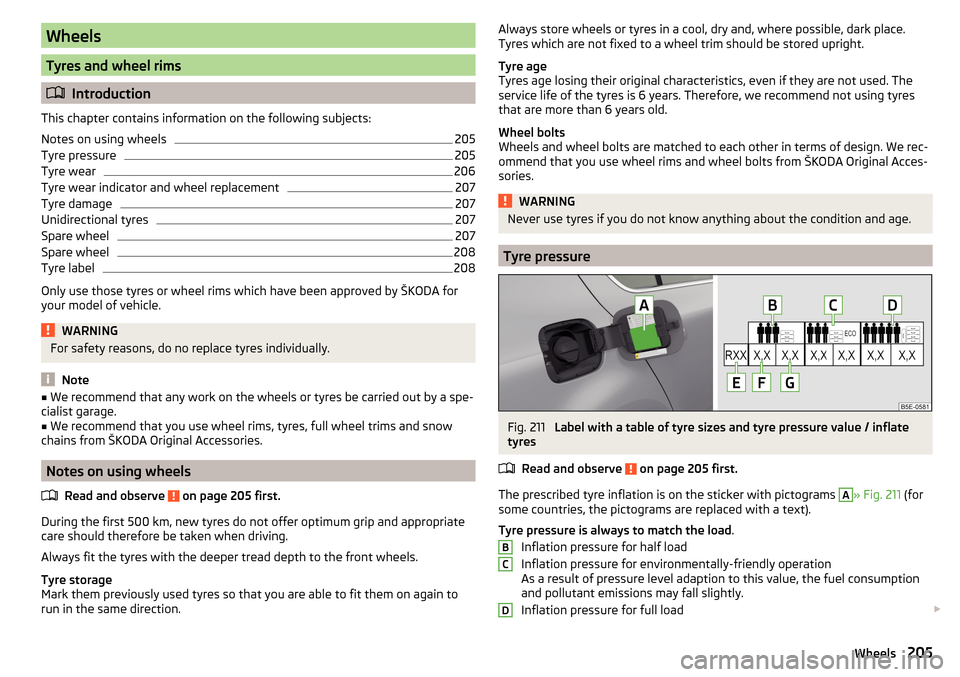
Fig. 211
Label with a table of tyre sizes and tyre pressure value / inflate
tyres
Read and observe
on page 205 first.
The prescribed tyre inflation is on the sticker with pictograms
A
» Fig. 211 (for
some countries, the pictograms are replaced with a text).
Tyre pressure is always to match the load .
Inflation pressure for half load
Inflation pressure for environmentally-friendly operation
As a result of pressure level adaption to this value, the fuel consumption
and pollutant emissions may fall slightly.
Inflation pressure for full load
BCD205Wheels
Page 210 of 268
In vehicles with tyre pressure monitoring, save tyre pressure values
» page 165 .WARNING■
If, you get a puncture and a spare tyre has to be mounted with opposite
direction of rotation, then drive carefully. The tyre no longer retains its opti-
mal characteristics in this situation.■
If the dimensions or design of the spare wheel differ from the tyres fitted
to the vehicle (e.g. winter tyres or low-profile tyres), it must only be used
briefly in the event of a puncture and if an appropriately cautious style of
driving is adopted.
■
Never use the temporary spare wheel if it is damaged.
Spare wheel
Read and observe
on page 205 first.
A yellow warning label is always displayed on the rim of the temporary spare
wheel.
Please note the following if you intend to use the temporary spare wheel. ▶ The warning label must not be covered after installing the wheel.
▶ Be specially attentive when driving.
▶ The emergency spare is inflated to the maximum inflation pressure for the
vehicle » page 205 .
▶ The tyre inflation pressure of the spare wheel R 18 is 4.2 bar.
▶ Only use this emergency spare wheel to reach the nearest specialist garage,
as it is not intended for permanent use.
If you need to use a spare wheel, make sure to fit a standard wheel of the ap-
propriate dimensions and design as soon as possible.
In vehicles with tyre pressure monitoring, save tyre pressure values
» page 165 .
WARNING■
Never drive with more than one temporary spare wheel mounted!■Only use the temporary spare wheel when absolutely necessary.■
Avoid accelerating at full throttle, sharp braking and fast cornering.
■
The snow chains cannot be used on the temporary spare wheel.
■
If the dimensions or design of the temporary spare wheel differ from the
tyres fitted, never drive faster than 80 km/h (or 50 mph).
WARNING (Continued)■ Never use the emergency spare wheel if it is damaged.■Observe instructions on the warning sign of the emergency wheel.
Tyre label
Read and observe
on page 205 first.
Only fit radial tyres of the same type, size (rolling circumference) and the same
tread pattern on one axle on all 4 wheels.
When fitting new tyres, the tyres must be replaced axle by axle.
Explanation of tyre markings
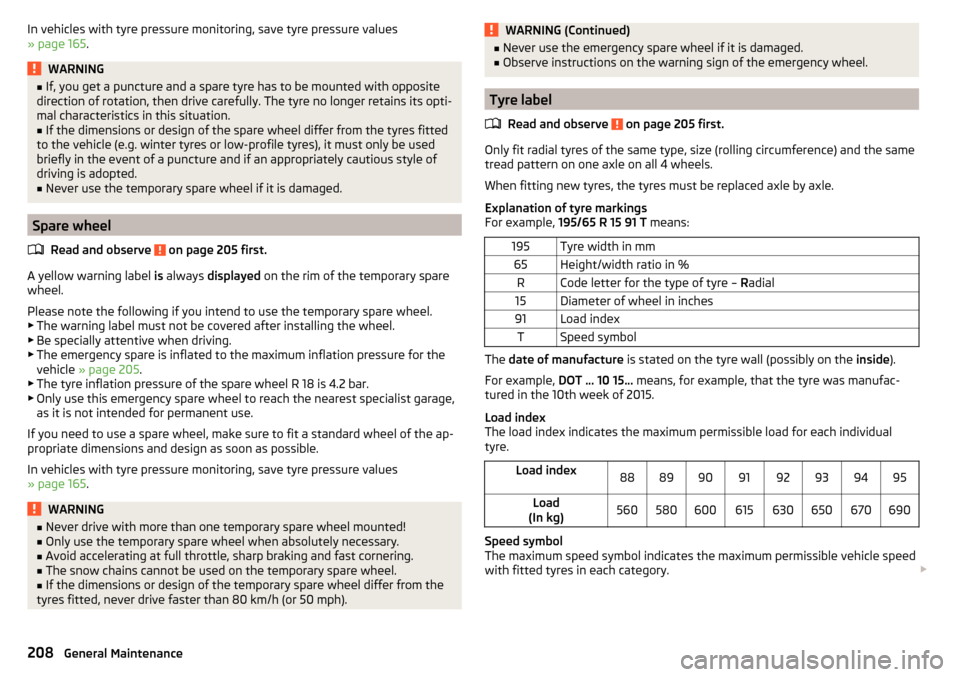
For example, 195/65 R 15 91 T means:
195Tyre width in mm65Height/width ratio in %RCode letter for the type of tyre – Radial15Diameter of wheel in inches91Load indexTSpeed symbol
The date of manufacture is stated on the tyre wall (possibly on the inside).
For example, DOT ... 10 15... means, for example, that the tyre was manufac-
tured in the 10th week of 2015.
Load index
The load index indicates the maximum permissible load for each individual
tyre.
Load index8889909192939495Load
(In kg)560580600615630650670690
Speed symbol
The maximum speed symbol indicates the maximum permissible vehicle speed
with fitted tyres in each category.
208General Maintenance
Page 211 of 268
Speed
symbolSTUHVWYMaximum speed
(in km/h)180190200210240270300WARNING■ Never exceed the maximum permissible load bearing capacity of moun-
ted tyres.■
Never exceed the maximum permissible speed for the mounted tyres.
Winter operation
Introduction
This chapter contains information on the following subjects:
Winter tyres
209
Snow chains
209
Do not use alloy rims with bevelled or polished surfaces during the winter. The
rim surface does not have sufficient corrosion protection and could be perma-
nently damaged (e.g. through grit).
Winter tyres
The handling of your vehicle will be significantly improved when driving on
wintry roads if you fit winter tyres (labelled M+S).
To ensure the best possible handling, winter tyres must be fitted to all four
wheels. The minimum tread depth is 4 mm.
Fit the summer tyres on again in good time as they provide better handling
properties, a shorter braking distance, less tyre noise, and reduced tyre wear
on roads which are free of snow and ice as well as at temperatures above 7 °C.
Speed symbol
Winter tyres (marked with M+S and a peak/snowflake symbol
) of a lower
speed category can be used provided that the permissible maximum speed of
these tyres is not exceeded even if the possible maximum speed of the vehicle
is higher.
On vehicles with the infotainment system with key the speed limit can be
set for winter tyres » Owner´s Manual Infotainment , chapter CAR - Adjust ve-
hicle systems .
For other vehicles, there is the possibility to set the speed limit for winter tyres
at a specialist garage.
Snow chains
When driving on wintry roads, snow chains improve not only traction, but also
the braking performance.
Snow chains must only be mounted on the front wheels.
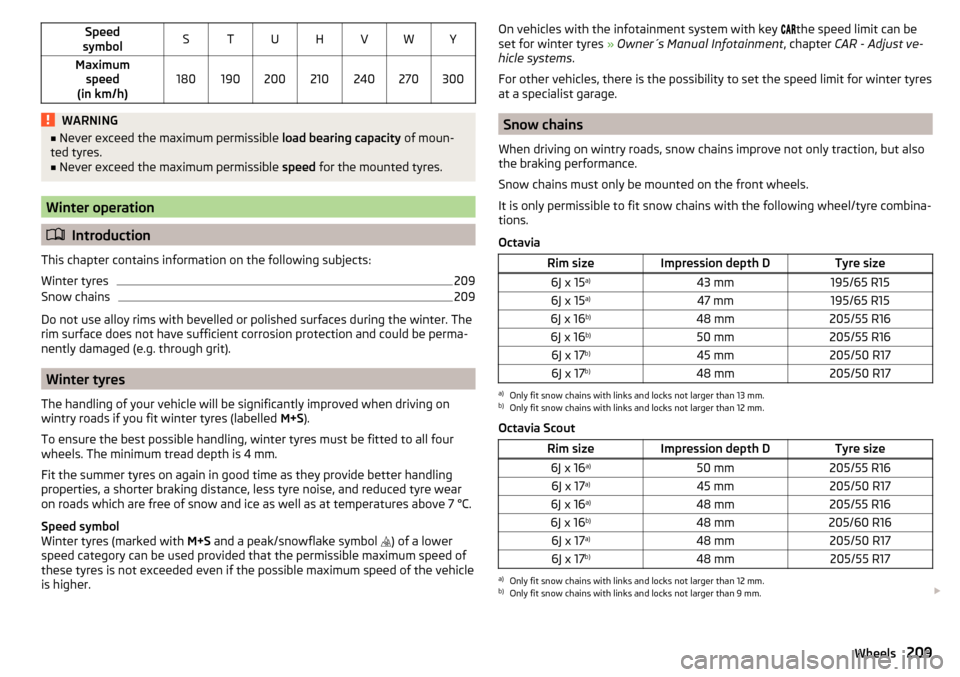
It is only permissible to fit snow chains with the following wheel/tyre combina-
tions.
Octavia
Rim sizeImpression depth DTyre size6J x 15 a)43 mm195/65 R156J x 15a)47 mm195/65 R156J x 16 b)48 mm205/55 R166J x 16b)50 mm205/55 R166J x 17b)45 mm205/50 R176J x 17 b)48 mm205/50 R17a)
Only fit snow chains with links and locks not larger than 13 mm.
b)
Only fit snow chains with links and locks not larger than 12 mm.
Octavia Scout
Rim sizeImpression depth DTyre size6J x 16 a)50 mm205/55 R166J x 17a)45 mm205/50 R176J x 16 a)48 mm205/55 R166J x 16 b)48 mm205/60 R166J x 17a)48 mm205/50 R176J x 17b)48 mm205/55 R17a)
Only fit snow chains with links and locks not larger than 12 mm.
b)
Only fit snow chains with links and locks not larger than 9 mm.
209Wheels
Page 212 of 268

Octavia RSRim sizeImpression depth DTyre size6J x 17a)45 mm205/50 R176J x 17a)48 mm205/50 R17a)
Only fit snow chains with links and locks not larger than 12 mm.
Remove the full wheel trims before fitting the snow chains » page 213.
CAUTION
The chains must be removed when driving on snow-free roads. They would
otherwise cause loss of performance and damage the tyres.210General Maintenance
Page 259 of 268
Reversing cameraLens care185
Revolutions counter29
Roller blind Luggage compartment cover
105
Roof Load
112
Roof rack110
mounting points111
Roof load112
Stowing in the luggage compartment111
Rubber seals184
Running-in Brake linings
132
Engine132
Tyres132
S
SAFE See Safe securing system
56
SAFELOCK See Safe securing system
56
Safe securing system56
Safety8
Child safety20
Child safety seats20
Correct seated position8
Head restraints82
ISOFIX23
TOP TETHER25
Saving electrical energy132
Saving fuel132
Seals Vehicle care
184
Seat belt height adjustment
12
warning light32
Warning light37
Seat belts11
Belt tensioners13
fastening and unfastening13
Seatbelts Inertia reels
13
Seat belts The physical principle of a head-on collision
12
Seat features85
Seats Folding front passenger seat
86
Front armrest86
Head restraints82
Heating85
Memory Function of the electrically adjustable seat
84
Rear armrest86
Seat backrests87
Storing in memory of remote control key84
Seats and head restraint81
see automatic gearbox Manual shifting of gears on the multifunctionsteering wheel
130
see Instrument cluster see Instrument cluster
28
Select drive mode Individual mode settings
159
Mode selection and Infotainment display159
Select driving mode Eco mode
158
Individual mode158
Off-road mode158
Sport mode157
Selector lever Refer to Selector lever
129
Selector lever lock Warning light
37
Service179
Service interval display49
Warning light40
Setting Positions of the variable loading floor108
Seat belt height12
seats and head restraints81
Settings Interior mirror
79
Setting the Clock
31
Side airbag17
sliding/tilting roof Sunblind
66
Sliding/tilting roof Closing
65
Sliding / tilting roof Malfunction
66
Malfunction of the sun blind66
Sliding/tilting roof Opening and tilting
65
Operation65
SmartGate Connection by searching for a Wi-Fi network
51
introductory information50
Password/PIN code change52
Setting52
Wi-Fi Direct51
SmartLink see Infotainment
4
Snow chains209
Sockets 230 V
97
Spare wheel207, 208
Remove213
stow213
Speed symbol see Wheels
208
Spoiler180
Stabilisation system135
Stability Control (ESC)136
Staring engine Jump-starting
219
257Index
Page 262 of 268
Visibility76
Visors see front sun visors
76
see Sun screen77
W
Warning indicator of a low temperature Warning light
39
Warning lights31
Warning symbols see Warning lights
31
Warning triangle211
warning when speeding43
Washing Automatic car wash system
182
by hand181
High-pressure cleaner182
Washing vehicles181
Waste container93
Water in the fuel filter Warning light
39
warning messages39
Weather conditions178
Wheel bolts Anti-theft wheel bolts
214
Caps214
Loosening and tightening215
Wheel rims205
Wheels Age of wheels
205
Changing213
Driving style206
Full trim213
General information205
Load index208
Low-profile tyres207
Remove213
Snow chains209
Speed symbol208
stow213
Tyre damage207
Tyre pressure205
Tyre size208
Tyre storage205
Tyre wear206
Tyre wear indicator207
Wheel balance206
Wheel replacement207
Winter tyres209
Wi-Fi Connection
51
Password51
Password change52
see Infotainment4
Setting52
Wi-Fi Direct Connection
51
Password change52
Setting52
Window operation Convenience operation
64
Malfunctions64
Window wiper Replacing the rear window wiper blade
226
Windscreen Heater
76
Windscreen washer fluid Checking
196
Replenishing196
Warning light39
Winter196
Windscreen washers Windscreen washers
78
Windscreen washer system196
Windscreen wipers automatic rear window wipers
78
operation78
Replacing the windscreen wipers225
Windscreen washer fluid196
Windscreen wipers and washers77
Winter operation209
De-icing windows184
Snow chains209
Winter tyres209
Winter tyres See Wheels
209
Wiper blades186
Service position of the windscreen wiper arms 225
Wiper interval
78
Wipers Maintaining wiper blades
186
X
XDS
137
Xenon headlight70
260Index