infotainment system SKODA OCTAVIA 2016 3.G / (5E) Owner's Guide
[x] Cancel search | Manufacturer: SKODA, Model Year: 2016, Model line: OCTAVIA, Model: SKODA OCTAVIA 2016 3.G / (5E)Pages: 324, PDF Size: 48.85 MB
Page 80 of 324
NoteEvery time you save new seat and exterior mirror settings for driving forwards,
you must also save the front passenger mirror setting for reversing again.
Memory function of the remote control key
Read and observe
on page 76 first.
Every time the vehicle is locked, the driver´s seat and exterior mirror settings
are saved and assigned to the key with which the vehicle was locked.
After the following unlocking of the vehicle with the same key and opening
the driver’s door, the driver´s seat and exterior mirrors that are saved to this
key will be adopted.
This function can be activated / deactivated in the Infotainment menu
→
→
Seats
.
Storing front passenger´s exterior mirror settings for reversing
The function for lowering the passenger-side mirror surface when reversing
can be activated in the Infotainment menu
→
→
Mirrors and wipers
.
›
Unlock the vehicle with the remote control key and switch on the ignition.
›
Turn the rotary knob for the exterior mirror control to the position for the
front passenger mirror area » page 74.
›
Engage reverse gear.
›
Adjust the front passenger's mirror to the desired position.
›
Disengage reverse gear. The adjusted position of the exterior mirror is stored
in the remote control key memory.
Stopping the ongoing adjustment
›
Press any button on the driver's seat or the button on the remote control
key.
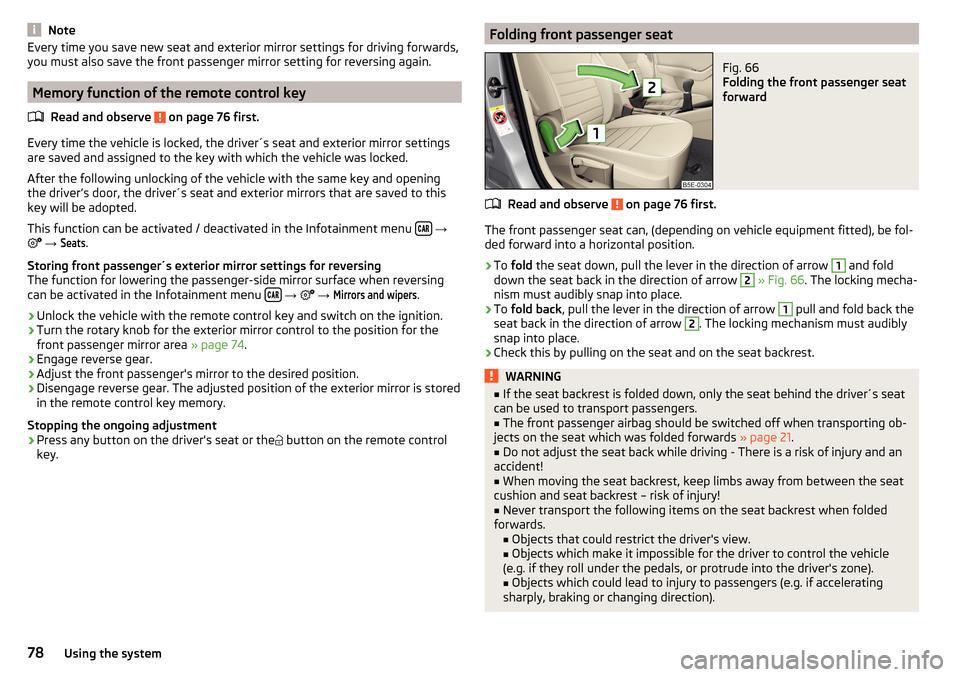
Folding front passenger seatFig. 66
Folding the front passenger seat
forward
Read and observe on page 76 first.
The front passenger seat can, (depending on vehicle equipment fitted), be fol-
ded forward into a horizontal position.
›
To fold the seat down, pull the lever in the direction of arrow
1
and fold
down the seat back in the direction of arrow
2
» Fig. 66 . The locking mecha-
nism must audibly snap into place.
›
To fold back , pull the lever in the direction of arrow
1
pull and fold back the
seat back in the direction of arrow
2
. The locking mechanism must audibly
snap into place.
›
Check this by pulling on the seat and on the seat backrest.
WARNING■ If the seat backrest is folded down, only the seat behind the driver´s seat
can be used to transport passengers.■
The front passenger airbag should be switched off when transporting ob-
jects on the seat which was folded forwards » page 21.
■
Do not adjust the seat back while driving - There is a risk of injury and an
accident!
■
When moving the seat backrest, keep limbs away from between the seat
cushion and seat backrest – risk of injury!
■
Never transport the following items on the seat backrest when folded
forwards. ■ Objects that could restrict the driver's view.
■ Objects which make it impossible for the driver to control the vehicle
(e.g. if they roll under the pedals, or protrude into the driver's zone). ■ Objects which could lead to injury to passengers (e.g. if accelerating
sharply, braking or changing direction).
78Using the system
Page 86 of 324
WARNINGThe storage compartmentA » Fig. 77 is to be used exclusively for storing
objects which do not stick out - danger of restricting the effectiveness of
the side airbags.
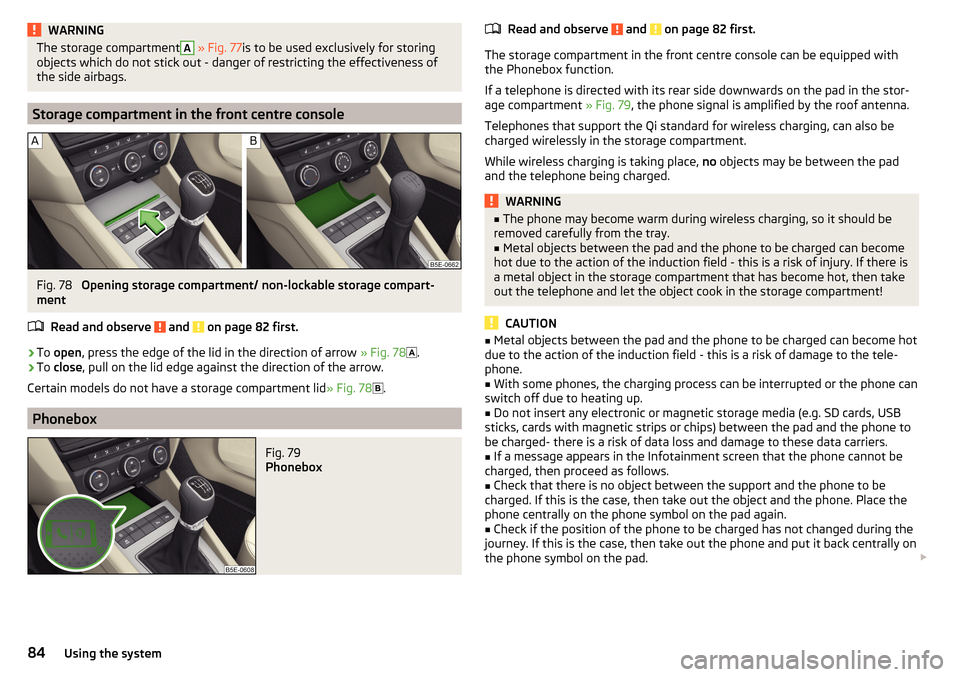
Storage compartment in the front centre console
Fig. 78
Opening storage compartment/ non-lockable storage compart-
ment
Read and observe
and on page 82 first.
›
To open , press the edge of the lid in the direction of arrow » Fig. 78
.
›
To close , pull on the lid edge against the direction of the arrow.
Certain models do not have a storage compartment lid » Fig. 78
.
Phonebox
Fig. 79
Phonebox
Read and observe and on page 82 first.
The storage compartment in the front centre console can be equipped with
the Phonebox function.
If a telephone is directed with its rear side downwards on the pad in the stor-
age compartment » Fig. 79, the phone signal is amplified by the roof antenna.
Telephones that support the Qi standard for wireless charging, can also be
charged wirelessly in the storage compartment.
While wireless charging is taking place, no objects may be between the pad
and the telephone being charged.
WARNING■ The phone may become warm during wireless charging, so it should be
removed carefully from the tray.■
Metal objects between the pad and the phone to be charged can become
hot due to the action of the induction field - this is a risk of injury. If there is
a metal object in the storage compartment that has become hot, then take
out the telephone and let the object cook in the storage compartment!
CAUTION
■ Metal objects between the pad and the phone to be charged can become hot
due to the action of the induction field - this is a risk of damage to the tele-
phone.■
With some phones, the charging process can be interrupted or the phone can
switch off due to heating up.
■
Do not insert any electronic or magnetic storage media (e.g. SD cards, USB
sticks, cards with magnetic strips or chips) between the pad and the phone to
be charged- there is a risk of data loss and damage to these data carriers.
■
If a message appears in the Infotainment screen that the phone cannot be
charged, then proceed as follows.
■
Check that there is no object between the support and the phone to be
charged. If this is the case, then take out the object and the phone. Place the
phone centrally on the phone symbol on the pad again.
■
Check if the position of the phone to be charged has not changed during the
journey. If this is the case, then take out the phone and put it back centrally on
the phone symbol on the pad.
84Using the system
Page 106 of 324
Stowing the roof racks
With vehicles have the variable loading floor, then the roof racks can be stow-
ed in the recesses of the luggage compartment side trim.›
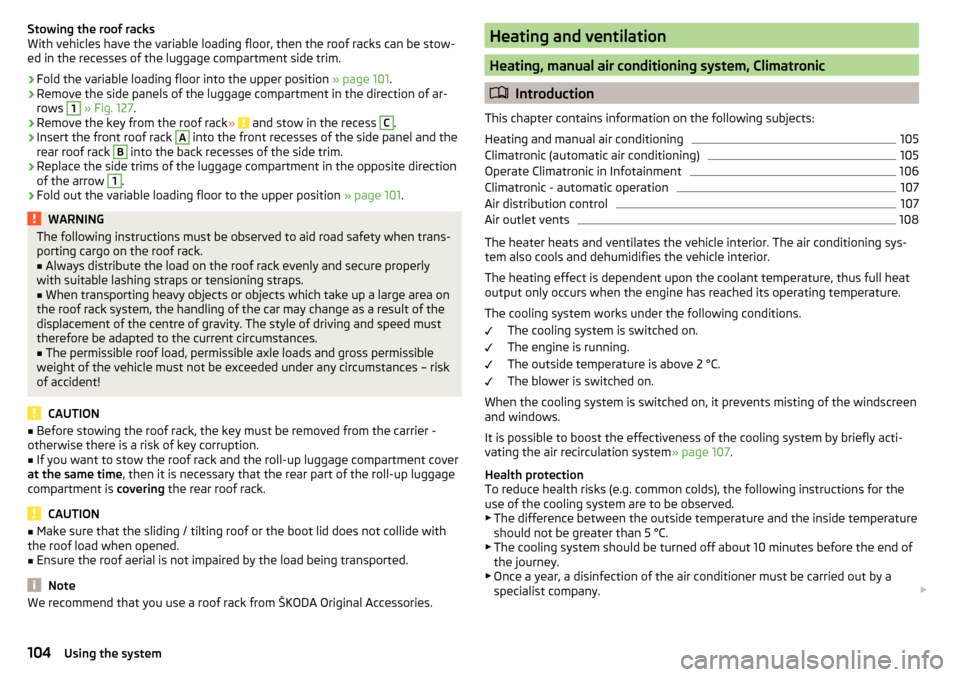
Fold the variable loading floor into the upper position » page 101.
›
Remove the side panels of the luggage compartment in the direction of ar-
rows
1
» Fig. 127 .
›
Remove the key from the roof rack » and stow in the recess
C
.
›
Insert the front roof rack
A
into the front recesses of the side panel and the
rear roof rack
B
into the back recesses of the side trim.
›
Replace the side trims of the luggage compartment in the opposite direction
of the arrow
1
.
›
Fold out the variable loading floor to the upper position » page 101.
WARNINGThe following instructions must be observed to aid road safety when trans-
porting cargo on the roof rack.■
Always distribute the load on the roof rack evenly and secure properly
with suitable lashing straps or tensioning straps.
■
When transporting heavy objects or objects which take up a large area on
the roof rack system, the handling of the car may change as a result of the
displacement of the centre of gravity. The style of driving and speed must
therefore be adapted to the current circumstances.
■
The permissible roof load, permissible axle loads and gross permissible
weight of the vehicle must not be exceeded under any circumstances – risk
of accident!
CAUTION
■ Before stowing the roof rack, the key must be removed from the carrier -
otherwise there is a risk of key corruption.■
If you want to stow the roof rack and the roll-up luggage compartment cover
at the same time , then it is necessary that the rear part of the roll-up luggage
compartment is covering the rear roof rack.
CAUTION
■
Make sure that the sliding / tilting roof or the boot lid does not collide with
the roof load when opened.■
Ensure the roof aerial is not impaired by the load being transported.
Note
We recommend that you use a roof rack from ŠKODA Original Accessories.Heating and ventilation
Heating, manual air conditioning system, Climatronic
Introduction
This chapter contains information on the following subjects:
Heating and manual air conditioning
105
Climatronic (automatic air conditioning)
105
Operate Climatronic in Infotainment
106
Climatronic - automatic operation
107
Air distribution control
107
Air outlet vents
108
The heater heats and ventilates the vehicle interior. The air conditioning sys-
tem also cools and dehumidifies the vehicle interior.
The heating effect is dependent upon the coolant temperature, thus full heat
output only occurs when the engine has reached its operating temperature.
The cooling system works under the following conditions. The cooling system is switched on.
The engine is running.
The outside temperature is above 2 °C.
The blower is switched on.
When the cooling system is switched on, it prevents misting of the windscreen
and windows.
It is possible to boost the effectiveness of the cooling system by briefly acti-
vating the air recirculation system » page 107.
Health protection
To reduce health risks (e.g. common colds), the following instructions for the
use of the cooling system are to be observed. ▶ The difference between the outside temperature and the inside temperature
should not be greater than 5 °C.
▶ The cooling system should be turned off about 10 minutes before the end of
the journey.
▶ Once a year, a disinfection of the air conditioner must be carried out by a
specialist company.
104Using the system
Page 108 of 324

Adjust fan speed (the setting is indicated by the number of illuminated
control lamps shown in the knob)
Adjust the temperature for the left side (or for both sides) 1)
▶ Reduce the temperature /
Increase the temperature
Adjust the temperature for the right side (or for both sides) 2)
▶ Reduce the temperature /
Increase the temperature
Depending on equipment fitted:
▶ Auxiliary heating and ventilation on / switch off » page 109
▶ Switch off Climatronic
Interior temperature sensor
Switch recirculation on/off » page 107
Intense air flow to the windscreen on / off (when switching on, the air
flow to the windows and
is also switched on)
Switch on/off the rear window heater » page 71
Switch on/off the windscreen heating » page 71
Setting Climatronic in Infotainment (also operate with some functions)
Synchronize the temperature inside the entire vehicle according to the
temperature setting on the driver's side
Switching automatic mode on » page 107
Switch the cooling system on/off
When the function is switched on, a warning light lights up within or below the
button.
Setting temperature
The temperature can be set on the Climatronic control unit or in Infotain-
ment » page 106 . In the range between 16 ° C to 29.5 ° C, an automatic tem-
perature control takes place.
At a temperature setting below 16 ° C, lights up in the temperature display,
the Climatronic functions with maximum cooling performance .
At a temperature setting over 29.5 ° C, lights up in the temperature display,
the Climatronic functions with maximum heating output.
CAUTION
Do not cover the interior temperature sensor H » Fig. 129 - the function of the
Climatronic could be affected.DEFGHNoteIn order to ensure adequate thermal comfort, there may be an increase in en-
gine idle speed during operation of the Climatronic in some circumstances.
Operate Climatronic in Infotainment
Fig. 130
Infotainment Columbus, Amund-
sen, Bolero:Climatronic main
menu
Fig. 131
Infotainment Swing: Climatronic
main menu
Read and observe on page 105 first.
›
To display the main menupress the button
on the Climatronic control
unit.
Function surfaces and screen display » Fig. 130 and. » Fig. 131ADisplays the current operation mode (or set the operation mode) of
the ClimatronicBSet the desired temperature, front - left sideCSet the desired temperature, front - right sideDSetting the power in operation 1)
Applies to left-hand drive vehicles.
2)
Applies to right-hand drive vehicles.
106Using the system
Page 109 of 324

Colour representation of the air flow from the air vents at the front
(Blue colour - temperature reduction / red colour - temperature in-
crease)Switching on/off the ClimatronicSet the auxiliary heater and ventilationSwitch on/off the windscreen heating a)Other Climatronic settingsa)
When switched on, the symbol in the function surface is green.
Other Climatronic settings
Press the
button on the Climatronic control panel → tap the function sur-
face on the Infotainment screen.
■
Air con. profile
- Setting the operating performance during operation (ap-
plies to the infotainment Swing)
■
Automatic air recirculation
- Automatic re-circulated air mode on/off
■
Automatic auxiliary heater
- Quick interior heating on/off
■
Automatic windscreen heating
- Activates/deactivates the automatic windscreen
heating
Climatronic - automatic operation
Read and observe
on page 105 first.
The automatic mode is used in order to maintain a constant temperature andto demist the windows in the interior of the car.
›
To turn on , press the
» Fig. 129 on page 105 .
›
To turn off , press any button for the air distribution or change the blower
speed. The temperature regulation is continued.
Holding the button will turn on
automatically.
Operating modes
Automatic mode works in three modes - moderate, medium, and intensive.
Setting the different modes is carried out via the function surface
D
» Fig. 130
on page 106 and. » Fig. 131 on page 106 .
After the automatic mode is switched on, Climatronic works in the last selec-
ted mode. The currently selected mode is displayed on the Infotainment
screen.
Air distribution control
Read and observe
on page 105 first.
The recirculation mode prevents contaminated outside air getting into the In-terior of the vehicle. In recirculated air mode air is sucked out of the interior of
the vehicle and then fed back into the interior.
›
To switch on press the
button. The warning light below the button lights
up.
›
To switch off , press the
button again. The warning light below the button
goes out.
Heating and manual air conditioning system
If the air distribution control is set to position when the recirculation modes
is switched on, the recirculated-air mode is switched off. By pressing the
button, the air recirculation also in this position can be switched on again.
When the cooling system (button ) is switched on and the temperature reg-
ulator is “turned” to the left, the recirculated-air mode is switched on.
Climatronic
The Climatronic can have a sensor that measures the air recirculation mode
and automatically turns on if there is an increased concentration of pollutants
in the incoming air.
When the pollutant concentration decreases to the normal level, the recircula-
ted air mode is automatically switched off.
Automatically switch on / off the air recirculation function can be set in the In-
fotainment screen. by pressing the button on the Climatronic and by sub-
sequently pressing the function surfaces
→
Automatic air recirculation
. Auto-
matic power on / off function at a temperature above 2 ° C.
A shut-off of the air recirculation function is carried out by pressing the
button, possibly depending on the moisture conditions in the vehicle interior.
WARNINGThe recirculation system cannot be switched on for a longer period of time,
because no fresh air is fed through from the outside. “Stale air” may result
in fatigue in the driver and occupants, reduce attention levels and also
cause the windows to mist up. As soon as windows mist up, turn on the re-
circulation system immediately - The is a risk of an accident! 107Heating and ventilation
Page 110 of 324
CAUTIONWe recommend not smoking in the vehicle when the recirculating air operation
is switched on. The smoke sucked from the interior is deposited on the evapo-
rator of the air conditioner. This produces a permanent odour when the air
conditioning system is operating which can only be eliminated through consid-
erable effort and expense (replacement of compressor).
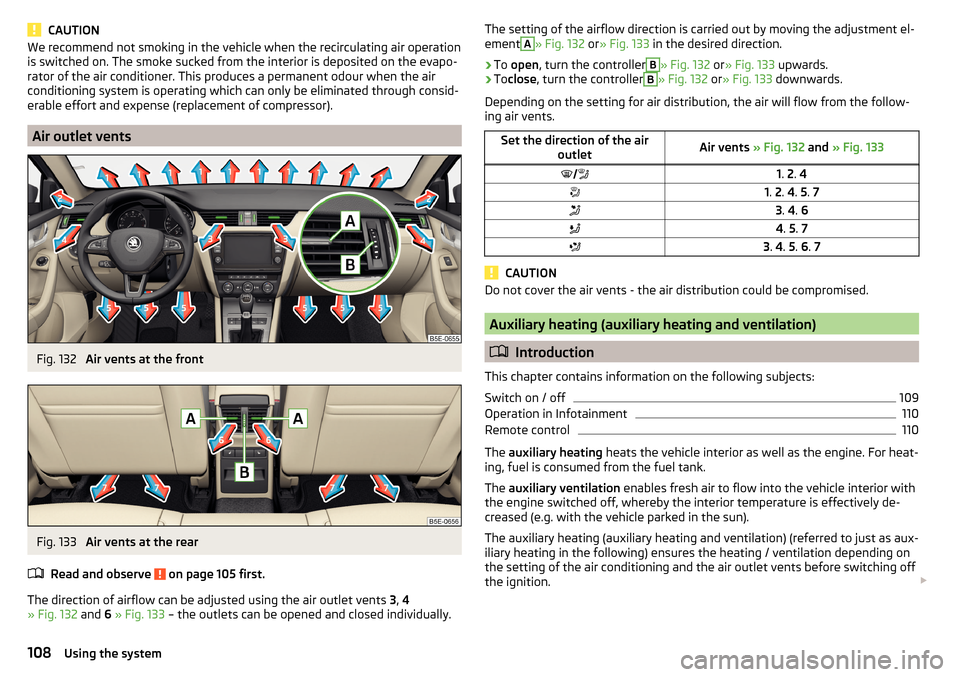
Air outlet vents
Fig. 132
Air vents at the front
Fig. 133
Air vents at the rear
Read and observe
on page 105 first.
The direction of airflow can be adjusted using the air outlet vents 3, 4
» Fig. 132 and 6 » Fig. 133 – the outlets can be opened and closed individually.
The setting of the airflow direction is carried out by moving the adjustment el-
ementA» Fig. 132 or» Fig. 133 in the desired direction.›
To open , turn the controller
B
» Fig. 132 or» Fig. 133 upwards.
›
Toclose , turn the controller
B
» Fig. 132 or» Fig. 133 downwards.
Depending on the setting for air distribution, the air will flow from the follow-
ing air vents.
Set the direction of the air outletAir vents » Fig. 132 and » Fig. 1331. 2 . 41. 2 . 4 . 5 . 73 . 4 . 64 . 5 . 73 . 4 . 5 . 6 . 7
CAUTION
Do not cover the air vents - the air distribution could be compromised.
Auxiliary heating (auxiliary heating and ventilation)
Introduction
This chapter contains information on the following subjects:
Switch on / off
109
Operation in Infotainment
110
Remote control
110
The auxiliary heating heats the vehicle interior as well as the engine. For heat-
ing, fuel is consumed from the fuel tank.
The auxiliary ventilation enables fresh air to flow into the vehicle interior with
the engine switched off, whereby the interior temperature is effectively de-
creased (e.g. with the vehicle parked in the sun).
The auxiliary heating (auxiliary heating and ventilation) (referred to just as aux- iliary heating in the following) ensures the heating / ventilation depending on
the setting of the air conditioning and the air outlet vents before switching off
the ignition.
108Using the system
Page 111 of 324
WARNING■The auxiliary heating must never be operated in closed rooms (e.g. garag-
es) – risk of poisoning!■
The auxiliary heating must not be allowed to run during refuelling – risk
of fire.
■
The exhaust pipe of the auxiliary heating is located on the underside of
the vehicle. If you want to use the auxiliary heating, do not park the vehicle
in places where the exhaust fumes can come into contact with flammable
materials such as dry grass, undergrowth, leaves, spilled fuel etc. - There is
a risk of fire.
CAUTION
The air inlet in front of the windscreen must be free (e.g. of ice, snow or
leaves) to ensure that the auxiliary heating operates properly.
Note
■ The auxiliary heating only switches the blower on, if it has achieved a coolant
temperature of approx. 50 °C.■
In the engine compartment, water vapour may form during the operation of
the heater.
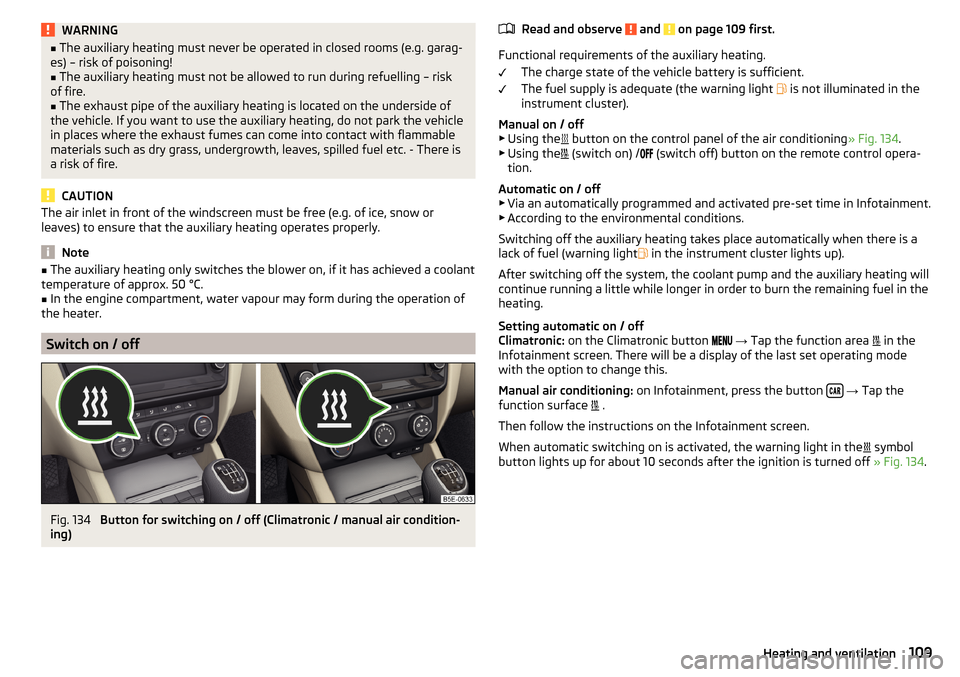
Switch on / off
Fig. 134
Button for switching on / off (Climatronic / manual air condition-
ing)
Read and observe and on page 109 first.
Functional requirements of the auxiliary heating.
The charge state of the vehicle battery is sufficient.
The fuel supply is adequate (the warning light
is not illuminated in the
instrument cluster).
Manual on / off ▶ Using the
button on the control panel of the air conditioning » Fig. 134.
▶ Using the
(switch on) /
(switch off) button on the remote control opera-
tion.
Automatic on / off ▶ Via an automatically programmed and activated pre-set time in Infotainment.
▶ According to the environmental conditions.
Switching off the auxiliary heating takes place automatically when there is a
lack of fuel (warning light in the instrument cluster lights up).
After switching off the system, the coolant pump and the auxiliary heating will
continue running a little while longer in order to burn the remaining fuel in the
heating.
Setting automatic on / off
Climatronic: on the Climatronic button
→ Tap the function area
in the
Infotainment screen. There will be a display of the last set operating mode
with the option to change this.
Manual air conditioning: on Infotainment, press the button
→ Tap the
function surface .
Then follow the instructions on the Infotainment screen.
When automatic switching on is activated, the warning light in the symbol
button lights up for about 10 seconds after the ignition is turned off » Fig. 134.
109Heating and ventilation
Page 112 of 324
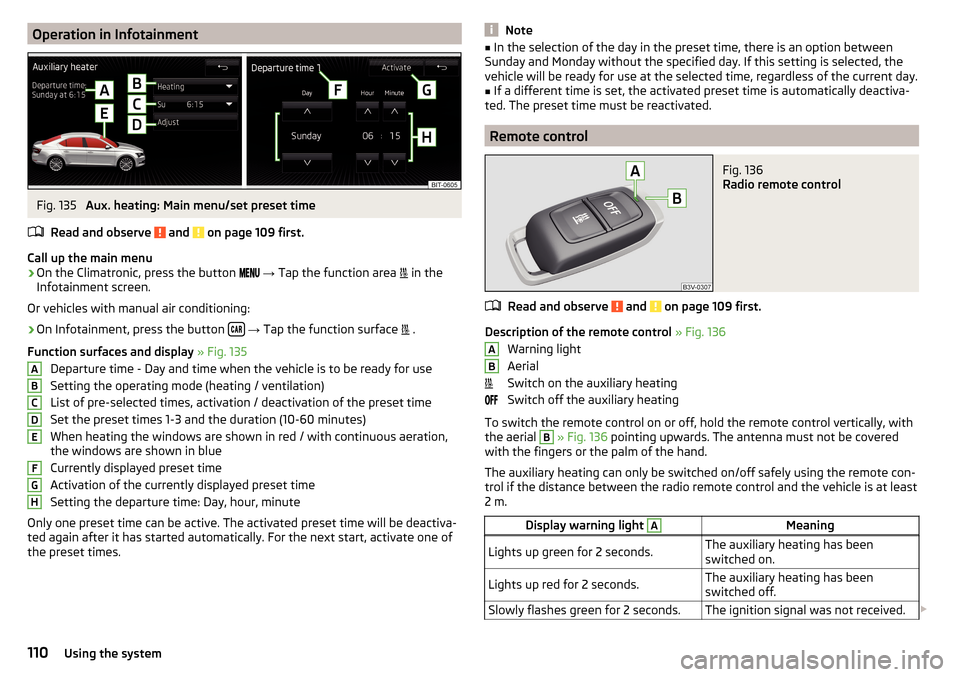
Operation in InfotainmentFig. 135
Aux. heating: Main menu/set preset time
Read and observe
and on page 109 first.
Call up the main menu
›
On the Climatronic, press the button
→ Tap the function area
in the
Infotainment screen.
Or vehicles with manual air conditioning:
›
On Infotainment, press the button
→ Tap the function surface
.
Function surfaces and display » Fig. 135
Departure time - Day and time when the vehicle is to be ready for use
Setting the operating mode (heating / ventilation)
List of pre-selected times, activation / deactivation of the preset time Set the preset times 1-3 and the duration (10-60 minutes)
When heating the windows are shown in red / with continuous aeration,
the windows are shown in blue
Currently displayed preset time
Activation of the currently displayed preset time
Setting the departure time: Day, hour, minute
Only one preset time can be active. The activated preset time will be deactiva-
ted again after it has started automatically. For the next start, activate one of
the preset times.
ABCDEFGHNote■ In the selection of the day in the preset time, there is an option between
Sunday and Monday without the specified day. If this setting is selected, the
vehicle will be ready for use at the selected time, regardless of the current day.■
If a different time is set, the activated preset time is automatically deactiva-
ted. The preset time must be reactivated.
Remote control
Fig. 136
Radio remote control
Read and observe and on page 109 first.
Description of the remote control » Fig. 136
Warning light
Aerial
Switch on the auxiliary heating
Switch off the auxiliary heating
To switch the remote control on or off, hold the remote control vertically, with the aerial
B
» Fig. 136 pointing upwards. The antenna must not be covered
with the fingers or the palm of the hand.
The auxiliary heating can only be switched on/off safely using the remote con-
trol if the distance between the radio remote control and the vehicle is at least
2 m.
Display warning light AMeaningLights up green for 2 seconds.The auxiliary heating has been
switched on.Lights up red for 2 seconds.The auxiliary heating has been
switched off.Slowly flashes green for 2 seconds.The ignition signal was not received. AB110Using the system
Page 114 of 324
Infotainment
Introductory information
Important information
Introduction to the subject
WARNING■Only use Infotainment in such a way that you have control of the vehicle
in every traffic situation (e.g. Do not write text messages while driving, do
not link or connect the telephone, do not work with the contact list, do not
enter any destinations, do not connect WLAN or SmartLink etc.)- Otherwise
there is a risk of an accident!■
Always route the connection cable of the external device such that is
does not restrict you when driving.
WARNING■ Adjust the volume to ensure that acoustic signals from outside the vehi-
cle, e.g. sirens from emergency vehicles, can be heard at all times.■
High volumes can cause hearing damage!
CAUTION
In some countries, some Infotainment functions can no longer be selected
when the vehicle is running faster than a certain speed. This is not a malfunc-
tion, but complies with the national legal regulations.
Mobile phones and applications
Fig. 137
QR code with reference to web
pages for checking the compati-
bility of devices
The availability of some of the functions described in this Owner's Manual
depends on the type of device to be connected and the applications installed
in it.
Mobile phones
On the ŠKODA pages, check to see if Infotainment is compatible with the se-
lected mobile phones. This verification is carried out by reading the QR code
» Fig. 137 or after typing the following address into the web browser.
http://go.skoda.eu/compatibility
Due to the multitude of mobile phones as well as the ongoing development of
these devices, ŠKODA AUTO cannot always ensure compatibility with Infotain-
ment unconditionally. It is always recommended to physically check the func-
tion on the associated vehicle, including the ŠKODA Partners, beforehand.
Only those versions of the selected phones will be tested and supported which
originate from the official distribution network. The same also applies to their
firmware and software.
The functions of the mobile phone to be tested may differ from the same type
of mobile phone depending on the specification for the respective country or
the specific service.
Mobile phones with the operating system and in the version available at the
time of these tests will be tested. In this regard, it could be the case that the
functions of a mobile phone may differ with a different operating system ver-
sion compared to the one used with the tested phone.
ŠKODA AUTO can accept no responsibility for the continuous changes made by
the mobile phone manufacturers and application vendors.
ŠKODA AUTO does not accept any liability for any damage to Infotainment or
vehicle due to the use of incorrect or illegal applications or the improper or un-
authorised use of mobile phones.
Applications
Applications can be installed in external devices (e.g. Mobile, tablet) making it possible to display additional information on the Infotainment screen or to op-
erate Infotainment.
Due to the variety of applications as well as their ongoing development, the
available applications may not work in all external devices. ŠKODA AUTO can
accept no liability for their proper function.
Applications, their use and the required data connection may be chargeable. 112Infotainment
Page 115 of 324
The range of available applications and their functionality is dependent on the
Infotainment model, vehicle and region.
The function of mobile applications can be influenced by the quality of the In- ternet connection.
Some applications are dependent on the availability of services that are provi-
ded by third parties.
Infotainment overview
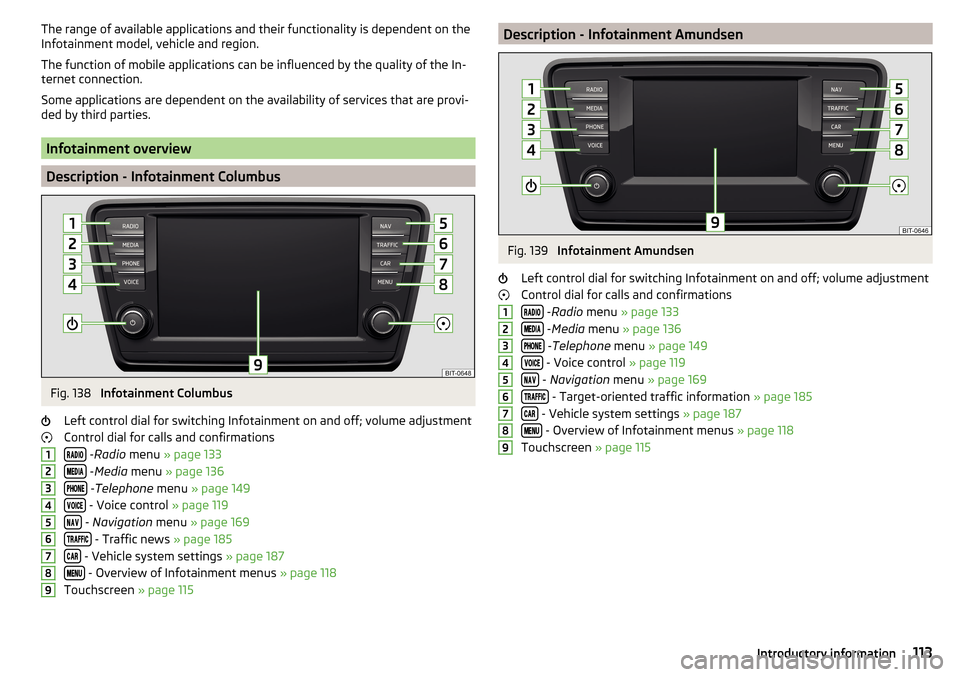
Description - Infotainment Columbus
Fig. 138
Infotainment Columbus
Left control dial for switching Infotainment on and off; volume adjustment
Control dial for calls and confirmations
- Radio menu » page 133
- Media menu » page 136
- Telephone menu » page 149
- Voice control » page 119
- Navigation menu » page 169
- Traffic news » page 185
- Vehicle system settings » page 187
- Overview of Infotainment menus » page 118
Touchscreen » page 115
123456789Description - Infotainment AmundsenFig. 139
Infotainment Amundsen
Left control dial for switching Infotainment on and off; volume adjustment
Control dial for calls and confirmations
- Radio menu » page 133
- Media menu » page 136
- Telephone menu » page 149
- Voice control » page 119
- Navigation menu » page 169
- Target-oriented traffic information » page 185
- Vehicle system settings » page 187
- Overview of Infotainment menus » page 118
Touchscreen » page 115
123456789113Introductory information