warning light SKODA OCTAVIA TOUR 2009 1.G / (1U) Service Manual
[x] Cancel search | Manufacturer: SKODA, Model Year: 2009, Model line: OCTAVIA TOUR, Model: SKODA OCTAVIA TOUR 2009 1.G / (1U)Pages: 224, PDF Size: 13.53 MB
Page 69 of 224
Seats and Storage
68
luggage compartmentLoading the luggage compartmentPlease observe the following in the inte
rest of having good handling char-
acteristics of your vehicle: – Distribute the items of luggage as evenly as possible.– Place heavy objects as far forward as possible. – Attach the items of luggage to the lashing eyes or the fixing net*
⇒
page 68.
In the event of an accident, there is such a
high kinetic energy wh
ich is produced by
small and light objects that they can caus
e severe injuries. The magnitude of the
kinetic energy depends on the speed at wh
ich the vehicle is travelling and on the
weight of the object. The speed at which the
vehicle is travelling is in this case the
more significant factor. Example: In the event of a frontal collision at a speed of 50 km/h, an unsecured object with a weight of 4.5 kg produces
an energy, which corresponds to 20 times
its own weight. This means that it results in a weight of approx. 90 kg. You can imagine the injuries that can occur, if th
is “bullet” is flying
through the interior
compartment and hits an occupant.
WARNING
•
Store the objects in the luggage comp
artment and attach them to the
lashing eyes.•
Loose objects in the passenger compartment can be thrown forward
during a sudden manoeuvre or in case of an accident and can injure the occupants or other oncoming traffic. This risk is still increased, if the objects which are flying around are hit by a depl
oyed airbag. In this case, the objects
which are thrown back can injure the occupants - hazard.•
Please note that the handling properti
es of your vehicle may be affected
when transporting heavy objects as a result of the displacement of the
centre of gravity. The speed and style
of driving must be adjusted accord-
ingly.•
The items carried in the luggage compar
tment should be stored in such
a way that no objects are able to slip forward if there are any sudden driving or braking manoeuvres undertaken - risk of injury!•
Never drive with the boot lid fully opened or slightly ajar otherwise
exhaust gases may get into the interior
of the vehicle - risk of poisoning!
•
On no account exceed the permissi
ble axle loads and the permissible
gross weight of the vehicle - risk of accident!•
Never transport occupants
in the luggage compartment!
Caution
Please ensure that the heating elements of the rear window heater are not damaged as a result of objects sliding in this area.
Note
Tyre pressure must be adjusted to the load
⇒page 173, fig. 159
.
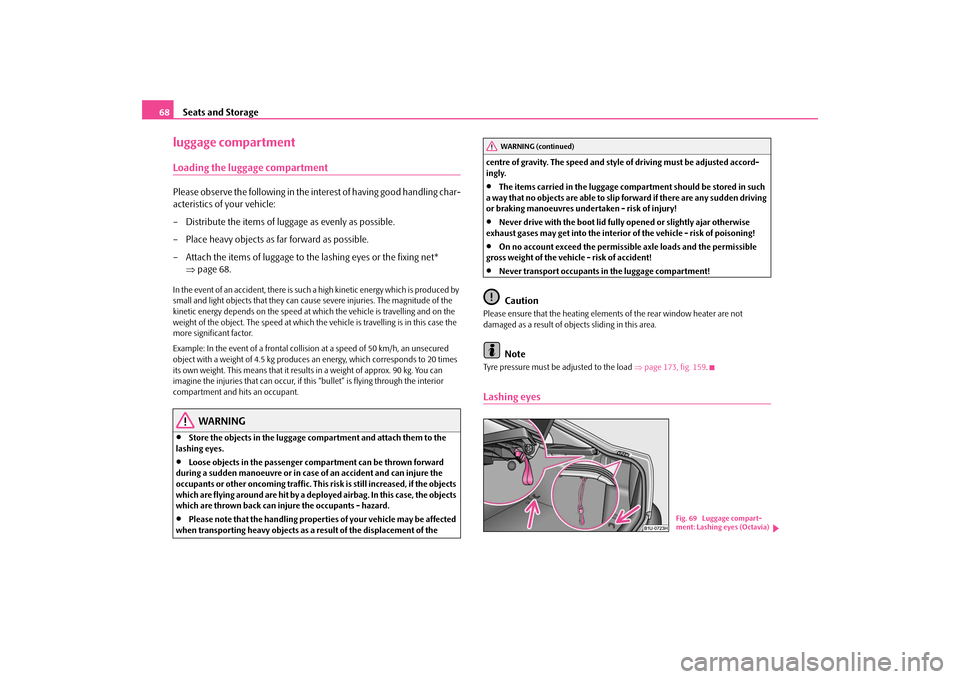
Lashing eyes
WARNING (continued)
Fig. 69 Luggage compart- ment: Lashing eyes (Octavia)
s2g8.b.book Page 68 Tuesday, April 7, 2009 8:53 AM
Page 72 of 224
Seats and Storage
71
Using the system
Safety
Driving Tips
General Maintenance
Breakdown assistance
Technical Data
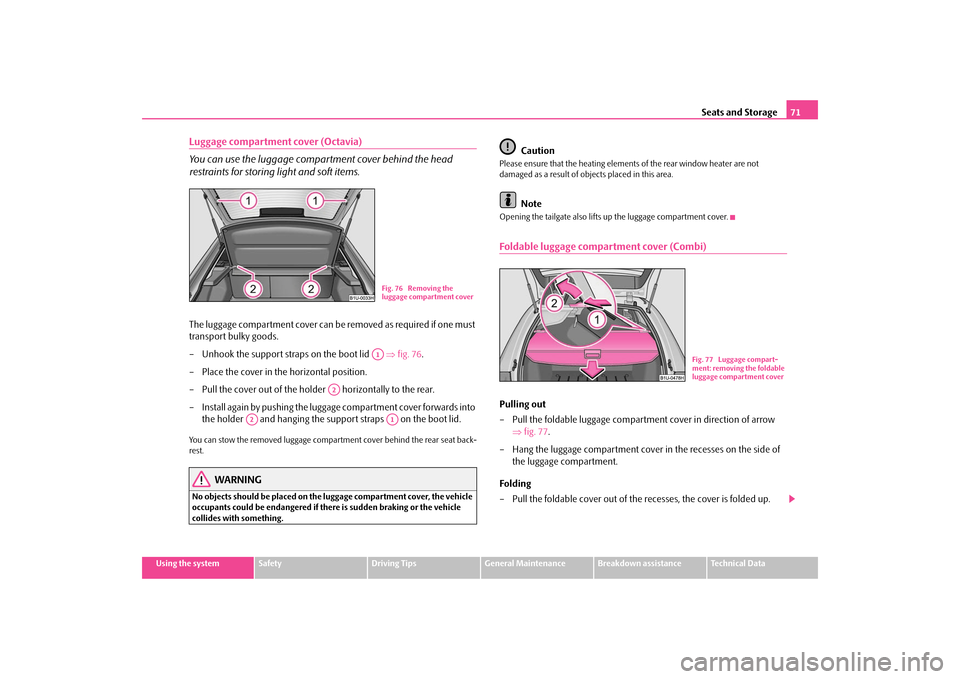
Luggage compartment cover (Octavia) You can use the luggage compartment cover behind the head restraints for storing
light and soft items.
The luggage compartment cover can be
removed as required if one must
transport bulky goods. – Unhook the support stra
ps on the boot lid
⇒
fig. 76
.
– Place the cover in the horizontal position. – Pull the cover out of the holder horizontally to the rear.– Install again by pushing the luggage
compartment cover forwards into
the holder and hanging the suppo
rt straps on the boot lid.
You can stow the removed luggage compartment cover behind the rear seat back- rest.
WARNING
No objects should be placed on the
luggage compartment cover, the vehicle
occupants could be endangered if th
ere is sudden braking or the vehicle
collides with something.
Caution
Please ensure that the heating elements of the rear window heater are not damaged as a result of obje
cts placed in this area.
Note
Opening the tailgate also lifts up the luggage compartment cover.Foldable luggage compartment cover (Combi)Pulling out – Pull the foldable luggage compartment cover in direction of arrow
⇒
fig. 77
.
– Hang the luggage compartment cover in the recesses on the side of
the luggage compartment.
Folding – Pull the foldable cover out of the recesses, the cover is folded up.
Fig. 76 Removing the luggage compartment coverA1
A2
A2
A1
Fig. 77 Luggage compart-ment: removing the foldable luggage compartment cover
s2g8.b.book Page 71 Tuesday, April 7, 2009 8:53 AM
Page 75 of 224
Seats and Storage
74
– Roll the net partition at an angle of
approx. 45° towards the boot lid in
the housing ,
so that it does not roll up automatically
.
WARNING
•
First check for yourself that the cros
s road is inserted into the mounts
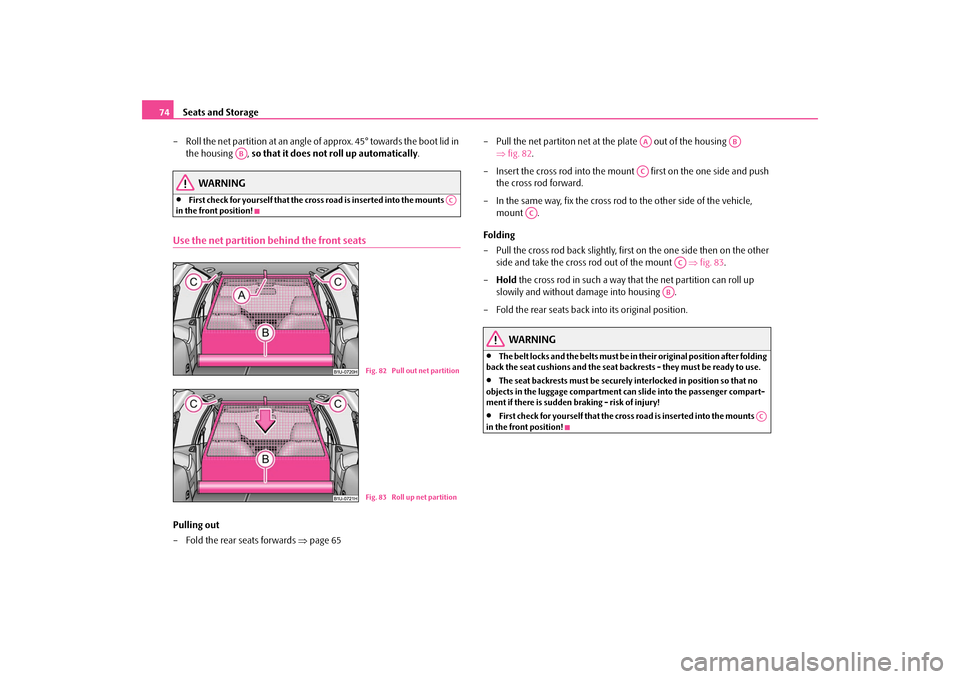
in the front position!Use the net partition behind the front seatsPulling out – Fold the rear seats forwards
⇒
page 65
– Pull the net partiton net at the plate out of the housing
⇒
fig. 82
.
– Insert the cross rod into the mount first on the one side and push
the cross rod forward.
– In the same way, fix the cross rod to the other side of the vehicle,
mount .
Folding – Pull the cross rod back slightly, first on the one side then on the other
side and take the cross rod out of the mount
⇒
fig. 83
.
–
Hold
the cross rod in such a way that the net partition can roll up
slowily and without damage into housing .
– Fold the rear seats back into its original position.
WARNING
•
The belt locks and the belts must be in their original position after folding
back the seat cushions and the seat backrests - they must be ready to use.•
The seat backrests must be securely interlocked in position so that no
objects in the luggage compartment ca
n slide into the passenger compart-
ment if there is sudden braking - risk of injury!•
First check for yourself that the cross
road is inserted into the mounts
in the front position!
AB
AC
Fig. 82 Pull out net partitionFig. 83 Roll up net partition
AA
AB
AC
AC
AC
AB
AC
s2g8.b.book Page 74 Tuesday, April 7, 2009 8:53 AM
Page 79 of 224
Seats and Storage
78
Insert ashtray insert – Insert the ashtray insert and press it slightly in direction of arrow .
WARNING
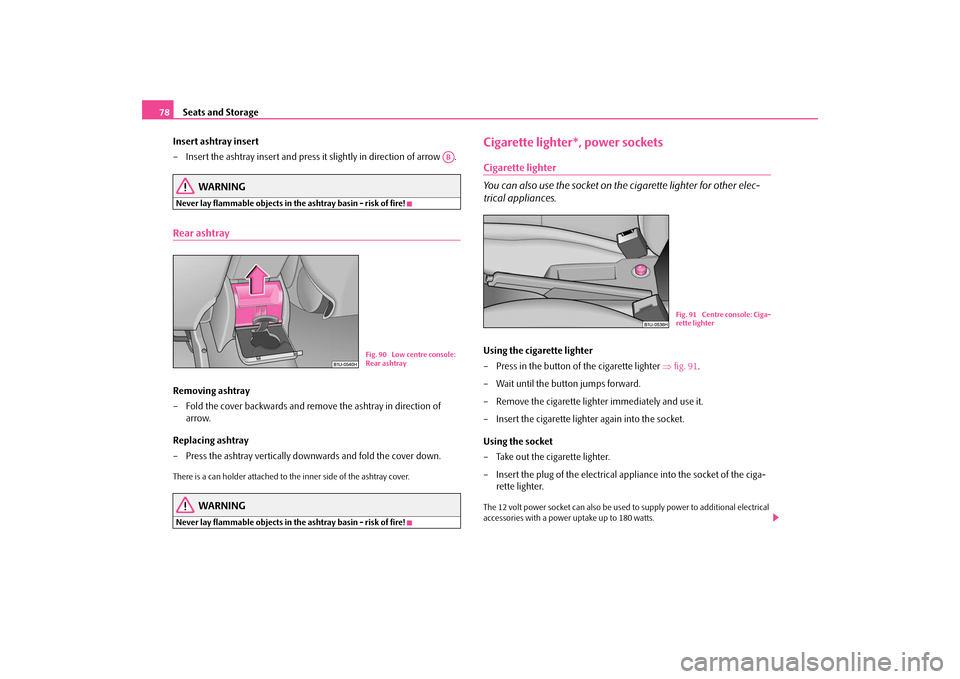
Never lay flammable objects in the ashtray basin - risk of fire!Rear ashtrayRemoving ashtray– Fold the cover backwards and remove the ashtray in direction of
arrow.
Replacing ashtray – Press the ashtray vertically downwards and fold the cover down.There is a can holder attached to
the inner side of
the ashtray cover.
WARNING
Never lay flammable objects in the ashtray basin - risk of fire!
Cigarette lighter*, power socketsCigarette lighter You can also use the socket on th
e cigarette lighter for other elec-
trical appliances.Using the cigarette lighter – Press in the button of the cigarette lighter
⇒
fig. 91
.
– Wait until the button jumps forward. – Remove the cigarette lighter immediately and use it.– Insert the cigarette lighter again into the socket. Using the socket – Take out the cigarette lighter. – Insert the plug of the electrical a
ppliance into the socket of the ciga-
rette lighter.
The 12 volt power socket can also be used
to supply power to a
dditional electrical
accessories with a power uptake up to 180 watts.
AB
Fig. 90 Low centre console: Rear ashtray
Fig. 91 Centre console: Ciga-rette lighter
s2g8.b.book Page 78 Tuesday, April 7, 2009 8:53 AM
Page 80 of 224
Seats and Storage
79
Using the system
Safety
Driving Tips
General Maintenance
Breakdown assistance
Technical Data
WARNING
•
Take care when using the cigarette li
ghter! Not paying proper attention
or incorrect use the cigarette lighter in
an uncontrolled manner may result in
burns.•
The cigarette lighter and the power so
cket also operates when the igni-
tion is switched off or the ignition key withdrawn. You should therefore never leave children unattended in the vehicle.
Caution
Always use matching plugs to av
oid damaging the power socket.
Note
•
Connecting electrical components when
the engine is not running will
drain the battery of the vehicl
e - risk of battery draining!
•
Further information
⇒page 179, “Accessories, chan
ges and replacement of
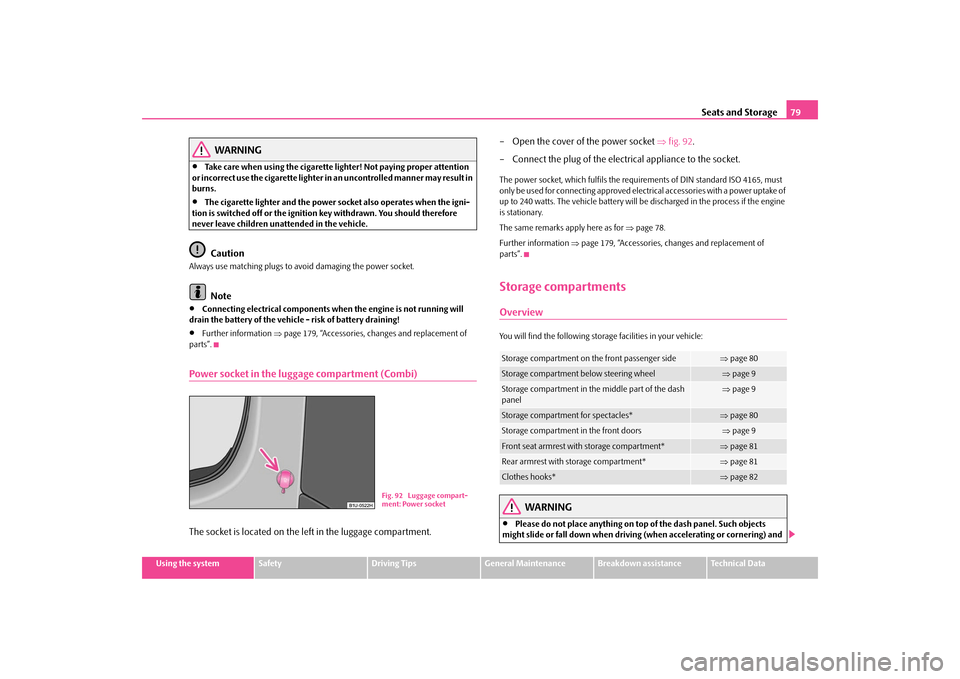
parts”.Power socket in the luggage compartment (Combi)The socket is located on the left in the luggage compartment.
– Open the cover of the power socket
⇒
fig. 92
.
– Connect the plug of the electr
ical appliance to the socket.
The power socket, which fulfils the requir
ements of DIN standard ISO 4165, must
only be used for connecting approved electr
ical accessories with a power uptake of
up to 240 watts. The vehicle ba
ttery will be discharged in the process if the engine
is stationary. The same remarks apply here as for
⇒page 78.
Further information
⇒page 179, “Accessories, changes and replacement of
parts”.Storage compartmentsOverviewYou will find the following storag
e facilities in
your vehicle:
WARNING
•
Please do not place anything on top of the dash panel. Such objects
might slide or fall down when driving
(when accelerating or cornering) and
Fig. 92 Luggage compart- ment: Power socket
Storage compartment on the front passenger side
⇒ page 80
Storage compartment below steering wheel
⇒page 9
Storage compartment in the middle part of the dash panel
⇒ page 9
Storage compartment for spectacles*
⇒page 80
Storage compartment in the front doors
⇒page 9
Front seat armrest with storage compartment*
⇒page 81
Rear armrest with storage compartment*
⇒page 81
Clothes hooks*
⇒page 82
s2g8.b.book Page 79 Tuesday, April 7, 2009 8:53 AM
Page 83 of 224
Seats and Storage
82
– The armrest includes a storage compartment. Press the button in
direction of arrow and open the storage compartment in direction of arrow .
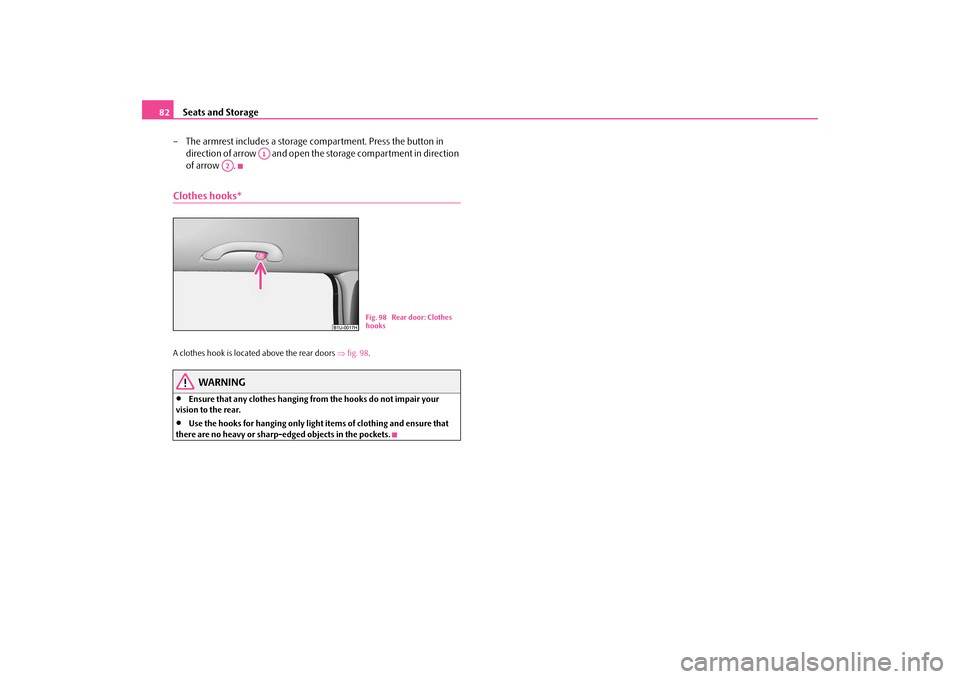
Clothes hooks*A clothes hook is located above the rear doors
⇒fig. 98
.
WARNING
•
Ensure that any clothes hanging from the hooks do not impair your
vision to the rear.•
Use the hooks for hanging only light items of clothing and ensure that
there are no heavy or sharp-e
dged objects in the pockets.
A1
A2
Fig. 98 Rear door: Clothes hooks
s2g8.b.book Page 82 Tuesday, April 7, 2009 8:53 AM
Page 86 of 224
Heating and air conditioning system
85
Using the system
Safety
Driving Tips
General Maintenance
Breakdown assistance
Technical Data
Recirculated air mode In recirculated air mode air is sucked
out of the interior of the vehicle
and then fed back into the interior.Recirculated air mode prevents polluted air outside the vehicle from getting into the vehicle, for example when driving through a tunnel or when standing in a traffic jam. Switching recirculated air mode on – Press the button - the warning light lights up in the button
⇒
page 83, fig. 100
.
Switching recirculated air mode off – Press again the button - the warn
ing light in the button goes out.
The button cannot be pressed if the control dial is in the position
or close
to this position.
WARNING
You should not leave recirculated air mode on over a longer period of time, as “stale” air may result in fatigue in the driver and occupants, divert your attention and also cause the windows to mist up. The risk of having an acci- dent increases. Switch recirculated air mode off as soon as the windows begin misting up.Air conditioning system*Description The air conditioning system is
a combined cooling and heating
system. It makes it possible to op
timally control the air temperature
at any season of the year.Description of the air conditioning system It is important for your safety and for your
driving comfort that the air conditioning
system is operating properly.
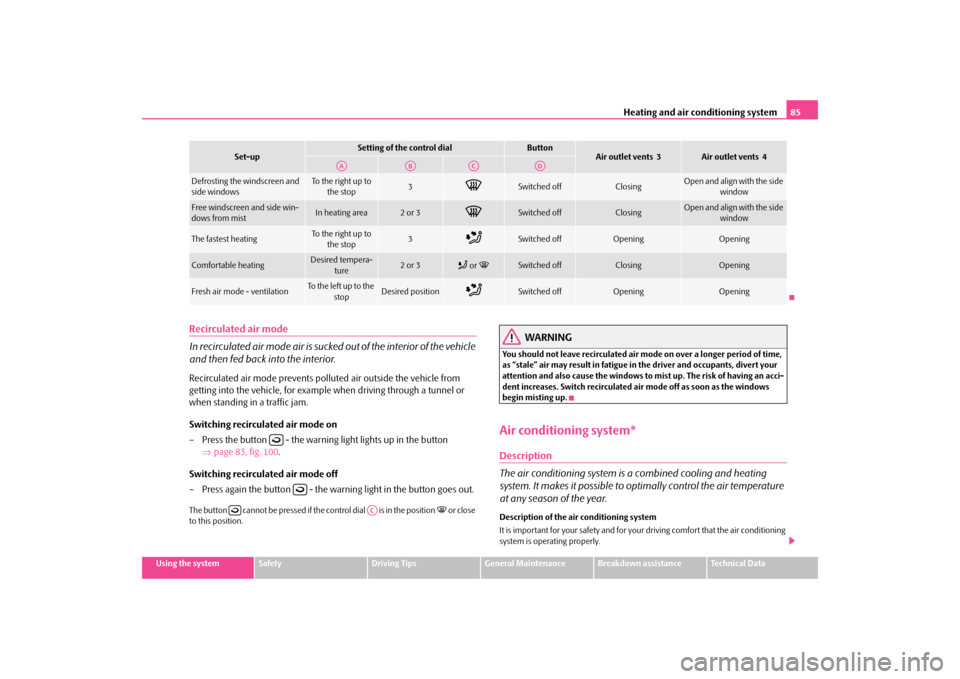
Set-up
Setting of the control dial
Button
Air outlet vents 3
Air outlet vents 4
Defrosting the windscreen and side windows
To the right up to
the stop
3
Switched off
Closing
Open and align with the side
window
Free windscreen and side win- dows from mist
In heating area
2 or 3
Switched off
Closing
Open and align with the side
window
The fastest heating
To the right up to
the stop
3
Switched off
Opening
Opening
Comfortable heating
Desired tempera-
ture
2 or 3
or
Switched off
Closing
Opening
Fresh air mode - ventilation
To the left up to the
stop
Desired position
Switched off
Opening
Opening
AA
AB
AC
AD
AC
s2g8.b.book Page 85 Tuesday, April 7, 2009 8:53 AM
Page 88 of 224
Heating and air conditioning system
87
Using the system
Safety
Driving Tips
General Maintenance
Breakdown assistance
Technical Data
Controlling blower – Turn the blower switch into one of the positions, 1 to 4, in order to
switch the blower on.
– Turn the blower switch into position 0 in order to switch the blower
off.
– IF you wish to close the inlet for fresh air, use the switch - Recir-
culated air mode
⇒
page 88.
Control for air distribution – You can adjust the direction of the
air flow using the air distribution
control
⇒
page 83.
switching cooling on and off – Press the button
⇒
page 86, fig. 101
. The warning light lights
up in the button.
– When you again press the switch , the cooling system is switched
off. The warning light in the button goes out. Note
•
The whole heat output will be needed
to unfrost the windscreen and side
windows. No warm air will be fed to the footwell. This can lead to restriction of the heating comfort.•
The used air streams out through the air removal openings in the luggage
compartment.•
If the cooling system has not been switched on for a lengthy period, odours may
be produced at the evaporator because of
deposits. Switch the cooling system on
at least once a month for approximately 5 mi
nutes at the highest blower stage - also
during the cold season of the year - in
order to remove such odours. Also open a
window for a short time.•
Please refer to the information regarding recirculated air mode
⇒page 88.
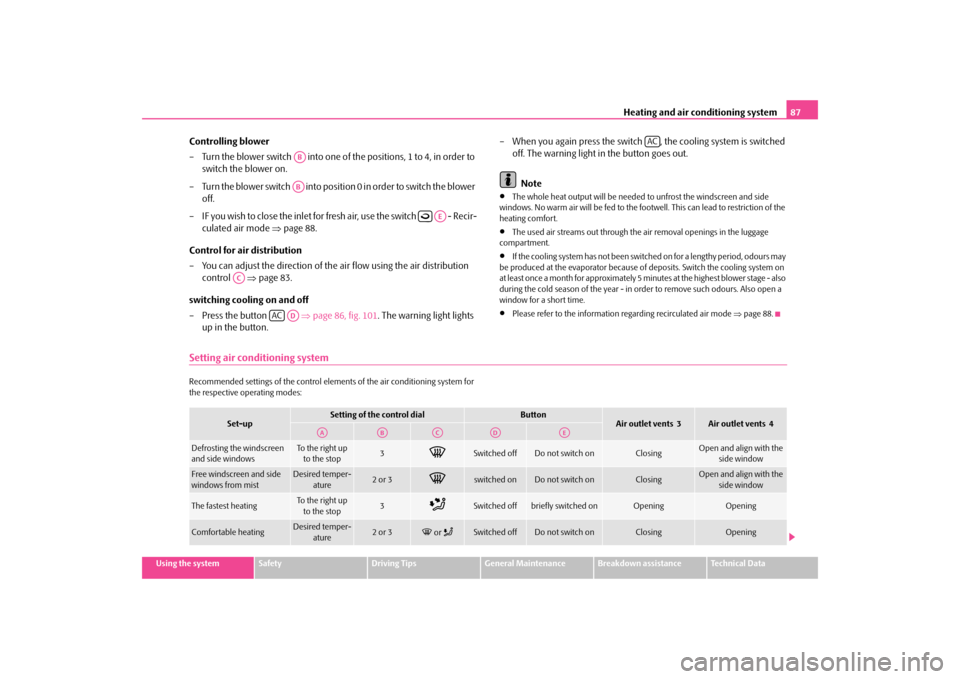
Setting air conditioning systemRecommended settings of the control elements of the air conditioning system for the respective operating modes:
ABAB
AE
AC
AC
AD
AC
Set-up
Setting of the control dial
Button
Air outlet vents 3
Air outlet vents 4
Defrosting the windscreen and side windows
To the right up to the stop
3
Switched off
Do not switch on
Closing
Open and align with the
side window
Free windscreen and side windows from mist
Desired temper-
ature
2 or 3
switched on
Do not switch on
Closing
Open and align with the
side window
The fastest heating
To the right up to the stop
3
Switched off
briefly switched on
Opening
Opening
Comfortable heating
Desired temper-
ature
2 or 3
or
Switched off
Do not switch on
Closing
Opening
AA
AB
AC
AD
AE
s2g8.b.book Page 87 Tuesday, April 7, 2009 8:53 AM
Page 89 of 224
Heating and air conditioning system
88
Recirculated air mode In recirculated air mode air is sucked
out of the interior of the vehicle
and then fed back into the interior.Recirculated air mode prevents polluted air outside the vehicle from getting into the vehicle, for example when driving through a tunnel or when standing in a traffic jam. Switching recirculated air mode on – Press the button
⇒
page 86, fig. 101
- the warning light lights up
in the button.
Switching recirculated air mode off – Press again the button - the warning light in the button goes out.The button cannot be pressed if the control dial is in the position
or close
to this position.
WARNING
You should not leave recirculated air mode on over a longer period of time, as “stale” air may result in fatigue in the driver and occupants, divert your attention and also cause the windows to mist up. The risk of having an acci-
dent increases. Switch recirculated air mode off as soon as the windows begin misting up.Using the air conditioning system economicallyThe compressor on the air co
nditioning system uses po
wer from the engine when
in cooling mode which will effect the fuel consumption. It recommended to open the windows or the doors of a vehicle for which the inte- rior has been strongly heated through the ef
fect of direct sunlight in order to allow
the heated air to escape. The cooling system should not be switched on while travelling when the window is open. The desired interior temperature can also be achieved without switching in the cooling system just by switching to fresh air mode.
For the sake of the environment
When you economize on fuel, you also reduce pollutant emissions.
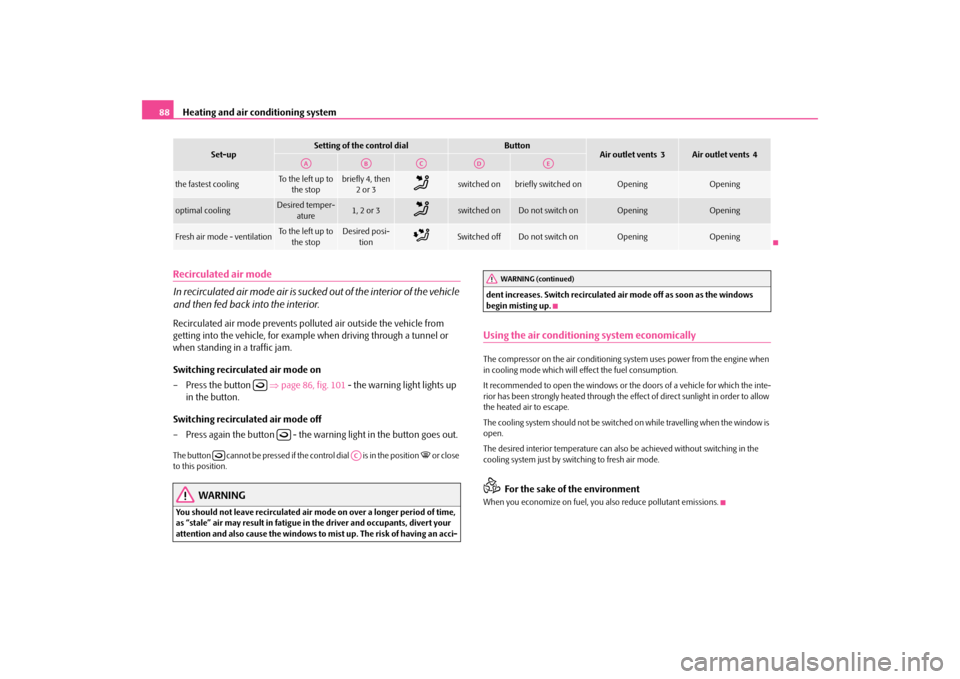
the fastest cooling
To the left up to
the stop
briefly 4, then
2or 3
switched on
briefly switched on
Opening
Opening
optimal cooling
Desired temper-
ature
1, 2 or 3
switched on
Do not switch on
Opening
Opening
Fresh air mode - ventilation
To the left up to
the stop
Desired posi-
tion
Switched off
Do not switch on
Opening
Opening
Set-up
Setting of the control dial
Button
Air outlet vents 3
Air outlet vents 4
AA
AB
AC
AD
AE
AC
WARNING (continued)
s2g8.b.book Page 88 Tuesday, April 7, 2009 8:53 AM
Page 90 of 224
Heating and air conditioning system
89
Using the system
Safety
Driving Tips
General Maintenance
Breakdown assistance
Technical Data
Climatronic* (automatic air conditioning)Description The Climatronic system is a combin
ation of an automatic heating,
fresh air and cooling system which provides optimal comfort for the occupants of the car.The Climatronic maintains a constant temp
erature fully automatically, once it has
been set. This is achiev
ed by automatically varying the temperature of the
outflowing air, the blower stages and the ai
r distribution. The system also takes into
account bright sunlight which eliminates
the need to alter the settings manually.
The
automatic mode
⇒page 90 ensures maximum wellbeing of the occupants at
all times of the year. Description of Climatronic system The cooling operates only if the following conditions are met:•
engine running,
•
outside temperature above +5 °C,
•
the button is
not
pressed.
If the cooling system is switched on, the temperature and air humidity drops in the vehicle. The wellbeing of the occupants of
the car is enhanced as a result of this
particularly at high outs
ide temperatures and a high air humidity. The system
prevents the windows misting up during the cold season of the year. The heating effect is dependent upon th
e coolant temperature, thus full heat
output only occurs when the engine has reached its operating temperature. It is possible to briefly activate recirc
ulated air mode in order to enhance the
cooling effect
⇒
.
The air inlet in front of the windscreen must be free of ice, snow or leaves in order to ensure that the heating and cooling systems operate properly. The AC compressor is switched off at a hi
gh coolant temperature in order to provide
cooling at a high load of the engine.
After switching on the cooling
Condensation
from the evaporator of the air condi-
tioning may drip down and form a puddle be
low the vehicle. This is quite normal
and not an indication of a leak! If you make a change before switching off
the ignition, which differs from the auto-
matic mode, the changed functions remain
stored. Only the function “circulating
air” is erased 20 minutes after switching off the ignition. Recommended setting for all periods of the year:•
Set the temperature to 22 °C (72 °F).
•
Press the button
⇒page 90, fig. 102
.
•
Move the air outlet vents
3 and
4, s o t h a t th e a i r f l o w i s d i re c t e d s l i g h tl y u pw a rd s
⇒ page 83, fig. 99
.
Switching over between degrees
Celsius and degrees Fahrenheit
Press and hold the buttons
17 and
9
⇒page 90, fig. 102
. The infor-
mation in the desired temperature measuring unit appears in the display.
WARNING
•
For your own safety and that of other road users, ensure that all the
windows are free of ice, snow and mistin
g. Please familiarize yourself about
how to correctly operate th
e heating and ventilation systems, how to demist
and defrost the windows, as well as with the cooling mode.•
You should not leave recirculated air mode on over a longer period of
time, as “stale” air may result in fatigue in the driver and occupants, divert your attention and also cause the windows to mist up. The risk of having an accident increases. Switch recirculated air mode off as soon as the windows begin misting up.
Note
•
If the cooling system has not been switched on for a lengthy period, odours may
be produced at the evaporator because of
deposits. Switch the cooling system on
at least once a month for approximately 5 mi
nutes at the highest blower stage - also
during the cold season of the year - in
order to remove such odours. Also open a
window for a short time.
ECON
AUTO
ECON
AUTO
s2g8.b.book Page 89 Tuesday, April 7, 2009 8:53 AM