light SKODA OCTAVIA TOUR 2009 1.G / (1U) Repair Manual
[x] Cancel search | Manufacturer: SKODA, Model Year: 2009, Model line: OCTAVIA TOUR, Model: SKODA OCTAVIA TOUR 2009 1.G / (1U)Pages: 224, PDF Size: 13.53 MB
Page 96 of 224
Starting-off and Driving
95
Using the system
Safety
Driving Tips
General Maintenance
Breakdown assistance
Technical Data
•
Let go of the key as soon as the engine starts otherwise there may be damage
to the starter. The engine running noises may louder at
first be louder for
a short time after
starting the cold engine until oil pressure
can be built up in the hydraulic valve
clearance compensation. This is quite normal and is not an operating problem. If the engine does not start ... You can use the battery of anothe
r vehicle as a jump-start aid
⇒page 188.
It is only possible to tow-start vehicl
es fitted with a manual gearbox. The tow-
starting distance must not be more than 50 metres
⇒page 191.
WARNING
•
Never run the engine in non ventilat
ed or enclosed areas. The exhaust
gases of the engine contain besides
the odorless and colourless carbon
monoxide a poisonous gas - hazard! Carbon monoxide can cause uncon- sciousness and death.•
Never leave your vehicle unattended with the engine running.Caution
•
The starter may only be operated (ignition key position ), if the engine is not
running. If the starter is immediately oper
ated after switching off the engine, the
starter or the engine can be damaged.•
Avoid high engine revolutions, full throttle and high engine loads as long as the
engine has not yet reached its normal oper
ating temperature - risk of damaging the
engine!•
Vehicles which are fitted wi
th an exhaust gas catalyti
c converter should not be
tow-started over a distance of more than 50 metres.
For the sake of the environment
Never warm up the engine when the vehi
cle is standing. Drive off right away.
Through this the engine reaches its operating temperature more rapidly and the pollutant emissions are lower.
Petrol enginesThese engines are fitted with a starter system which selects the correct fuel-air mixture for every external air temperature.•
Do
not depress
accelerator before and when starting engine.
•
Interrupt the attempt at starting after
10 seconds if the engine does not start
right awayand wait for about 30 se
conds before repeating the attempt.
•
It is possible that the fuse on the electric
al fuel pump is defect if the engine still
does not start. Check the fuse and replace it if necessary
⇒page 192.
•
Contact the nearest specialist garage to obtain professional assistance.
It may be necessary, if the engine is
very hot
, to slightly depress the accelerator
after the engine has started.Diesel enginesGlow plug system Diesel engines are equipped with a glow
plug system, the preglow period being
controlled automatically in
line with the coolant temperature and outside temper-
ature. The preglow indicator light
comes on after the ignition has been switched on.
You should not switch on any major electrical components during the heating period otherwise the vehicle battery will be drained unnecessarily.•
You should start the engine immediately after the glow plug warning light
has gone out.•
The glow plug warning light will come on for about one second if the engine is
at a normal operating temperature or if the outside temperature is above +5°C. This means that you can start the engine
right away
.
•
Interrupt the attempt at starting after
10 seconds if the engine does not start
right awayand wait for about 30 se
conds before repeating the attempt.
•
It is possible that the fuse on the diesel preglow system is defect if the engine
still does not start. Check the fuse and replace it if necessary
⇒page 192.
•
Contact the nearest specialist garage to obtain professional assistance.
A3
s2g8.b.book Page 95 Tuesday, April 7, 2009 8:53 AM
Page 97 of 224
Starting-off and Driving
96
Starting the engine after the fuel tank has run dry It may take longer than normal to start the
engine after refuelling
if the fuel tank has
run completely dry - up to one minute. This is because the fuel system must first of all be filled while the attempting to start the engine.Switching off the engine– The engine can be swit
ched off by turning the ignition key from posi-
tion into
⇒
page 94, fig. 105
.
WARNING
•
Never switch off the engine before the
vehicle is stationary - risk of acci-
dent!•
The brake booster only operates when the engine is running. Greater
physical effort for braking is required
when engine is switched off. Because
if you do not stop as normal, this can cause an accident and severe injuries.
Caution
you should not switch the engine off right
away at the end of your journey after the
engine has been operated fo
r a lengthy period at high
loads but should be allowed
it to run at idling speed for about 2 minutes
. This prevents any accumulation of heat
when the engine is switched off.
Note
•
The radiator fan may continue running fo
r a further 10 minutes or so after the
engine and the ignition have been switched
off. The coolant fan may, however, also
switch on again after some time if the coolant temperature rises because of an accumulation of heat in the engine or
if the engine is warm and the engine
compartment is additionally
heated by strong sunlight.
•
This is why particular care is required when carrying out any work in the engine
compartment
⇒page 160, “Working in the engine compartment”.
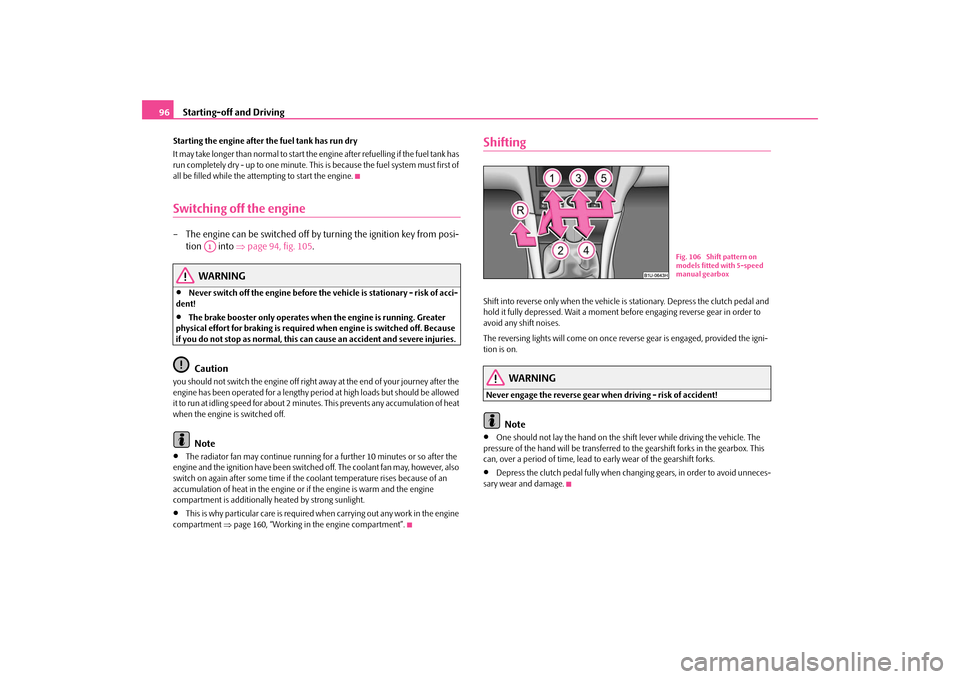
ShiftingShift into reverse only when the vehicle is
stationary. Depress the clutch pedal and
hold it fully depressed. Wa
it a moment before engaging reverse gear in order to
avoid any shift noises. The reversing lights will come on once reverse gear is engaged, provided the igni- tion is on.
WARNING
Never engage the reverse gear when driving - risk of accident!
Note
•
One should not lay the hand on the shift lever while driving the vehicle. The
pressure of the hand will be transferred to
the gearshift forks in the gearbox. This
can, over a period of time, lead to
early wear of the gearshift forks.
•
Depress the clutch pedal fully when chan
ging gears, in order to avoid unneces-
sary wear and damage.
A1
Fig. 106 Shift pattern on models fitted with 5-speed manual gearbox
s2g8.b.book Page 96 Tuesday, April 7, 2009 8:53 AM
Page 98 of 224
Starting-off and Driving
97
Using the system
Safety
Driving Tips
General Maintenance
Breakdown assistance
Technical Data
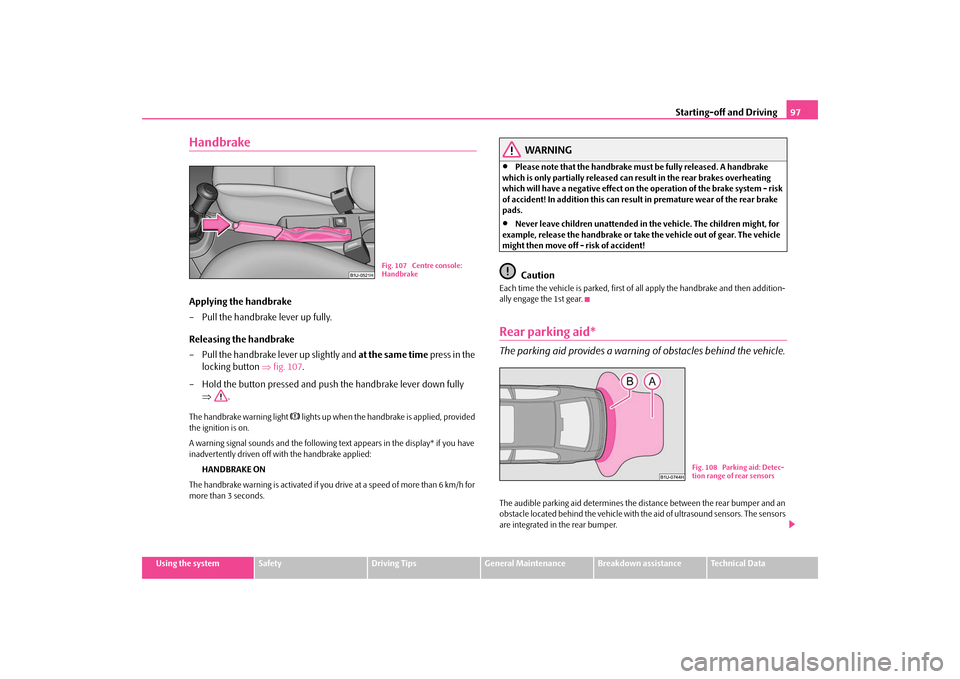
HandbrakeApplying the handbrake – Pull the handbrake lever up fully. Releasing the handbrake – Pull the handbrake lever up slightly and
at the same time
press in the
locking button
⇒
fig. 107
.
– Hold the button pressed and push the handbrake lever down fully
⇒
.
The handbrake warning light
lights up when the handbrake is applied, provided
the ignition is on. A warning signal sounds and the following text appears in the display* if you have inadvertently driven off with the handbrake applied:
HANDBRAKE ON
The handbrake warning is activated if you drive at a speed of more than 6 km/h for more than 3 seconds.
WARNING
•
Please note that the handbrake must be fully released. A handbrake
which is only partially released can re
sult in the rear brakes overheating
which will have a negative effect on th
e operation of the brake system - risk
of accident! In addition this can result in premature wear of the rear brake pads.•
Never leave children unattended in the vehicle. The children might, for
example, release the handbrake or take
the vehicle out of gear. The vehicle
might then move off - risk of accident!
Caution
Each time the vehicle is parked, first of
all apply the handbrake and then addition-
ally engage the 1st gear.Rear parking aid*The parking aid provides a warning of obstacles behind the vehicle.The audible parking aid determines the distance between the rear bumper and an obstacle located behind the vehicle with th
e aid of ultrasound sensors. The sensors
are integrated in the rear bumper.
Fig. 107 Centre console: Handbrake
Fig. 108 Parking aid: Detec-tion range of rear sensors
s2g8.b.book Page 97 Tuesday, April 7, 2009 8:53 AM
Page 102 of 224
Communication
101
Using the system
Safety
Driving Tips
General Maintenance
Breakdown assistance
Technical Data
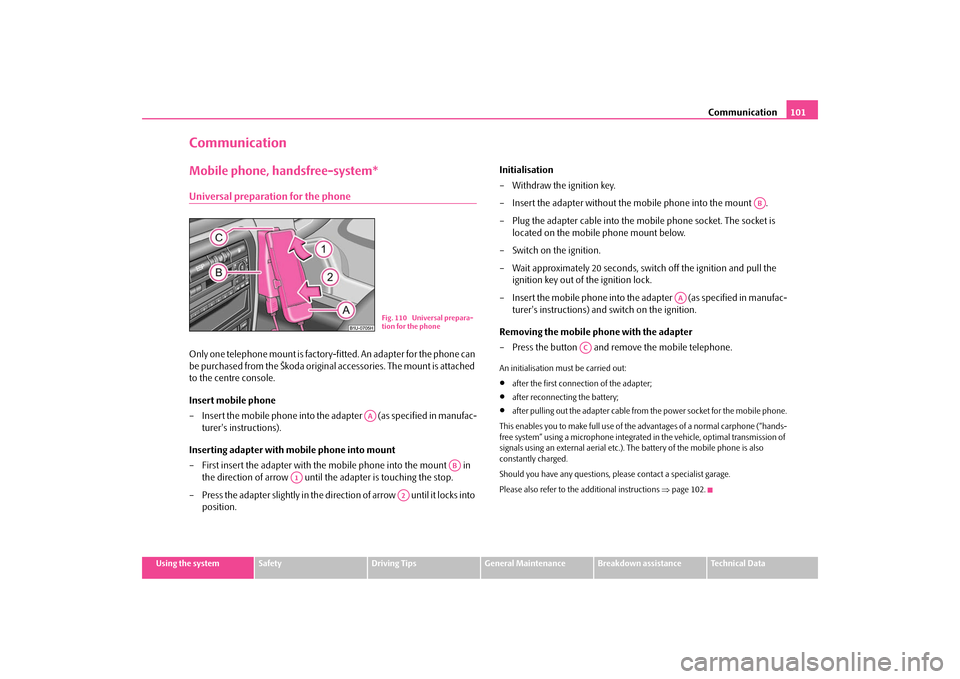
CommunicationMobile phone, handsfree-system*Universal preparation for the phoneOnly one telephone mount is factory-
fitted. An adapter for the phone can
be purchased from the Škoda original accessories. The mount is attached to the centre console. Insert mobile phone – Insert the mobile phone into the adapter (as specified in manufac-
turer's instructions).
Inserting adapter with mobile phone into mount – First insert the adapter with the mobile phone into the mount in
the direction of arrow until the adapter is touching the stop.
– Press the adapter slightly in the direction of arrow until it locks into
position.
Initialisation – Withdraw the ignition key. – Insert the adapter without the mobile phone into the mount . – Plug the adapter cable into the mobile phone socket. The socket is
located on the mobile phone mount below.
– Switch on the ignition.– Wait approximately 20 seconds, swit
ch off the ignition and pull the
ignition key out of the ignition lock.
– Insert the mobile phone into the adapter (as specified in manufac-
turer's instructions) and switch on the ignition.
Removing the mobile phone with the adapter – Press the button and remove the mobile telephone.An initialisation must be carried out:•
after the first connection of the adapter;
•
after reconnecting the battery;
•
after pulling out the adapter cable from
the power socket for the mobile phone.
This enables you to make full use of the advantages of a normal carphone (“hands- free system” using a microphone integrated in the vehicle, optimal transmission of signals using an external aerial etc.).
The battery of the mobile phone is also
constantly charged. Should you have any questions, pl
ease contact a specialist garage.
Please also refer to the additional instructions
⇒page 102.
Fig. 110 Universal prepara- tion for the phone
AA
AB
A1
A2
AB
AA
AC
s2g8.b.book Page 101 Tuesday, April 7, 2009 8:53 AM
Page 105 of 224
Passive Safety
104
•
Ensure that the lighting and the turn signal system are functioning properly.
•
Inspect the tyre inflation pressure.
•
Ensure that all the windows offer a good visibility to the outside.
•
Safely attach the items of luggage
⇒page 68, “Loading the luggage compart-
ment”.•
Ensure that no objects can obstruct the pedal.
•
Adjust the mirror, the front seat and the head restraint to match your body size.
•
Point out to your occupants that the head restraints must be adjusted to match
their body size.•
Protect the children in suitable child se
ats with correctly fastened seat belts
⇒ page 123, “Transporting children safely”.•
Adopt the correct seated position
⇒page 104, “Correct seated position”. Also
inform your occupants to adop
t the correct seated position.
•
Fasten the seat belt correctly. Also inform your occupants to properly fasten the
seat belts
⇒page 110, “How are seat belts correctly fastened?”.
What influences the driving safety? The driving safety is primarily dete
rmined by the style of driving and
the personal behaviour of all the occupants.The driver is fully responsible for himself and his occupants. If your driving safety is effected, you place yourself and the oncomi
ng traffic at risk. Please refer to the
following guidelines.•
Do not get distracted from concentrating on the traffic situation, e.g. by your
occupants or mobile phone calls.•
Never drive when your driving ability is impaired, e.g. through medication,
alcohol, drugs.•
Keep to the traffic regulations and the permissible speed limit.
•
Adjust the driving speed at all times to the road condition as well as to the traffic
and weather conditions.•
Take regular breaks on long journe
ys - at the latest every two hours.
Correct seated positionCorrect seated position for the driver Correct seated position for the dr
iver is important for safe and
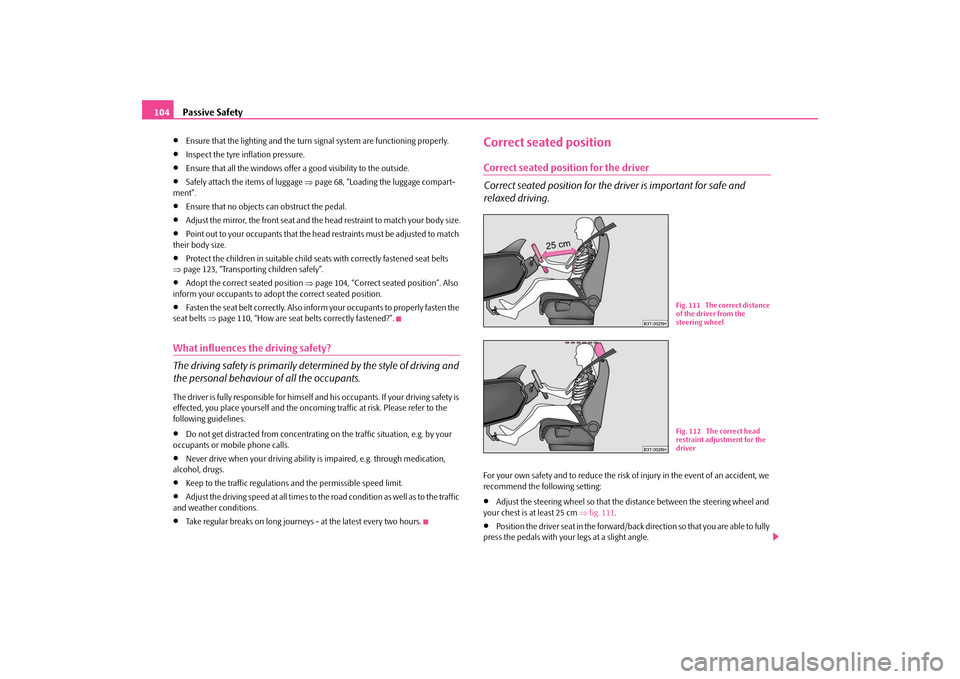
relaxed driving.For your own safety and to reduce the risk of injury in the event of an accident, we recommend the following setting:•
Adjust the steering wheel so that the distance between the steering wheel and
your chest is at least 25 cm
⇒fig. 111
.
•
Position the driver seat in the forward/back direction so that you are able to fully
press the pedals with your legs at a slight angle.
Fig. 111 The correct distance of the driver from the steering wheelFig. 112 The correct head restraint adjustment for the driver
s2g8.b.book Page 104 Tuesday, April 7, 2009 8:53 AM
Page 106 of 224
Passive Safety
105
Using the system
Safety
Driving Tips
General Maintenance
Breakdown assistance
Technical Data
•
Adjust the seat backrest so that you are able to reach the highest point of the
steering wheel with your arms at a slight angle.•
Adjust the head restraint so that the top edge of the head restraint is at the same
level as the upper part of your head
⇒page 104, fig. 112
.
•
Fasten the seat belt correctly
⇒page 110, “How are seat belts correctly
fastened?”. Manual driver seat adjustment
⇒page 60, “Adjusting the front seats”.
Electrical driver seat adjustment
⇒page 61, “Adjusting front seats electrically*”.
WARNING
•
The front seats and the head restraints must always be adjusted to match
the body size of the seat occupant as well as the seat belts must always be correctly fastened in order to provide an optimal protection for you and your occupants.•
The driver must maintain a distance of at least 25 cm to the steering
wheel
⇒page 104, fig. 111
. Not maintaining this minimum distance will
mean that the airbag system will not be able to properly protect you - hazard!•
When driving, hold the steering whee
l with both hands firmly on the
outer edge in the 9 o'clock and 3 o'clock position. Never hold the steering wheel firmly in the 12 o'clock position or in another way (e.g. in the middle of the steering wheel or at the inner
steering wheel edge). In such cases,
injuries to the arms, the hands and the head can occur when the driver airbag is deployed.•
The seat backrests must not be angled too far back when driving other-
wise this will affect proper operation of the seat belts and of the airbag system - risk of injury!•
Ensure that there are no objects in the footwell as any objects may get
behind the pedals during a driving or
braking manoeuvre.
You would then
no longer be able to operate the
clutch, to brake or accelerate.
Correct seated position for the front passenger The front passenger must maintain a distance of at least 25°cm from the dash panel so that the combination of the airbag and the seat belt offers the greatest possible sa
fety when an airbag is deployed.
For the safety of the front passenger and to
reduce the risk of injury in the event of
an accident, we recommend the following setting:•
Adjust the front passenger seat as far as possible to the rear.
•
Adjust the head restraint so that the top edge of the head restraint is at the same
level as the upper part of your head
⇒page 104, fig. 112
.
•
Fasten the seat belt correctly
⇒page 110, “How are seat belts correctly
fastened?”. In exceptional cases the front pass
enger airbag can be deactivated
⇒page 120,
“Deactivating an airbag”. Manual front passenger adjustment
⇒page 60, “Adjusting the front seats”.
Electrical front passenger seat adjustment
⇒page 61, “Adjusting front seats electri-
cally*”.
WARNING
•
The front seats and the head restraints must always be adjusted to match
the body size of the seat occupant as well as the seat belts must always be correctly fastened in order to provide an optimal protection for you and your occupants.•
The front passenger must maintain a distance of at least 25 cm to the
dash panel. Not maintaining this mi
nimum distance will mean that the
airbag system will not be able to properly protect you - hazard!•
Always keep your feet in
the footwell when the vehicle is being driven -
never place your feet on the instrument panel, out of the window or on the surfaces of the seats. You will be exposed to increased risk of injury if it becomes necessary to apply the brake or in the event of an accident. If an airbag is deployed, you may suffer fata
l injuries when adopting an incorrect
seated position!
s2g8.b.book Page 105 Tuesday, April 7, 2009 8:53 AM
Page 116 of 224
Airbag system
115
Using the system
Safety
Driving Tips
General Maintenance
Breakdown assistance
Technical Data
Airbag systemDescription of the airbag systemGeneral information on the airbag systemThe front airbag system is complementary
to the three-point seat belts and offers
additional protection for the head and chest area of the driver and passenger in the event of a frontal collision. In the case of a violent side crash, the side airbags* reduce the risk of injuries to the occupants on the side of the collision
⇒
.
The airbag system is only functional af
ter the ignition has been switched on.
The operational readiness of the airbag system is monitored electronically. The airbag warning light comes on for a few seconds each time the ignition is switched on. The airbag system (according to vehicle equipment) consists of:•
an electronic control unit,
•
front airbag for the driver and the front seat passenger*,
•
side airbags*,
•
an airbag warning light in the instrument cluster,
•
Switch for front passenger airbag* in
front passenger storage compartment
⇒ page 121,•
Indicator light for a switched off front seat passenger airbag*
⇒page 121.
A fault in the airbag system exists if:•
the airbag indicator light do
es not light up when the ignition is switched on,
•
the warning light does not go out after
about 4 seconds after the ignition is
switched on,•
the airbag indicator light goes out and comes on again after the ignition is
switched on,•
the airbag indicator light comes
on or flickers when driving.
WARNING
•
To enable the occupants of a vehicle
to be protected with the greatest
possible effect when the airbag is deployed, the front seats must be ⇒ page 104, “Correct seated position” co
rrectly adjusted to
match the body
size of the occupant.•
If you do not fasten the seat belts when driving, lean too far forward or
adopt an incorrect seated position, yo
u are exposing yourself to increased
risk of injury in the event of an accident.•
Have the airbag system checked immedi
ately by a specialist garage if a
fault exists. Otherwise, there is a risk
of the airbag not being activated in the
event of an accident.•
No modifications of any kind may be
made to parts of the airbag system.
•
It is prohibited to manipulate individual parts of the airbag system as this
might result in the airbag being deployed.•
The protective function of the airbag system is sufficient for only one
accident. The airbag system must then
be replaced if the airbag has been
deployed.•
The airbag system needs no main
tenance during its working life.
•
If you sell your car, please hand over the complete vehicle documenta-
tion to the new owener. Please note that the documents relating to the possibility of deactivating the front passenger airbag are also part of the vehicle documents!•
If the vehicle or individual parts of the airbag system are scrapped, it is
essential to observe the relevant safety
precautions. Specialist garages are
familiar with these regulations.•
When disposing of vehicle or parts of the airbag system, it is important
to comply with the national legal requirements.
s2g8.b.book Page 115 Tuesday, April 7, 2009 8:53 AM
Page 117 of 224
Airbag system
116
When are the airbags deployed?The airbag system is designed in such a
way that the driver and the front passenger
airbag* are deployed in the event of a
frontal collision of major severity
.
In the case of a
violent side crash
, the side airbag* is depl
oyed on the side of the
vehicle on which the collision occurs. In certain accident situations, the front as well as the side airbags are deployed at the same time. The airbags
are not deployed
in the case of
minor
frontal and side collisions, in the
case of rear-end collisi
ons and vehicle rollover.
Deployment factors It is not possible to state globally which deployment conditions apply to the airbag system in every situation as the circumstances which exist in the case of accidents vary greatly. An important role in this case
, for example, is played by factors such as
the type of object against wh
ich the vehicle impacts (hard,
soft), the angle of impact,
the vehicle speed etc. A decisive factor for the deployment of the airbags is the deceleration which occurs during a collision. The control unit analyses
the nature of the collision and activates
the relevant restraint system. If the vehicle deceleration which occurs and is meas- ured during the collision remains below the prescribed reference values specified in the control unit, the airbags are not
deployed although the vehicle may well
suffer severe damage to the bodywork as a consequence of the accident. The airbags are not deployed if:•
ignition is switched off;
•
a minor frontal collision;
•
a minor side collision;
•
a rear-end collision;
•
Rollover of the vehicle.Note
•
A grey white, non harmful gas is released when airbag is inflated. This is
perfectly normal and is not an indi
cation of a fire in the vehicle.
•
The dash panel must be replaced afte
r the front passenger airbag has been
deployed.•
In the event of an accident in which the airbags are deployed: − the interior lighting comes on (if the swit
ch for the interior light is in the door
contact position), − the hazard warning light is switched on; − All the doors are unlocked.
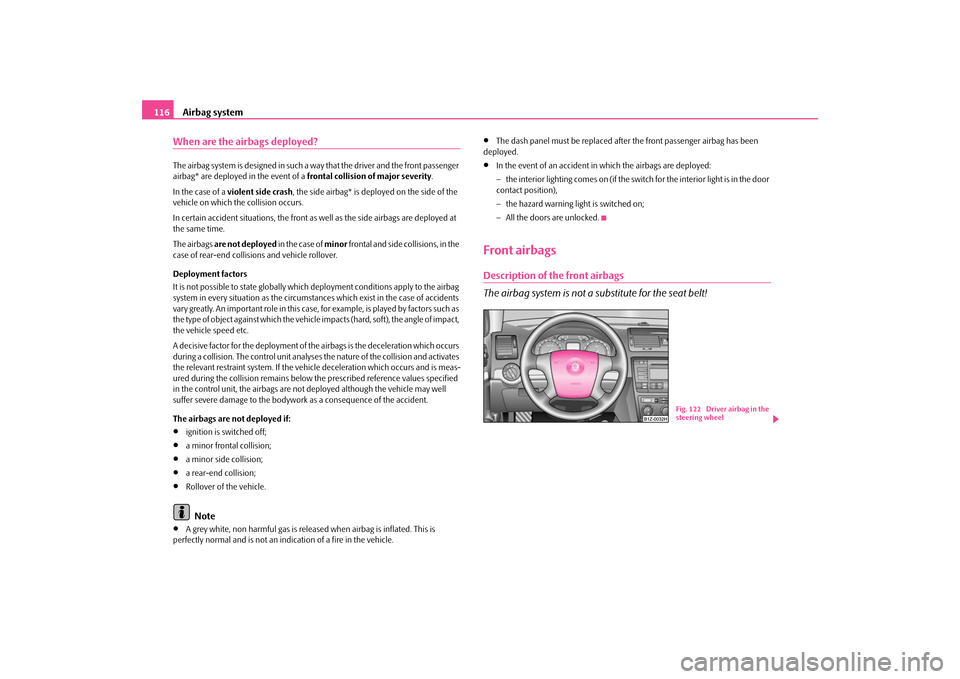
Front airbagsDescription of the front airbags The airbag system is not a substitute for the seat belt!
Fig. 122 Driver airbag in the steering wheel
s2g8.b.book Page 116 Tuesday, April 7, 2009 8:53 AM
Page 121 of 224
Airbag system
120
Important safety information on the side airbag Correct use of the airbag system considerably reduces the risk of injury!
WARNING
•
It is essential to always switch off
the front passenger airbag and/or side
airbag when attaching a child safety seat on the front passenger seat where the child is seated with its back facing in direction of travel (in some coun- tries also when the child is facing the direction of travel)
⇒page 120, “Deac-
tivating an airbag”. If this is not done, there is a risk of the child suffering severe or even fatal injuries if the
front passenger airbag is deployed. In
certain countries national legal provisions also require that the side passenger airbags be deactivated. When transporting a child on the front passenger seat, please comply with
the appropriate national regulations
regarding the use of child safety seats.•
Your head should never be positioned
in the deployment area of the side
airbag. You might suffer severe injuries in the event of an accident. This applies in particular to children who are transported without using a suit- able child safety seat
⇒page 125, “Child safety and side airbag*”.
•
If children adopt an incorrect seated position when travelling, they may
be exposed to an increased risk of injury
in the event of an accident. This can
result in serious injuries
⇒page 123, “What you should know about trans-
porting children!”.•
There must not be any further persons,
animals as well as objects posi-
tioned between the occupants and the
deployment area of the airbag. No
accessories, such as a can holder, should be attached to the doors.•
Only hang light items of clothing on the clothes hooks to the vehicle.
Never leave any heavy or sharp-edged ob
jects in the pockets of the items of
clothing.•
Ensure that there are no excessive fo
rces, such as violent knocks, kicks
etc., impact on the backrests of th
e seats otherwise the system may be
damaged. The side airbags would no
t be deployed in such a case!
•
Any seat or protective covers which you fit to the driver or front
passenger seats must only
be of the type expressly authorised by Škoda
Auto. In view of the fact that the airbag inflates out of the backrest of the seat, use of non-approved seat or protective covers would considerably impair the protective function of the side airbag.•
Any damage to the original seat covers in the area of the side airbag
module must be repaired without
delay by your specialist garage.
•
The airbag modules in the front se
ats must not display any damage,
cracks or deep scratches. It is not permissible to use force in order to open the modules.•
Any work on the side airbag system
including removing and installing
system components because of other repair work (e.g. removing seats) must only be carried out by a specialist garage.Deactivating an airbagDeactivating airbags If any airbags have been deactivated, switch them on again as soon as possible so that they are able to
again provide their proper protec-
tion.There is the technical means installed within your vehicle to switch off the front or side* airbag using a diagnostic equipment (take out of commission). This is why you should have the deacti
vation of the airbags carried out by a
specialist garage. On vehicles equipped with the switch for deactivation of the airbags, you can deac- tivate the front passenger airbag and/or
side airbag by means of this switch
⇒ page 121. Deactivation of airbags is envisaged only
for particular instances, such as if:
•
You must in
exceptional cases
use a child seat on the front passenger seat
where the child is seated with its back to
the direction of travel (in some countries
this must be in the direction of travel
due to other legal regulations applying)
⇒ page 123, “Important safety information re
garding the use of child safety seats”;
WARNING (continued)
s2g8.b.book Page 120 Tuesday, April 7, 2009 8:53 AM
Page 122 of 224
Airbag system
121
Using the system
Safety
Driving Tips
General Maintenance
Breakdown assistance
Technical Data
•
you are not able to maintain the distance
of at least 25 cm between middle of
steering wheel and chest, despite the driver seat being correctly adjusted;•
special attachments are required in the area of the steering wheel because of a
physical disability;•
you have installed other seats (e.g. orthopaedic seats without side airbags).
Monitoring the airbag system The functionality of the airbag system is also monitored electronically when one airbag has been switched off. If the airbag was switched of
f using diagnostic equipment:
•
The airbag indicator light in the instrume
nt cluster lights up for about 3 seconds
after switching on the ignition and then
flashes after that for about 12 seconds.
Front passenger airbags switched off
using the switch for front passenger
airbags* in storage compartmen
t on the front passenger side:
•
the airbag indicator light in the inst
rument cluster comes on for about 4
seconds each time the ig
nition is switched on;
•
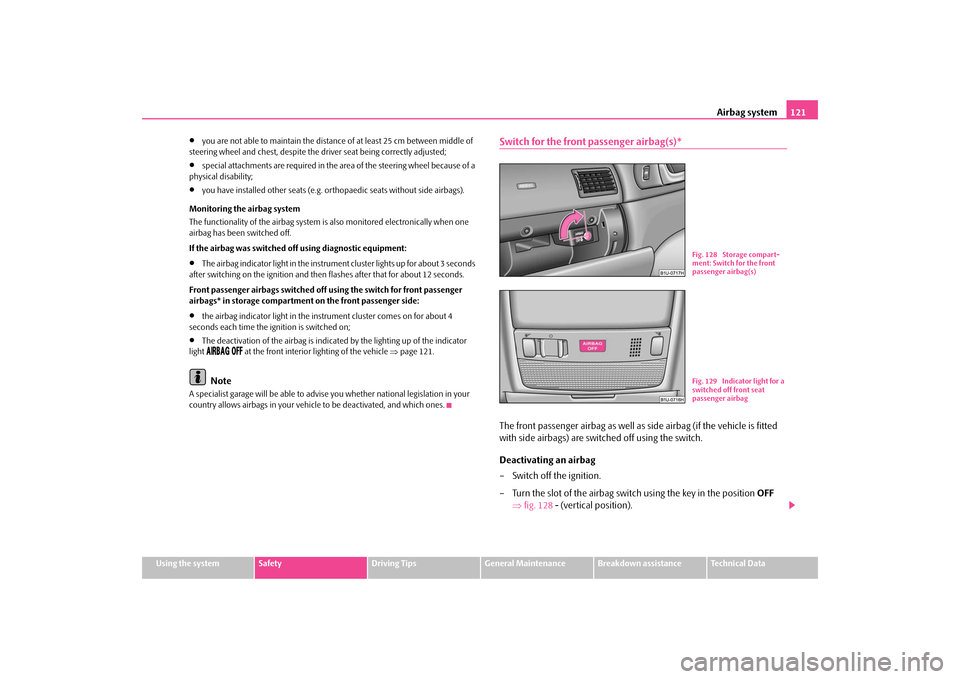
The deactivation of the airbag is indica
ted by the lighting up of the indicator
light
at the front interior lighting of the vehicle
⇒page 121.
Note
A specialist garage will be able to advise you whether national legislation in your country allows airbags in your vehicl
e to be deactivated, and which ones.
Switch for the front passenger airbag(s)*The front passenger airbag as well as side airbag (if the vehicle is fitted with side airbags) are switched off using the switch. Deactivating an airbag – Switch off the ignition. – Turn the slot of the airbag switch using the key in the position
OFF
⇒
fig. 128
- (vertical position).
Fig. 128 Storage compart- ment: Switch for the front passenger airbag(s)Fig. 129 Indicator light for a switched off front seat passenger airbag
s2g8.b.book Page 121 Tuesday, April 7, 2009 8:53 AM