length SKODA OCTAVIA TOUR 2010 2.G / (1Z) Owner's Manual
[x] Cancel search | Manufacturer: SKODA, Model Year: 2010, Model line: OCTAVIA TOUR, Model: SKODA OCTAVIA TOUR 2010 2.G / (1Z)Pages: 199, PDF Size: 12.09 MB
Page 43 of 199
Lights and Visibility
42
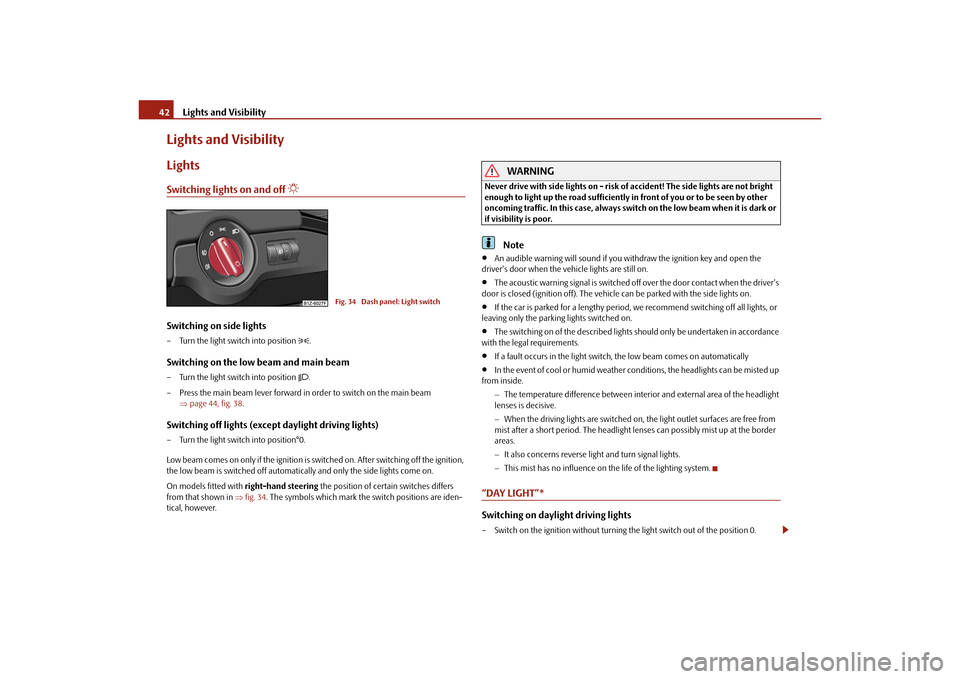
Lights and VisibilityLightsSwitching lights on and off
Switching on side lights– Turn the light switch into position
.
Switching on the low beam and main beam– Turn the light switch into position
.
– Press the main beam lever forward in order to switch on the main beam page 44, fig. 38 .
Switching off lights (except daylight driving lights)– Turn the light switch into position°0.
Low beam comes on only if the ignition is switched on. After switching off the ignition,
the low beam is switched off automatica lly and only the side lights come on.
On models fitted with right-hand steering the position of certain switches differs
from that shown in fig. 34 . The symbols which mark the switch positions are iden-
tical, however.
WARNING
Never drive with side lights on - risk of accident! The side lights are not bright
enough to light up the road sufficiently in front of you or to be seen by other
oncoming traffic. In this case, always switch on the low beam when it is dark or
if visibility is poor.
Note
An audible warning will sound if you wi thdraw the ignition key and open the
driver's door when the vehicle lights are still on.
The acoustic warning signal is switched off over the door contact when the driver's
door is closed (ignition off). The vehicle can be parked with the side lights on.
If the car is parked for a lengthy period, we recommend switching off all lights, or
leaving only the parking lights switched on.
The switching on of the described lights should only be undertaken in accordance
with the legal requirements.
If a fault occurs in the light switch , the low beam comes on automatically
In the event of cool or humid weather conditions, the headlights can be misted up
from inside.
The temperature difference between interior and external area of the headlight
lenses is decisive.
When the driving lights are switched on, the light outlet surfaces are free from
mist after a short period. The headlight lens es can possibly mist up at the border
areas.
It also concerns reverse light and turn signal lights.
This mist has no influence on th e life of the lighting system.
“DAY LIGHT”* Switching on daylight driving lights– Switch on the ignition without turning the light switch out of the position 0.
Fig. 34 Dash panel: Light switch
s2bs.2.book Page 42 Monday, September 27, 2010 9:53 AM
Page 68 of 199
Seats and Stowage67
Using the system
Safety
Driving Tips
General Maintenance
Breakdown assistance
Technical Data
WARNING
The storage compartment is not a substi tute for the ashtray and must also
not be used for such purposes - risk of fire!
Do not put any highly inflammable obje cts or objects which are sensitive to
heat (e.g. lighters, spra ys, spectacles, carbonated drinks) in the storage
compartment.
During the journey, no objects must be in the storage compartment. In the
event of a vehicle collision these objects could be thrown out of the compart-
ment - risk of injuries!
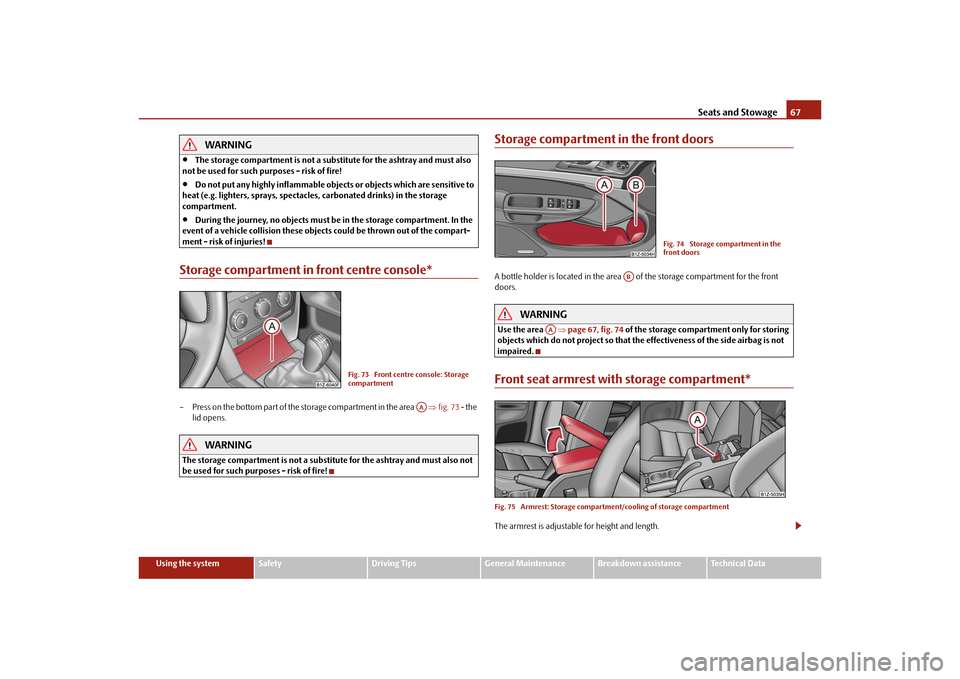
Storage compartment in front centre console*– Press on the bottom part of the storage compartment in the area fig. 73 - the
lid opens.
WARNING
The storage compartment is not a substitu te for the ashtray and must also not
be used for such purposes - risk of fire!
Storage compartment in the front doorsA bottle holder is located in the area of the storage compartment for the front
doors.
WARNING
Use the area page 67, fig. 74 of the storage compar tment only for storing
objects which do not project so that the effectiveness of the side airbag is not
impaired.Front seat armrest with storage compartment*Fig. 75 Armrest: Storage compartm ent/cooling of storage compartmentThe armrest is adjustable for height and length.
Fig. 73 Front centre console: Storage
compartment
AA
Fig. 74 Storage compartment in the
front doors
AB
AA
s2bs.2.book Page 67 Monday, September 27, 2010 9:53 AM
Page 74 of 199
Heating and air conditioning system73
Using the system
Safety
Driving Tips
General Maintenance
Breakdown assistance
Technical Data
Recirculated air mode
In recirculated air mode air is sucked out of the interior of the vehicle
and then fed back into the interior.Recirculated air mode prevents polluted air outside the vehicle from getting into the
vehicle, for example when driving through a tunnel or when standi ng in a traffic jam.Switching recirculated air mode on– Press the button . The warning light in the button page 71, fig. 81 goes out.Switching recirculated air mode off– Once again press the button . The warning light in the button goes out.
The recirculated air mode is switched off automatically if the air distribution control
is in position
page 71, fig. 81 . You can also switch recirculated air mode on again
from this setting by repeatedly pressing pushbutton .
WARNING
You should not leave recirculated air mode on over a longer period of time, as
“stale” air may result in fatigue in the driver and occupants, divert your atten-
tion and also cause the windows to mist up. The risk of having an accident
increases. Switch recirculated air mode off as soon as the windows begin
misting up.Climatic*Description
The Climatic is a combined coolin g and heating system. It makes it
possible to optimally control the air temperature at any season of the
year.Description of the Climatic
It is important for your safety and for your driving comfort that the Climatic is operating
properly. The cooling only operates if button
fig. 82 is pressed, and the following
conditions are met:
engine running,
outside temperature above approx. +2 °C and
blower switch switched on (positions 1 to 4).
If the cooling system is switched on, the temperature and air humidity drops in the
vehicle. The wellbeing of the occupants of the car is enhanced as a result of this partic-
ularly at high outside temperatures and a high air humidity. The system prevents the
windows misting up during the cold season of the year.
The heating effect depends on the coolant te mperature. The full heating effect does
not kick in until the engine is run in.
It is possible to briefly activate recirculat ed air mode in order to enhance the cooling
effect .
Air at a temperature of about 5 °C may fl ow out of the vents under certain circum-
stances when the cooling system is operating. Lengthy and uneven distribution of the
air flow out of the vents and large differences in temperature, for example when getting
out of the vehicle, can result in chills in sensitive persons.
The air inlet in front of the windscreen must be free of ice, snow or leaves in order to
ensure that the heating and cooling systems operate properly.
After switching on the cooling Condensation from the evaporator of the air condi-
tioning may drip down and form a puddle be low the vehicle. This is quite normal and
not an indication of a leak!
WARNING
For your own safety and that of other road users, ensure that all the
windows are free of ice, snow and misting. Please familiarize yourself about
how to correctly operate the heating and ventilation systems, how to demist
and defrost the windows, as well as with the cooling mode.
You should not leave recirculated air mode on over a longer period of time,
as “stale” air may result in fatigue in the driver and occupants, divert your
attention and also cause the windows to mist up. The risk of having an accident
increases. Switch recirculated air mo de off as soon as the windows begin
misting up.
AC
AC
A2
s2bs.2.book Page 73 Monday, September 27, 2010 9:53 AM
Page 75 of 199
Heating and air conditioning system
74Note
We recommend that you do not smoke in the vehicle when the recirculating air
mode is operating since the smoke which is drawn at the evaporator from the interior
of the vehicle forms deposits in the evapor ator of the air conditioning system. This
produces a permanent odour when the air conditioning system is operating which can
only be eliminated through considerable effort and expense (replacement of
compressor).
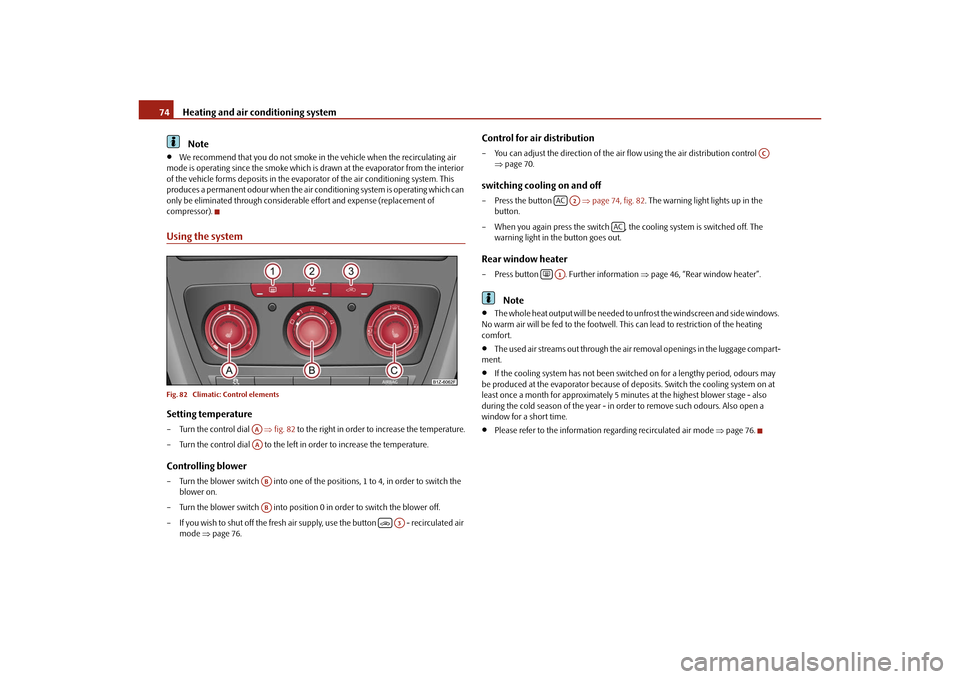
Using the systemFig. 82 Climatic: Control elementsSetting temperature– Turn the control dial fig. 82 to the right in order to increase the temperature.
– Turn the control dial to the left in order to increase the temperature.Controlling blower– Turn the blower switch into one of the po sitions, 1 to 4, in order to switch the
blower on.
– Turn the blower switch into position 0 in order to switch the blower off.
– If you wish to shut off the fresh air supp ly, use the button - recirculated air
mode page 76.
Control for air distribution– You can adjust the direction of the air flow using the air distribution control
page 70.switching cooling on and off– Press the button page 74, fig. 82 . The warning light lights up in the
button.
– When you again press the switch , the cooling system is switched off. The warning light in the button goes out.Rear window heater– Press button . Further information page 46, “Rear window heater”.
Note
The whole heat output will be needed to unfrost the windscreen and side windows.
No warm air will be fed to the footwell. Th is can lead to restriction of the heating
comfort.
The used air streams out through the air removal openings in the luggage compart-
ment.
If the cooling system has not been switched on for a lengthy period, odours may
be produced at the evaporator because of deposits. Switch the cooling system on at
least once a month for approximately 5 minutes at the highest blower stage - also
during the cold season of the year - in order to remove such odours. Also open a
window for a short time.
Please refer to the information regarding recirculated air mode page 76.
AAAAABAB
A3
AC
AC
A2
AC
A1
s2bs.2.book Page 74 Monday, September 27, 2010 9:53 AM
Page 80 of 199
Starting-off and Driving79
Using the system
Safety
Driving Tips
General Maintenance
Breakdown assistance
Technical Data
Avoid high engine revolutions, full throttle and high engine loads as long as the
engine has not yet reached its normal oper ating temperature - risk of damaging the
engine!
Vehicles which are fitted with an exhaust gas catalytic converter should not be tow-
started over a distance of more than 50 metres.For the sake of the environment
Never warm up the engine when the vehicle is standing. Drive off right away. Through
this the engine reaches its operating temperature more rapidly and the pollutant emis-
sions are lower.Petrol enginesThese engines are fitted with a starter system which selects the correct fuel-air mixture
for every external air temperature.
Do not operate accelerator before and when starting engine.
Interrupt the attempt at starting after 10 seconds if the engine does not start right
away and wait for about 30 seconds before repeating the attempt.
It is possible that the fuse on the electric al fuel pump is defect if the engine still
does not start. Check the fuse and replace it if necessary page 169.
Contact the nearest specialist garage to obtain professional assistance.
It may be necessary, if the engine is very hot, to slightly depress the accelerator after
the engine has started.
Diesel enginesGlow plug system
Diesel engines are equipped with a glow plug system, the preglow period being
controlled automatically in line with the coolant temperature and outside tempera-
ture.
The preglow indicator light
comes on after the ignition has been switched on.
You should not switch on any major electrical components during the heating
period otherwise the vehicle battery will be drained unnecessarily.
You should start the engine immediately after the glow plug warning light
has
gone out.
The glow plug warning light will come on for about one second if the engine is at a
normal operating temperature or if the outside temperature is above +5 °C. This
means that you can start the engine right away.
Interrupt the attempt at starting after 10 seconds if the engine does not start right
away and wait for about 30 seconds before repeating the attempt.
It is possible that the fuse on the diesel preglow system is defect if the engine still
does not start. Check the fuse and replace it if necessary page 169.
Contact the nearest specialist garage to obtain professional assistance.
Starting the engine after the fuel tank has run dry
It may take longer than normal to start the engine after refuelling if the fuel tank has
run completely dry - up to one minute. This is because the fuel system must first of all
be filled while the attempting to start the engine.
Switching off the engine– The engine can be switched off by tu rning the ignition key into position
page 77, fig. 84 .
WARNING
Never switch off the engine before the vehicle is stationary - risk of accident!
The brake booster only operates when the engine is running. Greater phys-
ical effort for braking is required when en gine is switched off. Because if you do
not stop as normal, this can cause an accident and severe injuries.Caution
you should not switch the engine off right away at the end of your journey after the
engine has been operated for a lengthy period at high loads but should be allowed it
to run at idling speed for about 2 minutes. This prevents any accumulation of heat
when the engine is switched off.
A1
s2bs.2.book Page 79 Monday, September 27, 2010 9:53 AM
Page 121 of 199
Driving and the Environment
120
The technical requirements for low fuel usage and economic efficiency of the vehicle
have already been built into the vehicle at the works. Special attention has been given
to minimising nega tive effects on the environment. It is necessary to take note of the
guidelines given in this chapter in order to make best use of these characteristics and
to maintain their effectiveness.
The optimal engine speed should be obtained when accelerating, in order to avoid a
high fuel consumption and resonance of the vehicle.Looking ahead when driving
A vehicle's highest fuel consumption occurs it accelerates.Avoid accelerating and brakin g unnecessarily. If you drive with forsight you will not
need to brake so often and will also then not have to accelerate so much. Let your
vehicle coast to a stop, for example, if this is possible, when you see that the next set of
traffic lights is at red.Shifting gears and saving energy
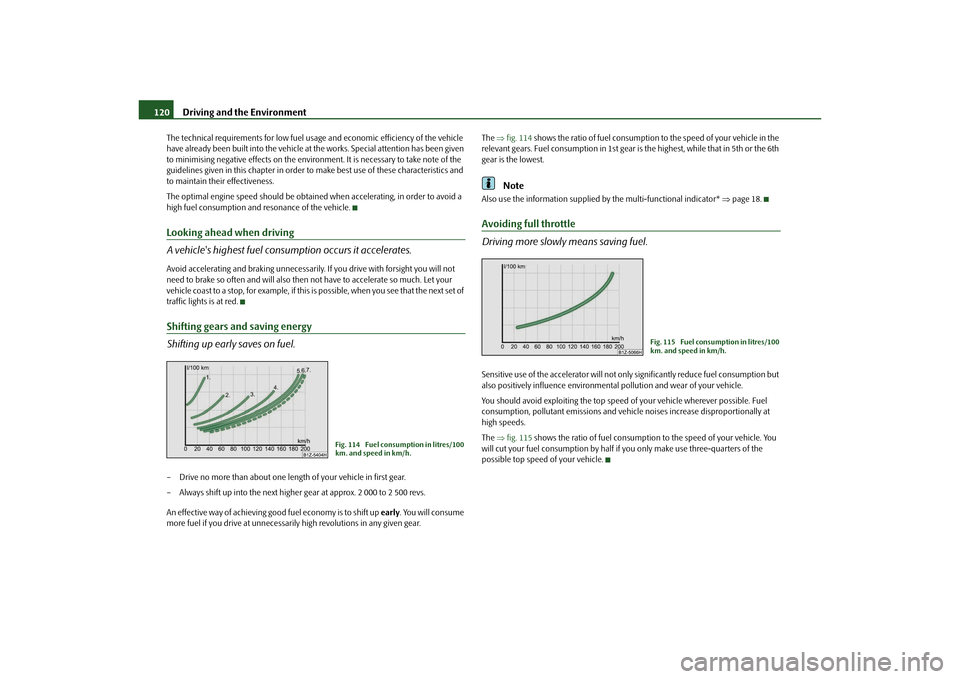
Shifting up early saves on fuel.– Drive no more than about one length of your vehicle in first gear.
– Always shift up into the next higher gear at approx. 2 000 to 2 500 revs.
An effective way of achieving good fuel economy is to shift up early. You will consume
more fuel if you drive at unnecessaril y high revolutions in any given gear. The
fig. 114 shows the ratio of fuel consumption to the speed of your vehicle in the
relevant gears. Fuel consumption in 1st gear is the highest, while that in 5th or the 6th
gear is the lowest.
Note
Also use the information supplied by the multi-functional indicator* page 18.Avoiding full throttle
Driving more slowly means saving fuel.Sensitive use of the accelerator will not only significantly reduce fuel consumption but
also positively influence environmenta l pollution and wear of your vehicle.
You should avoid exploiting the top speed of your vehicle wherever possible. Fuel
consumption, pollutant emissions and vehicle noises increase disproportionally at
high speeds.
The fig. 115 shows the ratio of fuel consumption to the speed of your vehicle. You
will cut your fuel consumption by half if you only make use three-quarters of the
possible top speed of your vehicle.
Fig. 114 Fuel consumption in litres/100
km. and speed in km/h.
Fig. 115 Fuel consumption in litres/100
km. and speed in km/h.
s2bs.2.book Page 120 Monday, September 27, 2010 9:53 AM
Page 122 of 199
Driving and the Environment121
Using the system
Safety
Driving Tips
General Maintenance
Breakdown assistance
Technical Data
Reducing idling
Idling also costs fuel.It is worthwhile switching off the engine in a traffic jam or when waiting at a level
crossing or at traffic lights with a lengthy red phase. Even after just 30 - 40 seconds you
will have saved more fuel th an that is needed when you start the engine up again.
If an engine is only idling it takes much longer for it to reach its normal operating
temperature. Wear-and-tear an d pollutant emissions, though, are particularly high in
the warming-up phase. This is why you should drive off right after starting the engine.
Do avoid high engine revolu tions at this time, however.Regular servicing
A poorly tuned engine consumes an unnecessarily high amount of fuel.Having your vehicle serviced regularly at a specialist garge enables you to satisfy one
of the requirements for economical motoring even before you set off on your journey.
Keeping your vehicle properly serviced not on ly has a positive effect on the safety of
your vehicle and maintaining its value, but also saves on fuel.
A poorly tuned engine can result in a fu el consumption which is 10 % higher than
normal.
The foreseen maintenance work should be undertaken exactly according to the
Service schedule by a specialist garage.
Also check the oil level after refuelling. Oil consumption is dependent to a consider-
able extent on the load and speed of the en gine. Oil consumption could be as high as
0.5 litres/1 000 km depending on your style of driving.
It is quite normal that a new engine has a higher oil consumption at first, and reaches
its lowest level only after a certain running in time. It is therefore not possible to
correctly assess the oil consum ption of a new vehicle until after you have driven about
5 000 km.
For the sake of the environment
You can achieve additional improvements in your fuel economy by using high-
lubricity oils.
Check the ground below your vehicle at regu lar intervals to detect any leakages in
good time. Please have your vehicle inspected by a specialist garge if you find any
stains caused by oil or other fluids on the floor.
Avoid driving short distances
Short distances result in an above-average high fuel consumption.– Avoid driving a distance of no more than 4 km if the engine is cold.
The engine and catalytic converter mu st first have reached their optimal operating
temperature in order to effectively reduce fuel consumption and pollutant emissions.
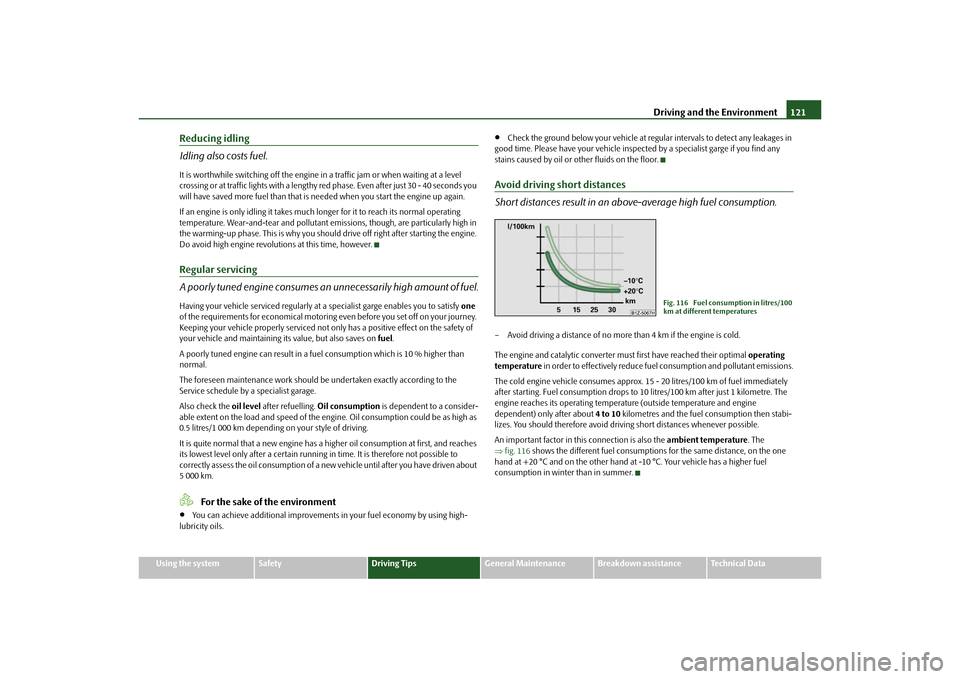
The cold engine vehicle cons umes approx. 15 - 20 litres/100 km of fuel immediately
after starting. Fuel co nsumption drops to 10 litres/100 km after just 1 kilometre. The
engine reaches its operating temperat ure (outside temperature and engine
dependent) only after about 4 to 10 kilometres and the fuel consumption then stabi-
lizes. You should therefore avoid driving short distances whenever possible.
An important factor in this connection is also the ambient temperature. The
fig. 116 shows the different fuel consumptions for the same distance, on the one
hand at +20 °C and on the other hand at -10 °C. Your vehicle has a higher fuel
consumption in winter than in summer.
Fig. 116 Fuel consumption in litres/100
km at different temperatures
s2bs.2.book Page 121 Monday, September 27, 2010 9:53 AM
Page 127 of 199
Towing a trailer
126
Further information on the towing device page 126.
Note
We recommend that you also have your vehicle inspected between service inter-
vals if you tow a trailer frequently.
The handbrake on the towing vehicle must be put on when coupling and decou-
pling the trailer.
Driving Tips
Particular caution is required when towing a trailer.– Do not, as far as possible, drive with your vehicle unladen and the trailer laden.
– Do not make full use of the legal maximum speeds. This applies in particular to downhill sections.
– Apply the brakes in good time.
– Keep a check on the coolant temperature gauge if the outside temperature is high.
Distribution of weight
The distribution of the weight is very poor if your vehicle is unladen and the trailer is
laden. Maintain a particularly low speed if you cannot avoid driving with this combina-
tion.
Driving speed
Do not drive faster than 80 km/hour for safety reasons. This also applies for countries
in which higher speeds are allowed.
The fact that the driving stability of the vehicle + trailer combination reduces with
increasing speed means that the legally allo wed speed should not be used when there
are unfavourable road, weather or wind cond itions, particularly near accident black
spots.
You must always reduce your speed immediat ely as soon as you detect even just the
slightest swaying of the trailer. On no account attempt to stop the trailer from
“swaying” by accelerating.
Apply the brakes in good time! If the trailer is fitted with a trailer brake, apply the
brakes gently at first and then brake firmly. This will avoid brake jolts resulting from the trailer wheels locking. Shift down gears in good time before negotiating a downhill
section to allow the engine
to also act as a brake.
Engine overheating
Please keep a check on the coolant temperature gauge if you have to negotiate a
lengthy slope in a low gear at a high engi ne speed when the outside temperature is
very high page 16, “Engine coolant temperature Display”.
If the needle of the coolant temperature gaug e moves into the right-hand area or even
the red area of the scale, reduce your speed immediately. Stop and switch off the
engine if the warning light
in the instrument cluster begins flashing. Wait a few
minutes and check the level of coolant in the coolant expansion bottle page 143,
“Inspecting the coolant level”.
Please refer to the following guidelines page 25, “Coolant temperature/coolant
level ”.
The coolant temperature can be reduced by switching on the heating.
Any increase in the cooling effect of the coolant fan through shifting down a gear and
increasing the engine speed is not possible since the fan speed is independent of the
engine speed. One should also not drop a gear for this reason when towing a trailer as
long as the engine can manage th e slope without any drop in speed.
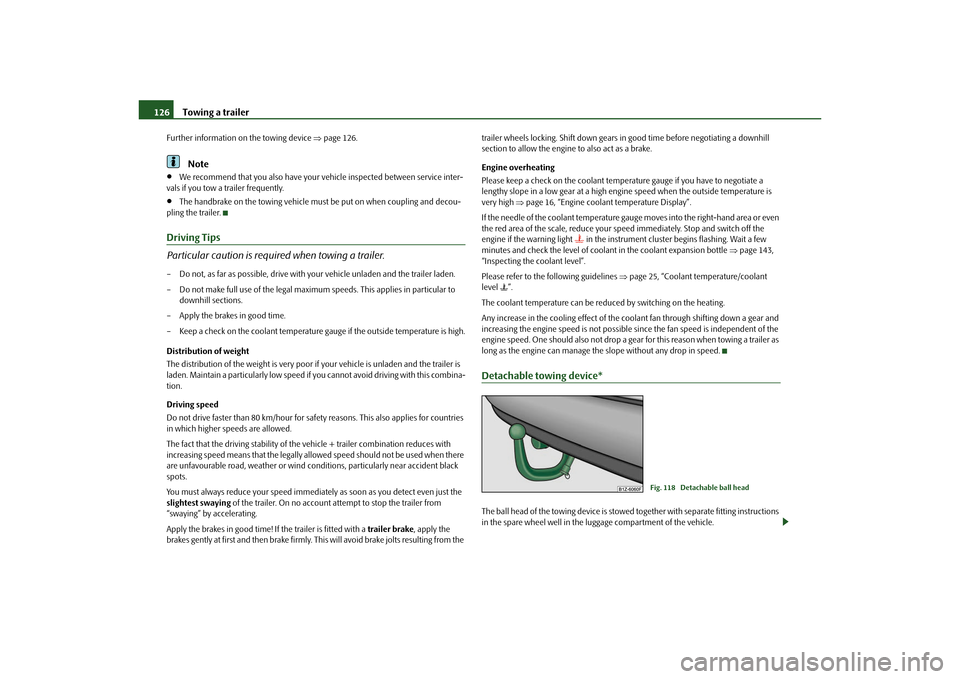
Detachable towing device*The ball head of the towing device is stowed together with separate fitting instructions
in the spare wheel well in the luggage compartment of the vehicle.
Fig. 118 Detachable ball head
s2bs.2.book Page 126 Monday, September 27, 2010 9:53 AM
Page 135 of 199
Taking care of your vehicle and cleaning the vehicle
134
We recommend using a cleaning product from Škoda genuine accessories offered by
your Škoda dealer.
Caution
Solvent-free cleaners attack th e material and can damage it.Fabric covers of electrically heated seatsDo not clean the seat covers moist as this may re sult in damage to the seat heating
system.
Clean such covers using specia l agents, for example dry foam.Natural leather
Natural leather requires quite particular care and attention.Leather should be treated from time to time according the following guidelines
depending on how much it is used.Normal cleaning– Clean soiled areas of the leather with slightly moistened cotton or woollen cloth.Severe soiling– Clean severely soiled areas with a cloth dipped in a mild soapy solution (2 spoon-
fuls of natural soap to 1 litre of water).
– Ensure that the leather is not soaked through at any point and that no water gets into the stitching of the seams.
– Dry off the leather with a soft, dry cloth.Removing stains– Remove fresh stains which are water-based (e.g. coffee, tea, juices, blood etc.)
with an absorbent cloth or household pape r or use the cleaner from the care set
for a stain which has already dried in. – Remove fresh stains on a
fat base (e.g. butter, mayonnaise, chocolate etc.) with an
absorbent cloth or household cleaning paper or with the cleaner from the care set
if the stain has not yet pe netrated into the surface.
– Use a grease dissolver for grease stains which have dried in .
–Eliminate special stains (e.g. ball-point pens, felt pe n, nail varnish, dispersion
paint, shoe cream etc.) with a special stain remover suitable for leather.
Leather care– Treat the leather every six months with th e leather care product available from an
authorised Škoda Service Partner.
– Apply only a small amount of the care product.
– Dry the leather off with a soft cloth
It is best to consult an authorised Škod a Service Partner if you have any questions
regarding cleaning and care of the leather interior in your vehicle.
Caution
You must on no account treat the leather wi th solvents (e.g. gasoline, turpentine),
floor wax, shoe cream or such like.
Avoid leaving your vehicle for lengthy period s in bright sunlight in order to avoid
bleaching the leather. If you leave your vehicle parked in the open for lengthy periods,
protect the leather from the direct ra ys of the sun by covering it over.
Sharp-edged objects on items of clothing su ch as zip fasteners, rivets, sharp-edged
belts may leave permanent scratches or signs of rubbing on the surface.Note
Use a care cream with ligh t blocker and impregnation effect regularly and each
time after cleaning the leathe r. The cream nourishes the leather, allows it to breathe
and keeps it supple and also provides mois ture. It also creates surface protection.
Clean the leather every 2 to 3 months, remo ve fresh soiling each time this occurs.
Remove fresh stains such as those from ba ll-point pens, ink, lipstick, shoe cream
etc., as quickly as possible.
s2bs.2.book Page 134 Monday, September 27, 2010 9:53 AM
Page 143 of 199
Inspecting and replenishing
142
It is normal for the engine to consume oil. The oil consumption may be as much as 0.5
l/1 000 km depending on your style of driving and the conditions under which you
operate your vehicle. The oil consumption may be slightly hi gher than this during the
first 5000 kilometres.
One should therefore check the oil level at regular intervals, preferably every time after
the fuel tank is filled or after driving for long stretches.
We recommend maintaining the oil level within the range - but not above this, if
the engine has been operating at high load s, for example during a lengthy motorway
trip during the summer months, towing a tr ailer or negotiating a high mountain pass.
The warning light in the instrument cluster* will indicate page 25, “Engine oil pres-
sure ” whether the oil level is too low. In this case, check the oil level as soon as
possible. Top up with an appropriate quantity of oil.
Caution
The oil level must on no account extend beyond the range . Danger of damaging
the catalytic converter.
Do not continue your journey if for some reason it is not possible under the
conditions prevailing to top up with oil. Switch the engine off and obtain professional
assistance from a specialist garage, otherwise it could lead to severe engine damage.Note
Engine oil specifications page 179, “Technical Data”.Replenishing engine oil– Inspecting the engine oil level page 141.
– Unscrew the cap of the engine oil filler opening.
– Pour in a suitable grade of oil in portions of 0.5 litres page 180, “Engine oil spec-
ifications”.
– Inspect the oil level page 141.
– Carefully screw on the cap of the filler opening and push the dipstick in fully.
WARNING
Avoid dripping oil onto hot parts of the engine when topping up will oil - a
risk of fire!
Read and observe the warning notes page 140, “Working in the engine
compartment” before working in the engine compartment.For the sake of the environment
The oil level must on no acco unt extend beyond the range page 141. Oil will
otherwise be drawn in through the crankc ase ventilation and may pass through the
exhaust system to atmosphere. The oil ma y combust in the catalytic converter and
damage it.Changing engine oilThe engine oil must be changed at the intervals stated in the Service schedule or
according to the service interval indicator page 17, “Service Interval Display”.
WARNING
Only carry out the engine oil change, if you have the required professional
knowledge!
Read and observe the warning notes page 140, “Working in the engine
compartment” before working in the engine compartment.
First of all, let the engine cool down, we ar an eye protection and gloves - risk
of caustic burns due to hot oil.Caution
You must not pour any additives into the engine oil - risk of engine damage! Damage,
which results from such product, are excluded from the warranty.
For the sake of the environment
You must on no account pour oil into the ground or into the sewage system.
AAAA
AA
s2bs.2.book Page 142 Monday, September 27, 2010 9:53 AM