turn signal SKODA OCTAVIA TOUR 2011 2.G / (1Z) Owner's Manual
[x] Cancel search | Manufacturer: SKODA, Model Year: 2011, Model line: OCTAVIA TOUR, Model: SKODA OCTAVIA TOUR 2011 2.G / (1Z)Pages: 183, PDF Size: 11.13 MB
Page 10 of 183
Cockpit9
Using the system
Safety
Driving Tips
General Maintenance
Breakdown assistance
Technical Data
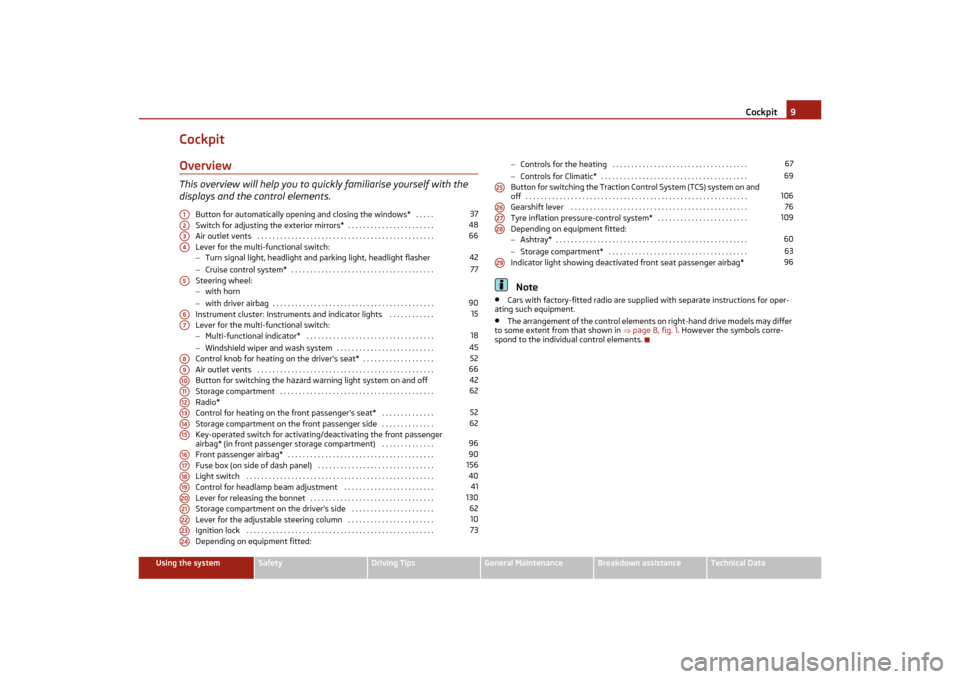
CockpitOverviewThis overview will help you to quickly familiarise yourself with the
displays and the control elements.
Button for automatically opening and closing the windows* . . . . .
Switch for adjusting the exterior mirrors* . . . . . . . . . . . . . . . . . . . . . . .
Air outlet vents . . . . . . . . . . . . . . . . . . . . . . . . . . . . . . . . . . . . . . . . . . . . . . .
Lever for the multi-functional switch:
−Turn signal light, headlight and parking light, headlight flasher
− Cruise control system* . . . . . . . . . . . . . . . . . . . . . . . . . . . . . . . . . . . . . .
Steering wheel:
− with horn
− with driver airbag . . . . . . . . . . . . . . . . . . . . . . . . . . . . . . . . . . . . . . . . . . .
Instrument cluster: Instruments and indicator lights . . . . . . . . . . . .
Lever for the multi-functional switch:
− Multi-functional indicator* . . . . . . . . . . . . . . . . . . . . . . . . . . . . . . . . . .
− Windshield wiper and wash system . . . . . . . . . . . . . . . . . . . . . . . . . .
Control knob for heating on the driver's seat* . . . . . . . . . . . . . . . . . . .
Air outlet vents . . . . . . . . . . . . . . . . . . . . . . . . . . . . . . . . . . . . . . . . . . . . . . .
Button for switching the hazard warning light system on and off
Storage compartment . . . . . . . . . . . . . . . . . . . . . . . . . . . . . . . . . . . . . . . . .
Radio*
Control for heating on the front passenger's seat* . . . . . . . . . . . . . .
Storage compartment on the front passenger side . . . . . . . . . . . . . .
Key-operated switch for activating /deactivating the front passenger
airbag* (in front passenger storage compartment) . . . . . . . . . . . . . .
Front passenger airbag* . . . . . . . . . . . . . . . . . . . . . . . . . . . . . . . . . . . . . . .
Fuse box (on side of dash panel) . . . . . . . . . . . . . . . . . . . . . . . . . . . . . . .
Light switch . . . . . . . . . . . . . . . . . . . . . . . . . . . . . . . . . . . . . . . . . . . . . . . . . .
Control for headlamp beam adjustment . . . . . . . . . . . . . . . . . . . . . . . .
Lever for releasing the bonnet . . . . . . . . . . . . . . . . . . . . . . . . . . . . . . . . .
Storage compartment on the driver's side . . . . . . . . . . . . . . . . . . . . . .
Lever for the adjustable steering column . . . . . . . . . . . . . . . . . . . . . . .
Ignition lock . . . . . . . . . . . . . . . . . . . . . . . . . . . . . . . . . . . . . . . . . . . . . . . . . .
Depending on equipment fitted: −
Controls for the heating . . . . . . . . . . . . . . . . . . . . . . . . . . . . . . . . . . . .
− Controls for Climatic* . . . . . . . . . . . . . . . . . . . . . . . . . . . . . . . . . . . . . . .
Button for switching the Traction Control System (TCS) system on and
off . . . . . . . . . . . . . . . . . . . . . . . . . . . . . . . . . . . . . . . . . . . . . . . . . . . . . . . . . . .
Gearshift lever . . . . . . . . . . . . . . . . . . . . . . . . . . . . . . . . . . . . . . . . . . . . . . .
Tyre inflation pressure-control system* . . . . . . . . . . . . . . . . . . . . . . . .
Depending on equipment fitted:
− Ashtray* . . . . . . . . . . . . . . . . . . . . . . . . . . . . . . . . . . . . . . . . . . . . . . . . . . .
− Storage compartment* . . . . . . . . . . . . . . . . . . . . . . . . . . . . . . . . . . . . .
Indicator light showing deactivated front seat passenger airbag*
Note
•
Cars with factory-fitted radio are supplie d with separate instructions for oper-
ating such equipment.
•
The arrangement of the control elements on right-hand drive models may differ
to some extent from that shown in page 8, fig. 1 . However the symbols corre-
spond to the individual control elements.
A1
37
A2
48
A3
66
A4
4277
A5
90
A6
15
A7
1845
A8
52
A9
66
A10
42
A11
62
A12A13
52
A14
62
A15
96
A16
90
A17
156
A18
40
A19
41
A20
130
A21
62
A22
10
A23
73
A24
6769
A25
106
A26
76
A27
109
A28
6063
A29
96
s2lk.2.book Page 9 Monday, April 18, 2011 7:41 AM
Page 13 of 183
The brief instruction
12
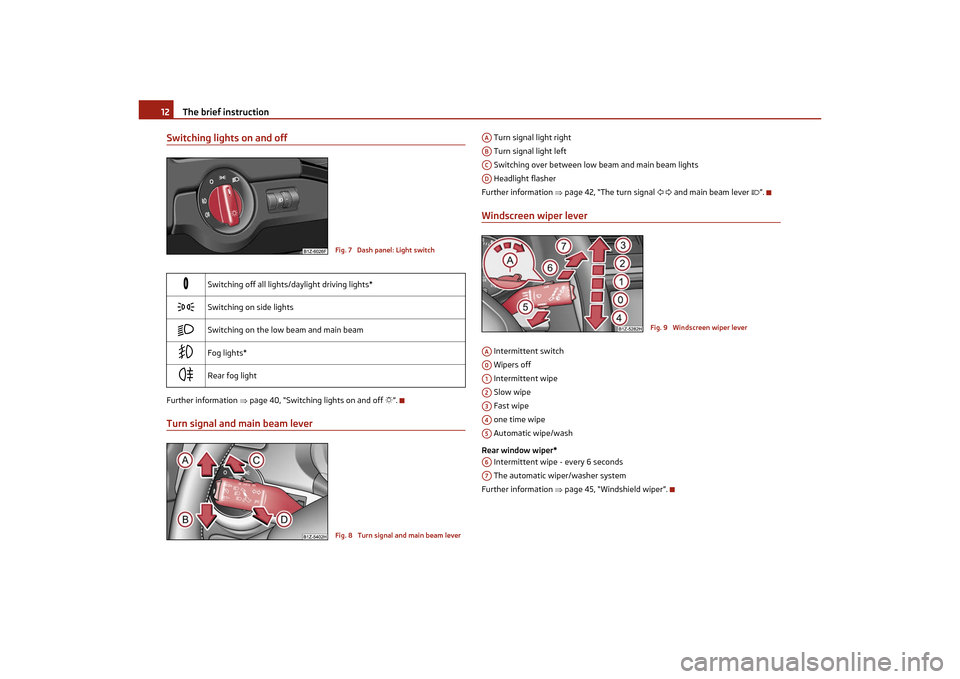
Switching lights on and offFurther information page 40, “Switching lights on and off ”.Turn signal and main beam lever
Turn signal light right
Turn signal light left
Switching over between low beam and main beam lights
Headlight flasher
Further information page 42, “The turn signal and main beam lever ”.Windscreen wiper lever Intermittent switch
Wipers off
Intermittent wipe
Slow wipe
Fast wipe
one time wipe
Automatic wipe/wash
Rear window wiper* Intermittent wipe - every 6 seconds
The automatic wiper/washer system
Further information page 45, “Windshield wiper”.
Switching off all lights/daylight driving lights*
Switching on side lights
Switching on the low beam and main beam
Fog lights*
Rear fog light
Fig. 7 Dash panel: Light switchFig. 8 Turn signal and main beam lever
AAABACAD
Fig. 9 Windscreen wiper lever
AAA0A1A2A3A4A5A6A7
s2lk.2.book Page 12 Monday, April 18, 2011 7:41 AM
Page 23 of 183
Instruments and Indicator/Warning Lights
22
WARNING
•
If you do not pay attention to the wa rning lights coming on and the corre-
sponding descriptions and warning notes, th is may result in severe body injuries
or major vehicle damage.
•
The engine compartment of your car is a hazardous area. There is a risk of
injuries, scalding, accidents and fire wh en working in the engine compartment,
e.g. inspecting and replenis hing oil and other fluids. It is also essential to
observe all warnings page 131, “Working in the engine compartment”.
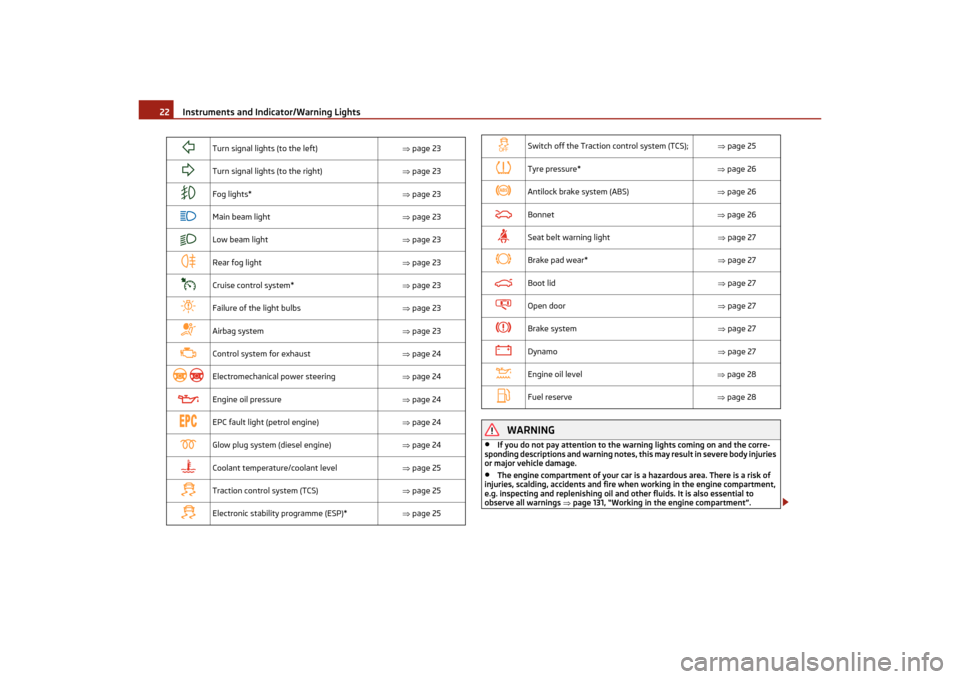
Turn signal lights (to the left) page 23
Turn signal lights (to the right) page 23
Fog lights* page 23
Main beam light page 23
Low beam light page 23
Rear fog light page 23
Cruise control system* page 23
Failure of the light bulbs page 23
Airbag system page 23
Control system for exhaust page 24
Electromechanical power steering page 24
Engine oil pressure page 24
EPC fault light (petrol engine) page 24
Glow plug system (diesel engine) page 24
Coolant temperature/coolant level page 25
Traction control system (TCS) page 25
Electronic stability programme (ESP)* page 25
Switch off the Traction control system (TCS); page 25
Tyre pressure* page 26
Antilock brake system (ABS) page 26
Bonnet page 26
Seat belt warning light page 27
Brake pad wear* page 27
Boot lid page 27
Open door page 27
Brake system page 27
Dynamo page 27
Engine oil level page 28
Fuel reserve page 28
s2lk.2.book Page 22 Monday, April 18, 2011 7:41 AM
Page 24 of 183
Instruments and Indicator/Warning Lights23
Using the system
Safety
Driving Tips
General Maintenance
Breakdown assistance
Technical Data
Note
•
The arrangement of the indicator lights depends on the model version. The
symbols shown in the following functional description are to be found as indicator
lights in the instrument cluster.
•
Operational faults are shown in the instrument cluster as red symbols (priority 1
- danger) or yellow symbols (priority 2 - warning).
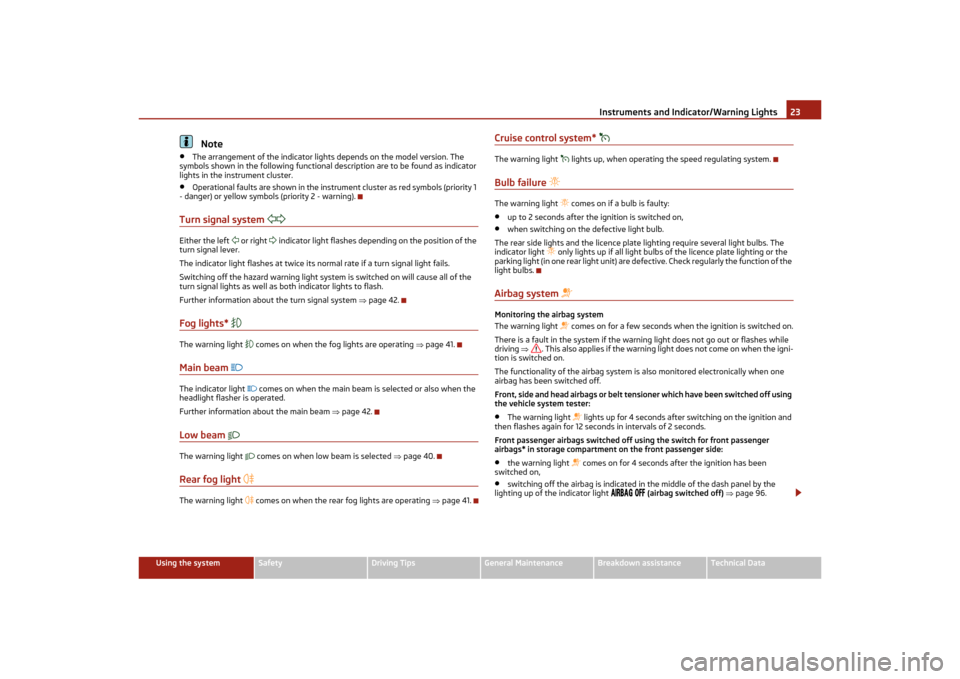
Turn signal system
Either the left
or right
indicator light flashes depending on the position of the
turn signal lever.
The indicator light flashes at twice its normal rate if a turn signal light fails.
Switching off the hazard warning light system is switched on will cause all of the
turn signal lights as well as both indicator lights to flash.
Further information about the turn signal system page 42.
Fog lights*
The warning light
comes on when the fog lights are operating page 41.
Main beam
The indicator light
comes on when the main beam is selected or also when the
headlight flasher is operated.
Further information about the main beam page 42.
Low beam
The warning light
comes on when low beam is selected page 40.
Rear fog light
The warning light
comes on when the rear fog lights are operating page 41.
Cruise control system*
The warning light
lights up, when operating the speed regulating system.
Bulb failure
The warning light
comes on if a bulb is faulty:
•
up to 2 seconds after the ignition is switched on,
•
when switching on the defective light bulb.
The rear side lights and the licence plate lighting require several light bulbs. The
indicator light
only lights up if all light bulbs of the licence plate lighting or the
parking light (in one rear light unit) are defective. Check regularly the function of the
light bulbs.
Airbag system
Monitoring the airbag system
The warning light
comes on for a few seconds when the ignition is switched on.
There is a fault in the system if the warning light does not go out or flashes while
driving . This also applies if the warning light does not come on when the igni-
tion is switched on.
The functionality of the airbag system is also monitored electronically when one
airbag has been switched off.
Front, side and head airbags or belt te nsioner which have been switched off using
the vehicle system tester:
•
The warning light
lights up for 4 seconds after switching on the ignition and
then flashes again for 12 seco nds in intervals of 2 seconds.
Front passenger airbags switched off using the switch for front passenger
airbags* in storage compartment on the front passenger side:
•
the warning light
comes on for 4 seconds after the ignition has been
switched on,
•
switching off the airbag is indicated in the middle of the dash panel by the
lighting up of the indicator light
(airbag switched off) page 96.
s2lk.2.book Page 23 Monday, April 18, 2011 7:41 AM
Page 36 of 183
Unlocking and locking35
Using the system
Safety
Driving Tips
General Maintenance
Breakdown assistance
Technical Data
If a lost key is replaced or if the receiver unit has been repaired or a new unit
installed, it is then necessary for an auth
orised Škoda Service Partner to initialise
the system. Only after this is it poss ible to again use the remote control.
Note
•
The remote control is automatically deactivated when the ignition is switched
on.
•
The operation of the remote control may temporarily be affected by interfer-
ence from transmitters close to the car and which operate in the same frequency
range (e.g. mobile phone, TV transmitter).
•
The battery must be replaced, ideally by an authorised Škoda Service Partner, if
the central locking or anti-theft alarm syst em does react to the remote control at
less than 3 metres away.
•
If the driver door is opened, the vehicle cannot be locked using the remote
control.
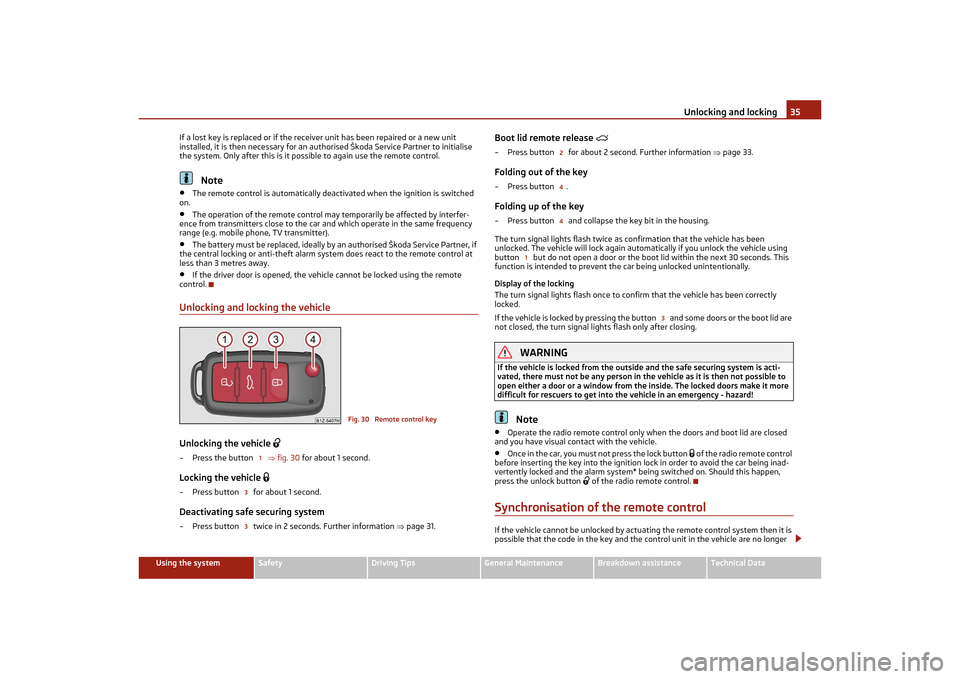
Unlocking and locking the vehicleUnlocking the vehicle
– Press the button fig. 30 for about 1 second.Locking the vehicle
– Press button for about 1 second.Deactivating safe securing system– Press button twice in 2 seconds. Further information page 31.
Boot lid remote release
– Press button for about 2 second. Further information page 33.Folding out of the key–Press button .Folding up of the key– Press button and collapse the key bit in the housing.
The turn signal lights flash twice as confirmation that the vehicle has been
unlocked. The vehicle will lock again automatically if you unlock the vehicle using
button but do not open a door or the b oot lid within the next 30 seconds. This
function is intended to prevent th e car being unlocked unintentionally.
Display of the locking
The turn signal lights flash once to co nfirm that the vehicle has been correctly
locked.
If the vehicle is locked by pressing the button and some doors or the boot lid are
not closed, the turn signal li ghts flash only after closing.
WARNING
If the vehicle is locked from the outsid e and the safe securing system is acti-
vated, there must not be any person in th e vehicle as it is then not possible to
open either a door or a window from the inside. The locked doors make it more
difficult for rescuers to get into the vehicle in an emergency - hazard!
Note
•
Operate the radio remote control only when the doors and boot lid are closed
and you have visual contact with the vehicle.
•
Once in the car, you must not press the lock button
of the radio remote control
before inserting the key into the ignition lock in order to avoid the car being inad-
vertently locked and the alarm system* being switched on. Should this happen,
press the unlock button
of the radio remote control.
Synchronisation of the remote controlIf the vehicle cannot be unlocked by actuating the remote control system then it is
possible that the code in the key and the control unit in the vehicle are no longer
Fig. 30 Remote control key
1
33
244
1
3
s2lk.2.book Page 35 Monday, April 18, 2011 7:41 AM
Page 41 of 183
Lights and Visibility
40
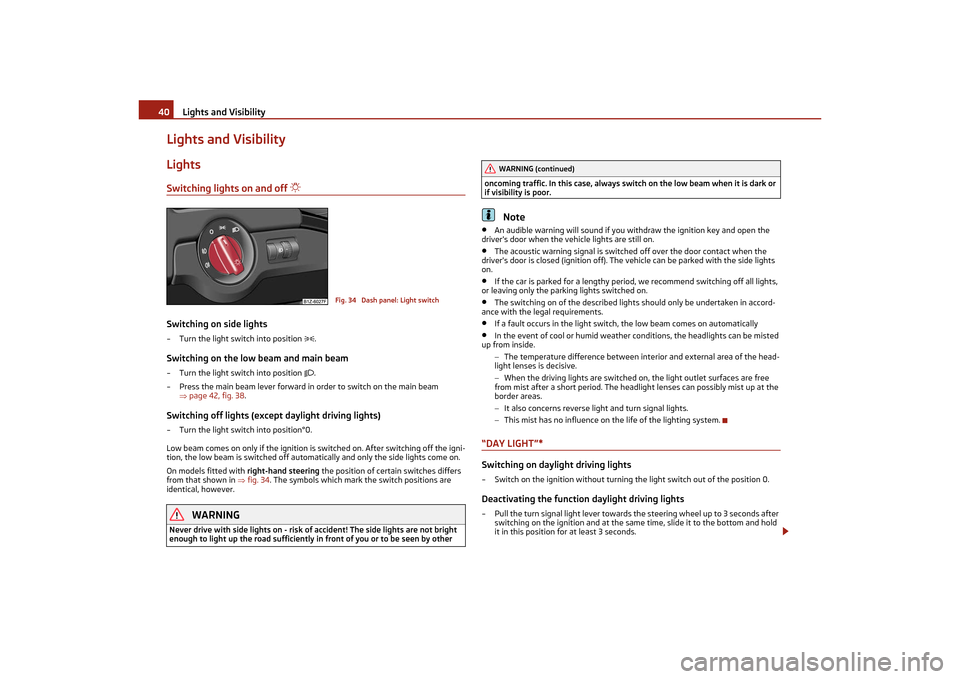
Lights and VisibilityLightsSwitching lights on and off
Switching on side lights– Turn the light switch into position
.
Switching on the low beam and main beam– Turn the light switch into position
.
– Press the main beam lever forward in order to switch on the main beam page 42, fig. 38 .
Switching off lights (except daylight driving lights)– Turn the light switch into position°0.
Low beam comes on only if the ignition is switched on. After switching off the igni-
tion, the low beam is switched off automati cally and only the side lights come on.
On models fitted with right-hand steering the position of certain switches differs
from that shown in fig. 34 . The symbols which mark the switch positions are
identical, however.
WARNING
Never drive with side lights on - risk of accident! The side lights are not bright
enough to light up the road sufficiently in front of you or to be seen by other oncoming traffic. In this case, always swit
ch on the low beam when it is dark or
if visibility is poor.
Note
•
An audible warning will sound if you withdraw the ignition key and open the
driver's door when the vehicle lights are still on.
•
The acoustic warning signal is switched off over the door contact when the
driver's door is closed (ignition off). The vehicle can be parked with the side lights
on.
•
If the car is parked for a lengthy period, we recommend switching off all lights,
or leaving only the parking lights switched on.
•
The switching on of the desc ribed lights should only be undertaken in accord-
ance with the legal requirements.
•
If a fault occurs in the light switch, the low beam comes on automatically
•
In the event of cool or humid weather co nditions, the headlights can be misted
up from inside.
−The temperature difference between interior and external area of the head-
light lenses is decisive.
− When the driving lights are switched on, the light outlet surfaces are free
from mist after a short period. The headlight lenses can possibly mist up at the
border areas.
− It also concerns reverse light and turn signal lights.
− This mist has no influence on the life of the lighting system.
“DAY LIGHT”* Switching on daylight driving lights– Switch on the ignition without turning the light switch out of the position 0.Deactivating the function daylight driving lights– Pull the turn signal light lever towards the steering wheel up to 3 seconds after
switching on the ignition and at the same time, slide it to the bottom and hold
it in this position for at least 3 seconds.
Fig. 34 Dash panel: Light switch
WARNING (continued)
s2lk.2.book Page 40 Monday, April 18, 2011 7:41 AM
Page 42 of 183
Lights and Visibility41
Using the system
Safety
Driving Tips
General Maintenance
Breakdown assistance
Technical Data
Activating the function daylight driving lights– Pull the turn signal light lever towards the steering wheel up to 3 seconds after
switching on the ignition and at the same time, slide it to the top and hold it in
this position for at least 3 seconds.
The daytime driving light is a combination of low-beam and parking light (front and
rear), including licence plate light.
When the daylight driving lights are switched on, the lighting of the instrument
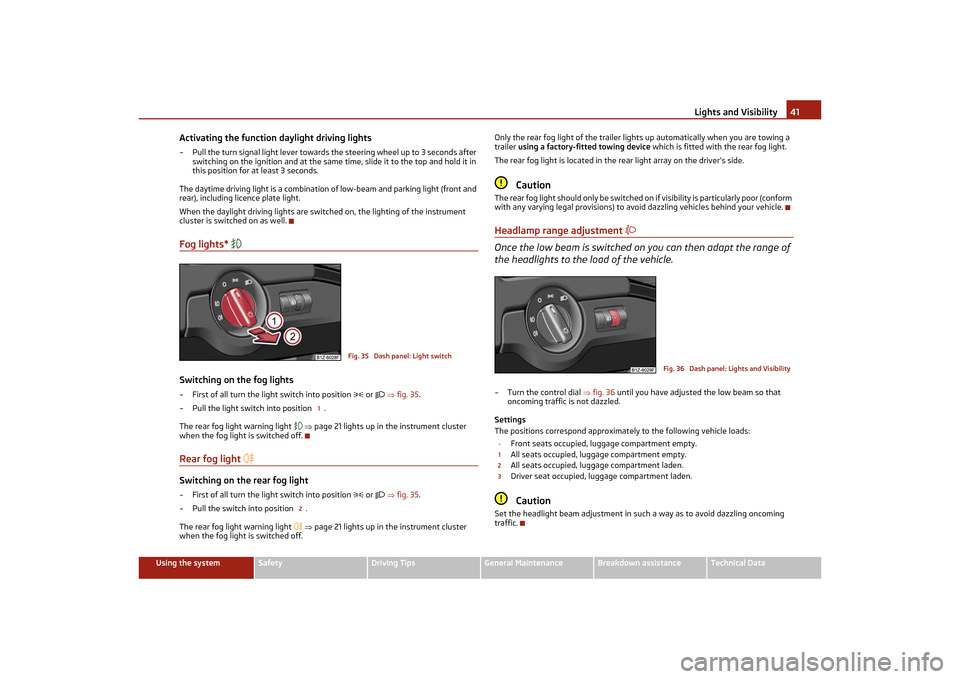
cluster is switched on as well.Fog lights*
Switching on the fog lights– First of all turn the light switch into position
or
fig. 35 .
– Pull the light switch into position .
The rear fog light warning light
page 21 lights up in the instrument cluster
when the fog light is switched off.
Rear fog light
Switching on the rear fog light– First of all turn the light switch into position
or
fig. 35 .
– Pull the switch into position .
The rear fog light warning light
page 21 lights up in the instrument cluster
when the fog light is switched off. Only the rear fog light of the trailer ligh
ts up automatically when you are towing a
trailer using a factory-fitted towing device which is fitted with the rear fog light.
The rear fog light is located in the re ar light array on the driver's side.
Caution
The rear fog light should only b e s w i t c h e d o n i f v i s i b i l i t y i s p a r t i c u l a r l y p o o r ( c o n f o r m
with any varying legal provisions) to avoid dazzling vehicles behind your vehicle.Headlamp range adjustment
Once the low beam is switched on you can then adapt the range of
the headlights to the load of the vehicle.– Turn the control dial fig. 36 until you have adjusted the low beam so that
oncoming traffic is not dazzled.
Settings
The positions correspond approximately to the following vehicle loads: Front seats occupied, luggage compartment empty.
All seats occupied, luggage compartment empty.
All seats occupied, luggage compartment laden.
Driver seat occupied, luggage compartment laden.
Caution
Set the headlight beam adjustment in such a way as to avoid dazzling oncoming
traffic.
Fig. 35 Dash panel: Light switch
1
2
Fig. 36 Dash panel: Lights and Visibility
-123
s2lk.2.book Page 41 Monday, April 18, 2011 7:41 AM
Page 43 of 183
Lights and Visibility
42
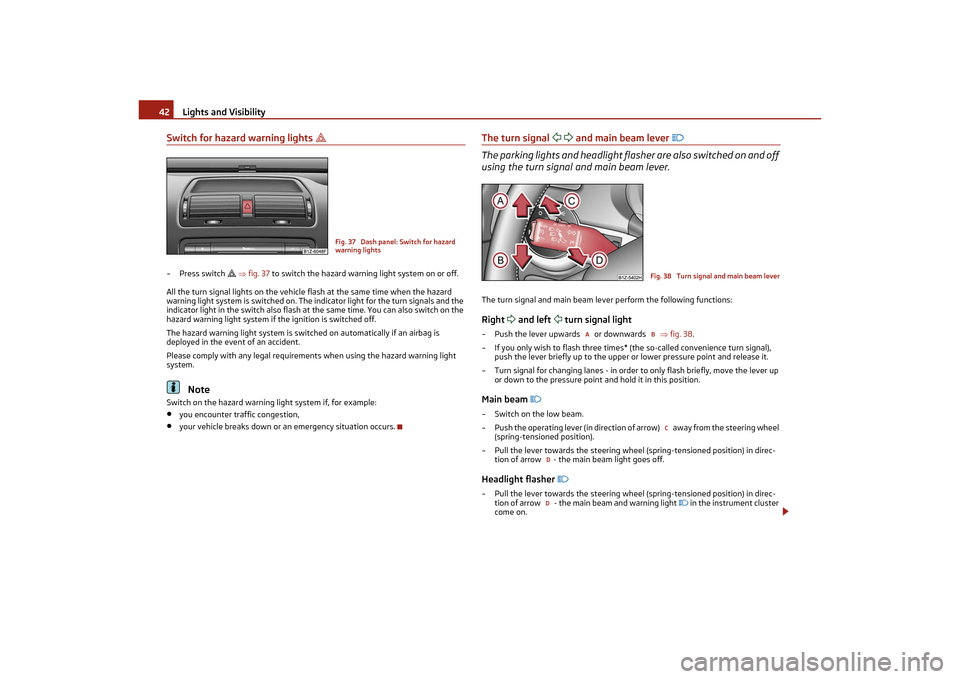
Switch for hazard warning lights
– Press switch
fig. 37 to switch the hazard warning light system on or off.
All the turn signal lights on the vehicle flash at the same time when the hazard
warning light system is switched on. The indicator light for the turn signals and the
indicator light in the switch also flash at the same time. You can also switch on the
hazard warning light system if the ignition is switched off.
The hazard warning light system is switched on automatically if an airbag is
deployed in the event of an accident.
Please comply with any legal requirements when using the hazard warning light
system.
Note
Switch on the hazard warning light system if, for example:•
you encounter traffic congestion,
•
your vehicle breaks down or an emergency situation occurs.
The turn signal
and main beam lever
The parking lights and headlight flas her are also switched on and off
using the turn signal and main beam lever.The turn signal and main beam le ver perform the following functions:Right
and left
turn signal light
– Push the lever upwards or downwards fig. 38 .
– If you only wish to flash three times* (the so-called convenience turn signal), push the lever briefly up to the upper or lower pressure point and release it.
– Turn signal for changing lanes - in order to only flash briefly, move the lever up or down to the pressure point and hold it in this position.Main beam
– Switch on the low beam.
– Push the operating lever (in direction of arrow) away from the steering wheel
(spring-tensioned position).
– Pull the lever towards the steering wheel (spring-tensioned position) in direc- tion of arrow - the main beam light goes off.Headlight flasher
– Pull the lever towards the steering wheel (spring-tensioned position) in direc-tion of arrow - the main beam and warning light
in the instrument cluster
come on.
Fig. 37 Dash panel: Switch for hazard
warning lights
Fig. 38 Turn signal and main beam lever
A
B
C
DD
s2lk.2.book Page 42 Monday, April 18, 2011 7:41 AM
Page 44 of 183
Lights and Visibility43
Using the system
Safety
Driving Tips
General Maintenance
Breakdown assistance
Technical Data
Parking light
– Switch off the ignition.
– Push the lever up or down - the right-hand or left-hand parking light is switched
on.
Information concerning the function of the lights.•
The turn signal system only operates when the ig nition is switched on. The
corresponding indicator light
or in the instrument cluster also flashes.
•
The turn signal is automatically cancelled after negotiating a curve.
•
The indicator light flashes at twice its normal rate if a bulb of the turn signal light
fails.
•
The side light and rear light on the appropriate side of the vehicle are switched
on when the parking light is selected. The parking light only operates if the ignition
is switched off.Caution
Use main beam or the headlight flasher only if this does not risk dazzling other road
users.
Note
•
If you have switched on the right or left turn signal light and you switch off the
ignition, the parking light is not automatically switched on.
•
Use only in accordance with the legal requirements the described lighting and
signal systems.
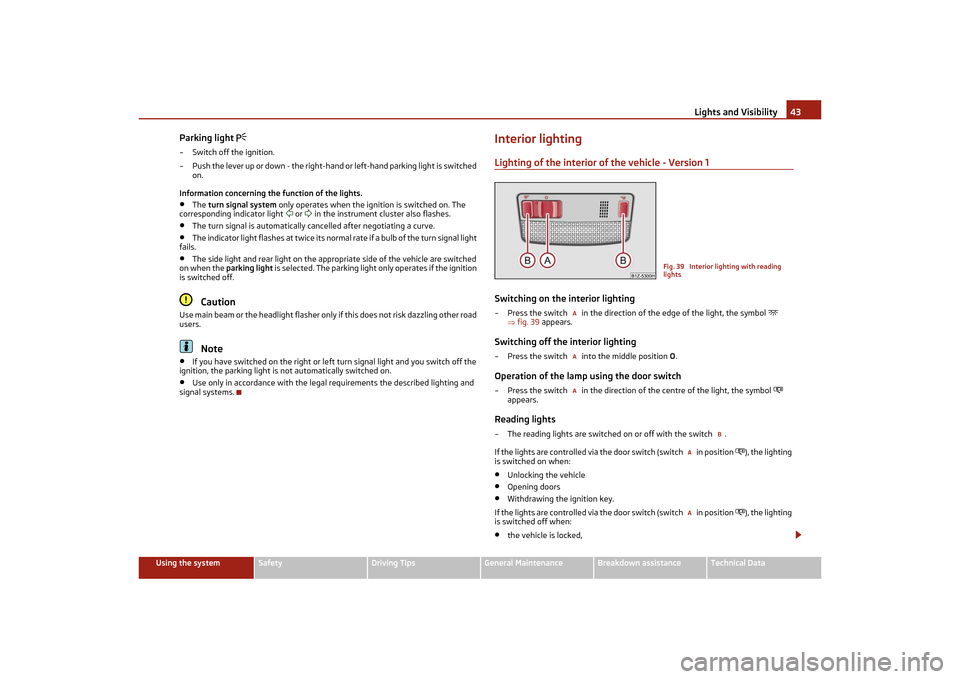
Interior lightingLighting of the interior of the vehicle - Version 1Switching on the interior lighting– Press the switch in the direction of the edge of the light, the symbol
fig. 39 appears.
Switching off the interior lighting– Press the switch into the middle position O .Operation of the lamp using the door switch– Press the switch in the direction of the centre of the light, the symbol
appears.
Reading lights– The reading lights are switched on or off with the switch .
If the lights are controlled via the door switch (switch in position
), the lighting
is switched on when:
•
Unlocking the vehicle
•
Opening doors
•
Withdrawing the ignition key.
If the lights are controlled via the door switch (switch in position
), the lighting
is switched off when:
•
the vehicle is locked,
Fig. 39 Interior lighting with reading
lights
AAA
B
AA
s2lk.2.book Page 43 Monday, April 18, 2011 7:41 AM
Page 78 of 183
Starting-off and Driving77
Using the system
Safety
Driving Tips
General Maintenance
Breakdown assistance
Technical Data
Caution
Each time the vehicle is parked, first of all apply the handbrake and then additionally
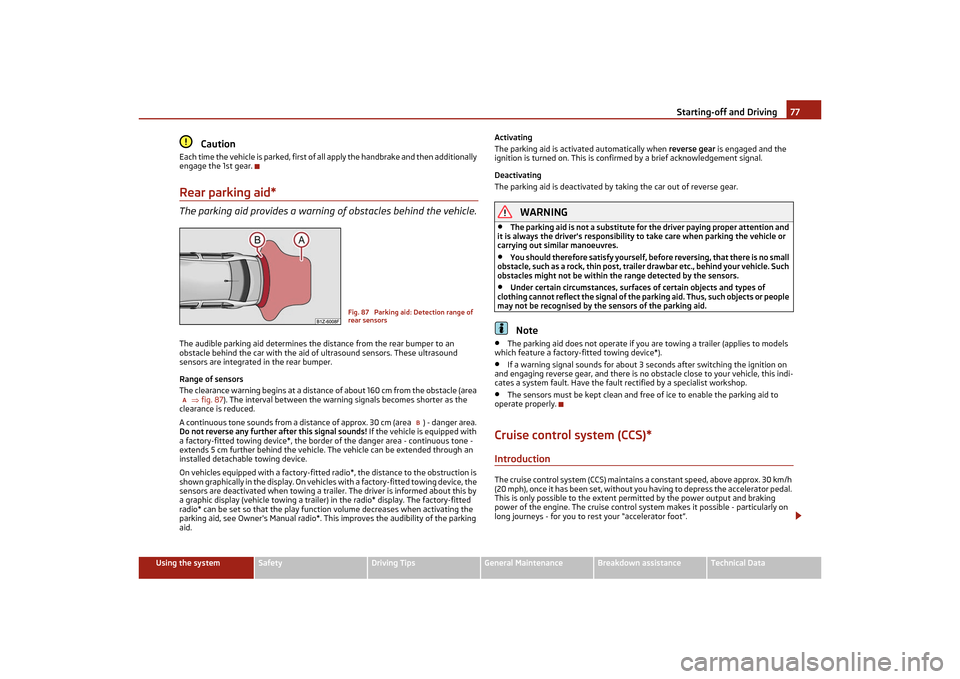
engage the 1st gear.Rear parking aid*The parking aid provides a warnin g of obstacles behind the vehicle.The audible parking aid determines the distance from the rear bumper to an
obstacle behind the car with the aid of ultrasound sensors. These ultrasound
sensors are integrated in the rear bumper.
Range of sensors
The clearance warning begins at a distance of about 160 cm from the obstacle (area
fig. 87 ). The interval between the warning signals becomes shorter as the
clearance is reduced.
A continuous tone sounds from a distance of approx. 30 cm (area ) - danger area.
Do not reverse any further after this signal sounds! If the vehicle is equipped with
a factory-fitted towing device*, the border of the danger area - continuous tone -
extends 5 cm further behind the vehicle. The vehicle can be extended through an
installed detachable towing device.
On vehicles equipped with a factory-fitted radio*, the distance to the obstruction is
shown graphically in the display. On vehicl es with a factory-fitted towing device, the
sensors are deactivated when towing a trailer. The driver is informed about this by
a graphic display (vehicle towing a trailer) in the radio* display. The factory-fitted
radio* can be set so that the play function volume decreases when activating the
parking aid, see Owner's Manual radio*. This improves the audibility of the parking
aid. Activating
The parking aid is activated automatically when
reverse gear is engaged and the
ignition is turned on. This is confirmed by a brief acknowledgement signal.
Deactivating
The parking aid is deactivated by taking the car out of reverse gear.
WARNING
•
The parking aid is not a substitute for the driver paying proper attention and
it is always the driver's responsibility to take care when parking the vehicle or
carrying out similar manoeuvres.
•
You should therefore satisfy yourself, before reversing, that there is no small
obstacle, such as a rock, thin post, traile r drawbar etc., behind your vehicle. Such
obstacles might not be within the range detected by the sensors.
•
Under certain circumstances, surfaces of certain objects and types of
clothing cannot reflect the signal of the pa rking aid. Thus, such objects or people
may not be recognised by the sensors of the parking aid.Note
•
The parking aid does not operate if you are towing a trailer (applies to models
which feature a factory-fitted towing device*).
•
If a warning signal sounds for about 3 seconds after switching the ignition on
and engaging reverse gear, and there is no obstacle close to your vehicle, this indi-
cates a system fault. Have the fault rectified by a specialist workshop.
•
The sensors must be kept clean and free of ice to enable the parking aid to
operate properly.
Cruise control system (CCS)*IntroductionThe cruise control system (CCS) maintains a constant speed, above approx. 30 km/h
(20 mph), once it has been set, without yo u having to depress the accelerator pedal.
This is only possible to the extent pe rmitted by the power output and braking
power of the engine. The cruise control syst em makes it possible - particularly on
long journeys - for you to rest your “accelerator foot”.
Fig. 87 Parking aid: Detection range of
rear sensors
A
B
s2lk.2.book Page 77 Monday, April 18, 2011 7:41 AM