technical data SKODA OCTAVIA TOUR 2011 2.G / (1Z) User Guide
[x] Cancel search | Manufacturer: SKODA, Model Year: 2011, Model line: OCTAVIA TOUR, Model: SKODA OCTAVIA TOUR 2011 2.G / (1Z)Pages: 183, PDF Size: 11.13 MB
Page 22 of 183
Instruments and Indicator/Warning Lights21
Using the system
Safety
Driving Tips
General Maintenance
Breakdown assistance
Technical Data
– Use switch to set the requir
ed speed limit, e.g. 50 km/h.
– Confirm the speed limit that was set with button , or wait 5 seconds until the setting is saved automatically (the value stops flashing).
In this way you can set the limit in 5 km/h steps.
Configuring the speed limit while the vehicle is moving– With switch , choose the menu point Warning against excessive speeds.
– Drive e.°g at a speed of 50 km/h.
– Press the switch to accept the current speed as the speed limit (the value flashes).
If you wish to change the speed limit that was set, it is changed in 5 km/h intervals
(e.g. the accepted speed of 47 km/h increa ses to 50 km/h or decreases to 45 km/h).
– Confirm the speed limit that was set by pressing button again, or wait 5
seconds until the setting is saved automatically (the value stops flashing).
Changing or erasing the speed limit– With switch , choose the menu point Warning against excessive speeds.
– When you press the switch again, the speed limit is erased.
– Pressing the switch a further time ac tivates the change mode for the speed
limit.
If you exceed the configured speed, an ac oustic signal will sound as a warning. A
Warning against excessive speeds appears together with the set limit on the
display.
The set speed limit remains stored even after switching off the ignition.
WARNING
Pay attention primarily to the traffic situation! As the driver you are fully respon-
sible for road safety.
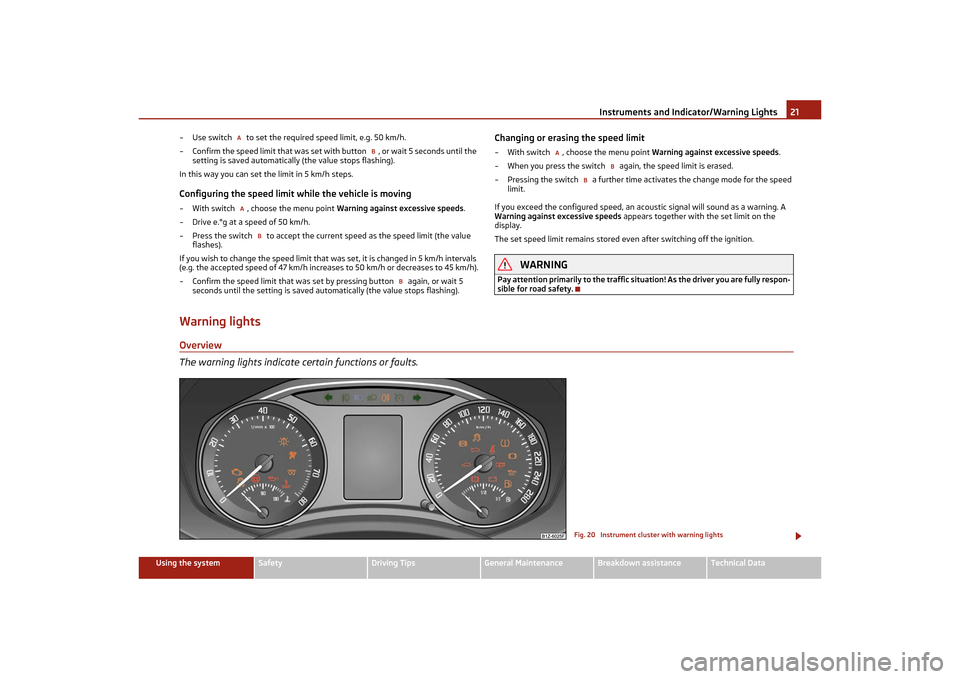
Warning lightsOverview
The warning lights indicate certain functions or faults.
A
B
A
B
B
A
B
BFig. 20 Instrument cluster with warning lights
s2lk.2.book Page 21 Monday, April 18, 2011 7:41 AM
Page 24 of 183
Instruments and Indicator/Warning Lights23
Using the system
Safety
Driving Tips
General Maintenance
Breakdown assistance
Technical Data
Note
•
The arrangement of the indicator lights depends on the model version. The
symbols shown in the following functional description are to be found as indicator
lights in the instrument cluster.
•
Operational faults are shown in the instrument cluster as red symbols (priority 1
- danger) or yellow symbols (priority 2 - warning).
Turn signal system
Either the left
or right
indicator light flashes depending on the position of the
turn signal lever.
The indicator light flashes at twice its normal rate if a turn signal light fails.
Switching off the hazard warning light system is switched on will cause all of the
turn signal lights as well as both indicator lights to flash.
Further information about the turn signal system page 42.
Fog lights*
The warning light
comes on when the fog lights are operating page 41.
Main beam
The indicator light
comes on when the main beam is selected or also when the
headlight flasher is operated.
Further information about the main beam page 42.
Low beam
The warning light
comes on when low beam is selected page 40.
Rear fog light
The warning light
comes on when the rear fog lights are operating page 41.
Cruise control system*
The warning light
lights up, when operating the speed regulating system.
Bulb failure
The warning light
comes on if a bulb is faulty:
•
up to 2 seconds after the ignition is switched on,
•
when switching on the defective light bulb.
The rear side lights and the licence plate lighting require several light bulbs. The
indicator light
only lights up if all light bulbs of the licence plate lighting or the
parking light (in one rear light unit) are defective. Check regularly the function of the
light bulbs.
Airbag system
Monitoring the airbag system
The warning light
comes on for a few seconds when the ignition is switched on.
There is a fault in the system if the warning light does not go out or flashes while
driving . This also applies if the warning light does not come on when the igni-
tion is switched on.
The functionality of the airbag system is also monitored electronically when one
airbag has been switched off.
Front, side and head airbags or belt te nsioner which have been switched off using
the vehicle system tester:
•
The warning light
lights up for 4 seconds after switching on the ignition and
then flashes again for 12 seco nds in intervals of 2 seconds.
Front passenger airbags switched off using the switch for front passenger
airbags* in storage compartment on the front passenger side:
•
the warning light
comes on for 4 seconds after the ignition has been
switched on,
•
switching off the airbag is indicated in the middle of the dash panel by the
lighting up of the indicator light
(airbag switched off) page 96.
s2lk.2.book Page 23 Monday, April 18, 2011 7:41 AM
Page 26 of 183
Instruments and Indicator/Warning Lights25
Using the system
Safety
Driving Tips
General Maintenance
Breakdown assistance
Technical Data
The glow plug indicator light will come on
for about 1 second if the engine is at a
normal operating temperature or if the outside temperature is above +5 °C. This
means that you can start the engine right away .
There is a fault in the glow plug system if the warning light
does not come on
at all or lights up continuously . Contact a specialist garage as soon as possible to
obtain assistance.
If the warning light
begins to flash while driving, a fault exists in the engine
control. The engine management system selects an emergency programme which
enables you to drive to the nearest specialist garage by adopting a gentle style of
driving.
Coolant temperature/coolant level
The warning light
comes on for a few seconds when the ignition is switched on.
The coolant temperature is too high or the coolant level too low if the warning light
does not go out or flashes while driving.
3 peeps sound as an additional warning signal.
In this case stop and switch the engine off and check the coolant level; top up the
coolant as necessary.
Do not continue your journey if for some reason it is not possible under the condi-
tions prevailing to top up with coolant. Keep the engine switched off and obtain
professional assistance from a specialist garage, otherwise it could lead to severe
engine damage.
If the coolant is within the specified range, the increased temperature may be
caused by an operating problem at the coolant fan. Check the fuse for the coolant
fan, replace it if necessary page 157, “Fuse assignment in engine compartment”.
Do not continue driving if the warning light does not go off although the fluid is at
the correct level and also the fuse of the fan is in proper order. Contact a specialist
garage to obtain assistance.
Please also refer to the additional instructions page 133, “Cooling system”.
WARNING
•
If you must stop for technical reason s, then park the vehicle at a safe
distance from the traffic and switch o ff the engine and switch on the hazard
warning light system page 42.
•
Take care when opening the coolant exp ansion bottle. If the engine is hot,
the cooling system is pressuri zed - risk of scalding! It is best to allow the engine
to cool down before removing the cap.
•
Do not touch the coolant fan The coolant fan may switch on automatically
even if the ignition is off.
Traction control system (TCS)
The warning light
comes on for a few seconds when the ignition is switched on.
The warning light flashes when a control cycle is activated while driving.
The warning light lights up permanently if there is a fault in the system.
The fact that the TCS system operates to gether with the ABS means that the TCS
warning light will also come on if the ABS system is not operating properly.
If the warning light comes on immediately after starting the engine, the TCS
system can be switched off for technical reasons. In this case, the TCS system can
be switched on again by switching the igniti on on and off. If the warning light goes
out, the TCS system is fully functional again.
Further information about the TCS page 106, “Traction control system (TCS)”.
Note
If the battery has been disconnected and reconnected, the warning light
comes
on after switching on the ignition. The warning light must go out after driving a
short distance.
Switch off the Traction control system (TCS)
The TCS system is switched off by pressing the button page 106, fig. 112 and the
warning light lights up
.
Electronic stability programme (ESP)*
The warning light
comes on for a few seconds when the ignition is switched on.
When the ESP system is actively helping to stabilise the vehicle, the warning light
in the instrument cluster
flashes quickly.
The warning light lights up permanently if there is a fault in the ESP system.
The fact that the ESP system operates to gether with the ABS means that the ESP
warning light will also come on if the ABS system is not operating properly.
WARNING (continued)
s2lk.2.book Page 25 Monday, April 18, 2011 7:41 AM
Page 28 of 183
Instruments and Indicator/Warning Lights27
Using the system
Safety
Driving Tips
General Maintenance
Breakdown assistance
Technical Data
The warning light comes on even when the ignition is switched off. The warning
light lights up for a
maximum of 5 minutes.
Seat belt warning light
The warning light
comes on after the ignition is switched on as a reminder to
fasten the seat belt. The warning light only goes out if the driver has fastened his
seat belt.
If the seat belt has not been fastened by the driver, a permanent warning signal
sounds at vehicle speeds greater than 20 km/h and simultaneously the warning
light flashes
.
If the seat belt is not fastened by the driver during the next 90 seconds, the warning
signal is deactivated and the warning light
lights up permanently.
Further information on the seat belts page 85, “Seat belts”.
Thickness of the brake pads*
The warning light
comes on for a few seconds when the ignition is switched on.
If the warning light comes on, contact a specialist garage immediately and have
the brake pads on all of the wheels inspected.
Boot lid
The warning light
comes on when the ignition is switched on if the luggage
compartment door is open. If th e boot lid opens while driving
, the warning light
lights up and an audible signal sounds.
The warning light comes on even when the ignition is switched off. The warning
light lights up for a maximum of 5 minutes.
Open door
The warning light
comes on if one or several door s are opened or if the boot lid
is opened. If one of the doors opens while driving, the warning light lights
up and
an audible signal sounds.
The warning light comes on even when the ignition is switched off. The warning
light lights up for a maximum of 5 minutes.
Brake system
The warning light
flashes or comes on if the brake fluid level is too low, if there
is a fault in the ABS or if the handbrake is applied.
If the warning light flashes and an audi ble signal sounds three times (handbrake
is not applied), stop and check the brake fluid level .
If there is a fault in the ABS which also influences the function of the brake system
(e.g. distribution of brake pressure), the ABS warning light
comes on and at the
same time the brake system warning light starts flashing
. Be aware that not only
the ABS but also another part of the brake system is defective .
An audible signal sounds three time s as an additional warning signal.
One should get used to high pedal forces, long braking distances and long free play
of the brake pedal when driving to the next specialist garage.
For further information on the brake system page 107, “Brakes”.
Handbrake applied
The warning light
also comes on if the handbrake is applied. An audible warning
is also given if you drive the vehicle for at least 3 seconds at a speed of more than
6 km/h.
WARNING
•
Pay attention to the following instruct ions before checking the brake fluid
level and opening the bonnet page 131, “Working in the engine compart-
ment”.
•
If the brake system warning light
does not go out a few seconds after
switching on the ignition or comes on when driving, stop immediately and check
the brake fluid in the reservoir page 135. If the fluid level has dropped below
the MIN marking, do not drive any further - risk of accident! Obtain professional
assistance.
Alternator
The warning light
comes on after the ignition has been switched on. It should go
out after the engine has started.
If the warning light does not go out after the engine has started, or comes on when
driving, drive to the nearest specialist garage. The vehicle battery will be discharged
in this case so switch off all no n-essential electrical components.
s2lk.2.book Page 27 Monday, April 18, 2011 7:41 AM
Page 30 of 183
Unlocking and locking29
Using the system
Safety
Driving Tips
General Maintenance
Breakdown assistance
Technical Data
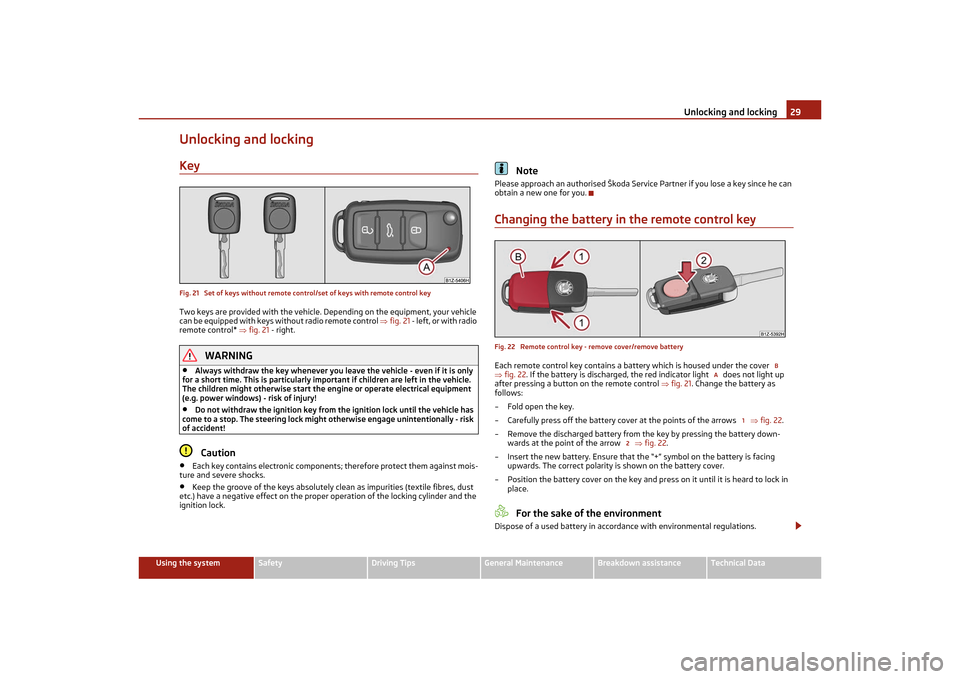
Unlocking and lockingKeyFig. 21 Set of keys without remote control/set of keys with remote control keyTwo keys are provided with the vehicle. Depending on the equipment, your vehicle
can be equipped with keys without radio remote control fig. 21 - left, or with radio
remote control* fig. 21 - right.
WARNING
•
Always withdraw the key whenever you leave the vehicle - even if it is only
for a short time. This is particularly import ant if children are left in the vehicle.
The children might otherwise start the en gine or operate electrical equipment
(e.g. power windows) - risk of injury!
•
Do not withdraw the ignition key from the ignition lock until the vehicle has
come to a stop. The steering lock might otherwise engage unintentionally - risk
of accident!Caution
•
Each key contains electronic components; therefore protect them against mois-
ture and severe shocks.
•
Keep the groove of the keys absolutely clean as impurities (textile fibres, dust
etc.) have a negative effect on the proper operation of the locking cylinder and the
ignition lock.
Note
Please approach an authoris ed Škoda Service Partner if you lose a key since he can
obtain a new one for you.Changing the battery in the remote control keyFig. 22 Remote control key - remove cover/remove batteryEach remote control key contains a battery which is housed under the cover
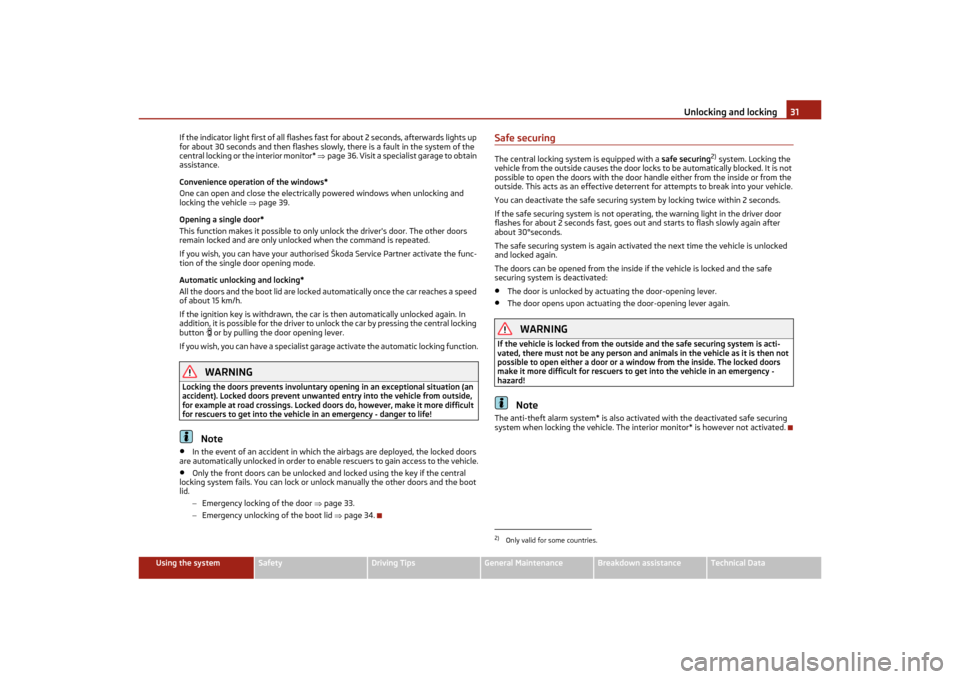
fig. 22 . If the battery is discharged, the red indicator light does not light up
after pressing a button on the remote control fig. 21 . Change the battery as
follows:
– Fold open the key.
– Carefully press off the battery cove r at the points of the arrows fig. 22 .
– Remove the discharged battery from the key by pressing the battery down- wards at the point of the arrow fig. 22 .
– Insert the new battery. Ensure that th e “+” symbol on the battery is facing
upwards. The correct polarity is shown on the battery cover.
– Position the battery cover on the key and pr ess on it until it is heard to lock in
place.
For the sake of the environment
Dispose of a used battery in accord ance with environmental regulations.
B
A
1
2
s2lk.2.book Page 29 Monday, April 18, 2011 7:41 AM
Page 32 of 183
Unlocking and locking31
Using the system
Safety
Driving Tips
General Maintenance
Breakdown assistance
Technical Data
If the indicator light first of all flashes fast
for about 2 seconds, afterwards lights up
for about 30 seconds and then flashes slowly, there is a fault in the system of the
central locking or the interior monitor* page 36. Visit a specialist garage to obtain
assistance.
Convenience operation of the windows*
One can open and close the electrically powered windows when unlocking and
locking the vehicle page 39.
Opening a single door*
This function makes it poss ible to only unlock the driver's door. The other doors
remain locked and are only unlocked when the command is repeated.
If you wish, you can have your authorised Škoda Service Partner activate the func-
tion of the single door opening mode.
Automatic unlocking and locking*
All the doors and the boot lid are locked automatically once the car reaches a speed
of about 15 km/h.
If the ignition key is withdrawn, the car is then automatically unlocked again. In
addition, it is possible for the driver to unlock the car by pressing the central locking
button
or by pulling the door opening lever.
If you wish, you can have a specialist gara ge activate the automatic locking function.WARNING
Locking the doors prevents involuntary opening in an exceptional situation (an
accident). Locked doors prevent unwanted entry into the vehicle from outside,
for example at road crossings. Locked do ors do, however, make it more difficult
for rescuers to get into the vehicl e in an emergency - danger to life!
Note
•
In the event of an accident in which the airbags are deployed, the locked doors
are automatically unlocked in order to enable rescuers to gain access to the vehicle.
•
Only the front doors can be unlocked and locked using the key if the central
locking system fails. You can lock or unlo ck manually the other doors and the boot
lid.
−Emergency locking of the door page 33.
− Emergency unlocking of the boot lid page 34.
Safe securingThe central locking system is equipped with a safe securing
2) system. Locking the
vehicle from the outside causes the door lock s to be automatically blocked. It is not
possible to open the doors with the door handle either from the inside or from the
outside. This acts as an effective deterren t for attempts to break into your vehicle.
You can deactivate the safe securing system by locking twice within 2 seconds.
If the safe securing system is not operat ing, the warning light in the driver door
flashes for about 2 seconds fast, goes out and starts to flash slowly again after
about 30°seconds.
The safe securing system is again activate d the next time the vehicle is unlocked
and locked again.
The doors can be opened from the inside if the vehicle is locked and the safe
securing system is deactivated:
•
The door is unlocked by actu ating the door-opening lever.
•
The door opens upon actuating the door-opening lever again.
WARNING
If the vehicle is locked from the outsid e and the safe securing system is acti-
vated, there must not be any person and animals in the vehicle as it is then not
possible to open either a door or a window from the inside. The locked doors
make it more difficult for rescuers to get into the vehicle in an emergency -
hazard!
Note
The anti-theft alarm system* is also acti vated with the deactivated safe securing
system when locking the vehicle. The interior monitor* is however not activated.2)Only valid for some countries.
s2lk.2.book Page 31 Monday, April 18, 2011 7:41 AM
Page 34 of 183
Unlocking and locking33
Using the system
Safety
Driving Tips
General Maintenance
Breakdown assistance
Technical Data
•
As long as one door is opened
3), the vehicle cannot be locked in order to avoid
inadvertently locking the key in the vehicle.
•
In the event of an accident in which the airbags are deployed, the locked doors
are automatically unlocked from the inside in order to enable rescuers to gain
access to the vehicle.
By pressing and holding the button or , you can conveniently close or open the
windows page 39.
WARNING
The central locking system also operates if the ignition is switched off. All the
doors and the boot lid are locked. Children should never be left unattended in
the vehicle since it is difficult to prov ide assistance from the outside when the
doors are locked. Locked doors make it difficult for rescuers to get into the
vehicle in an emergency - hazard!
Note
The door opening lever and the buttons for the central locking system do not
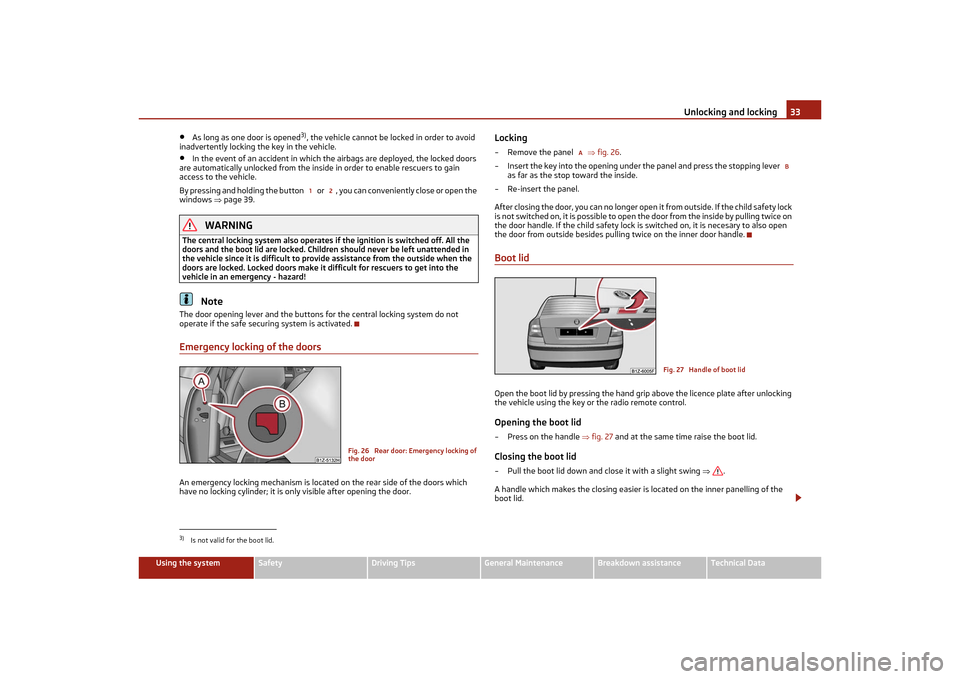
operate if the safe securing system is activated.Emergency locking of the doorsAn emergency locking mechanism is located on the rear side of the doors which
have no locking cylinder; it is on ly visible after opening the door.
Locking– Remove the panel fig. 26 .
– Insert the key into the opening under the panel and press the stopping lever as far as the stop toward the inside.
–Re-insert the panel.
After closing the door, you can no longer open it from outside. If the child safety lock
i s n o t sw it ch e d o n , i t i s p o ss ib le to o p e n t he do o r f ro m t he in si d e b y pu lli ng tw i ce o n
the door handle. If the child safety lock is switched on, it is necesary to also open
the door from outside besides pullin g twice on the inner door handle.Boot lidOpen the boot lid by pressing the hand grip above the licence plate after unlocking
the vehicle using the key or the radio remote control.Opening the boot lid–Press on the handle fig. 27 and at the same time raise the boot lid.Closing the boot lid– Pull the boot lid down and cl ose it with a slight swing .
A handle which makes the closing easier is located on the inner panelling of the
boot lid.
3)Is not valid for the boot lid.
1
2
Fig. 26 Rear door: Emergency locking of
the door
A
B
Fig. 27 Handle of boot lid
s2lk.2.book Page 33 Monday, April 18, 2011 7:41 AM
Page 36 of 183
Unlocking and locking35
Using the system
Safety
Driving Tips
General Maintenance
Breakdown assistance
Technical Data
If a lost key is replaced or if the receiver unit has been repaired or a new unit
installed, it is then necessary for an auth
orised Škoda Service Partner to initialise
the system. Only after this is it poss ible to again use the remote control.
Note
•
The remote control is automatically deactivated when the ignition is switched
on.
•
The operation of the remote control may temporarily be affected by interfer-
ence from transmitters close to the car and which operate in the same frequency
range (e.g. mobile phone, TV transmitter).
•
The battery must be replaced, ideally by an authorised Škoda Service Partner, if
the central locking or anti-theft alarm syst em does react to the remote control at
less than 3 metres away.
•
If the driver door is opened, the vehicle cannot be locked using the remote
control.
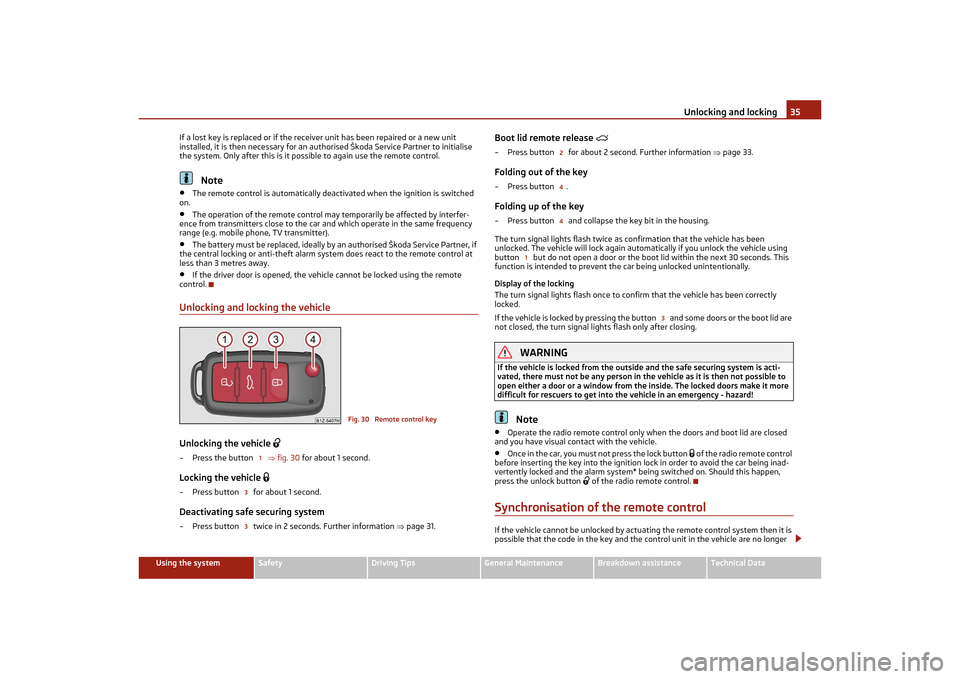
Unlocking and locking the vehicleUnlocking the vehicle
– Press the button fig. 30 for about 1 second.Locking the vehicle
– Press button for about 1 second.Deactivating safe securing system– Press button twice in 2 seconds. Further information page 31.
Boot lid remote release
– Press button for about 2 second. Further information page 33.Folding out of the key–Press button .Folding up of the key– Press button and collapse the key bit in the housing.
The turn signal lights flash twice as confirmation that the vehicle has been
unlocked. The vehicle will lock again automatically if you unlock the vehicle using
button but do not open a door or the b oot lid within the next 30 seconds. This
function is intended to prevent th e car being unlocked unintentionally.
Display of the locking
The turn signal lights flash once to co nfirm that the vehicle has been correctly
locked.
If the vehicle is locked by pressing the button and some doors or the boot lid are
not closed, the turn signal li ghts flash only after closing.
WARNING
If the vehicle is locked from the outsid e and the safe securing system is acti-
vated, there must not be any person in th e vehicle as it is then not possible to
open either a door or a window from the inside. The locked doors make it more
difficult for rescuers to get into the vehicle in an emergency - hazard!
Note
•
Operate the radio remote control only when the doors and boot lid are closed
and you have visual contact with the vehicle.
•
Once in the car, you must not press the lock button
of the radio remote control
before inserting the key into the ignition lock in order to avoid the car being inad-
vertently locked and the alarm system* being switched on. Should this happen,
press the unlock button
of the radio remote control.
Synchronisation of the remote controlIf the vehicle cannot be unlocked by actuating the remote control system then it is
possible that the code in the key and the control unit in the vehicle are no longer
Fig. 30 Remote control key
1
33
244
1
3
s2lk.2.book Page 35 Monday, April 18, 2011 7:41 AM
Page 38 of 183
Unlocking and locking37
Using the system
Safety
Driving Tips
General Maintenance
Breakdown assistance
Technical Data
The interior monitor and the towing protec
tion monitoring are switched on again
automatically the next time the car is locked.
Note
•
You can switch the interior monitor and the towing protection monitoring off if
there is a possibility that movements from (e.g. children or animals) inside the
vehicle interior or if the vehicle must be tr ansported (e.g. by train or ship) or towed,
might trigger the alarm.
•
The opened storage compartment for spectacles reduces the effectiveness of
the interior monitor. In orde r to ensure the function of the interior monitor to be
fully operational, always close the storage compartment for spectacles before
locking the vehicle.
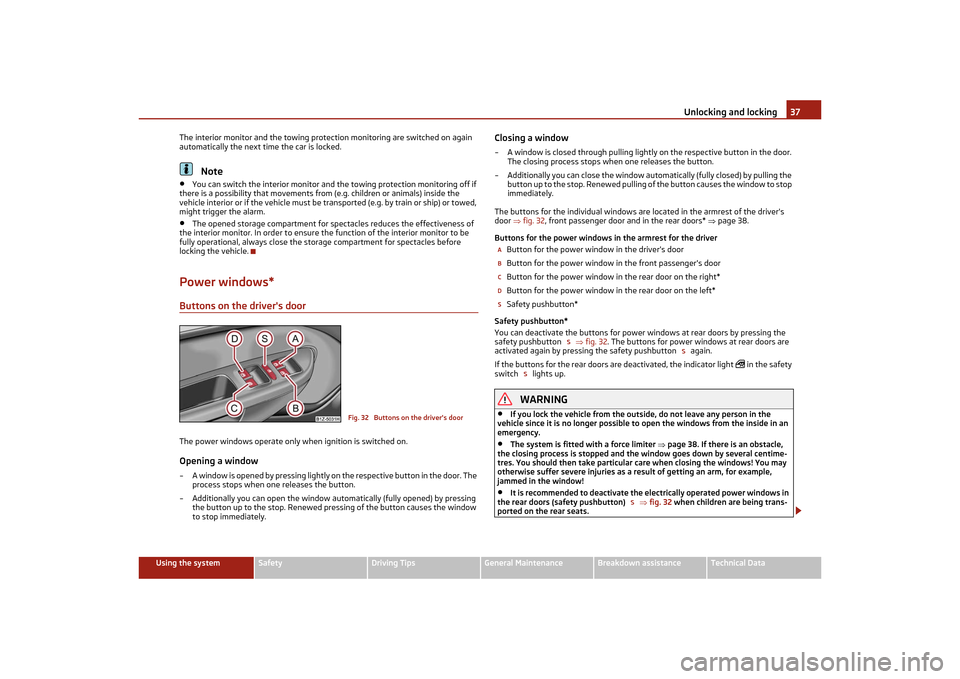
Power windows*Buttons on the driver's doorThe power windows operate only when ignition is switched on.Opening a window – A window is opened by pressing lightly on the respective button in the door. The process stops when one releases the button.
– Additionally you can open the window automatically (fully opened) by pressing the button up to the stop. Renewed pres sing of the button causes the window
to stop immediately.
Closing a window– A window is closed through pulling lightl y on the respective button in the door.
The closing process stops wh en one releases the button.
– Additionally you can close the window automatically (fully closed) by pulling the button up to the stop. Renewed pulling of the button causes the window to stop
immediately.
The buttons for the individual windows are located in the armrest of the driver's
door fig. 32 , front passenger door and in the rear doors* page 38.
Buttons for the power windows in the armrest for the driver Button for the power window in the driver's door
Button for the power window in the front passenger's door
Button for the power window in the rear door on the right*
Button for the power window in the rear door on the left*
Safety pushbutton*
Safety pushbutton*
You can deactivate the buttons for power windows at rear doors by pressing the
safety pushbutton fig. 32 . The buttons for power windows at rear doors are
activated again by pressing the safety pushbutton again.
If the buttons for the rear doors ar e deactivated, the indicator light
in the safety
switch lights up.
WARNING
•
If you lock the vehicle from the outs ide, do not leave any person in the
vehicle since it is no longer possible to open the windows from the inside in an
emergency.
•
The system is fitted with a force limiter page 38. If there is an obstacle,
the closing process is stopped and the window goes down by several centime-
tres. You should then take particular care when closing the windows! You may
otherwise suffer severe injuries as a result of getting an arm, for example,
jammed in the window!
•
It is recommended to deactivate the el ectrically operated power windows in
the rear doors (safety pushbutton) fig. 32 when children are being trans-
ported on the rear seats.
Fig. 32 Buttons on the driver's door
ABCDS
S
S
S
S
s2lk.2.book Page 37 Monday, April 18, 2011 7:41 AM
Page 40 of 183
Unlocking and locking39
Using the system
Safety
Driving Tips
General Maintenance
Breakdown assistance
Technical Data
Window convenience operation*You can open and close the window with power windows as follows when
unlocking and locking the vehicle.Opening a window– Hold the key in the locking cylinder of the driver's door in the unlock position or
press the unlock button of the radio remote control until all the windows are
opened.Closing a window– Hold the key in the locking cylinder of the driver's door in the lock position or press the lock button of the radio remo te control until all the windows are
closed.
You can interrupt the opening or closing operation of the windows immediately by
releasing the key or the lock button.
WARNING
The system is fitted with a force limiter page 38. If there is an obstacle, the
closing process is stopped and the window goes down by several centimetres.
You should then take particular care when closing the windows! You may other-
wise suffer severe injuries as a result of getting an arm, for example, jammed in
the window!
Note
On vehicles fitted with anti-theft alarm system the convenience window opening is
possible by means of the key in the locking cylinder only 45 seconds after deacti-
vating the warning system or after ac tivating the anti-theft alarm system.Operational faultsElectrically operated power windows do not operate
If the battery of the car has been disconnected and then reconnected, the electri-
cally operated power windows do not oper ate. The system must be activated.
Proceed as follows in order to re-establish the function:•
Switch on the ignition.
•
Press the relevant switch top and hold it pressed as long as necessary until the
window is closed.
•
Release the switch.
•
Press once again the relevant switch top and hold it pressed for approx. 3
seconds.
Operation in winter
Ice accumulating on the surface of the wi ndows during the winter may result in a
greater resistance when closing the windows and the window may stop and go
down several centimetres
It is necessary to put the force limiter out of operation in order to close the window
page 38, “Force limiter of the power windows”.
WARNING
The system is fitted with a force limiter page 38. If there is an obstacle, the
closing process is stopped and the window goes down by several centimetres.
You should then take particular care when closing the windows! You may other-
wise suffer severe injuries as a result of getting an arm, for example, jammed in
the window!
s2lk.2.book Page 39 Monday, April 18, 2011 7:41 AM