instrument cluster SKODA RAPID 2012 1.G User Guide
[x] Cancel search | Manufacturer: SKODA, Model Year: 2012, Model line: RAPID, Model: SKODA RAPID 2012 1.GPages: 180, PDF Size: 4.36 MB
Page 74 of 180
Faults in the brake surface
If it is found that the braking distance has suddenly become longer and that the
brake pedal can be depressed further, the brake system may be faulty. Visit a
ŠKODA specialist garage immediately and adjust your style of driving appropriate-
ly as you will not know how great the damage is.
Low brake fluid level
An insufficient level of brake fluid may result in problems in the brake system. The
level of the brake fluid is monitored electronically
» page 17, Brake system .
Brake booster
The brake booster increases the pressure generated with the brake pedal. The
brake booster only operates when the engine is running. ÐHandbrake
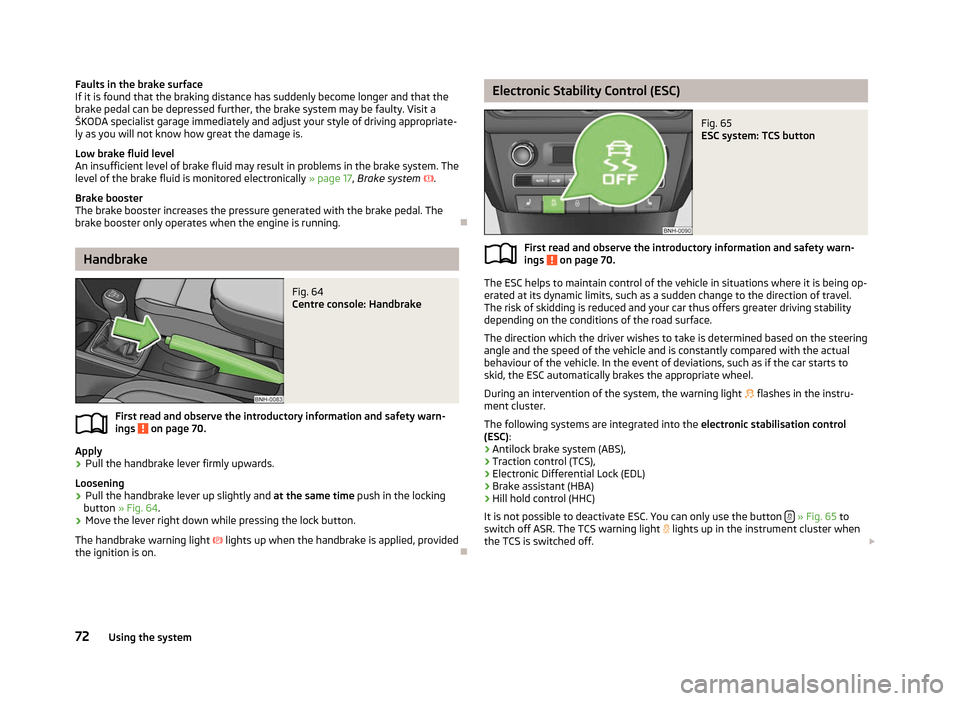
Fig. 64
Centre console: Handbrake
First read and observe the introductory information and safety warn-
ings on page 70.
Apply
› Pull the handbrake lever firmly upwards.
Loosening
› Pull the handbrake lever up slightly and
at the same time push in the locking
button » Fig. 64 .
› Move the lever right down while pressing the lock button.
The handbrake warning light lights up when the handbrake is applied, provided
the ignition is on. Ð
ä Electronic Stability Control (ESC)
Fig. 65
ESC system: TCS button
First read and observe the introductory information and safety warn-
ings on page 70.
The ESC helps to maintain control of the vehicle in situations where it is being op-
erated at its dynamic limits, such as a sudden change to the direction of travel.
The risk of skidding is reduced and your car thus offers greater driving stability
depending on the conditions of the road surface.
The direction which the driver wishes to take is determined based on the steering
angle and the speed of the vehicle and is constantly compared with the actual
behaviour of the vehicle. In the event of deviations, such as if the car starts to
skid, the ESC automatically brakes the appropriate wheel.
During an intervention of the system, the warning light flashes in the instru-
ment cluster.
The following systems are integrated into the electronic stabilisation control
(ESC):
› Antilock brake system (ABS),
› Traction control (TCS),
› Electronic Differential Lock (EDL)
› Brake assistant (HBA)
› Hill hold control (HHC)
It is not possible to deactivate ESC. You can only use the button » Fig. 65
to
switch off ASR. The TCS warning light lights up in the instrument cluster when
the TCS is switched off. £
ä
72 Using the system
Page 77 of 180

Activating/deactivating the parking aid
The parking aid is activated automatically when
reverse gear is engaged and the
ignition is turned on. This is confirmed by a brief audible signal.
The parking aid is deactivated by removing the reverse gear. WARNING
■ The parking aid is not a substitute for the driver paying proper attention and
it is always the driver's responsibility to take care when reversing the vehicle
or carrying out similar manoeuvres. Pay particular attention to small children
and animals as they are not recognised by the parking aid sensors.
■ Before reversing or parking, check that there is no small obstacle, such as a
rock, thin post, trailer drawbar etc., in front of or behind the vehicle. Such ob-
stacles may not be recognised by the parking aid sensors.
■ Under certain circumstances, surfaces of certain objects and types of cloth-
ing cannot reflect the signals from the parking aid. Thus, these objects or peo-
ple who wear such clothing are not recognised by the parking aid sensors.
■ External sound sources can have a detrimental effect on the parking aid.
Under unfavourable conditions, objects or people may not be recognised. Note
■ If a warning signal sounds for 3 seconds every time you activate the system,
this indicates a system fault. Have the fault rectified by a ŠKODA specialist ga-
rage. ■ The sensors must be kept clean (free of ice, etc.) to enable the parking aid to
operate properly.
■ If the parking aid is activated and the selector lever of the automatic gearbox is
in the position P , the warning signal is interrupted (the vehicle cannot move). ÐCruise control system (CCS)
ä
Introduction
This chapter contains information on the following subjects:
Storing a speed 76
Changing a stored speed 76
Switching off the cruise control system temporarily 76
Switching off the cruise control system completely 76The cruise control system (CCS) maintains a constant speed, more than 30
km/h,
once it has been set, without you having to depress the accelerator pedal. This is
only possible within the range which is permitted by the power output and brak-
ing power of the engine.
The warning light illuminates in the instrument cluster when the cruise control
system is activated. WARNING
■ For safety reasons, the cruise control system must not be used in dense
traffic or on unfavourable road surfaces (such as icy roads, slippery roads,
loose gravel) – risk of accident! ■ The saved speed may only be resumed if it is not too high for the current
traffic conditions. ■ Always switch off the cruise control system after use to prevent uninten-
tional use of the system. CAUTION
■ The cruise control system is not able to maintain a constant speed when driving
in areas with steeper gradients. The weight of the vehicle increases the speed at
which it travels. Therefore, shift to a lower gear in good time or slow the vehicle
down by applying the foot brake. Note
■ It is not possible on vehicles fitted with an automatic gearbox to switch on the
cruise control system if the selector lever is in the position P, N or R.
■ It is not possible to switch on the cruise control system on vehicles fitted with a
manual gearbox if the first gear or reverse gear is engaged. Ð
75
Starting-off and Driving
Page 79 of 180

START/STOP
Fig. 69
Dash panel: Button for the
START-STOP system
The START-STOP system helps you to save fuel while at the same time reducing
harmful exhaust emissions and CO 2 emissions.
The function is automatically activated each time the ignition is switched on.
In the start-stop mode, the engine automatically switches to the vehicle's idle
phase, e.g. when stopped at traffic lights.
Information regarding the current state of the
START-STOP system is indicated in
the display of the instrument cluster.
Automatic engine shut down (stop phase)
› Stop the vehicle (where necessary, apply the handbrake).
› Take the vehicle out of gear.
› Release the clutch pedal.
Automatic renewed engine restart (start phase).
› Depress the clutch pedal.
Switching the
START-STOP system on and off
The START/STOP system can be switched on/off by pressing the button » Fig. 69
.
When start-stop mode is deactivated, the warning light in the button lights up.
If the vehicle is in the stop phase when manually switching off the system, the
engine starts immediately.
The
START-STOP system is very complex. Some of the procedures are hard to
check without servicing. The general conditions for the proper functioning of the
START-STOP system are listed in the following overview. Conditions for the automatic engine shut down (stop phase)
› The gearshift lever is in Neutral.
› The clutch pedal is not depressed.
› The driver has fastened the seat belt.
› The driver's door is closed.
› The bonnet is closed.
› The vehicle is at a standstill.
› The factory-fitted towing device is not electrically connected to a trailer.
› The engine is at operating temperature.
› The charge state of the vehicle battery is sufficient.
› The stationary vehicle is not on a steep slope or a steep downhill section.
› The engine speed is less than 1
200 rpm.
› The temperature of the vehicle battery is not too low or too high.
› There is sufficient pressure in the braking system.
› The difference between the outdoor- and the set temperature in the interior is
not too great.
› The vehicle speed since the last time the engine was switched off was greater
than 3 km/h.
› No cleaning of the diesel particle filter takes place
» page 21.
› The front wheels are not turned excessively (the steering angle is less than 3/4
of a steering wheel revolution).
Conditions for an automatic restart (start phase) › The clutch is depressed.
› The max./min. temperature is set.
› The defrost function for the windscreen is switched on.
› A high blower stage has been selected.
› The START STOP button is pressed.
Conditions for an automatic restart without driver intervention
› The vehicle moves at a speed of more than 3 km/h.
› The difference between the outdoor- and the set temperature in the interior is
too great.
› The charge state of the vehicle battery is not sufficient.
› There is insufficient pressure in the braking system.
If the driver's seat belt is removed for more than 30 seconds or the driver's door is
opened during stop mode, the engine must be started manually with the key. The
following messages in the instrument cluster display must be observed. £
77
Starting-off and Driving
Page 80 of 180
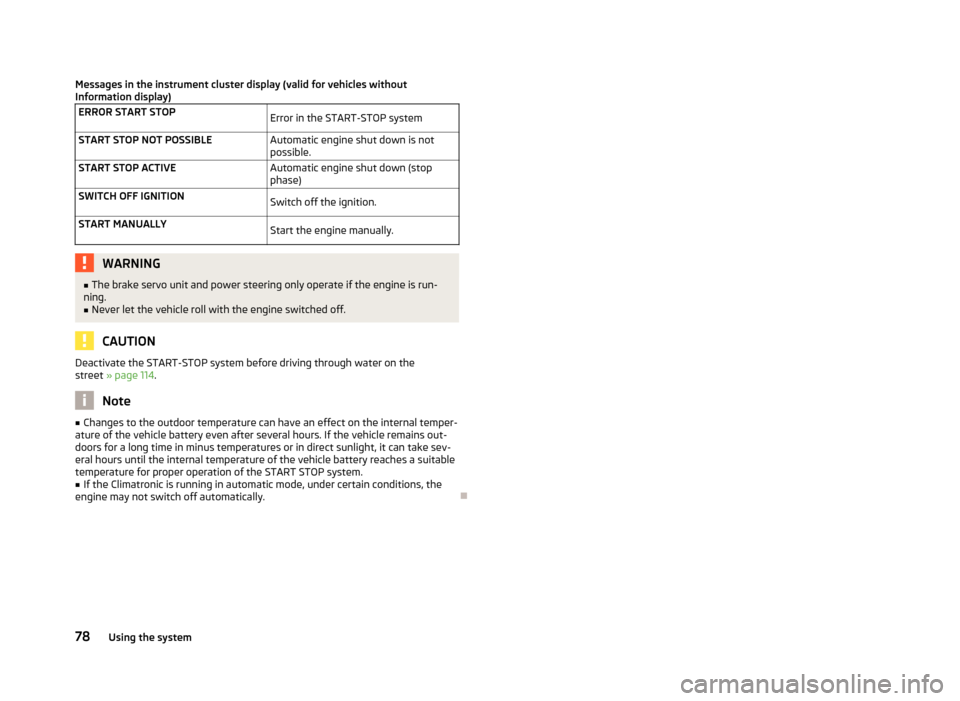
Messages in the instrument cluster display (valid for vehicles without
Information display)
ERROR START STOP Error in the START-STOP system
START STOP NOT POSSIBLE Automatic engine shut down is not
possible.
START STOP ACTIVE Automatic engine shut down (stop
phase)
SWITCH OFF IGNITION Switch off the ignition.
START MANUALLY Start the engine manually.WARNING
■ The brake servo unit and power steering only operate if the engine is run-
ning.
■ Never let the vehicle roll with the engine switched off. CAUTION
Deactivate the START-STOP system before driving through water on the
street » page 114. Note
■ Changes to the outdoor temperature can have an effect on the internal temper-
ature of the vehicle battery even after several hours. If the vehicle remains out-
doors for a long time in minus temperatures or in direct sunlight, it can take sev-
eral hours until the internal temperature of the vehicle battery reaches a suitable
temperature for proper operation of the
START STOP system.
■ If the Climatronic is running in automatic mode, under certain conditions, the
engine may not switch off automatically. Ð78
Using the system
Page 81 of 180

Automatic gearbox
Automatic gearbox
ä
Introduction
This chapter contains information on the following subjects:
Introductory information 79
Starting-off and driving 80
Selector lever positions 80
Manual shifting of gears (Tiptronic) 81
Selector lever lock 81
Kickdown function 82
Dynamic shift programme 82
Emergency programme 82
Selector lever-emergency unlocking 83
WARNING
■ Do not depress the accelerator if changing the position of the selector lever
when the vehicle is stationary and the engine is running – risk of accident!
■ Never move the selector lever into position R or P when driving – risk of an
accident!
■ When the engine is running and the vehicle is stationary, it is necessary to
hold the car with the brake pedal in all the positions of the selector lever (ex-
cept P and N) since the power transmission is never completely interrupted,
also not when the engine is idling – the vehicle creeps.
■ The selector lever must be placed into position P and the handbrake firmly
applied before the bonnet can be opened and work on the running engine can
be completed – risk of accident! The safety guidelines must always be ob-
served » page 126, Engine compartment .
■ If stopping on a hill (downhill gradient), never try to maintain the vehicle sta-
tionary with the gear engaged by means of the
“accelerator pedal”, i.e. by let-
ting the clutch slip. This can lead to overheating of the clutch. If there is a risk
of overheating of the clutch due to overload, the clutch is opened automati-
cally and the vehicle rolls backward – risk of accident! WARNING (Continued)
■ If you have to stop on a slope, depress and hold the brake pedal to prevent
the vehicle from rolling back.
■ On a smooth or slippery road surface using the kickdown function can cause
the driven wheels to spin – risk of skidding! CAUTION
■ The double clutch on the automatic gearbox DSG is equipped with an overload
protection. If the uphill function is used when the vehicle is stationary or driving
slowly uphill, the thermal stress on the clutches is increased. ■ If the clutch system overheats, the symbol is shown in the information dis-
play along with the message Gearbox overheated. Stop! Owner's man.! appears.
An audible signal sounds as a warning signal. Stop the vehicle, switch off the en-
gine, and wait until the symbol disappears – risk of gearbox damage! You can
continue your journey as soon as the symbol disappears. Ð Introductory information
First read and observe the introductory information and safety warn-
ings on page 79.
Shifting up and down through the gears is performed automatically. The gearbox
can also be switched to
Tiptronic mode. This mode makes it possible for you to
also shift gears manually » page 81.
The engine can only be started when the selector lever is in position P or N . If
the selector lever is not in the P or N positions when locking the steering, switch-
ing the ignition on or off or when leaving the engine on, the following message
will appear in the Information display Move selector lever to position P/N! or, in
the instrument cluster display: P/N .
At temperatures below -10 °C the engine can only be started in the selector lever
position P.
When parking on a level road surface, it suffices to engage selector lever position
P. When parking on a slope, the handbrake should be applied firmly before the
park position is selected. This ensures that there is no excessive pressure on the
lock mechanism and that it is subsequently easier to move the selector lever out
of position P. £
ä
79
Automatic gearbox
Page 82 of 180
If the selector lever position
N is accidentally selected while driving, it is first nec-
essary to release pressure on the accelerator pedal and wait for the idling speed
of the engine to be reached before the selector lever can be engaged in the drive
position. ÐStarting-off and driving
First read and observe the introductory information and safety warn-
ings on page 79.
Starting off
›
Firmly depress and hold the brake pedal.
› Press the Shiftlock button (button in the selector lever handle), move the selec-
tor lever into the desired position » page 80 and then release the Shiftlock
button.
› Release the brake pedal and accelerate.
Stop
› The selector lever position
N does not have to be selected when stopping for a
short time, such as at a cross roads. It is sufficient to hold the vehicle stationary
using the foot brake. The engine can, however, be allowed just to idle.
Parking
› Depress the brake pedal.
› Firmly apply the handbrake.
› Press and Shiftlock button in the selector lever, move the selector lever to
P
and then release the Shiftlock button. Ð
ä Selector lever positions
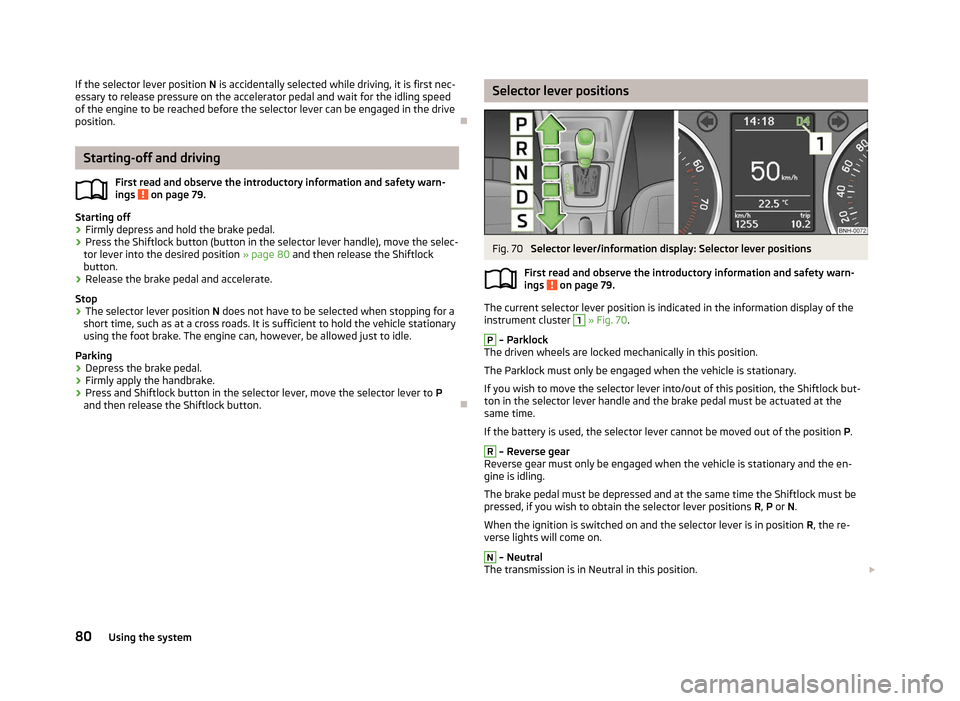
Fig. 70
Selector lever/information display: Selector lever positions
First read and observe the introductory information and safety warn-
ings on page 79.
The current selector lever position is indicated in the information display of the
instrument cluster
1
» Fig. 70.
P
– Parklock
The driven wheels are locked mechanically in this position.
The Parklock must only be engaged when the vehicle is stationary.
If you wish to move the selector lever into/out of this position, the Shiftlock but-
ton in the selector lever handle and the brake pedal must be actuated at the
same time.
If the battery is used, the selector lever cannot be moved out of the position P. R
– Reverse gear
Reverse gear must only be engaged when the vehicle is stationary and the en-
gine is idling.
The brake pedal must be depressed and at the same time the Shiftlock must be
pressed, if you wish to obtain the selector lever positions R, P or N.
When the ignition is switched on and the selector lever is in position R, the re-
verse lights will come on. N
– Neutral
The transmission is in Neutral in this position. £
ä
80 Using the system
Page 83 of 180

The brake pedal must be depressed to move the selector lever out of the position
N (if the lever is in this position for longer than 2
seconds) into the position D or R
when the vehicle is travelling at less than 5 km/h or the vehicle is stationary and
the ignition is switched on. D
– Position for driving forward (normal programme)
When the selector lever is in this position, the forward gears are automatically
shifted up and down in line with the engine load, vehicle speed and dynamic shift
programme.
The brake pedal must be depressed to move the selector lever into position D
from Nwhen the vehicle is travelling at less than 5
km/h or is stationary.
Under certain circumstances (e.g. when driving in mountainous regions or when
towing a trailer) it may be beneficial to select the manual shift pro-
gramme » page 81 for a short time in order to adapt the gearbox ratios manual-
ly to the driving situations. S
– Position for driving forward (sports programme)
Shifting up later into a higher gear makes it possible to fully exploit the power po-
tential of the engine. The gearbox also then shifts down at higher engine speeds
as in the position D .
The Shiftlock on the selector lever grip must be pressed when moving the selec-
tor lever out of the position D into the position S. ÐManual shifting of gears (Tiptronic)
Fig. 71
Selector lever: Manual shifting of
gears
First read and observe the introductory information and safety warn-
ings on page 79.
Tiptronic mode makes it possible to manually shift gears on the selector lever.
ä Switching to manual shifting
› Push the selector lever to the right out of position
D. The selector lever posi-
tion you have engaged is indicated in the information display of the instrument
cluster together with the engaged gear 1
» Fig. 70 on page 80
on the right.
Shifting up gears
› Press the selector lever forwards +
» Fig. 71.
Shifting down gears
› Press the selector lever backwards -
» Fig. 71.
It is possible to switch to manual shifting when the car is stationary and when
driving.
When accelerating, the gearbox automatically shifts up into the higher gear just
before the maximum permissible engine speed is reached.
If a lower gear is selected, the gearbox does not shift down until there is no risk
of the engine overrevving.
If you operate the kickdown function, the gearbox shifts into a lower gear in line
with the vehicle speed and engine speed. Note
The kickdown function is also available when manually shifting gears. Ð Selector lever lock
First read and observe the introductory information and safety warn-
ings on page 79.
Automatic selector lever lock
With the ignition on, the selector lever is locked when it is in the positions P and
N. The brake pedal must be depressed to move the selector lever out of this posi-
tion. The indicator light » page 22 illuminates in the instrument cluster as a re-
minder for the driver when the selector lever is in the positions P and N.
The selector lever is not locked when quickly moving across the position
N (e.g.
from R to D). This, for example, helps to rock out a vehicle that is stuck. The selec-
tor lever lock will click into place if the lever is in the N position for more than 2
seconds without the brake pedal being pressed.
The selector lever lock is only active if the vehicle is stationary or moving at speed
of less than 5 km/hour. The lock is switched off automatically into position N
when the car is travelling at a higher speed. £
ä
81
Automatic gearbox
Page 101 of 180

Airbag system
Description of the airbag system
Introductory information
The operational readiness of the airbag system is monitored electronically. The
airbag warning light comes on for a few seconds each time the ignition is
switched on »
page 22.
The airbags inflate in fractions of a second and at a high speed to offer additional
protection in the event of an accident.
The airbag system (according to vehicle equipment) consists of: › an electronic control unit;
› Front airbags for the driver and front seat passenger
» page 100;
› side airbags » page 101;
› head airbags
» page 102;
› an airbag warning light in the instrument cluster
» page 22;
› a key switch for the front seat passenger airbag
» page 103;
› an warning light in the middle of the dash panel to indicate the front seat pas-
senger airbag is switched off » page 103.
A fault in the airbag system exists if:
› the warning light
does not illuminate when the ignition is switched on;
› the warning light
does not go out 4 seconds after the ignition is switched on;
› the warning light
goes out and comes on again after the ignition is switched
on;
› the warning light
comes on or flashes when driving;
› the warning light in the middle of the dash panel for the deactivated front seat
passenger airbag flashes. WARNING
■ The airbag is not a substitute for the seat belt, but instead forms part of the
complete passive vehicle safety concept. Please note that an airbag can only
offer you optimal protection in combination with a seat belt which is fas-
tened.
■ To ensure passengers are protected with the greatest possible effect when
the airbag is deployed, the front seats must be correctly adjusted to match
the body size »
page 92, Correct seated position .
■ If you do not fasten the seat belts when driving, lean too far forward or
adopt an incorrect seated position, you are exposing yourself to increased risk
of injury in the event of an accident. ■ If there is a fault, have the airbag system checked immediately by a ŠKODA
specialist garage. Otherwise, there is a risk of the airbag not being activated in
the event of an accident. ■ No modifications of any kind must be made to parts of the airbag system.
Any work on the airbag system including the installation and removal of sys-
tem components due to other repair work (e.g. removal of the steering wheel)
must only be carried out by a
ŠKODA specialist garage.
■ Never make any changes to the front bumper or bodywork.
■ It is prohibited to manipulate individual parts of the airbag system as this
might result in the airbag being deployed. ■ The protective function of the airbag system is sufficient for only one acci-
dent. The airbag system must then be replaced if the airbag has been de-
ployed.
■ The airbag system needs no maintenance during its working life.
■ If you sell your vehicle, provide the complete vehicle documentation to the
new owner. Please note that the information relating to the possibility of de-
activating the front passenger airbag must be included! ■ When disposing of vehicle or parts of the airbag system, it is important to
comply with the national legal requirements. Ð When are the airbags deployed?
The airbag system is only functional when the ignition is switched on.
In certain accident situations, the several airbags may be deployed simultaneous-
ly.
The airbags are not deployed in the case of minor frontal and side collisions, rear-
end collisions, tilting of the vehicle and vehicle rollover. £
99
Airbag system
Page 118 of 180

Immediately reduce your speed as soon as even the slightest swaying of the trail-
er is detected. Never attempt to stop the trailer from “swaying” by accelerating.
Brakes
Apply the brakes in good time! If the trailer is fitted with a trailer brake, apply the
brakes gently at first, then brake firmly. This will avoid brake jolts resulting from
the trailer wheels locking. On downhill sections shift down a gear in good time to
also use the engine as a brake.
Trailer is connected to the anti-theft alarm system.
› If the vehicle is factory-fitted with an anti-theft alarm system and a towing de-
vice.
› If the trailer is electrically connected to the towing vehicle by means of the trail-
er socket.
› If the electrical system of the vehicle and trailer is fully functional.
› If the vehicle is locked with the car key and the anti-theft alarm system is acti-
vated.
When the vehicle is locked, the alarm is activated as soon as the electrical con-
nection to the trailer is interrupted.
Always deactivate the anti-theft alarm system before a trailer is connected/dis-
connected. Otherwise, the anti-theft alarm system could accidentally be trig-
gered » page 29, Anti-theft alarm system .
Engine overheating
If the needle for the coolant temperature gauge moves into the right-hand area
or the red area of the scale, the speed must be reduced immediately. Stop and
switch off the engine if the warning light in the instrument cluster starts to
flash. Wait a few minutes and check the level of coolant in the coolant expansion
bottle » page 130, Checking the coolant level .
The following guidelines must be observed » page 19, Coolant temperature/cool-
ant level .
The coolant temperature can be reduced by switching on the heating. WARNING
■ Adapt your speed to the conditions of the road surface and to the traffic sit-
uation.
■ Improper or incorrectly connected electric cables can energise the trailer and
cause functional faults to the vehicle's entire electrical system as well as acci-
dents and severe injuries.
■ Any work on the electrical system must be carried out only by ŠKODA spe-
cialist garages.
■ Never directly connect the trailer's electrical system with the electrical con-
nections for the tail lights or other current sources. CAUTION
■ Avoid abrupt and sudden driving/braking manoeuvres.
■ When the ball rod is removed, the mounting shaft must be sealed with an ap-
propriate cover. This prevents foreign matter from penetrating into the mounting
shaft. See the fitting instructions for the towing device. Note
■ We recommend that you also have your vehicle inspected between service in-
tervals if you tow a trailer frequently. ■ The handbrake on the towing vehicle must be put on when coupling and decou-
pling the trailer.
■ For technical reasons, trailers with rear LED lights cannot be connected to the
anti-theft alarm system. Ð
116 Driving Tips
Page 131 of 180

Note
The location of the inspection points in the engine compartment of petrol and
diesel engines is practically identical. ÐChecking the engine oil level
Fig. 99
Dipstick
First read and observe the introductory information and safety warn-
ings on page 126.
The dipstick indicates the level of oil in the engine
» Fig. 99.
Checking the oil level
› Ensure that the vehicle is positioned on a level surface and the engine has
reached its operating temperature.
› Switch off the engine.
› Open the bonnet.
› Wait a few minutes until the engine oil flows back into the oil sump and remove
the dipstick.
› Wipe the dipstick with a clean cloth and insert it again to the stop.
› Then pull the dipstick out again and check the oil level.
Oil level within range A
›
No oil must be refilled.
Oil level within range B
›
Oil can
be refilled. It is possible that the oil level may then be within range A
after doing this.
Oil level within range C
›
Oil must be refilled. It is sufficient, once this is done, to keep the oil level within
range B
.
ä
It is normal for the engine to consume oil. The oil consumption may be as much as
0.5 l/1 000
km depending on your style of driving and the conditions under which
you operate your vehicle. Consumption may be slightly higher than this during the
first 5 000 kilometres.
One should therefore check the oil level at regular intervals, preferably every time
after the fuel tank is filled or after driving for long stretches.
We recommend maintaining the oil level within the range A
, but not above
, if
the engine has been operating at high loads, for example, during a lengthy motor-
way trip during the summer months, towing a trailer or negotiating a high moun-
tain pass.
The warning light in the instrument cluster will indicate whether the oil level is
too low » page 18 , Engine oil . In this case, check the oil level with the dip-
stick, as soon as possible. Add oil accordingly. CAUTION
■ The oil level must on no account extend beyond the range A
» Fig. 99
. Risk of
damaging the exhaust system!
■ If it is not possible to top up the engine oil under the prevailing conditions, do
not continue your journey! Switch off the engine and obtain professional assis-
tance from a ŠKODA specialist garage, otherwise it could cause severe engine
damage. Note
Engine oil specifications » page 166 , Specifications and engine oil capacity .Ð Replenishing the engine oil
First read and observe the introductory information and safety warn-
ings on page 126.
›
Check the engine oil level
» page 129.
› Unscrew the cap of the engine oil filler opening.
› Replenish the oil in portions of 0.5 litres in accordance with the correct specifi-
cations » page 166 , Specifications and engine oil capacity .
› Check the oil level
» page 129.
› Carefully screw on the oil filler opening cap and push the dipstick in fully. Ð
ä
129
Inspecting and replenishing