remove seats SKODA RAPID 2012 1.G Owner's Manual
[x] Cancel search | Manufacturer: SKODA, Model Year: 2012, Model line: RAPID, Model: SKODA RAPID 2012 1.GPages: 180, PDF Size: 4.36 MB
Page 47 of 180
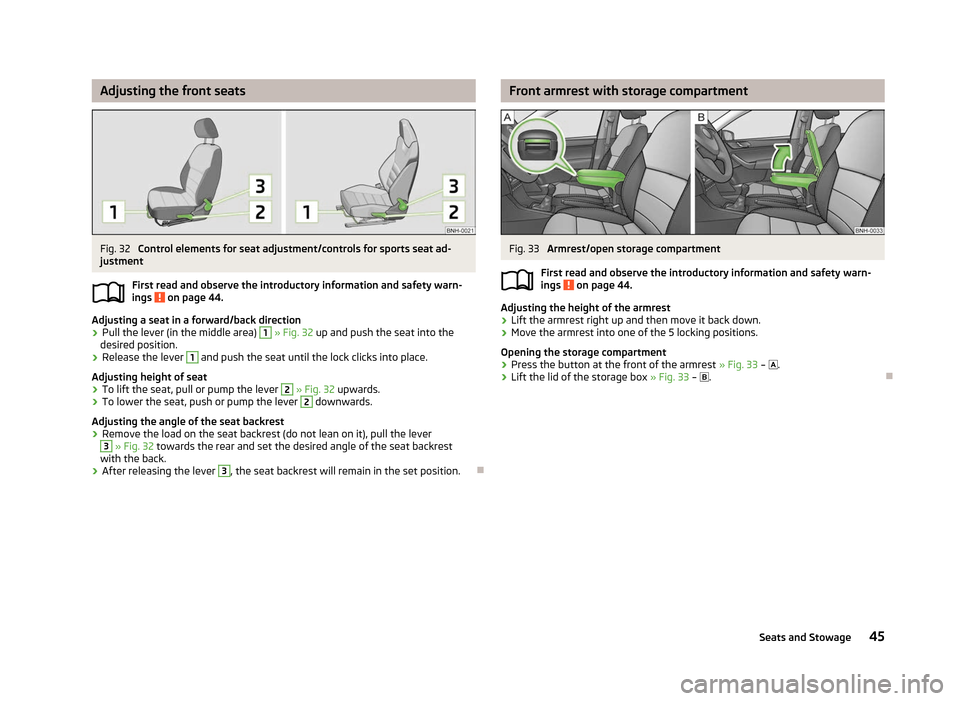
Adjusting the front seats
Fig. 32
Control elements for seat adjustment/controls for sports seat ad-
justment
First read and observe the introductory information and safety warn-
ings on page 44.
Adjusting a seat in a forward/back direction
›
Pull the lever (in the middle area) 1
» Fig. 32
up and push the seat into the
desired position.
› Release the lever 1
and push the seat until the lock clicks into place.
Adjusting height of seat
› To lift the seat, pull or pump the lever 2
» Fig. 32
upwards.
› To lower the seat, push or pump the lever 2
downwards.
Adjusting the angle of the seat backrest
› Remove the load on the seat backrest (do not lean on it), pull the lever 3
» Fig. 32 towards the rear and set the desired angle of the seat backrest
with the back.
› After releasing the lever 3
, the seat backrest will remain in the set position.
Ð
ä Front armrest with storage compartment
Fig. 33
Armrest/open storage compartment
First read and observe the introductory information and safety warn-
ings on page 44.
Adjusting the height of the armrest
›
Lift the armrest right up and then move it back down.
› Move the armrest into one of the 5 locking positions.
Opening the storage compartment
› Press the button at the front of the armrest
» Fig. 33 – .
› Lift the lid of the storage box
» Fig. 33 – . Ð
ä
45
Seats and Stowage
Page 48 of 180
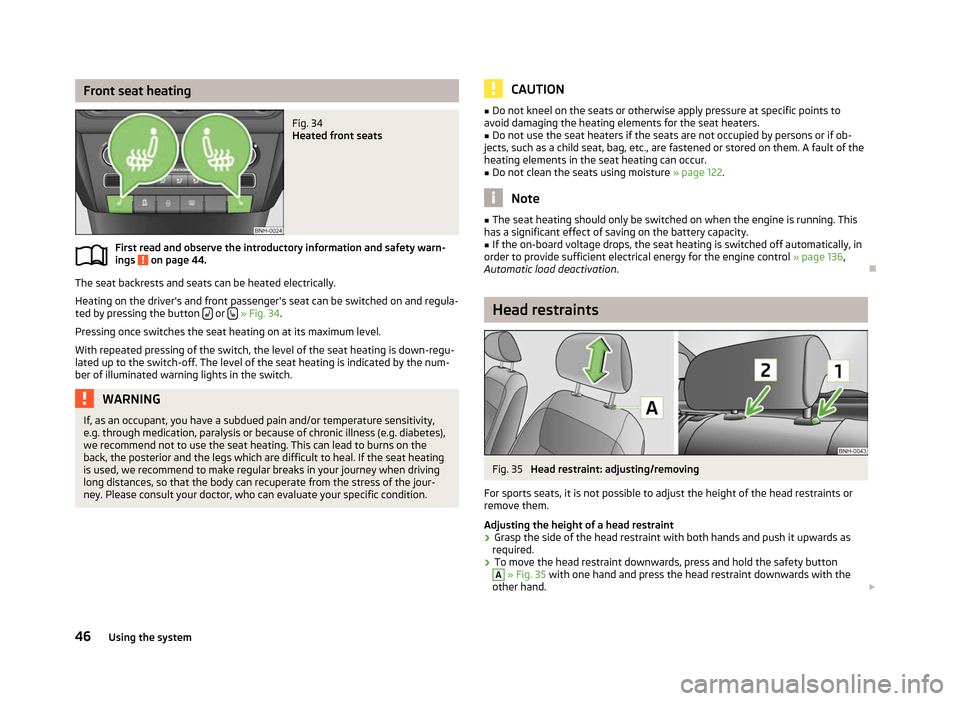
Front seat heating
Fig. 34
Heated front seats
First read and observe the introductory information and safety warn-
ings on page 44.
The seat backrests and seats can be heated electrically.
Heating on the driver's and front passenger's seat can be switched on and regula-
ted by pressing the button or
» Fig. 34.
Pressing once switches the seat heating on at its maximum level.
With repeated pressing of the switch, the level of the seat heating is down-regu-
lated up to the switch-off. The level of the seat heating is indicated by the num-
ber of illuminated warning lights in the switch. WARNING
If, as an occupant, you have a subdued pain and/or temperature sensitivity,
e.g. through medication, paralysis or because of chronic illness (e.g. diabetes),
we recommend not to use the seat heating. This can lead to burns on the
back, the posterior and the legs which are difficult to heal. If the seat heating
is used, we recommend to make regular breaks in your journey when driving
long distances, so that the body can recuperate from the stress of the jour-
ney. Please consult your doctor, who can evaluate your specific condition.
ä CAUTION
■ Do not kneel on the seats or otherwise apply pressure at specific points to
avoid damaging the heating elements for the seat heaters.
■ Do not use the seat heaters if the seats are not occupied by persons or if ob-
jects, such as a child seat, bag, etc., are fastened or stored on them. A fault of the
heating elements in the seat heating can occur.
■ Do not clean the seats using moisture » page 122. Note
■ The seat heating should only be switched on when the engine is running. This
has a significant effect of saving on the battery capacity. ■ If the on-board voltage drops, the seat heating is switched off automatically, in
order to provide sufficient electrical energy for the engine control » page 136,
Automatic load deactivation . Ð Head restraints
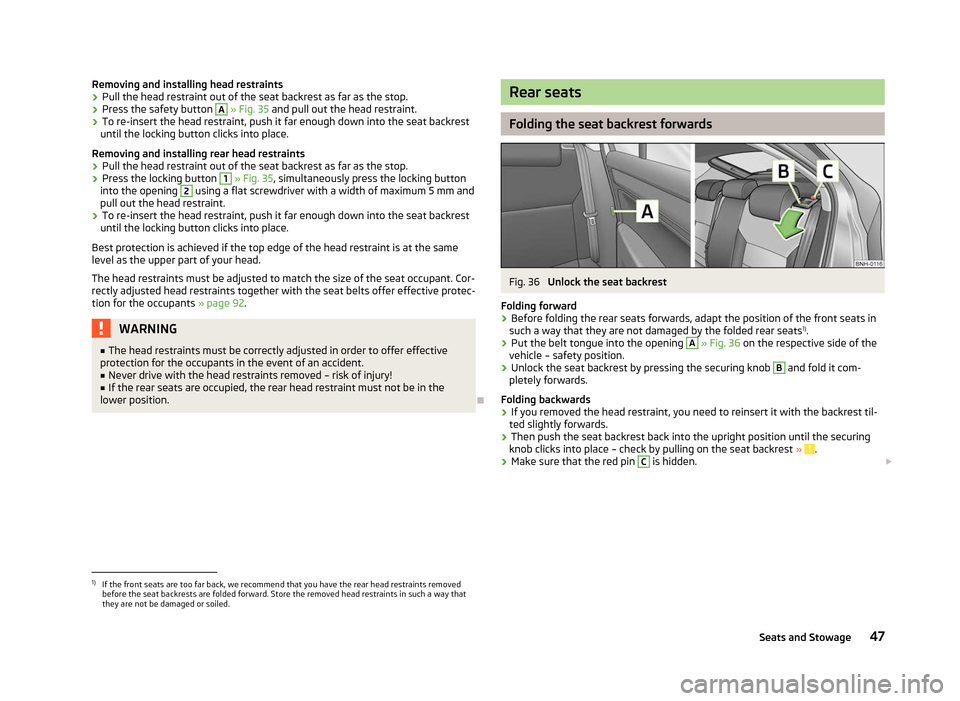
Fig. 35
Head restraint: adjusting/removing
For sports seats, it is not possible to adjust the height of the head restraints or
remove them.
Adjusting the height of a head restraint
› Grasp the side of the head restraint with both hands and push it upwards as
required.
› To move the head restraint downwards, press and hold the safety button A
» Fig. 35 with one hand and press the head restraint downwards with the
other hand. £
46 Using the system
Page 49 of 180
Removing and installing head restraints
›
Pull the head restraint out of the seat backrest as far as the stop.
› Press the safety button A
» Fig. 35 and pull out the head restraint.
› To re-insert the head restraint, push it far enough down into the seat backrest
until the locking button clicks into place.
Removing and installing rear head restraints
› Pull the head restraint out of the seat backrest as far as the stop.
› Press the locking button 1
» Fig. 35, simultaneously press the locking button
into the opening 2
using a flat screwdriver with a width of maximum 5 mm and
pull out the head restraint.
› To re-insert the head restraint, push it far enough down into the seat backrest
until the locking button clicks into place.
Best protection is achieved if the top edge of the head restraint is at the same
level as the upper part of your head.
The head restraints must be adjusted to match the size of the seat occupant. Cor-
rectly adjusted head restraints together with the seat belts offer effective protec-
tion for the occupants » page 92.WARNING
■ The head restraints must be correctly adjusted in order to offer effective
protection for the occupants in the event of an accident.
■ Never drive with the head restraints removed – risk of injury!
■ If the rear seats are occupied, the rear head restraint must not be in the
lower position. Ð Rear seats
Folding the seat backrest forwards
Fig. 36
Unlock the seat backrest
Folding forward
› Before folding the rear seats forwards, adapt the position of the front seats in
such a way that they are not damaged by the folded rear seats 1)
.
› Put the belt tongue into the opening A
» Fig. 36
on the respective side of the
vehicle – safety position.
› Unlock the seat backrest by pressing the securing knob B
and fold it com-
pletely forwards.
Folding backwards
› If you removed the head restraint, you need to reinsert it with the backrest til-
ted slightly forwards.
› Then push the seat backrest back into the upright position until the securing
knob clicks into place – check by pulling on the seat backrest » .
› Make sure that the red pin C
is hidden.
£1)
If the front seats are too far back, we recommend that you have the rear head restraints removed
before the seat backrests are folded forward. Store the removed head restraints in such a way that
they are not be damaged or soiled.
47
Seats and Stowage
Page 53 of 180
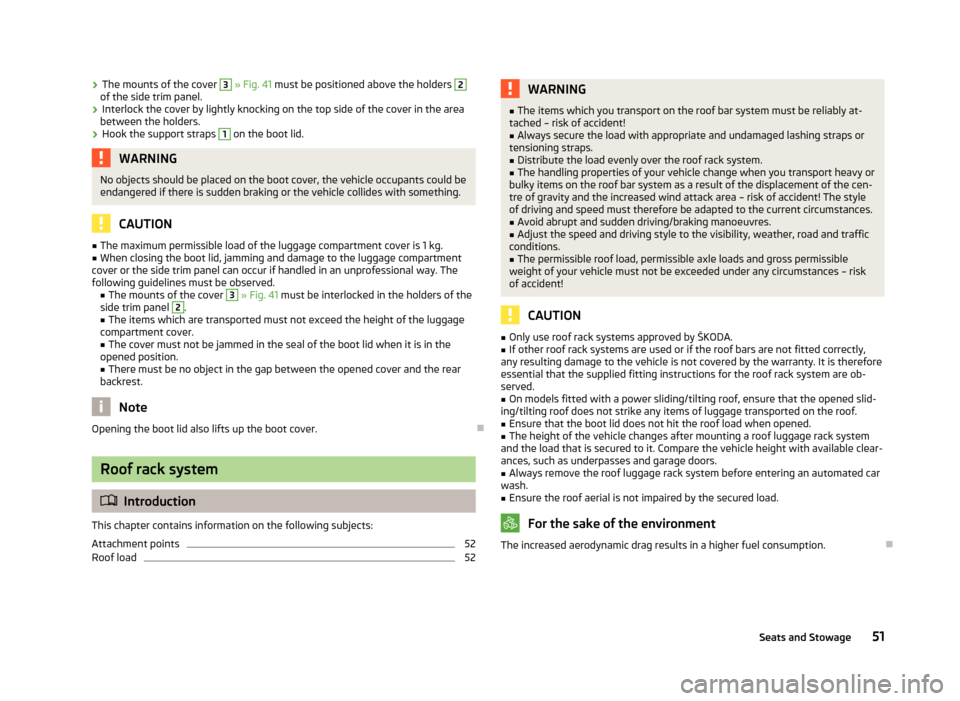
›
The mounts of the cover 3
» Fig. 41 must be positioned above the holders 2
of the side trim panel.
› Interlock the cover by lightly knocking on the top side of the cover in the area
between the holders.
› Hook the support straps 1
on the boot lid.
WARNING
No objects should be placed on the boot cover, the vehicle occupants could be
endangered if there is sudden braking or the vehicle collides with something. CAUTION
■ The maximum permissible load of the luggage compartment cover is 1 kg.
■ When closing the boot lid, jamming and damage to the luggage compartment
cover or the side trim panel can occur if handled in an unprofessional way. The
following guidelines must be observed. ■ The mounts of the cover 3
» Fig. 41 must be interlocked in the holders of the
side trim panel 2
.
■ The items which are transported must not exceed the height of the luggage
compartment cover. ■ The cover must not be jammed in the seal of the boot lid when it is in the
opened position.
■ There must be no object in the gap between the opened cover and the rear
backrest. Note
Opening the boot lid also lifts up the boot cover. ÐRoof rack system
ä
Introduction
This chapter contains information on the following subjects:
Attachment points 52
Roof load 52 WARNING
■ The items which you transport on the roof bar system must be reliably at-
tached – risk of accident!
■ Always secure the load with appropriate and undamaged lashing straps or
tensioning straps.
■ Distribute the load evenly over the roof rack system.
■ The handling properties of your vehicle change when you transport heavy or
bulky items on the roof bar system as a result of the displacement of the cen-
tre of gravity and the increased wind attack area – risk of accident! The style
of driving and speed must therefore be adapted to the current circumstances. ■ Avoid abrupt and sudden driving/braking manoeuvres.
■ Adjust the speed and driving style to the visibility, weather, road and traffic
conditions. ■ The permissible roof load, permissible axle loads and gross permissible
weight of your vehicle must not be exceeded under any circumstances – risk
of accident! CAUTION
■ Only use roof rack systems approved by
ŠKODA.
■ If other roof rack systems are used or if the roof bars are not fitted correctly,
any resulting damage to the vehicle is not covered by the warranty. It is therefore
essential that the supplied fitting instructions for the roof rack system are ob-
served.
■ On models fitted with a power sliding/tilting roof, ensure that the opened slid-
ing/tilting roof does not strike any items of luggage transported on the roof. ■ Ensure that the boot lid does not hit the roof load when opened.
■ The height of the vehicle changes after mounting a roof luggage rack system
and the load that is secured to it. Compare the vehicle height with available clear-
ances, such as underpasses and garage doors.
■ Always remove the roof luggage rack system before entering an automated car
wash. ■ Ensure the roof aerial is not impaired by the secured load. For the sake of the environment
The increased aerodynamic drag results in a higher fuel consumption. Ð
51
Seats and Stowage
Page 55 of 180
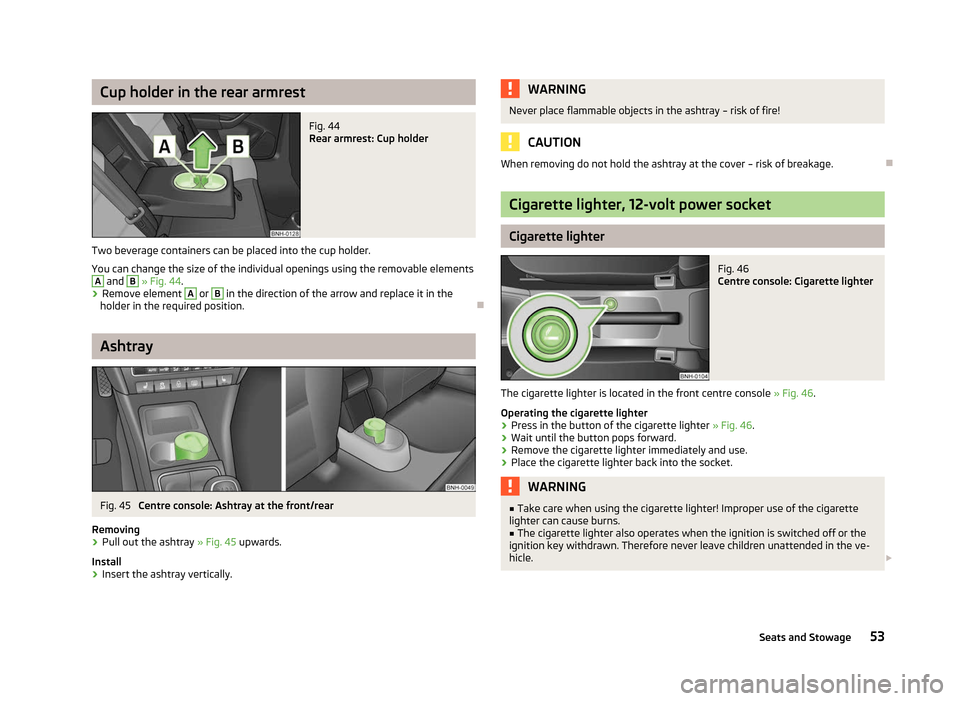
Cup holder in the rear armrest
Fig. 44
Rear armrest: Cup holder
Two beverage containers can be placed into the cup holder.
You can change the size of the individual openings using the removable elements A
and B
» Fig. 44.
› Remove element A
or B
in the direction of the arrow and replace it in the
holder in the required position. ÐAshtray
Fig. 45
Centre console: Ashtray at the front/rear
Removing › Pull out the ashtray
» Fig. 45 upwards.
Install
› Insert the ashtray vertically. WARNING
Never place flammable objects in the ashtray – risk of fire! CAUTION
When removing do not hold the ashtray at the cover – risk of breakage. Ð Cigarette lighter, 12-volt power socket
Cigarette lighter
Fig. 46
Centre console: Cigarette lighter
The cigarette lighter is located in the front centre console » Fig. 46.
Operating the cigarette lighter
› Press in the button of the cigarette lighter
» Fig. 46.
› Wait until the button pops forward.
› Remove the cigarette lighter immediately and use.
› Place the cigarette lighter back into the socket. WARNING
■ Take care when using the cigarette lighter! Improper use of the cigarette
lighter can cause burns. ■ The cigarette lighter also operates when the ignition is switched off or the
ignition key withdrawn. Therefore never leave children unattended in the ve-
hicle. £
53
Seats and Stowage
Page 56 of 180
Note
■ The cigarette lighter socket can also be used as a 12Volt socket for electrical ap-
pliances » page 54, 12-volt power socket.
■ Further information » page 144, Accessories, changes and replacement of
parts. Ð12-volt power socket
Fig. 47
Centre console: 12-Volt power
socket
The 12-Volt power socket is located in the front centre console » Fig. 47.
Using the power socket
› Remove the power socket cover or the cigarette lighter.
› Connect the plug for the electrical appliance to the socket.
Further information » page 144, Accessories, changes and replacement of parts .WARNING
■ Improper use of the 12-volt power socket and the electrical accessories can
cause fires, burns and other serious injuries.
■ Never leave children unattended in the vehicle. The 12-volt power socket
and any connected appliances can also be operated when the ignition is
switched off or the ignition key is withdrawn. ■ If the connected electric device becomes too hot, switch it off and discon-
nect it from the power supply immediately. CAUTION
■ The 12-volt power socket can only be used for connecting approved electrical
accessories with a total power uptake of up to 120
watt.
■ Never exceed the maximum power consumption, otherwise the vehicle's elec-
trical system can be damaged.
■ Connecting electrical components when the engine is not running will drain the
battery of the vehicle – risk of battery draining!
■ Only use matching plugs to avoid damaging the 12-volt power socket.
■ Only use accessories that have been tested for electromagnetic compatibility in
accordance with the applicable directives.
■ Before turning the ignition on or off, and before starting the car, switch off the
device connected to the 12-volt power socket to prevent any damage caused by
voltage fluctuations. ■ Observe the operating instructions for the connected devices! Ð Storage compartments
Overview
The vehicle has the following storage compartments: Storage compartment on the front passenger side » page 55
Storage box for safety vest » page 55
Map pockets in the front seats » page 56
Meshed pockets at the front seat rests » page 56
Glasses storage box » page 56
Storage compartment in centre console » page 57
Multimedia holder » page 57
Storage compartments in the doors » page 57
Storage compartments in the boot » page 57£54
Using the system
Page 59 of 180

Storage compartment in centre console
Fig. 53
Centre console: Storage compartments
Open storage compartment at the front of the centre console.
Open storage compartment at the rear of the centre console. ÐMultimedia holder
Fig. 54
Front centre console: Multimedia
holder
The multimedia holder can be found in the stowage compartment of the front
centre console » Fig. 54.
You can use this holder to store e.g. a mobile phone, MP3 player or similar devi-
ces. WARNING
Never use the multimedia holder as an ashtray or for storing flammable ob-
jects – risk of fire! ÐA
B Storage compartments in the doors
Fig. 55
Storage compartment: in the front door/in the rear door
Storage compartment in the front doors
Bottle compartment in the front doors
Storage compartment in the rear doors
Bottle compartment in the rear doors WARNING
Use the area A
» Fig. 55 of the storage compartment only for storing objects
which do not project so that the effectiveness of the side airbag is not im-
paired. Ð Storage compartments in the boot
Fig. 56
Boot: Stowage compartment
The cover for the side compartment can be removed, thus enlarging the boot. £ A
B
C
D
57
Seats and Stowage
Page 98 of 180

WARNING (Continued)
■ The seat belts for the rear seats can only fulfil their function reliably when
the seat backrests are correctly locked into position » page 47.
■ The belt webbing must always be kept clean. Soiled belt webbing may im-
pair proper operation of the inertia reel » page 123.
■ The seat belts must not be removed or changed in any way. Do not attempt
to repair the seat belts yourself. ■ Check the condition of all the seat belts on a regular basis. If any damage to
the seat belts, seat belt tongue, inertia reel or the lock is detected, the rele-
vant seat belt must be replaced by a specialist garage.
■ Damaged seat belts which have been subjected to stress in an accident and
were therefore stretched, must be replaced – this is best done by a specialist
garage. The anchorage points of the belts must also be inspected. The an-
chorage points for the belts should also be checked. Note
The national legal requirements must be observed when using seat belts. ÐThe physical principle of a frontal collision
Fig. 78
Driver without a fastened seat belt/rear seat passenger without a
fastened seat belt
First read and observe the introductory information and safety warn-
ings on page 95.
The physical principle of a frontal collision can be explained quite simply.
ä As soon as the vehicle is moving, so-called kinetic energy (the energy of motion)
is produced both in terms of the car as well as in terms of the occupants. The
magnitude of this kinetic energy depends essentially on the speed at which the
vehicle is travelling and on the weight of the vehicle including the occupants. The
greater the speed and weight increase, the greater the amount of energy which
has to be absorbed in the event of an accident.
The speed of the vehicle is, nevertheless, the most important factor. Doubling the
speed of the vehicle from 25
km/h up to 50 km/hour increases the kinetic energy
four times.
The common opinion that it is possible to support your body in a minor accident
with your hands, is incorrect. Even in a collision at only a low speed, the forces
acting on the body are such that it is no longer possible to support your body.
Even if you only drive at a speed of 30 km/h to 50 km/h, the forces that your body
is exposed to in the event of an accident can exceed a tonne (1 000 kg).
In the event of a frontal collision, occupants of the car not wearing a seat belt, are
thrown forward and strike in an uncontrolled way parts of the interior of the car,
such as steering wheel, dash panel or windscreen » Fig. 78 – . In certain circum-
stances you could even be thrown out of the vehicle, which could cause life
threatening or even fatal injuries.
It is also important that rear seat occupants fasten their seat belts as they will
otherwise be thrown through the vehicle in an uncontrolled manner in the event
of an accident A rear seat passenger who has not fastened the seat belt is a dan-
ger not only to himself but also for those seated at the front » Fig. 78 – . Ð
96 Safety
Page 107 of 180

Transporting children safely
Child seat
ä
Introduction
This chapter contains information on the following subjects:
Use of a child seat on the front passenger seat 105
Child safety and side airbag 106
Classification of child seats 106
Suitability of child seats 107
Child seats with the ISOFIX system 107
Child seat with the TOP TETHER system 108
Children are generally safer on the rear seats than on the front passenger seat.
In contrast to adults, the muscles and bone structure of children are not yet fully
developed. Thus children are exposed to increased risk of injury.
Children should be transported in accordance with the relevant statutory provi-
sions.
Child seats that comply with the ECE-R
44 standard must be used. The ECE-R
Norm stands for: Economic Commission for Europe – Regulation.
Child seats that comply with the ECE-R 44 standard have a test seal that cannot
be removed: a large E within a circle with the test number below. WARNING
■ The national legal requirements must be observed when using child seats.
■ One should never carry children, and also not babies! - on one's lap.
■ Never leave children unattended in the vehicle. Certain outside climatic con-
ditions can cause life-threatening temperatures in the vehicle.
■ Under no circumstances allow children to be transported without the use of
a suitable restraint system. In the event of an accident the child will be
thrown through the vehicle and may as a result suffer fatal injuries, and also
injure other occupants. WARNING (Continued)
■ Children are exposed to an increased risk of injury in the event of an acci-
dent if they lean forward or adopt an incorrect seated position when the vehi-
cle is moving. This particularly applies to children who are transported on the
front passenger seat as they can suffer severe, or even fatal injuries if the air-
bag system is deployed!
■ Pay particular attention to the information provided by the manufacturer of
the child safety seat regarding the correct routing of the belt. Seat belts
which are not correctly adjusted can themselves cause injuries even in minor
accidents.
■ Safety belts must be checked to ensure that they are running properly. One
should also ensure that the belt is not damaged by sharp-edged fittings.
■ It is essential to switch off the front passenger airbag if using a child seat in
which the child is seated with its back facing the direction of travel on the
front passenger seat. Further information » page 105, Use of a child seat on
the front passenger seat. Note
We recommend that you use child seats from ŠKODA Original Accessories. These
child seats were developed and also tested for use in
ŠKODA vehicles. They fulfil
the ECE-R 44 standard. Ð Use of a child seat on the front passenger seat
Fig. 87
Sticker on the B column on the
front passenger side.
First read and observe the introductory information and safety warn-
ings on page 105.
For safety reasons, we recommend that you install child seats on the rear seats
whenever possible. £
ä
105
Transporting children safely
Page 124 of 180
Artificial leather and materials
First read and observe the introductory information and safety warn-
ings on page 117.
The artificial leather can be cleaned using a damp cloth. If this does not prove to
be adequate, these parts can only be treated with special
solvent-free plastic
cleaning and care products .
Clean upholstery cover materials and cloth trims on doors, boot cover, etc. using
specific cleaning agents, e.g., dry foam. Use a soft sponge, brush, or commercially
available microfibre cloth. Use a cloth and a specific cleaning agent to clean the
roof trim.
Some clothing materials, such as dark denim, do, in part, not have sufficient col-
our fastness. This can cause damage or clearly visible discolouration to seat cov-
ers (fabric or leather) even when used correctly. This particularly applies to light
seat covers (fabric or leather). This is not a defect in the seat cover, but poor col-
our fastness of the clothing textiles. ÐFabric covers on electrically heated seats
First read and observe the introductory information and safety warn-
ings on page 117.
Do not clean the seat covers
using moisture as this can damage the seat heating
system.
Use a specific cleaning agent such as dry foam or similar to clean the covers. ÐNatural leather
First read and observe the introductory information and safety warn-
ings on page 117.
Depending on the amount of wear-and-tear, the leather should be cleaned on a
regular basis.
Normal cleaning
Clean soiled areas of the leather with slightly moistened cotton or woollen cloth.
ä
ä
ä
Severe soiling
Ensure that the leather is not soaked through at any point and that no water gets
into the stitching of the seams.
Dry off the leather with a soft, dry cloth.
Removing stains
Remove fresh water-based stains (e.g., coffee, tea, juices, blood) with an absorb-
ent cloth or household cleaning paper. A specific cleaning agent is required for
dried-on stains.
Remove fresh grease-based stains (e.g. butter, mayonnaise, chocolate, etc.) with
an absorbent cloth, household cleaning paper, or use a suitable cleaner if the
stain has not yet penetrated into the surface.
Use a grease solvent for grease stains which have dried in .
Remove specific stains (e.g. ball-point pens, marker pen, nail varnish, dispersion
paint, shoe polish, etc.) with a special stain remover suitable for leather.
Leather care
Treat the leather roughly every six months with a suitable leather care product.
Apply only a small amount of the cleaning and care product.
Dry off the leather with a soft, dry cloth. CAUTION
■ Avoid leaving the vehicle for lengthy periods in bright sunlight to avoid the
leather from bleaching. If the vehicle is parked in the open for lengthy periods,
protect the leather from direct sunlight by covering it.
■ Sharp-edged objects on items of clothing such as zip fasteners, rivets, sharp-
edged belts, jewellery and pendants may leave permanent scratches or signs of
rubbing on the surface.
■ The use of a mechanical steering wheel lock may damage the leather surface of
the steering wheel. Note
■ Use a care cream with light blocker and impregnation effect on a regular basis
and each time after cleaning. The cream nourishes the leather, allows it to
breathe and keeps it supple and also provides moisture. It also creates surface
protection. ■ Clean the leather every 2 to 3 months, remove any fresh stains as they occur. £
122 General Maintenance