heating SKODA RAPID SPACEBACK 2014 1.G Owner's Manual
[x] Cancel search | Manufacturer: SKODA, Model Year: 2014, Model line: RAPID SPACEBACK, Model: SKODA RAPID SPACEBACK 2014 1.GPages: 204, PDF Size: 27.11 MB
Page 5 of 204
Table of Contents
Board literature4
Notes
5
Structure and more information about the
Operating Instructions
6
Abbreviations
Safety
Passive Safety
8
General information
8
Correct and safe seated position
9
Seat belts
12
Using seat belts
12
Inertia reels and belt tensioners
15
Airbag system
16
Description of the airbag system
16
Airbag overview
17
Deactivating airbags
20
Transporting children safely
22
Child seat
22
Fastening systems
25
Using the system
Cockpit
29
Overview
28
Instruments and Indicator Lights
30
Instrument cluster
30
Indicator lights
34
Information system
41
Driver information system
41
Multifunction display (MFD)
43MAXI DOT display46Service interval display47
Unlocking and opening
49
Unlocking and locking
49
Anti-theft alarm system
53
Luggage compartment lid
54
Power windows
55
Mechanical windows
57
Lights and visibility
58
Lights
58
Interior lighting
63
Visibility
64
Windscreen wipers and washers
65
Rear mirror
67
Seats and head restraints
69
Seats and head restraints
69
Seat features
71
Transporting and practical equipment
73
Useful equipment
73
Luggage compartment
80
Variable loading floor in the luggage
compartment (Estate)
85
Roof rack
88
Heating and air conditioning
89
Heating, ventilation, cooling
89
Communication and multimedia
94
Universal telephone installation GSM II
94
Voice control
98
Multimedia
99
SmartGate
101
Driving
Starting-off and Driving
104
Starting and turning off the engine
104
Brakes and parking
106Manual gear changing and pedals107Automatic gearbox108
Retraction and economical driving
111
Driving through water and driving off made-
up roads
111
Assist systems
113
Braking and stabilisation systems
113
Parking aid
114
Cruise Control System
115
START-STOP
116
Tyre pressure monitoring
119
Hitch and trailer
120
Hitch
120
Trailer
125
General Maintenance
Care and maintenance
128
Service work, adjustments and technical alterations
128
Washing vehicle
131
Cleaning vehicle exterior
132
Interior care
136
Inspecting and replenishing
138
Fuel
138
Engine compartment
141
Engine oil
144
Coolant
146
Brake fluid
147
Vehicle battery
148
Wheels
152
Tyres and wheel rims
152
Manufacturer-approved tyre variants
155
Winter operation
1562Table of Contents
Page 32 of 204
Using the system
Cockpit
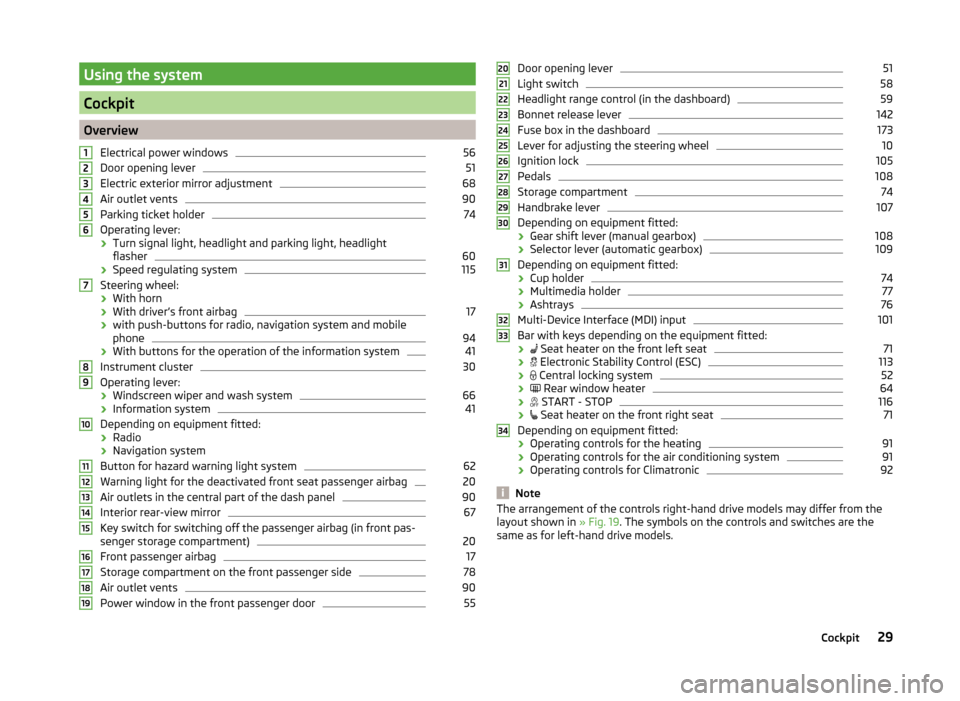
OverviewElectrical power windows
56
Door opening lever
51
Electric exterior mirror adjustment
68
Air outlet vents
90
Parking ticket holder
74
Operating lever:
› Turn signal light, headlight and parking light, headlight
flasher
60
› Speed regulating system
115
Steering wheel:
› With horn
› With driver’s front airbag
17
›with push-buttons for radio, navigation system and mobile
phone
94
› With buttons for the operation of the information system
41
Instrument cluster
30
Operating lever:
› Windscreen wiper and wash system
66
›Information system
41
Depending on equipment fitted:
› Radio
› Navigation system
Button for hazard warning light system
62
Warning light for the deactivated front seat passenger airbag
20
Air outlets in the central part of the dash panel
90
Interior rear-view mirror
67
Key switch for switching off the passenger airbag (in front pas-
senger storage compartment)
20
Front passenger airbag
17
Storage compartment on the front passenger side
78
Air outlet vents
90
Power window in the front passenger door
5512345678910111213141516171819Door opening lever51
Light switch
58
Headlight range control (in the dashboard)
59
Bonnet release lever
142
Fuse box in the dashboard
173
Lever for adjusting the steering wheel
10
Ignition lock
105
Pedals
108
Storage compartment
74
Handbrake lever
107
Depending on equipment fitted:
› Gear shift lever (manual gearbox)
108
›Selector lever (automatic gearbox)
109
Depending on equipment fitted:
› Cup holder
74
›Multimedia holder
77
›Ashtrays
76
Multi-Device Interface (MDI) input
101
Bar with keys depending on the equipment fitted:
›
Seat heater on the front left seat
71
›
Electronic Stability Control (ESC)
113
›
Central locking system
52
›
Rear window heater
64
›
START - STOP
116
›
Seat heater on the front right seat
71
Depending on equipment fitted:
› Operating controls for the heating
91
›
Operating controls for the air conditioning system
91
›Operating controls for Climatronic
92
Note
The arrangement of the controls right-hand drive models may differ from the
layout shown in » Fig. 19. The symbols on the controls and switches are the
same as for left-hand drive models.20212223242526272829303132333429Cockpit
Page 35 of 204
Warning at excessive speeds
An audible warning signal will sound when the vehicle speed exceeds 120 km/
h 1)
. The audible warning signal is switched off when the vehicle speed falls be-
low 120 km/h.
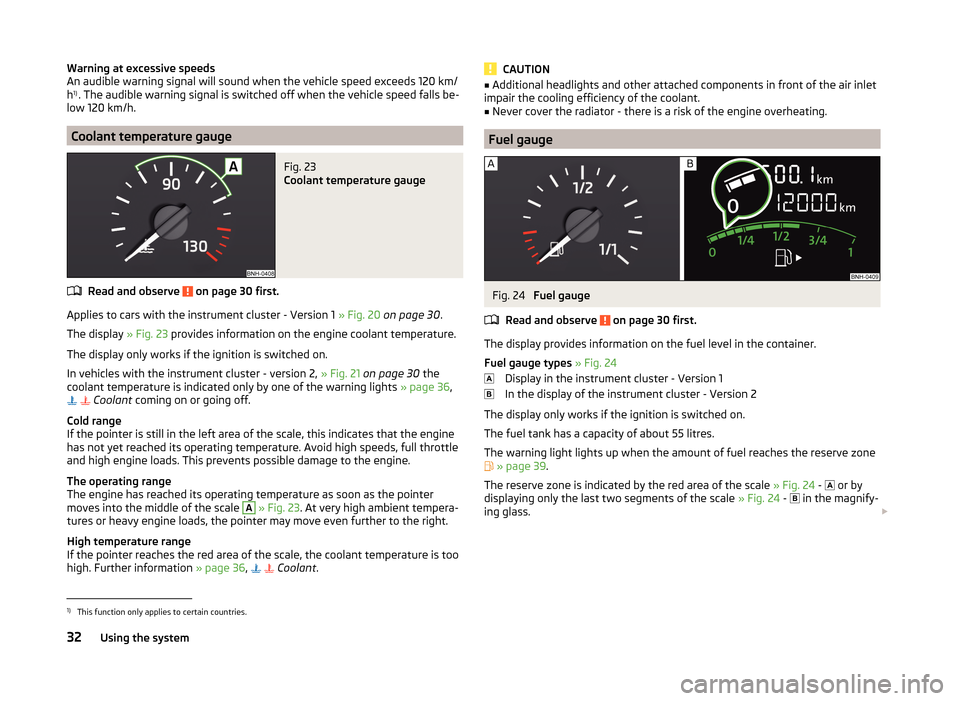
Coolant temperature gauge
Fig. 23
Coolant temperature gauge
Read and observe on page 30 first.
Applies to cars with the instrument cluster - Version 1 » Fig. 20 on page 30 .
The display » Fig. 23 provides information on the engine coolant temperature.
The display only works if the ignition is switched on.
In vehicles with the instrument cluster - version 2, » Fig. 21 on page 30 the
coolant temperature is indicated only by one of the warning lights » page 36,
Coolant
coming on or going off.
Cold range
If the pointer is still in the left area of the scale, this indicates that the engine
has not yet reached its operating temperature. Avoid high speeds, full throttle
and high engine loads. This prevents possible damage to the engine.
The operating range
The engine has reached its operating temperature as soon as the pointer
moves into the middle of the scale
A
» Fig. 23 . At very high ambient tempera-
tures or heavy engine loads, the pointer may move even further to the right.
High temperature range
If the pointer reaches the red area of the scale, the coolant temperature is too
high. Further information » page 36,
Coolant
.
CAUTION■
Additional headlights and other attached components in front of the air inlet
impair the cooling efficiency of the coolant.■
Never cover the radiator - there is a risk of the engine overheating.
Fuel gauge
Fig. 24
Fuel gauge
Read and observe
on page 30 first.
The display provides information on the fuel level in the container.
Fuel gauge types » Fig. 24
Display in the instrument cluster - Version 1
In the display of the instrument cluster - Version 2
The display only works if the ignition is switched on.
The fuel tank has a capacity of about 55 litres.
The warning light lights up when the amount of fuel reaches the reserve zone
» page 39 .
The reserve zone is indicated by the red area of the scale » Fig. 24 -
or by
displaying only the last two segments of the scale » Fig. 24 -
in the magnify-
ing glass.
1)
This function only applies to certain countries.
32Using the system
Page 40 of 204
Seek help from a specialist garage.WARNING■Carefully open the coolant expansion bottle. If the engine is hot, the cool-
ing system is pressurized – risk of scalding! It is therefore best to allow the
engine to cool down before removing the cap.■
Do not touch the radiator fan. The radiator fan may switch itself on auto-
matically even if the ignition is off - a danger of injury is present!
CAUTION
■ Additional headlights and other attached components in front of the air inlet
impair the cooling efficiency of the coolant.■
Never cover the radiator - there is a risk of the engine overheating.
Power steering
Read and observe
on page 35 first.
If the warning light
illuminates , there is a fault in the power steering sys-
tem.
The power steering operates with reduced steering assist or does not function
at all.
Seek assistance from a specialist garage immediately.
Stability Control (ESC)
Read and observe
on page 35 first.
The warning light
flashes , to show that the ESC is currently operating.
If the warning light
illuminates , there is a fault in the ESC.
The following message is shown in the MAXI DOT display. Error: Electronic Stability Control (ESC)
or Error: Traction control (ASR)
Seek assistance from a specialist garage immediately.
If the warning light
illuminates immediately after you start the engine, the
ESC might be switched off due to technical reasons.
›
Switch the ignition off and on again.
If the warning light does not illuminate after you switch the engine back on,
the ESR is fully functional again.
Further information » page 113, Electronic Stability Control (ESC) .
Note
If the vehicle battery has been disconnected and then reconnected, the indica-
tor light comes on after switching on the ignition. If the warning light does
not go out after moving a short distance, this means that there is an error in
the system. Seek assistance from a specialist garage immediately.
Traction control (ASR)
Read and observe
on page 35 first.
If the warning light
flashes , the ASR is currently operating.
If the warning light
illuminates , there is a fault in the ASR.
The following message is shown in the MAXI DOT display. Error: Traction control (ASR)
Seek assistance from a specialist garage immediately.
If the warning light
illuminates immediately after you start the engine, the
ASR might be switched off due to technical reasons.
›
Switch the ignition off and on again.
If the warning light does
not illuminate any more after the engine is
switched on again, then the ASR is fully functional again.
Further information » page 113, Traction Control System (TCS) .
Note
If the vehicle battery has been disconnected and then reconnected, the indica-
tor light comes on after switching on the ignition. If the warning light does
not go out after moving a short distance, this means that there is an error in
the system. Seek assistance from a specialist garage immediately.
Antilock brake system (ABS)
Read and observe
on page 35 first.
If the warning light
illuminates , there is a fault in the ABS.
37Instruments and Indicator Lights
Page 59 of 204
Note■When driving always use the existing heating, air conditioning and ventila-
tion system for ventilating the interior of the vehicle. If the windows are
opened, dust as well as other dirt can get into the vehicle and in addition the wind noise is more at certain speeds.■
The window lift mechanism is equipped with protection against overheating.
Repeated opening and closing of the window can cause this mechanism to
overheat. If this happens, it will not be possible to operate the window for a
short time. You will be able to operate the window again as soon as the over-
heating protection has cooled down.
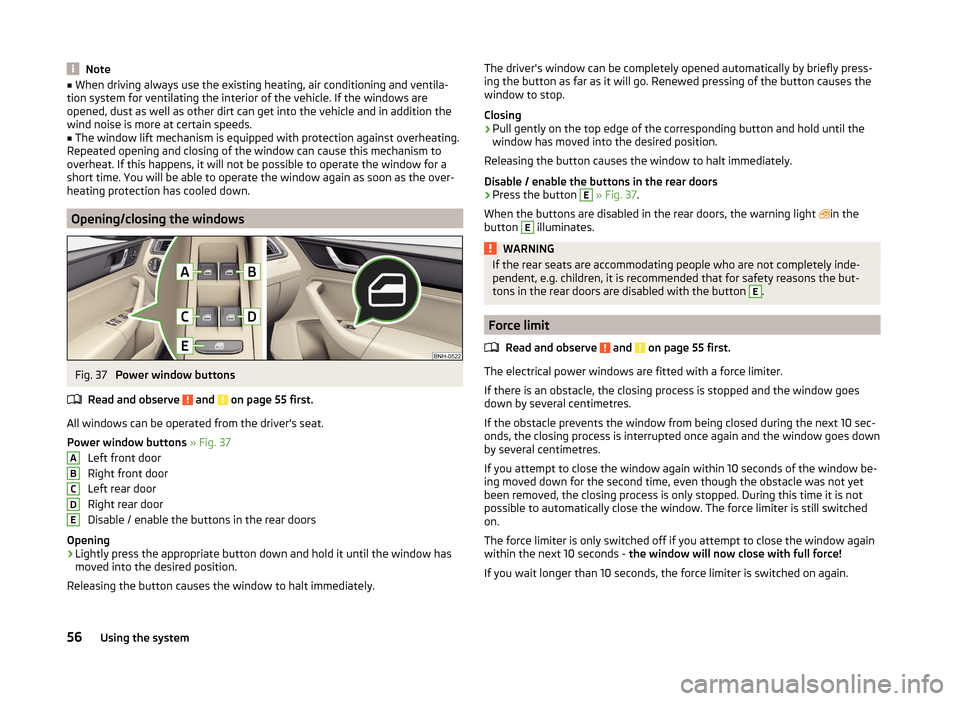
Opening/closing the windows
Fig. 37
Power window buttons
Read and observe
and on page 55 first.
All windows can be operated from the driver's seat.
Power window buttons » Fig. 37
Left front door
Right front door
Left rear door
Right rear door
Disable / enable the buttons in the rear doors
Opening
›
Lightly press the appropriate button down and hold it until the window has
moved into the desired position.
Releasing the button causes the window to halt immediately.
ABCDEThe driver's window can be completely opened automatically by briefly press-
ing the button as far as it will go. Renewed pressing of the button causes the
window to stop.
Closing›
Pull gently on the top edge of the corresponding button and hold until the
window has moved into the desired position.
Releasing the button causes the window to halt immediately.
Disable / enable the buttons in the rear doors
›
Press the button
E
» Fig. 37 .
When the buttons are disabled in the rear doors, the warning light
in the
button
E
illuminates.
WARNINGIf the rear seats are accommodating people who are not completely inde-
pendent, e.g. children, it is recommended that for safety reasons the but-
tons in the rear doors are disabled with the button E
.
Force limit
Read and observe
and on page 55 first.
The electrical power windows are fitted with a force limiter.
If there is an obstacle, the closing process is stopped and the window goes
down by several centimetres.
If the obstacle prevents the window from being closed during the next 10 sec-
onds, the closing process is interrupted once again and the window goes down
by several centimetres.
If you attempt to close the window again within 10 seconds of the window be-
ing moved down for the second time, even though the obstacle was not yet
been removed, the closing process is only stopped. During this time it is not
possible to automatically close the window. The force limiter is still switched
on.
The force limiter is only switched off if you attempt to close the window again
within the next 10 seconds - the window will now close with full force!
If you wait longer than 10 seconds, the force limiter is switched on again.
56Using the system
Page 60 of 204
Mechanical windows
Introduction
This chapter contains information on the following subjects:
Open / close window
57
The window can be operated mechanically by means of the handle attached to
the respective door panel.
WARNINGThe windows should nevertheless be closed carefully – risk of injury!
CAUTION
■ In the event that the windows are frozen, first of all eliminate the
ice » page 134 , Windows and external mirrors and only then operate the elec-
trical power windows. Otherwise, the window sealing and the electrical power
window mechanism could be damaged.■
Make sure that the windows are closed whenever you leave the locked vehi-
cle.
For the sake of the environment
At high speeds, you should keep the windows closed to prevent unnecessarily high fuel consumption.
Note
When driving always use the existing heating, air conditioning and ventilation
system for ventilating the interior of the vehicle. If the windows are opened,
dust as well as other dirt can get into the vehicle and in addition the wind
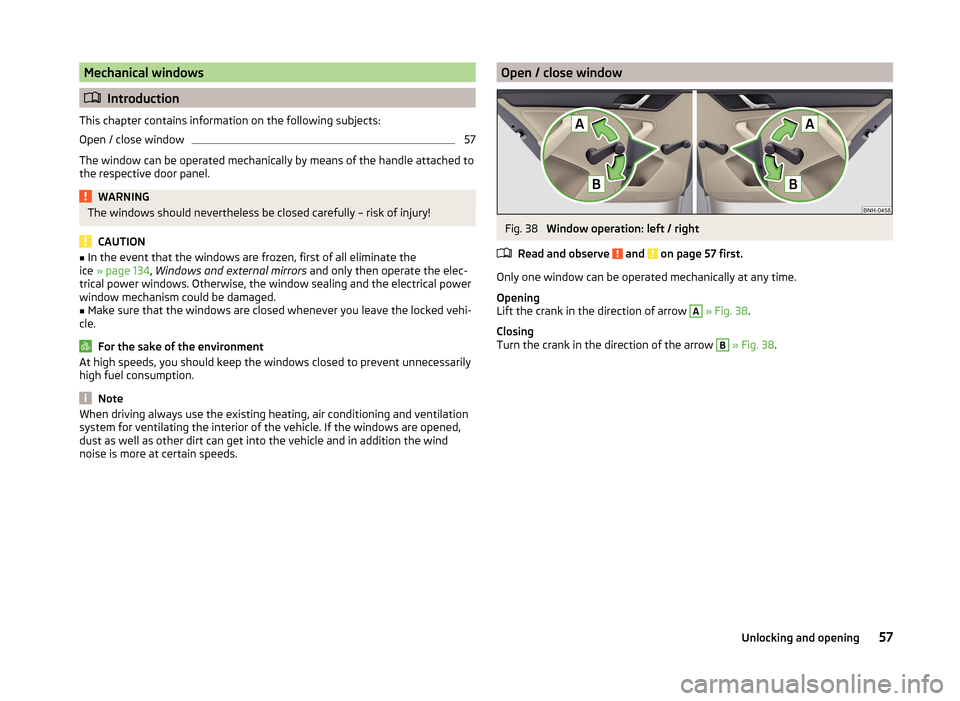
noise is more at certain speeds.Open / close windowFig. 38
Window operation: left / right
Read and observe
and on page 57 first.
Only one window can be operated mechanically at any time.
Opening
Lift the crank in the direction of arrow
A
» Fig. 38 .
Closing
Turn the crank in the direction of the arrow
B
» Fig. 38 .
57Unlocking and opening
Page 67 of 204
The system is turned off when any of the following is present.
› The vehicle is locked.
› The ignition is switched on.
› About 30 seconds after all the doors have been closed.
Rear interior light
Fig. 45
Interior lights at the rear: Version 1/version 2
Rear light - version 1: press switch
A
» Fig. 45
Switching on/off
Rear light - version 2: move lens
B
» Fig. 45
Switching on
Switching off
Operating with the door contact switch 1)
Rear light - version 1
The rear light is operated together with the front light 2)
.
› When the front lighting is
switched on, the rear lighting also turns on auto-
matically.
› When the front lighting is
switched off, the rear lighting can be turned on/off
as required.
Visibility
Introduction
This chapter contains information on the following subjects:
Rear window heater
64
Front sun visors
65
Sun screen of the panoramic roof
65
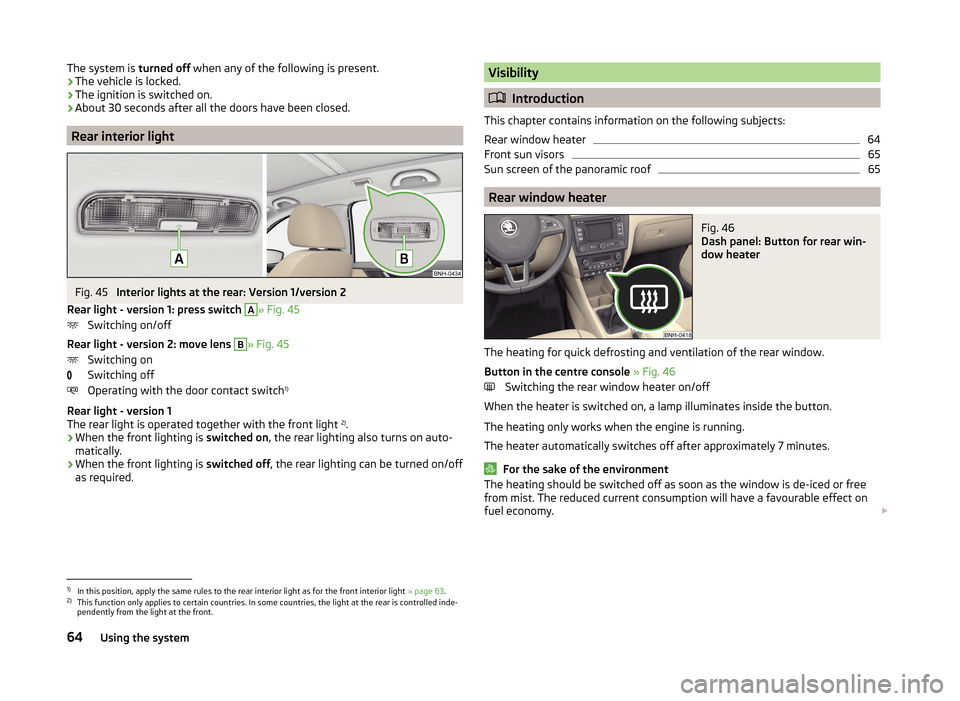
Rear window heater
Fig. 46
Dash panel: Button for rear win-
dow heater
The heating for quick defrosting and ventilation of the rear window.
Button in the centre console » Fig. 46
Switching the rear window heater on/off
When the heater is switched on, a lamp illuminates inside the button.
The heating only works when the engine is running.
The heater automatically switches off after approximately 7 minutes.
For the sake of the environment
The heating should be switched off as soon as the window is de-iced or free
from mist. The reduced current consumption will have a favourable effect on
fuel economy. 1)
In this position, apply the same rules to the rear interior light as for the front interior light
» page 63.
2)
This function only applies to certain countries. In some countries, the light at the rear is controlled inde-
pendently from the light at the front.
64Using the system
Page 69 of 204
WARNING■Properly maintained windscreen wiper blades are essential for clear visi-
bility and safe driving » page 172.■
Replace the windscreen wiper blades once or twice a year for safety rea-
sons. These can be purchased from a ŠKODA Partner.
■
Do not use the windscreen washer system at low temperatures, without
heating the windscreen beforehand. The window washer fluid could other-
wise freeze on the windscreen and restrict the view to the front.
■
Automatic wiping during rain is only a support. The driver is not released
from the responsibility to set the function of the windscreen wipers man-
ually depending on the visibility conditions.
CAUTION
■ If the ignition is switched off while the windscreen wipers are switched on,
the windscreen wipers will continue wiping in the same mode after the igni-
tion is turned back on. The windscreen wipers could freeze up in cold tempera-
tures between the time the ignition was turned off and when it was turned
back on again.■
In cold temperatures and during the winter, check before the journey or be-
fore switching on the ignition that the wiper blades are not frozen to the
windscreen. If the windscreen wipers are switched on when the blades are fro-
zen to the windscreen, this may damage both the blades and windscreen wip-
er motor!
■
Carefully peel frozen wiper blades off the windscreen.
■
Remove snow and ice from the windscreen wipers before driving.
■
Do not switch on the ignition if the front wiper arms are retracted. The wiper
arms could damage the paint of the bonnet.
■
If the windscreen wipers are handled carelessly, there is a risk of damage to
the windscreen.
Note
■ To avoid streaking, the wiper blades must be kept clean » page 136.■The windscreen washer nozzles for the windscreen are heated when the en-
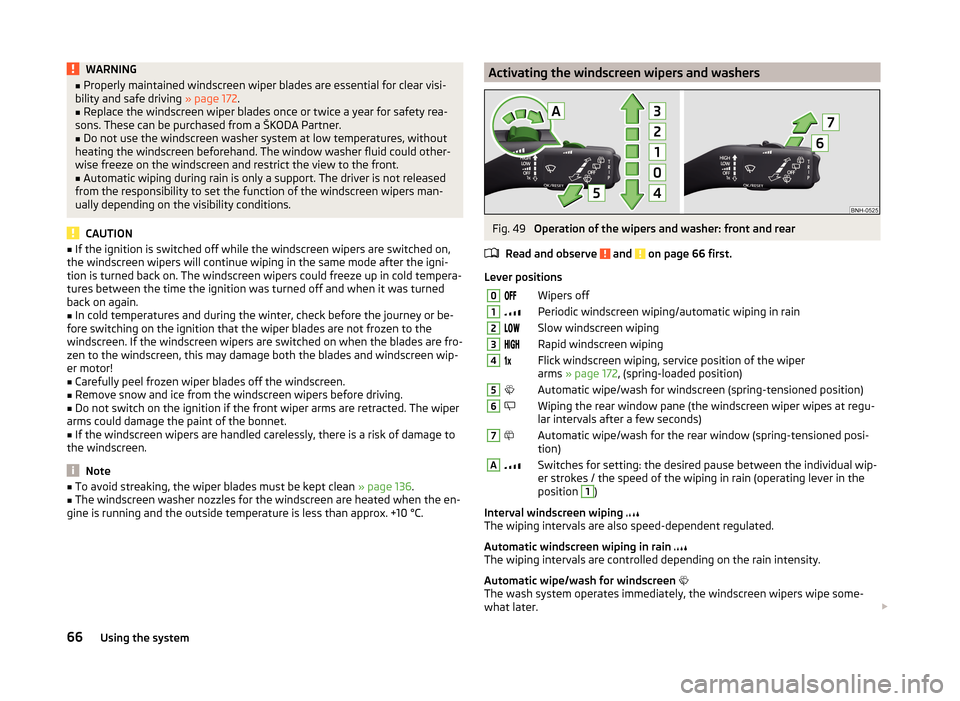
gine is running and the outside temperature is less than approx. +10 °C.Activating the windscreen wipers and washersFig. 49
Operation of the wipers and washer: front and rear
Read and observe
and on page 66 first.
Lever positions
0Wipers off1Periodic windscreen wiping/automatic wiping in rain2Slow windscreen wiping3Rapid windscreen wiping4 Flick windscreen wiping, service position of the wiper
arms » page 172 , (spring-loaded position)5Automatic wipe/wash for windscreen (spring-tensioned position)6Wiping the rear window pane (the windscreen wiper wipes at regu-
lar intervals after a few seconds)7Automatic wipe/wash for the rear window (spring-tensioned posi-
tion)ASwitches for setting: the desired pause between the individual wip-
er strokes / the speed of the wiping in rain (operating lever in the
position 1
)
Interval windscreen wiping
The wiping intervals are also speed-dependent regulated.
Automatic windscreen wiping in rain
The wiping intervals are controlled depending on the rain intensity.
Automatic wipe/wash for windscreen
The wash system operates immediately, the windscreen wipers wipe some-
what later.
66Using the system
Page 71 of 204
Do not attach external navigation devices on to the windscreen or in the vicini-
ty of the automatic dimming interior mirror » .WARNINGThe illuminated display of an external navigation unit can lead to opera-
tional faults to the automatic dimming interior mirror – risk of accident.WARNINGThe mirrors with automatic dimming contain an electrolyte liquid which can
escape if mirror glass is broken.■
The leaking electrolytic fluid can irritate the skin, eyes and breath appara-
tus. Immediately seek out fresh air and leave the vehicle. If this is not pos-
sible, at least open the window.
■
If you swallow electrolytic fluid, seek medical assistance immediately.
■
If your eyes or skin come into contact with the electrolytic fluid, immedi-
ately wash the affected area for a few minutes long with a lot of water.
Then consult a doctor immediately.
CAUTION
Automatic mirror dimming operates only properly if the light striking the sen-
sors is not affected by other objects.
Exterior mirror
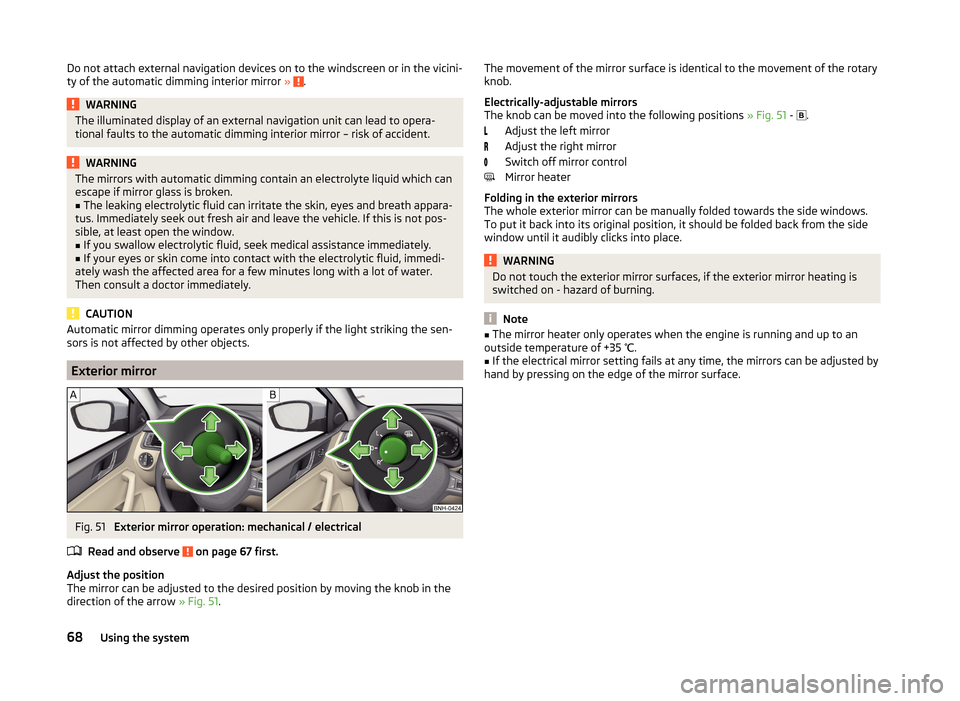
Fig. 51
Exterior mirror operation: mechanical / electrical
Read and observe
on page 67 first.
Adjust the position
The mirror can be adjusted to the desired position by moving the knob in the
direction of the arrow » Fig. 51.
The movement of the mirror surface is identical to the movement of the rotary
knob.
Electrically-adjustable mirrors
The knob can be moved into the following positions » Fig. 51 -
.
Adjust the left mirror
Adjust the right mirror
Switch off mirror control
Mirror heater
Folding in the exterior mirrors
The whole exterior mirror can be manually folded towards the side windows.
To put it back into its original position, it should be folded back from the side
window until it audibly clicks into place.WARNINGDo not touch the exterior mirror surfaces, if the exterior mirror heating is
switched on - hazard of burning.
Note
■ The mirror heater only operates when the engine is running and up to an
outside temperature of +35 ℃.■
If the electrical mirror setting fails at any time, the mirrors can be adjusted by
hand by pressing on the edge of the mirror surface.
68Using the system
Page 74 of 204
›To re-insert the head restraint, push it far enough down in the direction of
arrow 7 into the seat backrest until the locking button clicks into place.WARNINGWith seats occupied, the respective head rests must be installed and adjus- ted correctly - there is a risk of fatal injury!
Note
For the sports seats, the head restraints are integrated into the front seat
backrests. These headrests cannot be removed.
Seat features
Introduction
This chapter contains information on the following subjects:
Front seat heating
71
Front armrest
72
Rear armrest
72
Seat backrests
72
Front seat heating
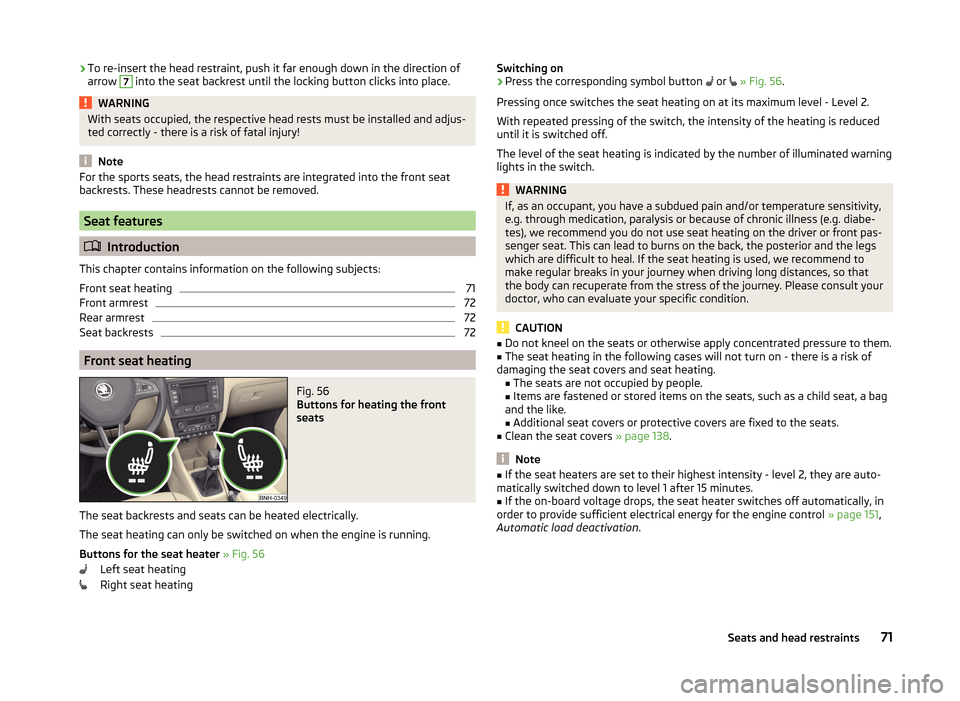
Fig. 56
Buttons for heating the front
seats
The seat backrests and seats can be heated electrically.
The seat heating can only be switched on when the engine is running.
Buttons for the seat heater » Fig. 56
Left seat heating
Right seat heating
Switching on›Press the corresponding symbol button or » Fig. 56 .
Pressing once switches the seat heating on at its maximum level - Level 2.
With repeated pressing of the switch, the intensity of the heating is reduced
until it is switched off.
The level of the seat heating is indicated by the number of illuminated warning
lights in the switch.WARNINGIf, as an occupant, you have a subdued pain and/or temperature sensitivity,
e.g. through medication, paralysis or because of chronic illness (e.g. diabe-
tes), we recommend you do not use seat heating on the driver or front pas-
senger seat. This can lead to burns on the back, the posterior and the legs
which are difficult to heal. If the seat heating is used, we recommend to
make regular breaks in your journey when driving long distances, so that
the body can recuperate from the stress of the journey. Please consult your
doctor, who can evaluate your specific condition.
CAUTION
■ Do not kneel on the seats or otherwise apply concentrated pressure to them.■The seat heating in the following cases will not turn on - there is a risk of
damaging the seat covers and seat heating. ■The seats are not occupied by people.
■ Items are fastened or stored items on the seats, such as a child seat, a bag
and the like.
■ Additional seat covers or protective covers are fixed to the seats.■
Clean the seat covers » page 138.
Note
■
If the seat heaters are set to their highest intensity - level 2, they are auto-
matically switched down to level 1 after 15 minutes.■
If the on-board voltage drops, the seat heater switches off automatically, in
order to provide sufficient electrical energy for the engine control » page 151,
Automatic load deactivation .
71Seats and head restraints