display SKODA RAPID SPACEBACK 2016 1.G Columbus Amundsen Bolero Infotainment System Navigation Manual
[x] Cancel search | Manufacturer: SKODA, Model Year: 2016, Model line: RAPID SPACEBACK, Model: SKODA RAPID SPACEBACK 2016 1.GPages: 100, PDF Size: 12.8 MB
Page 19 of 100
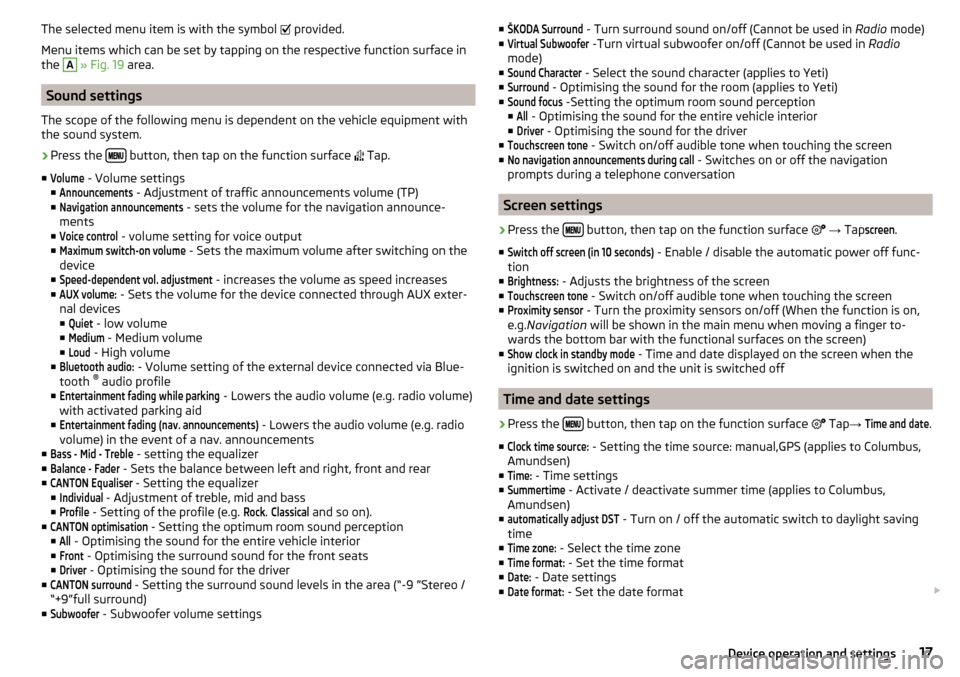
The selected menu item is with the symbol provided.
Menu items which can be set by tapping on the respective function surface in
the A
» Fig. 19 area.
Sound settings
The scope of the following menu is dependent on the vehicle equipment with the sound system.
›
Press the button, then tap on the function surface
Tap.
■
Volume
- Volume settings
■
Announcements
- Adjustment of traffic announcements volume (TP)
■
Navigation announcements
- sets the volume for the navigation announce-
ments
■
Voice control
- volume setting for voice output
■
Maximum switch-on volume
- Sets the maximum volume after switching on the
device
■
Speed-dependent vol. adjustment
- increases the volume as speed increases
■
AUX volume:
- Sets the volume for the device connected through AUX exter-
nal devices
■
Quiet
- low volume
■
Medium
- Medium volume
■
Loud
- High volume
■
Bluetooth audio:
- Volume setting of the external device connected via Blue-
tooth ®
audio profile
■
Entertainment fading while parking
- Lowers the audio volume (e.g. radio volume)
with activated parking aid
■
Entertainment fading (nav. announcements)
- Lowers the audio volume (e.g. radio
volume) in the event of a nav. announcements
■
Bass - Mid - Treble
- setting the equalizer
■
Balance - Fader
- Sets the balance between left and right, front and rear
■
CANTON Equaliser
- Setting the equalizer
■
Individual
- Adjustment of treble, mid and bass
■
Profile
- Setting of the profile (e.g.
Rock
.
Classical
and so on).
■
CANTON optimisation
- Setting the optimum room sound perception
■
All
- Optimising the sound for the entire vehicle interior
■
Front
- Optimising the surround sound for the front seats
■
Driver
- Optimising the sound for the driver
■
CANTON surround
- Setting the surround sound levels in the area (“-9 ”Stereo /
“+9”full surround)
■
Subwoofer
- Subwoofer volume settings
■ŠKODA Surround - Turn surround sound on/off (Cannot be used in Radio mode)
■Virtual Subwoofer
-Turn virtual subwoofer on/off (Cannot be used in Radio
mode)
■
Sound Character
- Select the sound character (applies to Yeti)
■
Surround
- Optimising the sound for the room (applies to Yeti)
■
Sound focus
-Setting the optimum room sound perception
■
All
- Optimising the sound for the entire vehicle interior
■
Driver
- Optimising the sound for the driver
■
Touchscreen tone
- Switch on/off audible tone when touching the screen
■
No navigation announcements during call
- Switches on or off the navigation
prompts during a telephone conversation
Screen settings
›
Press the button, then tap on the function surface
→ Tap
screen
.
■
Switch off screen (in 10 seconds)
- Enable / disable the automatic power off func-
tion
■
Brightness:
- Adjusts the brightness of the screen
■
Touchscreen tone
- Switch on/off audible tone when touching the screen
■
Proximity sensor
- Turn the proximity sensors on/off (When the function is on,
e.g. Navigation will be shown in the main menu when moving a finger to-
wards the bottom bar with the functional surfaces on the screen)
■
Show clock in standby mode
- Time and date displayed on the screen when the
ignition is switched on and the unit is switched off
Time and date settings
›
Press the button, then tap on the function surface
Tap
→
Time and date
.
■
Clock time source:
- Setting the time source: manual,GPS (applies to Columbus,
Amundsen)
■
Time:
- Time settings
■
Summertime
- Activate / deactivate summer time (applies to Columbus,
Amundsen)
■
automatically adjust DST
- Turn on / off the automatic switch to daylight saving
time
■
Time zone:
- Select the time zone
■
Time format:
- Set the time format
■
Date:
- Date settings
■
Date format:
- Set the date format
17Device operation and settings
Page 20 of 100
NoteWith the Yeti model, the time and date settings are set via the MAXI DOT dis-
play » Owner's Manual .
Setting the device language
›
Press the button, then tap on the function surface
Tap
→
Language
.
›
Select the device language or tap the function surface
Automatic
to set the
MAXI DOT display matching language (applies to the Yeti).
In some languages, after selecting the function key
Female
and
Male
are dis-
played for the choice of voice prompts for the device.
Note
■ When a language is selected which does not support voice control, the de-
vice will indicate with a message on the screen .■
The messages are generated by the device. The flawless clarity (e.g. road or
city name) cannot always be guaranteed.
Additional keypad language settings
›
Press the button, then tap on the function surface
Tap →
Additionalkeypad languages
.
In this menu, a keyboard language set can be added to allow the entering of
characters other than those in the currently selected language (function sur-
face
).
Unit settings
›
Press the button, then tap on the function surface
Tap →
units
.
■
Distance:
- Distance units
■
Speed:
- Speed units
■
Temperature:
- Temperature units
■
Volume:
- Volume units
■
Consumption:
- Consumption units
■
CNG consumption:
- CNG consumption units (compressed natural gas)
■
Pressure:
- Pressure units for tyre pressure
Note
With the Yetimodel setting the device units is carried out via the MAXI DOT
display. » Owner's Manual .Setting data transfer
An active data transfer allows data transfer between the device and the exter-
nal device (e.g. MirrorLink ®
application) or the operation of some device func-
tions using the application of the external device (e.g. ŠKODA Media
Command).›
Press the button, then tap on the function surface
Tap →
Mobile devicedata transfer
.
■
Enable data transfer for ŠKODA apps
- Turning data transfer on and off
■
Operation by Apps:
- Setting device operation via the applications of the exter-
nal device (applies to Columbus)
■
Deactivate
- Prohibition of device operation through an external device
■
Confirm
- Device operation with required confirmation
■
Allow
- Device operation without any restriction
Voice control settings
›
Press the button, then tap on the function surface
Tap
→
voice control
.
■
Example commands (Infotainment system)
-Display available commands - Switch
on/off the menu display containing basic voice commands when voice con-
trol is activated
■
Voice control session start tone
- Switch on/off the audible signal when turning on
the voice control
■
Voice control session end tone
- Switch on/off the audible signal when voice con-
trol ends
■
Input tone in voice dialogue
- Switch on/off the audible signal for the voice input
■
End tone in voice dialog
- Turn on / off the acoustic signal after the end of a voice
command
Safe removal of the external device
›
Press the button, then tap on the function surface
→
Remove safely:
Tap and select the external device to be removed.
Reset to factory settings
›
Press the button, then tap on the function surfaces
→
Factory settings
.
In this menu, all or only chosen settings can be restored.
18Device operation and settings
Page 21 of 100
Bluetooth®
Settings›
Press the button, then tap on the function surface
→ Tap
Bluetooth
.
■
Bluetooth
- Switch on/off Bluetooth ®
function
■
Visibility:
- switch on/off the visibility of the Bluetooth ®
device for other exter-
nal devices
■
Name:
- Changing the name of the Bluetooth ®
unit
■
Paired devices
- display the list of paired Bluetooth ®
devices
■
Find devices
- searches for available devices
■
Bluetooth audio (A2DP/AVRCP)
- Turn on/off the ability to connect an audio device
(e.g. MP3 player, tablet etc.)
Settings
›
Press the button, then tap on the function surface
→ Tap
network
.
■
Network settings
- Setting of the data connection according to the associated
telephone service provider (APN settings)
■
Access point name: ...
- Setting of the access point name
■
User name: …
- Setting of user name
■
Password: ...
- Password setting
■
Authentication
- Setting for the type of verification
■
Normal
- Without verification
■
Safe
- Verification required
■
Reset Access Point (APN)
- Delete the parameters for the network setting
■
Save
- Store the parameters for the network setting
■
Network provider: ...
- Selection of the data service provider (the menu item is
visible when the data services are active in the SIM card inserted in the ex-
ternal module)
■
Data roaming
- Enable / disable the use of data roaming connection
■
Current connection details
- Display of information on data downloaded (by press-
ing the function key
Reset
the data information is deleted)
■
Data connection:
- Data service settings for the SIM card inserted in the external
module
■
Off
- Data services are turned off
■
Inquire
- Data services are actively seeking confirmation
■
On
- Data services are turned on
Wireless settings
Applies to Columbus, Amundsen (not applicable to Yeti).›
Press the button, then tap on the function surface
Tap →
WLAN
.
■
WLAN
- List of available hotspots of external devices
■
WLAN
- Turn on / off the device wireless
■
WPS Quick Connect (WPS button)
- Establishing a secure connection to the hot-
spot of the external device via WPS (applies to Amundsen)
■
Manual settings
- Setting the parameters for search and connection to the
hotspot of the external device ■
Network name
- Enter the Hotspot name
■
Network key
- Setting the access password
■
Security level:
- Adjustment of the coverage
■
WPA2
- WPA2 security
■
WPA
- WPA security
■
No security level
- No coverage (without required entry of the access pass-
word)
■
Connect
- Connection establishment
■
Search
- Search / Restore the list of available hotspots
■
Mobile hotspot
- Setting device hotspots (in the functional surface the symbol
is displayed with the number of connected external devices)
■
Mobile hotspot
- Turn on / off device hotspots
■
WPS Quick Connect (WPS button)
- Establishing a secure connection to the de-
vice via WPS hotspot (applies to Amundsen)
■
Hotspot settings
- Setting the parameters for the connection to the device
hotspot
■
Security level:
- Setting the connection coverage
■
WPA2
- WPA2 security
■
WPA
- WPA security
■
No security level
- No coverage (without required entry of the access pass-
word)
■
Network key
- Entering the access password
■
SSID: ...
- Name of the device hotspot
■
Do not send network name (SSID)
-Switch WLAN hotspot security on/off
■
Storage
- Storage of the device hotspot parameters
System information
›
Press the button, then tap on the function surface
Tap
→
system infor-mation
.
19Device operation and settings
Page 22 of 100
›To perform a
Software Update (Z. B. Bluetooth®
or radio station logo) Tap
the functional surface Update software
.
Displaying system information.
▶ Device part number: ... - Part number of the device
▶ Hardware: ... - Version of the hardware used
▶ Software: ... - Version of the software used
▶ Navigation database: ... - Version of the navigation data
▶ “Gracenote” database: ... - Version of the Gracenote multimedia database
(applies to Columbus)
▶ Media Codec: ... - Media codec version
▶ Bluetooth version: ... - Version of the Bluetooth ®
software used
The information on available software updates is to be obtained from a ŠKODA
partner or on the following ŠKODA Internet pages.
http://go.skoda.eu/infotainment20Device operation and settings
Page 23 of 100
Radio
Operation
Introduction to the subject
The device allows analogue radio reception of FM and AM frequency ranges as
well as DAB digital radio reception.
CAUTION
■ For vehicles with window antennas do not stick foil or metal coated stickers
to the window - Radio signal reception could be affected.■
Car parks, tunnels, tall buildings or mountains can interfere with the radio
signal even causing it to fail completely.
Main menu
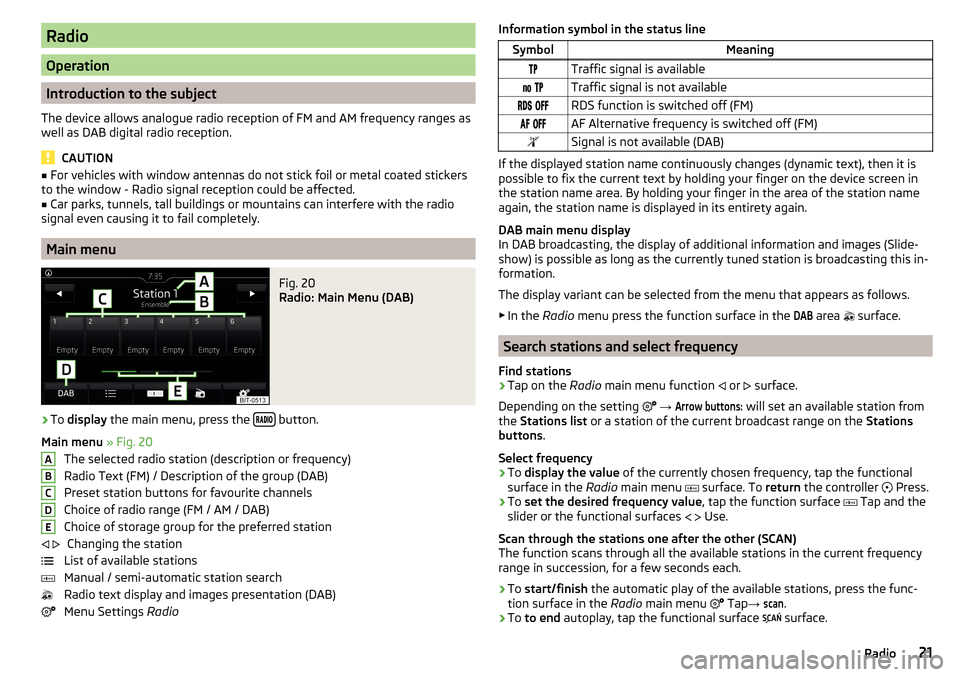
Fig. 20
Radio: Main Menu (DAB)
›
To display the main menu, press the button.
Main menu » Fig. 20
The selected radio station (description or frequency)
Radio Text (FM) / Description of the group (DAB)
Preset station buttons for favourite channels
Choice of radio range (FM / AM / DAB) Choice of storage group for the preferred station Changing the station
List of available stations
Manual / semi-automatic station search
Radio text display and images presentation (DAB)
Menu Settings Radio
ABCDE Information symbol in the status lineSymbolMeaningTraffic signal is available Traffic signal is not available RDS function is switched off (FM) AF Alternative frequency is switched off (FM)Signal is not available (DAB)
If the displayed station name continuously changes (dynamic text), then it is
possible to fix the current text by holding your finger on the device screen in
the station name area. By holding your finger in the area of the station name
again, the station name is displayed in its entirety again.
DAB main menu display
In DAB broadcasting, the display of additional information and images (Slide-
show) is possible as long as the currently tuned station is broadcasting this in-
formation.
The display variant can be selected from the menu that appears as follows. ▶ In the Radio menu press the function surface in the
DAB
area
surface.
Search stations and select frequency
Find stations
›
Tap on the Radio main menu function
or
surface.
Depending on the setting
→
Arrow buttons:
will set an available station from
the Stations list or a station of the current broadcast range on the Stations
buttons .
Select frequency
›
To display the value of the currently chosen frequency, tap the functional
surface in the Radio main menu
surface. To
return the controller
Press.
›
To
set the desired frequency value , tap the function surface
Tap and the
slider or the functional surfaces
Use.
Scan through the stations one after the other (SCAN)
The function scans through all the available stations in the current frequency
range in succession, for a few seconds each.
›
To start/finish the automatic play of the available stations, press the func-
tion surface in the Radio main menu
Tap
→
scan
.
›
To to end autoplay, tap the functional surface
surface.
21Radio
Page 24 of 100
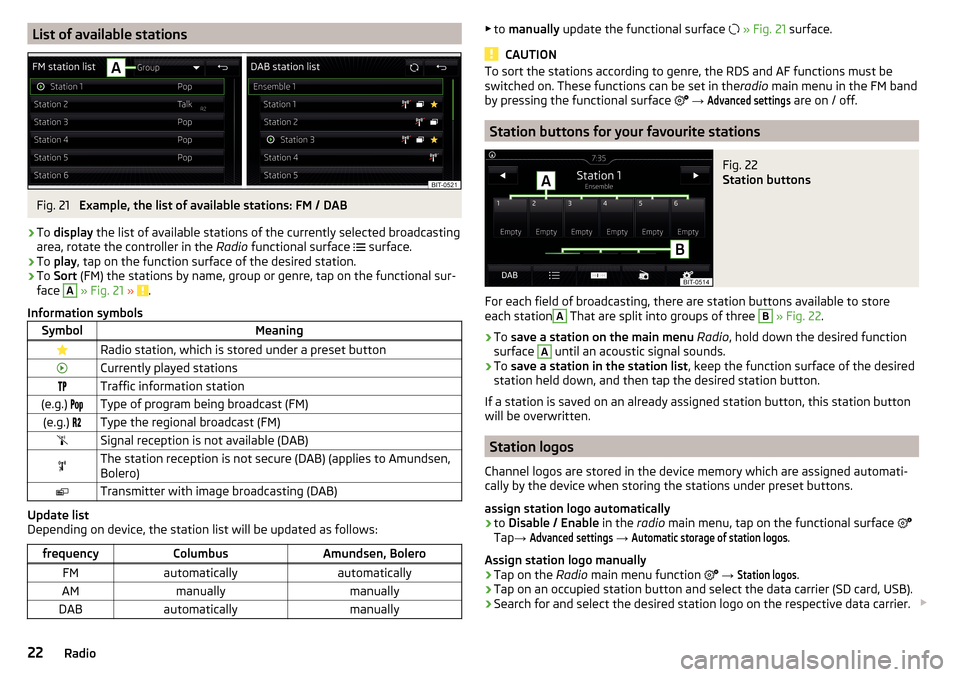
List of available stationsFig. 21
Example, the list of available stations: FM / DAB
›
To display the list of available stations of the currently selected broadcasting
area, rotate the controller in the Radio functional surface
surface.
›
To
play , tap on the function surface of the desired station.
›
To Sort (FM) the stations by name, group or genre, tap on the functional sur-
face
A
» Fig. 21 » .
Information symbols
SymbolMeaningRadio station, which is stored under a preset buttonCurrently played stationsTraffic information station(e.g.) Type of program being broadcast (FM)(e.g.) Type the regional broadcast (FM)Signal reception is not available (DAB)The station reception is not secure (DAB) (applies to Amundsen,
Bolero)Transmitter with image broadcasting (DAB)
Update list
Depending on device, the station list will be updated as follows:
frequencyColumbusAmundsen, BoleroFMautomaticallyautomaticallyAMmanuallymanuallyDABautomaticallymanually▶ to manually update the functional surface » Fig. 21 surface.
CAUTION
To sort the stations according to genre, the RDS and AF functions must be
switched on. These functions can be set in the radio main menu in the FM band
by pressing the functional surface
→ Advanced settings
are on / off.
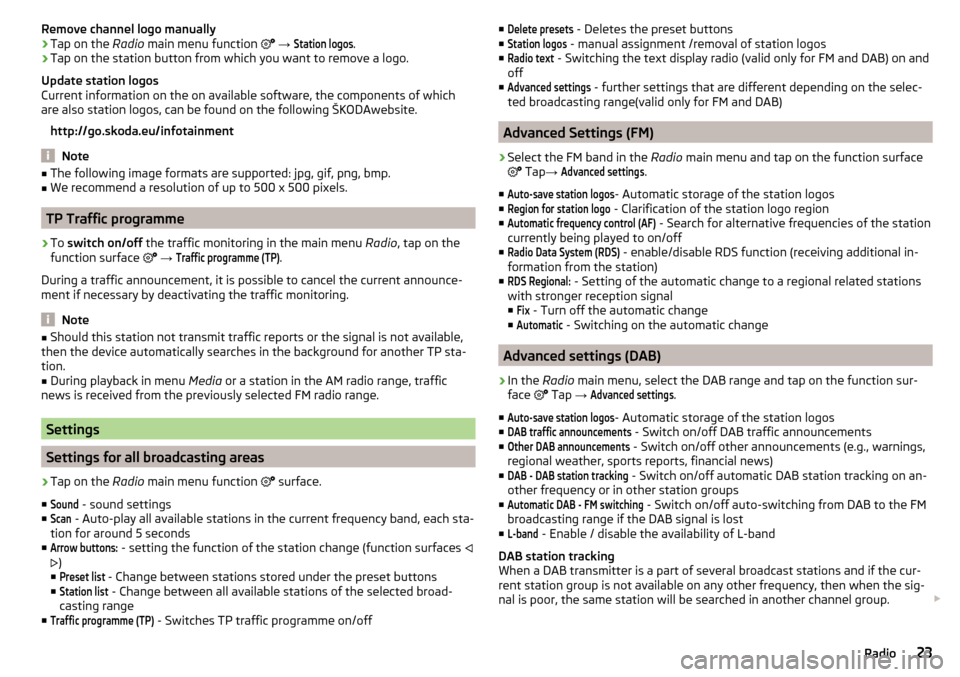
Station buttons for your favourite stations
Fig. 22
Station buttons
For each field of broadcasting, there are station buttons available to store
each station
A
That are split into groups of three
B
» Fig. 22 .
›
To save a station on the main menu Radio , hold down the desired function
surface
A
until an acoustic signal sounds.
›
To save a station in the station list , keep the function surface of the desired
station held down, and then tap the desired station button.
If a station is saved on an already assigned station button, this station button
will be overwritten.
Station logos
Channel logos are stored in the device memory which are assigned automati-
cally by the device when storing the stations under preset buttons.
assign station logo automatically
›
to Disable / Enable in the radio main menu, tap on the functional surface
Tap →
Advanced settings
→
Automatic storage of station logos
.
Assign station logo manually
›
Tap on the Radio main menu function
→
Station logos
.
›
Tap on an occupied station button and select the data carrier (SD card, USB).
›
Search for and select the desired station logo on the respective data carrier.
22Radio
Page 25 of 100
Remove channel logo manually›Tap on the Radio main menu function →
Station logos
.›
Tap on the station button from which you want to remove a logo.
Update station logos
Current information on the on available software, the components of which
are also station logos, can be found on the following ŠKODAwebsite.
http://go.skoda.eu/infotainment
Note
■ The following image formats are supported: jpg, gif, png, bmp.■We recommend a resolution of up to 500 x 500 pixels.
TP Traffic programme
›
To switch on/off the traffic monitoring in the main menu Radio, tap on the
function surface
→
Traffic programme (TP)
.
During a traffic announcement, it is possible to cancel the current announce-
ment if necessary by deactivating the traffic monitoring.
Note
■ Should this station not transmit traffic reports or the signal is not available,
then the device automatically searches in the background for another TP sta-
tion.■
During playback in menu Media or a station in the AM radio range, traffic
news is received from the previously selected FM radio range.
Settings
Settings for all broadcasting areas
›
Tap on the Radio main menu function
surface.
■
Sound
- sound settings
■
Scan
- Auto-play all available stations in the current frequency band, each sta-
tion for around 5 seconds
■
Arrow buttons:
- setting the function of the station change (function surfaces
)
■
Preset list
- Change between stations stored under the preset buttons
■
Station list
- Change between all available stations of the selected broad-
casting range
■
Traffic programme (TP)
- Switches TP traffic programme on/off
■Delete presets - Deletes the preset buttons
■Station logos
- manual assignment /removal of station logos
■
Radio text
- Switching the text display radio (valid only for FM and DAB) on and
off
■
Advanced settings
- further settings that are different depending on the selec-
ted broadcasting range(valid only for FM and DAB)
Advanced Settings (FM)
›
Select the FM band in the Radio main menu and tap on the function surface
Tap →
Advanced settings
.
■
Auto-save station logos
- Automatic storage of the station logos
■
Region for station logo
- Clarification of the station logo region
■
Automatic frequency control (AF)
- Search for alternative frequencies of the station
currently being played to on/off
■
Radio Data System (RDS)
- enable/disable RDS function (receiving additional in-
formation from the station)
■
RDS Regional:
- Setting of the automatic change to a regional related stations
with stronger reception signal
■
Fix
- Turn off the automatic change
■
Automatic
- Switching on the automatic change
Advanced settings (DAB)
›
In the Radio main menu, select the DAB range and tap on the function sur-
face Tap
→
Advanced settings
.
■
Auto-save station logos
- Automatic storage of the station logos
■
DAB traffic announcements
- Switch on/off DAB traffic announcements
■
Other DAB announcements
- Switch on/off other announcements (e.g., warnings,
regional weather, sports reports, financial news)
■
DAB - DAB station tracking
- Switch on/off automatic DAB station tracking on an-
other frequency or in other station groups
■
Automatic DAB - FM switching
- Switch on/off auto-switching from DAB to the FM
broadcasting range if the DAB signal is lost
■
L-band
- Enable / disable the availability of L-band
DAB station tracking
When a DAB transmitter is a part of several broadcast stations and if the cur-
rent station group is not available on any other frequency, then when the sig-
nal is poor, the same station will be searched in another channel group.
23Radio
Page 26 of 100
Automatic change from DAB to FM
With bad DAB reception the device tries to find an FM transmitter.
The station name is followed by (
) while the station is being received on the
FM band. The (
) marker disappears when the relevant DAB station can be re-
ceived again.
If a DAB station is also not available in the FM band due to poor reception, the
device will be switched to mute.
L-band
For the DAB radio reception in different countries, different broadcasting rang-
es are used. In some countries the DAB radio reception is only possible in the
so called L-band.
If no L-band DAB radio reception is possible in the country then we recom-
mend turning off the L-band. The channel scan is therefore faster.Media
Operation
Main menu
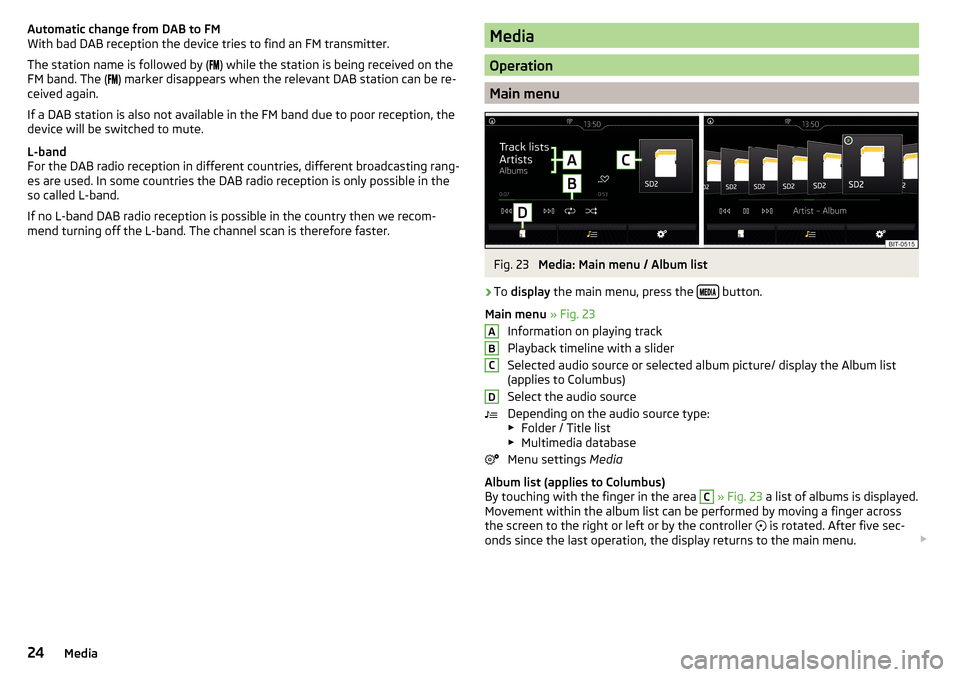
Fig. 23
Media: Main menu / Album list
›
To display the main menu, press the button.
Main menu » Fig. 23
Information on playing track
Playback timeline with a slider
Selected audio source or selected album picture/ display the Album list
(applies to Columbus)
Select the audio source
Depending on the audio source type:
▶ Folder / Title list
▶ Multimedia database
Menu settings Media
Album list (applies to Columbus)
By touching with the finger in the area
C
» Fig. 23 a list of albums is displayed.
Movement within the album list can be performed by moving a finger across
the screen to the right or left or by the controller is rotated. After five sec-
onds since the last operation, the display returns to the main menu.
ABCD24Media
Page 27 of 100
Note■Information concerning the given title appears on the screen, if they are stor-
ed as so-called ID3 Tags on the audio source. If no ID3 tag is available, only the
title name is displayed.■
The remaining playback time indicated does not correspond to the actual re-
maining playback time for titles with variable bit rates (VBR).
Select audio source
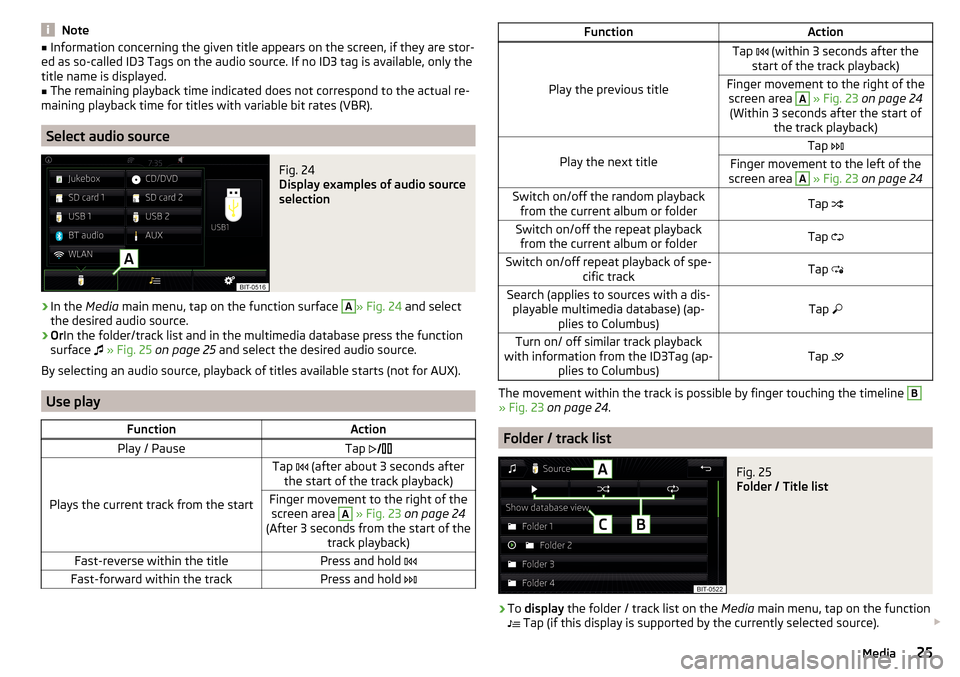
Fig. 24
Display examples of audio source
selection
›
In the Media main menu, tap on the function surface
A
» Fig. 24 and select
the desired audio source.
›
Or In the folder/track list and in the multimedia database press the function
surface
» Fig. 25 on page 25 and select the desired audio source.
By selecting an audio source, playback of titles available starts (not for AUX).
Use play
FunctionActionPlay / PauseTap
Plays the current track from the start
Tap (after about 3 seconds after
the start of the track playback)Finger movement to the right of the screen area A
» Fig. 23 on page 24
(After 3 seconds from the start of the track playback)Fast-reverse within the titlePress and hold Fast-forward within the trackPress and hold FunctionAction
Play the previous title
Tap (within 3 seconds after the
start of the track playback)Finger movement to the right of the screen area A
» Fig. 23 on page 24
(Within 3 seconds after the start of the track playback)Play the next title
Tap Finger movement to the left of the
screen area A
» Fig. 23 on page 24Switch on/off the random playback
from the current album or folderTap Switch on/off the repeat playback
from the current album or folderTap Switch on/off repeat playback of spe-
cific trackTap Search (applies to sources with a dis-
playable multimedia database) (ap- plies to Columbus)Tap Turn on/ off similar track playback
with information from the ID3Tag (ap- plies to Columbus)Tap
The movement within the track is possible by finger touching the timeline
B
» Fig. 23
on page 24 .
Folder / track list
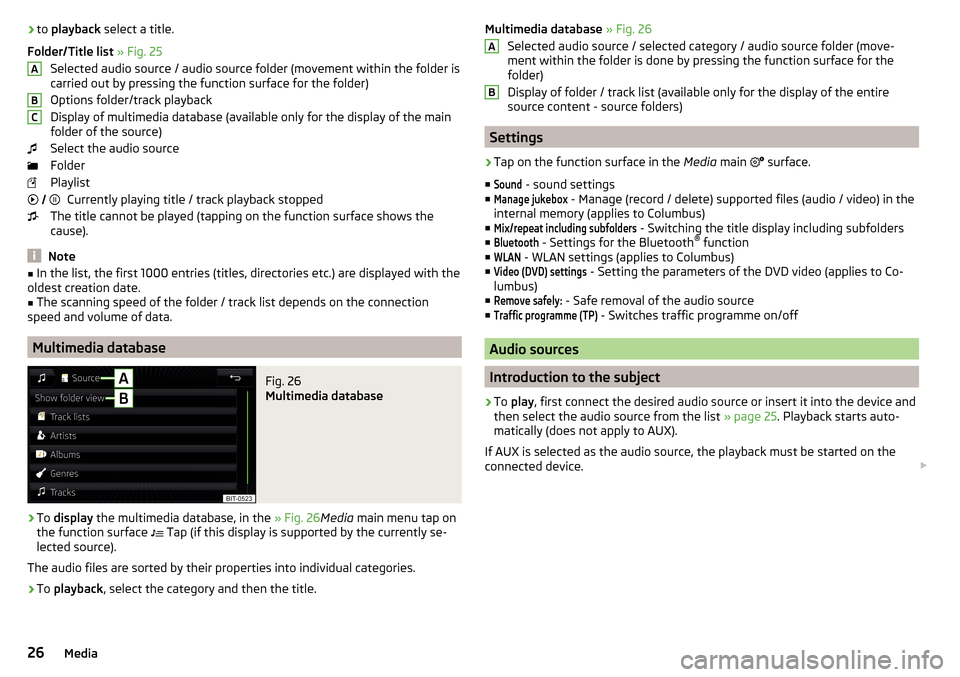
Fig. 25
Folder / Title list
›
To display the folder / track list on the Media main menu, tap on the function
Tap (if this display is supported by the currently selected source).
25Media
Page 28 of 100
›to
playback select a title.
Folder/Title list » Fig. 25
Selected audio source / audio source folder (movement within the folder is
carried out by pressing the function surface for the folder)
Options folder/track playback
Display of multimedia database (available only for the display of the main
folder of the source)
Select the audio source
Folder
Playlist Currently playing title / track playback stopped
The title cannot be played (tapping on the function surface shows the
cause).
Note
■ In the list, the first 1000 entries (titles, directories etc.) are displayed with the
oldest creation date.■
The scanning speed of the folder / track list depends on the connection
speed and volume of data.
Multimedia database
Fig. 26
Multimedia database
›
To display the multimedia database, in the » Fig. 26Media main menu tap on
the function surface
Tap (if this display is supported by the currently se-
lected source).
The audio files are sorted by their properties into individual categories.
›
To playback , select the category and then the title.
ABC Multimedia database » Fig. 26
Selected audio source / selected category / audio source folder (move-
ment within the folder is done by pressing the function surface for the
folder)
Display of folder / track list (available only for the display of the entire
source content - source folders)
Settings
›
Tap on the function surface in the Media main
surface.
■
Sound
- sound settings
■
Manage jukebox
- Manage (record / delete) supported files (audio / video) in the
internal memory (applies to Columbus)
■
Mix/repeat including subfolders
- Switching the title display including subfolders
■
Bluetooth
- Settings for the Bluetooth ®
function
■
WLAN
- WLAN settings (applies to Columbus)
■
Video (DVD) settings
- Setting the parameters of the DVD video (applies to Co-
lumbus)
■
Remove safely:
- Safe removal of the audio source
■
Traffic programme (TP)
- Switches traffic programme on/off
Audio sources
Introduction to the subject
›
To play , first connect the desired audio source or insert it into the device and
then select the audio source from the list » page 25. Playback starts auto-
matically (does not apply to AUX).
If AUX is selected as the audio source, the playback must be started on the
connected device.
AB26Media