gearbox SKODA ROOMSTER 2009 1.G Owner's Manual
[x] Cancel search | Manufacturer: SKODA, Model Year: 2009, Model line: ROOMSTER, Model: SKODA ROOMSTER 2009 1.GPages: 263, PDF Size: 32.25 MB
Page 4 of 263
Contents3
Using the system
Safety
Driving Tips
General Maintenance
Breakdown assistance
Praktik
Technical Data
ContentsLayout of this Owner's Manual
(explanations)
. . . . . . . . . . . . . . . . . . . . . . . . . .
Using the system
. . . . . . . . . . . . . . . . . . . . . .
Cockpit
. . . . . . . . . . . . . . . . . . . . . . . . . . . . . . . . . . . . . . . .
General view . . . . . . . . . . . . . . . . . . . . . . . . . . . . . . . . .
The brief instruction
. . . . . . . . . . . . . . . . . . . . . . . . . .
Basic functions and important information . . . . .
Instruments and Indicator/Warning Lights
. . .
General view of the instrument cluster . . . . . . . . .
Engine revolutions counter . . . . . . . . . . . . . . . . . . . .
Coolant temperature gauge* . . . . . . . . . . . . . . . . . .
Fuel gauge* . . . . . . . . . . . . . . . . . . . . . . . . . . . . . . . . . .
Counter for distance driven . . . . . . . . . . . . . . . . . . .
Service Interval Display . . . . . . . . . . . . . . . . . . . . . . .
Digital clock . . . . . . . . . . . . . . . . . . . . . . . . . . . . . . . . . .
Multi-functional indicator (onboard computer)*
Information display* . . . . . . . . . . . . . . . . . . . . . . . . . .
Auto Check Control . . . . . . . . . . . . . . . . . . . . . . . . . . .
Warning lights . . . . . . . . . . . . . . . . . . . . . . . . . . . . . . . .
Unlocking and locking
. . . . . . . . . . . . . . . . . . . . . . . .
Key . . . . . . . . . . . . . . . . . . . . . . . . . . . . . . . . . . . . . . . . . .
Locking . . . . . . . . . . . . . . . . . . . . . . . . . . . . . . . . . . . . . .
Child safety lock . . . . . . . . . . . . . . . . . . . . . . . . . . . . . .
Central locking system* . . . . . . . . . . . . . . . . . . . . . . .
Remote control* . . . . . . . . . . . . . . . . . . . . . . . . . . . . . .
Anti-theft alarm system* . . . . . . . . . . . . . . . . . . . . . .
Interior monitor* and towing protection
monitoring* . . . . . . . . . . . . . . . . . . . . . . . . . . . . . . . . . .
Electrical power windows* . . . . . . . . . . . . . . . . . . . .
Panorama roof* . . . . . . . . . . . . . . . . . . . . . . . . . . . . . .
Lights and Visibility
. . . . . . . . . . . . . . . . . . . . . . . . . . .
Lights . . . . . . . . . . . . . . . . . . . . . . . . . . . . . . . . . . . . . . . .
Interior lighting . . . . . . . . . . . . . . . . . . . . . . . . . . . . . . .
Visibility . . . . . . . . . . . . . . . . . . . . . . . . . . . . . . . . . . . . .
Windshield wiper and wash system . . . . . . . . . . . .
Rear mirror . . . . . . . . . . . . . . . . . . . . . . . . . . . . . . . . . .
Seats and Storage
. . . . . . . . . . . . . . . . . . . . . . . . . . . . .
Front seats . . . . . . . . . . . . . . . . . . . . . . . . . . . . . . . . . . .
Head restraints . . . . . . . . . . . . . . . . . . . . . . . . . . . . . . .
Heating the front seats* . . . . . . . . . . . . . . . . . . . . . . .
Rear seats . . . . . . . . . . . . . . . . . . . . . . . . . . . . . . . . . . . .
Pedals . . . . . . . . . . . . . . . . . . . . . . . . . . . . . . . . . . . . . . .
luggage compartment . . . . . . . . . . . . . . . . . . . . . . . .
Variable loading floor* . . . . . . . . . . . . . . . . . . . . . . . .
Bicycle carrier* . . . . . . . . . . . . . . . . . . . . . . . . . . . . . . .
The roof luggage rack system* . . . . . . . . . . . . . . . . .
Front cup holder . . . . . . . . . . . . . . . . . . . . . . . . . . . . .
Rear cup holder* . . . . . . . . . . . . . . . . . . . . . . . . . . . . .
Note holder . . . . . . . . . . . . . . . . . . . . . . . . . . . . . . . . . .
Ashtray* . . . . . . . . . . . . . . . . . . . . . . . . . . . . . . . . . . . . .
Cigarette lighter* and power sockets* . . . . . . . . . .
Storage compartments . . . . . . . . . . . . . . . . . . . . . . . .
Heating and air conditioning system
. . . . . . . . .
Air outlet vents . . . . . . . . . . . . . . . . . . . . . . . . . . . . . . .
Recirculated air mode . . . . . . . . . . . . . . . . . . . . . . . .
Heating . . . . . . . . . . . . . . . . . . . . . . . . . . . . . . . . . . . . . .
Climatic (semi-automatic air conditioning
system)* . . . . . . . . . . . . . . . . . . . . . . . . . . . . . . . . . . . . .
Climatronic (automatic air conditioning)* . . . . . .
Starting-off and Driving
. . . . . . . . . . . . . . . . . . . . . . .
Setting steering wheel position . . . . . . . . . . . . . . . .
Ignition lock . . . . . . . . . . . . . . . . . . . . . . . . . . . . . . . . . .
Starting the engine . . . . . . . . . . . . . . . . . . . . . . . . . . . Switching off the engine . . . . . . . . . . . . . . . . . . . . . .
Shifting (manual gearbox) . . . . . . . . . . . . . . . . . . . . .
Handbrake . . . . . . . . . . . . . . . . . . . . . . . . . . . . . . . . . . .
Parking aid* . . . . . . . . . . . . . . . . . . . . . . . . . . . . . . . . . .
Cruise control system (CCS)* . . . . . . . . . . . . . . . . . .
Automatic gearbox
. . . . . . . . . . . . . . . . . . . . . . . . . . .
6-speed automatic gearbox* . . . . . . . . . . . . . . . . . .
Communication
. . . . . . . . . . . . . . . . . . . . . . . . . . . . . .
Operating the radio . . . . . . . . . . . . . . . . . . . . . . . . . . .
Radio and mobile phone operation . . . . . . . . . . . .
Universal telephone preinstallation with voice
control* . . . . . . . . . . . . . . . . . . . . . . . . . . . . . . . . . . . . .
Inserting the mobile phone with the adapter* . .
Mobile phone operation . . . . . . . . . . . . . . . . . . . . . .
Voice commands . . . . . . . . . . . . . . . . . . . . . . . . . . . . .
Enter PIN code . . . . . . . . . . . . . . . . . . . . . . . . . . . . . . .
Dial number . . . . . . . . . . . . . . . . . . . . . . . . . . . . . . . . .
Repeat last call . . . . . . . . . . . . . . . . . . . . . . . . . . . . . . .
Phone voice phonebook* . . . . . . . . . . . . . . . . . . . . .
Bluetooth®* . . . . . . . . . . . . . . . . . . . . . . . . . . . . . . . . .
Mobile phones and two-way radio system . . . . .
Input AUX-IN* . . . . . . . . . . . . . . . . . . . . . . . . . . . . . . .
CD changer* . . . . . . . . . . . . . . . . . . . . . . . . . . . . . . . . .
Safety
. . . . . . . . . . . . . . . . . . . . . . . . . . . . . . . . . . . . . .
Passive Safety
. . . . . . . . . . . . . . . . . . . . . . . . . . . . . . . . .
Basic information . . . . . . . . . . . . . . . . . . . . . . . . . . . .
Correct seated position . . . . . . . . . . . . . . . . . . . . . . .
Seat belts
. . . . . . . . . . . . . . . . . . . . . . . . . . . . . . . . . . . . . .
Why seat belts? . . . . . . . . . . . . . . . . . . . . . . . . . . . . . .
The physical principle of a frontal collision . . . . . 6
9
11
11
12
12
18
18
18
19
19
20
20
22
22
25
27
29
39
39
41
41
42
46
48
49
49
5253
53
57
58
59
62
63
63
64
65
66
70
70
74
77
79
80
81
81
81
82
83
89
89
89
90
92
95
99
99
100
100102
102
103
103
104
107
107
112
112
113
114
115
116
117
117
118
118
119
121
122
123
123
127
127
127
128
132
132
133
s29g.4.book Page 3 Wednesday, June 17, 2009 9:54 AM
Page 7 of 263
Layout of this Owner's Manual (explanations) 6Layout of this Owner's Manual (explanations)The Owner's Manual has been systematically designed, in order to make it easy for
you to find and absorb the information you require.Chapters, table of contents and subject indexThe text of the Owner's manual is divided into relatively short sections which are
combined into easy-to-read chapters. The chapter you are reading at any partic-
ular moment is highlighted at the bottom right of the page.
The Table of contents is arranged according to the chapters and the detailed
Subject index at the end of the Owner's Manual helps you to rapidly find the infor-
mation you are looking for.SectionsThe majority of Sections apply to all models.
Since there is a wide range of different equipment and options available it is clearly
unavoidable, despite dividing the contents into sections, that mention may be
made of equipment which is not fitted to your vehicle.
Equipment which is marked * is only standard on certain vehicle model versions or
only suppliable as optional equipment for certain models.Brief information and instructionsEach section has a Heading.
This is followed by Brief information (in large italic lettering), which tells you the
subject which is dealt with in this section.
Most of the illustrations are accompanied by an Instruction (in relatively large
letters) which explains to you in a straightforward way the action you have to take.
Work steps which have to be carried out are illustrated with a hyphen.Direction indicationsAll direction indications such as “left”, “right”, “front”, “rear” relate to the direction
of travel of the vehicle.Explanation of symbols* Equipment which is marked in such a way is only standard on certain vehicle
model versions or only suppliable as optional equipment for certain models.
End of a section. The section is continued on the next page.NotesAll four kinds of notes, which are used in the text, are always stated at the end of the
respective section.
WARNING
The most important notes are marked with the heading Warning. These
Warning notes draw your attention to a serious risk of accident or injury.
While reading the text you will frequently encounter a double arrow
followed by a small warning symbol. This symbol is intended to draw your
attention to a Warning note at the end of the section to which you must pay
careful attention.
Caution
A Caution note draws your attention to the possibility of damage to your vehicle
(e.g. damage to gearbox), or points out general risks of an accident.
For the sake of the environment
An Environmental note draws your attention to environmental protection aspects.
This is where you will, for example, find tips aimed at reducing your fuel consump-
tion.
Note
A normal Note draws your attention in a general way to important information.Direction indicationsAll direction indications such as “left”, “right”, “front”, “rear” relate to the direction
of travel of the vehicle.
s29g.4.book Page 6 Wednesday, June 17, 2009 9:54 AM
Page 12 of 263
Cockpit11
Using the system
Safety
Driving Tips
General Maintenance
Breakdown assistance
Praktik
Technical Data
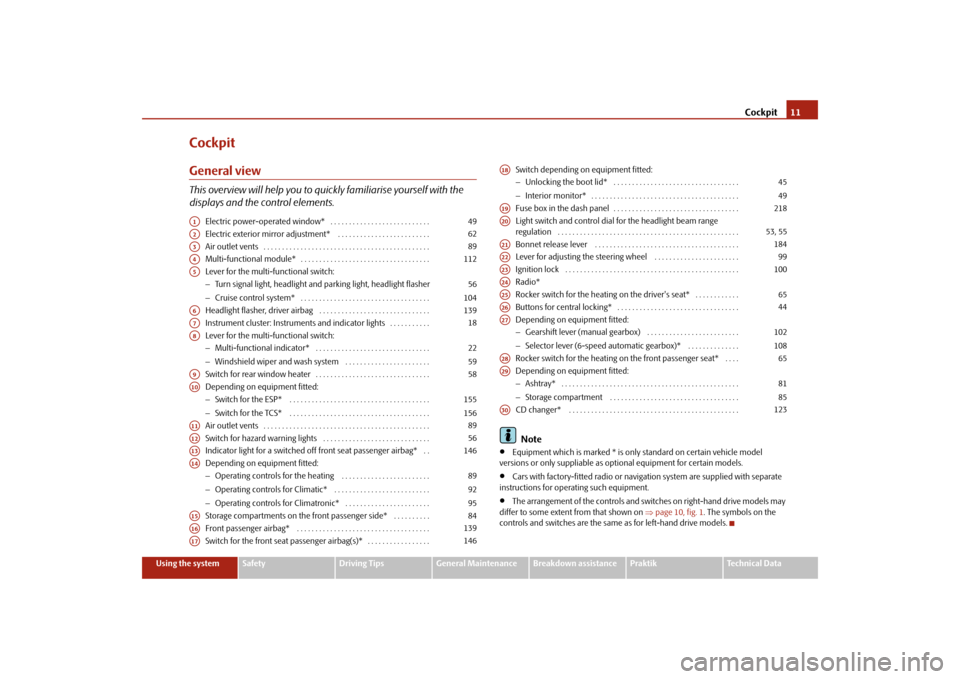
CockpitGeneral viewThis overview will help you to quickly familiarise yourself with the
displays and the control elements.
Electric power-operated window* . . . . . . . . . . . . . . . . . . . . . . . . . . .
Electric exterior mirror adjustment* . . . . . . . . . . . . . . . . . . . . . . . . .
Air outlet vents . . . . . . . . . . . . . . . . . . . . . . . . . . . . . . . . . . . . . . . . . . . . .
Multi-functional module* . . . . . . . . . . . . . . . . . . . . . . . . . . . . . . . . . . .
Lever for the multi-functional switch:
−Turn signal light, headlight and parking light, headlight flasher
−Cruise control system* . . . . . . . . . . . . . . . . . . . . . . . . . . . . . . . . . . .
Headlight flasher, driver airbag . . . . . . . . . . . . . . . . . . . . . . . . . . . . . .
Instrument cluster: Instruments and indicator lights . . . . . . . . . . .
Lever for the multi-functional switch:
−Multi-functional indicator* . . . . . . . . . . . . . . . . . . . . . . . . . . . . . . .
−Windshield wiper and wash system . . . . . . . . . . . . . . . . . . . . . . .
Switch for rear window heater . . . . . . . . . . . . . . . . . . . . . . . . . . . . . . .
Depending on equipment fitted:
−Switch for the ESP* . . . . . . . . . . . . . . . . . . . . . . . . . . . . . . . . . . . . . .
−Switch for the TCS* . . . . . . . . . . . . . . . . . . . . . . . . . . . . . . . . . . . . . .
Air outlet vents . . . . . . . . . . . . . . . . . . . . . . . . . . . . . . . . . . . . . . . . . . . . .
Switch for hazard warning lights . . . . . . . . . . . . . . . . . . . . . . . . . . . . .
Indicator light for a switched off front seat passenger airbag* . .
Depending on equipment fitted:
−Operating controls for the heating . . . . . . . . . . . . . . . . . . . . . . . .
−Operating controls for Climatic* . . . . . . . . . . . . . . . . . . . . . . . . . .
−Operating controls for Climatronic* . . . . . . . . . . . . . . . . . . . . . . .
Storage compartments on the front passenger side* . . . . . . . . . .
Front passenger airbag* . . . . . . . . . . . . . . . . . . . . . . . . . . . . . . . . . . . .
Switch for the front seat passenger airbag(s)* . . . . . . . . . . . . . . . . . Switch depending on equipment fitted:
−Unlocking the boot lid* . . . . . . . . . . . . . . . . . . . . . . . . . . . . . . . . . .
−Interior monitor* . . . . . . . . . . . . . . . . . . . . . . . . . . . . . . . . . . . . . . . .
Fuse box in the dash panel . . . . . . . . . . . . . . . . . . . . . . . . . . . . . . . . . .
Light switch and control dial for the headlight beam range
regulation . . . . . . . . . . . . . . . . . . . . . . . . . . . . . . . . . . . . . . . . . . . . . . . . .
Bonnet release lever . . . . . . . . . . . . . . . . . . . . . . . . . . . . . . . . . . . . . . .
Lever for adjusting the steering wheel . . . . . . . . . . . . . . . . . . . . . . .
Ignition lock . . . . . . . . . . . . . . . . . . . . . . . . . . . . . . . . . . . . . . . . . . . . . . .
Radio*
Rocker switch for the heating on the driver's seat* . . . . . . . . . . . .
Buttons for central locking* . . . . . . . . . . . . . . . . . . . . . . . . . . . . . . . . .
Depending on equipment fitted:
−Gearshift lever (manual gearbox) . . . . . . . . . . . . . . . . . . . . . . . . .
−Selector lever (6-speed automatic gearbox)* . . . . . . . . . . . . . .
Rocker switch for the heating on the front passenger seat* . . . .
Depending on equipment fitted:
−Ashtray* . . . . . . . . . . . . . . . . . . . . . . . . . . . . . . . . . . . . . . . . . . . . . . . .
−Storage compartment . . . . . . . . . . . . . . . . . . . . . . . . . . . . . . . . . . .
CD changer* . . . . . . . . . . . . . . . . . . . . . . . . . . . . . . . . . . . . . . . . . . . . . .
Note
•
Equipment which is marked * is only standard on certain vehicle model
versions or only suppliable as optional equipment for certain models.
•
Cars with factory-fitted radio or navigation system are supplied with separate
instructions for operating such equipment.
•
The arrangement of the controls and switches on right-hand drive models may
differ to some extent from that shown on ⇒page 10, fig. 1. The symbols on the
controls and switches are the same as for left-hand drive models.
A1
49
A2
62
A3
89
A4
112
A5
56
104
A6
139
A7
18
A8
22
59
A9
58
A10
155
156
A11
89
A12
56
A13
146
A14
89
92
95
A15
84
A16
139
A17
146
A18
45
49
A19
218
A20
53, 55
A21
184
A22
99
A23
100
A24A25
65
A26
44
A27
102
108
A28
65
A29
81
85
A30
123
s29g.4.book Page 11 Wednesday, June 17, 2009 9:54 AM
Page 19 of 263
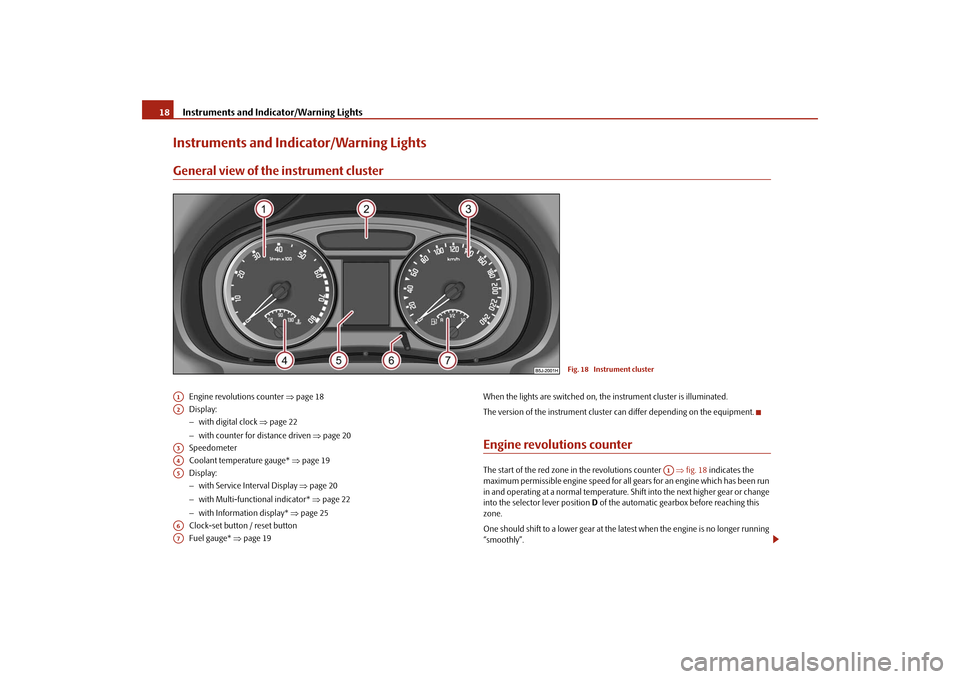
Instruments and Indicator/Warning Lights 18Instruments and Indicator/Warning LightsGeneral view of the instrument cluster
Engine revolutions counter ⇒page 18
Display:
−with digital clock ⇒page 22
−with counter for distance driven ⇒page 20
Speedometer
Coolant temperature gauge* ⇒page 19
Display:
−with Service Interval Display ⇒page 20
−with Multi-functional indicator* ⇒page 22
−with Information display* ⇒page 25
Clock-set button / reset button
Fuel gauge* ⇒page 19When the lights are switched on, the instrument cluster is illuminated.
The version of the instrument cluster can differ depending on the equipment.
Engine revolutions counterThe start of the red zone in the revolutions counter ⇒fig. 18 indicates the
maximum permissible engine speed for all gears for an engine which has been run
in and operating at a normal temperature. Shift into the next higher gear or change
into the selector lever position D of the automatic gearbox before reaching this
zone.
One should shift to a lower gear at the latest when the engine is no longer running
“smoothly”.
Fig. 18 Instrument cluster
A1A2A3A4A5A6A7
A1
s29g.4.book Page 18 Wednesday, June 17, 2009 9:54 AM
Page 31 of 263
Instruments and Indicator/Warning Lights 30
WARNING
•
If you do not pay attention to the warning lights coming on and the corre-
sponding descriptions and warning notes, this may result in severe body
injuries or major vehicle damage.
•
The engine compartment of your car is a hazardous area. There is a risk
of injuries, scalding, accidents and fire when working in the engine
compartment, e.g. inspecting and replenishing oil and other fluids. It is also
essential to observe all warnings ⇒page 185.Note
•
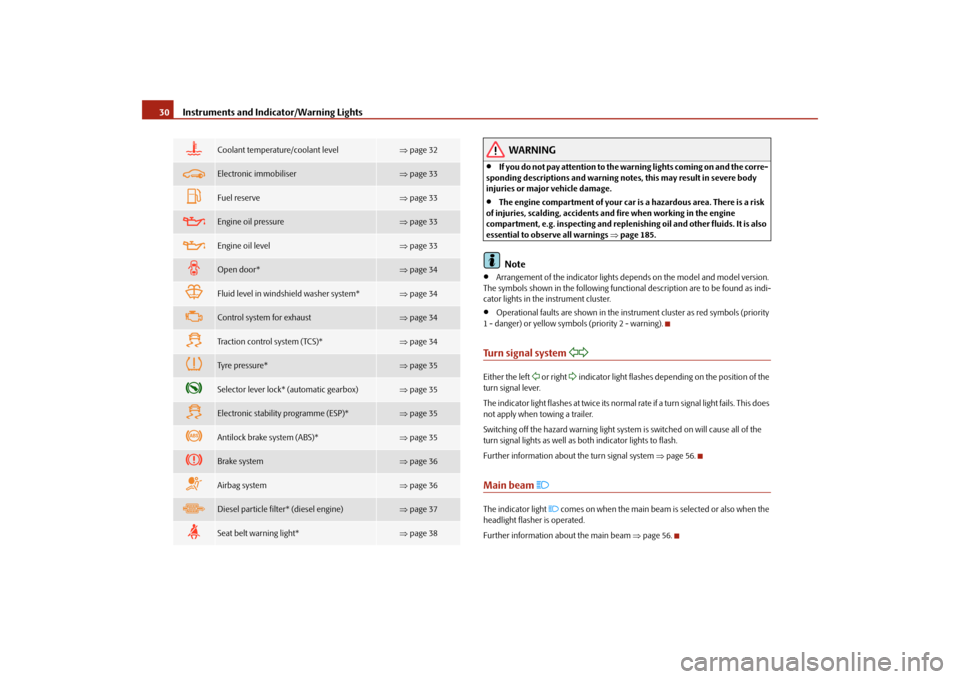
Arrangement of the indicator lights depends on the model and model version.
The symbols shown in the following functional description are to be found as indi-
cator lights in the instrument cluster.
•
Operational faults are shown in the instrument cluster as red symbols (priority
1 - danger) or yellow symbols (priority 2 - warning).
Turn signal system
Either the left
or right
indicator light flashes depending on the position of the
turn signal lever.
The indicator light flashes at twice its normal rate if a turn signal light fails. This does
not apply when towing a trailer.
Switching off the hazard warning light system is switched on will cause all of the
turn signal lights as well as both indicator lights to flash.
Further information about the turn signal system ⇒page 56.
Main beam
The indicator light
comes on when the main beam is selected or also when the
headlight flasher is operated.
Further information about the main beam ⇒page 56.
Coolant temperature/coolant level
⇒page 32
Electronic immobiliser
⇒page 33
Fuel reserve
⇒page 33
Engine oil pressure
⇒page 33
Engine oil level
⇒page 33
Open door*
⇒page 34
Fluid level in windshield washer system*
⇒page 34
Control system for exhaust
⇒page 34
Traction control system (TCS)*
⇒page 34
Tyre pressure*
⇒page 35
Selector lever lock* (automatic gearbox)
⇒page 35
Electronic stability programme (ESP)*
⇒page 35
Antilock brake system (ABS)*
⇒page 35
Brake system
⇒page 36
Airbag system
⇒page 36
Diesel particle filter* (diesel engine)
⇒page 37
Seat belt warning light*
⇒page 38
s29g.4.book Page 30 Wednesday, June 17, 2009 9:54 AM
Page 33 of 263
Instruments and Indicator/Warning Lights 32EPC fault light
(petrol engine)
The
(Electronic Power Control) warning light comes on for a few seconds when
the ignition is switched on.
There is a fault in the engine control system if the warning light
does not go out
or comes on or flashes while driving. The engine management system selects an
emergency programme which enables you to drive to the nearest specialist garage
by adopting a gentle style of driving.
The following text will be displayed in the information display*:
ENGINE FAULT WORKSHOP!
Glow plug system
(diesel engine)
The warning light
lights up for a cold engine when switching on the ignition
(pre-heat position) 2 ⇒page 100. Start the engine after the indicator light goes out.
The glow plug indicator light will come on for about 1 second if the engine is at a
normal operating temperature or if the outside temperature is above +5°C. This
means that you can start the engine right away.
There is a fault in the glow plug system if the warning light
does not come on or
lights up continuously, contact a specialist garage as soon as possible to obtain
assistance.
There is a system fault in the engine control system if the warning light
has
started to flash while driving. The engine management system selects an emer-
gency programme which enables you to drive to the nearest specialist garage by
adopting a gentle style of driving.
The following text will be displayed in the information display*:
ENGINE FAULT WORKSHOP!
Turn signal system for vehicles towing a trailer*
Only if a trailer is attached to the vehicle, the indicator light
flashes together with
the turn signals.The indicator light
does not flash if a turn signal light on the trailer or on the
vehicle is not operating.
Coolant temperature/coolant level
After the ignition is switched on the warning light lights up blue until the engine
reaches operating temperature
1). Avoid running at high engine speeds, at full
throttle and at severe engine loads. The blue warning light goes out once the oper-
ating temperature has been reached .
The coolant temperature is too high or the coolant level too low if the warning light
lights up red or flashes red while driving.
3 peeps sound as an additional warning signal.
In this case stop and switch the engine off and check the coolant level; top up the
coolant as necessary ⇒page 190, “Replenishing the coolant”.
Do not continue your journey if for some reason it is not possible under the
conditions prevailing to top up with coolant. Keep the engine switched off and
obtain professional assistance from a specialist garage, otherwise it could lead to
severe engine damage.
If the coolant is within the specified range, the increased temperature may be
caused by an operating problem at the coolant fan. Check the fuse for the coolant
fan, replace it if necessary ⇒page 221, “Fuse assignment at the battery (manual
gearbox)”.
Do not continue driving if the warning light does not go off although the fluid is at
the correct level and also the fuse of the fan is in proper order. Contact a specialist
garage to obtain assistance.
Please also refer to the additional instructions ⇒page 189, “Cooling system”.
The following text will be displayed in the information display*:
STOP CHECK COOLANT OWNER'S MANUAL!1)Not valid for vehicles with information display.
s29g.4.book Page 32 Wednesday, June 17, 2009 9:54 AM
Page 36 of 263
Instruments and Indicator/Warning Lights35
Using the system
Safety
Driving Tips
General Maintenance
Breakdown assistance
Praktik
Technical Data
Tyre inflation pressure*
The warning light
lights up, if there is a substantial drop in inflation pressure in
one of the tyres. Reduce the speed and check or correct as soon as possible the
inflation pressure in the tyres ⇒page 198.
A peep sounds as an additional warning signal.
If the warning light flashes
, there is a system fault. Visit the nearest specialist
garage and have the fault rectified.
Further information about tyre pressure-control system ⇒page 160.
WARNING
•
When the warning light
lights up, immediately reduce the speed and
avoid sudden steering and brake manoeuvres. Please stop the vehicle
without delay at the nearest possible stop and inspect the tyres and their
inflation pressures.
•
Under certain circumstances (e.g. sporty style of driving, wintry or
unpaved roads) the warning light
can be delayed or does not light up at
all.
•
The tyre inflation pressure-control system does not take away the
responsability from the driver for the correct tyre inflation pressure.Note
If the battery has been disconnected, the warning light
comes on after switching
on the ignition. The warning light must go out after driving a short distance.
Selector lever lock*
(automatic gearbox)
If the warning light
lights up, operate the brake pedal. This is necessary, in order
to be able to move the selector lever out of the position P or N.
Electronic stability programme (ESP)*
The warning light
comes on for a few seconds when the ignition is switched on.
Components of the ESP system also include the Traction Control System (TCS), the
Electronic Differential Lock (EDL) and the Antilock Brake System (ABS).
The warning light flashes when a control cycle is activated while driving.
The warning light will come on and remains on if the ESP is switched off or if there
is a fault in the system.
The fact that the ESP system operates together with the ABS means that the ESP
warning light will also come on if the ABS system is not operating properly.
Further information on the ESP ⇒page 155, “Electronic stability programme
(ESP)*”.
Electronic Differential Lock (EDL)*
The EDL is a part of the ESP. A fault in the EDL is indicated by the ESP warning light
in the instrument cluster. Have the vehicle inspected immediately by your
specialist garage. Further information on the EDL ⇒page 157.Antilock brake system (ABS)*
The warning light
shows the functionality of the ABS.
The warning light comes on for a few seconds after the ignition has been switched
on or when starting the engine. The warning light goes out after an automatic check
sequence has been completed.
A fault in the ABS
The system is not functioning properly if the ABS warning light
does not go out
within a few seconds after switching on the ignition, does not light up at all or lights
up while driving. The vehicle will only be braked by the normal brake system. Visit
a specialist garage as quickly as possible and adjust your style of driving to take
account of the fault in the meantime since you will not know the extent of the fault
and in how far the effect of the antilock brakes is affected.
Three additional warning tones will sound if there is a major fault in the ABS.
s29g.4.book Page 35 Wednesday, June 17, 2009 9:54 AM
Page 102 of 263
Starting-off and Driving101
Using the system
Safety
Driving Tips
General Maintenance
Breakdown assistance
Praktik
Technical Data
•
Let go of the key as soon as the engine starts otherwise there may be damage
to the starter.
The engine running noises may louder at first be louder for a short time after
starting the cold engine until oil pressure can be built up in the hydraulic valve
clearance compensation. This is quite normal and is not an operating problem.
If the engine does not start ...
You can use the battery of another vehicle as a jump-start aid ⇒page 213.
It is only possible to tow-start vehicles fitted with a manual gearbox. The tow-
starting distance must not be more than 50 metres ⇒page 216.
WARNING
•
Never run the engine in non ventilated or enclosed areas. The exhaust
gases of the engine contain besides the odorless and colourless carbon
monoxide a poisonous gas - hazard! Carbon monoxide can cause uncon-
sciousness and death.
•
Never leave your vehicle unattended with the engine running.Caution
•
The starter may only be operated (ignition key position ), if the engine is not
running. If the starter is immediately operated after switching off the engine, the
starter or the engine can be damaged.
•
Avoid high engine revolutions, full throttle and high engine loads as long as the
engine has not yet reached its normal operating temperature - risk of damaging the
engine!
•
Vehicles which are fitted with an exhaust gas catalytic converter should not be
tow-started over a distance of more than 50 metres.For the sake of the environment
Never warm up the engine when the vehicle is standing. Drive off right away. When
driving the engine reaches its operating temperature more rapidly and the pollutant
emissions are lower.
Petrol enginesThese engines are fitted with a starter system which selects the correct fuel-air
mixture for every external air temperature.•
Do not operate accelerator before and when starting engine.
•
Interrupt the attempt at starting after 10 seconds if the engine does not start
right awayand wait for about 30 seconds before repeating the attempt.
•
It is possible that the fuse on the electrical fuel pump is defect if the engine still
does not start. Check the fuse and replace it if necessary ⇒page 218.
•
If the engine does not start, contact the nearest specialist garage to obtain
professional assistance.
It may be necessary, if the engine is very hot, to slightly depress the accelerator
after the engine has started.
Diesel enginesGlow plug system
Diesel engines are equipped with a glow plug system, the preglow period being
controlled automatically in line with the coolant temperature and outside temper-
ature.
The preglow indicator light
comes on after the ignition has been switched on.
You should not switch on any major electrical components during the heating
period otherwise the vehicle battery will be drained unnecessarily.
•
You should start the engine immediately after the glow plug warning light
has gone out.
•
The glow plug warning light will come on for about one second if the engine is
at a normal operating temperature or if the outside temperature is above +5°C. This
means that you can start the engine right away.
•
Interrupt the attempt at starting after 10 seconds if the engine does not start
right awayand wait for about 30 seconds before repeating the attempt.
•
It is possible that the fuse on the diesel preglow system is defect if the engine
still does not start. Check the fuse and replace it if necessary ⇒page 218.
A3
s29g.4.book Page 101 Wednesday, June 17, 2009 9:54 AM
Page 103 of 263
Starting-off and Driving 102•
Contact the nearest specialist garage to obtain professional assistance.
Starting the engine after fuel tank has run dry
It may take longer than normal to start the engine after refuelling if the fuel tank has
run completely dry - up to one minute. This is because the fuel system must first of
all be filled while the attempting to start the engine.
Switching off the engine– The engine can be switched off by turning the ignition key from posi-
tion into ⇒page 100, fig. 120.
WARNING
•
Never switch off the engine before the vehicle is stationary - risk of acci-
dent!
•
The brake booster only operates when the engine is running. Greater
physical effort for braking is required when engine is switched off. Because
if you do not stop as normal, this can cause an accident and severe injuries.Caution
you should not switch the engine off right away at the end of your journey after the
engine has been operated for a lengthy period at high loads but should be allowed
it to run at idling speed for about 2 minutes. This prevents any accumulation of heat
when the engine is switched off.
Note
•
The radiator fan may continue running for a further 10 minutes or so after the
engine and the ignition have been switched off. The coolant fan may, however, also
switch on again after some time if the coolant temperature rises because of an
accumulation of heat in the engine or if the engine is warm and the engine
compartment is additionally heated by strong sunlight.
•
This is why particular care is required when carrying out any work in the engine
compartment ⇒page 185, “Working in the engine compartment”.
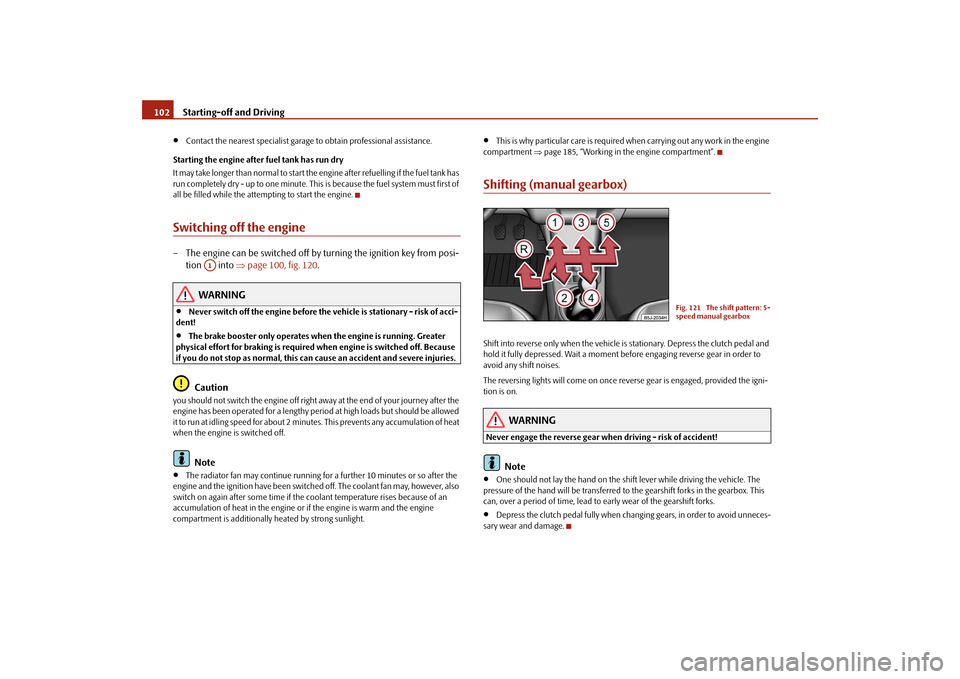
Shifting (manual gearbox)Shift into reverse only when the vehicle is stationary. Depress the clutch pedal and
hold it fully depressed. Wait a moment before engaging reverse gear in order to
avoid any shift noises.
The reversing lights will come on once reverse gear is engaged, provided the igni-
tion is on.
WARNING
Never engage the reverse gear when driving - risk of accident!
Note
•
One should not lay the hand on the shift lever while driving the vehicle. The
pressure of the hand will be transferred to the gearshift forks in the gearbox. This
can, over a period of time, lead to early wear of the gearshift forks.
•
Depress the clutch pedal fully when changing gears, in order to avoid unneces-
sary wear and damage.
A1
Fig. 121 The shift pattern: 5-
speed manual gearbox
s29g.4.book Page 102 Wednesday, June 17, 2009 9:54 AM
Page 104 of 263
Starting-off and Driving103
Using the system
Safety
Driving Tips
General Maintenance
Breakdown assistance
Praktik
Technical Data
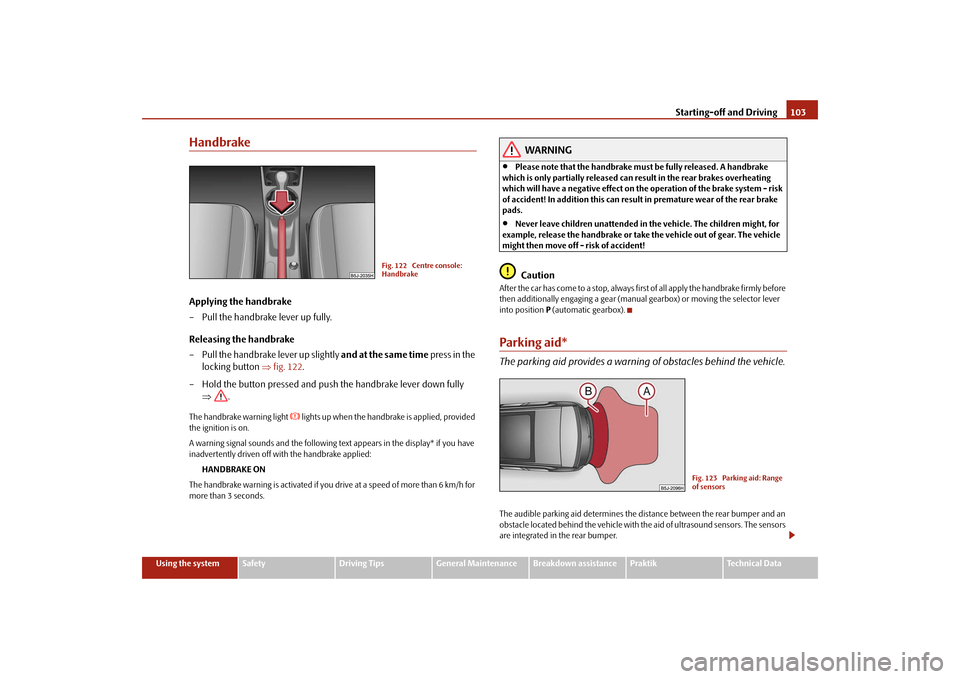
HandbrakeApplying the handbrake
– Pull the handbrake lever up fully.
Releasing the handbrake
– Pull the handbrake lever up slightly and at the same time press in the
locking button ⇒fig. 122.
– Hold the button pressed and push the handbrake lever down fully
⇒.The handbrake warning light
lights up when the handbrake is applied, provided
the ignition is on.
A warning signal sounds and the following text appears in the display* if you have
inadvertently driven off with the handbrake applied:
HANDBRAKE ON
The handbrake warning is activated if you drive at a speed of more than 6 km/h for
more than 3 seconds.
WARNING
•
Please note that the handbrake must be fully released. A handbrake
which is only partially released can result in the rear brakes overheating
which will have a negative effect on the operation of the brake system - risk
of accident! In addition this can result in premature wear of the rear brake
pads.
•
Never leave children unattended in the vehicle. The children might, for
example, release the handbrake or take the vehicle out of gear. The vehicle
might then move off - risk of accident!Caution
After the car has come to a stop, always first of all apply the handbrake firmly before
then additionally engaging a gear (manual gearbox) or moving the selector lever
into position P (automatic gearbox).Parking aid*The parking aid provides a warning of obstacles behind the vehicle.The audible parking aid determines the distance between the rear bumper and an
obstacle located behind the vehicle with the aid of ultrasound sensors. The sensors
are integrated in the rear bumper.
Fig. 122 Centre console:
Handbrake
Fig. 123 Parking aid: Range
of sensors
s29g.4.book Page 103 Wednesday, June 17, 2009 9:54 AM