ECU SKODA ROOMSTER 2010 1.G User Guide
[x] Cancel search | Manufacturer: SKODA, Model Year: 2010, Model line: ROOMSTER, Model: SKODA ROOMSTER 2010 1.GPages: 231, PDF Size: 12.91 MB
Page 63 of 231
Seats and Storage
62Note
The seat belts of the outer seats must always be guided through the guide loops next
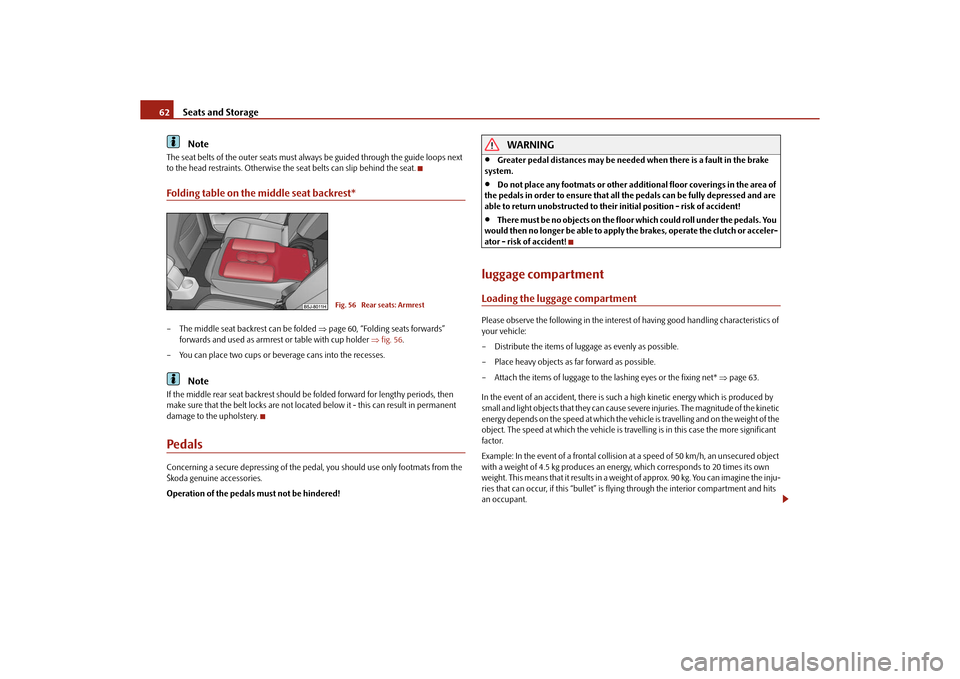
to the head restraints. Otherwise the seat belts can slip behind the seat.Folding table on the middle seat backrest*– The middle seat backrest can be folded page 60, “Folding seats forwards”
forwards and used as armres t or table with cup holder fig. 56 .
– You can place two cups or beverage cans into the recesses.
Note
If the middle rear seat backrest should be folded forward for lengthy periods, then
make sure that the belt locks are not located below it - this can result in permanent
damage to the upholstery.PedalsConcerning a secure depressing of the pedal, you should use only footmats from the
Škoda genuine accessories.
Operation of the pedals must not be hindered!
WARNING
Greater pedal distances may be needed when there is a fault in the brake
system.
Do not place any footmats or other additional floor coverings in the area of
the pedals in order to ensure that all the pedals can be fully depressed and are
able to return unobstructed to their initial position - risk of accident!
There must be no objects on the floor which could roll under the pedals. You
would then no longer be able to apply the brakes, operate the clutch or acceler-
ator - risk of accident!
luggage compartmentLoading the luggage compartmentPlease observe the following in the interest of having good handling characteristics of
your vehicle:
– Distribute the items of luggage as evenly as possible.
– Place heavy objects as far forward as possible.
– Attach the items of luggage to the lashing eyes or the fixing net* page 63.
In the event of an accident, there is such a high kinetic energy which is produced by
small and light objects that they can cause severe injuries. The magnitude of the kinetic
energy depends on the speed at which the vehicle is travelling and on the weight of the
object. The speed at which the vehicle is trave lling is in this case the more significant
factor.
Example: In the event of a frontal collision at a speed of 50 km/h, an unsecured object
with a weight of 4.5 kg produces an en ergy, which corresponds to 20 times its own
weight. This means that it results in a weight of approx. 90 kg. You can imagine the inju-
ries that can occur, if this “bullet” is fl ying through the interior compartment and hits
an occupant.
Fig. 56 Rear seats: Armrest
s16g.4.book Page 62 Wednesda y, February 10, 2010 3:53 PM
Page 65 of 231
Seats and Storage
64
forward, always use suitable lashing st raps which are firmly attached to the
lashing eyes. Never attach a ch ild seat to the lashing eyes!Folding hooksFolding hooks for attaching small items of luggage, such as bags etc., are provided on
both sides of the luggage compartment fig. 58 .
An item of luggage weighing up to 10 kg can be attached to the hook.
WARNING
Please refer to the following guidelines page 62.
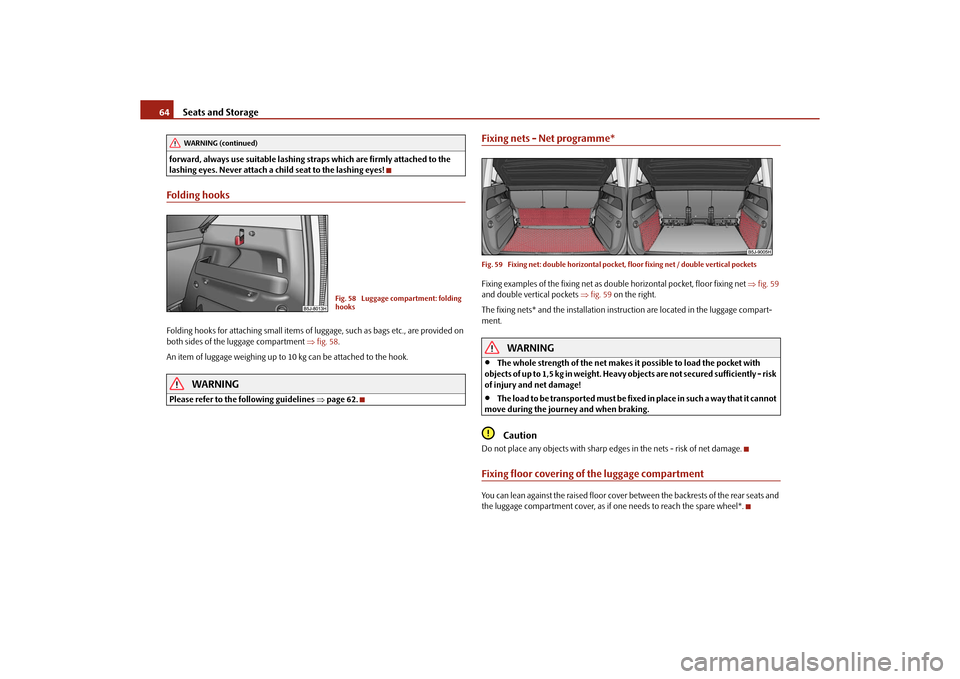
Fixing nets - Net programme*Fig. 59 Fixing net: double horizontal pocket , floor fixing net / double vertical pocketsFixing examples of the fixing net as double horizontal pocket, floor fixing net fig. 59
and double vertical pockets fig. 59 on the right.
The fixing nets* and the installation inst ruction are located in the luggage compart-
ment.
WARNING
The whole strength of the net makes it possible to load the pocket with
objects of up to 1,5 kg in weight. Heavy objects are not secured sufficiently - risk
of injury and net damage!
The load to be transported must be fixed in place in such a way that it cannot
move during the journey and when braking.Caution
Do not place any objects with sharp edge s in the nets - risk of net damage.Fixing floor covering of the luggage compartmentYou can lean against the raised floor cover between the backrests of the rear seats and
the luggage compartment cover, as if one needs to reach the spare wheel*.
WARNING (continued)
Fig. 58 Luggage compartment: folding
hooks
s16g.4.book Page 64 Wednesda y, February 10, 2010 3:53 PM
Page 69 of 231
Seats and Storage
68
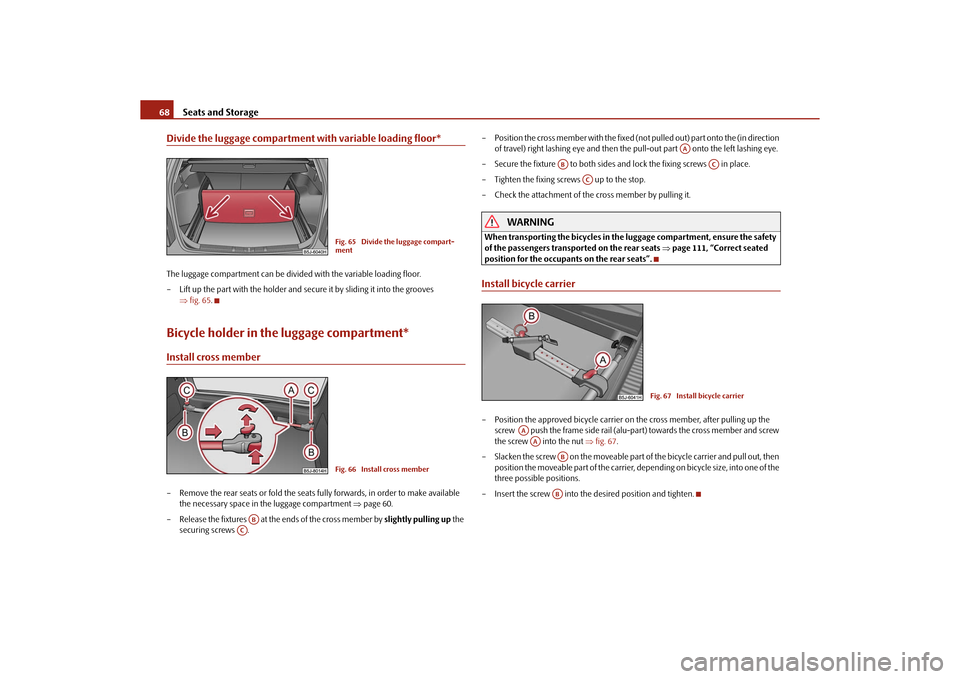
Divide the luggage compartment with variable loading floor*The luggage compartment can be divided with the variable loading floor.
– Lift up the part with the holder and secure it by sliding it into the grooves
fig. 65 .Bicycle holder in the luggage compartment*Install cross member– Remove the rear seats or fold the seats fully forwards, in order to make available
the necessary space in the luggage compartment page 60.
– Release the fixtures at the ends of the cross member by slightly pulling up the
securing screws . – Position the cross member with the fixed (not
pulled out) part onto the (in direction
of travel) right lashing eye and then the pull-out part onto the left lashing eye.
– Secure the fixture to both sides an d lock the fixing screws in place.
– Tighten the fixing screws up to the stop.
– Check the attachment of the cross member by pulling it.
WARNING
When transporting the bicycles in the luggage compartment, ensure the safety
of the passengers transported on the rear seats page 111, “Correct seated
position for the occupants on the rear seats”.Install bicycle carrier– Position the approved bicycle carrier on the cross member, after pulling up the
screw push the frame side rail (alu-part) towards the cross member and screw
the screw into the nut fig. 67 .
– Slacken the screw on the moveable part of the bicycle carrier and pull out, then
position the moveable part of the carrier, depending on bicycle size, into one of the
three possible positions.
– Insert the screw into the desired position and tighten.
Fig. 65 Divide the luggage compart-
mentFig. 66 Install cross member
AB
AC
AA
AB
AC
AC
Fig. 67 Install bicycle carrier
AAAA
ABAB
s16g.4.book Page 68 Wednesda y, February 10, 2010 3:53 PM
Page 70 of 231
Seats and Storage69
Using the system
Safety
Driving Tips
General Maintenance
Breakdown assistance
Praktik
Technical Data
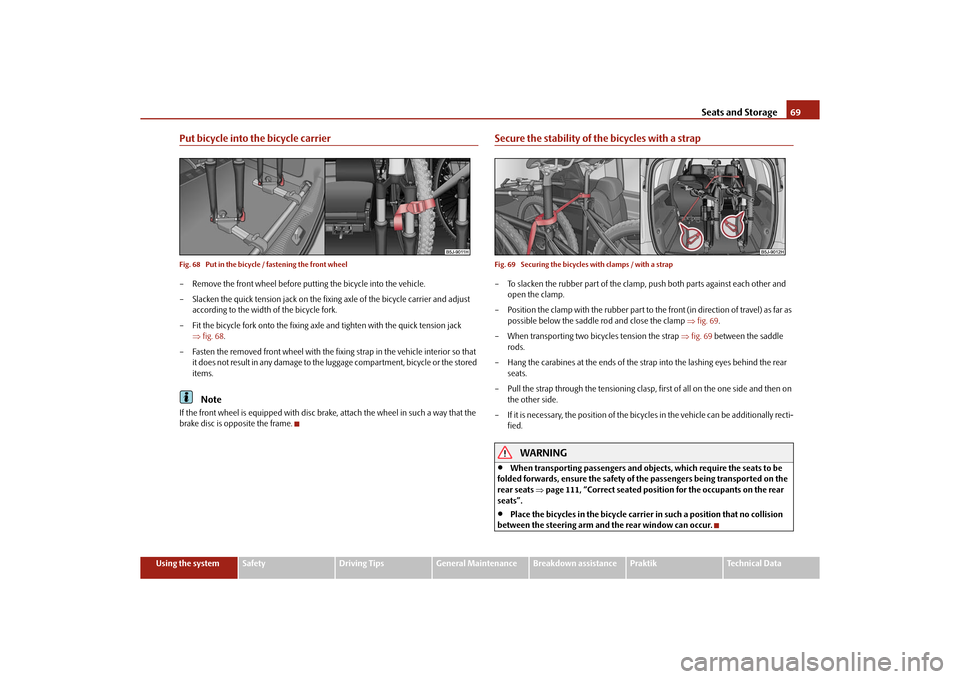
Put bicycle into the bicycle carrierFig. 68 Put in the bicycle / fastening the front wheel– Remove the front wheel before putti ng the bicycle into the vehicle.
– Slacken the quick tension jack on the fixi ng axle of the bicycle carrier and adjust
according to the width of the bicycle fork.
– Fit the bicycle fork onto the fixing axle and tighten with the quick tension jack
fig. 68 .
– Fasten the removed front wheel with the fixing strap in the vehicle interior so that it does not result in any damage to the luggage compartment, bicycle or the stored
items.
Note
If the front wheel is equipped with disc brak e, attach the wheel in such a way that the
brake disc is opposite the frame.
Secure the stability of the bicycles with a strapFig. 69 Securing the bicycles with clamps / with a strap– To slacken the rubber part of the clamp, push both parts against each other and
open the clamp.
– Position the clamp with the rubber part to the front (in direction of travel) as far as possible below the saddle rod and close the clamp fig. 69 .
– When transporting two bi cycles tension the strap fig. 69 between the saddle
rods.
– Hang the carabines at the ends of the strap into the lashing eyes behind the rear seats.
– Pull the strap through the tensioning clasp, first of all on the one side and then on the other side.
– If it is necessary, the position of the bicycles in the vehicle can be additionally recti- fied.
WARNING
When transporting passengers and objects, which require the seats to be
folded forwards, ensure the safety of the passengers being transported on the
rear seats page 111, “Correct seated position for the occupants on the rear
seats”.
Place the bicycles in the bicycle carrier in such a position that no collision
between the steering arm and the rear window can occur.
s16g.4.book Page 69 Wednesda y, February 10, 2010 3:53 PM
Page 104 of 231
Communication103
Using the system
Safety
Driving Tips
General Maintenance
Breakdown assistance
Praktik
Technical Data
During the connecting procedur
e, no other mobile phone may be connected with the
hands-free system.
Up to four mobile phones can be paired to the hands-free system, whereby only one
mobile phone can communicate with the hands-free system.
Connection with an already paired mobile phone
After switching on the ignition, the connect ion is automatically established for the
already paired mobile phone
11). Check on the mobile unit if the automatic connection
was established.
Ending the connection
By withdrawing the ignition key.
By disconnecting the device in the information display.
By disconnecting the device in the mobile phone.
Solving connection problems
If the system announces No paired phone found , check the operating state of the
telephone:
Is the telephone switched on?
Is the PIN code entered?
Is Bluetooth
® active?
Is the visibility of the mobile phone active?
Was the telephone already paired with the handsfree-system?
WARNING
In the event of air transport, the Bluetooth
® function of the handsfree-system
must be switched off by a specialist garage!
Note
Not valid for all mobile phones which enable a communication via Bluetooth
®.
You can ask at an authorised Škoda Service Partner if your telephone is compatible
with the universal telephone preinstallation GSM II.
Please operate your mobile phone exclusiv ely with a suitable adapter in order to
keep a low radiation in the vehicle.
Inserting the mobile phone into the adapter ensures an optimal sending and
receiving power and offers at the same ti me the advantage of the battery charging.
The range of the Bluetooth
® connection to the handsfree-system is restricted to
the vehicle interior. The range is dependent on local factors, e.g. obstacles between the
devices and mutual interferences with other de vices. If your mobile phone is e.g. in a
jacket pocket, this can lead to diffic ulties when establishing the Bluetooth
® connection
with the handsfree-system or the data transfer.
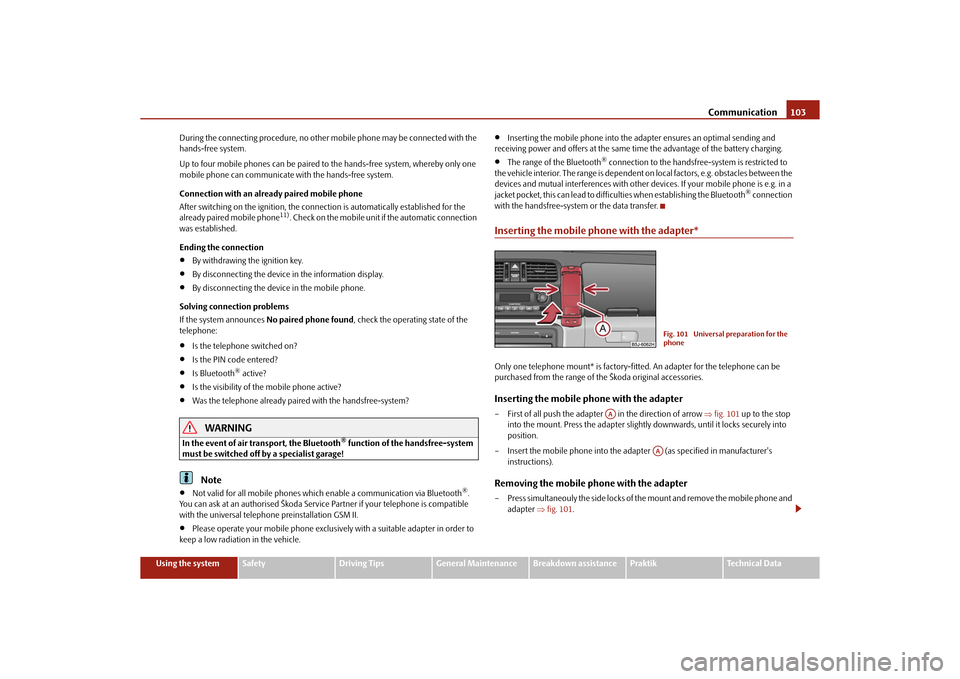
Inserting the mobile phone with the adapter*Only one telephone mount* is factory-fitted. An adapter for the telephone can be
purchased from the range of the Škoda original accessories.Inserting the mobile phone with the adapter– First of all push the adapter in the direction of arrow fig. 101 up to the stop
into the mount. Press the adapter slightly downwards, until it locks securely into
position.
– Insert the mobile phone into the adapter (as specified in manufacturer's instructions).Removing the mobile phone with the adapter– Press simultaneouly the side locks of the mount and remove the mobile phone and adapter fig. 101 .
Fig. 101 Universal preparation for the
phone
AA
AA
s16g.4.book Page 103 Wednesda y, February 10, 2010 3:53 PM
Page 117 of 231
Seat belts
116
– Then pull firmly on the belt to ensure that the seat belt height adjuster has correctly
locked in place.
WARNING
Adjust the height of the belt in such a way that the shoulder part of the belt is
positioned approximately across the middle of your shoulder - on no account
across your neck.
Note
It is also possible to adapt the routing of the belt webbing on the front seats by
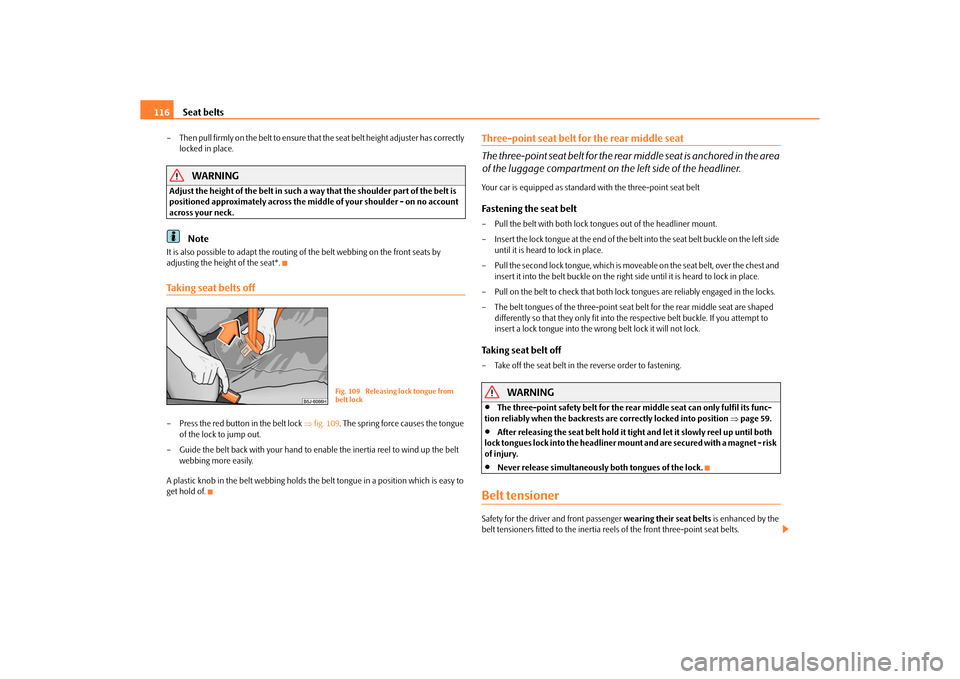
adjusting the height of the seat*.Taking seat belts off– Press the red button in the belt lock fig. 109 . The spring force causes the tongue
of the lock to jump out.
– Guide the belt back with your hand to en able the inertia reel to wind up the belt
webbing more easily.
A plastic knob in the belt webbing holds the be lt tongue in a position which is easy to
get hold of.
Three-point seat belt for the rear middle seat
The three-point seat belt for the rear middle seat is anchored in the area
of the luggage compartment on the left side of the headliner.Your car is equipped as standard with the three-point seat beltFastening the seat belt– Pull the belt with both lock to ngues out of the headliner mount.
– Insert the lock tongue at the end of the belt into the seat belt buckle on the left side
until it is heard to lock in place.
– Pull the second lock tongue, which is move able on the seat belt, over the chest and
insert it into the belt buckle on the right side until it is heard to lock in place.
– Pull on the belt to check that both lock tongues are reliably engaged in the locks.
– The belt tongues of the thre e-point seat belt for the rear middle seat are shaped
differently so that they only fit into the respective belt buckle. If you attempt to
insert a lock tongue into the wrong belt lock it will not lock.Taking seat belt off– Take off the seat belt in the reverse order to fastening.
WARNING
The three-point safety belt for the rear middle seat can only fulfil its func-
tion reliably when the backrests are correctly locked into position page 59.
After releasing the seat belt hold it tight and let it slowly reel up until both
lock tongues lock into the headliner mount and are secured with a magnet - risk
of injury.
Never release simultaneously both tongues of the lock.
Belt tensionerSafety for the driver and front passenger wearing their seat belts is enhanced by the
belt tensioners fitted to the inertia reels of the front three-point seat belts.
Fig. 109 Releasing lock tongue from
belt lock
s16g.4.book Page 116 Wednesda y, February 10, 2010 3:53 PM
Page 127 of 231
Transporting children safely
126
Transporting children safelyWhat you should know ab out transporting children!An introduction to the subject
Accident statistics have revealed that children are generally more safely
transported on the rear seats than on the front passenger seat.Children who are less than 1.50 m in height and who weigh less than 36 kg should,
under normal circumstances, sit on the rear seat (take note of any national legal provi-
sions which differ from this). They should be secured there by means of a child restraint
system or by using the existing seat belts depending on their body size and weight. The
child seat should be mounted behind the front passenger seat for safety reasons.
The physical principle of an accident does, of course, also apply to children
page 113, “The physical principle of a fronta l collision”. They differ from adults in
that their muscles and bone structure of children are not yet fully developed. Thus chil-
dren are exposed to increased risk of injury.
Children should be transporte d by using special child safety seats in order to reduce
this risk of injury.
Only use child safety seats which are offici ally approved, suitable for children and
which comply with the standard ECE-R 44, wh ich classifies child safety seats into 5
groups page 128, “Classification of child seats into groups”. Child restraint systems
which have been tested for conformity to ECE-R 44 standard have a non-detachable
test seal (a large E within a circle and below this the test number) attached to the seat.
We recommend that you use child safety seats from the Škoda genuine accessories.
These child seats were developed and also tested for use in Škoda vehicles. They fulfil
the ECE-R 44 standard.
WARNING
Always comply with national legal provisions and instructions from the rele-
vant child safety seat manufacturer wh en installing and using a child seat
in “Important safety information regarding the use of child safety seats”.
Note
National legal provisions, which deviate from the information contained in these oper-
ating instructions, take precedence over the information contained in the operating
instructions.Important safety information regarding the use of child safety seats
Correct use of child safety seats considerably reduces the risk of injury!
WARNING
All the occupants of the vehicle - particularly children - must wear a seat
belt when the ve hicle is moving.
Children who are less than 1.50 m in height and who weigh less than 36 kg
must not use a normal seat belt without a child restraint system, otherwise this
may result in injuries to the stomach and neck areas. Comply with the national
legal requirements.
One should never carry children, and also not babies! - on one's lap.
You can transport a child safely in a suitable child safety seat page 128,
“Child seat”!
Only one child may be fastened with a seat belt into a child safety seat.
Never leave the child sitting unattended in the seat.
Certain outside climatic conditions can cause life-threatening tempera-
tures in the vehicle.
Never allow your child to be transported in a vehicle without the use of a
suitable restraint system.
Children should also never stand up in a vehicle or kneel on the seats when
the vehicle is moving. In the event of an accident the child will be thrown
through the vehicle and may as a result suffer fatal injuries, and also injure
other occupants.
Children are exposed to an increased risk of injury in the event of an acci-
dent if they lean forward or adopt an in correct seated position when the vehicle
s16g.4.book Page 126 Wednesday, February 10, 2010 3:53 PM
Page 149 of 231
Towing a trailer
148
Towing a trailerTo w i n g a t r a i l e rTechnical requirements
The towing device must satisfy certain technical requirements.Your vehicle is designed primarily for tr ansporting persons and luggage. It can,
however, also be used for towing a traile r - provided certain technical equipment is
fitted.
If your vehicle has been equipped with a towing device from Škoda Original Accesso-
ries, then the towing device satisfies all technical and legal requirements.
Your vehicle is fitted with a 13-pin power socket for the electrical connection between
the vehicle and trailer. If the tr ailer which you wish to tow has a 7-pin connector, you
can use a suitable adapter
13) from Škoda original accessories.
This work must be carried out in accordance with the manufacturer's specifications if
a towing device is retrofitted.
Specialist garages are familiar with details re lating to retrofitting a towing device and
for any necessary modifications to the cooling system.
WARNING
We recommend that you have the towing device from Škoda original accesso-
ries installed by a specialist garage. He is familiar with all the relevant details
relating to retrofitting such equipment. There is a risk of an accident if the
towing device is not properly fitted!General Maintenance
There are a number of points to pay attention to when towing a trailer.Trailer load
The permissible trailer load must on no account be exceeded. You can negotiate appropriately steeper inclin
es and descents if you do not make full
use of the permissible trailer load.
The trailer loads specified only apply for altitudes up to 1 000 metres above mean sea
level. On petrol engines without forced indu ction, the engine power output drops with
increasing height due to a lowering of air pr essure and thus the ability to climb, this
means that the trailer load must be reduced by 10% for every further increase of 1 000
metres in height above sea le vel. The towed weight is the weight of the (laden) vehicle
and the (laden) trailer together. One should ta ke this into account before driving up to
higher altitudes. Petrol engines with forced induction use an air pressure correction
method, so that their power output does not depend on the height above sea level.
The trailer and drawbar load information on the type plate of the towing device
are merely test data for the towing device The data relating to your vehicle, which
is often less than this test data, can be found in your vehicle registration docu-
ments.
Distribution of the load
Distribute the load in the trailer in such a way that any heavy items are located as close
as possible to the axle. Secure th e items to prevent them slipping.
Tyre pressure
Correct the tyre inflation pressure on yo ur vehicle for that of “fully laden”, page 173.
The inflation pressure of the tyres fitted to the trailer adjust in accordance with the
manufacturer's recommendation.
Exterior mirrors
You have to have additional ex terior mirrors fitted if you are not able to see the traffic
behind the trailer with the standard rear-view mirrors. Both exterior mirrors should be
attached to folding arms. Adjust the mirrors so that they provide you with an adequate
field of view to the rear.
Headlights
Before starting off with a hitched trailer, al so check the setting of the headlights. Alter
the setting as necessary with the aid of the headlight beam adjuster page 49.13)In some countries the adapter is supplied with the towing device.s16g.4.book Page 148 Wednesda y, February 10, 2010 3:53 PM
Page 160 of 231
Fuel159
Using the system
Safety
Driving Tips
General Maintenance
Breakdown assistance
Praktik
Technical Data
You can find information on refuelling
page 159, “Refuelling”.
Caution
Therefore, your vehicle can only be operated with diesel fuel which complies with
the standard EN 590 (standard DIN 51628 in Germany, standard ÖNORM C 1590 in
Austria). Filling the tank even only once wi th diesel fuel which does not comply with
the standard, can result in damage to the engine parts, the lubrication system, the fuel
and exhaust system.
If by mistake you have refuelled with a different fuel other than the diesel fuel
which complies to the above mentioned stan dards (e.g. petrol), on no account start
the engine! This can result in severe engine damage! Contact a specialist garage.
Water which has collected in the fuel fi lter can result in engine problems.
Your vehicle is not adapted for use of biofue l (RME), therefore this fuel must not be
refuelled and driven. The use of biofuel (RME) can lead to damage to the engine or the
fuel system.
Operation in winterWinter-grade diesel fuel
A different grade of diesel fuel is available at filling stations in winter than during the
summer. Using “summer-grade diesel fuel” at temperatures below 0°C can result in
operational problems because th e diesel becomes viscous as a result of paraffin sepa-
ration.
It is therefore the case that the standard EN 590 (standard DIN 51628 in Germany,
standard ÖNORM C 1590 in Austria) is the diesel fuel class prescribed for certain
periods of the year which can also be purc hased at the corresponding time during the
year. “Winter-grade diesel fuel” will still operate properly even at a temperature of -
20°C.
It is often the case in countries with different climatic conditions that diesel fuels avail-
able have a different temperature characteristic. The authorised Škoda Service Part-
ners and filling stations in the country concer ned will be able to provide you with infor-
mation regarding the diesel fuels available. Prewarming fuel
The vehicle is fitted with a fu
el filter prewarming system. This secures operation of a
vehicle using diesel fuel down to an environmental temperature of -25°C.
Caution
It is not permitted to add the various fuel additives on the market, including petrol, to
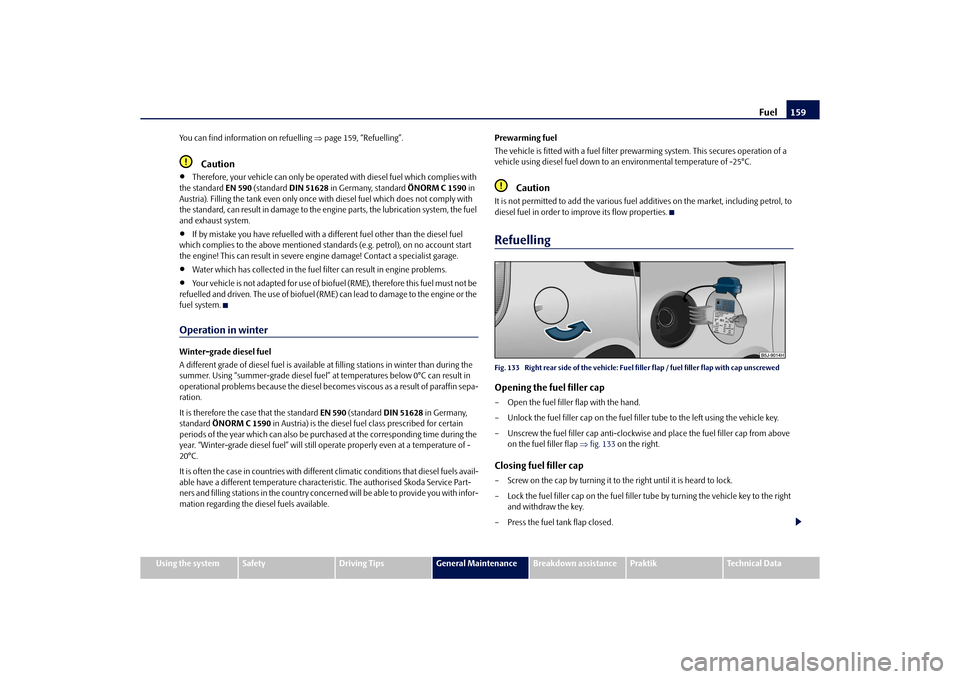
diesel fuel in order to improve its flow properties.RefuellingFig. 133 Right rear side of the vehicle: Fuel filler flap / fuel filler flap with cap unscrewedOpening the fuel filler cap– Open the fuel filler flap with the hand.
– Unlock the fuel filler cap on the fuel filler tube to the left using the vehicle key.
– Unscrew the fuel filler ca p anti-clockwise and place the fuel filler cap from above
on the fuel filler flap fig. 133 on the right.Closing fuel filler cap– Screw on the cap by turning it to the right until it is heard to lock.
– Lock the fuel filler cap on the fuel filler tube by turning the vehicle key to the right
and withdraw the key.
– Press the fuel tank flap closed.
s16g.4.book Page 159 Wednesda y, February 10, 2010 3:53 PM
Page 163 of 231
Inspecting and replenishing
162
Working in the engine compartment
Particular care is required when carrying out any work in the engine
compartment!There is a risk of injuries, scalding, acci dents and fire when working in the engine
compartment, e.g. inspecting and replenishing oil and other fluids. For this
reason, it is essential to comply with the warning instructions stated below and
with the general applicable rules of safe ty. The engine compartment of your car
is a hazardous area .
WARNING
Never open the bonnet if you see that steam or coolant is flowing out of the
engine compartment - risk of scalding! Wait long enough until the steam or
coolant has stopped escaping.
Switch off the engine and pull out the ignition key.
Apply the handbrake firmly.
If your vehicle is fitted with a manual gearbox, move the gearshift lever into
Neutral, or if it is fitted with automatic gearbox, move the selector lever into
position P.
Allow the engine to cool down.
Keep children clear of the engine compartment.
Do not touch any hot engine parts - risk of burns!
Never spill oil and other fluids over the hot engine. Such fluids (e.g. the anti-
freeze contained in the wash liquid) may ignite!
Avoid short circuits in the electrical system - particularly on the battery.
Never place your hand into the radiator fan as long as the engine is still
warm. The fan might suddenly start running!
Never open the cap of the coolant expans ion bottle as long as the engine is
still warm. The cooling system is pressurized!
Cover over the cap of the coolant expansion reservoir with a large cloth
when opening it as protection for your face, hands and arms from hot steam or
hot coolant.
Do not let objects, such as e.g cleaning cloth or tools lie in the engine
compartment.
If you wish to work under the vehicl e, you must secure the vehicle from
rolling away and support it with suitable supporting blocks: the car jack is not
sufficient for this - risk of injury!
In cases where it be necessary to carry out inspection work when the engine
is running there is an additional risk fr om rotating parts (e.g. the V-ribbed belt,
alternator, radiator fan) and from the high-voltage ignition system. Please
observe in addition the following:
Never touch the electrical cabl es of the ignition system.
Absolutely avoid any jewellery, loose it ems of clothing or long hair from
getting into the rotating parts of the engine - Hazard! Therefore remove any
jewellery beforehand, tie up your hair and wear tight fitting clothing.
Please also comply with the warnin g instructions stated below when
carrying out any essential work on the fuel system or on th e electrical system:
Always separate the car battery from the electrical system.
Do not smoke.
Never carry out any work close to naked flames.
Always keep a working fire extinguisher at hand.Caution
When replenishing fluids in the engine, always ensure that the fluids are on no account
mixed up. This may result in major oper ating problems and also vehicle damage!
WARNING (continued)
s16g.4.book Page 162 Wednesday, February 10, 2010 3:53 PM