ECU SKODA ROOMSTER 2010 1.G Owner's Manual
[x] Cancel search | Manufacturer: SKODA, Model Year: 2010, Model line: ROOMSTER, Model: SKODA ROOMSTER 2010 1.GPages: 231, PDF Size: 12.91 MB
Page 36 of 231
Unlocking and locking35
Using the system
Safety
Driving Tips
General Maintenance
Breakdown assistance
Praktik
Technical Data
For the sake of the environment
Dispose of a used battery in accord ance with environmental regulations.
Note
Pay attention to the correct pola rity when changing the battery.
The replacement battery must have the same specification as the original battery.
If it is still not be possible to unlock or lock the vehicle with the remote control even
after replacing the battery this means that the system has to be synchronised
page 41.
Electronic immobiliser
The electronic immobiliser prevents the vehicle being operated by an
unauthorised person.An electronic chip is integrated in the he ad of the key. The immobiliser is deactivated
with the aid of this chip when the key is in serted in the ignition lock. The electronic
immobiliser is automatically activated when you withdraw the ignition key from the
lock.
Note
It is only possible to start the engine of your car with a Genuine Škoda key with the
matching code.LockingValid for vehicles without a central locking system:Locking from outside
The securing knob will move upwards or downwards in the door when unlocking or
locking. Locking from inside
All closed vehicle doors are locked by pressi
ng in the securing knobs from the inside.
The doors cannot be opened from the outside when the securing knobs have been
pressed in. The vehicle d oors can be opened from the inside as follows:
the door is unlocked by actuating the door-opening lever;
The door opens upon actuating the door-opening lever again.Note
The opened door cannot be locked with the securing knob. This prevents the
possibility of forgetting the key in the locked vehicle.
The opened doors at the rear and the fron t passenger door are locked by pressing
in the securing knob and slamming the door closed.
Please refer to the safety guidelines in “Description” on page 36.
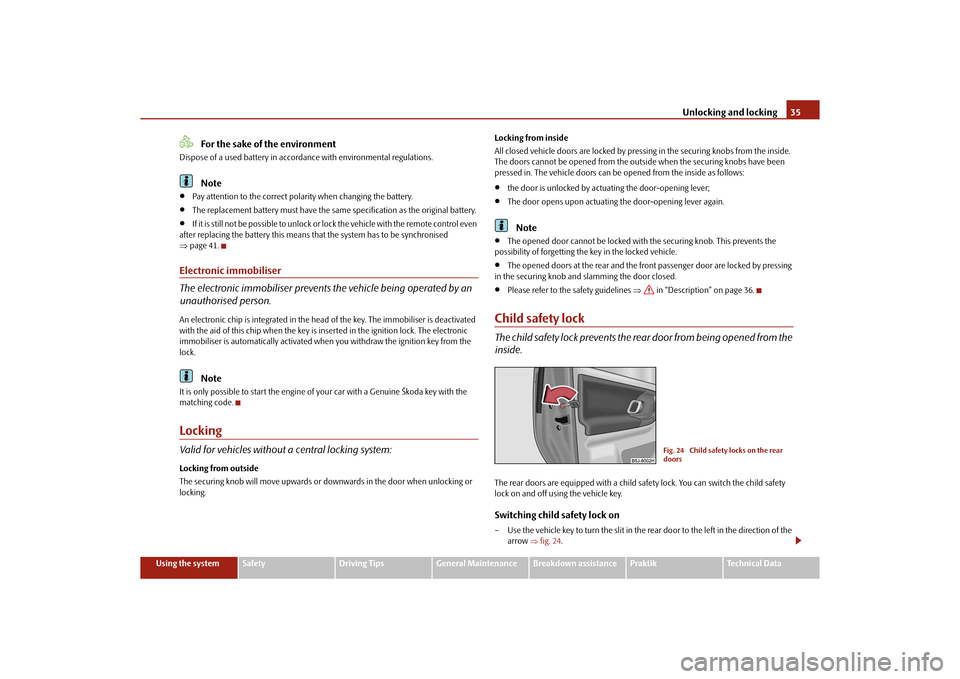
Child safety lockThe child safety lock prev ents the rear door from being opened from the
inside.The rear doors are equipped with a child safe ty lock. You can switch the child safety
lock on and off using the vehicle key.Switching child safety lock on– Use the vehicle key to turn the slit in the rear door to the left in the direction of the
arrow fig. 24 .
Fig. 24 Child safety locks on the rear
doors
s16g.4.book Page 35 Wednesda y, February 10, 2010 3:53 PM
Page 37 of 231
Unlocking and locking
36
Switching child safety lock off
– Use the vehicle key to turn the slit to the right against the direction of the arrow.
So long as the child safety lock is switched on it is not possible to open the door from
the inside with the door opening lever. In this case the door can be opened only from
the outside.Central locking system*DescriptionUnlocking or locking the vehicle causes all doors to be unlocked or locked at the same
time by the central locking system. The boot lid is unlocked when opening. It can be
opened by pressing the hand grip above the licence plate.
Operation of the central locking system is possible:
from the outside using the vehicle key page 37;
using the buttons for the central locking system page 38;
by using the remote control page 40.
Indicator light in the driver's door
After locking the vehicle the indicator light fl ashes for 2 seconds fast, then more slowly.
If the vehicle is locked and the safe securing system page 36 is not operating, the
indicator light in the driver door flashes for about 2 seconds fast, goes out and starts to
flash slowly after about 30 seconds.
If the indicator light first of all flashes fast for about 2 seconds, afterwards lights up for
about 30 seconds and then flashes slowly, there is a fault in the system of the central
locking or the interior monitor* page 42. Visit a specialist garage to obtain assist-
ance.
Convenience operatio n of the windows
One can open and close the electrically powered windows when unlocking and
locking the vehicle page 44, “Window convenience operation”. Opening a single door*
This function makes it possible to only unlock the driver's door. The other doors
remain locked and are only unlocked when the command is repeated. The single door
opening function can be first activated by recoding the control unit of the central
locking system. This work is undertaken by a specialist garage which can give you more
information.
Automatic locking*
All the doors and the boot lid are locked automatically once the car reaches a speed of
about 15 km/h.
If the ignition key is withdrawn, the car is
then automatically unlocked again. The driver
can also unlock the vehicle by pressing the button
of the central locking system.
If you wish, you can have a specialist gara ge activate the automatic locking function.
WARNING
Locking the doors prevents involuntary op ening in an exceptional situation (an
accident). Locked doors prevent unwanted entry into the vehicle from outside,
for example at road crossings. Locked do ors do, however, make it more difficult
for rescuers to get into the vehicle in an emergency - danger to life!
Note
In the event of an accident in which the airbags are deployed, the locked doors are
automatically unlocked in order to enable rescuers to gain access to the vehicle.
Only the front doors can be unlocked and locked using the key if the central locking
system fails. You can operate the rear doors manually.
Emergency locking of the door page 38.
Emergency unlocking of the boot lid page 39.
Safe securingThe central locking system is equipped with a safe securing
5) system. Locking the
vehicle from the outside causes the door lo cks to be automatically blocked. The indi-
5)The equipment is only valid for some countries.
s16g.4.book Page 36 Wednesday, February 10, 2010 3:53 PM
Page 38 of 231
Unlocking and locking37
Using the system
Safety
Driving Tips
General Maintenance
Breakdown assistance
Praktik
Technical Data
cator light in the driver's door flashes. It is
not possible to open the doors with the door
handle ei the r fro m the ins id e or from the outsi de. T hi s a cts as an ef fe cti ve dete rrent for
attempts to break into your vehicle.
You can deactivate the safe securing system by locking twice within 5 seconds.
The safe securing system is again activated the next time the vehicle is unlocked and
locked again.
If the vehicle is locked and the safe securing system is deactivated, you can open the
vehicle from the inside by pulling on the d oor opening lever. The door is unlocked and
opened at the same time.
WARNING
If the vehicle is locked from the outside and the safe securing system is acti-
vated, there must not be any person and animals in the vehicle as it is then not
possible to open either a door or a window from the inside. The locked doors
make it more difficult for rescuers to get into the vehicle in an emergency -
hazard!
Note
The anti-theft alarm system* is also activated with the deactivated safe securing
system when locking the vehicle. The interior monitor* is however not activated.Unlocking the vehicle using the key
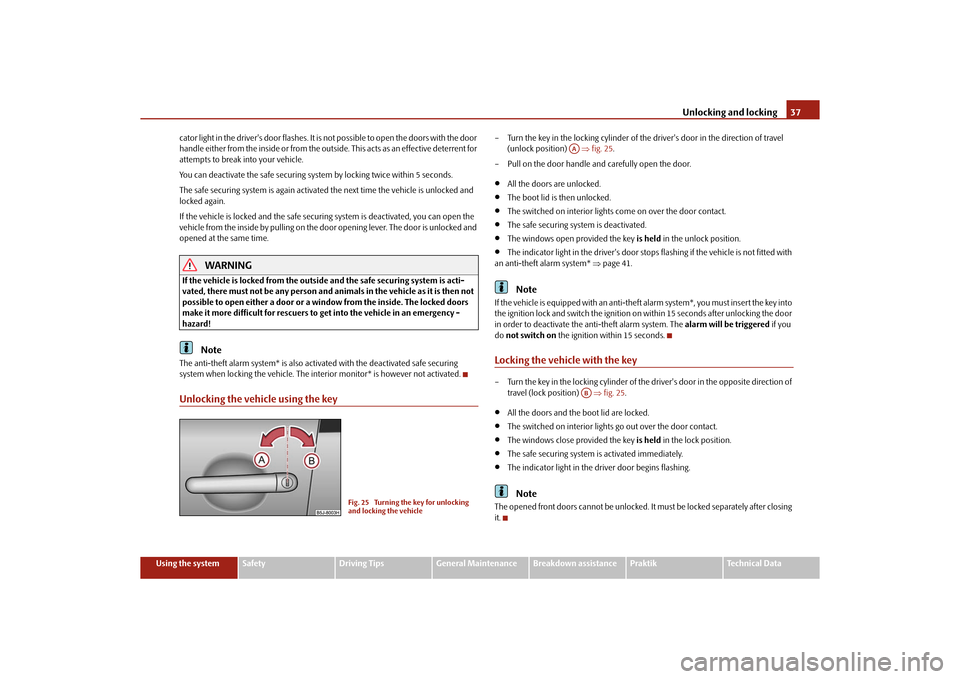
– Turn the key in the locking cylinder of the driver's door in the direction of travel
(unlock position) fig. 25 .
– Pull on the door handle and carefully open the door.
All the doors are unlocked.
The boot lid is then unlocked.
The switched on interior lights come on over the door contact.
The safe securing system is deactivated.
The windows open provided the key is held in the unlock position.
The indicator light in the driver's door stops flashing if the vehicle is not fitted with
an anti-theft alarm system* page 41.Note
If the vehicle is equipped with an anti-theft alarm system*, you must insert the key into
the ignition lock and switch the ignition on within 15 seconds after unlocking the door
in order to deactivate the anti-theft alarm system. The alarm will be triggered if you
do not switch on the ignition within 15 seconds.Locking the vehicle with the key– Turn the key in the locking cylinder of the driver's door in the opposite direction of
travel (lock position) fig. 25 .
All the doors and the boot lid are locked.
The switched on interior lights go out over the door contact.
The windows close provided the key is held in the lock position.
The safe securing system is activated immediately.
The indicator light in the dr iver door begins flashing.Note
The opened front doors cannot be unlocked. It must be locked separately after closing
it.
Fig. 25 Turning the key for unlocking
and locking the vehicle
AAAB
s16g.4.book Page 37 Wednesda y, February 10, 2010 3:53 PM
Page 39 of 231
Unlocking and locking
38
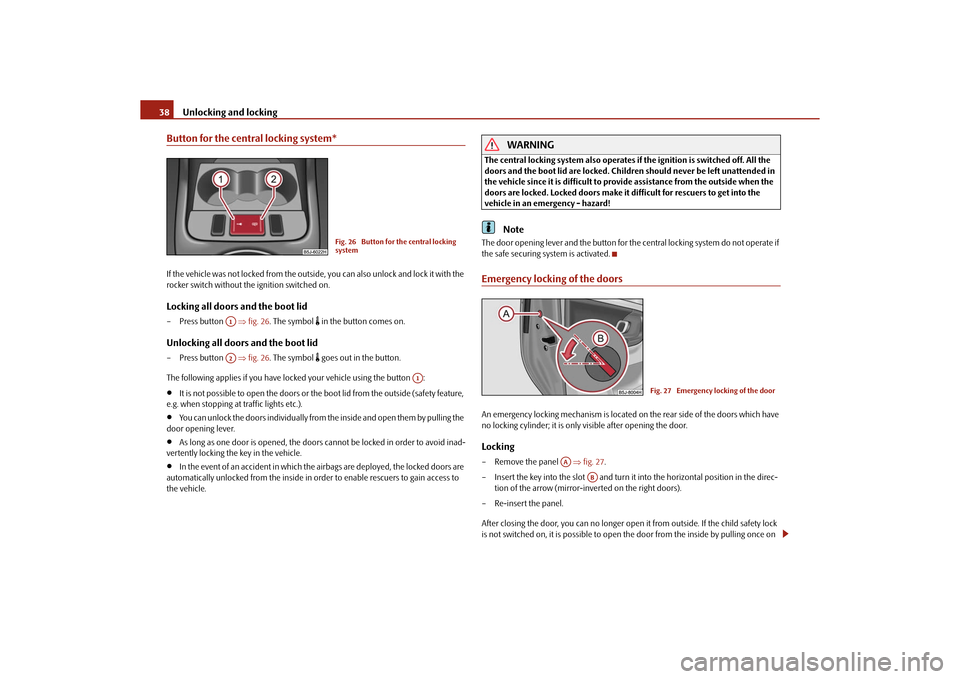
Button for the central locking system*If the vehicle was not locked from the outsid e, you can also unlock and lock it with the
rocker switch without th e ignition switched on.Locking all doors and the boot lid– Press button fig. 26 . The symbol
in the button comes on.
Unlocking all doors and the boot lid– Press button fig. 26 . The symbol
goes out in the button.
The following applies if you have locked your vehicle using the button :
It is not possible to open the doors or the boot lid from the outside (safety feature,
e.g. when stopping at traffic lights etc.).
You can unlock the doors individually from the inside and open them by pulling the
door opening lever.
As long as one door is opened, the doors cannot be locked in order to avoid inad-
vertently locking the key in the vehicle.
In the event of an accident in which the airbags are deployed, the locked doors are
automatically unlocked from the inside in orde r to enable rescuers to gain access to
the vehicle.
WARNING
The central locking system al so operates if the ignition is switched off. All the
doors and the boot lid are locked. Children should never be left unattended in
the vehicle since it is difficult to provide assistance from the outside when the
doors are locked. Locked doors make it difficult for rescuers to get into the
vehicle in an emergency - hazard!
Note
The door opening lever and the button for th e central locking system do not operate if
the safe securing system is activated.Emergency locking of the doorsAn emergency locking mechanism is located on the rear side of the doors which have
no locking cylinder; it is only visible after opening the door.Locking– Remove the panel fig. 27 .
– Insert the key into the slot and turn it into the horizontal position in the direc- tion of the arrow (mirror-inverted on the right doors).
– Re-insert the panel.
After closing the door, you can no longer open it from outside. If the child safety lock
is not switched on, it is possible to open the door from the inside by pulling once on
Fig. 26 Button for the central locking
system
A1A2
A1
Fig. 27 Emergency locking of the door
AA
AB
s16g.4.book Page 38 Wednesday, February 10, 2010 3:53 PM
Page 41 of 231
Unlocking and locking
40
– Move the operating lever A with the aid of a narrow object e.g. screwdriver up to
the stop in the direction of arrow; the boot lid is then unlocked.
– Open the boot lid from the outside.Remote control*DescriptionYou can use the remote control:
to unlock and lock the vehicle;
unlocking boot lid.
The transmitter with the battery is incorporat ed in the handle of the master key. The
receiver is located in the interior of the ca r. The operating range of the remote control
is approx. 10 m. But this range of the remote control can be reduced if the batteries are
weak.
The master key has a fold-open key bit whic h can be used for unlocking and locking
the car manually and also for starting the engine.
If a lost key is replaced or if the receiver unit has been repaired or a new unit installed,
it is then necessary for a specialist garage to adapt the system. Only after this is it
possible to again use the remote control.Note
The remote control is automatically deactivated when the ignition is switched on.
The operation of the remote control may temporarily be affected by interference
from transmitters close to the car and which operate in the same frequency range (e.g.
mobile phone, TV transmitter).
The battery must be replaced if the centra l locking or anti-theft alarm system does
not react to the remote control at less th an 3 metres away. We recommend having the
battery replaced by a specialist garage.
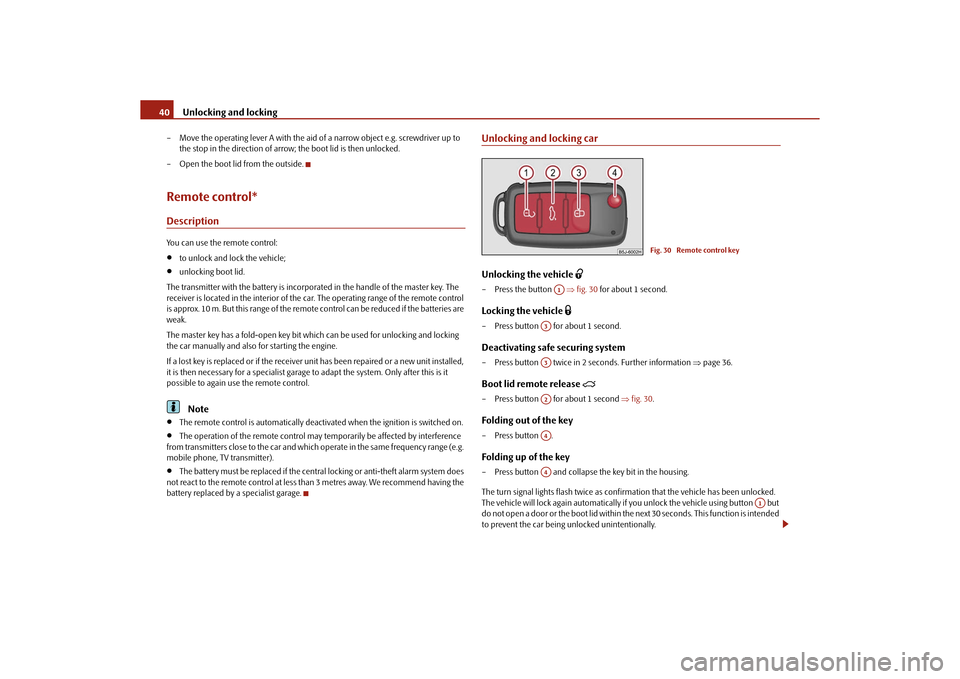
Unlocking and locking carUnlocking the vehicle
– Press the button fig. 30 for about 1 second.Locking the vehicle
– Press button for about 1 second.Deactivating safe securing system– Press button twice in 2 seconds. Further information page 36.Boot lid remote release
– Press button for about 1 second fig. 30 .Folding out of the key– Press button .Folding up of the key– Press button and collapse the key bit in the housing.
The turn signal lights flash twice as confir mation that the vehicle has been unlocked.
The vehicle will lock again automatically if you unlock the vehicle using button but
do not open a door or the boot lid within th e next 30 seconds. This function is intended
to prevent the car being unlocked unintentionally.
Fig. 30 Remote control key
A1
A3A3A2A4A4
A1
s16g.4.book Page 40 Wednesda y, February 10, 2010 3:53 PM
Page 42 of 231
Unlocking and locking41
Using the system
Safety
Driving Tips
General Maintenance
Breakdown assistance
Praktik
Technical Data
The safe securing system along with the anti-theft alarm system* are, however, deac-
tivated during these 30 seconds.
When the vehicle is unlocked or locked, the interior lights in the door contact are auto-
matically switched on or off.
Display of the locking
The turn signal lights flash once to confir
m that the vehicle has been correctly locked.
If the vehicle is locked by pressing the bu tton and some doors or the boot lid are
not closed, the turn signal lights flash only after closing.
WARNING
If the vehicle is locked from the outside and the safe securing system is acti-
vated, there must not be any person in the vehicle as it is then not possible to
open either a door or a window from the inside. The locked doors make it more
difficult for rescuers to get into the vehicle in an emergency - hazard!
Note
Operate the radio remote control only when the doors and boot lid are closed and
you have visual contact with the vehicle.
Once in the vehicle, you must not press the lock button
of the master key before
inserting the key into the ignition lock in order to avoid the vehicle being inadvertently
locked and the anti-theft alarm system* being switched on. Should this happen, press
the unlock button
of the master key.
Synchronisation of the remote controlIf the vehicle cannot be unlocked by actuatin g the remote control system then it is
possible that the code in the key and the co ntrol unit in the vehicle are no longer
synchronised. This can occur when the buttons on the radio-operated key are actuated
a number of times outside of the operative range of the equipment or the battery on
the remote control was replaced.
This means it is necessary to synchronise the code as follows:
press any button on the remote control;
pressing of the button means that the door will unlock with the key within 1
minute.
Anti-theft alarm system*DescriptionThe anti-theft alarm system increases the level of protection against people seeking to
break into the vehicle. The system triggers audible and visual warning signals if an
attempt is made to break into the vehicle.
How is the alarm system activated?
The anti-theft alarm system is activated au tomatically when the unlocked vehicle is
locked with the key inserted in the driver's door or with the remote control key. It is
activated 30 seconds after locking the door.
How is the alarm system deactivated?
The anti-theft alarm system is deactivated if the vehicle is unlocked by only using the
radio remote control. The anti-theft alarm system is reactivated if the vehicle is not
opened within 30 seconds after transmitting the radio signal.
Once you unlock the vehicle by inserting the ke y into the driver door you then have to
insert the key into the ignition lock and sw itch the ignition on within 15 seconds after
opening the door in order to deactivate the anti-theft alarm system. The alarm will be
triggered if you do not switch on the ignition within 15 seconds.
When is the alarm triggered?
The following security areas of the locked vehicle are monitored:
bonnet;
boot lid;
doors;
ignition lock;
vehicle interior* page 42;
Angle of the vehicle* page 42;
Decoupling of the attached trailer;
A3
s16g.4.book Page 41 Wednesda y, February 10, 2010 3:53 PM
Page 43 of 231
Unlocking and locking
42
A drop in voltage of the on-board power supply.
An alarm is immediately triggered if either of the two battery terminals is disconnected
while the anti-theft alarm system is activated.
How is the alarm switched off?
You switch the alarm off if you unlock the vehi cle with the radio remote control or if you
switch the ignition on.Note
The working life of the alarm siren is 5 years. More detailed information is available
by a specialist garage.
Before leaving the car, check that all the doors, windows and the electric
sliding/tilting roof* are properly closed in order to ensure that the anti-theft alarm
system is fully operational.
Coding of the radio remote control and th e receiver unit precludes the use of the
radio remote control from other vehicles.
Interior monitor* and Towing protection monitoring*The interior monitor and the towing protection monitoring detect
movements inside the vehicle interior and then trigger the alarm.The interior monitor and the towing protec tion monitoring are operated with the
button
. You can switch the interior monitor and the towing protection monitoring
off if there is a possibility that movements from (e.g. children or animals) inside the vehicle interior or if the vehi
cle must be transported (e.g. by train or ship) or towed,
might trigger the alarm.
Switch off the interior monitor and towing protection monitoring– Switch off the ignition.
– Open the driver door.
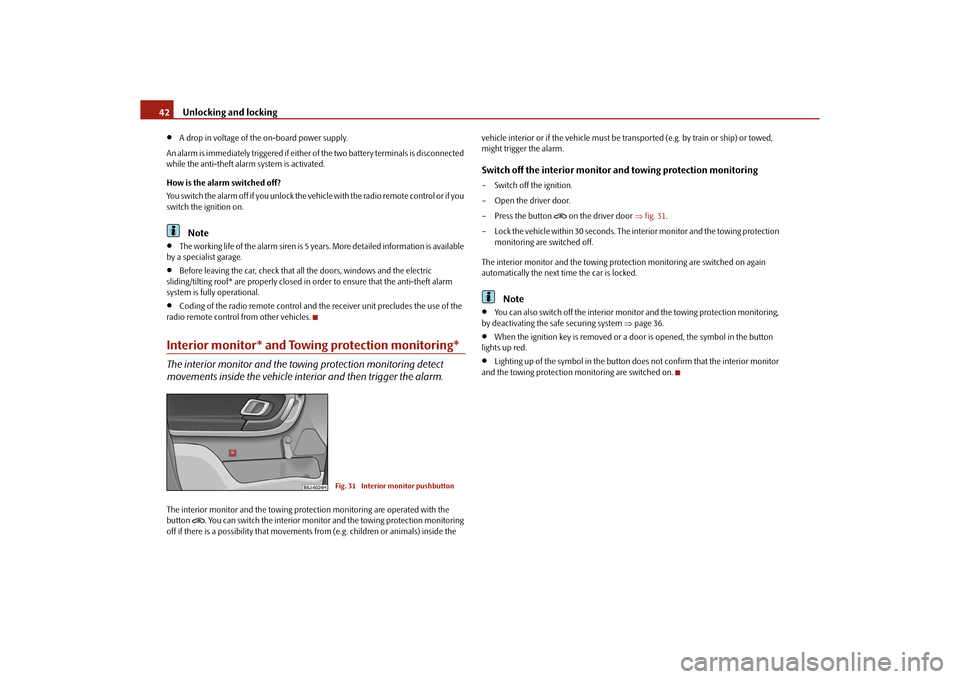
– Press the button
on the driver door fig. 31 .
– Lock the vehicle within 30 seconds. The in terior monitor and the towing protection
monitoring are switched off.
The interior monitor and the towing protec tion monitoring are switched on again
automatically the next ti me the car is locked.
Note
You can also switch off the interior moni tor and the towing protection monitoring,
by deactivating the sa fe securing system page 36.
When the ignition key is removed or a door is opened, the symbol in the button
lights up red.
Lighting up of the symbol in the button does not confirm that the interior monitor
and the towing protection monitoring are switched on.
Fig. 31 Interior monitor pushbutton
s16g.4.book Page 42 Wednesda y, February 10, 2010 3:53 PM
Page 60 of 231
Seats and Storage59
Using the system
Safety
Driving Tips
General Maintenance
Breakdown assistance
Praktik
Technical Data
Heating the front seats*You can electrically heat the seat cushions and the seat backrests of the front seats.
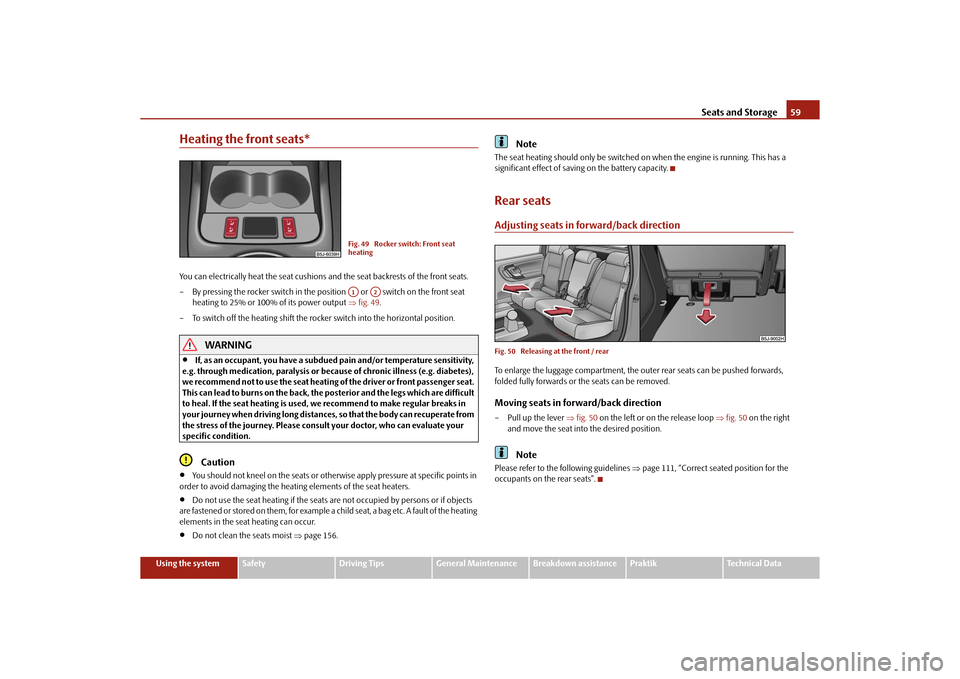
– By pressing the rocker switch in the posi tion or switch on the front seat
heating to 25% or 100% of its power output fig. 49 .
– To switch off the heating shift the rocker switch into the horizontal position.
WARNING
If, as an occupant, you have a subdued pain and/or temperature sensitivity,
e.g. through medication, paralysis or beca use of chronic illness (e.g. diabetes),
we recommend not to use the seat heating of the driver or front passenger seat.
This can lead to burns on the back, the posterior and the legs which are difficult
to heal. If the seat heating is used, we recommend to make regular breaks in
your journey when driving long distances, so that the body can recuperate from
the stress of the journey. Please consult your doctor, who can evaluate your
specific condition.Caution
You should not kneel on the seats or otherwise apply pressure at specific points in
order to avoid damaging the heating elements of the seat heaters.
Do not use the seat heating if the seats are not occupied by persons or if objects
are fastened or stored on them, for example a child seat, a bag etc. A fault of the heating
elements in the seat heating can occur.
Do not clean the seats moist page 156.
Note
The seat heating should only be switched on when the engine is running. This has a
significant effect of saving on the battery capacity.Rear seatsAdjusting seats in forward/back directionFig. 50 Releasing at the front / rearTo enlarge the luggage compartment, the ou ter rear seats can be pushed forwards,
folded fully forwards or the seats can be removed.Moving seats in forward/back direction– Pull up the lever fig. 50 on the left or on the release loop fig. 50 on the right
and move the seat into the desired position.
Note
Please refer to the following guidelines page 111, “Correct seated position for the
occupants on the rear seats”.
Fig. 49 Rocker switch: Front seat
heatingA1
A2
s16g.4.book Page 59 Wednesda y, February 10, 2010 3:53 PM
Page 61 of 231
Seats and Storage
60
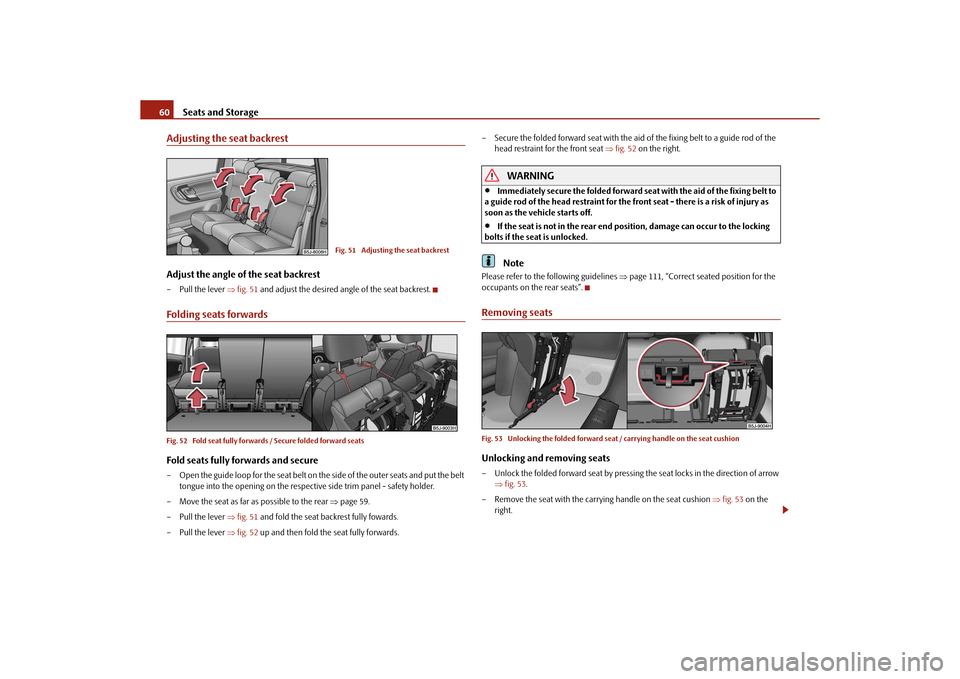
Adjusting the seat backrestAdjust the angle of the seat backrest– Pull the lever fig. 51 and adjust the desired angle of the seat backrest.Folding seats forwardsFig. 52 Fold seat fully forwards / Secure folded forward seatsFold seats fully forwards and secure– Open the guide loop for the seat belt on th e side of the outer seats and put the belt
tongue into the opening on the respective side trim panel - safety holder.
– Move the seat as far as possible to the rear page 59.
– Pull the lever fig. 51 and fold the seat backrest fully fowards.
– Pull the lever fig. 52 up and then fold the seat fully forwards. – Secure the folded forward seat with the aid of the fixing belt to a guide rod of the
head restraint for the front seat fig. 52 on the right.
WARNING
Immediately secure the folded forward seat with the aid of the fixing belt to
a guide rod of the head restraint for the front seat - there is a risk of injury as
soon as the vehicle starts off.
If the seat is not in the rear end po sition, damage can occur to the locking
bolts if the seat is unlocked.Note
Please refer to the following guidelines page 111, “Correct seated position for the
occupants on the rear seats”.Removing seatsFig. 53 Unlocking the folded forward seat / carrying handle on the seat cushionUnlocking and removing seats– Unlock the folded forward seat by pressing the seat locks in the direction of arrow fig. 53 .
– Remove the seat with the carrying handle on the seat cushion fig. 53 on the
right.
Fig. 51 Adjusting the seat backrest
s16g.4.book Page 60 Wednesda y, February 10, 2010 3:53 PM
Page 62 of 231
Seats and Storage61
Using the system
Safety
Driving Tips
General Maintenance
Breakdown assistance
Praktik
Technical Data
Note
The outer seats are not replac eable alternatively. In the rear area the left seat is
marked with the letter L and the right seat with the letter R.
Please refer to the following guidelines page 111.
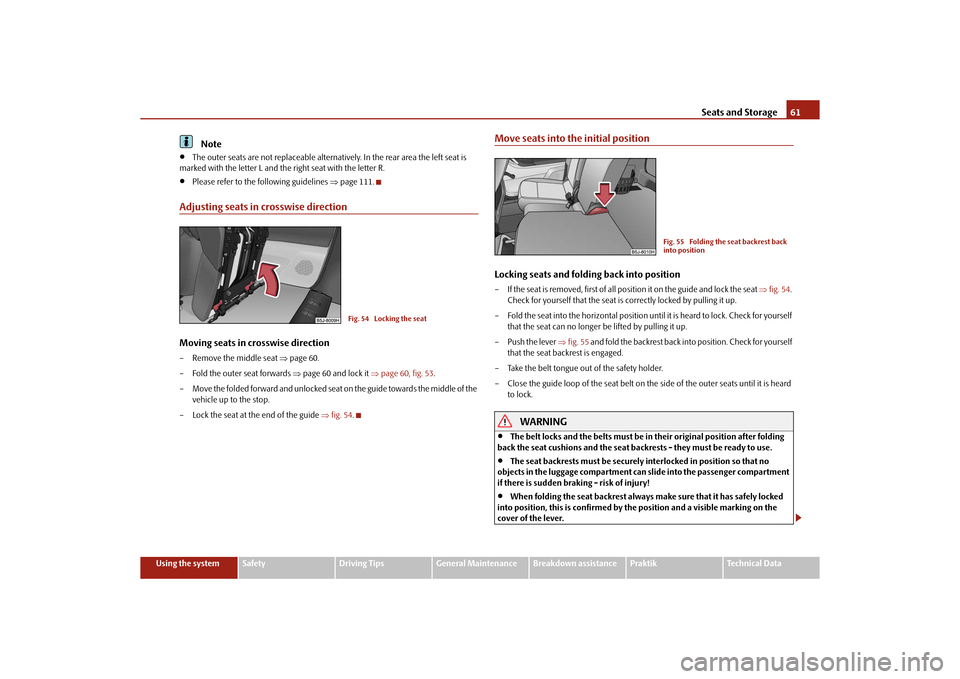
Adjusting seats in crosswise directionMoving seats in crosswise direction– Remove the middle seat page 60.
– Fold the outer seat forwards page 60 and lock it page 60, fig. 53 .
– Move the folded forward and unlocked seat on the guide towards the middle of the vehicle up to the stop.
– Lock the seat at the end of the guide fig. 54 .
Move seats into the initial positionLocking seats and folding back into position– If the seat is removed, first of all position it on the guide and lock the seat fig. 54 .
Check for yourself that the seat is correctly locked by pulling it up.
– Fold the seat into the horizontal position until it is heard to lock. Check for yourself that the seat can no longer be lifted by pulling it up.
– Push the lever fig. 55 and fold the backrest back in to position. Check for yourself
that the seat backrest is engaged.
– Take the belt tongue out of the safety holder.
– Close the guide loop of the seat belt on the side of the outer seats until it is heard to lock.
WARNING
The belt locks and the belts must be in their original position after folding
back the seat cushions and the seat backrests - they must be ready to use.
The seat backrests must be securely interlocked in position so that no
objects in the luggage compartment can slide into the passenger compartment
if there is sudden braking - risk of injury!
When folding the seat backrest always make sure that it has safely locked
into position, this is confirmed by the position and a visible marking on the
cover of the lever.
Fig. 54 Locking the seat
Fig. 55 Folding the seat backrest back
into position
s16g.4.book Page 61 Wednesda y, February 10, 2010 3:53 PM