tow SKODA ROOMSTER 2010 1.G Service Manual
[x] Cancel search | Manufacturer: SKODA, Model Year: 2010, Model line: ROOMSTER, Model: SKODA ROOMSTER 2010 1.GPages: 231, PDF Size: 12.91 MB
Page 189 of 231
Breakdown assistance
188WARNING
The non-insulated parts of the terminal clamps must never make contact
with each other. Furthermore, the cable connected to the positive terminal of
the battery must not come into contact with electrically conducting parts of the
vehicle - risk of a short circuit!
Do not affix the jump starting cables to the negative terminal of the
discharged battery. There is the risk of detonating gas seeping out the battery
being ignited by the strong spark which results from the engine being started.
Do not affix the cable end to parts of the fuel and brake system.
Run the jump-start cables so that they cannot be caught by any rotating
parts in the engine compartment.
Do not bend over the batteries - risk of caustic burns!
The vent screws of the battery cells must be tightened firmly.
Keep any sources of ignition (naked flame, smouldering cigarettes etc.)
away from the battery - risk of an explosion!
Never jump-start the batteries which have a too low electrolyte level - risk
of explosion and caustic burns!
Tow-starting and towing vehicleGeneralPlease pay attention to the following instru ctions if you are going to use a tow rope:Driver of the towing vehicle– Do not drive off until the tow rope is taught.
– Release the clutch particularly gently when starting off.Driver of the towed vehicle– Switch the ignition on so that the steering wheel is not blocked and you can also operate the turn signal lights, the headlight flasher, the windscreen wipers and
windscreen washer system. – Take the vehicle out of gear or move the selector lever into position
N if your
vehicle is fitted with an automatic gearbox.
– Note that the brake servo unit and power steering only operate if the engine is running. You will require significantly greater physical force to depress the brake
pedal and to steer the vehicle if the engine is not running.
– Ensure that the tow rope is always kept taught.
Tow rope or tow bar
A tow bar is safest way of towing a vehicle and also minimizes any shocks. You can use
a tow rope only if a suitable tow bar is not available.
The tow rope must be elastic to protect the vehicle. Thus one should only use plastic
fibre rope or a rope made out of a similarly elastic material.
Attach the tow rope or the tow bar only to the towing eyes provided for this purpose
page 189, “Front towing eye” and page 189, “Rear towing eye”.
Driving style
Towing another vehicle requires a certain am ount of practice. Both drivers should be
familiar with the particular points about to wing a vehicle. Unskilled drivers should not
attempt to tow in another vehicle or to be towed in.
One should be constantly vigilant not to allow impermissibly high towing forces or
jerky loadings. There is always a risk of excessive stresses and damage resulting at the
points to which you attach the tow rope or tow bar when you attempt to tow a vehicle
which is not standing on a paved road.
Caution
If the gearbox of your vehicle no longer contains any oil because of a defect, your
vehicle must only be towed in with the driven wheels raised clear of the ground, or on
a special vehicle transporter or trailer.
Note
Please comply with any national legal provisions particularly regarding the
switched on signal systems, when towi ng in or tow-starting another vehicle.
The tow rope must not be twisted as it may in certain circumstances result in the
front towing eye being unscrewed out of your vehicle.
A4
s16g.4.book Page 188 Wednesda y, February 10, 2010 3:53 PM
Page 190 of 231
Breakdown assistance189
Using the system
Safety
Driving Tips
General Maintenance
Breakdown assistance
Praktik
Technical Data
Front towing eye
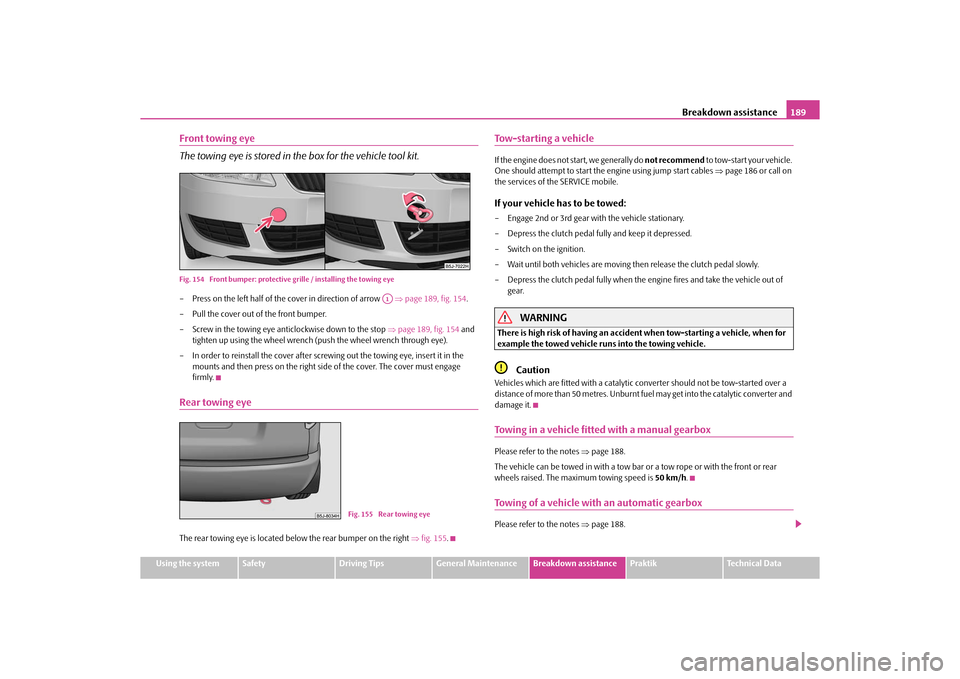
The towing eye is stored in the box for the vehicle tool kit.Fig. 154 Front bumper: protective gr ille / installing the towing eye– Press on the left half of the cover in direction of arrow page 189, fig. 154 .
– Pull the cover out of the front bumper.
– Screw in the towing eye anticlockwise down to the stop page 189, fig. 154 and
tighten up using the wheel wrench (push the wheel wrench through eye).
– In order to reinstall the cover after screwing out the towing eye, insert it in the mounts and then press on the right side of the cover. The cover must engage
firmly.Rear towing eyeThe rear towing eye is located be low the rear bumper on the right fig. 155 .
Tow-starting a vehicleIf the engine does not start, we generally do not recommend to tow-start your vehicle.
One should attempt to start the engine using jump start cables page 186 or call on
the services of the SERVICE mobile.If your vehicle has to be towed:– Engage 2nd or 3rd gear with the vehicle stationary.
– Depress the clutch pedal fu lly and keep it depressed.
– Switch on the ignition.
– Wait until both vehicles are moving then release the clutch pedal slowly.
– Depress the clutch pedal fully when the engine fires and take the vehicle out of
gear.
WARNING
There is high risk of having an accident when tow-starting a vehicle, when for
example the towed vehicle runs into the towing vehicle.
Caution
Vehicles which are fitted with a catalytic converter should not be tow-started over a
distance of more than 50 metres. Unburnt fuel may get into the catalytic converter and
damage it.Towing in a vehicle fitted with a manual gearboxPlease refer to the notes page 188.
The vehicle can be towed in with a tow bar or a tow rope or with the front or rear
wheels raised. The maximum towing speed is 50 km/h.Towing of a vehicle with an automatic gearboxPlease refer to the notes page 188.
A1
Fig. 155 Rear towing eye
s16g.4.book Page 189 Wednesda y, February 10, 2010 3:53 PM
Page 191 of 231
Breakdown assistance
190
The car can be towed in with a tow bar or a tow rope. Refer at the same time to the
following guidelines:
Move selector lever into N .
The maximum towing speed is 50 km/h.
The maximum permissible towing distance is 50 km. The gear oil pump does not
operate when the engine is not running; th e gearbox would not be adequately lubri-
cated at higher speeds and ov er longer towing distance.Caution
If the vehicle is towed in by a recovery vehicle, it should only be towed in with the front
wheels raised. If the vehicle is raised at rear, the automatic gearbox is damaged!
Note
The vehicle must be transported on a special vehi cle or trailer if it is not possible to tow
in the vehicle in the way described or if the towing distance is greater than 50 km.s16g.4.book Page 190 Wednesday, February 10, 2010 3:53 PM
Page 197 of 231
Fuses and light bulbs
196Caution
Observe the following guidelines in “Replace fuses at the battery (automatic
gearbox)”.BulbsReplacing bulbsThe relevant lamp must always be switch ed off before a light bulb is replaced.
Do not take hold of the glass bulb with naked fingers (even the smallest amount of dirt
reduces the working life of the light bulb). Use a clean cloth, serviette or something
similar.
Defect light bulbs should only be replaced with light bulbs of the same type. The desig-
nation is located on the ligh t socket or the glass bulb.
Changing certain bulbs is not something whic h you can do yourself, but requires to be
done by a specialist. Other parts of the vehicle must be removed in order to change the
light bulbs. This applies, in particular, to bulbs which can only be reached from the
engine compartment.
We therefore recommend that you have any bulbs changed by a specialist garage or,
in exceptional cases, by calling on other professional assistance.
Please note that the engine compartment is a hazardous area page 162, “Working
in the engine compartment”.
We recommend that you always have a small box of replacement bulbs in your vehicle.
You can obtain replacement bulbs from Škoda original accessories or from a specialist
garage
16).
A stowage place for the bulbs is located in the box in the spare wheel.
Bulb - Overview
16)The small box with replacement bulbs is part of the basic equipping of the vehicle in some coun-
tries.
Front headlight
Halogen headlight
Halogen projector
headlights
Low beam light
H4
H7
Main beam light
H4
H7
Parking lights
W5W
Turn signals
PY21W
Fog lights*
H8/HB4
a)
a)Valid for vehicles Scout.Daylight driving lights*
P21W
Rear light unit
Bulb
Reversing light
P21W
Turn signals
PY21W
Brake lights
P21W
Fog lights
P21W
Parking lights
2x W5W
Others
Bulb
Side turn signal lights
WY5W
Licence plate light
C5W / T4W (5W)
3. Brake light
LED
Interior lighting front / rear
C10W
Reading lights
W5W
Luggage compartment light
W5W
Storage compartment light - front passenger
side
W5W
s16g.4.book Page 196 Wednesda y, February 10, 2010 3:53 PM
Page 198 of 231
Fuses and light bulbs197
Using the system
Safety
Driving Tips
General Maintenance
Breakdown assistance
Praktik
Technical Data
WARNING
Bulbs H7 and H4 are pressurised and may burst when changing the bulb -
risk of injury!
It is recommended to wear gloves and safety glasses when changing a bulb.Note
This Owner's Manual only describes the replacement of bulbs where it is assumed that
no major complications will arise. Other light bulbs should be replaced by your
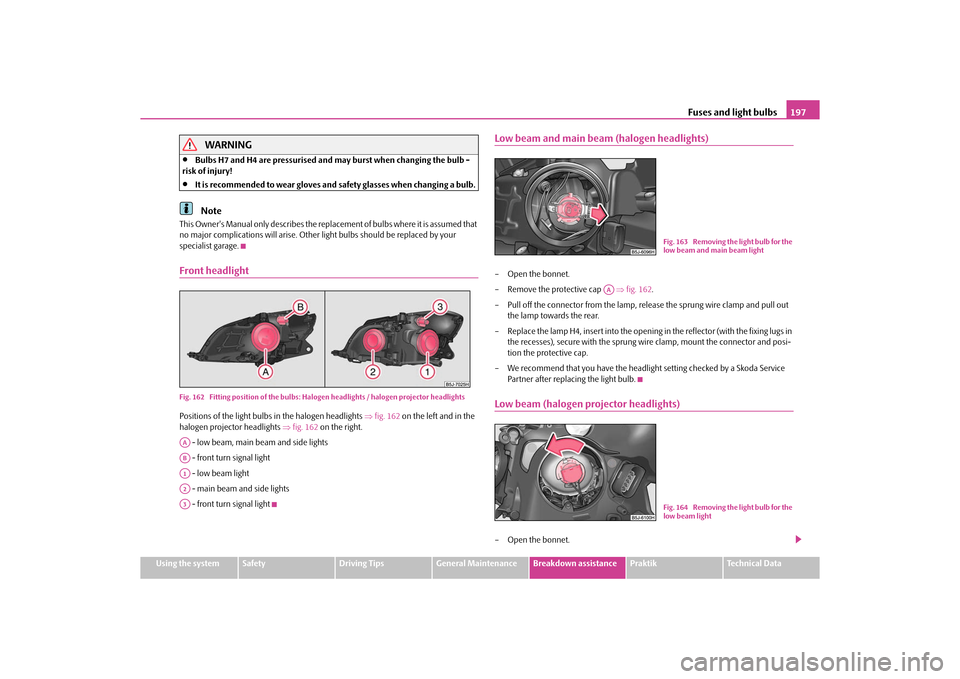
specialist garage.Front headlightFig. 162 Fitting position of the bulbs: Halo gen headlights / halogen projector headlightsPositions of the light bulbs in the halogen headlights fig. 162 on the left and in the
halogen projector headlights fig. 162 on the right.
- low beam, main beam and side lights
- front turn signal light
- low beam light
- main beam and side lights
- front turn signal light
Low beam and main beam (halogen headlights)– Open the bonnet.
– Remove the protective cap fig. 162 .
– Pull off the connector from the lamp, rele ase the sprung wire clamp and pull out
the lamp towards the rear.
– Replace the lamp H4, insert into the opening in the reflector (with the fixing lugs in the recesses), secure with the sprung wi re clamp, mount the connector and posi-
tion the protective cap.
– We recommend that you have the headli ght setting checked by a Skoda Service
Partner after replacing the light bulb.Low beam (halogen projector headlights)– Open the bonnet.
AAABA1A2A3
Fig. 163 Removing the light bulb for the
low beam and main beam light
AA
Fig. 164 Removing the light bulb for the
low beam light
s16g.4.book Page 197 Wednesda y, February 10, 2010 3:53 PM
Page 199 of 231
Fuses and light bulbs
198
– Remove the protective cap page 197, fig. 162 on the right.
– Turn the connector with the light bulb up to the stop towards the left and remove.
– Replace the halogen lamp H7, insert the connector with the new halogen lamp and turn to the right up to the stop.
– Insert the protective cap.
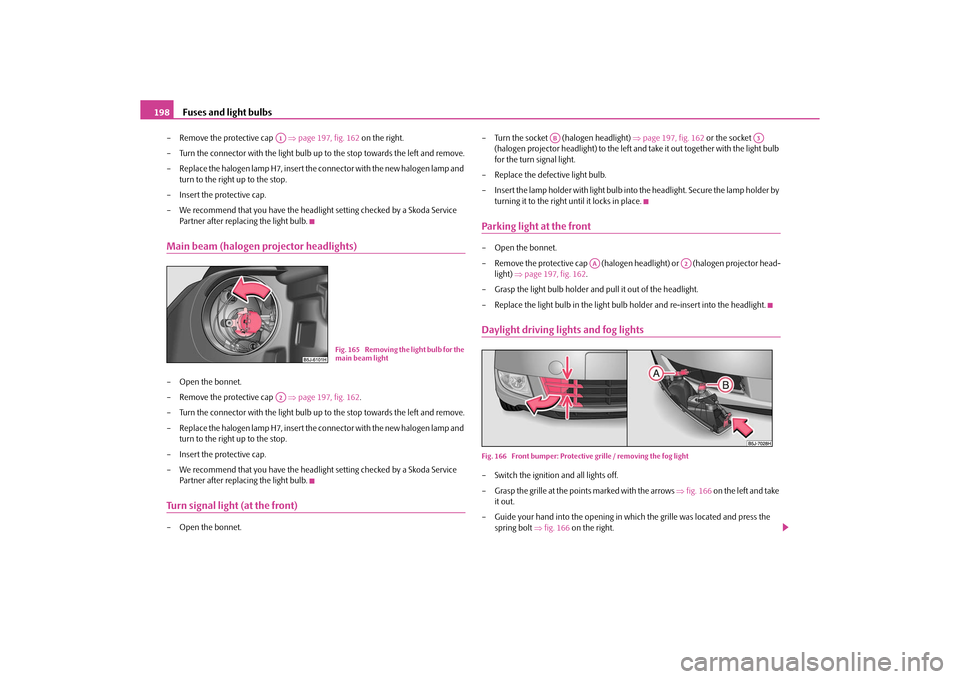
– We recommend that you have the headlight setting checked by a Skoda Service Partner after replacing the light bulb.Main beam (halogen projector headlights)– Open the bonnet.
– Remove the protective cap page 197, fig. 162 .
– Turn the connector with the light bulb up to the stop towards the left and remove.
– Replace the halogen lamp H7, insert the connector with the new halogen lamp and turn to the right up to the stop.
– Insert the protective cap.
– We recommend that you have the headlight setting checked by a Skoda Service Partner after replacing the light bulb.Turn signal light (at the front)– Open the bonnet. – Turn the socket (halogen headlight)
page 197, fig. 162 or the socket
(halogen projector headlight) to the left and take it out together with the light bulb
for the turn signal light.
– Replace the defective light bulb.
– Insert the lamp holder with light bulb into the headlight. Secure the lamp holder by
turning it to the right until it locks in place.
Parking light at the front– Open the bonnet.
– Remove the protective cap (halogen headlight) or (halogen projector head- light) page 197, fig. 162 .
– Grasp the light bulb holder and pull it out of the headlight.
– Replace the light bulb in the light bulb holder and re-insert into the headlight.Daylight driving lights and fog lightsFig. 166 Front bumper: Protective grille / removing the fog light– Switch the ignition and all lights off.
– Grasp the grille at the points marked with the arrows fig. 166 on the left and take
it out.
– Guide your hand into the opening in wh ich the grille was located and press the
spring bolt fig. 166 on the right.
A1
Fig. 165 Removing the light bulb for the
main beam light
A2
AB
A3
AA
A2
s16g.4.book Page 198 Wednesda y, February 10, 2010 3:53 PM
Page 205 of 231
Praktik
204
You can fix the loading floor with a hook on th e top edge of the boot lid cutout, in order
to e.g. reach the spare wheel*.
– Raise the loading floor at the loop page 203, fig. 175 and fix it with a plastic hook
(it is located below the loading floor edge) to the top edge of the tailgate cutout
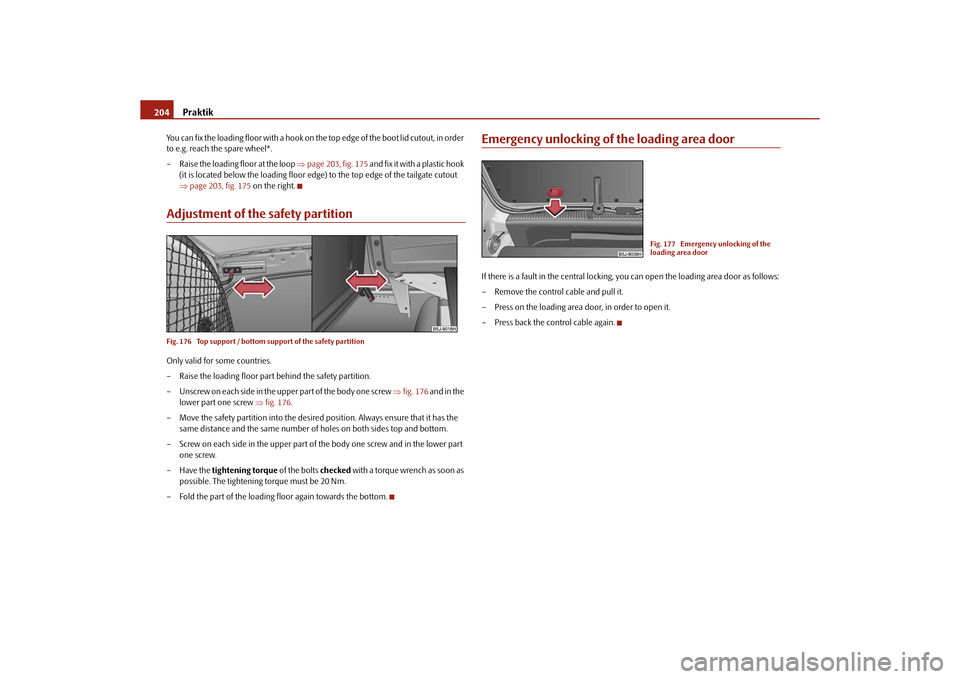
page 203, fig. 175 on the right.Adjustment of the safety partitionFig. 176 Top support / bottom support of the safety partitionOnly valid for some countries.
– Raise the loading floor part behind the safety partition.
– Unscrew on each side in the u pper part of the body one screw fig. 176 and in the
lower part one screw fig. 176 .
– Move the safety partition into the desired position. Always ensure that it has the same distance and the same number of holes on both sides top and bottom.
– Screw on each side in the upper part of the body one screw and in the lower part one screw.
–Have the tightening torque of the bolts checked with a torque wrench as soon as
possible. The tightening torque must be 20 Nm.
– Fold the part of the loading floor again towards the bottom.
Emergency unlocking of the loading area doorIf there is a fault in the central locking, you can open the loading area door as follows:
– Remove the control cable and pull it.
– Press on the loading area door, in order to open it.
– Press back the control cable again.
Fig. 177 Emergency unlocking of the
loading area door
s16g.4.book Page 204 Wednesda y, February 10, 2010 3:53 PM
Page 226 of 231
Index225
Using the system
Safety
Driving Tips
General Maintenance
Breakdown assistance
Praktik
Technical Data
Remote control . . . . . . . . . . . . . . . . . . . . . . . . . . . . . . . 40
Synchronisation process . . . . . . . . . . . . . . . . . . . 41
Removing seats . . . . . . . . . . . . . . . . . . . . . . . . . . . . . . . 60
Replacing bulbs . . . . . . . . . . . . . . . . . . . . . . . . . . . . . . 196
Replacing fuses . . . . . . . . . . . . . . . . . . . . . . . . . . . . . . 191
Replacing the wiper blades . . . . . . . . . . . . . . . . . . . . 54
Roof aerial . . . . . . . . . . . . . . . . . . . . . . . . . . . . . . . . . . 151
Running in the car . . . . . . . . . . . . . . . . . . . . . . . . . . . 141
SSafe securing . . . . . . . . . . . . . . . . . . . . . . . . . . . . . . . . . 36
Safety . . . . . . . . . . . . . . . . . . . . . . . . . . . . . . . . . . . . . . . 109
Safety information Engine compartment . . . . . . . . . . . . . . . . . . . . . 162
Saving electrical energy . . . . . . . . . . . . . . . . . . . . . . 142
Seat belt height adjuster . . . . . . . . . . . . . . . . . . . . . . 115
Seat belt warning light . . . . . . . . . . . . . . . . . . . . . . . . 115
Seat belts . . . . . . . . . . . . . . . . . . . . . . . . . . . . . . . . . . . . 113 Cleaning . . . . . . . . . . . . . . . . . . . . . . . . . . . . . . . . . 157
fastening . . . . . . . . . . . . . . . . . . . . . . . . . . . . . . . . 115
Height adjustment . . . . . . . . . . . . . . . . . . . . . . . . 115
Safety information . . . . . . . . . . . . . . . . . . . . . . . . 114
taking off . . . . . . . . . . . . . . . . . . . . . . . . . . . . . . . . 116
Warning light . . . . . . . . . . . . . . . . . . . . . . . . . . . . . 33
Seats . . . . . . . . . . . . . . . . . . . . . . . . . . . . . . . . . . . . . . . . . 57 Heating . . . . . . . . . . . . . . . . . . . . . . . . . . . . . . . . . . . 59
Selector lever . . . . . . . . . . . . . . . . . . . . . . . . . . . . . . . . . 95
Selector lever positions . . . . . . . . . . . . . . . . . . . . . . . . 95
Selector lever-emergency unlocking . . . . . . . . . . . . 98
Service Display . . . . . . . . . . . . . . . . . . . . . . . . . . . . . . . 17
Service Interval Display . . . . . . . . . . . . . . . . . . . . . . . . 17 Setting temperature
Air conditioning system . . . . . . . . . . . . . . . . . . . . 82
Heating . . . . . . . . . . . . . . . . . . . . . . . . . . . . . . . . . . . 79
Setting the clock . . . . . . . . . . . . . . . . . . . . . . . . . . . . . . 18
Shifting . . . . . . . . . . . . . . . . . . . . . . . . . . . . . . . . . . . . . . . 90
Side airbag . . . . . . . . . . . . . . . . . . . . . . . . . . . . . . . . . . 121
Side lights . . . . . . . . . . . . . . . . . . . . . . . . . . . . . . . . . . . . 46
Snow chains . . . . . . . . . . . . . . . . . . . . . . . . . . . . . . . . . 177
Spare wheel . . . . . . . . . . . . . . . . . . . . . . . . . . . . . . . . . 182
Speedometer . . . . . . . . . . . . . . . . . . . . . . . . . . . . . . . . . 16
Stability programme (ESP) . . . . . . . . . . . . . . . . . . . . 133
Starting the engine . . . . . . . . . . . . . . . . . . . . . . . . . . . . 88 Diesel engines . . . . . . . . . . . . . . . . . . . . . . . . . . . . . 89
Petrol engines . . . . . . . . . . . . . . . . . . . . . . . . . . . . . 89
Static separation net . . . . . . . . . . . . . . . . . . . . . . . . . . . 65
Steering force assistance . . . . . . . . . . . . . . . . . . . . . . 137
Storage compartment Lighting . . . . . . . . . . . . . . . . . . . . . . . . . . . . . . . . . . . 51
Storage compartments . . . . . . . . . . . . . . . . . . . . . . . . 73
Storage facilities . . . . . . . . . . . . . . . . . . . . . . . . . . . . . . 73
Sun visors . . . . . . . . . . . . . . . . . . . . . . . . . . . . . . . . . . . . 52
Switching lights on and off . . . . . . . . . . . . . . . . . . . . . 46
Switching off the engine . . . . . . . . . . . . . . . . . . . . . . . 89
TTaking care of your vehicle . . . . . . . . . . . . . . . . . . . . 151
TCS . . . . . . . . . . . . . . . . . . . . . . . . . . . . . . . . . . . . . . . . . 134 Warning light . . . . . . . . . . . . . . . . . . . . . . . . . . . . . . 30
Telephone . . . . . . . . . . . . . . . . . . . . . . . . . . . . . . . . . . . 101
Temperature outside . . . . . . . . . . . . . . . . . . . . . . . . . . . . . . . . . . . 20 the first 1 500 kilometres . . . . . . . . . . . . . . . . . . . . . 141
The roof luggage rack system . . . . . . . . . . . . . . . . . . . 70
Tiptronic . . . . . . . . . . . . . . . . . . . . . . . . . . . . . . . . . . . . . 94
Tool . . . . . . . . . . . . . . . . . . . . . . . . . . . . . . . . . . . . . . . . 181
Tourist light . . . . . . . . . . . . . . . . . . . . . . . . . . . . . . . . . . . 47
Towing a trailer . . . . . . . . . . . . . . . . . . . . . . . . . . . . . 148
Towing eye
front . . . . . . . . . . . . . . . . . . . . . . . . . . . . . . . . . . . . 189
rear . . . . . . . . . . . . . . . . . . . . . . . . . . . . . . . . . . . . . 189
Towing protection monitoring . . . . . . . . . . . . . . . . . . 42
towing vehicle . . . . . . . . . . . . . . . . . . . . . . . . . . . . . . 188
Tow-starting . . . . . . . . . . . . . . . . . . . . . . . . . . . . . . . . 188
Tow-starting and towing vehicle Automatic gearbox . . . . . . . . . . . . . . . . . . . . . . . . . 99
Traction control system (TCS) . . . . . . . . . . . . . . . . 134 Warning light . . . . . . . . . . . . . . . . . . . . . . . . . . . . . . 30
Trailer . . . . . . . . . . . . . . . . . . . . . . . . . . . . . . . . . . . . . . 148 General Maintenance . . . . . . . . . . . . . . . . . . . . 148
Transporting children . . . . . . . . . . . . . . . . . . . . . . . . 126
Tread depth . . . . . . . . . . . . . . . . . . . . . . . . . . . . . . . . 174
Turn signal light . . . . . . . . . . . . . . . . . . . . . . . . . . . . . 198
Turn signal lights . . . . . . . . . . . . . . . . . . . . . . . . . . . . . . 50 Warning light . . . . . . . . . . . . . . . . . . . . . . . . . . . . . . 26
Two-way radio systems . . . . . . . . . . . . . . . . . . . . . . 101
Tyre . . . . . . . . . . . . . . . . . . . . . . . . . . . . . . . . . . . . . . . . 173
Tyre inflation pressure Warning light . . . . . . . . . . . . . . . . . . . . . . . . . . . . . . 30
Tyre pressure monitoring system . . . . . . . . . . . . . 138
Tyre repair kit . . . . . . . . . . . . . . . . . . . . . . . . . . . . . . . 182
Tyres Winter tyres . . . . . . . . . . . . . . . . . . . . . . . . . . . . . 177
s16g.4.book Page 225 Wednesda y, February 10, 2010 3:53 PM