service SKODA ROOMSTER 2011 1.G User Guide
[x] Cancel search | Manufacturer: SKODA, Model Year: 2011, Model line: ROOMSTER, Model: SKODA ROOMSTER 2011 1.GPages: 212, PDF Size: 3.3 MB
Page 36 of 212
Remote control
Description You can use the remote control key:
●
to unlock and lock the vehicle;
● unlocking boot lid;
● electrically open and close the windows.
The transmitter with the battery is housed in the handle of the remote control
key. The receiver is located in the interior of the car. The operating range of the
remote control key is approx. 10 m. But this range can be reduced if the batteries
are weak.
The key has a fold-open key bit which can be used for unlocking and locking the
car manually and also for starting the engine.
If a lost key is replaced or if the receiver unit has been repaired or a new unit in-
stalled, it is then necessary for an authorised
ŠKODA Service Partner to initialise
the system. Only after this is it possible to again use the remote control. Note
● The remote control is automatically deactivated when the ignition is switched
on.
● The operation of the remote control may temporarily be affected by interfer-
ence from transmitters close to the car and which operate in the same frequency
range (e.g. mobile phone, TV transmitter).
● The battery must be replaced if the central locking or anti-theft alarm system
does react to the remote control at less than 3
metres away ⇒ page 28.
● If the driver door is opened, the vehicle cannot be locked using the remote
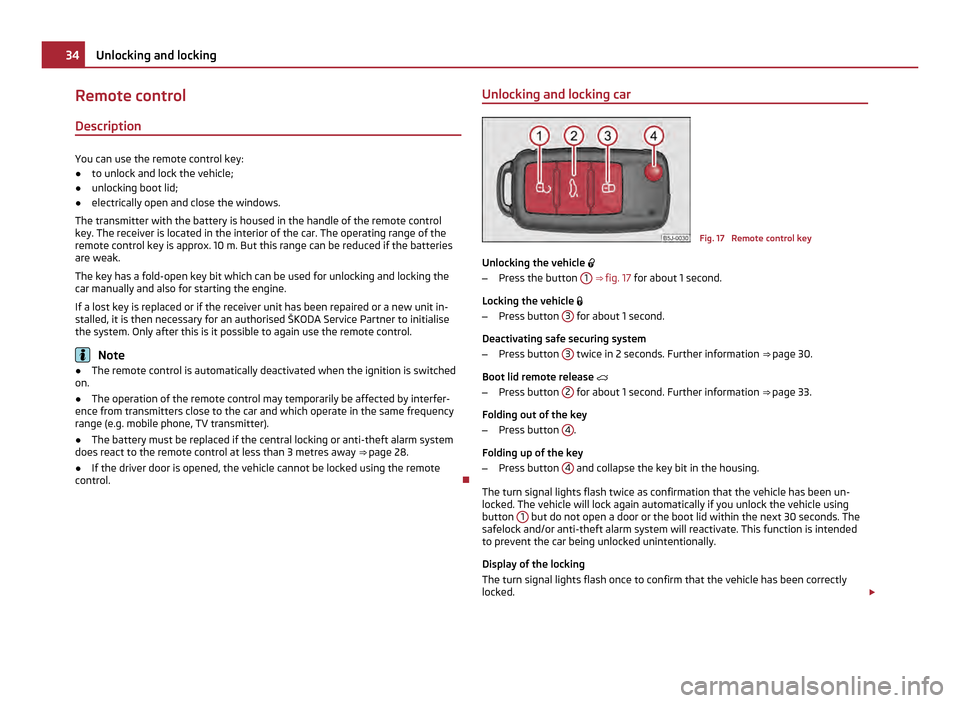
control. Unlocking and locking car Fig. 17 Remote control key
Unlocking the vehicle
– Press the button 1
⇒ fig. 17 for about 1 second.
Locking the vehicle
– Press button 3 for about 1 second.
Deactivating safe securing system
– Press button 3 twice in 2 seconds. Further information
⇒
page 30.
Boot lid remote release
– Press button 2 for about 1 second. Further information
⇒
page 33.
Folding out of the key
– Press button 4 .
Folding up of the key
– Press button 4 and collapse the key bit in the housing.
The turn signal lights flash twice as confirmation that the vehicle has been un-
locked. The vehicle will lock again automatically if you unlock the vehicle using
button 1 but do not open a door or the boot lid within the next 30 seconds. The
safelock and/or anti-theft alarm system will reactivate. This function is intended
to prevent the car being unlocked unintentionally.
Display of the locking
The turn signal lights flash once to confirm that the vehicle has been correctly
locked. £34
Unlocking and locking
Page 96 of 212
Mobile phones and two-way radio systems
The installation of a mobile phone and two-way radio system in a vehicle should
be carried out by a specialist garage.
ŠKODA
permits the operation of mobile phones and two-way radio systems with a
professionally installed external aerial and a maximum transmission power of up
to 10 watts.
It is essential that you inform a specialist garage about the possibilities to assem-
ble and operate mobile phones and two-way radio sets which have a power out-
put of more than 10 W. The garage will inform you which technical possibilities ex-
ist for retrofitting mobile phones.
When using a mobile phone inside the vehicle, which is not inserted into the
phone adapter, and thus has no connection to the external aerial, the electromag-
netic radiation can exceed the current limit value. If a suitable adapter is available
for your mobile phone, use your mobile phone exclusively in the adapter so that
the radiation in the vehicle drops to a minimum. This also improves the quality of
the connection.
Operation of mobile phones or two-way radio systems may interfere with func-
tioning of the electronic systems of your vehicle.
The reasons for this may be:
● no external aerial,
● external aerial incorrectly installed,
● transmission power greater than 10 watts. WARNING
● If a mobile phone or a two-way radio system is operated in the vehicle
without using an external aerial or an external aerial which has been incor-
rectly installed, this can increase the strength of the electromagnetic field in
the interior of the vehicle.
● Please concentrate fully at all times on your driving!
● You must not install two-way radio systems, mobile phones or mounts on
the covers of the airbags or within the immediate deployment range of air-
bags. This might result in injuries to the occupants in the event of an accident.
● Never leave a mobile phone on a seat, on the dash panel or in another
area, from which it can be thrown during a sudden braking manoeuvre, an ac-
cident or a collision. In this case, the occupants of the vehicle might be injured. Note
Observe the country-specific regulations for the use of mobile phones in vehicles.
Universal telephone preinstallation GSM II Introduction The universal telephone preinstallation GSM II is a built-in “hands-free system”, it
provides a voice operated convenience mode via the multifunction steering wheel or the radio navigation system.
All communication between a telephone and the hands-free system of your vehi-
cle can only be established with the help of the Bluetooth ®
technology. The
adapter serves only for charging the telephone and for transmitting the signal to
the external aerial of the vehicle.
To ensure an optimum signal transmission, always leave the telephone with the
adapter in the telephone mount.
Furthermore the volume can be changed individually during the call at any time
with the button for setting the radio or radio navigation system or with the but-
tons on the multifunction steering wheel. WARNING
Pay attention primarily to the traffic situation! As the driver you are fully re-
sponsible for road safety. Use the telephone system only to such an extent
that you are in full control of your vehicle at any time. Note
● Please refer to the following guidelines ⇒ page 94, Mobile phones and two-
way radio systems.
● Should you have any questions, please contact an authorised ŠKODA Service
Partner.
Phone Phonebook A phone phonebook is part of the mobile phone preinstallation with voice control.
In the phone phonebook there are 2
500 free memory locations available. Each
contact can contain up to 4 telephone numbers. This phone phonebook can be
used in line with the mobile telephone. £94
Communication
Page 98 of 212
Note
● Not valid for all mobile phones which enable a communication via Bluetooth ®
.
You can ask at an authorised ŠKODA Service Partner if your telephone is compati-
ble with the universal telephone preinstallation GSM II.
● If a suitable adapter is available for your mobile phone, use your mobile phone
exclusively in the adapter so that the radiation in the vehicle drops to a minimum.
● Inserting the mobile phone into the adapter ensures an optimal sending and
receiving power and offers at the same time the advantage of the battery charg-
ing.
● The range of the Bluetooth ®
connection to the hands-free system is restricted
to the vehicle interior. The range is dependent on local factors, e.g. obstacles be-
tween the devices and mutual interferences with other devices. If your mobile
phone is e.g. in a jacket pocket, this can lead to difficulties when establishing the
Bluetooth ®
connection with the hands-free system or the data transfer.
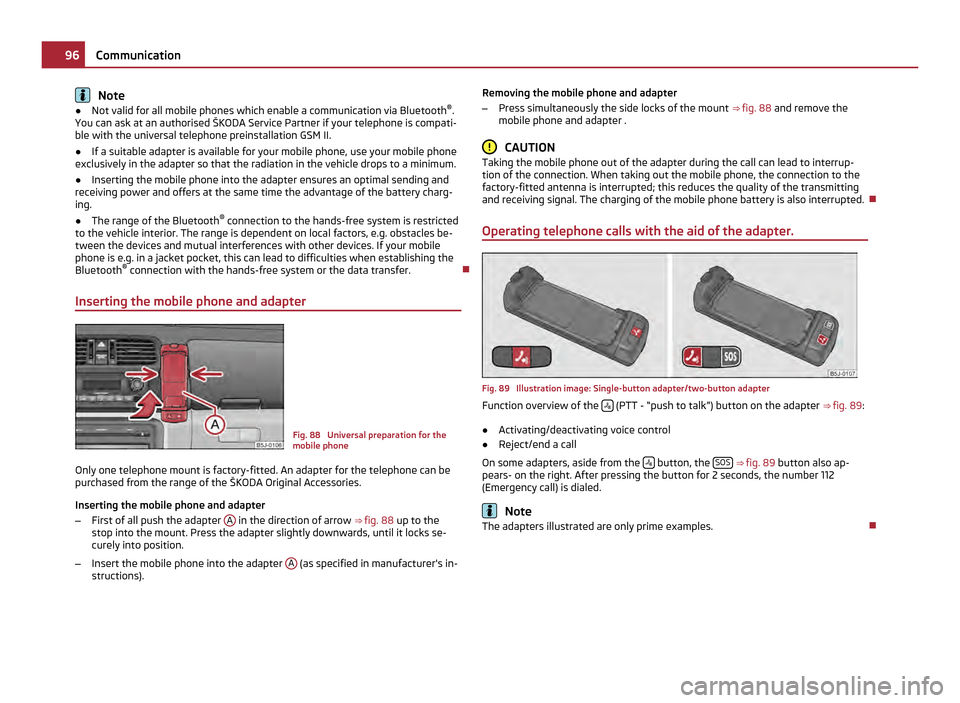
Inserting the mobile phone and adapter Fig. 88 Universal preparation for the
mobile phone
Only one telephone mount is factory-fitted. An adapter for the telephone can be
purchased from the range of the
ŠKODA Original Accessories.
Inserting the mobile phone and adapter
– First of all push the adapter A in the direction of arrow
⇒ fig. 88 up to the
stop into the mount. Press the adapter slightly downwards, until it locks se-
curely into position.
– Insert the mobile phone into the adapter A (as specified in manufacturer's in-
structions). Removing the mobile phone and adapter
–
Press simultaneously the side locks of the mount ⇒ fig. 88 and remove the
mobile phone and adapter . CAUTION
Taking the mobile phone out of the adapter during the call can lead to interrup-
tion of the connection. When taking out the mobile phone, the connection to the
factory-fitted antenna is interrupted; this reduces the quality of the transmitting
and receiving signal. The charging of the mobile phone battery is also interrupted.
Operating telephone calls with the aid of the adapter. Fig. 89 Illustration image: Single-button adapter/two-button adapter
Function overview of the
(PTT - “push to talk”) button on the adapter
⇒
fig. 89 :
● Activating/deactivating voice control
● Reject/end a call
On some adapters, aside from the button, the
SOS
⇒ fig. 89 button also ap-
pears- on the right. After pressing the button for 2 seconds, the number 112
(Emergency call) is dialed. Note
The adapters illustrated are only prime examples. 96
Communication
Page 112 of 212
Airbag system
Description of the airbag system General information on the airbag system The front airbag system is complementary to the three-point seat belts and offers
additional protection for the head and chest area of the driver and passenger in
the event of a frontal collision.
In the event of a side collision, the side airbags reduce the risk of injury to the oc-
cupants to the part of their body facing the side of the accident.
The airbag system is only functional after the ignition has been switched on.
The operational readiness of the airbag system is monitored electronically. The
airbag warning light comes on for a few seconds each time the ignition is switch-
ed on.
The airbag system (according to vehicle equipment) consists of:
● an electronic control unit;
● the front airbags for the driver and front passenger ⇒ page 111;
● the side airbags ⇒ page 113;
● head airbags ⇒ page 114;
● an airbag indicator light in the instrument cluster ⇒ page 26;
● a front passenger airbag switch ⇒ page 117;
● an indicator light for a switched off front seat passenger airbag in the middle
of the dash panel ⇒
page 117.
A fault in the airbag system exists if:
● the airbag indicator light does not light up when the ignition is switched on;
● the airbag indicator light does not go out after about 3 seconds after the igni-
tion is switched on;
● the airbag indicator light goes out and comes on again after the ignition is
switched on;
● the airbag indicator light comes on or flickers when driving;
● the airbag indicator light showing a switched-off front passenger airbag in the
middle of the dash panel flashes. WARNING
● To enable the occupants of a car to be protected with the greatest possi-
ble effect when the airbag is deployed, the front seats must be ⇒
page 102,
Correct seated position correctly adjusted to match the body size of the occu-
pant.
● If you do not fasten the seat belts when driving, lean too far forward or
adopt an incorrect seated position, you are exposing yourself to increased risk
of injury in the event of an accident.
● Have the airbag system checked immediately by a specialist garage if a
fault exists. Otherwise, there is a risk of the airbag not being activated in the
event of an accident.
● No modifications of any kind may be made to parts of the airbag system.
● It is prohibited to manipulate individual parts of the airbag system as this
might result in the airbag being deployed.
● The protective function of the airbag system is sufficient for only one acci-
dent. The airbag system must then be replaced if the airbag has been de-
ployed.
● The airbag system needs no maintenance during its working life.
● If you sell your car, please hand over the complete vehicle documentation
to the new owner. Please note that the documents relating to the possibility
of deactivating the front passenger airbag are also part of the vehicle docu-
ments!
● If the vehicle or individual parts of the airbag system are scrapped, it is es-
sential to observe the relevant safety precautions. The authorised
ŠKODA
Service Partners are familiar with these regulations.
● When disposing of vehicle or parts of the airbag system, it is important to
comply with the national legal requirements.
When are the airbags deployed? The airbag system is designed in such a way that the driver and front passenger
airbag are deployed in the event of a violent frontal collision
.
In the case of a violent side crash , the side airbag in the front seat and the head
airbag on the side on which the collision occurs are deployed. £110
Airbag system
Page 118 of 212
WARNING (Continued)
● There must not be any other persons (e.g. children) or animals between
the car occupant and the deployment area of the head airbag. In addition,
none of the occupants should lean their head out of the window when driving,
or extend their arms and hands out of the window.
● The sun visors must not be swivelled to the side windows into the deploy-
ment area of the head airbags if any objects, such as ball-point pens etc. are
attached to them. This might result in injuries to the occupants if the head air-
bag is deployed.
● Installing impermissible accessories in the area of the head airbags may
considerably impair the protection offered by the head airbag in the event of it
being deployed. When the deployed head airbag is inflated, parts of the acces-
sories fitted may in certain circumstances be thrown into the interior of the
car and cause injuries to the occupants ⇒
page 166.
● Any work on the head airbag system including installing and removing sys-
tem components because of other repair work (e.g. removing headliner) must
only be carried out by a specialist garage.
Deactivating airbags Deactivating airbags If any airbags have been deactivated, switch them on again as
soon as possible so that they are able to again provide their proper
protection.
There is the technical means installed within your vehicle to switch off the front,
side or head airbag (take out of commission).
This is why you should have the deactivation of the airbags carried out by a spe-
cialist garage.
On vehicles equipped with the switch for deactivation of the airbags, you can de-
activate the front passenger front airbag by means of this switch ⇒ page 117. Deactivation of airbags is envisaged only for particular instances, such as if:
●
You must in exceptional cases use a child seat on the front passenger seat
where the child is seated with its back to the direction of travel (in some countries
this must be in the direction of travel due to other legal regulations applying)
⇒ page 118, Important safety information regarding the use of child safety seats
;
● you are not able to maintain the distance of at least 25 cm between middle of
steering wheel and chest, despite the driver seat being correctly adjusted;
● special attachments are required in the area of the steering wheel because of
a physical disability;
● you have installed other seats (e.g. orthopaedic seats without side airbags).
Monitoring the airbag system
The functionality of the airbag system is also monitored electronically when one
airbag has been switched off.
If the airbag was switched off using diagnostic equipment:
● The airbag indicator light lights up for 3 seconds each time the ignition is
switched on and then flashes after that for about 12 seconds.
If the airbag was switched off using the airbag switch on the side of the dash
panel:
● the airbag indicator light in the instrument cluster comes on for about 3 sec-
onds each time the ignition is switched on;
● switching off the airbag is indicated by the lighting up of the indicator light in
the display
in the middle of the dash panel ⇒ fig. 104 - right. Note
Your authorised ŠKODA Service Partner will be able to advise you whether nation-
al legislation in your country allows airbags in your vehicle to be deactivated, and
which ones. 116
Airbag system
Page 129 of 212
During an intervention of the system, the TCS warning light flashes
in the in-
strument cluster ⇒ page 25.
Switching off
You can switch the TCS off and on again as you wish by pressing the button
⇒ fig. 113. The TCS warning light lights up in the instrument cluster when the TCS
is switched off ⇒
page 24.
The TCS should normally always be switched on. It may be good practice in certain
exceptional cases, such as when you wish to have wheel slip, to switch off the
system.
Examples:
● when driving with snow chains;
● when driving in deep snow or on a loose surface;
● when it is necessary to rock a car free when it has become stuck.
then you should switch on the TCS again. WARNING
You should always adjust your style of driving to the conditions of the road
surface and the traffic situation. The increased safety offered must not tempt
you to take greater risks than otherwise - risk of an accident! Note
● All four wheels must be fitted with the same tyres in order to achieve prob-
lem-free operation of the TCS. Differing rolling circumferences of the tyres can
lead to an undesirable reduction in the engine output.
● Changes to vehicle (e.g. on engine, on the brakes, on chassis or another combi-
nation of tyres and wheels) can influence the function of the TCS ⇒
page 166, Ac-
cessories, changes and replacement of parts. Brakes What has a negative effect on braking efficiency?
Wear-and-tear
Wear-and-tear to the brake pads is greatly dependent on the operating conditions
of the vehicle and your style of driving. Particularly if you drive a great deal in
towns and over short distances or if you adopt a sporty style of driving, it may be
necessary to have the thickness of the brake pads inspected at a specialist garage
between the service inspections.
Wet roads or road salt
There may be a certain delay before the brakes take full effect under certain con-
ditions such as when driving through water, during heavy rain showers or after
the vehicle has been washed in an automatic vehicle wash, since the brake discs
and brake pads may be moist or even have a coating of ice on them in winter. You
should dry the brakes as soon as possible by applying and releasing the brakes
several times.
There also may be a certain delay before the full braking efficiency is available
when driving on roads which have been treated with road salt if you have not
used the brakes for some considerable time beforehand. The layer of salt on the
brake discs and brake pads must first be rubbed off when you apply the brakes.
Corrosion
Corrosion on the brake discs and dirt on the bake pads occur if the vehicle has
been parked for a long period and if you do not make much use of the braking sys-
tem.
We recommend cleaning the brake discs by firmly applying the brakes at a fairly
high speed if you do not make much use of the braking system or if surface corro-
sion is present ⇒ .
Faults in the brake surface
If you notice that the braking distance has suddenly become longer and that the
brake pedal can be depressed further, it is possible that a brake circuit of the dual-
circuit brake system has failed. Drive, in such cases, to the nearest specialist ga-
rage without delay in order to have the problem rectified. Drive at a reduced
speed while on your way to the dealer and adapt your style of driving to the high-
er brake pedal pressure required. £ 127
Intelligent Technology Using the system Safety Driving Tips General Maintenance Breakdown assis-
tance Praktik Technical data
Page 133 of 212
WARNING
● When the warning light lights up, immediately reduce the speed and
avoid sudden steering and brake manoeuvres. Please stop the vehicle without
delay at the nearest possible stop and inspect the tyres and their inflation
pressures.
● The driver is responsible for the correct tyre inflation pressures. For this
reason, the tyre inflation pressures must be checked regularly.
● Under certain circumstances (e.g. sporty style of driving, wintry or unpaved
roads) the warning light can be delayed or does not light up at all.
● The tyre pressure monitoring system does not take away the responsibility
from the driver for the correct tyre inflation pressure. Note
The tyre pressure monitoring system:
● does not replace the regular tyre inflation pressure control, because the sys-
tem cannot detect an even pressure loss,
● cannot warn in case of very rapid tyre inflation pressure loss, e.g. in case of
sudden tyre damage. In this case carefully bring the vehicle to a standstill without
sudden steering movements and without sharp braking.
● In order to ensure a proper functioning of the tyre inflation pressure-control
system, it is necessary to carry out the basic setting again every 10 000 km or 1x a
year.
Diesel particle filter (diesel engine) In the diesel particle filter the resulting soot particles are collected
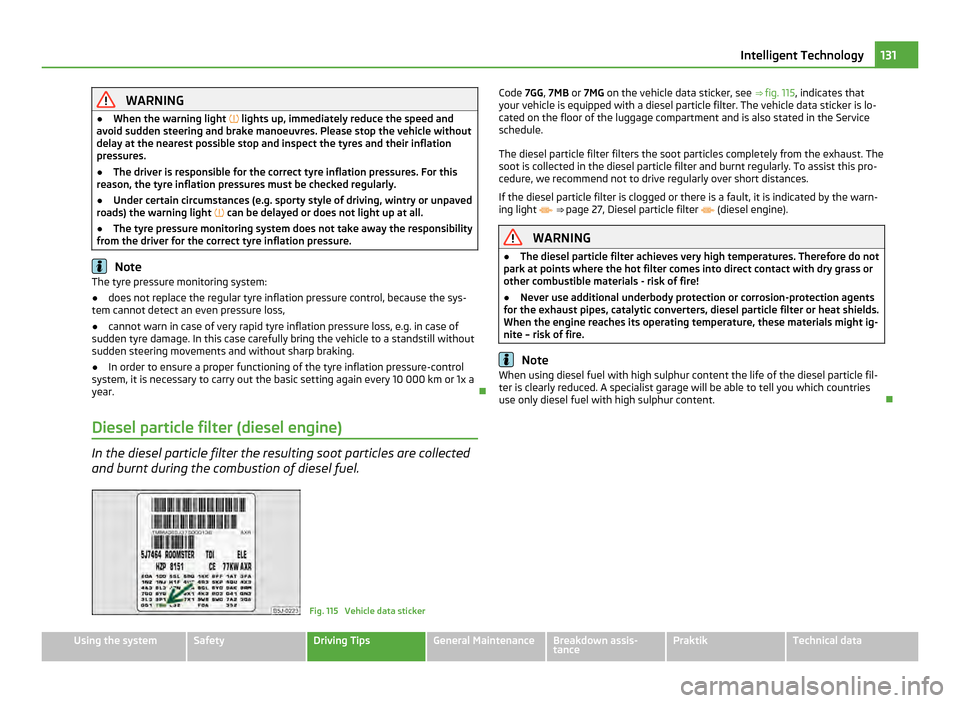
and burnt during the combustion of diesel fuel. Fig. 115 Vehicle data stickerCode 7GG
, 7MB or 7MG on the vehicle data sticker, see ⇒ fig. 115, indicates that
your vehicle is equipped with a diesel particle filter. The vehicle data sticker is lo-
cated on the floor of the luggage compartment and is also stated in the Service
schedule.
The diesel particle filter filters the soot particles completely from the exhaust. The
soot is collected in the diesel particle filter and burnt regularly. To assist this pro-
cedure, we recommend not to drive regularly over short distances.
If the diesel particle filter is clogged or there is a fault, it is indicated by the warn-
ing light ⇒
page 27, Diesel particle filter (diesel engine). WARNING
● The diesel particle filter achieves very high temperatures. Therefore do not
park at points where the hot filter comes into direct contact with dry grass or
other combustible materials - risk of fire!
● Never use additional underbody protection or corrosion-protection agents
for the exhaust pipes, catalytic converters, diesel particle filter or heat shields.
When the engine reaches its operating temperature, these materials might ig-
nite – risk of fire. Note
When using diesel fuel with high sulphur content the life of the diesel particle fil-
ter is clearly reduced. A specialist garage will be able to tell you which countries
use only diesel fuel with high sulphur content. 131
Intelligent Technology Using the system Safety Driving Tips General Maintenance Breakdown assis-
tance Praktik Technical data
Page 137 of 212
Regular servicing
A poorly tuned engine uses an unnecessarily high amount of fuel.
Having your vehicle serviced regularly at a specialist garage enables you to satisfy
one of the requirements for economical motoring even before you set off on your
journey. Keeping your vehicle properly serviced not only has a positive effect on
the safety of your vehicle and maintaining its value, but also saves on fuel.
A poorly tuned engine can result in a fuel consumption which is 10 % higher than
normal.
The foreseen maintenance work should be undertaken exactly according to the
Service schedule by a specialist garage.
Also check the oil level after refuelling. Oil consumption is dependent to a consid-
erable extent on the load and speed of the engine. Oil consumption could be as
high as 0.5 litres/1 000 km depending on your style of driving.
It is quite normal that a new engine has a higher oil consumption at first, and rea-
ches its lowest level only after a certain running in time. It is therefore not possi-
ble to correctly assess the oil consumption of a new vehicle until after you have
driven about 5 000 km. For the sake of the environment
● You can achieve additional improvements in your fuel economy by using high-
lubricity oils.
● Check the ground below your car at regular intervals to detect any leakages in
good time. Please have your vehicle inspected by a specialist garage if you find
any stains caused by oil or other fluids on the floor. Avoid driving short distances Short distances result in an above-average high fuel consumption.
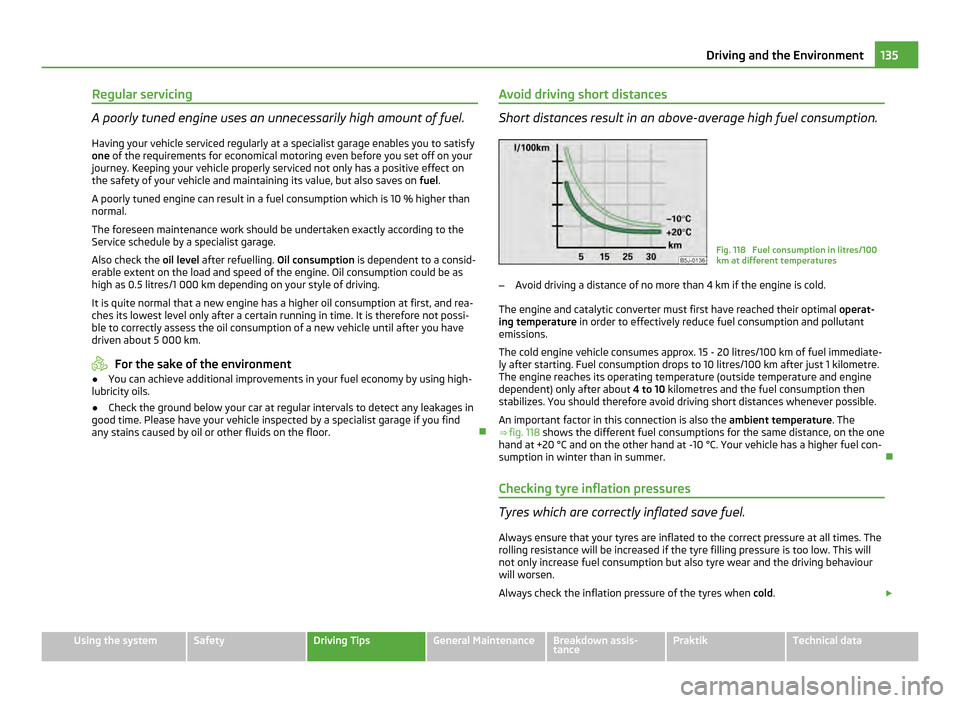
Fig. 118 Fuel consumption in litres/100
km at different temperatures
– Avoid driving a distance of no more than 4 km if the engine is cold.
The engine and catalytic converter must first have reached their optimal operat-
ing temperature in order to effectively reduce fuel consumption and pollutant
emissions.
The cold engine vehicle consumes approx. 15 - 20 litres/100 km of fuel immediate-
ly after starting. Fuel consumption drops to 10 litres/100 km after just 1 kilometre.
The engine reaches its operating temperature (outside temperature and engine
dependent) only after about 4 to 10 kilometres and the fuel consumption then
stabilizes. You should therefore avoid driving short distances whenever possible.
An important factor in this connection is also the ambient temperature. The
⇒ fig. 118 shows the different fuel consumptions for the same distance, on the one
hand at +20 °C and on the other hand at -10
°C. Your vehicle has a higher fuel con-
sumption in winter than in summer.
Checking tyre inflation pressures Tyres which are correctly inflated save fuel.
Always ensure that your tyres are inflated to the correct pressure at all times. The
rolling resistance will be increased if the tyre filling pressure is too low. This will
not only increase fuel consumption but also tyre wear and the driving behaviour
will worsen.
Always check the inflation pressure of the tyres when cold. £ 135
Driving and the Environment Using the system Safety Driving Tips General Maintenance Breakdown assis-
tance Praktik Technical data
Page 139 of 212
Trade-in and recycling of old cars
ŠKODA meets the requirements of the brand and its products regarding environ-
ment and resource protection. All new
ŠKODA vehicles can be utilized up to 95 %
and always 1)
be returned. In a lot of countries sufficient trade-in networks have
been created, where you can trade-in your vehicle. After you trade-in your vehicle,
you will receive a confirmation stating the recycling in accordance with environ-
mental regulations.
Vehicles with special built-on types
Technical documents regarding changes carried out on the vehicle must be kept
by the vehicle user, in order to hand over later to the old car user. This ensures the
recycling in accordance with environmental regulations. Note
Detailed information about the trade-in and recycling of old cars is available from
a ŠKODA Service Partner.
Motoring abroad General Other circumstances may exist abroad.
It is also possible, in certain countries, that the
ŠKODA Service Partner network is
limited or has not been established yet. This is the reason why obtaining certain
spare parts may be somewhat complicated and specialist garage personnel may
only be able to make limited repairs. ŠKODA in the Czech Republic and its foreign
importers are happy to provide information about technical aspects of the vehicle,
required maintenance work and possibilities for getting repairs done.
Unleaded petrol A vehicle fitted with a petrol engine must always be refuelled with unleaded pet-
rol
⇒ page 132. The automobile associations can provide you with information re-
garding the locations of filling stations which offer unleaded petrol. Headlights The low beam of your headlights is set asymmetrically. It illuminates the side of
the road on which you are driving to a greater extent. If you drive abroad on the
other side of the road, you will dazzle oncoming traffic.
Halogen projector headlights
The adaptation of the headlights (valid for vehicles which are designed for driving
on the left and on the right) must be performed by switching over a bezel by a
specialist garage.
Halogen projector headlights with cornering light function
Headlight beam setting ⇒ page 40
.
Halogen headlight
When using Halogen headlights, it is necessary to stick a sticker over a certain
part of the headlights in order to prevent the dazzling of oncoming traffic.
You can purchase headlight stickers from the range of the ŠKODA Original Acces-
sories. Note
You can obtain further information regarding masking over or converting the
headlights from your specialist garage.
Avoiding damage to your vehicle When driving on poor roads and lanes or when driving over kerb stones, steep
ramps, etc., you must pay particular attention to ensuring that any low-slung parts
of the vehicle, such as spoiler and exhaust, do not touch the ground and get dam-
aged.
This particularly applies to models with a lowered suspension (sport suspension)
and also when your vehicle is fully laden. 1)
Subject to fulfilment of the national legal requirements. 137
Driving and the Environment Using the system Safety Driving Tips General Maintenance Breakdown assis-
tance Praktik Technical data
Page 141 of 212
Towing a trailer
Towing a trailer
Technical requirements Your vehicle is designed primarily for transporting persons and luggage. It can,
however, also be used for towing a trailer - provided certain technical equipment
is fitted.
If your vehicle has been
factory-fitted with a towing device or has a towing device
from
ŠKODA Original Accessories, the towing device satisfies all technical and le-
gal requirements.
Your vehicle is fitted with a 13-pin power socket for the electrical connection be-
tween the vehicle and trailer. If the trailer which you wish to tow has a 7-pin con-
nector , you can use a suitable adapter from ŠKODA Original Accessories.
This work must be carried out in accordance with the manufacturer's specifica-
tions if a towing device is retrofitted.
Authorised ŠKODA Service Partners can provide detailed information about retro-
fitting a towing device and for any necessary modifications to the cooling system. WARNING
We recommend that you have the towing device from ŠKODA Original Acces-
sories installed by an authorised
ŠKODA Service Partner. He is familiar with all
the relevant details relating to retrofitting such equipment. There is a risk of
an accident if the towing device is not properly fitted!
General Maintenance Trailer load
The permissible trailer load must on no account be exceeded.
You can negotiate appropriately steeper inclines and descents if you do not make
full use of the permissible trailer load.
The trailer loads specified only apply for
altitudes up to 1000 metres above mean
sea level. The fact that the engine power output drops with increasing height due
to a lowering of air pressure and thus the ability to climb, means that the towed
weight must be reduced by 10 % for every further increase of 1 000 metres in height above sea level. The towed weight is the weight of the (laden) vehicle and
the (laden) trailer together. One should take this into account before driving up to
higher altitudes.
The trailer and drawbar load information on the type plate of the towing device
are merely test data for the towing device The data relating to your vehicle,
which is often less than this test data, can be found in your vehicle registration
documents.
Distribution of the load
Distribute the load in the trailer in such a way that any heavy items are located as
close as possible to the axle. Secure the items to prevent them slipping.
Tyre pressure
Correct the tyre inflation pressure on your vehicle for that of
“fully laden”
⇒ page 161. The inflation pressure of the tyres fitted to the trailer adjust in ac-
cordance with the manufacturer's recommendation.
Exterior mirrors
You have to have additional exterior mirrors fitted if you are not able to see the
traffic behind the trailer with the standard rear-view mirrors. Both exterior mirrors
should be attached to folding arms. Adjust the mirrors so that they provide you
with an adequate field of view to the rear.
Headlights
Before starting off with a hitched trailer, also check the setting of the headlights.
Alter the setting as necessary with the aid of the headlight beam adjuster
⇒ page 42.
Detachable ball head
The ball head is detachable on vehicles with towing device and can be obtained
from ŠKODA Original Accessories. It is stowed together with separate fitting in-
structions in the spare wheel well in the luggage compartment of the vehicle. Note
● We recommend that you also have your vehicle inspected between service in-
tervals if you tow a trailer frequently.
● The handbrake on the towing vehicle must be put on when coupling and de-
coupling the trailer. 139
Towing a trailer Using the system Safety Driving Tips General Maintenance Breakdown assis-
tance Praktik Technical data