service SKODA ROOMSTER 2011 1.G Owner's Guide
[x] Cancel search | Manufacturer: SKODA, Model Year: 2011, Model line: ROOMSTER, Model: SKODA ROOMSTER 2011 1.GPages: 212, PDF Size: 3.3 MB
Page 166 of 212
WARNING
● Only use those tyres or wheel rims which have been approved for your
model of ŠKODA vehicle. Failure to observe this instruction will adversely af-
fect the road safety of your vehicle - risk of accident! Approval and licensing of
your vehicle on public roads may also become void as a result.
● You must on no account drive at a higher speed than is permissible for
your tyres - risk of an accident resulting from tyre damage and loss of control
over your vehicle.
● Tyres which are 6 years old or more should only be fitted in exceptional ca-
ses and when adopting an appropriately cautious style of driving.
● Never fit tyres which have already been used without having adequate
knowledge of their previous history. Tyres age even if they have not been
used at all or only very little. A spare tyre must only be used in exceptional ca-
ses and only then when adopting an appropriately cautious style of driving.
● Do not, where possible, replace individual tyres but at least replace them
on both wheels of a given axle at the same time. Always fit the tyres with the
deeper tread depth to the front wheels. For the sake of the environment
Old tyres must be disposed of in conformity with the appropriate regulations. Note
It is not normally possible to fit wheels from other models of cars for technical
reasons. This may also apply in certain circumstances to the wheels of the same
type of vehicle.
Wheel bolts Wheels and
wheel bolts are matched to each other in terms of design. Each time
you fit other wheels - e.g. light alloy wheels or wheels with winter tyres - you
must therefore also use the matching wheel bolts of the correct length and shape
of spherical cap. This is essential to ensure that the wheels are tightly fitted and
that the brake system operates properly.
If you retrofit wheel trims (or have this done), please also ensure that an ade-
quate flow of air remains assured for cooling the brake system.
Authorised
ŠKODA Service Partners are instructed in the technical possibilities
which exist regarding converting or retrofitting tyres, wheels and wheel trims. WARNING
● In case of incorrect treatment of the wheel bolts, the wheel can loosen
when the car is moving - risk of accident!
● The wheel bolts must be clean and must turn easily. However, they must
never be treated with grease or oil.
● If the wheel bolts are tightened to a too low tightening torque, the rim can
come loose when the car is moving - risk of accident! A tightening torque
which is too high can damage the bolts and threads and this can result in per-
manent deformation of the contact surfaces on the rim. CAUTION
The prescribed tightening torque of the wheel bolts for steel and light alloy
wheels is 120 Nm.
Winter tyres The handling of your vehicle will be significantly improved when driving on wintry
roads if you fit winter tyres. Summer tyres do not offer the same grip on ice, snow
and at temperatures below 7 °C because of their construction (width, rubber
blend, tread pattern). This applies in particular to vehicles which are equipped
with low-profile tyres
or high-speed tyres (code index H, V or W on wall of tyre).
Winter tyres must be mounted on all four wheels to obtain the best handling
characteristics.
You must only fit those types of winter tyre which are approved for your vehicle.
The permissible sizes of winter tyres are stated in your vehicle documents. Ap-
provals may differ because of national legislation.
Please remember that the tyres should be inflated to 20
kPa (0.2 bar) more than is
the case for summer tyres ⇒ page 161.
Winter tyres no longer offer the same winter performance once the tyre tread has
worn down to a depth of about 4 mm.
Ageing also causes winter tyres to lose most of their winter performance proper-
ties - even in cases where the remaining tread depth is still clearly more than 4
mm.
Speed restrictions apply to winter tyres as well as to summer tyres ⇒ page 163,
⇒ .
£164
Wheels and Tyres
Page 168 of 212
Accessories, changes and replacement of parts
General ŠKODA vehicles have been built according to the latest discoveries in safety engi-
neering. Thus one should not change the condition in which the vehicle was deliv-
ered from the manufacturer without some thought.
If you want to retrofit the vehicle with accessories, if a vehicle part is to be re-
placed with a new one, or when technical changes are to be made, the following
instructions must be observed:
● Advise should always be obtained from an authorised ŠKODA Service Partner
before buying any accessories or parts and before making any technical changes
⇒ .
● The guidelines and instructions issued by ŠKODA must be observed when
making technical changes.
Adhering to the prescribed procedures will prevent any kind of damage to the ve-
hicle, and its travelling and operating safety will be maintained. The vehicle also
complies with German road transport regulations (StVZO). More information is
available from an authorised
ŠKODA Service Partner who can also perform the
necessary work properly.
Interference on the electronic components and their software can lead to opera-
tional faults. This interference can also impair systems that are not directly affec-
ted because the electronic components are networked. In other words, the vehi-
cle's road-worthiness may be put at risk and increased wear on parts may arise.
Any damage caused by technical changes made without consent by ŠKODA is ex-
cluded from the warranty – see the warranty certificate. WARNING
● Work or modifications on your vehicle, which have been carried out unpro-
fessionally, can cause operational faults - risk of accident!
● We advise you, in your own interest, to only use ŠKODA Original Accesso-
ries and ŠKODA Original Parts which have been expressly approved for use on
your vehicle. Reliability, safety and suitability have been established for
ŠKODA Original Accessories and ŠKODA
Original Parts.
● Although we constantly monitor the market, we are not able to assess or
warrant the parts even though in some instances such parts may have a type
approval or may have been approved by a nationally recognised testing labo-
ratory. Note
● ŠKODA Original Accessories and
ŠKODA Original Parts can be bought from au-
thorised ŠKODA Service Partners who also professionally undertake the assembly
of parts which were purchased there.
● We recommend having all work undertaken by an authorised ŠKODA Service
Partner.
● All ŠKODA Original Accessories and Original Parts from the Original Accessories
catalogue, such as a towing device, child seats, etc. are authorised.
● We recommend that you also buy car stereos, aerials or other electrical acces-
sories from an authorised
ŠKODA Service Partner, who should also carry out the
installation. 166
Accessories, changes and replacement of parts
Page 169 of 212
Breakdown assistance
Breakdown assistance
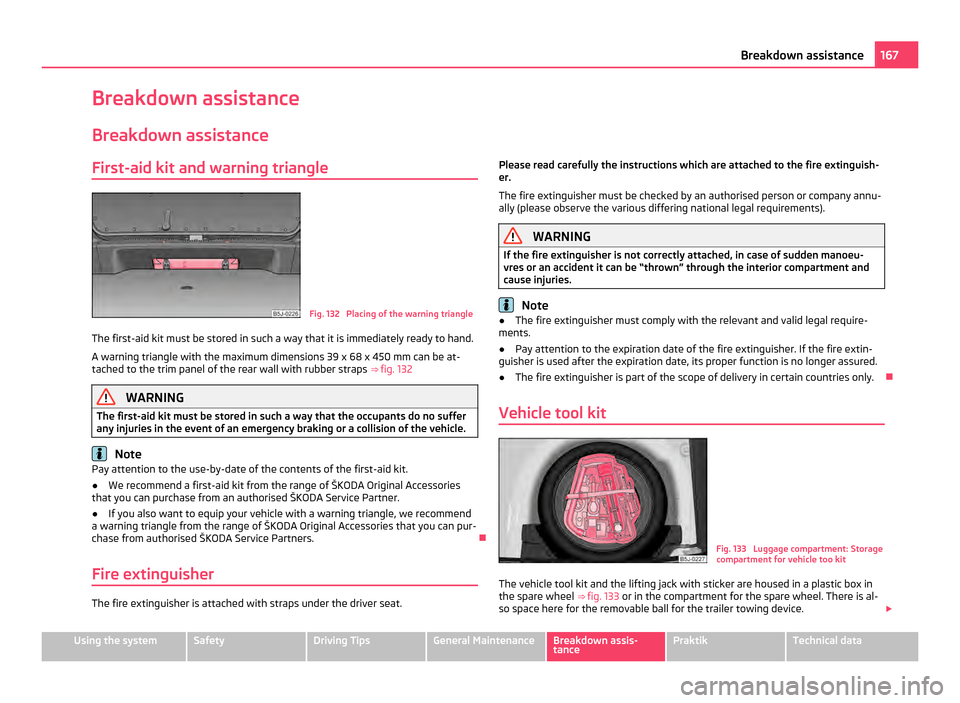
First-aid kit and warning triangle Fig. 132 Placing of the warning triangle
The first-aid kit must be stored in such a way that it is immediately ready to hand.
A warning triangle with the maximum dimensions 39 x 68 x 450 mm can be at-
tached to the trim panel of the rear wall with rubber straps ⇒ fig. 132 WARNING
The first-aid kit must be stored in such a way that the occupants do no suffer
any injuries in the event of an emergency braking or a collision of the vehicle. Note
Pay attention to the use-by-date of the contents of the first-aid kit.
● We recommend a first-aid kit from the range of ŠKODA Original Accessories
that you can purchase from an authorised
ŠKODA Service Partner.
● If you also want to equip your vehicle with a warning triangle, we recommend
a warning triangle from the range of
ŠKODA Original Accessories that you can pur-
chase from authorised ŠKODA Service Partners.
Fire extinguisher The fire extinguisher is attached with straps under the driver seat. Please read carefully the instructions which are attached to the fire extinguish-
er.
The fire extinguisher must be checked by an authorised person or company annu-
ally (please observe the various differing national legal requirements). WARNING
If the fire extinguisher is not correctly attached, in case of sudden manoeu-
vres or an accident it can be
“thrown” through the interior compartment and
cause injuries. Note
● The fire extinguisher must comply with the relevant and valid legal require-
ments.
● Pay attention to the expiration date of the fire extinguisher. If the fire extin-
guisher is used after the expiration date, its proper function is no longer assured.
● The fire extinguisher is part of the scope of delivery in certain countries only.
Vehicle tool kit Fig. 133 Luggage compartment: Storage
compartment for vehicle too kit
The vehicle tool kit and the lifting jack with sticker are housed in a plastic box in
the spare wheel ⇒ fig. 133 or in the compartment for the spare wheel. There is al-
so space here for the removable ball for the trailer towing device. £ 167
Breakdown assistance Using the system Safety Driving Tips General Maintenance Breakdown assis-
tance Praktik Technical data
Page 174 of 212
WARNING (Continued)
● Secure the base plate of the lifting jack with suitable means to prevent
possible moving. A soft and slippery ground under the base plate may move
the lifting jack, causing the vehicle to fall down. It is therefore always neces-
sary to place the lifting jack on a solid surface or use a wide and stable base.
Use a non-slip base (e.g. a rubber foot mat) if the
surface is smooth, such as
cobbled stones, a tiled floor, etc.
● Attach the lifting jack only at the attachment points provided for this pur-
pose.
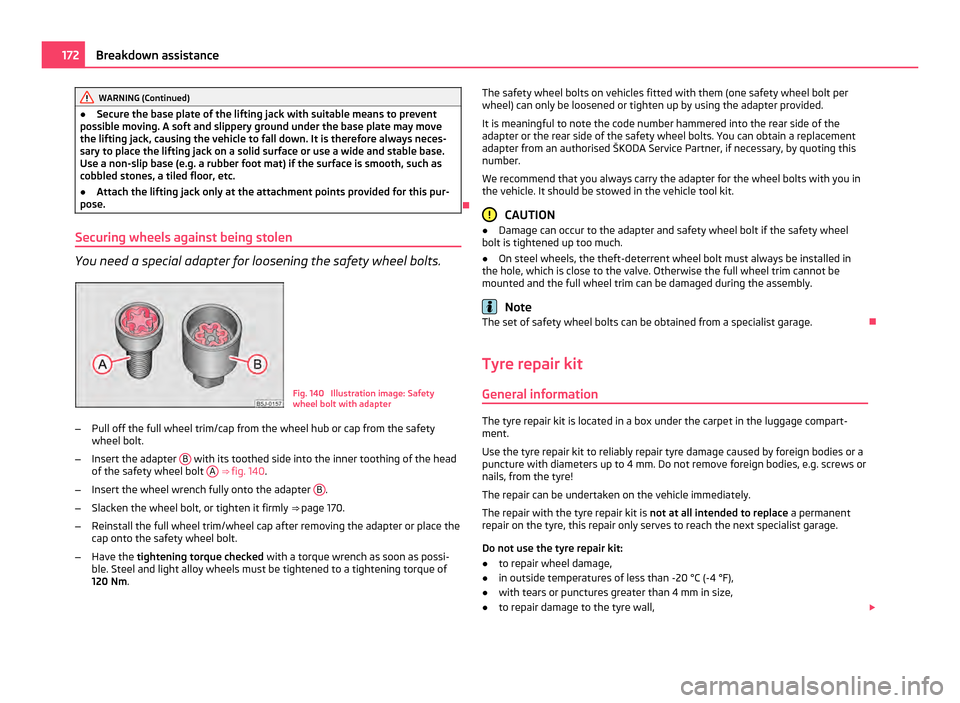
Securing wheels against being stolen You need a special adapter for loosening the safety wheel bolts.
Fig. 140 Illustration image: Safety
wheel bolt with adapter
– Pull off the full wheel trim/cap from the wheel hub or cap from the safety
wheel bolt.
– Insert the adapter B with its toothed side into the inner toothing of the head
of the safety wheel bolt A
⇒
fig. 140 .
– Insert the wheel wrench fully onto the adapter B .
– Slacken the wheel bolt, or tighten it firmly ⇒ page 170.
– Reinstall the full wheel trim/wheel cap after removing the adapter or place the
cap onto the safety wheel bolt.
– Have the tightening torque checked with a torque wrench as soon as possi-
ble. Steel and light alloy wheels must be tightened to a tightening torque of
120
Nm. The safety wheel bolts on vehicles fitted with them (one safety wheel bolt per
wheel) can only be loosened or tighten up by using the adapter provided.
It is meaningful to note the code number hammered into the rear side of the
adapter or the rear side of the safety wheel bolts. You can obtain a replacement
adapter from an authorised
ŠKODA Service Partner, if necessary, by quoting this
number.
We recommend that you always carry the adapter for the wheel bolts with you in
the vehicle. It should be stowed in the vehicle tool kit. CAUTION
● Damage can occur to the adapter and safety wheel bolt if the safety wheel
bolt is tightened up too much.
● On steel wheels, the theft-deterrent wheel bolt must always be installed in
the hole, which is close to the valve. Otherwise the full wheel trim cannot be
mounted and the full wheel trim can be damaged during the assembly. Note
The set of safety wheel bolts can be obtained from a specialist garage.
Tyre repair kit General information The tyre repair kit is located in a box under the carpet in the luggage compart-
ment.
Use the tyre repair kit to reliably repair tyre damage caused by foreign bodies or a
puncture with diameters up to 4 mm. Do not remove foreign bodies, e.g. screws or
nails, from the tyre!
The repair can be undertaken on the vehicle immediately.
The repair with the tyre repair kit is not at all intended to replace a permanent
repair on the tyre, this repair only serves to reach the next specialist garage.
Do not use the tyre repair kit:
● to repair wheel damage,
● in outside temperatures of less than -20 °C (-4 °F),
● with tears or punctures greater than 4 mm in size,
● to repair damage to the tyre wall, £172
Breakdown assistance
Page 179 of 212
Driver of the towed vehicle
–
Switch the ignition on so that the steering wheel is not blocked and you can
also operate the turn signal lights, the headlight flasher, the windshield wipers
and windshield washer system.
– Take the vehicle out of gear or move the selector lever into position N if your
vehicle is fitted with an automatic gearbox.
Note that the brake servo unit and power steering only operate if the engine is
running. You will require significantly greater physical force to depress the brake
pedal and to steer the vehicle if the engine is not running.
Ensure that the tow rope is always kept taught. CAUTION
● Do not tow start the engine - danger of damaging the engine. On vehicles with
a catalytic converter, unburnt fuel may get into the catalytic converter where it
may ignite. This in turn may damage or destroy the catalytic converter. You can
use the battery of another vehicle as a jump-start aid ⇒ page 175,
Jump-starting.
● If the gearbox of your vehicle no longer contains any oil because of a defect,
your vehicle must only be towed in with the driven wheels raised clear of the
ground, or on a special vehicle transporter or trailer.
● The vehicle must be transported on a special vehicle or trailer if it is not possi-
ble to tow in the vehicle in the way described or if the towing distance is greater
than 50
km.
● To protect both vehicles when tow-starting or towing, the tow rope should be
elastic. Thus one should only use plastic fibre rope or a rope made out of a similar-
ly elastic material.
● One should be constantly vigilant not to allow impermissibly high towing
forces or jerky loadings. There is always a risk of excessive stresses and damage
resulting at the points to which you attach the tow rope or tow bar when you at-
tempt to tow a vehicle which is not standing on a paved road.
● Attach the tow rope or the tow bar only to the towing eyes provided for this
purpose ⇒ page 177
, Front towing eye and ⇒ page 178, Rear towing eye. Note
● We recommend a tow rope from the range of
ŠKODA Original Accessories that
you can purchase from an authorised ŠKODA Service Partner.
● Towing another vehicle requires a certain amount of practice. Both drivers
should be familiar with the particular points about towing a vehicle. Unskilled driv-
ers should not attempt to tow in another vehicle or to be towed in. ●
When towing, respect the national legal provisions, especially those which re-
late to the identification of the towing vehicle and the vehicle being towed.
● The tow rope must not be twisted as it may in certain circumstances result in
the front towing eye being unscrewed out of your vehicle.
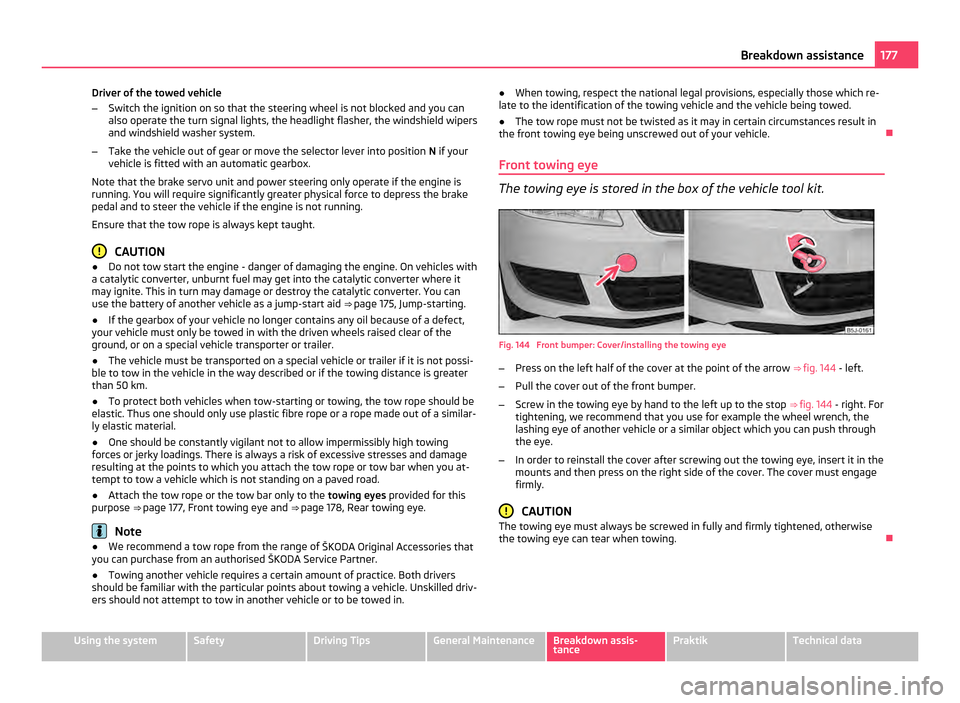
Front towing eye The towing eye is stored in the box of the vehicle tool kit.
Fig. 144 Front bumper: Cover/installing the towing eye
–
Press on the left half of the cover at the point of the arrow ⇒
fig. 144 - left.
– Pull the cover out of the front bumper.
– Screw in the towing eye by hand to the left up to the stop ⇒ fig. 144 - right. For
tightening, we recommend that you use for example the wheel wrench, the
lashing eye of another vehicle or a similar object which you can push through
the eye.
– In order to reinstall the cover after screwing out the towing eye, insert it in the
mounts and then press on the right side of the cover. The cover must engage
firmly. CAUTION
The towing eye must always be screwed in fully and firmly tightened, otherwise
the towing eye can tear when towing. 177
Breakdown assistance Using the system Safety Driving Tips General Maintenance Breakdown assis-
tance Praktik Technical data
Page 194 of 212
The following specifications are listed on the type plate
⇒ fig. 167:
Permissible gross weight
The permissible overall weight of the vehicle/trailer combination when the
vehicle is being operated with a trailer
Maximum permissible front axle load
Maximum permissible rear axle load
The identification plate is affixed to the lower part of the column between the
front and rear doors on the front passenger side. WARNING
Do not exceed the permissible overall weight - risk of accident and damage to
the vehicle.
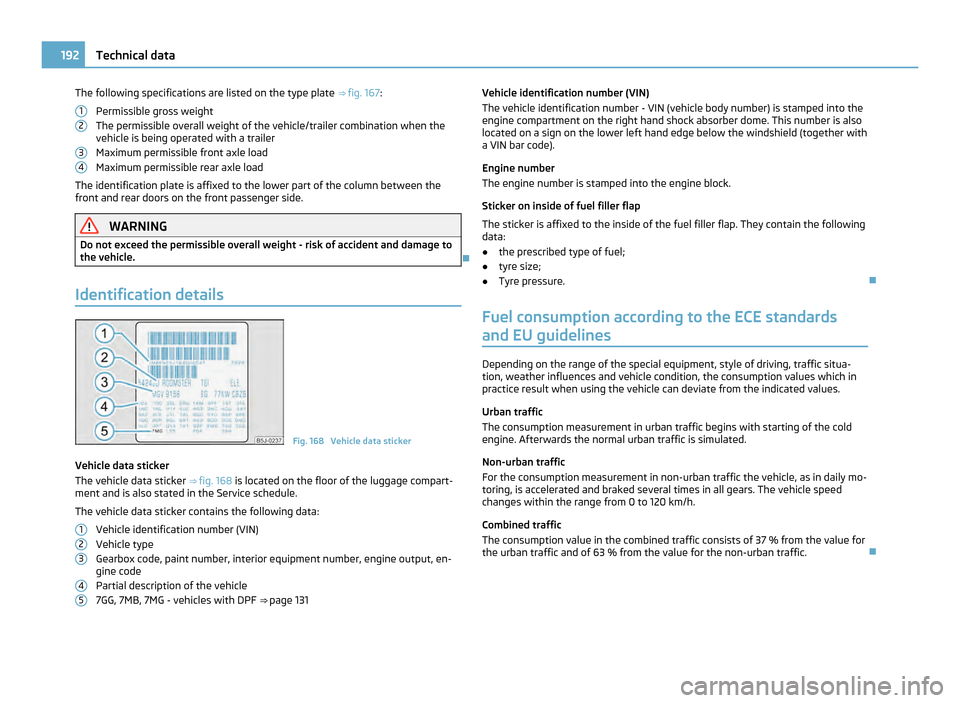
Identification details Fig. 168 Vehicle data sticker
Vehicle data sticker
The vehicle data sticker ⇒ fig. 168
is located on the floor of the luggage compart-
ment and is also stated in the Service schedule.
The vehicle data sticker contains the following data:
Vehicle identification number (VIN)
Vehicle type
Gearbox code, paint number, interior equipment number, engine output, en-
gine code
Partial description of the vehicle
7GG, 7MB, 7MG - vehicles with DPF ⇒ page 131
1 2
3
4
1
2
3
4
5 Vehicle identification number (VIN)
The vehicle identification number - VIN (vehicle body number) is stamped into the
engine compartment on the right hand shock absorber dome. This number is also
located on a sign on the lower left hand edge below the windshield (together with
a VIN bar code).
Engine number
The engine number is stamped into the engine block.
Sticker on inside of fuel filler flap
The sticker is affixed to the inside of the fuel filler flap. They contain the following
data:
● the prescribed type of fuel;
● tyre size;
● Tyre pressure.
Fuel consumption according to the ECE standards
and EU guidelines Depending on the range of the special equipment, style of driving, traffic situa-
tion, weather influences and vehicle condition, the consumption values which in
practice result when using the vehicle can deviate from the indicated values.
Urban traffic
The consumption measurement in urban traffic begins with starting of the cold
engine. Afterwards the normal urban traffic is simulated.
Non-urban traffic
For the consumption measurement in non-urban traffic the vehicle, as in daily mo-
toring, is accelerated and braked several times in all gears. The vehicle speed
changes within the range from 0 to 120 km/h.
Combined traffic
The consumption value in the combined traffic consists of 37 % from the value for
the urban traffic and of 63 % from the value for the non-urban traffic. 192
Technical data
Page 196 of 212
Engine oil specifications
The grade of engine oil should be selected in accordance with pre-
cise specifications.
The engine of your vehicle has been factory-filled with a high-grade oil which you
can use throughout the year - except in extreme climatic regions.
You can mix various oils together with each other when refilling with oil. This does
not, however, apply for models with flexible service intervals (QG1).
Engine oils are, of course, undergoing continuous further development. Thus the
information stated in this Owner's Manual is only correct at the time of publica-
tion.
Specialist garages are informed by ŠKODA about the latest changes. We recom-
mend having this oil change undertaken by a specialist garage.
The specifications (VW standards) stated in the following must be indicated sepa-
rately or together with other specifications on the bottle.
Engine oil specifications for models with flexible service intervals (QG1) Petrol engines Specification Content
a)1.2 l/51 kW - EU5/EU2 DDK VW 503 00, VW 504 00 2,8
1.2 l/63 kW TSI - EU5 VW 504 00 3,6
1.2 l/77 kW TSI - EU5 VW 504 00 3,6
1.4 l/63 kW - EU5 VW 503 00, VW 504 00 3,2
a)
Oil capacity with oil filter change. Inspect oil level when filling; do not fill up too much. The oil level
must be between the markings ⇒ page 152, Check engine oil level
.Diesel engines Specification Content
a)1.2 l/55 kW TDI CR - EU5 VW 507 00 4,3
1.6 ltr./66 kW TDI CR DPF - EU5 VW 507 00 4,3
1.6 ltr./77 kW TDI CR DPF - EU5 VW 507 00 4,3
a)
Oil capacity with oil filter change. Inspect oil level when filling; do not fill up too much. The oil level
must be between the markings ⇒ page 152, Check engine oil level
.
Engine oil specifications for vehicles with fixed service intervals (QG2) Petrol engines Specification Content
a)1.2 l/51 kW - EU5/EU2 DDK VW 501 01, VW 502 00 2,8
1.2 l/63 kW TSI - EU5 VW 502 00 3,6 Petrol engines Specification Content
a) 1.2 l/77 kW TSI - EU5 VW 502 00 3,6
1.4 l/63 kW - EU5 VW 501 01, VW 502 00 3,2
1.6 l/77 kW - EU5/EU2 DDK VW 501 01, VW 502 00 3,6
a)
Oil capacity with oil filter change. Inspect oil level when filling; do not fill up too much. The oil level
must be between the markings ⇒ page 152, Check engine oil level
.
If the oils specified above are not available, oils according to ACEA A2 or ACEA A3
can be used once for refilling. Diesel engines Specification Content
a) 1.2 l/55 kW TDI CR - EU5 VW 507 00 4,3
1.6 ltr./66 kW TDI CR DPF - EU5 VW 507 00 4,3
1.6 ltr./77 kW TDI CR DPF - EU5 VW 507 00 4,3
a)
Oil capacity with oil filter change. Inspect oil level when filling; do not fill up too much. The oil level
must be between the markings ⇒ page 152, Check engine oil level
.
If the oils specified above are not available, oils according to ACEA B3 or ACEA B4
can be used once for refilling. CAUTION
Only the above-mentioned oils may be used on vehicles with flexible service inter-
vals (QG1). We recommend always refilling with oil of the same specification since
this will maintain the properties of the oil. In exceptional cases, you must top up
only once engine oil complying with Specification VW 502 00 (only for petrol en-
gines) or Specification VW 505 01 (only for diesel engines) to maximum 0.5 litres.
You must not use other engine oils - risk of engine damage! Note
● Before a long drive we recommend that you purchase and carry with you en-
gine oil which complies with the specification for your vehicle. Consequently, you
will always have the correct engine oil for refilling.
● We recommend using oils from the ŠKODA Original Parts.
● For further information - see Service schedule. 194
Technical data
Page 208 of 212
Parking aid . . . . . . . . . . . . . . . . . . . . . . . . . . . . . . . . . . . 82
Parking light . . . . . . . . . . . . . . . . . . . . . . . . . . . . . . . . . 43
Parking ticket holder . . . . . . . . . . . . . . . . . . . . . . . . . . 63
Passive Safety . . . . . . . . . . . . . . . . . . . . . . . . . . . . . . . . 101
Payload . . . . . . . . . . . . . . . . . . . . . . . . . . . . . . . . . . . . . . 191
Pedals . . . . . . . . . . . . . . . . . . . . . . . . . . . . . . . . . . . . 55, 81
Petrol . . . . . . . . . . . . . . . . . . . . . . . . . . . . . . . . . . . . . . . 147
Petrol engines Starting the engine . . . . . . . . . . . . . . . . . . . . . . . . . 80
Polishing . . . . . . . . . . . . . . . . . . . . . . . . . . . . . . . . . . . . 143
Power socket . . . . . . . . . . . . . . . . . . . . . . . . . . . . . . . . . 64
Power steering . . . . . . . . . . . . . . . . . . . . . . . . . . . . . . 129 Warning light . . . . . . . . . . . . . . . . . . . . . . . . . . . . . . . . 22
Power windows . . . . . . . . . . . . . . . . . . . . . . . . . . . . . . . 36 Central locking system . . . . . . . . . . . . . . . . . . . . . . . 37
Operational faults . . . . . . . . . . . . . . . . . . . . . . . . . . . 38
R
Radiator fan . . . . . . . . . . . . . . . . . . . . . . . . . . . . . . . . . 155
Raise vehicle . . . . . . . . . . . . . . . . . . . . . . . . . . . . . . . . . 171
Range . . . . . . . . . . . . . . . . . . . . . . . . . . . . . . . . . . . . . . . . 16
Rear-view mirror Interior mirror . . . . . . . . . . . . . . . . . . . . . . . . . . . . . . . 48
Rear armrest . . . . . . . . . . . . . . . . . . . . . . . . . . . . . . . . . 54
Rear fog light . . . . . . . . . . . . . . . . . . . . . . . . . . . . . . . . . 41 Warning light . . . . . . . . . . . . . . . . . . . . . . . . . . . . . . . . 21
Rear mirror . . . . . . . . . . . . . . . . . . . . . . . . . . . . . . . . . . . 48
Rear seats . . . . . . . . . . . . . . . . . . . . . . . . . . . . . . . . . . . . 52
Rear window heater . . . . . . . . . . . . . . . . . . . . . . . . . . . 45
Recharge battery . . . . . . . . . . . . . . . . . . . . . . . . . . . . 159
Recommendation for changing gears . . . . . . . . . . . 13
Refuelling . . . . . . . . . . . . . . . . . . . . . . . . . . . . . . . . . . . 148
Remote control . . . . . . . . . . . . . . . . . . . . . . . . . . . . . . . 34 Synchronisation . . . . . . . . . . . . . . . . . . . . . . . . . . . . . . 35
Removing seats . . . . . . . . . . . . . . . . . . . . . . . . . . . . . . . 53
Replacement of parts . . . . . . . . . . . . . . . . . . . . . . . . 166
Replacing bulbs . . . . . . . . . . . . . . . . . . . . . . . . . . . . . . 183
Replacing fuses . . . . . . . . . . . . . . . . . . . . . . . . . . . . . . 179 Replacing the wiper blades . . . . . . . . . . . . . . . . . . . . 47
Roof aerial
. . . . . . . . . . . . . . . . . . . . . . . . . . . . . . . . . . 142
Roof luggage rack system . . . . . . . . . . . . . . . . . . . . . 62
Running in the vehicle . . . . . . . . . . . . . . . . . . . . . . . . 132
S
Safe securing . . . . . . . . . . . . . . . . . . . . . . . . . . . . . . . . . 30
Safety . . . . . . . . . . . . . . . . . . . . . . . . . . . . . . . . . . . . . . . 101
Safety information Engine compartment . . . . . . . . . . . . . . . . . . . . . . . . 150
Saving electrical energy . . . . . . . . . . . . . . . . . . . . . . 133
Seat belt height adjuster . . . . . . . . . . . . . . . . . . . . . 107
Seat belts . . . . . . . . . . . . . . . . . . . . . . . . . . . . . . . . . . . 105 Cleaning . . . . . . . . . . . . . . . . . . . . . . . . . . . . . . . . . . . . 146
fastening . . . . . . . . . . . . . . . . . . . . . . . . . . . . . . . . . . . 107
Height adjustment . . . . . . . . . . . . . . . . . . . . . . . . . . 107
Safety information . . . . . . . . . . . . . . . . . . . . . . . . . 106
taking off . . . . . . . . . . . . . . . . . . . . . . . . . . . . . . . . . . 108
Warning light . . . . . . . . . . . . . . . . . . . . . . . . . . . . . . . . 27
Seat belt warning light . . . . . . . . . . . . . . . . . . . . . . . 107
Seats . . . . . . . . . . . . . . . . . . . . . . . . . . . . . . . . . . . . . . . . 50 Heating . . . . . . . . . . . . . . . . . . . . . . . . . . . . . . . . . . . . . 51
Selector lever . . . . . . . . . . . . . . . . . . . . . . . . . . . . . . . . . 89
Selector lever-emergency unlocking . . . . . . . . . . . . 91
Selector lever lock Indicator light . . . . . . . . . . . . . . . . . . . . . . . . . . . . . . . . 25
Selector lever positions . . . . . . . . . . . . . . . . . . . . . . . . 89
Service reminder indicator . . . . . . . . . . . . . . . . . . . . . 12
Setting temperature Air conditioning system . . . . . . . . . . . . . . . . . . . . . . . 72
Heating . . . . . . . . . . . . . . . . . . . . . . . . . . . . . . . . . . . . 70
Setting the clock . . . . . . . . . . . . . . . . . . . . . . . . . . . . . . 13
Shifting . . . . . . . . . . . . . . . . . . . . . . . . . . . . . . . . . . . . . . 81
Side airbag . . . . . . . . . . . . . . . . . . . . . . . . . . . . . . . . . . . 113
Side lights . . . . . . . . . . . . . . . . . . . . . . . . . . . . . . . . . . . . 39
Snow chains . . . . . . . . . . . . . . . . . . . . . . . . . . . . . . . . . 165
Spare wheel . . . . . . . . . . . . . . . . . . . . . . . . . . . . . . . . . 168
Speedometer . . . . . . . . . . . . . . . . . . . . . . . . . . . . . . . . . . 11
Stability system . . . . . . . . . . . . . . . . . . . . . . . . . . . . . . 125 Start-stop . . . . . . . . . . . . . . . . . . . . . . . . . . . . . . . . . . . . 85
Starting the engine
. . . . . . . . . . . . . . . . . . . . . . . . . . . 79
Diesel engines . . . . . . . . . . . . . . . . . . . . . . . . . . . . . . 80
Petrol engines . . . . . . . . . . . . . . . . . . . . . . . . . . . . . . 80
Static separation net . . . . . . . . . . . . . . . . . . . . . . . . . . 58
Steering force assistance . . . . . . . . . . . . . . . . . . . . . 129
Storage compartment Lighting . . . . . . . . . . . . . . . . . . . . . . . . . . . . . . . . . . . . 44
Storage compartments . . . . . . . . . . . . . . . . . . . . . . . . 64
Storage facilities . . . . . . . . . . . . . . . . . . . . . . . . . . . . . . 64
Sun visors . . . . . . . . . . . . . . . . . . . . . . . . . . . . . . . . . . . . 45
Switching off the engine . . . . . . . . . . . . . . . . . . . . . . 80
Switch off Anti-spin regulation (ASR) Warning light . . . . . . . . . . . . . . . . . . . . . . . . . . . . . . . . 24
Systems Start-stop . . . . . . . . . . . . . . . . . . . . . . . . . . . . . . . . . . 85
T Tailgate Lighting . . . . . . . . . . . . . . . . . . . . . . . . . . . . . . . . . . . . 44
Taking care of your vehicle . . . . . . . . . . . . . . . . . . . . . 141
TCS . . . . . . . . . . . . . . . . . . . . . . . . . . . . . . . . . . . . . . . . . 126 Warning light . . . . . . . . . . . . . . . . . . . . . . . . . . . . . . . . 25
Telephone . . . . . . . . . . . . . . . . . . . . . . . . . . . . . . . . . . . . 94
Temperature outside . . . . . . . . . . . . . . . . . . . . . . . . . . . . . . . . . . . . . . 15
The first 1 500 kilometres . . . . . . . . . . . . . . . . . . . . . 132
Tiptronic . . . . . . . . . . . . . . . . . . . . . . . . . . . . . . . . . . . . . 87
Tool . . . . . . . . . . . . . . . . . . . . . . . . . . . . . . . . . . . . . . . . 167
Top Tether . . . . . . . . . . . . . . . . . . . . . . . . . . . . . . . . . . 124
Tourist light . . . . . . . . . . . . . . . . . . . . . . . . . . . . . . . . . . 40
Towing . . . . . . . . . . . . . . . . . . . . . . . . . . . . . . . . . . . . . . 176
Towing a trailer . . . . . . . . . . . . . . . . . . . . . . . . . . . . . . 139
Towing eye front . . . . . . . . . . . . . . . . . . . . . . . . . . . . . . . . . . . . . . . 177
rear . . . . . . . . . . . . . . . . . . . . . . . . . . . . . . . . . . . . . . . . 178
Towing protection monitoring . . . . . . . . . . . . . . . . . . 36
Traction control system (TCS) . . . . . . . . . . . . . . . . . 126 Warning light . . . . . . . . . . . . . . . . . . . . . . . . . . . . . . . . 25206
Index
Page 210 of 212

ŠKODA pursues a policy of constant product and model development. We trust
that you will understand that changes to models in terms of shape, equipment
and engineering, may be introduced at any time. The information about scope of
delivery, appearance, performances, dimensions, weight, fuel consumption, stand-
ards and functions of the vehicle is only correct at the time of publication. Certain
items of equipment might only be installed later on (information given by your lo-
cal authorised
ŠKODA Service Partner) and only envisaged for particular markets.
It is therefore not possible for legal claims to be made based on the data, illustra-
tions and descriptions contained in this Owner's Manual. Reprinting, reproduction or translation, either in whole or in part, is not permitted
without the written consent of ŠKODA.
ŠKODA expressly reserves all rights relating to copyright laws.
We reserve the right to make changes to this document.
Issued by: ŠKODA AUTO a.s.
© ŠKODA AUTO a.s. 2011