boot SKODA ROOMSTER 2012 1.G Owner's Guide
[x] Cancel search | Manufacturer: SKODA, Model Year: 2012, Model line: ROOMSTER, Model: SKODA ROOMSTER 2012 1.GPages: 194, PDF Size: 4.8 MB
Page 134 of 194
Artificial leather and materials
First read and observe the introductory information and safety warn-
ings on page 127.
The artificial leather can be cleaned using a damp cloth. If this does not prove to
be adequate, these parts can only be treated with special
solvent-free plastic
cleaning and care products .
Clean upholstery cover materials and cloth trims on doors, boot cover, etc. using
specific cleaning agents, e.g., dry foam. Use a soft sponge, brush, or commercially
available microfibre cloth. Use a cloth and a specific cleaning agent to clean the
roof trim.
Some clothing materials, such as dark denim, do, in part, not have sufficient col-
our fastness. This can cause damage or clearly visible discolouration to seat cov-
ers (fabric or leather) even when used correctly. This particularly applies to light
seat covers (fabric or leather). This is not a defect in the seat cover, but poor col-
our fastness of the clothing textiles. ÐFabric covers on electrically heated seats
First read and observe the introductory information and safety warn-
ings on page 127.
Do not clean the seat covers
using moisture as this can damage the seat heating
system.
Use a specific cleaning agent such as dry foam or similar to clean the covers. ÐNatural leather
First read and observe the introductory information and safety warn-
ings on page 127.
Depending on the amount of wear-and-tear, the leather should be cleaned on a
regular basis.
Normal cleaning
Clean soiled areas of the leather with slightly moistened cotton or woollen cloth.
ä
ä
ä
Severe soiling
Ensure that the leather is not soaked through at any point and that no water gets
into the stitching of the seams.
Dry off the leather with a soft, dry cloth.
Removing stains
Remove fresh water-based stains (e.g., coffee, tea, juices, blood) with an absorb-
ent cloth or household cleaning paper. A specific cleaning agent is required for
dried-on stains.
Remove fresh grease-based stains (e.g. butter, mayonnaise, chocolate, etc.) with
an absorbent cloth, household cleaning paper, or use a suitable cleaner if the
stain has not yet penetrated into the surface.
Use a grease solvent for grease stains which have dried in .
Remove specific stains (e.g. ball-point pens, marker pen, nail varnish, dispersion
paint, shoe polish, etc.) with a special stain remover suitable for leather.
Leather care
Treat the leather roughly every six months with a suitable leather care product.
Apply only a small amount of the cleaning and care product.
Dry off the leather with a soft, dry cloth. CAUTION
■ Avoid leaving the vehicle for lengthy periods in bright sunlight to avoid the
leather from bleaching. If the vehicle is parked in the open for lengthy periods,
protect the leather from direct sunlight by covering it.
■ Sharp-edged objects on items of clothing such as zip fasteners, rivets, sharp-
edged belts, jewellery and pendants may leave permanent scratches or signs of
rubbing on the surface.
■ The use of a mechanical steering wheel lock may damage the leather surface of
the steering wheel. Note
■ Use a care cream with light blocker and impregnation effect on a regular basis
and each time after cleaning. The cream nourishes the leather, allows it to
breathe and keeps it supple and also provides moisture. It also creates surface
protection. ■ Clean the leather every 2 to 3 months, remove any fresh stains as they occur. £
132 General Maintenance
Page 153 of 194
The date of manufacture
is also stated on the tyre wall (possibly only on the in-
side of wheel ): e.g.
DOT ... 20 12...
means, for example, that the tyre was manufactured in the 20th week of 2012.
The following must be observed if only one temporary spare wheel is availa-
ble » page 151. ÐUnidirectional tyres
First read and observe the introductory information and safety warn-
ings on page 148.
The direction of rotation of the tyres is marked by arrows on the wall of the tyre
.
The so specified running direction must absolutely be complied with. Only then
are the tyres able to provide the optimal properties in terms of grip, low noise,
wear-and-tear and aquaplaning.
If, in the event of a puncture, it is necessary to fit a spare wheel with a tyre with-
out a dedicated running direction or the opposite running direction, drive carefully
as the optimum characteristics of the tyre are no longer applicable in this situa-
tion. ÐSpare wheel
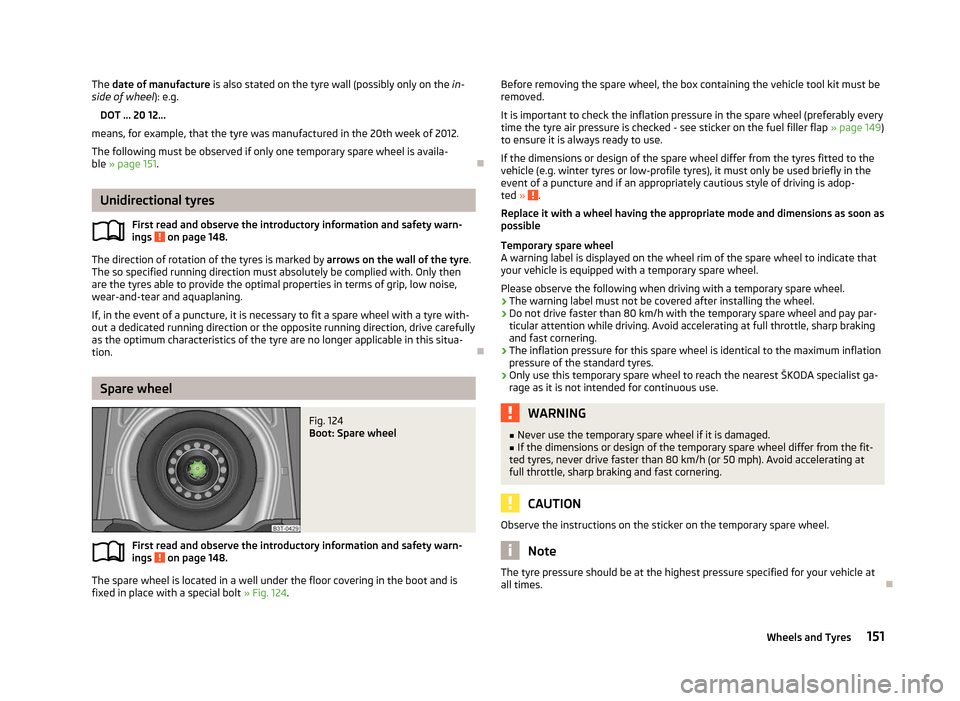
Fig. 124
Boot: Spare wheel
First read and observe the introductory information and safety warn-
ings on page 148.
The spare wheel is located in a well under the floor covering in the boot and is
fixed in place with a special bolt
» Fig. 124.
ä
ä Before removing the spare wheel, the box containing the vehicle tool kit must be
removed.
It is important to check the inflation pressure in the spare wheel (preferably every
time the tyre air pressure is checked - see sticker on the fuel filler flap » page 149)
to ensure it is always ready to use.
If the dimensions or design of the spare wheel differ from the tyres fitted to the
vehicle (e.g. winter tyres or low-profile tyres), it must only be used briefly in the
event of a puncture and if an appropriately cautious style of driving is adop-
ted » .
Replace it with a wheel having the appropriate mode and dimensions as soon as
possible
Temporary spare wheel
A warning label is displayed on the wheel rim of the spare wheel to indicate that
your vehicle is equipped with a temporary spare wheel.
Please observe the following when driving with a temporary spare wheel.
› The warning label must not be covered after installing the wheel.
› Do not drive faster than 80
km/h with the temporary spare wheel and pay par-
ticular attention while driving. Avoid accelerating at full throttle, sharp braking
and fast cornering.
› The inflation pressure for this spare wheel is identical to the maximum inflation
pressure of the standard tyres.
› Only use this temporary spare wheel to reach the nearest ŠKODA specialist ga-
rage as it is not intended for continuous use. WARNING
■ Never use the temporary spare wheel if it is damaged.
■ If the dimensions or design of the temporary spare wheel differ from the fit-
ted tyres, never drive faster than 80
km/h (or 50 mph). Avoid accelerating at
full throttle, sharp braking and fast cornering. CAUTION
Observe the instructions on the sticker on the temporary spare wheel. Note
The tyre pressure should be at the highest pressure specified for your vehicle at
all times. Ð
151
Wheels and Tyres
Page 158 of 194
Do-it-yourself
Do-it-yourself
First-aid kit and warning triangle
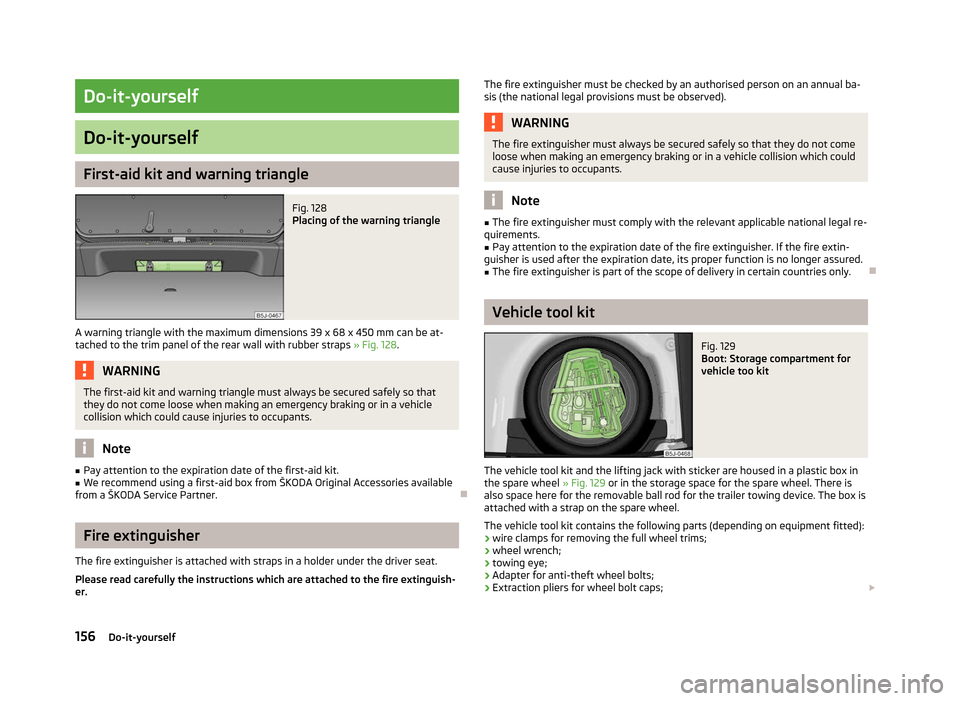
Fig. 128
Placing of the warning triangle
A warning triangle with the maximum dimensions 39 x 68 x 450 mm can be at-
tached to the trim panel of the rear wall with rubber straps » Fig. 128.WARNING
The first-aid kit and warning triangle must always be secured safely so that
they do not come loose when making an emergency braking or in a vehicle
collision which could cause injuries to occupants. Note
■ Pay attention to the expiration date of the first-aid kit.
■ We recommend using a first-aid box from ŠKODA Original Accessories available
from a ŠKODA Service Partner. ÐFire extinguisher
The fire extinguisher is attached with straps in a holder under the driver seat.
Please read carefully the instructions which are attached to the fire extinguish-
er. The fire extinguisher must be checked by an authorised person on an annual ba-
sis (the national legal provisions must be observed). WARNING
The fire extinguisher must always be secured safely so that they do not come
loose when making an emergency braking or in a vehicle collision which could
cause injuries to occupants. Note
■ The fire extinguisher must comply with the relevant applicable national legal re-
quirements. ■ Pay attention to the expiration date of the fire extinguisher. If the fire extin-
guisher is used after the expiration date, its proper function is no longer assured.
■ The fire extinguisher is part of the scope of delivery in certain countries only. Ð Vehicle tool kit
Fig. 129
Boot: Storage compartment for
vehicle too kit
The vehicle tool kit and the lifting jack with sticker are housed in a plastic box in
the spare wheel » Fig. 129 or in the storage space for the spare wheel. There is
also space here for the removable ball rod for the trailer towing device. The box is
attached with a strap on the spare wheel.
The vehicle tool kit contains the following parts (depending on equipment fitted):
› wire clamps for removing the full wheel trims;
› wheel wrench;
› towing eye;
› Adapter for anti-theft wheel bolts;
› Extraction pliers for wheel bolt caps;
£
156 Do-it-yourself
Page 159 of 194
›
Replacement bulb set;
› Screwdriver.
Before placing the lifting jack back into its storage area, screw in the arm of the
lifting jack fully. WARNING
■ The factory-supplied lifting jack is only intended for your model of vehicle.
Under no circumstances attempt to lift heavier vehicles or other loads - risk of
injury!
■ Ensure that the vehicle tool kit is safely secured in the boot. Note
Ensure that the box is always secured with the strap. ÐChanging a wheel
ä
Introduction
This chapter contains information on the following subjects:
Preliminary work 157
Changing a wheel 158
Subsequent steps 158
Loosening and tightening wheel bolts 159
Raising the vehicle 159
Securing wheels against theft 160
WARNING
■ If you are in flowing traffic, switch on the hazard warning light system and
set up the warning triangle at the prescribed distance! The national legal re-
quirements must be observed. In this way you are not only protecting yourself
but other road users as well.
■ If the wheel is damaged or in the event of a puncture, park the vehicle as far
away as possible from the flow of traffic. Park on as flat and firm a surface as
possible. WARNING (Continued)
■ If the wheel has to be changed on a slope, first of all block the opposite
wheel with a stone or similar object to prevent the vehicle from unexpectedly
rolling away.
■ If the vehicle is subsequently fitted with tyres which are different to those it
was fitted with at the works, follow these guidelines »
page 150, New wheels
and tyres.
■ Always raise the vehicle with the doors closed.
■ Never position any body parts, such as arms or legs under the vehicle, while
the vehicle is raised with a lifting jack. ■ Secure the base plate of the lifting jack with suitable means to prevent pos-
sible moving. A soft and slippery ground under the base plate may move the
lifting jack, causing the vehicle to fall down. It is therefore always necessary to
place the lifting jack on a solid surface or use a wide and stable base. Use a
non-slip base (e.g. a rubber foot mat) if the surface is smooth, such as cobbled
stones, tiled floor, etc.
■ Never start the engine with the vehicle sitting on the raised jack - danger of
suffering injury.
■ Only attach the lifting jack to the attachment points provided for this pur-
pose. CAUTION
■ The prescribed tightening torque of the wheel bolts for steel and light alloy
wheels is 120 Nm.
■ If the anti-theft wheel bolt is fastened too tightly, it can cause damage to the
anti-theft wheel bolt and adapter. Note
■ The anti-theft wheel bolt set and adapter can be purchased from a
ŠKODA Serv-
ice Partner. ■ The national legal requirements must be observed when changing a wheel. Ð Preliminary work
First read and observe the introductory information and safety warn-
ings on page 157.
The following steps must be carried out before actually changing the wheel:
£
ä
157
Do-it-yourself
Page 160 of 194
›
In the event of a puncture, park the vehicle as far away as possible from the
flow of traffic. The place you choose should be level.
› Let all of the occupants get out.
While changing a tyre, the occupants of the
vehicle should not stand on the road (instead they should remain behind a crash
barrier).
› Switch off the engine and move the gearshift lever into
Neutral or move the
selector lever for the automatic gearbox into position P .
› Firmly apply the
handbrake.
› If a trailer is connected, remove it.
› Remove the vehicle tool kit
» page 156 and the spare wheel » page 151, Spare
wheel from the boot. ÐChanging a wheel
First read and observe the introductory information and safety warn-
ings on page 157.
Always change a wheel on a level surface as far as possible.
›
Remove the full wheel trim
» page 152 or caps » page 152.
› In the case of light alloy wheel rims remove the wheel trim cap
» page 152.
› First of all slacken the anti-theft wheel bolt and then the other wheel
bolts » page 159.
› Jack up the vehicle until the wheel that needs changing is clear of the
ground » page 159.
› Unscrew the wheel bolts and place them on a clean surface (cloth, paper, etc.).
› Remove the wheel.
› Attach the spare wheel and slightly screw on the wheel bolts.
› Lower the vehicle.
› Alternately tighten the wheel bolts opposite each other using the wheel
wrench (crosswise) and then tighten the anti-theft wheel bolt » page 159.
› Reinstall the wheel trim/wheel trim cap or the caps. Note
■ All bolts must be clean and must turn easily.
■ Under no circumstances grease or oil the wheel bolts!
■ When fitting unidirectional tyres, ensure that the direction of rotation is cor-
rect »
page 148 . Ð
ä Subsequent steps
First read and observe the introductory information and safety warn-
ings on page 157.
The following steps must also be performed after changing the wheel.
›
Stow and attach the replaced wheel in the spare wheel well using a special
screw » page 151, Spare wheel.
› Stow the vehicle tool kit in the space provided.
› Check
the tyre pressure
on the installed spare wheel as soon as possible.
› Have the
tightening torque of the wheel bolts checked with a torque wrench
as soon as possible.
› Change the damaged wheel or consult a ŠKODA specialist garage about repair
possibilities. Note
■ If it is determined that the wheel bolts are corroded and difficult to turn when
changing the wheel, the bolts must be replaced before checking the tightening
torque. ■ Drive cautiously and only at a moderate speed until the tightening torque has
been checked. Ð
ä
158 Do-it-yourself
Page 162 of 194
›
Continue turning up the jack until the wheel is just about lifted off the ground. ÐSecuring wheels against theft
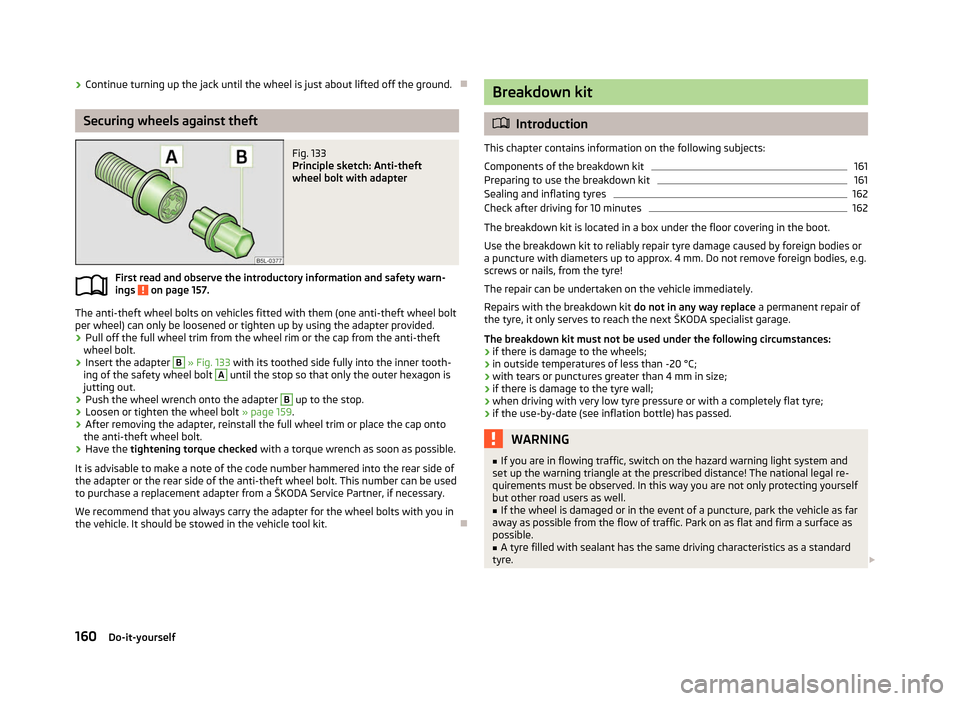
Fig. 133
Principle sketch: Anti-theft
wheel bolt with adapter
First read and observe the introductory information and safety warn-
ings on page 157.
The anti-theft wheel bolts on vehicles fitted with them (one anti-theft wheel bolt
per wheel) can only be loosened or tighten up by using the adapter provided.
›
Pull off the full wheel trim from the wheel rim or the cap from the anti-theft
wheel bolt.
› Insert the adapter B
» Fig. 133 with its toothed side fully into the inner tooth-
ing of the safety wheel bolt A
until the stop so that only the outer hexagon is
jutting out.
› Push the wheel wrench onto the adapter B
up to the stop.
› Loosen or tighten the wheel bolt
» page 159.
› After removing the adapter, reinstall the full wheel trim or place the cap onto
the anti-theft wheel bolt.
› Have the
tightening torque checked with a torque wrench as soon as possible.
It is advisable to make a note of the code number hammered into the rear side of
the adapter or the rear side of the anti-theft wheel bolt. This number can be used
to purchase a replacement adapter from a
ŠKODA Service Partner, if necessary.
We recommend that you always carry the adapter for the wheel bolts with you in
the vehicle. It should be stowed in the vehicle tool kit. Ð
ä Breakdown kit
ä
Introduction
This chapter contains information on the following subjects:
Components of the breakdown kit 161
Preparing to use the breakdown kit 161
Sealing and inflating tyres 162
Check after driving for 10 minutes 162
The breakdown kit is located in a box under the floor covering in the boot.
Use the breakdown kit to reliably repair tyre damage caused by foreign bodies or
a puncture with diameters up to approx. 4
mm. Do not remove foreign bodies, e.g.
screws or nails, from the tyre!
The repair can be undertaken on the vehicle immediately.
Repairs with the breakdown kit do not in any way replace a permanent repair of
the tyre, it only serves to reach the next ŠKODA specialist garage.
The breakdown kit must not be used under the following circumstances:
› if there is damage to the wheels;
› in outside temperatures of less than -20 °C;
› with tears or punctures greater than 4 mm in size;
› if there is damage to the tyre wall;
› when driving with very low tyre pressure or with a completely flat tyre;
› if the use-by-date (see inflation bottle) has passed. WARNING
■ If you are in flowing traffic, switch on the hazard warning light system and
set up the warning triangle at the prescribed distance! The national legal re-
quirements must be observed. In this way you are not only protecting yourself
but other road users as well.
■ If the wheel is damaged or in the event of a puncture, park the vehicle as far
away as possible from the flow of traffic. Park on as flat and firm a surface as
possible. ■ A tyre filled with sealant has the same driving characteristics as a standard
tyre. £
160 Do-it-yourself
Page 163 of 194
WARNING (Continued)
■ Do not drive faster than 80 km/h (50 mph).
■ Avoid accelerating at full throttle, sharp braking and fast cornering.
■ Check the tyre inflation pressure after driving for 10 minutes!
■ The sealant is hazardous to heath. Remove immediately if it comes into con-
tact with the skin. For the sake of the environment
Used sealant or sealant whose expiry date has passed must be disposed of in ac-
cordance with environmental protection regulations. Note
■ Observe the manufacturer's usage instructions for the breakdown kit.
■ A new bottle of sealant can be purchased from ŠKODA Original Accessories.
■ Immediately replace the wheel that was repaired using the breakdown kit or
consult a ŠKODA specialist garage about repair possibilities. ÐComponents of the breakdown kit
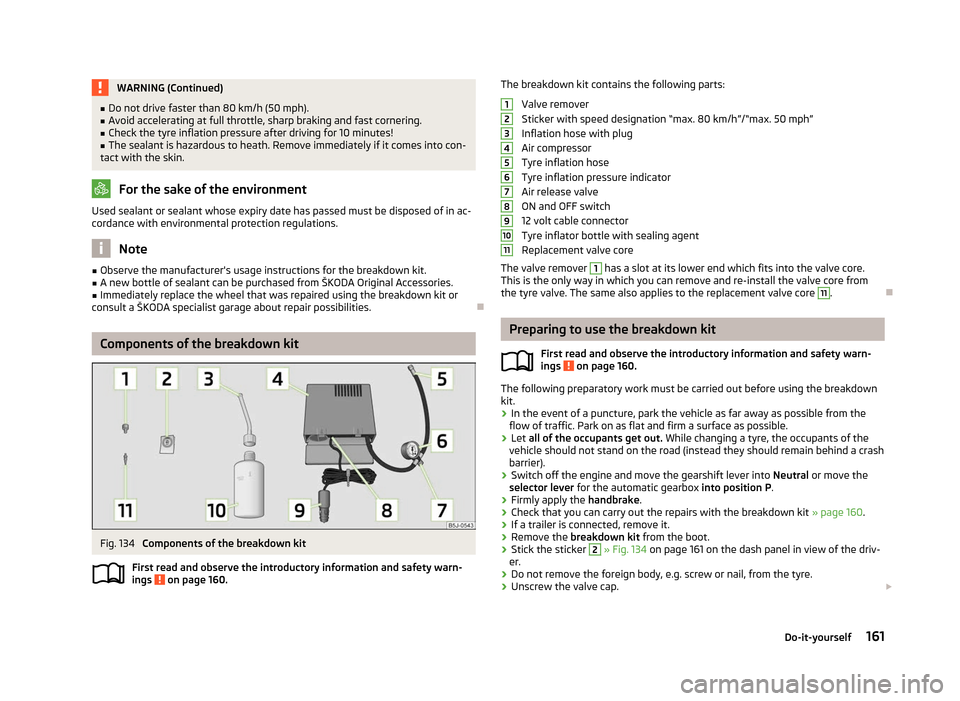
Fig. 134
Components of the breakdown kit
First read and observe the introductory information and safety warn-
ings on page 160.
ä The breakdown kit contains the following parts:
Valve remover
Sticker with speed designation
“max. 80 km/h”/“max. 50 mph”
Inflation hose with plug
Air compressor
Tyre inflation hose
Tyre inflation pressure indicator
Air release valve
ON and OFF switch
12 volt cable connector
Tyre inflator bottle with sealing agent
Replacement valve core
The valve remover 1
has a slot at its lower end which fits into the valve core.
This is the only way in which you can remove and re-install the valve core from
the tyre valve. The same also applies to the replacement valve core 11
.
Ð Preparing to use the breakdown kit
First read and observe the introductory information and safety warn-
ings on page 160.
The following preparatory work must be carried out before using the breakdown
kit.
›
In the event of a puncture, park the vehicle as far away as possible from the
flow of traffic. Park on as flat and firm a surface as possible.
› Let all of the occupants get out.
While changing a tyre, the occupants of the
vehicle should not stand on the road (instead they should remain behind a crash
barrier).
› Switch off the engine and move the gearshift lever into
Neutral or move the
selector lever
for the automatic gearbox into position P .
› Firmly apply the
handbrake.
› Check that you can carry out the repairs with the breakdown kit
» page 160.
› If a trailer is connected, remove it.
› Remove the breakdown kit
from the boot.
› Stick the sticker 2
»
Fig. 134 on page 161 on the dash panel in view of the driv-
er.
› Do not remove the foreign body, e.g. screw or nail, from the tyre.
› Unscrew the valve cap.
£ 1
2
3
4
5
6
7
8
9
10
11
ä
161
Do-it-yourself
Page 171 of 194
No. Power consumer
6 Glow plugs, radiator fan7 Electrohydraulic power steering
8 ABS or TCS or ESC 9 Radiator fan
10 Automatic gearbox 11 ABS or TCS or ESC
12 Central control unit
13 Electrical auxiliary heating system Note
Fuses 1 - 7 are replaced by a specialist ŠKODA garage. ÐBulbs
ä
Introduction
This chapter contains information on the following subjects:
Headlights 170
Replacing a bulb for low beam and main beam (halogen headlights) 170
Replacing the bulb for the low beam (Halogen projector headlights) 171
Replacing the bulb for the main beam (Halogen projector headlights) 171
Changing the bulb for the front turn signal light 171
Changing the light bulb for the front parking light 171
Fog lights and daytime running lights 172
Fog lights - Roomster Scout 172
Changing the bulb for the licence plate light 173
Tail lamp assembly 173
Some manual skills are required to change a bulb. For this reason, if uncertain, we
recommend that bulbs are replaced by a ŠKODA specialist garage or other expert
help is sought. ›
Switch off the ignition and all of the lights before replacing a bulb.
› Faulty bulbs must only be replaced with the same type of bulbs. The designa-
tion is located on the light socket or the glass bulb.
› A stowage compartment for replacement bulbs is located in a plastic box in the
spare wheel or underneath the floor covering in the boot. WARNING
■ Accidents can be caused if the road in front of the vehicle is not sufficiently
illuminated and the vehicle cannot or can only be seen with difficulty by other
road users.
■ Always read and observe the warnings before completing any work in the
engine compartment » page 136, Engine compartment .
■ Bulbs H7 and H4 are pressurised and may burst when changing the bulb -
risk of injury! We therefore recommended wearing gloves and safety glasses
when changing a bulb. CAUTION
■ Do not take hold of the glass bulb with naked fingers (even the smallest
amount of dirt reduces the working life of the light bulb). Use a clean cloth, nap-
kin, or similar. ■ When removing and installing the tail light make sure that the paintwork of the
vehicle and the tail light are not damaged. Note
■ This Owner's Manual only describes the replacement of bulbs where it is possi-
ble to replace the bulbs on your own without any complications arising. Other
light bulbs should be changed by a
ŠKODA specialist garage.
■ We recommend that a box of replacement bulbs be always carried in the vehi-
cle. Replacement bulbs can be purchased from
ŠKODAOriginal Accessories.
■ We recommend that the headlight settings are checked by a ŠKODA specialist
garage after replacing a bulb in the main or low beam.
■ LED diodes should be changed by a specialist ŠKODA garage. Ð
169
Fuses and light bulbs
Page 175 of 194
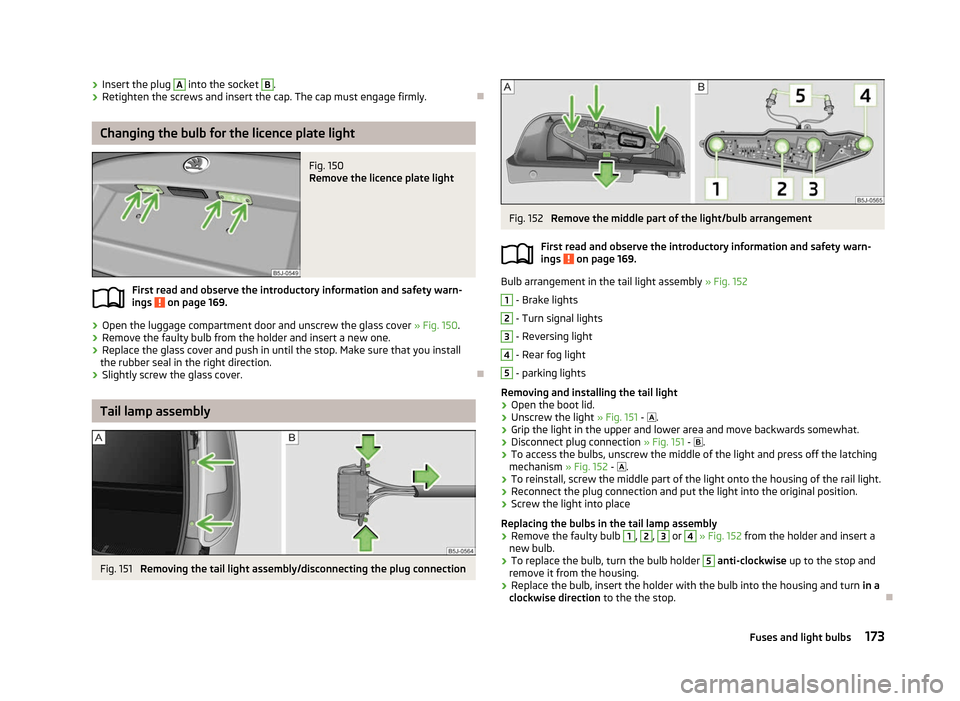
›
Insert the plug A
into the socket B
.
› Retighten the screws and insert the cap. The cap must engage firmly. ÐChanging the bulb for the licence plate light
Fig. 150
Remove the licence plate light
First read and observe the introductory information and safety warn-
ings on page 169.
›
Open the luggage compartment door and unscrew the glass cover
» Fig. 150.
› Remove the faulty bulb from the holder and insert a new one.
› Replace the glass cover and push in until the stop. Make sure that you install
the rubber seal in the right direction.
› Slightly screw the glass cover. ÐTail lamp assembly
Fig. 151
Removing the tail light assembly/disconnecting the plug connection
ä Fig. 152
Remove the middle part of the light/bulb arrangement
First read and observe the introductory information and safety warn-
ings on page 169.
Bulb arrangement in the tail light assembly
» Fig. 152 1
- Brake lights
2
- Turn signal lights
3
- Reversing light
4
- Rear fog light
5
- parking lights
Removing and installing the tail light
› Open the boot lid.
› Unscrew the light
» Fig. 151 - .
› Grip the light in the upper and lower area and move backwards somewhat.
› Disconnect plug connection
» Fig. 151 - .
› To access the bulbs, unscrew the middle of the light and press off the latching
mechanism » Fig. 152 - .
› To reinstall, screw the middle part of the light onto the housing of the rail light.
› Reconnect the plug connection and put the light into the original position.
› Screw the light into place
Replacing the bulbs in the tail lamp assembly
› Remove the faulty bulb 1
, 2
, 3
or 4
» Fig. 152 from the holder and insert a
new bulb.
› To replace the bulb, turn the bulb holder 5
anti-clockwise
up to the stop and
remove it from the housing.
› Replace the bulb, insert the holder with the bulb into the housing and turn
in a
clockwise direction to the the stop. Ð
ä
173
Fuses and light bulbs
Page 177 of 194
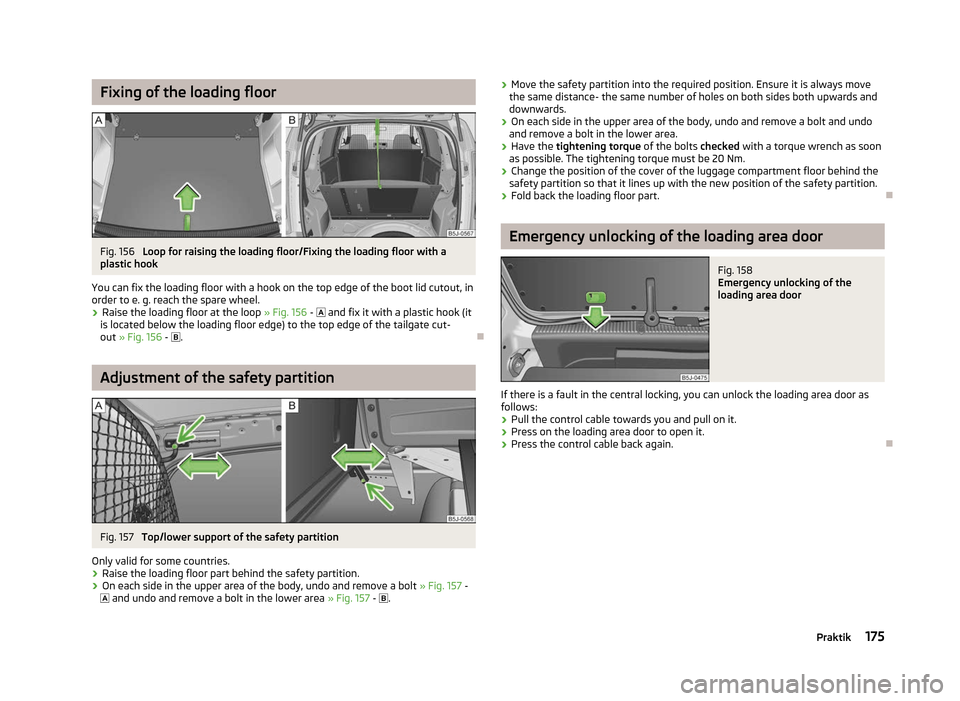
Fixing of the loading floor
Fig. 156
Loop for raising the loading floor/Fixing the loading floor with a
plastic hook
You can fix the loading floor with a hook on the top edge of the boot lid cutout, in
order to e. g. reach the spare wheel.
› Raise the loading floor at the loop
» Fig. 156 - and fix it with a plastic hook (it
is located below the loading floor edge) to the top edge of the tailgate cut-
out » Fig. 156 - . ÐAdjustment of the safety partition
Fig. 157
Top/lower support of the safety partition
Only valid for some countries. › Raise the loading floor part behind the safety partition.
› On each side in the upper area of the body, undo and remove a bolt
» Fig. 157 -
and undo and remove a bolt in the lower area » Fig. 157 - . ›
Move the safety partition into the required position. Ensure it is always move
the same distance- the same number of holes on both sides both upwards and
downwards.
› On each side in the upper area of the body, undo and remove a bolt and undo
and remove a bolt in the lower area.
› Have the
tightening torque of the bolts checked with a torque wrench as soon
as possible. The tightening torque must be 20 Nm.
› Change the position of the cover of the luggage compartment floor behind the
safety partition so that it lines up with the new position of the safety partition.
› Fold back the loading floor part. Ð Emergency unlocking of the loading area door
Fig. 158
Emergency unlocking of the
loading area door
If there is a fault in the central locking, you can unlock the loading area door as
follows:
› Pull the control cable towards you and pull on it.
› Press on the loading area door to open it.
› Press the control cable back again. Ð
175
Praktik