manual transmission SKODA ROOMSTER 2013 1.G Owner's Manual
[x] Cancel search | Manufacturer: SKODA, Model Year: 2013, Model line: ROOMSTER, Model: SKODA ROOMSTER 2013 1.GPages: 219, PDF Size: 13.83 MB
Page 6 of 219
Table of Contents
Materials defect liability and ŠKODA warranty for
new cars5
Mobility warranty and ŠKODA extended
warranty
6
Abbreviations
Operation
Cockpit
9
Overview
8
Instruments and Indicator Lights
10
Instrument cluster
10
Multifunction display (MFD)
13
Service Interval Display
16
MAXI DOT display
18
Warning lights
20
Unlocking and locking
28
Unlocking and locking
28
Central locking system
31
Remote control
34
Anti-theft alarm system
35
Luggage compartment lid
37
Electrical power windows
38
Lights and visibility
41
Lights
41
Interior lights
46
Visibility
47
Windscreen wipers and washers
48
Rear window
51
Seats and stowing
52
Front seats
52
Rear seats
54Head restraints56Boot57
Variable loading floor in the luggage
compartment (Estate)
61
Bicycle carrier in the luggage compartment
63
Roof rack system
65
Useful equipment
65
Storage compartments
68
Praktik
73
Heating and air-conditioning
77
Heating, ventilation, cooling
77
Heating
78
Air conditioning system (manual air conditioning system)
80
Climatronic (automatic air conditioningsystem)
83
Communication and multimedia
86
Universal telephone preinstallation GSM II
86
Voice control
91
Multimedia
92
Driving
Starting-off and Driving
95
Steering
95
Starting and stopping the engine
96
Brakes
98
Manual gear changing and pedals
99
Automatic transmission
100
Running in
103
Economical driving and environmental
sustainability
104
Avoiding damage to your vehicle
108
Driving abroad
109
Assist systems
110
Brake assist systems
110
Parking aid
112Cruise Control System113START-STOP115
Towing a trailer
117
Towing device
117
Trailer
120
Safety
Passive Safety
123
General information
123
Correct seated position
124
Seat belts
127
Using seat belts
127
Inertia reels and belt tensioners
130
Airbag system
132
Description of the airbag system
132
Airbag overview
133
Deactivating airbags
136
Transporting children safely
139
Child seat
139
Fastening systems
141
General Maintenance
Car care
144
Service intervals
144
Services, modifications and technical
alterations
146
Washing your car
149
Taking care of your vehicle exterior
150
Taking care of the interior
154
Inspecting and replenishing
157
Fuel
157
Engine compartment
159
Engine oil
163
Coolant
1653Table of Contents
Page 101 of 219
Switching off the engineFirst read and observe the introductory information and safety warn-ings
on page 96.
Switch off the engine by turning the ignition key to position
1
» Fig. 89 on
page 97.
Brakes
Introduction
This chapter contains information on the following subjects:
Information on braking
98
Handbrake
99WARNING■ Greater physical effort is required for braking when the engine is switched
off – risk of accident!■
The clutch pedal must be depressed when braking on a vehicle with manual
transmission, when the vehicle is in gear and at low revs. Otherwise, the func-
tion of the brake booster may be impaired – risk of accident!
■
If a front spoiler, full wheel trim, etc. is mounted retrospectively, it must be
ensured that the air supply to the front wheel brakes is not reduced. The front
brakes may overheat, which can have a negative impact on the functioning of
the braking system – there is a risk of an accident.
■
Never leave children unattended in the vehicle. The children might, for ex-
ample, release the handbrake or take the vehicle out of gear. The vehicle
could then start to move – risk of accident!
CAUTION
■ Observe the recommendations on the new brake pads » page 104.■Never let the brakes slip with light pressure on the pedal if braking is not neces-
sary. This causes the brakes to overheat and can also result in a longer braking distance and excessive wear.
Information on braking
First read and observe the introductory information and safety warn-
ings
on page 98.
If the brakes are applied in full and the control unit for the braking system consid-
ers the situation to be dangerous for the following traffic, the brake light flashes
automatically.
After the speed was reduced below around 10 km/h or the vehicle was stopped,
the brake light stops flashing and the hazard warning light system switches on.
The hazard warning light system is switched off automatically after accelerating
or driving off again.
Before travelling a long distance down a steep gradient, reduce speed and shift
into the next lowest gear. As a result, the braking effect of the engine will be
used, reducing the load on the brakes. Any additional braking should be comple-
ted intermittently, not continuously.
Wear-and-tear
The wear of the brake pads is dependent on the operating conditions and driving style.
The brake pads wear more quickly if a lot of journeys are completed in towns and
over short distances or if a very sporty style of driving is adopted.
Under these severe conditions , the thickness of the brake pads must also be
checked by a specialist garage between services.
Wet roads or road salt
The performance of the brakes can be delayed as the brake discs and brake pads may be moist or have a coating of ice or layer of salt on them in winter. The
brakes are cleaned and dried by applying the brakes several times.
Corrosion
Corrosion on the brake discs and dirt on the bake pads occur if the vehicle has been parked for a long period and if you do not make much use of the braking
system. The brakes are cleaned and dried by applying the brakes several times.
Faults in the brake surface
If it is found that the braking distance has suddenly become longer and that the brake pedal can be depressed further, the brake system may be faulty.
Visit a specialist garage immediately and adjust your style of driving appropriately as you will not know the exact extent of the damage.
98Driving
Page 103 of 219
CAUTIONIf not in the process of changing gear, do not leave your hand on the gearshiftlever while driving. The pressure from the hand can cause the gearshift mecha-nism to wear excessively.
Pedals
First read and observe the introductory information given on page 99.
The operation of the pedals must not be hindered under any circumstances!
In the driver's footwell, only a footmat, which is attached to the two correspond- ing attachment points, may be used.
Only use footmats from the range of ŠKODA Original Accessories, which are fitted to two attachment points.
WARNINGNo objects are allowed in the driver's footwell – risk of obstruction or limita-
tion in operating the pedals!
Automatic transmission
Introduction
This chapter contains information on the following subjects:
Modes and use of selector lever
101
Manual shifting (Tiptronic)
102
Starting-off and driving
102
Malfunction
103
Selector lever-emergency unlocking
103WARNING■ Do not depress the accelerator if the forward driving mode is changed when
the vehicle is halted and the engine is running – there is a risk of an accident.■
Never shift the selector lever to R or P modes when driving – there is a risk
of an accident.
■
The vehicle must be held on the brake pedal in D, S or R modes if the vehicle
is halted and the engine is running. Even when the engine is idling, power
transmission is never completely interrupted – the vehicle will creep.
CAUTION
■ If the selector lever is shifted to N while the vehicle is being driven you must lift
off the accelerator pedal and you will need to wait until the engine has reached
its idling speed before shifting the selector lever to a forward driving mode again.■
At temperatures below -10 °C, the engine can only be started in selector lever
position P.
■
Never try to hold the vehicle using the accelerator pedal when stopping on a hill
– this may lead to transmission damage.
Note
The ignition key can only be withdrawn once the ignition has been switched off if
the selector lever is in the P position 1)
.1)
Only valid for some countries.
100Driving
Page 107 of 219
During the first operating hours the engine has higher internal friction than lateruntil all of the moving parts have harmonized. The driving style which you adopt
during the first approx.1 500 kilometres plays a decisive part in the success of
running in your car.
Never drive at unnecessarily high engine speeds even after the running-in period. On vehicles fitted with a manual gearbox, at the very latest shift up into the nextgear when the red area is reached. Observe the recommended gear » page 13,
Recommended gear . Very high engine speeds when accelerating (accelerator) are
automatically restricted »
.
In vehicles with manual transmission, do not drive at unnecessarily low engine
speeds. Shift down a gear when the engine is no longer running smoothly. Ob-
serve the recommended gear » page 13, Recommended gear .
CAUTION
■
The engine is not protected from excessive engine revs caused by shifting
down at the wrong time. This can result in a sudden increase in revs beyond the
permissible maximum rpm and hence engine damage.■
Never rev up a cold engine when the vehicle is stationary or when driving in in-
dividual gears.
For the sake of the environment
Do not drive at unnecessarily high engine speeds. Shifting up sooner helps save
fuel, reduces engine noise and protects the environment.
New tyres
First read and observe the introductory information given on page 103.
New tyres must firstly be “run in” since they do not offer optimal grip at first.Therefore, drive especially carefully for the first 500 km or so.
New brake pads
First read and observe the introductory information given on page 103.
New brake pads do not initially provide optimal braking performance. They firstneed to be “run in”. Therefore, drive especially carefully for the first 200 km or so.
Economical driving and environmental sustainability
Introduction
This chapter contains information on the following subjects:
Looking ahead
105
Economical gear changing.
105
Avoiding full throttle
105
Reducing idling
106
Avoiding short distances
106
Checking tyre pressure
106
Avoiding unnecessary ballast
106
Regular maintenance
107
Saving electrical energy
107
Environmental compatibility
107
The technical requirements for low fuel usage and economic efficiency of the ve-
hicle have already been built into the vehicle at the works. ŠKODA places a partic-
ular emphasis on minimising negative effects on the environment.
It is necessary to take note of the guidelines given in this chapter in order tomake best use of these characteristics and to maintain their effectiveness.
Fuel consumption, environmental pollution and the wear to the engine, brakes
and tyres depend essentially on the following three factors.
› Your personal driving style
› Operating conditions
› Technical requirements
The fuel economy by can be improved by 10 -15 % by always looking ahead and
driving in an economical way.
104Driving
Page 191 of 219
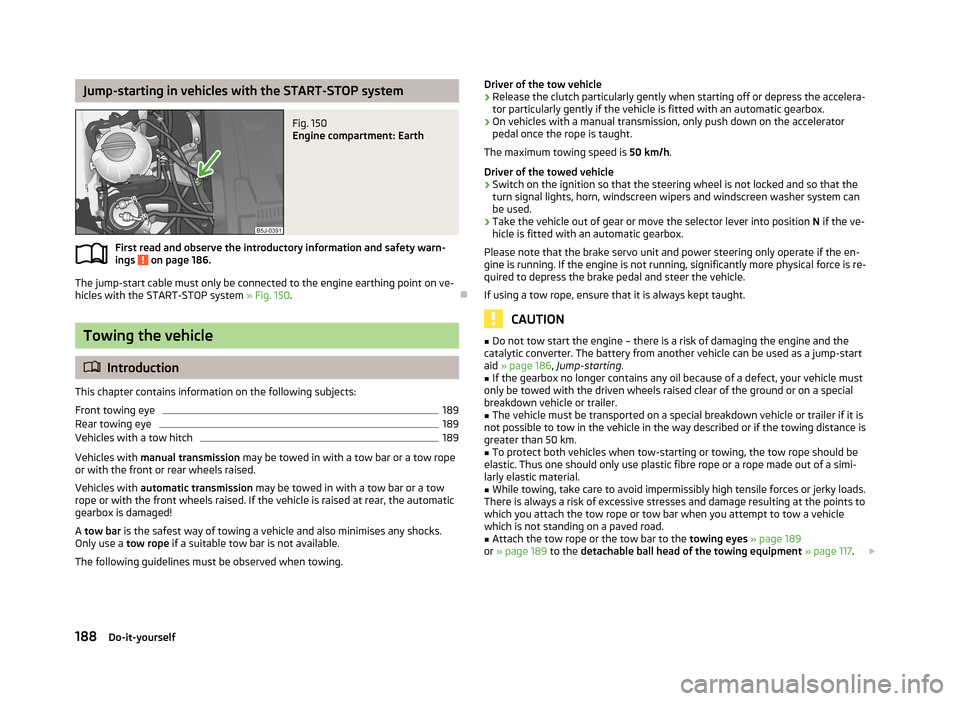
Jump-starting in vehicles with the START-STOP systemFig. 150
Engine compartment: Earth
First read and observe the introductory information and safety warn-ings on page 186.
The jump-start cable must only be connected to the engine earthing point on ve-
hicles with the START-STOP system » Fig. 150.
Towing the vehicle
Introduction
This chapter contains information on the following subjects:
Front towing eye
189
Rear towing eye
189
Vehicles with a tow hitch
189
Vehicles with manual transmission may be towed in with a tow bar or a tow rope
or with the front or rear wheels raised.
Vehicles with automatic transmission may be towed in with a tow bar or a tow
rope or with the front wheels raised. If the vehicle is raised at rear, the automatic
gearbox is damaged!
A tow bar is the safest way of towing a vehicle and also minimises any shocks.
Only use a tow rope if a suitable tow bar is not available.
The following guidelines must be observed when towing.
Driver of the tow vehicle›Release the clutch particularly gently when starting off or depress the accelera-
tor particularly gently if the vehicle is fitted with an automatic gearbox.›
On vehicles with a manual transmission, only push down on the accelerator pedal once the rope is taught.
The maximum towing speed is 50 km/h.
Driver of the towed vehicle
›
Switch on the ignition so that the steering wheel is not locked and so that the turn signal lights, horn, windscreen wipers and windscreen washer system can
be used.
›
Take the vehicle out of gear or move the selector lever into position N if the ve-
hicle is fitted with an automatic gearbox.
Please note that the brake servo unit and power steering only operate if the en-
gine is running. If the engine is not running, significantly more physical force is re-
quired to depress the brake pedal and steer the vehicle.
If using a tow rope, ensure that it is always kept taught.
CAUTION
■ Do not tow start the engine – there is a risk of damaging the engine and the
catalytic converter. The battery from another vehicle can be used as a jump-start
aid » page 186 , Jump-starting .■
If the gearbox no longer contains any oil because of a defect, your vehicle must
only be towed with the driven wheels raised clear of the ground or on a special
breakdown vehicle or trailer.
■
The vehicle must be transported on a special breakdown vehicle or trailer if it is
not possible to tow in the vehicle in the way described or if the towing distance is greater than 50 km.
■
To protect both vehicles when tow-starting or towing, the tow rope should be
elastic. Thus one should only use plastic fibre rope or a rope made out of a simi-
larly elastic material.
■
While towing, take care to avoid impermissibly high tensile forces or jerky loads.
There is always a risk of excessive stresses and damage resulting at the points to
which you attach the tow rope or tow bar when you attempt to tow a vehicle
which is not standing on a paved road.
■
Attach the tow rope or the tow bar to the towing eyes » page 189
or » page 189 to the detachable ball head of the towing equipment » page 117 .
188Do-it-yourself
Page 209 of 219
Index
A
Abroad Driving abroad
109
Unleaded petrol109
ABS111
Warning light24
Accessories146
Adjusting Exterior mirrors
51
Seat53
Steering wheel95
Adjusting the seats124
Aerial150
See windows152
Airbag132
Deactivating137
Deactivating the front passenger airbag137
Deployment132
Front airbag134
Head airbag136
Modifications and damage to the airbag system 148
Side airbag
135
Airbag system132
Air conditioning Operation
81
Air conditioning system Air outlets
77
Climatronic83
Manual air conditioning system80
Air outlets77
Alarm35
Anti-theft alarm system35
Operation36
Trailer122
Antilock Braking System111
Armrest71
Ashtray66
ASR111
warning light23
Assist systems ABS
24, 111
ASR23, 111
Cruise Control System113
EDS and XDL111
ESC23, 110
Parking aid112
START-STOP115
Auto Check Control19
Automatic gearbox Selector lever-emergency unlocking
103
Starting-off and driving102
Tiptronic102
Automatic load deactivation171
Automatic transmission100
Kickdown102
Malfunction103
Selector lever lock101
Using the selector lever101
AUX94
Avoiding damage to the vehicle Driving through water
108
Avoiding damage to your vehicle108
B
Ball head Check fitting
119
Fitting118
Ready position118
Removing119
Belts127
Belt tensioners131
Bicycle carrier63
Bonnet Closing
161
Opening161
Boot Cover60
Emergency unlocking38
Fastening elements58
Fixing nets59
Folding hooks59
see Boot lid37
Unlocking the boot lid38
Boot lid37
Automatic locking37
Brake assist110
Brake booster99
Brake fluid167
Changing168
Checking167
Display messages20
Brakes Brake booster
99
Brake fluid167
Handbrake99
Indicator light20
Running in104
Braking Information on braking
98
Breakdown kit185
Bulbs In the tail light
198
Replacing194
Button in the driver's door Electrical power windows
38
C
Car care
144
Car computer see Multifunction display
13
Car park ticket holder68
Carrier65
Cavity protection153
Central locking button33
206Index
Page 212 of 219
HeatingDeicing the windows79
Exterior mirrors51
Operating78
Operation79
Rear window47
Recirculated air mode80
Seats53
Heating and air-conditioning77
Hill hold control110
Horn9
I
Ignition
97
Ignition lock97
Immobilizer97
Individual settings locking
32
unlocking32
Inertia reels130
Instrument cluster10
Overview10
Interior monitor36
Internal lighting Praktik
75
Internal lights Praktik
75
ISOFIX141
J
Jack
180
Jacking points Raise vehicle
183
Jump-starting186, 187
L
lashings Praktik
74
LightCockpit46
Headlight beam adjustment42
Headlight flash43
Replacing bulbs194
Lights41
Cockpit46
Daylight running42
Fog lights44
Foglights with the CORNER function44
Halogen projector headlights with cornering light
function
43
Hazard warning light system45
Low beam lights41
Main beam lights43
Parking lights41, 45
Rear fog light44
Switching on and off41
Tourist lights44
Turn signals43
warning lights20
Loads199
Lock Central locking system
33
Locking Emergency locking
31
Remote control34
without central locking30
Locking and unlocking from the inside33
Low beam lights41
Luggage compartment Class N1 vehicles
58
Lighting47
Variable loading floor61
Luggage compartment lid37
M
Main beam
43
Maintenance107
Decorative films152
Manual air conditioning Recirculated air mode82
Manual gear changing see gear changing
99
Materials defect liability5
MAXI DOT Main menu
18
see MAXI DOT display18
Settings18
MAXI DOT display18
Maximum speed202
MDI94
Mirror Exterior mirrors
51
Manually dimmed rear-view mirror51
Vanity48
Mobile phone86
Connecting to the hands-free system89
Modes of the automatic transmission101
Modifications146
Modifications and technical alterations Airbags
148
Service147
Spoiler148
Multifunction display Functions
13
Memory14
Operation14
Multimedia92
N
N1
58
Net partition60
O
Oil See Engine oil
164
Oil pressure Display messages
21
209Index