stop start SKODA ROOMSTER 2014 1.G Owner's Guide
[x] Cancel search | Manufacturer: SKODA, Model Year: 2014, Model line: ROOMSTER, Model: SKODA ROOMSTER 2014 1.GPages: 204, PDF Size: 14.15 MB
Page 128 of 204
Error: Start-Stop
ERROR START-STOP
A system error is present. Seek help from a specialist garage.
Tyre pressure monitoring
Introduction
This chapter contains information on the following subjects:
Save tyre pressure values
125
The tyre pressure monitoring function (hereinafter referred to only as a sys-
tem) monitors the tyre pressure while driving.
If the rolling circumference of a wheel is changed, the indicator light in the
instrument cluster lights up and an audible signal sounds.
Information on the procedure for the notification of change of tyre inflation
pressure » page 45 .
The system can only function properly if the tyres have the prescribed inflation
pressure and this pressure values are stored in the system.
WARNING■ The driver is always responsible for the tyre inflation pressure. Tyre pres-
sure should be checked regularly » page 157.■
The system cannot warn in case of very rapid loss of tyre pressure, e.g. in
the event of a sudden puncture.
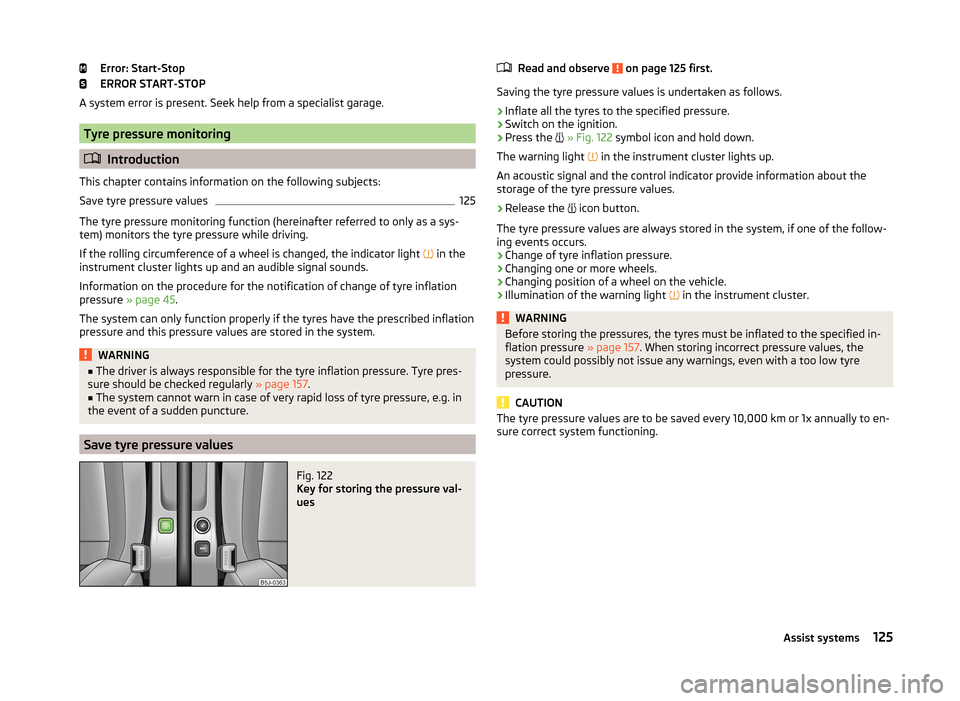
Save tyre pressure values
Fig. 122
Key for storing the pressure val-
ues
Read and observe on page 125 first.
Saving the tyre pressure values is undertaken as follows.
›
Inflate all the tyres to the specified pressure.
›
Switch on the ignition.
›
Press the
» Fig. 122 symbol icon and hold down.
The warning light
in the instrument cluster lights up.
An acoustic signal and the control indicator provide information about the
storage of the tyre pressure values.
›
Release the
icon button.
The tyre pressure values are always stored in the system, if one of the follow-
ing events occurs.
› Change of tyre inflation pressure.
› Changing one or more wheels.
› Changing position of a wheel on the vehicle.
› Illumination of the warning light
in the instrument cluster.
WARNINGBefore storing the pressures, the tyres must be inflated to the specified in-
flation pressure » page 157. When storing incorrect pressure values, the
system could possibly not issue any warnings, even with a too low tyre
pressure.
CAUTION
The tyre pressure values are to be saved every 10,000 km or 1x annually to en-
sure correct system functioning.125Assist systems
Page 134 of 204
The towed weight comprises the actual weights of the (loaded) towing vehicle
and the (loaded) trailer.
The trailer and drawbar load information on the type plate of the towing
equipment are merely test data for the towing equipment. The vehicle-specific
values are detailed in the vehicle documents.WARNING■ The maximum permissible axle and drawbar load and the permissible
weight of the trailer must not exceed - this could cause an accident!■
A sliding cargo can significantly adversely affect stability and driving safe-
ty - there is a risk of accident!
Towing a trailer
Driving speed
For safety reasons, do not drive faster than 80 km/h when towing a trailer.
Immediately reduce your speed as soon as even the slightest swaying of the
trailer is detected. Never attempt to stop the trailer from “swaying” by acceler-
ating.
Brakes
Apply the brakes in good time! If the trailer is fitted with a trailer brake, apply
the brakes gently at first, then brake firmly. This will avoid brake jolts resulting
from the trailer wheels locking.
On downhill sections shift down a gear in good time to also use the engine as
a brake.
Engine overheating
The speed must be reduced immediately if the needle for the coolant tempera-
ture gauge moves into the right-hand area or the red area of the scale.
Stop and switch off the engine if the warning light in the instrument cluster
starts to flash. Wait a few minutes and check the level of coolant » page 151,
Checking the coolant level .
Further information » page 41,
Coolant
.
The coolant temperature can be reduced by switching on the heating.
WARNING■ Always drive particularly carefully with the trailer.■Adapt your speed to the conditions of the road surface and to the traffic
situation.
Note
If you tow a trailer frequently, you should also have your vehicle inspected be-
tween service intervals.
Anti-theft alarm system
When the vehicle is locked, the alarm is activated when the electrical connec-
tion to the trailer is interrupted.
Always switch off the anti-theft alarm system before a trailer is coupled or un-
coupled » page 53 .
Conditions for including a trailer in the anti-theft alarm system. The vehicle is factory-fitted with an anti-theft alarm system and towing
equipment.
The trailer is electrically connected to the towing vehicle by means of the
trailer socket.
The electrical system of the vehicle and trailer is functional.
The vehicle is locked with the vehicle key and the anti-theft alarm system
is activated.
CAUTION
For technical reasons, trailers with rear LED lights cannot be connected to the
anti-theft alarm system.131Hitch and trailer
Page 158 of 204
Vehicles with a START-STOP system are fitted with a battery control unit for
checking the energy level for the recurring engine start.
We recommend that you have the acid level checked regularly by a specialist garage, especially in the following cases.
› High external temperatures.
› Longer day trips.
› After each charge.
Winter time
The vehicle battery only has some of its starting power at low temperatures. A
discharged vehicle battery may freeze at temperatures just below 0 °C .
We therefore recommend that you have the battery checked and, if necessary,
recharged by a specialist garage before the start of the winter.
CAUTION
For technical reasons, on vehicles with the description “AGM”, the electrolyte
level cannot be checked.
Note
The battery acid level is also checked regularly by a specialist garage as part of
the inspection service.
Charging
Read and observe
and on page 153 first.
A properly charged vehicle battery is essential for reliably starting the engine.
›
Switch off the ignition and all of the electrical components.
›
Disconnect both battery cables (“negative” first, then “positive”) only when“rapid charging” the battery.
›
Attach the terminal clamps of the charger to the battery terminals (red =
“positive”, black = “negative”).
›
Plug the mains cable of the charger into the power socket and switch the
charger on.
›
Once charging is complete: Switch off the charger and remove the mains ca-
ble from the power socket.
›
Only then disconnect the charger's terminal clamps.
›
Reconnect the cables to the battery (first “positive”, then “negative”).
It is not necessary to disconnect the battery cables if you are recharging the
vehicle battery using low amperages (for example from a mini-charger). Refer
to the charger manufacturer's instructions .
A charging current of 0.1 multiple of the total vehicle battery capacity (or low-
er) must be used until full charging is achieved.
Both cables must be disconnected before charging the battery with high
amperages, known as “ rapid charging”.
The vent plugs of the vehicle battery should not be opened for charging.WARNING“Quick-charging” the vehicle battery is dangerous and requires a special
charger and specialist knowledge.
CAUTION
On vehicles with the START/STOP system, the pole terminal of the charger
must not be connected directly to the negative terminal of the vehicle battery,
but only to the engine earth » page 173, Jump-starting in vehicles with the
START-STOP system .
Note
We therefore recommend that vehicle batteries be rapid charged by a special-
ist garage.
Replacing
Read and observe
and on page 153 first.
The new vehicle battery must have the same capacity, voltage, current and
size as the original battery. Suitable vehicle battery types can be purchased
from a specialist garage.
We recommend having the battery replaced by a specialist garage, where the
new vehicle battery will be installed properly and the original battery will be
disposed of in accordance with national regulations.
Disconnecting or reconnecting
Read and observe
and on page 153 first.
The following functions are initially deactivated or are no longer able to oper-
ate faultlessly after the vehicle battery has been disconnected and reconnec-
ted.
155Inspecting and replenishing
Page 172 of 204
›Continue turning up the jack until the wheel is just about lifted off the
ground.WARNINGNotes for vehicle lifting■Choose a flat and firm surface for jacking the vehicle.■
If the wheel has to be changed on a slope, first of all block the opposite
wheel with a stone or similar object to prevent the vehicle from unexpect-
edly rolling away.
■
Secure the base plate of the lifting jack with suitable means to prevent
possible moving. A soft and slippery ground under the base plate may move
the lifting jack, causing the vehicle to fall down. It is therefore always nec-
essary to place the lifting jack on a solid surface or use a wide and stable
base. Use a non-slip base (e.g. a rubber foot mat) if the surface is smooth,
such as cobbled stones, tiled floor, etc.
■
Only attach the lifting jack to the attachment points provided for this pur-
pose.
■
Always raise the vehicle with the doors closed.
■
Never position any body parts, such as arms or legs under the vehicle,
while the vehicle is raised with a lifting jack.
■
When the vehicle is raised, never start the engine.
CAUTION
It is important to ensure that the jack is correctly attached to the web of the
lower fork leg, otherwise there is a risk of damage to the vehicle occurring.
Anti-theft wheel bolts
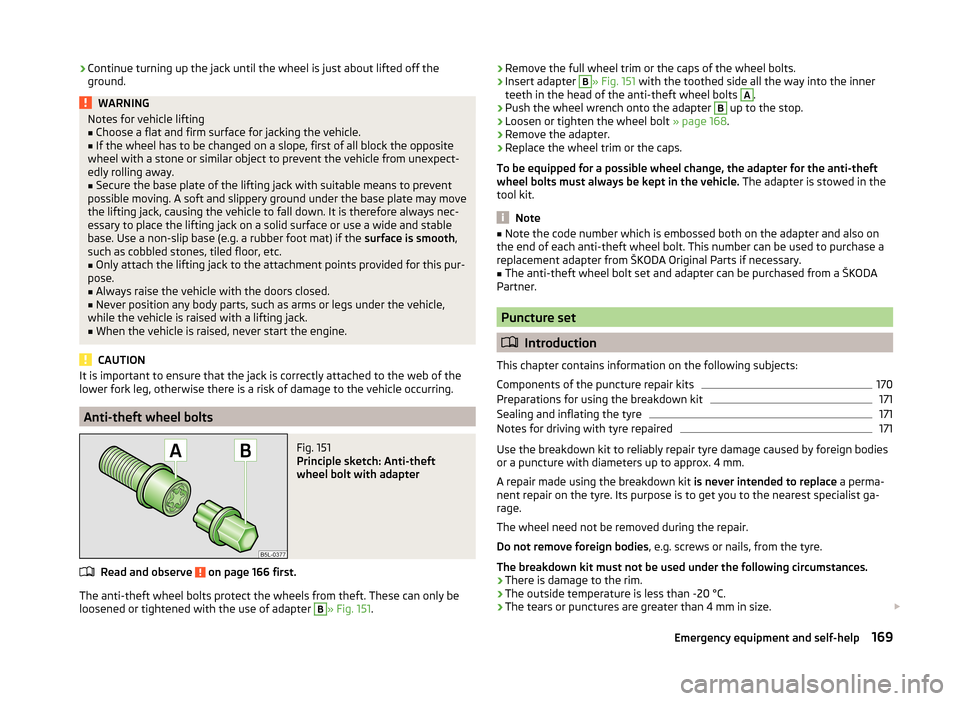
Fig. 151
Principle sketch: Anti-theft
wheel bolt with adapter
Read and observe on page 166 first.
The anti-theft wheel bolts protect the wheels from theft. These can only be
loosened or tightened with the use of adapter
B
» Fig. 151 .
›Remove the full wheel trim or the caps of the wheel bolts.›Insert adapter B» Fig. 151
with the toothed side all the way into the inner
teeth in the head of the anti-theft wheel bolts A
.
›
Push the wheel wrench onto the adapter
B
up to the stop.
›
Loosen or tighten the wheel bolt » page 168.
›
Remove the adapter.
›
Replace the wheel trim or the caps.
To be equipped for a possible wheel change, the adapter for the anti-theft
wheel bolts must always be kept in the vehicle. The adapter is stowed in the
tool kit.
Note
■ Note the code number which is embossed both on the adapter and also on
the end of each anti-theft wheel bolt. This number can be used to purchase a
replacement adapter from ŠKODA Original Parts if necessary.■
The anti-theft wheel bolt set and adapter can be purchased from a ŠKODA
Partner.
Puncture set
Introduction
This chapter contains information on the following subjects:
Components of the puncture repair kits
170
Preparations for using the breakdown kit
171
Sealing and inflating the tyre
171
Notes for driving with tyre repaired
171
Use the breakdown kit to reliably repair tyre damage caused by foreign bodies
or a puncture with diameters up to approx. 4 mm.
A repair made using the breakdown kit is never intended to replace a perma-
nent repair on the tyre. Its purpose is to get you to the nearest specialist ga-
rage.
The wheel need not be removed during the repair.
Do not remove foreign bodies , e.g. screws or nails, from the tyre.
The breakdown kit must not be used under the following circumstances. › There is damage to the rim.
› The outside temperature is less than -20 °C.
› The tears or punctures are greater than 4 mm in size.
169Emergency equipment and self-help
Page 175 of 204
If the tyre pressure is 1.3 bar or less› Do not drive the vehicle! You cannot properly seal with tyre with the
breakdown kit.
If the tyre pressure is 1.3 bar or more›
Set the tyre pressure back to the correct value.
›
Continue driving carefully to the nearest specialist garage at a maximum speed of 80 km/h (50 mph).
Jump-starting
Introduction
This chapter contains information on the following subjects:
Jump-starting using the battery from another vehicle
172
Jump-starting in vehicles with the START-STOP system
173
The battery of another vehicle can be used to jump-start your vehicle if the en-
gine will not start because the battery is flat.
WARNING■ Pay attention to the warning instructions relating to work in the engine
compartment » page 145.■
A discharged vehicle battery may already freeze at temperatures just be-
low 0 °C. If the battery is frozen, do not jump start with the battery of an-
other vehicle – there is a risk of explosion.
■
Keep any sources of ignition (naked flame, smouldering cigarettes, etc.)
away from the battery – risk of explosion!
■
Never jump-start vehicle batteries with insufficient acid levels – risk of
explosion and chemical burns.
■
The vent screws of the battery cells must be tightened firmly.
Note
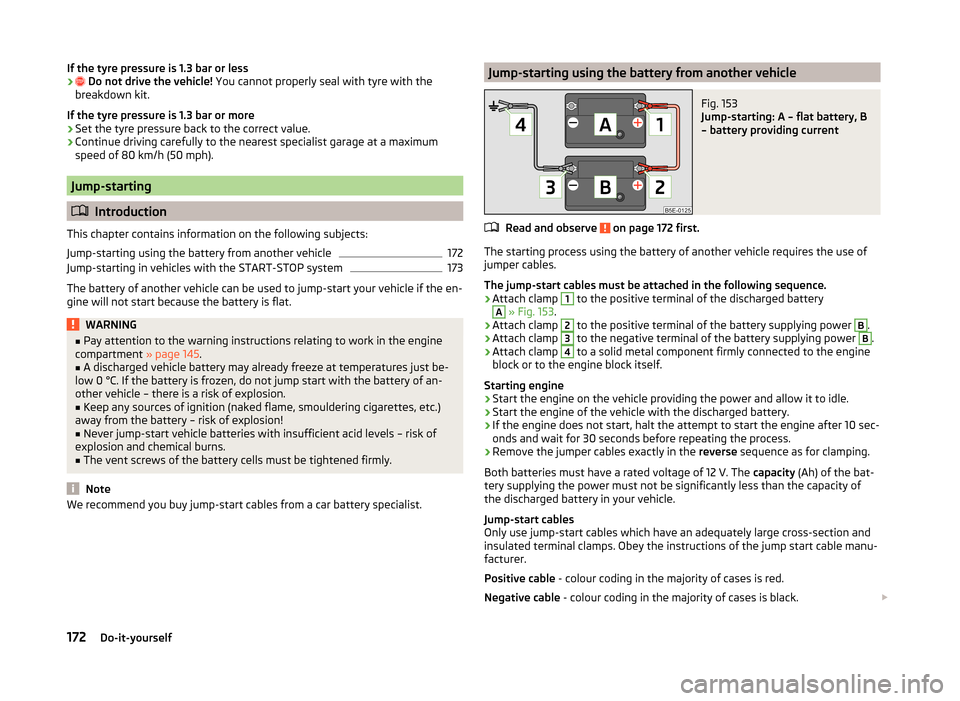
We recommend you buy jump-start cables from a car battery specialist.Jump-starting using the battery from another vehicleFig. 153
Jump-starting: A – flat battery, B
– battery providing current
Read and observe on page 172 first.
The starting process using the battery of another vehicle requires the use of
jumper cables.
The jump-start cables must be attached in the following sequence.
›
Attach clamp
1
to the positive terminal of the discharged battery
A
» Fig. 153 .
›
Attach clamp
2
to the positive terminal of the battery supplying power
B
.
›
Attach clamp
3
to the negative terminal of the battery supplying power
B
.
›
Attach clamp
4
to a solid metal component firmly connected to the engine
block or to the engine block itself.
Starting engine
›
Start the engine on the vehicle providing the power and allow it to idle.
›
Start the engine of the vehicle with the discharged battery.
›
If the engine does not start, halt the attempt to start the engine after 10 sec-
onds and wait for 30 seconds before repeating the process.
›
Remove the jumper cables exactly in the reverse sequence as for clamping.
Both batteries must have a rated voltage of 12 V. The capacity (Ah) of the bat-
tery supplying the power must not be significantly less than the capacity of
the discharged battery in your vehicle.
Jump-start cables
Only use jump-start cables which have an adequately large cross-section and
insulated terminal clamps. Obey the instructions of the jump start cable manu-
facturer.
Positive cable - colour coding in the majority of cases is red.
Negative cable - colour coding in the majority of cases is black.
172Do-it-yourself
Page 176 of 204
WARNING■Do not clamp the jump-start cable to the negative terminal of the dis-
charged battery. There is the risk of detonating gas seeping out the battery
being ignited by the strong spark which results from the engine being star-
ted.■
The non-insulated parts of the terminal clamps must never touch each
other – there is a risk of short circuit.
■
The jump-start cable connected to the positive terminal of the battery
must not come into contact with electrically conducting parts of the vehicle
– there is a risk of short circuit.
■
Route the jump-start cables so that they cannot be caught by any rotat-
ing parts in the engine compartment.
■
There must not be any contact between the two vehicles otherwise cur-
rent may flow as soon as the negative terminals are connected.
Jump-starting in vehicles with the START-STOP system
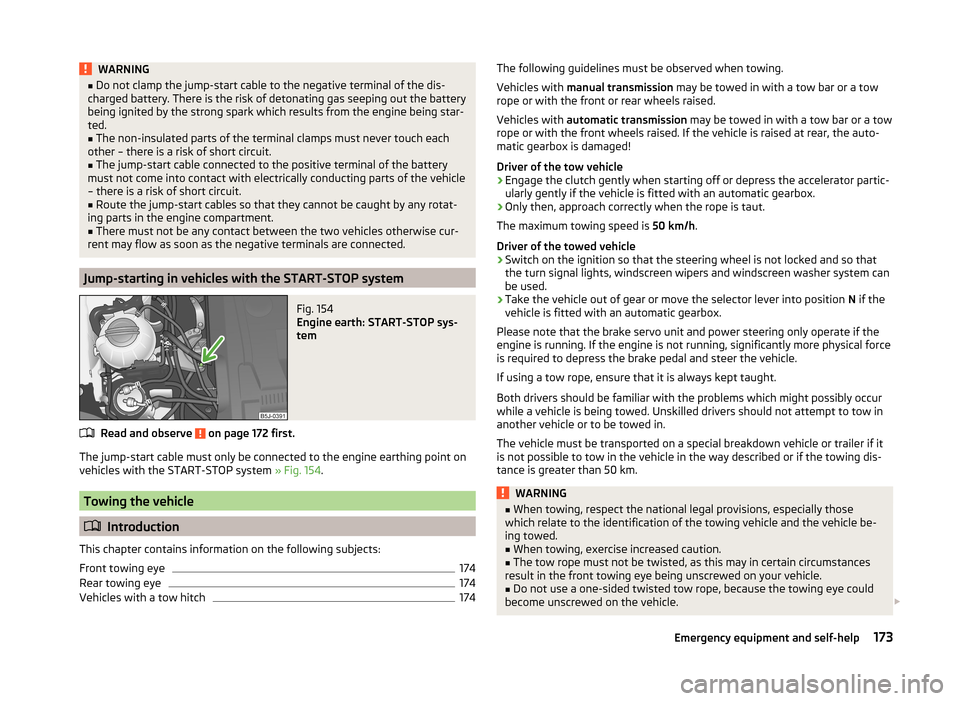
Fig. 154
Engine earth: START-STOP sys-
tem
Read and observe on page 172 first.
The jump-start cable must only be connected to the engine earthing point on
vehicles with the START-STOP system » Fig. 154.
Towing the vehicle
Introduction
This chapter contains information on the following subjects:
Front towing eye
174
Rear towing eye
174
Vehicles with a tow hitch
174The following guidelines must be observed when towing.
Vehicles with manual transmission may be towed in with a tow bar or a tow
rope or with the front or rear wheels raised.
Vehicles with automatic transmission may be towed in with a tow bar or a tow
rope or with the front wheels raised. If the vehicle is raised at rear, the auto-
matic gearbox is damaged!
Driver of the tow vehicle›
Engage the clutch gently when starting off or depress the accelerator partic-
ularly gently if the vehicle is fitted with an automatic gearbox.
›
Only then, approach correctly when the rope is taut.
The maximum towing speed is 50 km/h.
Driver of the towed vehicle
›
Switch on the ignition so that the steering wheel is not locked and so that
the turn signal lights, windscreen wipers and windscreen washer system can
be used.
›
Take the vehicle out of gear or move the selector lever into position N if the
vehicle is fitted with an automatic gearbox.
Please note that the brake servo unit and power steering only operate if the
engine is running. If the engine is not running, significantly more physical force
is required to depress the brake pedal and steer the vehicle.
If using a tow rope, ensure that it is always kept taught.
Both drivers should be familiar with the problems which might possibly occur while a vehicle is being towed. Unskilled drivers should not attempt to tow in
another vehicle or to be towed in.
The vehicle must be transported on a special breakdown vehicle or trailer if it
is not possible to tow in the vehicle in the way described or if the towing dis-
tance is greater than 50 km.
WARNING■ When towing, respect the national legal provisions, especially those
which relate to the identification of the towing vehicle and the vehicle be-
ing towed.■
When towing, exercise increased caution.
■
The tow rope must not be twisted, as this may in certain circumstances
result in the front towing eye being unscrewed on your vehicle.
■
Do not use a one-sided twisted tow rope, because the towing eye could
become unscrewed on the vehicle.
173Emergency equipment and self-help
Page 177 of 204
CAUTION■Do not tow start the engine – there is a risk of damaging the engine and the
catalytic converter. The battery from another vehicle can be used as a jump-
start aid » page 172 , Jump-starting .■
If the gearbox no longer contains any oil, your vehicle must only be towed
with the front axle raised clear of the ground or on a breakdown vehicle or
trailer.
■
To protect both vehicles when tow-starting or towing, the tow rope should
be elastic. Thus one should only use plastic fibre rope or a rope made out of a
similarly elastic material.
■
There is always a risk of excessive stresses and damage resulting at the
points to which you attach the tow rope or tow bar when you attempt to tow a
vehicle which is not standing on a paved road.
■
Attach the tow rope or the tow bar to the towing eyes » page 174 , Front
towing eye or » page 174 , Rear towing eye to the detachable ball head of the
towing equipment » page 126 .
Note
We recommend using a tow rope from ŠKODA Original Accessories, which is
available from a ŠKODA Partner.
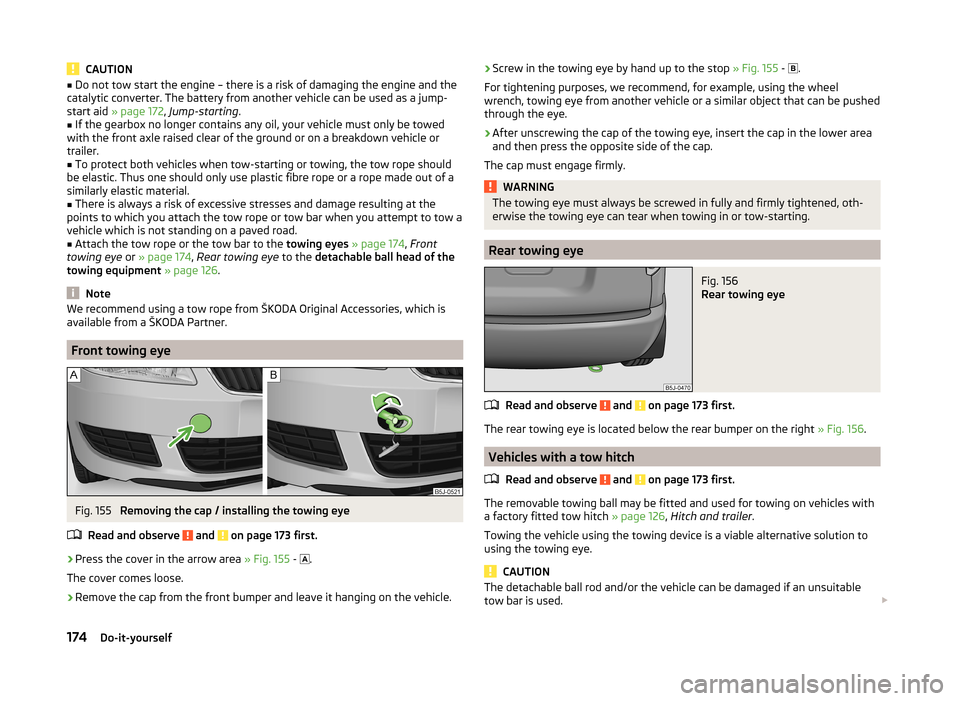
Front towing eye
Fig. 155
Removing the cap / installing the towing eye
Read and observe
and on page 173 first.
›
Press the cover in the arrow area » Fig. 155 -
.
The cover comes loose.
›
Remove the cap from the front bumper and leave it hanging on the vehicle.
› Screw in the towing eye by hand up to the stop
» Fig. 155 - .
For tightening purposes, we recommend, for example, using the wheel
wrench, towing eye from another vehicle or a similar object that can be pushed
through the eye.›
After unscrewing the cap of the towing eye, insert the cap in the lower area
and then press the opposite side of the cap.
The cap must engage firmly.
WARNINGThe towing eye must always be screwed in fully and firmly tightened, oth-
erwise the towing eye can tear when towing in or tow-starting.
Rear towing eye
Fig. 156
Rear towing eye
Read and observe and on page 173 first.
The rear towing eye is located below the rear bumper on the right » Fig. 156.
Vehicles with a tow hitch
Read and observe
and on page 173 first.
The removable towing ball may be fitted and used for towing on vehicles with
a factory fitted tow hitch » page 126, Hitch and trailer .
Towing the vehicle using the towing device is a viable alternative solution to
using the towing eye.
CAUTION
The detachable ball rod and/or the vehicle can be damaged if an unsuitable
tow bar is used. 174Do-it-yourself
Page 179 of 204
Note■We recommend always carrying replacement fuses in the vehicle. A box of
replacement fuses can be purchased from ŠKODA Original Accessories.■
There can be multiple power consuming devices for one fuse.
■
A single consumer may use several fuses.
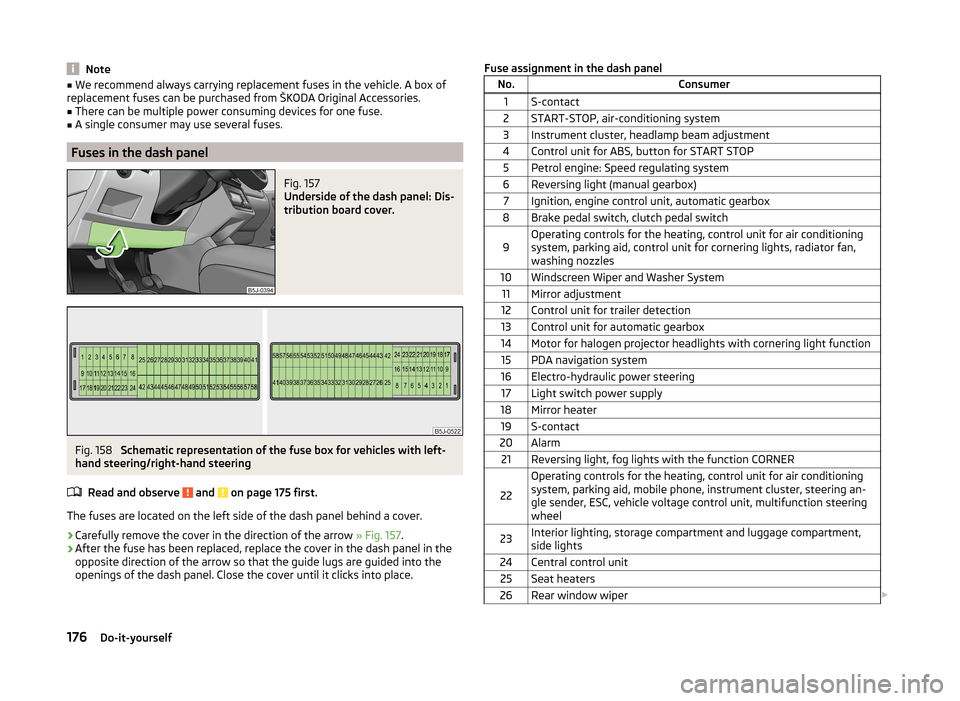
Fuses in the dash panel
Fig. 157
Underside of the dash panel: Dis-
tribution board cover.
Fig. 158
Schematic representation of the fuse box for vehicles with left-
hand steering/right-hand steering
Read and observe
and on page 175 first.
The fuses are located on the left side of the dash panel behind a cover.
› Carefully remove the cover in the direction of the arrow
» Fig. 157.
› After the fuse has been replaced, replace the cover in the dash panel in the
opposite direction of the arrow so that the guide lugs are guided into the
openings of the dash panel. Close the cover until it clicks into place.
Fuse assignment in the dash panelNo.Consumer1S-contact2START-STOP, air-conditioning system3Instrument cluster, headlamp beam adjustment4Control unit for ABS, button for START STOP5Petrol engine: Speed regulating system6Reversing light (manual gearbox)7Ignition, engine control unit, automatic gearbox8Brake pedal switch, clutch pedal switch9Operating controls for the heating, control unit for air conditioning
system, parking aid, control unit for cornering lights, radiator fan,
washing nozzles10Windscreen Wiper and Washer System11Mirror adjustment12Control unit for trailer detection13Control unit for automatic gearbox14Motor for halogen projector headlights with cornering light function15PDA navigation system16Electro-hydraulic power steering17Light switch power supply18Mirror heater19S-contact20Alarm21Reversing light, fog lights with the function CORNER
22
Operating controls for the heating, control unit for air conditioning
system, parking aid, mobile phone, instrument cluster, steering an-
gle sender, ESC, vehicle voltage control unit, multifunction steering
wheel23Interior lighting, storage compartment and luggage compartment,
side lights24Central control unit25Seat heaters26Rear window wiper 176Do-it-yourself
Page 180 of 204
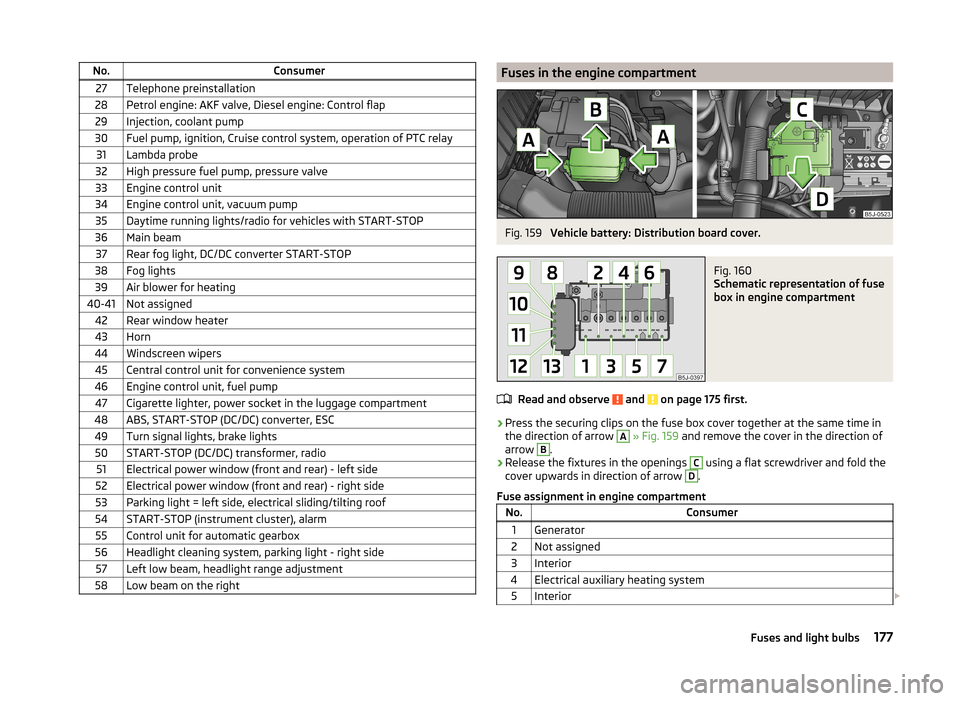
No.Consumer27Telephone preinstallation28Petrol engine: AKF valve, Diesel engine: Control flap29Injection, coolant pump30Fuel pump, ignition, Cruise control system, operation of PTC relay31Lambda probe32High pressure fuel pump, pressure valve33Engine control unit34Engine control unit, vacuum pump35Daytime running lights/radio for vehicles with START-STOP36Main beam37Rear fog light, DC/DC converter START-STOP38Fog lights39Air blower for heating40-41Not assigned42Rear window heater43Horn44Windscreen wipers45Central control unit for convenience system46Engine control unit, fuel pump47Cigarette lighter, power socket in the luggage compartment48ABS, START-STOP (DC/DC) converter, ESC49Turn signal lights, brake lights50START-STOP (DC/DC) transformer, radio51Electrical power window (front and rear) - left side52Electrical power window (front and rear) - right side53Parking light = left side, electrical sliding/tilting roof54START-STOP (instrument cluster), alarm55Control unit for automatic gearbox56Headlight cleaning system, parking light - right side57Left low beam, headlight range adjustment58Low beam on the rightFuses in the engine compartmentFig. 159
Vehicle battery: Distribution board cover.
Fig. 160
Schematic representation of fuse
box in engine compartment
Read and observe and on page 175 first.
› Press the securing clips on the fuse box cover together at the same time in
the direction of arrow
A
» Fig. 159 and remove the cover in the direction of
arrow
B
.
› Release the fixtures in the openings
C
using a flat screwdriver and fold the
cover upwards in direction of arrow
D
.
Fuse assignment in engine compartment
No.Consumer1Generator2Not assigned3Interior4Electrical auxiliary heating system5Interior 177Fuses and light bulbs
Page 193 of 204
Index
A
Abroad Driving abroad
118
Unleaded petrol118
ABS
120
Warning light42
Accessories132
Adjusting Belt height
15
Exterior mirrors68
Seat69
Steering wheel10
Adjusting the seats9
Aerial135
See windows138
Airbag16
Deactivating20
Deactivating the front passenger airbag21
Deployment17
Front airbag18
Head airbag19
Modifications and damage to the airbag system 134
Side airbag
19
Airbag system16
Air conditioning Operation
93
Air conditioning system Air outlets
90
Climatronic95
Manual air conditioning system93
Air outlets90
Alarm53
Anti-theft alarm system53
Operation53
Trailer131
Anti-theft wheel bolts169
Antilock Braking System120
Armrest86
Ashtray81
ASR120
warning light42
Assist systems ABS
42, 120
ASR42, 120
Cruise Control System121
EDL120
ESC42, 119
Parking aid120
START-STOP123
Audio see radio / navigation system
4
Auto Check Control38
Automatic gearbox Selector lever-emergency unlocking
112
Starting-off and driving112
Tiptronic111
Automatic load deactivation156
Automatic transmission110
Kickdown112
Malfunction112
Selector lever lock111
Using the selector lever110
AUX104
Avoiding damage to the vehicle Driving through water
117
Avoiding damage to your vehicle117
B
Ball head Check fitting
128
Fitting127
Ready position127
Removing128
Belts12
Belt tensioners15
Bicycle carrier78
Bonnet Closing146
Opening146
Boot Cover
75
Emergency unlocking55
Fastening elements74
Fixing nets75
Folding hooks74
see Boot lid55
Unlocking the boot lid55
Boot lid55
automatic locking55
Brake assist119
Brake booster108
Brake fluid152
Checking152
Display messages40
specification152
Brakes Brake booster
108
Brake fluid152
Handbrake109
Indicator light40
Running in113
Braking Information on braking
108
Button in the driver's door Electrical power windows
55
C
Car care
132
Jack138
Car computer see Multifunction display
33
Car park ticket holder83
Carrier80
Cavity protection138
Central locking button51
190Index