phone SKODA ROOMSTER 2014 1.G Owner's Manual
[x] Cancel search | Manufacturer: SKODA, Model Year: 2014, Model line: ROOMSTER, Model: SKODA ROOMSTER 2014 1.GPages: 204, PDF Size: 14.15 MB
Page 5 of 204
Table of Contents
Board literature4
Notes
5
Structure and more information about the
Operating Instructions
6
Abbreviations
Safety
Passive Safety
8
General information
8
Correct and safe seated position
9
Seat belts
12
Using seat belts
12
Inertia reels and belt tensioners
15
Airbag system
16
Description of the airbag system
16
Airbag overview
17
Deactivating airbags
20
Transporting children safely
22
Child seat
22
Fastening systems
25
Operation
Cockpit
29
Overview
28
Instruments and Indicator Lights
30
Instrument cluster
30
Multifunction display (MFD)
33
Service Interval Display
36
MAXI DOT display
37
Warning lights
39Unlocking and locking47Unlocking and locking47
Central locking system
49
Remote control
52
Anti-theft alarm system
53
Luggage compartment lid
54
Electrical power windows
55
Mechanical windows
58
Lights and visibility
59
Lights
59
Interior lights
63
Visibility
64
Windscreen wipers and washers
65
Rear window
67
Seats and stowing
69
Front seats
69
Rear seats
70
Head restraints
72
Boot
73
Variable loading floor in the luggage
compartment (Estate)
76
Bicycle carrier in the luggage compartment
78
Roof rack system
80
Useful equipment
80
Storage compartments
83
Praktik
87
Heating and air-conditioning
90
Heating, ventilation, cooling
90
Heating
91Air conditioning system (manual air
conditioning system)93
Climatronic (automatic air conditioning
system)
95
Communication and multimedia
97
Universal telephone preinstallation GSM II
97
Voice control
102
Multimedia
103
Driving
Starting-off and Driving
106
Starting and stopping the engine
106
Brakes
108
Manual gear changing and pedals
109
Automatic transmission
110
Running in
113
Economical driving and environmental
sustainability
113
Avoiding damage to your vehicle
117
Driving abroad
118
Assist systems
119
Brake assist systems
119
Parking aid
120
Cruise Control System
121
START-STOP
123
Tyre pressure monitoring
125
Hitch and trailer
126
Hitch
126
Trailer
129
General Maintenance
Car care
132
Services, modifications and technical
alterations
132
Washing vehicle
1352Table of Contents
Page 7 of 204
Board literature
You always find these Operating Instructions and the Service Plan in the on-
board literature for your vehicle.
Depending on the equipment, the on-board literature can also contain The ra-
dio instruction manual or Manual of the navigation system and in some coun-
tries also the brochure On the road.
Owner's Manual
These operating instructions apply to all body variants of the vehicle and all
related model versions as well as all equipment levels .
This owner's manual describes all possible equipment variants without identi-
fying them as special equipment, model variants or market-dependent equip-
ment. Consequently, this vehicle does not contain all of the equipment com-
ponents described in this Owner's Manual.
The scope of equipment on your vehicle depends on your purchase contract
for the vehicle. For questions regarding the scope of equipment, please con-
tact a ŠKODA Partner, if required.
The Pictures in this manual are for illustrative purposes only. The illustrations
can differ in minor details from your vehicle; they are only intended to provide
general information.
ŠKODA AUTO a.s. pursues a policy of constant product and model develop-
ment. Changes in terms of supply scope are possible at any time with regard to
design, equipment and technology. The information listed in this operating
manual corresponds to the information available at the time of going to press.
It is therefore not possible for legal claims to be made based on the technical
data, illustrations and information contained in this Owner's Manual.
Service schedule
The service plan includes the documentation of the vehicle handover informa-
tion with regard to warranty and service events.
The radio instruction manual
The instruction manual of the radio contains a description of the operation of
the radio, and possibly also some functions and vehicle systems.
Manual of the navigation system
The manual of the navigation system includes a description of the operation of
the navigation system, and possibly also some functions and vehicle systems.Move Brochure
The Move brochure contains phone numbers of importers and service offices in
individual countries, together with emergency numbers.4Board literature
Page 8 of 204
Notes
Terms used
The on-board literature contains the following terms relating to the service
work for your vehicle.
- a workshop that carries out specialist service tasks for
ŠKODA vehicles. A specialist garage can be a ŠKODA partner, a ŠKODA
service partner or an independent workshop.
- A Workshop that has been contractually authorised
by the manufacturer ŠKODA AUTO a.s. or its sales partner to perform
service tasks on ŠKODA vehicles and to sell ŠKODA Genuine Parts.
- A company that has been authorised by the manufacturer
ŠKODA AUTO a.s. or its sales partner to sell new ŠKODA vehicles and,
when applicable, to service them using ŠKODA Genuine Parts and sell
ŠKODA Genuine Parts.
Explanation of symbols
An overview of the symbols used in the instruction manual and a brief explan-
ation of their meaning.Reference to the introductory module of a chapter with important infor-
mation and safety warnings.Continuation of the module on the next page.Situations where the vehicle must be stopped as soon as possible.®Trademark.Telephone operation in the MAXI DOT display .Text display in the segment display.WARNINGTexts with this symbol draw attention to threats of a serious accident, in-
jury or loss of life .
CAUTION
Texts with this symbol draw attention to the risk of vehicle damage or possible
inoperability of some systems.
For the sake of the environment
Texts with this symbol contain information on environmental protection as
well as tips for economical operation.“Specialist garage”“ŠKODA service partner”“ŠKODA partner”NoteTexts with this symbol contain additional information.5Notes
Page 11 of 204
Safety
Passive Safety
General information
Introduction
This chapter contains information on the following subjects:
Before setting off
8
Driving safety
8
Safety equipment
8
In this section you will find important information, tips and notes on the sub-
ject of passive safety in your vehicle.
We have combined everything here which you should be familiar with, for ex-
ample, regarding seat belts, airbags, child seats and safety of children.
WARNING■ This chapter contains important information on how to use the vehicle for
the driver and his occupants.■
You can find further information on safety concerning you and those trav-
elling with you in the following chapters of this owner's manual.
■
The complete on-board literature should always be in the vehicle. This
applies in particular, if you rent out or sell the vehicle.
Before setting off
Read and observe
on page 8 first.
For your own safety and the safety of the people travelling with you, please
pay attention to the following points before setting off.
Ensure that the lighting and the turn signal system are functioning proper-
ly.
Ensure that the function of the wiper and the condition of the wiper
blades are free of any defects.
Ensure that all of the windows offer good visibility to the outside.
Adjust the rear-view mirror so that vision to the rear is guaranteed.
Ensure that the mirrors are not covered.
Check the tyre inflation pressure.
Check the engine oil, brake fluid and coolant level.
Secure all items of luggage.
Do not exceed the permissible axle loads and permissible gross weight of
the vehicle.
Close all doors as well as the bonnet and boot lid.
Ensure that no objects can obstruct the pedals.
Protect children in suitable child seats with correctly fastened seat
belts » page 22 , Transporting children safely .
Adopt the correct seated position » page 9, Correct and safe seated
position . Tell your passengers to assume the correct seated position.
Driving safety
Read and observe
on page 8 first.
The driver is fully responsible for himself and his occupants. If your driving
safety is effected, you place yourself and the oncoming traffic at risk.
The following guidelines must therefore be observed. Do not become distracted from concentrating on the traffic situation, e.g.
by your passengers or mobile phone calls.
Never drive when your driving ability is impaired, e.g. due to medication, al-
cohol or drugs.
Keep to the traffic regulations and the permissible speed limit.
Always adjust the driving speed to the road, traffic and weather condi-
tions.
Take regular breaks on long journeys – at least every two hours.
Safety equipment
Read and observe
on page 8 first.
The following list contains only part of the safety equipment in your vehicle.
› Three-point seat belts for all the seats.
› Belt force limiters for the front seats.
› Belt tensioners for the front seats.
› Seat belt height adjusters for the front seats.
› Front airbag for the driver and the front passenger.
› Side airbags.
8Safety
Page 21 of 204
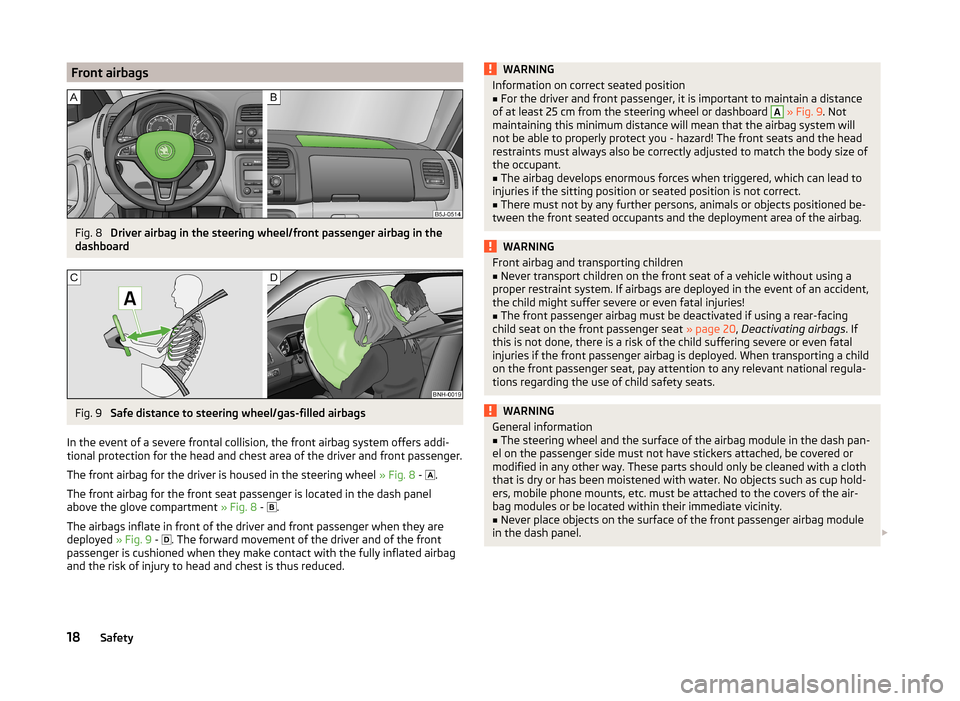
Front airbagsFig. 8
Driver airbag in the steering wheel/front passenger airbag in the
dashboard
Fig. 9
Safe distance to steering wheel/gas-filled airbags
In the event of a severe frontal collision, the front airbag system offers addi-
tional protection for the head and chest area of the driver and front passenger.
The front airbag for the driver is housed in the steering wheel » Fig. 8 -
.
The front airbag for the front seat passenger is located in the dash panel
above the glove compartment » Fig. 8 -
.
The airbags inflate in front of the driver and front passenger when they are
deployed » Fig. 9 -
. The forward movement of the driver and of the front
passenger is cushioned when they make contact with the fully inflated airbag
and the risk of injury to head and chest is thus reduced.
WARNINGInformation on correct seated position■For the driver and front passenger, it is important to maintain a distance
of at least 25 cm from the steering wheel or dashboard A
» Fig. 9 . Not
maintaining this minimum distance will mean that the airbag system will
not be able to properly protect you - hazard! The front seats and the head
restraints must always also be correctly adjusted to match the body size of
the occupant.
■
The airbag develops enormous forces when triggered, which can lead to
injuries if the sitting position or seated position is not correct.
■
There must not by any further persons, animals or objects positioned be-
tween the front seated occupants and the deployment area of the airbag.
WARNINGFront airbag and transporting children■Never transport children on the front seat of a vehicle without using a
proper restraint system. If airbags are deployed in the event of an accident,
the child might suffer severe or even fatal injuries!■
The front passenger airbag must be deactivated if using a rear-facing
child seat on the front passenger seat » page 20, Deactivating airbags . If
this is not done, there is a risk of the child suffering severe or even fatal
injuries if the front passenger airbag is deployed. When transporting a child
on the front passenger seat, pay attention to any relevant national regula-
tions regarding the use of child safety seats.
WARNINGGeneral information■The steering wheel and the surface of the airbag module in the dash pan-
el on the passenger side must not have stickers attached, be covered or
modified in any other way. These parts should only be cleaned with a cloth
that is dry or has been moistened with water. No objects such as cup hold-
ers, mobile phone mounts, etc. must be attached to the covers of the air-
bag modules or be located within their immediate vicinity.■
Never place objects on the surface of the front passenger airbag module
in the dash panel.
18Safety
Page 32 of 204
Operation
Cockpit
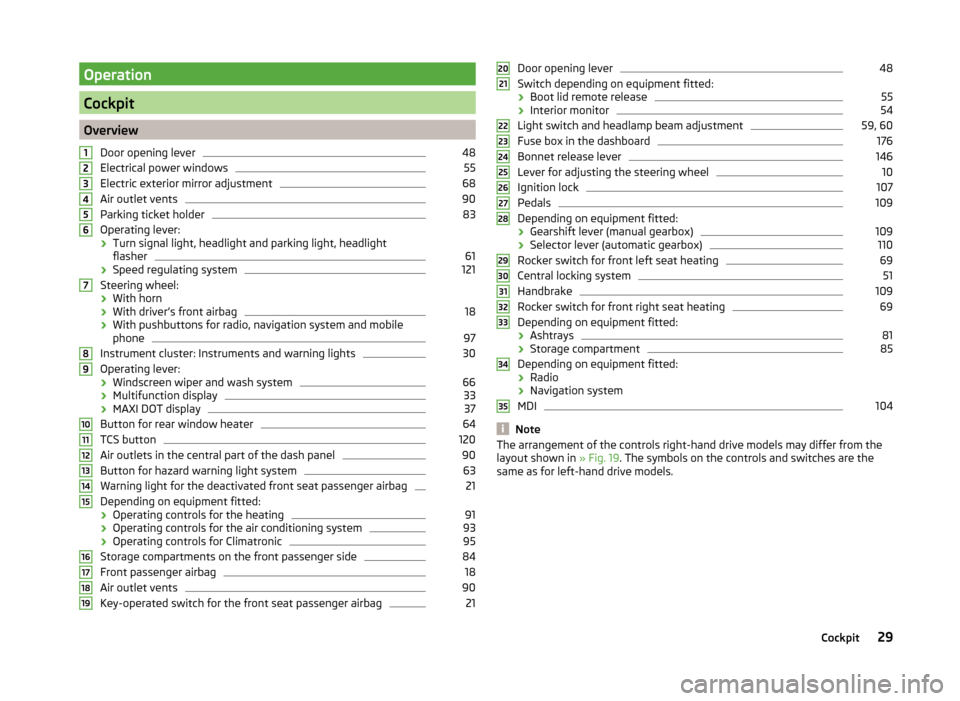
OverviewDoor opening lever
48
Electrical power windows
55
Electric exterior mirror adjustment
68
Air outlet vents
90
Parking ticket holder
83
Operating lever:
› Turn signal light, headlight and parking light, headlight
flasher
61
› Speed regulating system
121
Steering wheel:
› With horn
› With driver’s front airbag
18
›With pushbuttons for radio, navigation system and mobile
phone
97
Instrument cluster: Instruments and warning lights
30
Operating lever:
› Windscreen wiper and wash system
66
›Multifunction display
33
›MAXI DOT display
37
Button for rear window heater
64
TCS button
120
Air outlets in the central part of the dash panel
90
Button for hazard warning light system
63
Warning light for the deactivated front seat passenger airbag
21
Depending on equipment fitted:
› Operating controls for the heating
91
›Operating controls for the air conditioning system
93
›Operating controls for Climatronic
95
Storage compartments on the front passenger side
84
Front passenger airbag
18
Air outlet vents
90
Key-operated switch for the front seat passenger airbag
2112345678910111213141516171819Door opening lever48
Switch depending on equipment fitted:
› Boot lid remote release
55
›Interior monitor
54
Light switch and headlamp beam adjustment
59, 60
Fuse box in the dashboard
176
Bonnet release lever
146
Lever for adjusting the steering wheel
10
Ignition lock
107
Pedals
109
Depending on equipment fitted:
› Gearshift lever (manual gearbox)
109
›Selector lever (automatic gearbox)
110
Rocker switch for front left seat heating
69
Central locking system
51
Handbrake
109
Rocker switch for front right seat heating
69
Depending on equipment fitted:
› Ashtrays
81
›Storage compartment
85
Depending on equipment fitted:
› Radio
› Navigation system
MDI
104
Note
The arrangement of the controls right-hand drive models may differ from the
layout shown in » Fig. 19. The symbols on the controls and switches are the
same as for left-hand drive models.2021222324252627282930313233343529Cockpit
Page 40 of 204
Displaying the distance and days until the next service interval
You can display the remaining distance and days until the next service in the
Settings menu whenever the ignition is switched on » page 38.
The following message is displayed for 10 seconds. Oil change ... km / ... days
Inspection ... km / ... days
Resetting the service interval display
We recommend that the display reset is completed by a specialist garage.
We recommend that you do not reset the service interval display yourself. In-
correctly setting the service interval display could cause problems to the vehi-
cle.
Variable service interval
For vehicles with variable service intervals, after resetting the oil change serv-
ice display, the values of a new service interval are displayed, which are based
on the previous operating conditions of the vehicle.
These values are then continuously matched according to the actual operating
conditions of the vehicle.
MAXI DOT display
Introduction
This chapter contains information on the following subjects:
Main menu
37
Settings
38
Door, boot lid and bonnet warning
38
Auto Check Control
38
The MAXI DOT display provides you with information about the current operat-
ing state of your vehicle . The information system also provides you with data
(depending on the vehicle equipment) relating to the radio, mobile phone, mul-
ti-functional display, navigation system, the device connected to the MDI input
and the automatic gearbox » page 110.
Lighting up of certain symbols is combined with an acoustic warning signal.
WARNINGConcentrate fully on your driving at all times. As the driver you are fully re-
sponsible for the operation of your vehicle.
Main menu
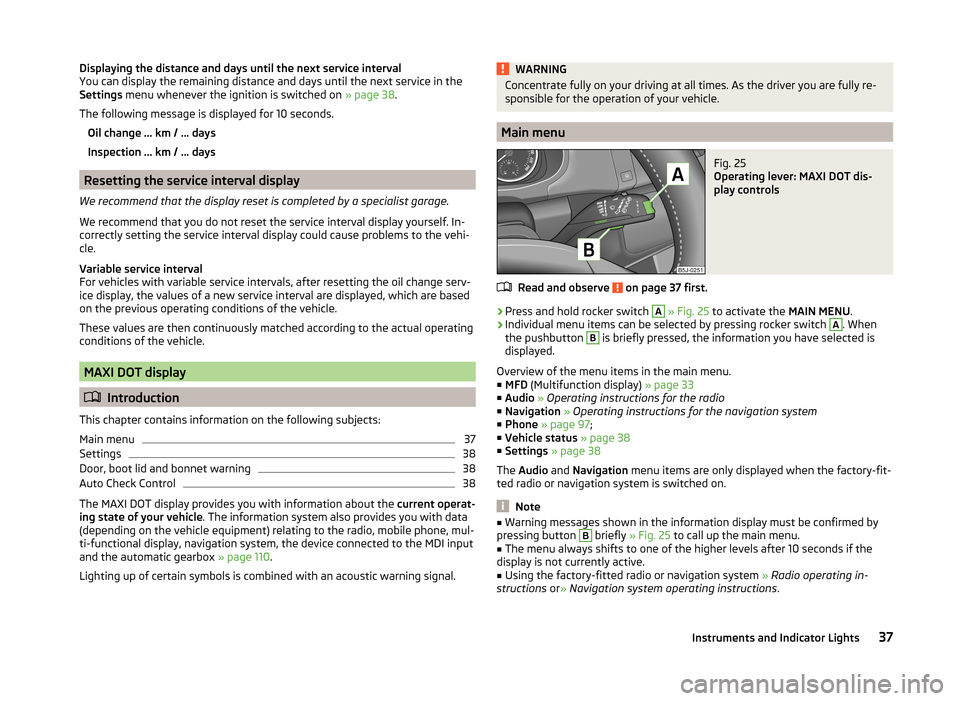
Fig. 25
Operating lever: MAXI DOT dis-
play controls
Read and observe on page 37 first.
›
Press and hold rocker switch
A
» Fig. 25 to activate the MAIN MENU.
›
Individual menu items can be selected by pressing rocker switch
A
. When
the pushbutton
B
is briefly pressed, the information you have selected is
displayed.
Overview of the menu items in the main menu.
■ MFD (Multifunction display) » page 33
■ Audio » Operating instructions for the radio
■ Navigation » Operating instructions for the navigation system
■ Phone » page 97 ;
■ Vehicle status » page 38
■ Settings » page 38
The Audio and Navigation menu items are only displayed when the factory-fit-
ted radio or navigation system is switched on.
Note
■ Warning messages shown in the information display must be confirmed by
pressing button B briefly » Fig. 25 to call up the main menu.■
The menu always shifts to one of the higher levels after 10 seconds if the
display is not currently active.
■
Using the factory-fitted radio or navigation system » Radio operating in-
structions or» Navigation system operating instructions .
37Instruments and Indicator Lights
Page 50 of 204
Unlocking and locking
Unlocking and locking
Introduction
This chapter contains information on the following subjects:
Vehicle key
47
Replacing the battery in the remote control key
47
Child safety lock
48
Opening/closing a door
48
Locking/unlocking the vehicle without central locking
49
Emergency locking of the doors
49
Vehicle key
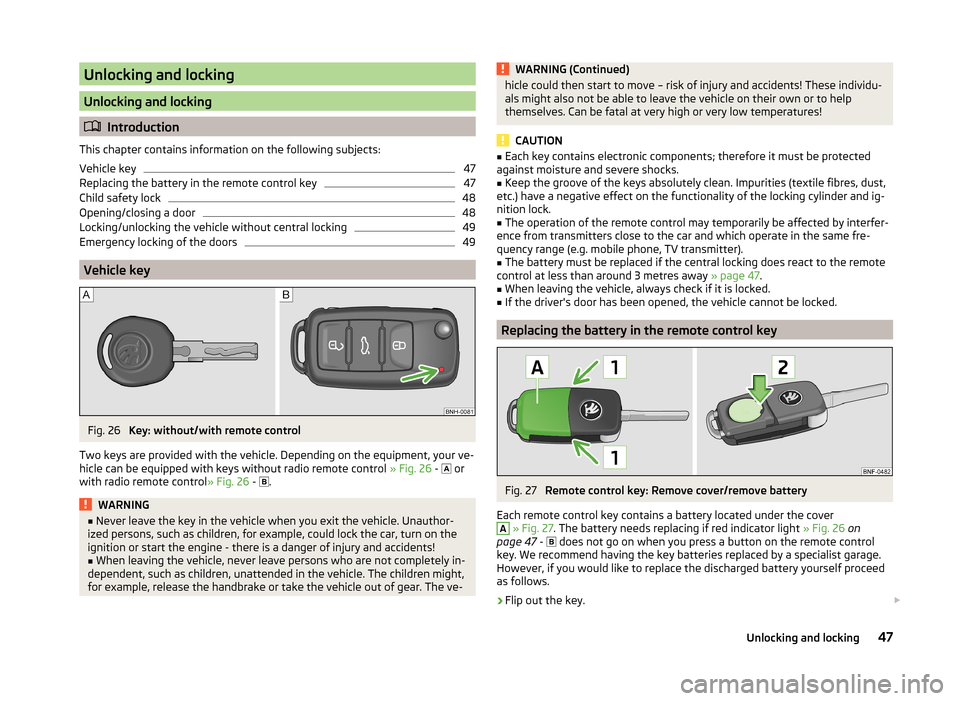
Fig. 26
Key: without/with remote control
Two keys are provided with the vehicle. Depending on the equipment, your ve-
hicle can be equipped with keys without radio remote control » Fig. 26 -
or
with radio remote control » Fig. 26 -
.
WARNING■
Never leave the key in the vehicle when you exit the vehicle. Unauthor-
ized persons, such as children, for example, could lock the car, turn on the
ignition or start the engine - there is a danger of injury and accidents!■
When leaving the vehicle, never leave persons who are not completely in-
dependent, such as children, unattended in the vehicle. The children might,
for example, release the handbrake or take the vehicle out of gear. The ve-
WARNING (Continued)hicle could then start to move – risk of injury and accidents! These individu-
als might also not be able to leave the vehicle on their own or to help
themselves. Can be fatal at very high or very low temperatures!
CAUTION
■ Each key contains electronic components; therefore it must be protected
against moisture and severe shocks.■
Keep the groove of the keys absolutely clean. Impurities (textile fibres, dust,
etc.) have a negative effect on the functionality of the locking cylinder and ig-
nition lock.
■
The operation of the remote control may temporarily be affected by interfer-
ence from transmitters close to the car and which operate in the same fre-
quency range (e.g. mobile phone, TV transmitter).
■
The battery must be replaced if the central locking does react to the remote
control at less than around 3 metres away » page 47.
■
When leaving the vehicle, always check if it is locked.
■
If the driver's door has been opened, the vehicle cannot be locked.
Replacing the battery in the remote control key
Fig. 27
Remote control key: Remove cover/remove battery
Each remote control key contains a battery located under the cover
A
» Fig. 27 . The battery needs replacing if red indicator light » Fig. 26 on
page 47 -
does not go on when you press a button on the remote control
key. We recommend having the key batteries replaced by a specialist garage.
However, if you would like to replace the discharged battery yourself proceed
as follows.
›
Flip out the key.
47Unlocking and locking
Page 55 of 204
The following applies if your vehicle has been locked using the central locking
button.
› It is not possible to open the doors or the boot lid from the outside (safety
feature, e.g. when stopping at traffic lights etc.).
› The doors can be unlocked and opened from the inside by pulling on the
opening lever of the respective door. By the first pull on the opening lever,
the door is unlocked. By the second pull on the opening lever, the door is
opened .
› If at least one door has been opened, the vehicle cannot be locked.
› In the event of an accident in which the airbags are deployed, the locked
doors are automatically unlocked in order to enable rescuers to gain access
to the vehicle.WARNING■ Doors locked from the inside make it difficult for rescuers to get into the
vehicle in an emergency – risk to life!■
If the safe lock system is switched on » page 50, the door opening lever
and the central locking buttons do not operate.
Remote control
Introduction
This chapter contains information on the following subjects:
Unlocking/locking
52
Synchronization
53
You can use the remote control key to:
› unlock and lock the vehicle,
› unlocking boot lid;
› open and close the windows
» page 57, Window convenience operation .
The transmitter with the battery is housed in the handle of the remote control
key. The receiver is located in the interior of the vehicle. The operating range of the remote control key is approx. 30 m. But this range of the remote control
can be reduced if the batteries are weak.
The key has a fold-open key bit which can be used for unlocking and locking
the car manually and also for starting the engine.
If a lost key is replaced or if the receiver unit has been repaired or replaced, the
system must be initialised by a specialist garage. Only then can the remote
control key be used again.
Note■ The remote control is automatically deactivated when the ignition is switch-
ed on.■
The operation of the remote control may temporarily be affected by interfer-
ence from transmitters close to the car and which operate in the same fre-
quency range (e.g. mobile phone, TV transmitter).
■
The battery must be replaced if the central locking or anti-theft alarm system
does react to the remote control at less than 3 metres away » page 47.
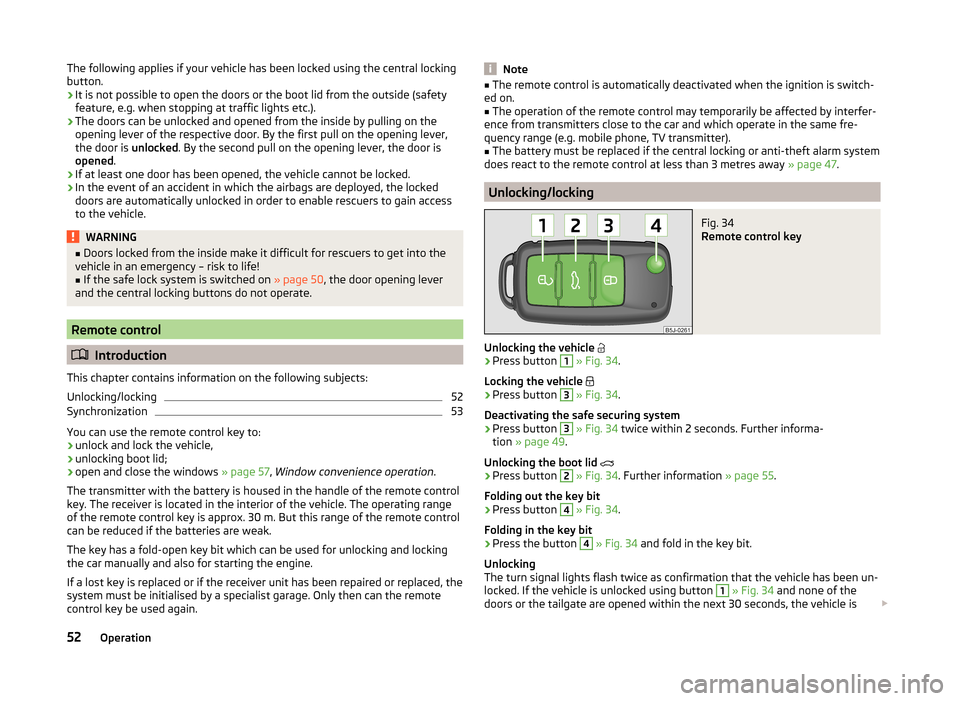
Unlocking/locking
Fig. 34
Remote control key
Unlocking the vehicle
›
Press button
1
» Fig. 34 .
Locking the vehicle
›
Press button
3
» Fig. 34 .
Deactivating the safe securing system
›
Press button
3
» Fig. 34 twice within 2 seconds. Further informa-
tion » page 49 .
Unlocking the boot lid
›
Press button
2
» Fig. 34 . Further information » page 55.
Folding out the key bit
›
Press button
4
» Fig. 34 .
Folding in the key bit
›
Press the button
4
» Fig. 34 and fold in the key bit.
Unlocking
The turn signal lights flash twice as confirmation that the vehicle has been un-
locked. If the vehicle is unlocked using button
1
» Fig. 34 and none of the
doors or the tailgate are opened within the next 30 seconds, the vehicle is
52Operation
Page 100 of 204
The blower speed set is indicated by displaying the corresponding number of
segments in icon 9 » Fig. 102 on page 95 in the display.WARNING■
“Stale air” may result in fatigue in the driver and occupants, reduce atten-
tion levels and also cause the windows to mist up. The risk of having an ac-
cident increases.■
Do not switch off the Climatronic system for longer than necessary.
■
Switch on the Climatronic system as soon as the windows mist up.
Defrosting windscreen
Switching on
›
Press the button
» Fig. 102 on page 95 .
Switching off
›
Press the button
» Fig. 102 on page 95 again or press the
button.
More air flows out of the air outlet vents 1 and 2 » Fig. 99 on page 90 . The
temperature control is controlled automatically.
Communication and multimedia
Universal telephone preinstallation GSM II
Introduction
This chapter contains information on the following subjects:
Mobile phones and two-way radio systems
97
Introductory information
98
Phone Phonebook
98
Operating the phone on the multifunction steering wheel
99
Inserting the mobile phone and adapter
99
Managing telephone calls with the help of the adapter
100
Connecting the mobile phone to the hands-free system
100
Symbols in the MAXI DOT display
101
Telephone operation in the MAXI DOT display
101
Mobile phones and two-way radio systems
ŠKODA permits the operation of mobile phones and two-way radio systems
with a professionally installed external aerial and a maximum transmission
power of up to 10 watts.
Please consult a ŠKODA Partner for information about the possibility of instal- ling and operating mobile phones and two-way radio systems with a transmis-
sion power of more than 10 W.
Operating mobile phones or two-way radio systems may interfere with the
functionality of the electronic systems in your vehicle.
This could be for the following reasons.
› no external aerial.
› external aerial incorrectly installed.
› transmission power greater than 10 watts.
WARNING■
Concentrate fully at all times on your driving! As the driver, you are fully
responsible for the operation of your vehicle.■
Only use the device in such a way that you are in full control of your vehi-
cle in every traffic situation – there is the risk of accidents!
97Communication and multimedia