light SKODA SUPERB 2003 1.G / (B5/3U) Owner's Manual
[x] Cancel search | Manufacturer: SKODA, Model Year: 2003, Model line: SUPERB, Model: SKODA SUPERB 2003 1.G / (B5/3U)Pages: 259
Page 211 of 259
Inspecting and Replenishing
210
For the sake of the environment
Do not re-use coolant if it is necessary to drain the coolant in the system.
It should be collected and disposed of in compliance with environmental
protection regulations.
The radiator fan
The radiator fan may switch on suddenly.
The radiator fan is driven by an electric motor and controlled by a thermo-
stat according to the coolant temperature.
After the engine is switched off, the radiator fan may continue running for
up to 10 minutes - even if the ignition is also off. It may also switch on
suddenly after a certain time, if
•the coolant temperature has risen because of an accumulation of heat
or
•the warm engine compartment is heated up additionally by strong
sunlight.
Brake fluid
Inspecting the brake fluid level
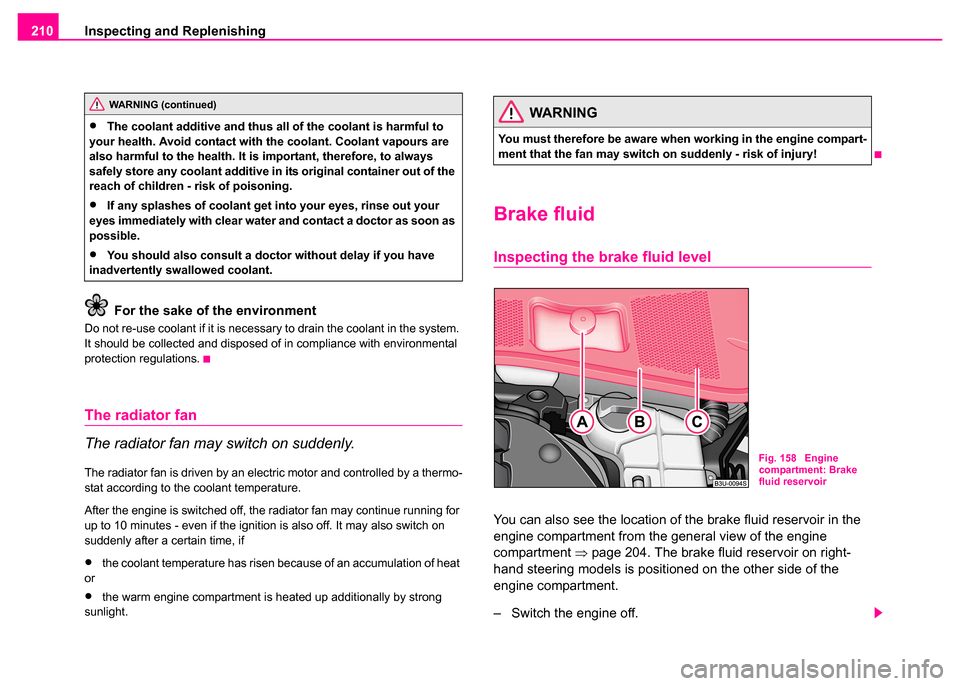
You can also see the location of the brake fluid reservoir in the
engine compartment from the general view of the engine
compartment ⇒page 204. The brake fluid reservoir on right-
hand steering models is positioned on the other side of the
engine compartment.
– Switch the engine off.
WARNING (continued)
•The coolant additive and thus all of the coolant is harmful to
your health. Avoid contact with the coolant. Coolant vapours are
also harmful to the health. It is important, therefore, to always
safely store any coolant additive in its original container out of the
reach of children - risk of poisoning.
•If any splashes of coolant get into your eyes, rinse out your
eyes immediately with clear water and contact a doctor as soon as
possible.
•You should also consult a doctor without delay if you have
inadvertently swallowed coolant.
WARNING
You must therefore be aware when working in the engine compart-
ment that the fan may switch on suddenly - risk of injury!
Fig. 158 Engine
compartment: Brake
fluid reservoir
Page 212 of 259
Inspecting and Replenishing211
Using the systemSafetyDriving TipsGeneral MaintenanceBreakdown assistanceTechnical Data
– Open the bonnet ⇒ in “Working in the engine compart-
ment” on page 203.
– Pull off the rubber seal ⇒fig. 158 partially away and lift the
cover slightly.
– Inspect the brake fluid level at the reservoir . The level must be between the “MIN” and “MAX” markings. The markings are
indicated on the side of the reservoir.
A slight drop in the fluid level results when driving due to normal wear-and-
tear and automatic adjustment of the brake pads, and is perfectly normal.
There may be an indication of a leak in the brake system, however, if the
fluid level drops significantly within a short time or if it drops below the
“MIN” marking. A situation where the brake fluid level is too low is indi-
cated by the warning light
lighting up in the instrument cluster
⇒ page 35. You should drive carefully and immediately to the nearest
Škoda Dealer and have the brake system inspected.
Replacing brake fluid
Brake fluid absorbs moisture. This causes the fluid to absorb moisture
from the surrounding air over a period of time. Excessive water in the
brake fluid may be the cause of corrosion in the brake system. The water
content also lowers the boiling point of the brake fluid. This is why brake
fluid must be replaced every two years.
One may only use new genuine brake fluid from Skoda Auto. The specifi-
cation for the brake fluid is “FMVSS 116 DOT 4”.
We recommend that you have the brake fluid replaced by a Škoda Dealer
as part of an Inspection Service.
Caution
Brake fluid damages the paintwork of the vehicle.
For the sake of the environment
In view of the problems involved with proper disposal of brake fluid, the
special tools and the professional knowledge required, you should have
the brake fluid replaced by a Škoda dealer.
AB
AC
AA
WARNING
•Using old brake fluid can result in severe stress on the brakes
because of the formation of vapour bubbles in the brake system.
This greatly impairs the braking efficiency and thus also the safety
of your vehicle.
•Brake fluid is toxic! It must therefore be kept safely in closed
original containers and well away from children and unauthorized
persons.
Page 214 of 259
Inspecting and Replenishing213
Using the systemSafetyDriving TipsGeneral MaintenanceBreakdown assistanceTechnical Data
Caution
•You must only disconnect the battery if the ignition is switched on,
otherwise the electrical system (electronic components) of the vehicle
may be damaged. When disconnecting the battery from the electrical
system of the vehicle, first disconnect the negative terminal (-) of the
battery. Then disconnect the positive terminal (+).
•When reconnecting the battery, first connect the positive terminal (+)
and only then the negative terminal (-) of the battery. You must on no
account connect the cables wrongly - risk of a cable fire.
•Ensure that battery acid does not come into contact with the vehicle
body otherwise damage could occur to the paintwork.
•Do not place the battery in direct daylight in order to protect the battery
housing from the effects of ultra-violet light.
For the sake of the environment
A removed battery is a special type of waste which is harmful to the envi-
ronment - contact your Škoda dealer regarding disposing of the battery.
Note
Please also refer to the guidelines ⇒page 216, also after connecting the
battery.
Battery with a charge level indicator, the so-called
magic eye
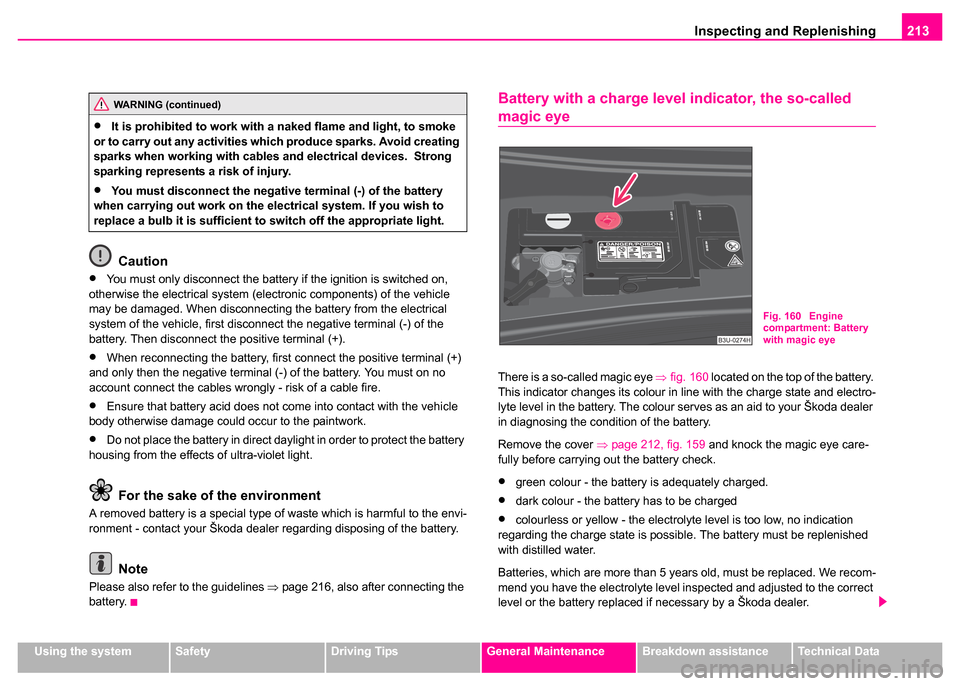
There is a so-called magic eye ⇒fig. 160 located on the top of the battery.
This indicator changes its colour in line with the charge state and electro-
lyte level in the battery. The colour serves as an aid to your Škoda dealer
in diagnosing the condition of the battery.
Remove the cover ⇒page 212, fig. 159 and knock the magic eye care-
fully before carrying out the battery check.
•green colour - the battery is adequately charged.
•dark colour - the battery has to be charged
•colourless or yellow - the electrolyte level is too low, no indication
regarding the charge state is possible. The battery must be replenished
with distilled water.
Batteries, which are more than 5 years old, must be replaced. We recom-
mend you have the electrolyte level inspected and adjusted to the correct
level or the battery replaced if necessary by a Škoda dealer.
WARNING (continued)
•It is prohibited to work with a naked flame and light, to smoke
or to carry out any activities which produce sparks. Avoid creating
sparks when working with cables and electrical devices. Strong
sparking represents a risk of injury.
•You must disconnect the negative terminal (-) of the battery
when carrying out work on the electrical system. If you wish to
replace a bulb it is sufficient to switch off the appropriate light.
Fig. 160 Engine
compartment: Battery
with magic eye
Page 215 of 259
Inspecting and Replenishing
214
Caution
If the vehicle has not been driven for more than 4 weeks, the battery will
discharge gradually as a result from electrical components such as the
control units which were not switched off. You can prevent the discharging
of the battery by disconnecting the negative terminal or charging the
battery constantly with a very low charging current. Please also refer to
the notes when working on the battery ⇒page 212, “Working on the
battery”.
Inspecting the electrolyte level
The battery is practically maintenance-free under normal operating
conditions. We do, however, recommend that you have the electrolyte
level inspected from time to time by a Škoda dealer when outside temper-
atures are high or when driving on long trips. You should also check the
electrolyte level ⇒page 214 each time the battery is charged.
The battery acid level will also be checked as part of the Inspection
Service.
Caution
Do not expose the battery to direct sunlight for lengthy periods in order to
protect it from UV rays.
Operation in winter
The battery has to provide greater amounts of electricity during the winter.
It also has only part of the initial power output at low temperatures that it
has at normal temperatures. A discharged battery may already freeze at temperatures just below
0°C.
We therefore recommend that you have the battery checked by a Škoda
dealer before the start of the winter, and recharged if necessary.
Note
If the vehicle is not going to be driven for a period of some weeks when
there is very severe frost one should remove
⇒page 215 the battery and
store it in a place which is protected from frost. This prevents the battery
from freezing up and thereby being destroyed.
Charging the battery
A properly charged battery is essential for reliably starting
the engine.
– Read the warning notes ⇒ in “Working on the battery” on
page 212 and ⇒.
– Switch the ignition and all electrical components off.
– Only for “quick-charging”: disconnect both battery cables (first of all “negative”, then “positive”) .
– Carefully attach the terminal clamps of the charger to the battery terminals (red = “positive”, black = “negative”).
– You can now plug the mains cable of the charger into the power socket and switch on the charger.
– When charging is completed: switch the charger off and unplug the mains cable from the power socket.
Page 218 of 259
Inspecting and Replenishing217
Using the systemSafetyDriving TipsGeneral MaintenanceBreakdown assistanceTechnical Data
Windscreen Wiper and Washer System
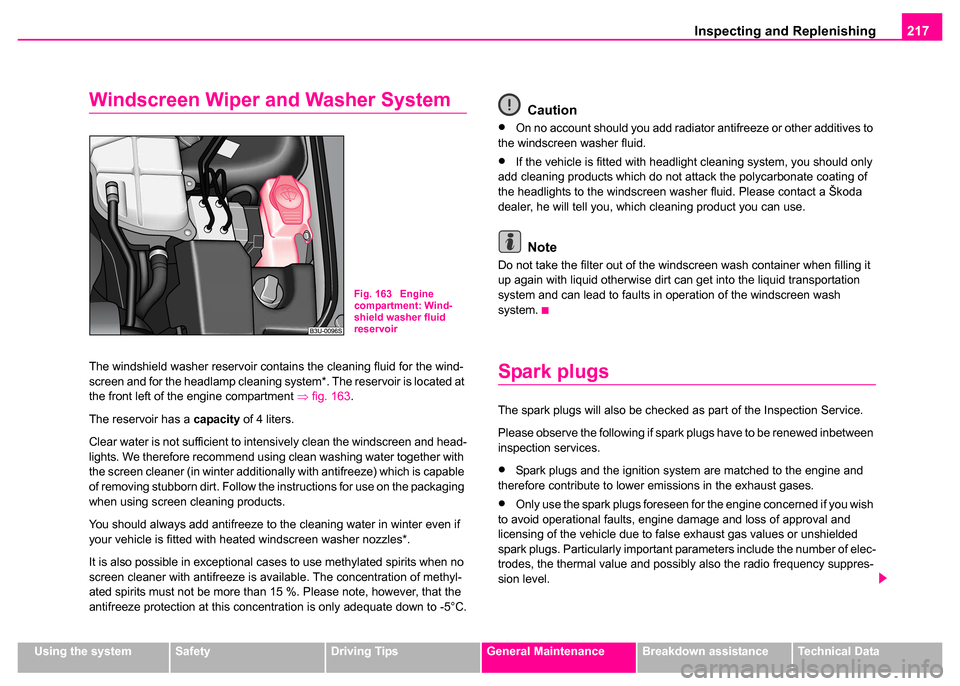
The windshield washer reservoir contains the cleaning fluid for the wind-
screen and for the headlamp cleaning system*. The reservoir is located at
the front left of the engine compartment ⇒fig. 163 .
The reservoir has a capacity of 4 liters.
Clear water is not sufficient to intensively clean the windscreen and head-
lights. We therefore recommend using clean washing water together with
the screen cleaner (in winter additionally with antifreeze) which is capable
of removing stubborn dirt. Follow the instructions for use on the packaging
when using screen cleaning products.
You should always add antifreeze to the cleaning water in winter even if
your vehicle is fitted with heated windscreen washer nozzles*.
It is also possible in exceptional cases to use methylated spirits when no
screen cleaner with antifreeze is available. The concentration of methyl-
ated spirits must not be more than 15 %. Please note, however, that the
antifreeze protection at this concentration is only adequate down to -5°C.
Caution
•On no account should you add radiator antifreeze or other additives to
the windscreen washer fluid.
•If the vehicle is fitted with headlight cleaning system, you should only
add cleaning products which do not attack the polycarbonate coating of
the headlights to the windscreen washer fluid. Please contact a Škoda
dealer, he will tell you, which cleaning product you can use.
Note
Do not take the filter out of the windscreen wash container when filling it
up again with liquid otherwise dirt can get into the liquid transportation
system and can lead to faults in operation of the windscreen wash
system.
Spark plugs
The spark plugs will also be checked as part of the Inspection Service.
Please observe the following if spark plugs have to be renewed inbetween
inspection services.
•Spark plugs and the ignition system are matched to the engine and
therefore contribute to lower emissions in the exhaust gases.
•Only use the spark plugs foreseen for the engine concerned if you wish
to avoid operational faults, engine damage and loss of approval and
licensing of the vehicle due to false exhaust gas values or unshielded
spark plugs. Particularly important parameters include the number of elec-
trodes, the thermal value and possibly also the radio frequency suppres-
sion level.
Fig. 163 Engine
compartment: Wind-
shield washer fluid
reservoir
Page 224 of 259
Wheels and Tyres223
Using the systemSafetyDriving TipsGeneral MaintenanceBreakdown assistanceTechnical Data
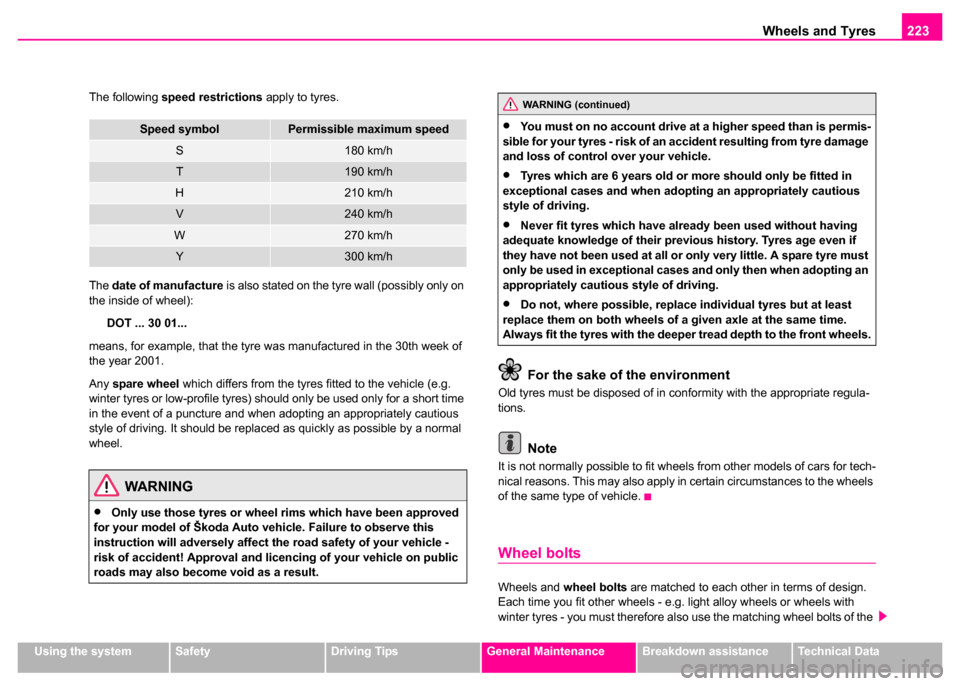
The following
speed restrictions apply to tyres.
The date of manufacture is also stated on the tyre wall (possibly only on
the inside of wheel):
DOT ... 30 01...
means, for example, that the tyre was manufactured in the 30th week of
the year 2001.
Any spare wheel which differs from the tyres fitted to the vehicle (e.g.
winter tyres or low-profile tyres) should only be used only for a short time
in the event of a puncture and when adopting an appropriately cautious
style of driving. It should be replaced as quickly as possible by a normal
wheel.
For the sake of the environment
Old tyres must be disposed of in conformity with the appropriate regula-
tions.
Note
It is not normally possible to fit wheels from other models of cars for tech-
nical reasons. This may also apply in certain circumstances to the wheels
of the same type of vehicle.
Wheel bolts
Wheels and wheel bolts are matched to each other in terms of design.
Each time you fit other wheels - e.g. light alloy wheels or wheels with
winter tyres - you must therefore also use the matching wheel bolts of the
Speed symbolPermissible maximum speed
S180 km/h
T190 km/h
H210 km/h
V240 km/h
W270 km/h
Y300 km/h
WARNING
•Only use those tyres or wheel rims which have been approved
for your model of Škoda Auto vehicle. Failure to observe this
instruction will adversely affect the road safety of your vehicle -
risk of accident! Approval and licencing of your vehicle on public
roads may also become void as a result.
WARNING (continued)
•You must on no account drive at a higher speed than is permis-
sible for your tyres - risk of an accident resulting from tyre damage
and loss of control over your vehicle.
•Tyres which are 6 years old or more should only be fitted in
exceptional cases and when adopting an appropriately cautious
style of driving.
•Never fit tyres which have already been used without having
adequate knowledge of their previous history. Tyres age even if
they have not been used at all or only very little. A spare tyre must
only be used in exceptional cases and only then when adopting an
appropriately cautious style of driving.
•Do not, where possible, replace individual tyres but at least
replace them on both wheels of a given axle at the same time.
Always fit the tyres with the deeper tread depth to the front wheels.
Page 231 of 259
Breakdown assistance
230
– Have all the occupants get out. While changing a wheel, the
occupants of the vehicle should not stand on the road (it is
better behind a crash barrier).
– Apply the handbrake firmly.
– Engage 1st gear or if your vehicle is fitted with an automatic
gearbox, position the selector lever into position P .
– If a trailer is coupled, uncouple it.
– Take the vehicle tool kit and the spare wheel ⇒ page 229
out of the luggage compartment.
Caution
If you have to change a wheel on a slope first block the opposite wheel
with a stone or similar object in order to secure the vehicle from unexpect-
edly rolling away.
Note
Comply with the national legal regulations.
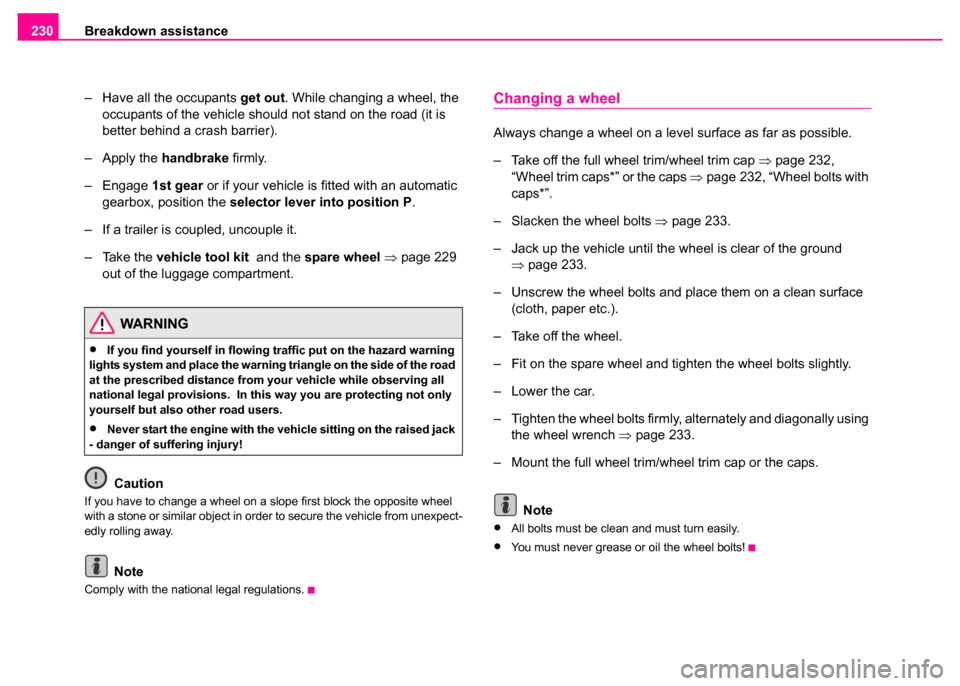
Changing a wheel
Always change a wheel on a level surface as far as possible.
– Take off the full wheel trim/wheel trim cap ⇒page 232,
“Wheel trim caps*” or the caps ⇒page 232, “Wheel bolts with
caps*”.
– Slacken the wheel bolts ⇒ page 233.
– Jack up the vehicle until the wheel is clear of the ground ⇒page 233.
– Unscrew the wheel bolts and place them on a clean surface (cloth, paper etc.).
– Take off the wheel.
– Fit on the spare wheel and tighten the wheel bolts slightly.
– Lower the car.
– Tighten the wheel bolts firmly, alternately and diagonally using the wheel wrench ⇒page 233.
– Mount the full wheel trim/wheel trim cap or the caps.
Note
•All bolts must be clean and must turn easily.
•You must never grease or oil the wheel bolts!
WARNING
•If you find yourself in flowing traffic put on the hazard warning
lights system and place the warning triangle on the side of the road
at the prescribed distance from your vehicle while observing all
national legal provisions. In this way you are protecting not only
yourself but also other road users.
•Never start the engine with the vehicle sitting on the raised jack
- danger of suffering injury!
Page 236 of 259

Breakdown assistance235
Using the systemSafetyDriving TipsGeneral MaintenanceBreakdown assistanceTechnical Data
Changing a wheel
– Turn the wheel bolt which is farthest to the top fully out with
the hexagon socket in the screwdriver handle (car tool kit)
and place the bolt down on a clean surface ⇒page 234,
fig. 177 .
– Screw the assembly pin (car tool kit) into the vacant hole ⇒page 234, fig. 178.
– Unscrew the remaining wheel bolts as described above.
– Take off the wheel.
Fitting on wheel
– Push the spare wheel over the assembly pin.
– Screw in the wheel bolts and tighten them slightly with the aid
of the hexagon socket.
– Unscrew the assembly pin and screw in the remaining wheel bolt also slightly.
The wheel bolts must be clean and must turn easily.
The hexagon socket in the handle of the screwdriver makes it simpler to
fit on the wheel bolts. The reversible blade should be pulled out for this
step.
When fitting on unidirectional tyres, ensure that the tyres rotate in the
correct direction ⇒page 225.
Note
Do not use the hexagon socket in the handle of the screwdriver for slack-
ening or tightening the wheel bolts.
Securing wheels against being stolen
You need a special adapter for slackening the safety
wheel bolts.
– Pull off the full wheel trim/cap from the wheel hub or cap from
the safety wheel bolt.
– Push the adapter with its toothed side into the inner toothing of the safety wheel bolt right down in such a way
that only the outer hexagon is jutting out ⇒fig. 179.
– Push the wheel wrench fully onto the adapter .
– Slacken the wheel bolt, or tighten it firmly ⇒page 223.
– Reinstall the full wheel trim/wheel cap after removing the adapter or place the cap onto the safety wheel bolt.
Fig. 179 Safety wheel
bolt with adapter
AB
AA
AB
Page 239 of 259

Breakdown assistance
238
Tow-starting and towing vehicle
General
Please pay attention to the following instructions if you are going
to use a tow rope:
Driver of the towing vehicle
– Do not drive off until the tow rope is taught.
– Release the clutch particularly gently when starting off or depress the accelerator particularly gently if your vehicle is
fitted with an automatic gearbox.
Driver of th e towed vehicle
– Switch the ignition on so that the steering wheel is not blocked and you can also operate the turn signal lights, the headlight
flasher, the windscreen wipers and windscreen washer
system.
– Take the vehicle out of gear or move the selector lever into position N if your vehicle is fitted with an automatic gearbox.
– Note that the brake servo unit and power steering only operate if the engine is running. You will require significantly greater
physical force to depress the brake pedal and to steer the
vehicle if the engine is not running.
– Ensure that the tow rope is always kept taught.
Tow rope or tow bar
A tow bar is safest way of towing a vehicle and also minimizes any
shocks. You can use a tow rope only if a suitable tow bar is not available.
The tow rope must be elastic to protect the vehicle. Thus one should only
use plastic fibre rope or a rope made out of a similarly elastic material.
Attach the tow rope or the tow bar only to the towing eyes provided for
this purpose ⇒ page 239, “Towing eye” and ⇒page 239, “Rear towing
eye”.
Driving style
Towing another vehicle requires a certain amount of practice. Both drivers
should be familiar with the particular points about towing a vehicle.
Unskilled drivers should not attempt to tow-start or tow in another vehicle.
One should be constantly vigilant not to allow impermissibly high towing
forces or jerky loadings. There is always a risk of excessive stresses and
damage resulting at the points to which you attach the tow rope or tow bar
when you attempt to tow a vehicle which is not standing on a paved road.
Caution
If the gearbox of your vehicle no longer contains any oil because of a
defect, your vehicle must only be towed in with the driven wheels raised
clear of the ground, or on a special vehicle transporter or trailer.
Note
Please comply with any legal requirements particularly regarding the
switched on signal systems, when towing in or tow-starting another
vehicle.
Page 242 of 259
Fuses and light bulbs241
Using the systemSafetyDriving TipsGeneral MaintenanceBreakdown assistanceTechnical Data
Fuses and light bulbs
Electric fuses
Replacing fuses
Defect fuses must be replaced.
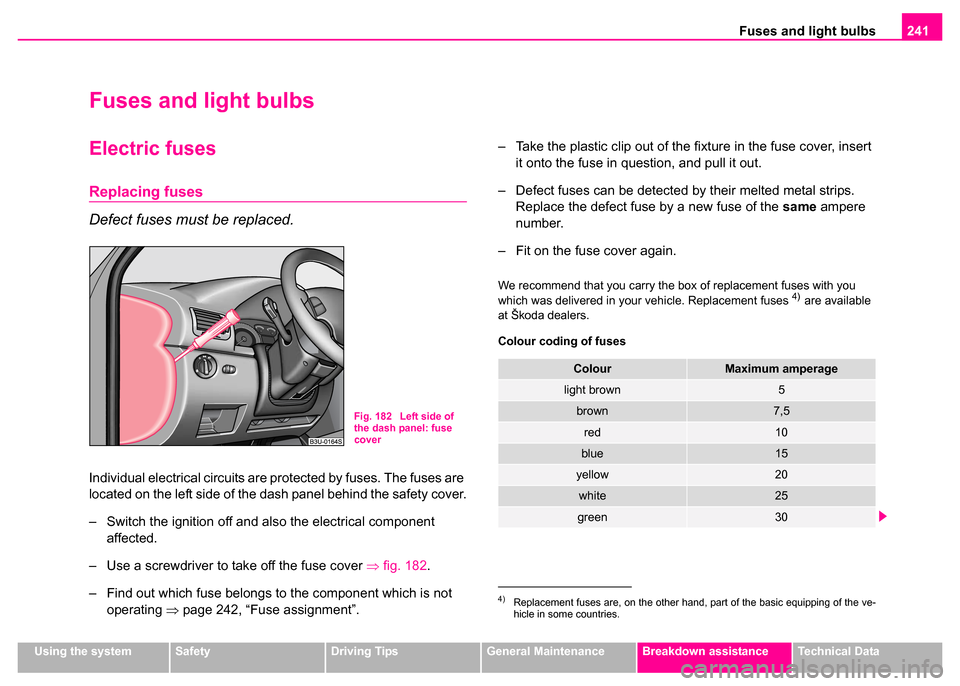
Individual electrical circuits are protected by fuses. The fuses are
located on the left side of the dash panel behind the safety cover.
– Switch the ignition off and also the electrical component
affected.
– Use a screwdriver to take off the fuse cover ⇒fig. 182.
– Find out which fuse belongs to the component which is not operating ⇒page 242, “Fuse assignment”. – Take the plastic clip out of the fixture in the fuse cover, insert
it onto the fuse in question, and pull it out.
– Defect fuses can be detected by their melted metal strips. Replace the defect fuse by a new fuse of the same ampere
number.
– Fit on the fuse cover again.
We recommend that you carry the box of replacement fuses with you
which was delivered in your vehicle. Replacement fuses 4) are available
at Škoda dealers.
Colour coding of fuses
Fig. 182 Left side of
the dash panel: fuse
cover
4)Replacement fuses are, on the other hand, part of the basic equipping of the ve-
hicle in some countries.
ColourMaximum amperage
light brown5
brown7,5
red10
blue15
yellow20
white25
green30