SKODA SUPERB 2003 1.G / (B5/3U) Owner's Manual
Manufacturer: SKODA, Model Year: 2003, Model line: SUPERB, Model: SKODA SUPERB 2003 1.G / (B5/3U)Pages: 259
Page 111 of 259

Heating and air conditioning system
110
– Set a temperature between +18 °C (64 °F) and +29 °C (86 °F).
Recirculated air mode in ECON mode
– Press the button .
– After this, press the button .
When the ECON mode is operating, ECON appears in the display. ECON
mode operates only within the control temperature range from +18 °C
(17,78 °C) up to +29 °C (30,00 °C).
Once a temperature has been set, it is maintained constant fully automat-
ically. This is achieved by automatically varying the temperature of the
outflowing air, the blower stages and the air distribution. The system also
takes into account bright sunlight which eliminates the need to alter the
settings manually.
The ECON mode is switched off when pressing button , or .
Please note that, in the ECON mode, the interior temperature cannot be
lower than the outside temperature. The interior is not cooled and the air
is not dehumidified.
If you select the temperature below +18 °C (17,78 °C), LO appears in the
display. If you select a temperature higher than +29 °C (30,00 °C), HI
appears in the display. In the position LO the recirculated air is not
warmed up. In the HI position, the system operates continuously with
maximum heating capacity.
Please refer to the information regarding recirculated air mode
⇒ page 110.
Recirculated air mode
In recirculated air mode air is sucked out of the interior of
the vehicle and then fed back into the interior.
Recirculated air mode prevents polluted air outside the vehicle
from getting into the vehicle, for example when driving through a
tunnel or when standing in a traffic jam.
Switching recirculated air mode on
– Press button , the symbol
lights up on the display.
Switching recirculated air mode off
– Once again press the button or the button , the symbol
goes out on the display.
Note
If the windscreen is misted up, first of all press the button and then
the button . After the windscreen has been demisted, once again press
the button .
ECON
AUTO
WARNING
You should not leave recirculated air mode on over a longer period
of time. “Stale air” may result in fatigue in the driver and passen-
gers, reduce attention levels and also cause the windows to mist
up. The risk of having an accident increases. Switch recirculated
air mode off as soon as the windows begin misting up.
AUTO
AUTOAUTO
Page 112 of 259

Heating and air conditioning system 111
Using the systemSafetyDriving TipsGeneral MaintenanceBreakdown assistanceTechnical Data
Setting temperature
– Press the button or ⇒page 108, fig. 102 and continue
pressing until the desired temperature is set.
You can set the interior temperature between +18°C (64°F) and +29°C
(86°F). The interior temperature is regulated automatically within this
range. If you select the temperature below 18 °C (64 °F), “LO” appears in
the display. If you select the temperature higher than 29°C (86°F), “ HI”
appears in the display. In both limit positions the Climatronic operates at
maximum cooling or heating capacity, respectively. The temperature is not
controlled in this case.
Lengthy and uneven distribution of the air flow out of the vents (in partic-
ular at the leg area) and large differences in temperature, for example
when getting out of the vehicle, can result in chills in sensitive persons.
Controlling blower
There are a total of seven blower stages available.
The Climatronic system controls the blower stages automatically
in line with the interior temperature. You can also, however, adapt
the blower stages manually to suit your particular needs.
Setting blower stages
– Press the button or the button to set the blower stage.
The number of dashes in the display ⇒page 108, fig. 102 indicates
the blower stage.
If OFF is shown in the display, this indicates that the Climatronic system
is switched off ⇒ page 112.
A15A16
A2
WARNING
•“Stale air” may result in fatigue in the driver and passengers,
reduce attention levels and also cause the windows to mist up. The
risk of having an accident increases.
•Do not switch the Climatronic system off for longer than neces-
sary.
•Switch the Climatronic system on as soon as the windows mist
up.
Page 113 of 259
Heating and air conditioning system
112
Air outlet vents
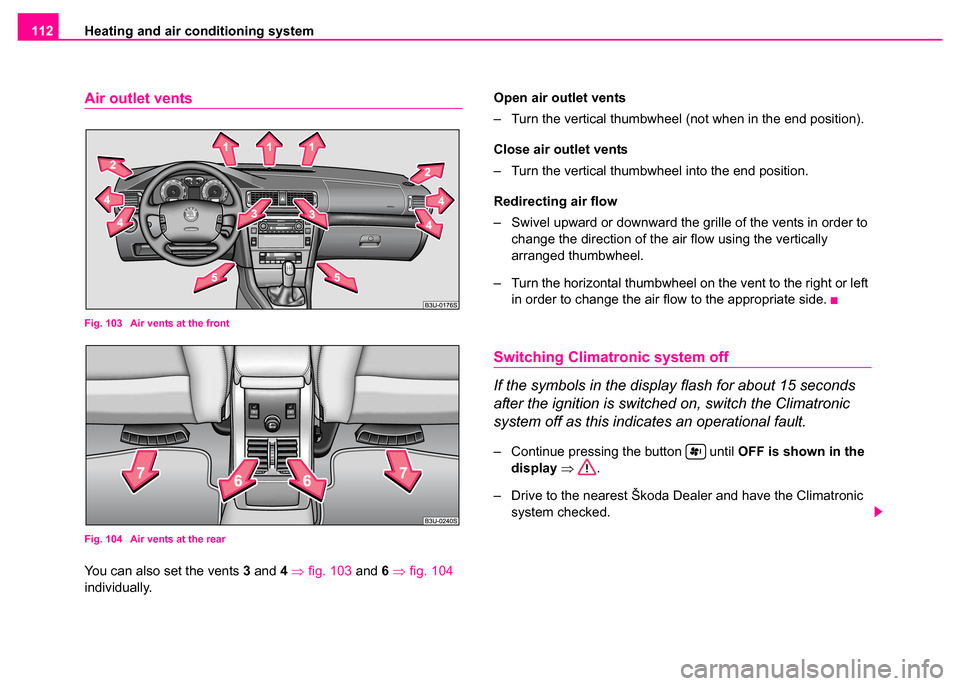
Fig. 103 Air vents at the front
Fig. 104 Air vents at the rear
You can also set the vents 3 and 4 ⇒ fig. 103 and 6 ⇒ fig. 104
individually. Open air outlet vents
– Turn the vertical thumbwheel (not when in the end position).
Close air outlet vents
– Turn the vertical thumbwheel into the end position.
Redirecting air flow
– Swivel upward or downward the gr
ille of the vents in order to
change the direction of the air flow using the vertically
arranged thumbwheel.
– Turn the horizontal thumbwheel on the vent to the right or left in order to change the air flow to the appropriate side.
Switching Climatronic system off
If the symbols in the display flash for about 15 seconds
after the ignition is switched on, switch the Climatronic
system off as this indicates an operational fault.
– Continue pressing the button until OFF is shown in the
display ⇒ .
– Drive to the nearest Škoda Dealer and have the Climatronic system checked.
Page 114 of 259

Heating and air conditioning system 113
Using the systemSafetyDriving TipsGeneral MaintenanceBreakdown assistanceTechnical Data
WARNING
•If the Climatronic system is swit ched off (OFF), there is no
supply of fresh air from the outside. “Stale air” may result in fatigue
in the driver and passengers, reduce attention levels and also
cause the windows to mist up. The risk of having an accident
increases.
•Do not switch the Climatronic system off for longer than neces-
sary.
Page 115 of 259
Starting-off and Driving
114
Starting-off and Driving
Setting steering wheel position
You can set the height and the forward/back position of the
steering wheel to the desired position.
– Adjust the driver seat ⇒page 69.
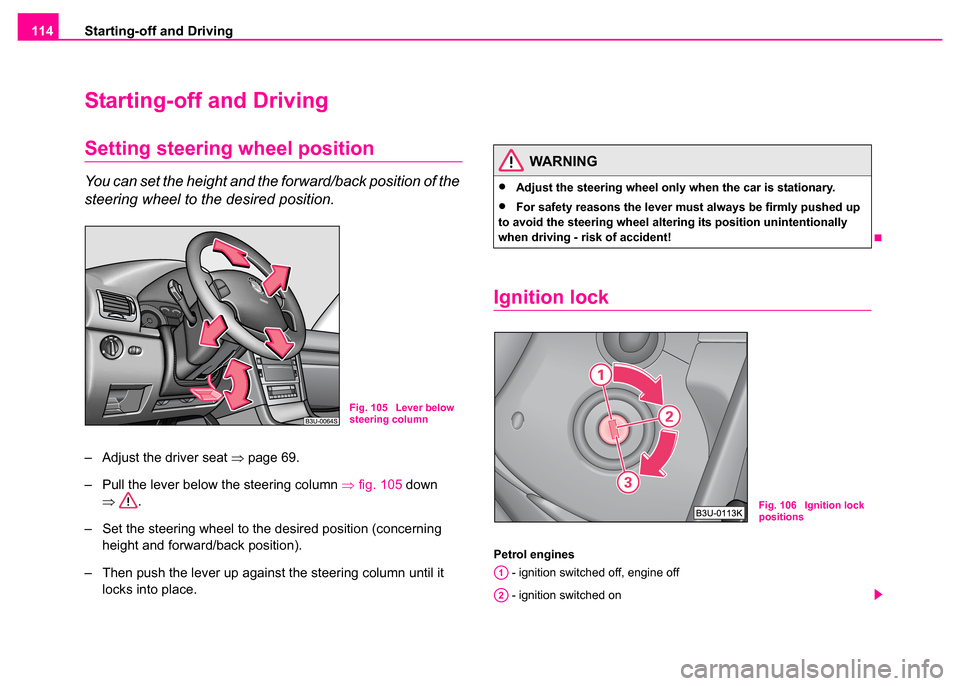
– Pull the lever below the steering column ⇒fig. 105 down
⇒ .
– Set the steering wheel to the desired position (concerning height and forward/back position).
– Then push the lever up against the steering column until it locks into place.
Ignition lock
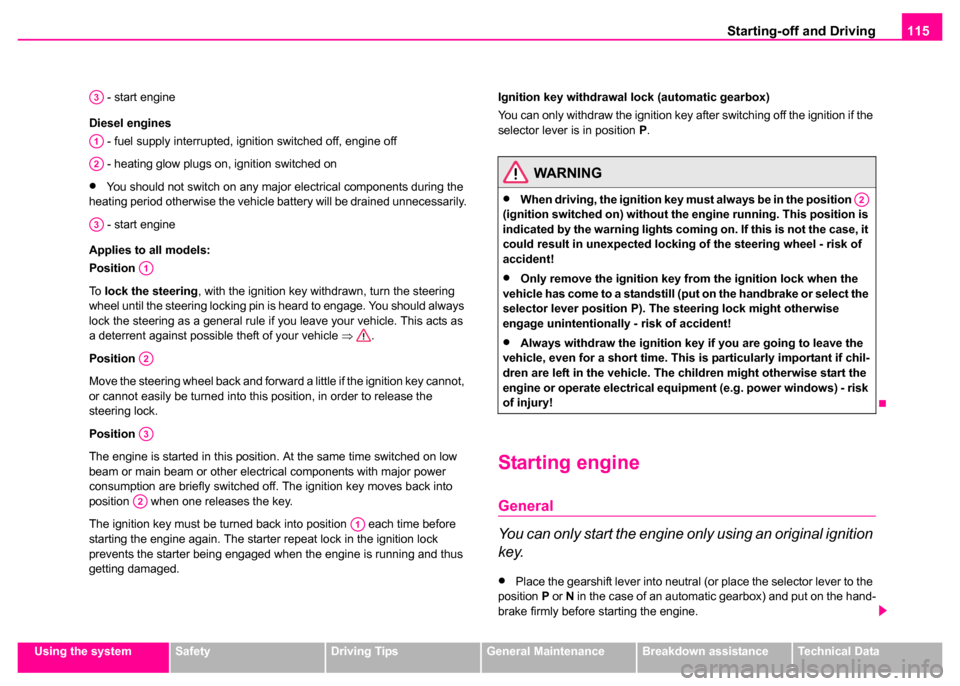
Petrol engines
- ignition switched off, engine off
- ignition switched on
Fig. 105 Lever below
steering column
WARNING
•Adjust the steering wheel only when the car is stationary.
•For safety reasons the lever must always be firmly pushed up
to avoid the steering wheel alte ring its position unintentionally
when driving - risk of accident!
Fig. 106 Ignition lock
positions
A1
A2
Page 116 of 259
Starting-off and Driving115
Using the systemSafetyDriving TipsGeneral MaintenanceBreakdown assistanceTechnical Data
- start engine
Diesel engines - fuel supply interrupted, ignition switched off, engine off
- heating glow plugs on, ignition switched on
•You should not switch on any major electrical components during the
heating period otherwise the vehicle battery will be drained unnecessarily.
- start engine
Applies to all models:
Position
To lock the steering , with the ignition key withdrawn, turn the steering
wheel until the steering locking pin is heard to engage. You should always
lock the steering as a general rule if you leave your vehicle. This acts as
a deterrent against possible theft of your vehicle ⇒.
Position
Move the steering wheel back and forward a little if the ignition key cannot,
or cannot easily be turned into this position, in order to release the
steering lock.
Position
The engine is started in this position. At the same time switched on low
beam or main beam or other electrical components with major power
consumption are briefly switched off. The ignition key moves back into
position when one releases the key.
The ignition key must be turned back into position each time before
starting the engine again. The starter repeat lock in the ignition lock
prevents the starter being engaged when the engine is running and thus
getting damaged. Ignition key withdrawal lock (automatic gearbox)
You can only withdraw the ignition key after switching off the ignition if the
selector lever is in position
P.
Starting engine
General
You can only start the engine only using an original ignition
key.
•Place the gearshift lever into neutral (or place the selector lever to the
position P or N in the case of an automatic gearbox) and put on the hand-
brake firmly before starting the engine.
A3
A1
A2
A3
A1
A2
A3
A2
A1
WARNING
•When driving, the ignition key must always be in the position
(ignition switched on) without the engine running. This position is
indicated by the warning lights coming on. If this is not the case, it
could result in unexpected locking of the steering wheel - risk of
accident!
•Only remove the ignition key fr om the ignition lock when the
vehicle has come to a standstill (put on the handbrake or select the
selector lever position P). The steering lock might otherwise
engage unintentionally - risk of accident!
•Always withdraw the ignition key if you are going to leave the
vehicle, even for a short time. This is particularly important if chil-
dren are left in the vehicle. The children might otherwise start the
engine or operate electrical equipment (e.g. power windows) - risk
of injury!
A2
Page 117 of 259
Starting-off and Driving
116
•The clutch pedal should be fully depressed when starting the engine
which means that the starter only has to crank the engine.
•Let go of the key as soon as the engine starts otherwise there may be
damage to the starter.
The engine running noises may louder at first be louder for a short time
after starting the cold engine until oil pressure can be built up in the
hydraulic valve clearance compensation. This is quite normal and is not
an operating problem.
If the engine does not start ...
You can use the battery of another vehicle as a jump-start aid
⇒ page 236.
It is only possible to tow-start vehicles fitted with a manual gearbox. The
tow-starting distance must not be more than 50 metres ⇒page 238.
Caution
•Avoid high engine revolutions, full throttle and high engine loads as
long as the engine has not yet reached its normal operating temperature
- risk of damaging the engine!
•Do not allow the engine to idle for long periods. If vehicle is stationary,
there is not sufficient air flowing through the cooler. In certain specific situ-
ations it can happen that the engine overheats - risk of engine damage!
•Vehicles which are fitted with an exhaust gas catalytic converter
should not be tow-started over a distance of more than 50 metres.
For the sake of the environment
Never warm up the engine when the vehicle is standing. Drive off right
away. This enables you to avoid unnecessary pollutant emissions.
Petrol engine
These engines are fitted with a starter system which selects the correct
fuel/air mixture for every external air temperature.
•Do not operate accelerator before and when starting engine.
•Interrupt the attempt at starting after 10 seconds if the engine does not
start right awayand wait for about 30 seconds before repeating the
attempt.
•It is possible that the fuse on the electrical fuel pump is defect if the
engine still does not start ⇒page 241.
•Contact the nearest Škoda dealer to obtain professional assistance.
It may be necessary, if the engine is very hot, to slightly depress the
accelerator after the engine has started.
Diesel engine
Glow plug system
Diesel engines are equipped with a glow plug system, the preglow period
being controlled automatically in line with the coolant temperature and
outside temperature.
The preglow indicator light
comes on after the ignition has been
switched on.
WARNING
There is the danger of poisoning if the engine is left running in an
enclosed space!
Page 118 of 259
Starting-off and Driving117
Using the systemSafetyDriving TipsGeneral MaintenanceBreakdown assistanceTechnical Data
You should not switch on any major electrical components during
the heating period otherwise the ve
hicle battery will be drained
unnecessarily.
•You should start the engine immediately after the glow plug warning
light has gone out.
•The glow plug warning light will come on for about one second if the
engine is at a normal operating temperature or if the outside temperature
is above +5°C. This means that you can start the engine right away.
•Interrupt the attempt at starting after 10 seconds if the engine does not
start right awayand wait for about 30 seconds before repeating the
attempt.
•It is possible that the fuse on the diesel preglow system is defect if the
engine still does not start ⇒page 241.
•Contact the nearest Škoda dealer to obtain professional assistance.
Starting the engine after the fuel tank has run dry
It may take longer than normal to start the engine after refuelling if the fuel
tank has run completely dry - up to one minute. This is because the fuel
system must first of all be filled while the attempting to start the engine.
Switching the engine off
– Turn the ignition key into position ⇒page 114.
Caution
you should not switch the engine off right away at the end of your journey
after the engine has been operated for a lengthy period at high loads but
should be allowed it to run at idling speed for about 2 minutes. This
prevents any accumulation of heat when the engine is switched off.
Note
•The radiator fan may continue running for a further 10 minutes or so
after the engine and the ignition have been switched off. The coolant fan
may, however, also switch on again after some time if the coolant temper-
ature rises because of an accumulation of heat in the engine or if the
engine is warm and the engine compartment is additionally heated by
strong sunlight.
•This is why particular care is required when carrying out any work in
the engine compartment ⇒page 203.
A1
Page 119 of 259

Starting-off and Driving
118
Shifting gears
The shift pattern
Shift into reverse only when the car is stationary. Depress the clutch pedal
and hold it fully depressed. Wait a moment before engaging reverse gear
in order to avoid any shift noises.
The reversing lights will come on once reverse gear is engaged, provided
the ignition is on.
Note
One should not lay the hand on the shift lever while driving the vehicle.
The pressure of the hand will be transferred to the gearshift forks in the
gearbox. This can, over a period of time, lead to early wear of the gearshift
forks.
Handbrake
Handbrake
Fig. 107 Shift pattern
on models fitted with 5-
speed manual gearbox
Fig. 108 Shift pattern
on models fitted with 6-
speed manual gearbox
Fig. 109 Centre
console: Handbrake
Page 120 of 259

Starting-off and Driving119
Using the systemSafetyDriving TipsGeneral MaintenanceBreakdown assistanceTechnical Data
Applying the handbrake
– Pull the handbrake lever up fully.
Releasing the handbrake
– Pull the handbrake lever up slightly and at the same time
press in the locking button ⇒page 118, fig. 109 .
– Hold the button pressed and push the handbrake lever down fully ⇒ .
The handbrake warning light lights up when the handbrake is applied,
provided the ignition is on.
A warning signal (buzzer) sounds and the following text appears in the
display* if you have inadvertently driven off with the handbrake applied:
"Handbrake on"
The handbrake warning is activated if you drive at a speed of more than 5
km/h for more than 3 seconds.
Caution
After the car has come to a stop, always first of all apply the handbrake
firmly before then additionally engaging a gear (manual gearbox) or
moving the selector lever into position P (automatic gearbox).
Parking aid*
The parking aid provides a warning of obstacles behind
the vehicle.
The audible parking aid at the rear determines the distance to an obstacle
behind the car with the aid of ultrasound sensors. The sensors are inte-
grated in the rear bumper.
The parking aid is activated automatically when reverse gear is engaged
and the ignition is turned on. This is confirmed by a brief signal.
The clearance warning begins at a distance of about 160 cm from the
obstacle. The interval between the warning signals becomes shorter as
the clearance is reduced.
A continuous tone sounds from a clearance of just 30 cm - danger area.
You should not reverse any further after this signal sounds.
WARNING
•Please note that the handbrake must be fully released. A hand-
brake which is only partially released can result in the rear brakes
overheating which will have a negative effect on the operation of
the brake system - risk of accident!
•Never leave children unattended in the vehicle. The children
might, for example, release the ha ndbrake or take the vehicle out
of gear. The vehicle might then move off - risk of accident!WARNING
•The parking aid is not a substitute for the driver paying proper
attention. It is always the driver's responsibility to take care when
parking the vehicle or carrying out similar manoeuvres.