technical data SKODA SUPERB 2003 1.G / (B5/3U) Owner's Guide
[x] Cancel search | Manufacturer: SKODA, Model Year: 2003, Model line: SUPERB, Model: SKODA SUPERB 2003 1.G / (B5/3U)Pages: 259
Page 66 of 259
Lights and Visibility65
Using the systemSafetyDriving TipsGeneral MaintenanceBreakdown assistanceTechnical Data
– If you have switched the ignition off and on again, you must
then once again activate the sensor by moving the lever into
home position , and then back into position .
The windscreen wipers and the windscreen washer system only operate
if the ignition is switched on.
The windscreen washer nozzles are heated* when the ignition is switched
on.
The rain sensor* automatically regulates the break between the individual
wiper strokes depending on the intensity of the rain.
Caution
In frosty weather, please first of all check whether the windscreen wiper
blades are not frozen to the windscreen before switching them on.
Switching on windscreen wipers when the blades are frozen to the wind-
screen may result in damage both to the blades and the motor of the wind-
screen wipers!
Headlight cleaning system*
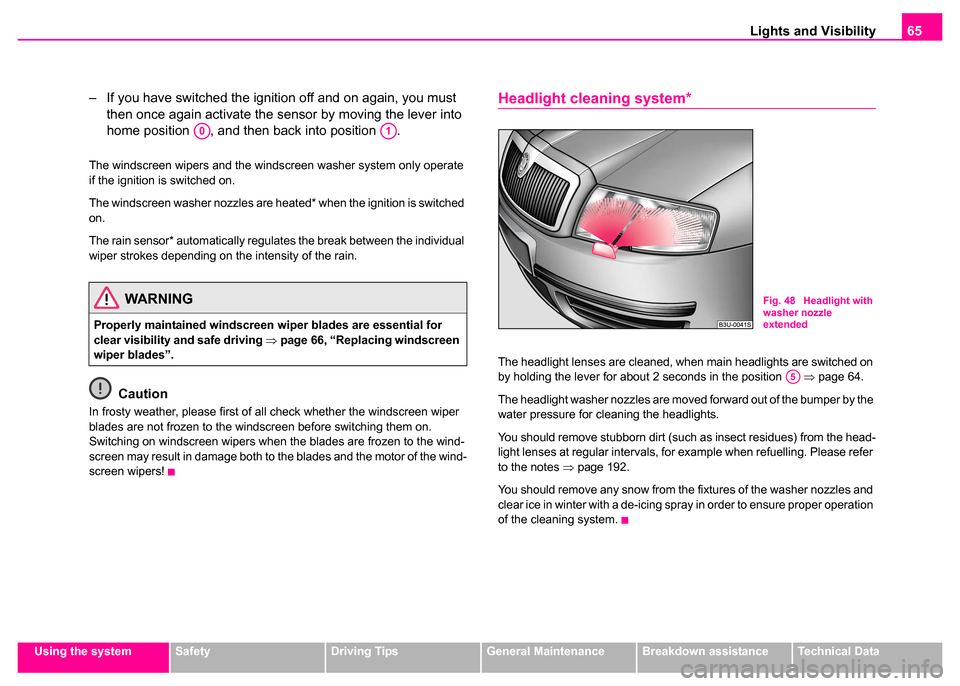
The headlight lenses are cleaned, when main headlights are switched on
by holding the lever for about 2 seconds in the position ⇒page 64.
The headlight washer nozzles are moved forward out of the bumper by the
water pressure for cleaning the headlights.
You should remove stubborn dirt (such as insect residues) from the head-
light lenses at regular intervals, for example when refuelling. Please refer
to the notes ⇒page 192.
You should remove any snow from the fixtures of the washer nozzles and
clear ice in winter with a de-icing spray in order to ensure proper operation
of the cleaning system.
WARNING
Properly maintained windscreen wiper blades are essential for
clear visibility and safe driving ⇒page 66, “Replacing windscreen
wiper blades”.
A0A1
Fig. 48 Headlight with
washer nozzle
extended
A5
Page 68 of 259
Lights and Visibility67
Using the systemSafetyDriving TipsGeneral MaintenanceBreakdown assistanceTechnical Data
Automatic dimming interi or rear-view mirror*
The mirror is dimmed automatically depending on the light striking the
mirror from the rear provided the ignition is switched on. The mirror has no
lever on the bottom edge of the mirror. When the interior lights are
switched on or the reverse gear is engaged, the mirror always moves back
into the basic position (not dimmed).
Note
Automatic mirror dimming operates only properly if the sun screen* for the
rear window is not in use or the light striking the rear of the interior rear-
view mirror is not affected by other objects.
Exterior mirror with entry lighting*
The lighting is positioned on the bottom edge of the exte-
rior mirror.
The light beam is aimed at the entry area of the front doors after the car is
unlocked.
The light comes on after the doors have been locked or on opening the
front door. The lighting goes out about 30 seconds after the doors are
closed or if the ignition is switched on.
If the doors remain open, the lighting goes out automatically after about
10 minutes provided the ignition is not switched on.
Electrically adjustable rear mirror
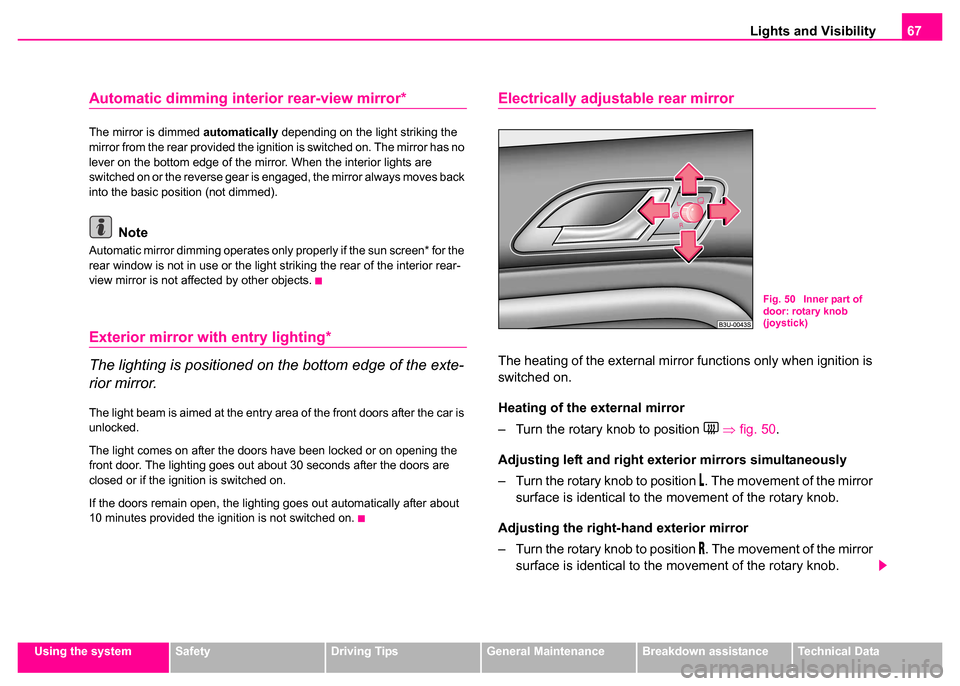
The heating of the external mirror functions only when ignition is
switched on.
Heating of the external mirror
– Turn the rotary knob to position
⇒ fig. 50 .
Adjusting left and right ext erior mirrors simultaneously
– Turn the rotary knob to position
. The movement of the mirror
surface is identical to the movement of the rotary knob.
Adjusting the right-hand exterior mirror
– Turn the rotary knob to position
. The movement of the mirror
surface is identical to the movement of the rotary knob.
Fig. 50 Inner part of
door: rotary knob
(joystick)
Page 70 of 259
Seats and Stowage69
Using the systemSafetyDriving TipsGeneral MaintenanceBreakdown assistanceTechnical Data
Seats and Stowage
Front seats
Basic information
The front seats have a wide range of different settings and can thus be
matched to the physical characteristics of the driver and front passenger.
Correct adjustment of the seats is particularly important for
•safely and quickly reaching the controls,
•a relaxed, fatigue-free body position,
•achieving the maximum protection offered by the seat belts and
the airbag system.
The chapters which follow describe the procedure which you should adopt
for adjusting the seats.
Adjusting front seats manually
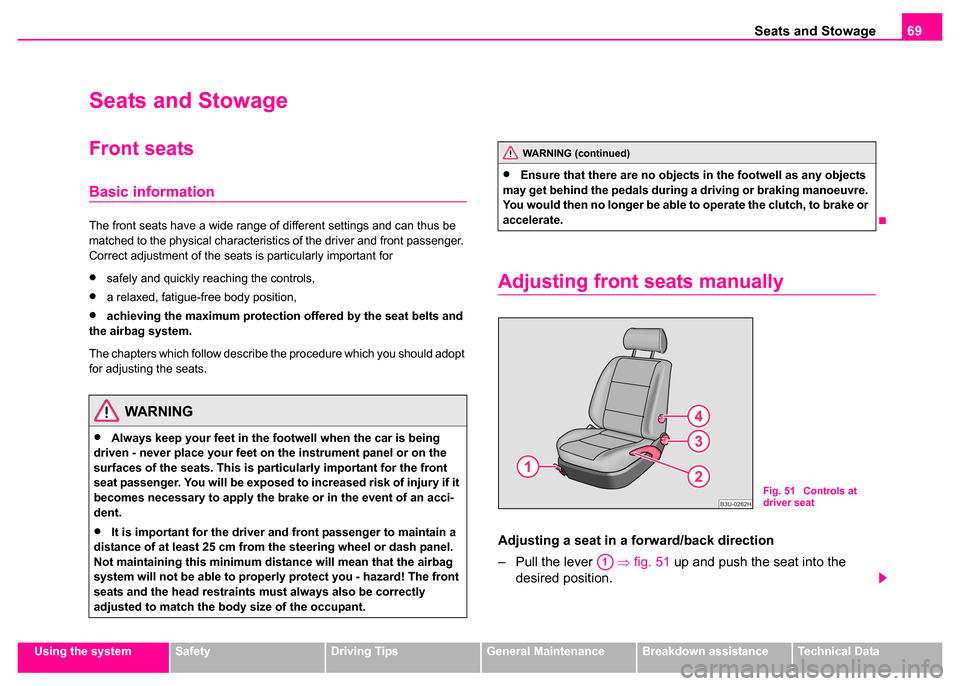
Adjusting a seat in a fo rward/back direction
– Pull the lever ⇒fig. 51 up and push the seat into the
desired position.
WARNING
•Always keep your feet in the footwell when the car is being
driven - never place your feet on the instrument panel or on the
surfaces of the seats. This is particularly important for the front
seat passenger. You will be exposed to increased risk of injury if it
becomes necessary to apply the brake or in the event of an acci-
dent.
•It is important for the driver and front passenger to maintain a
distance of at least 25 cm from the steering wheel or dash panel.
Not maintaining this minimum distan ce will mean that the airbag
system will not be able to properly protect you - hazard! The front
seats and the head restraints must always also be correctly
adjusted to match the body size of the occupant.
WARNING (continued)
•Ensure that there are no objects in the footwell as any objects
may get behind the pedals during a driving or braking manoeuvre.
You would then no longer be able to operate the clutch, to brake or
accelerate.
Fig. 51 Controls at
driver seat
A1
Page 72 of 259
Seats and Stowage71
Using the systemSafetyDriving TipsGeneral MaintenanceBreakdown assistanceTechnical Data
Caution
If the movement of the seat is inadvertently interrupted during an adjust-
ment, once again press the switch in the appropriate direction and
continue with the adjustment of the seat to the end.
Memory for the seat
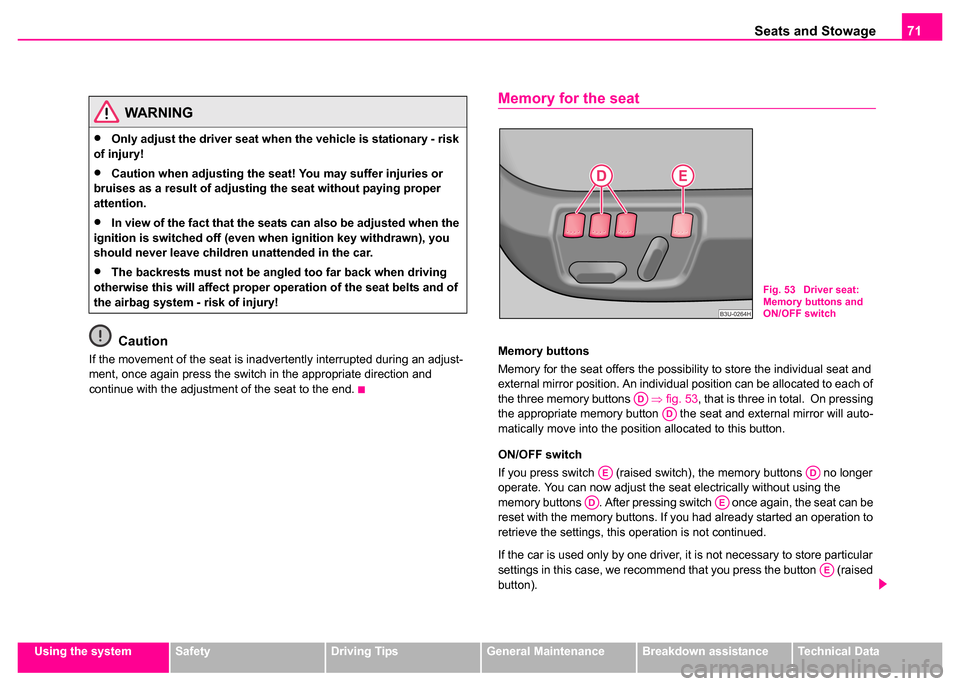
Memory buttons
Memory for the seat offers the possibility to store the individual seat and
external mirror position. An individual position can be allocated to each of
the three memory buttons ⇒fig. 53 , that is three in total. On pressing
the appropriate memory button the seat and external mirror will auto-
matically move into the position allocated to this button.
ON/OFF switch
If you press switch (raised switch), the memory buttons no longer
operate. You can now adjust the seat electrically without using the
memory buttons . After pressing switch once again, the seat can be
reset with the memory buttons. If you had already started an operation to
retrieve the settings, this operation is not continued.
If the car is used only by one driver, it is not necessary to store particular
settings in this case, we recommend that you press the button (raised
button).
WARNING
•Only adjust the driver seat when the vehicle is stationary - risk
of injury!
•Caution when adjusting the seat! You may suffer injuries or
bruises as a result of adjusting the seat without paying proper
attention.
•In view of the fact that the seats can also be adjusted when the
ignition is switched off (even when ignition key withdrawn), you
should never leave children unattended in the car.
•The backrests must not be angled too far back when driving
otherwise this will affect proper operation of the seat belts and of
the airbag system - risk of injury!
Fig. 53 Driver seat:
Memory buttons and
ON/OFF switch
ADAD
AEAD
ADAE
AE
Page 74 of 259
Seats and Stowage73
Using the systemSafetyDriving TipsGeneral MaintenanceBreakdown assistanceTechnical Data
If you wish, you can obtain an additional remote control from a Škoda
Dealer and then assign it to the rear memory button.
Note
•If the remote control had previously been assigned to another memory
button, this setting is then erased by the new assignment.
•If you assign the remote control to a memory button which has already
been assigned to a remote control, the old assignment is also replaced by
a new assignment in this case.
•The assignment of the remote control to a memory button is retained,
however, after reassigning the seats and exterior mirrors.
Retrieving seat and exterior mirror settings for driving
forward
You can retrieve the stored settings either with the
memory buttons or with the remote control*.
Retrieving settings with memory buttons
– For safety reasons, you can only retrieve the seat and mirror
settings if the ignition is switched off. You have a choice of two
different ways of retrieving the settings:
– One-touch automatic memory: with the driver door open,
operate the desired memory button ⇒page 71, fig. 53
with one-touch. The seat and the exterior mirrors now move
automatically into the stored position.
– Memory keying : with the driver door open or closed, press
and hold the desired memory button until the seat and the
exterior mirrors have moved into the stored position. Retrieving settings with remote control
– If the driver door is closed and the ignition is switched off,
briefly press the unlock button of the remote control
⇒page 46 and then open the door.
– The seat and exterior mirrors now move automatically into the stored positions.
Retrieving setting of exterior mirror for reversing*
– Engage reverse gear and then move the control for the exte- rior mirror setting into position
⇒ page 67.
Emergency Off
You can interrupt any memory retrieval operation in an emergency by
pressing the switch ⇒page 71, fig. 53 , by one-touch of a memory
button or by pressing the seat setting switch.
AD
AD
AE
Page 76 of 259

Seats and Stowage75
Using the systemSafetyDriving TipsGeneral MaintenanceBreakdown assistanceTechnical Data
Front passenger seat with a folding
central back rest*
Folding out and setting
You can fold out the central back rest of the front passenger seat
during a long journey for improved comfort. It then serves as a
comfortable footrest for the passengers in the rear. You can
adjust the position of the footrest by adjusting the passenger seat
using the switches in the armrest of the rear seats ⇒fig. 57 .
Folding out the central back rest
– Pull the handle in direction of arrow ⇒fig. 56 and pull the
central part of the back rest downwards.
Folding up the central back rest
– Fold the central back rest up until it is heard to lock.
Adjusting the passenger seat
– Tilt the back rest forwards or backwards using switch .
– Move the front part of the seat upwards or downwards using switch .
WARNING
The head restraints must be corr ectly adjusted in order to offer
effective protection to the occupants in the event of an accident.
Fig. 56 Front
passenger seat: folding
central back rest
Fig. 57 Armrest of rear
seats: Operating the
passenger seat
AA
AB
Page 78 of 259

Seats and Stowage77
Using the systemSafetyDriving TipsGeneral MaintenanceBreakdown assistanceTechnical Data
The protective sack has zip on the upper side to release air. It allows the
upper side to be opened out.
You can also use the protective sack as a luggage bag.
Footrest at the rear*
The passengers sitting in the rear of the car can use
⇒fig. 59 the
foot rest for increased comfort. The foot rest is attached to the
carpet by a velcro fastener.
Seat heaters*
You can heat the surfaces of the seats and of the backrests of the
front seats and the two outer rear seats.
Fig. 59 The floor
behind the front seat:
Footrest at the rear
Fig. 60 Dash panel:
Control dial for heating
the front seats
Fig. 61 Centre console
at rear: Rotary controls
for heaters of rear seats
Page 80 of 259
Seats and Stowage79
Using the systemSafetyDriving TipsGeneral MaintenanceBreakdown assistanceTechnical Data
Note
•You have to adjust the inflation pressure of the tyres to the load of the
car - refer to tyre inflation pressure sticker on the inside of the fuel filler
flap.
•The backrest of the rear seats is a fixed element and can therefore not
be folded forward to increase the size of the luggage compartment!
Lashing eyes
Eyes are located on the sides of the loading area for lashing the goods to
be loaded ⇒fig. 62 .
You can also attach a securing net* to these eyes for lashing small objects.
The securing net* and the fixing instruction is located in the well under the
floor covering of the lugagge compartment behind the spare wheel.
WARNING
•Please note that the handling properties of your vehicle may be
affected when transporting heavy objects as a result of the
displacement of the centre of gravity. The speed and style of
driving must be adjusted accordingly.
•The items carried in the luggage compartment should be stored
in such a way that no objects are able to slip forward if there are
any sudden driving or braking manoeuvres undertaken - risk of
injury!
•Never drive with the boot lid slightly ajar or even fully opened
otherwise exhaust gases may get into the interior of the vehicle -
risk of poisoning!
•On no account exceed the permissible axle loads and the
permissible gross weight of th e vehicle - risk of accident!
WARNING
The load to be transported must be fixed in place in such a way that
it cannot move during the journey and when braking.
Fig. 62 Position of
lashing eyes in luggage
compartment
Page 82 of 259

Seats and Stowage81
Using the systemSafetyDriving TipsGeneral MaintenanceBreakdown assistanceTechnical Data
Caution
Please ensure that the heating elements of the rear window heater are not
damaged as a result of objects placed in this area.
Through-loading bag*
The through-loading bag enables you to conveniently
transport long objects (such as skis) without damaging the
interior of the car.
Loading
– Fold down the armrest of the rear seats to the front.
– Press the unlock button for the cover of the through-loading
bag in the interior of the car and swivel it down.
– Pull the bag out and unfold it.
– Open the boot lid/luggage compartment door.
– Press the unlock button for the cover of the through-loading bag ⇒fig. 65 and swivel it down.
– Push the objects into the through-loading bag from the boot ⇒ .
Securing
– Insert the belt ⇒fig. 66 into the middle seat belt buckle .
WARNING
No objects should be placed on the luggage compartment cover,
the vehicle occupants could be endangered if there is sudden
braking or the vehicle collides with something.
Fig. 65 Luggage
compartment: cover for
through-loading bag
Fig. 66 Attaching
through-loading bag to
middle seat belt buckle
of rear seats
AAAB
Page 84 of 259

Seats and Stowage83
Using the systemSafetyDriving TipsGeneral MaintenanceBreakdown assistanceTechnical Data
You can remove the cool box if necessary
⇒page 84. You can replace the
cool box with a storage net ⇒fig. 68 .
Caution
Never cover the ventilator on the cool box otherwise it will overheat and
could be damaged.
Note
The cool box also operates if the ignition is switched off. The battery will
not run down fully, however, since the system is fitted with a device which
monitors the battery charge level. The cool box will be automatically
switched off when it is threatening to empty the battery.
Partition with storage net
If the cool box is removed, install the partition with the storage net
⇒fig. 68 which is fixed with a velcro fastener to the side wall of
the cool box.
– The partition is installed and removed in a similar way to the cool box ⇒ page 84.
Fig. 68 Partition with
storage net