technical data SKODA SUPERB 2003 1.G / (B5/3U) Repair Manual
[x] Cancel search | Manufacturer: SKODA, Model Year: 2003, Model line: SUPERB, Model: SKODA SUPERB 2003 1.G / (B5/3U)Pages: 259
Page 126 of 259
Automatic gearbox*125
Using the systemSafetyDriving TipsGeneral MaintenanceBreakdown assistanceTechnical Data
The reversing lights come on when the selector lever is moved into posi-
tion
R when the ignition is also on.
N - Neutral
The transmission is in Neutral in this position.
The brake pedal must be depressed and the Shiftlock in the selector lever
grip must be pressed (if the selector lever is in its position for longer than
2 seconds) in order to move the selector lever out of the N position, with
the ignition switched on, on a vehicle travelling at less than 5 km/hour or
on a stationary vehicle.
D - Drive, position for driving forward
When the selector lever is in this position, the forward gears are shifted up
and down automatically in line with engine load, vehicle speed and the
dynamic shift programme (DSP).
You must depress the brake pedal ⇒ if you wish to move the selector
lever into position D from N when the vehicle is travelling at less than
5 km/hour or is stationary.
In certain circumstances (e.g. when driving in mountainous regions or
when towing a trailer) it may be beneficial to select the manual shift
programme ⇒page 128 for a short time in order to adapt the gearbox
ratios manually to the driving situations.
4 - Position when driving in hilly areas
We recommend this position if driving with the selector lever in position D
would, in certain circumstances, result in the gearbox frequently shifting
between fourth and fifth gears.
The gearbox then shifts up and down automatically into the first, second,
third and fourth gears in line with engine load and vehicle speed. Fifth gear
is not engaged in this case. This makes it possible to exploit greater
engine braking power when the accelerator is released ⇒.
The Shiftlock on the selector lever grip must be pressed when moving out
of position 4 into position D. 3 - Position when drivin
g in mountainous regions
This position of the selector lever is suitable for long sloping sections.
The gearbox shifts up and down automatically into first, second and third
gear in line with engine load and vehicle speed. The fourth and fifth gears
remain locked out in order to avoid unnecessary gear changes. Enhanced
engine braking power is thus available.
The Shiftlock on the selector lever grip must be pressed when moving out
of position 4 into position 3.
2 - Position for extreme mountainous sections
This position of selector lever is suitable for very steep downhill sections.
The gearbox shifts up and down automatically into first and second gear
in line with engine load and vehicle speed. Third, fourth and fifth gears are
not engaged. This position offers you the maximum possible engine
braking power.
The Shiftlock on the selector lever grip must be pressed when moving out
of position 2 into position 3.
The cruise control system is locked in position 2.
WARNING
•Never move the selector lever into position R or P when driving
- risk of an accident!
•When the engine is running and the vehicle is stationary, it is
necessary to hold the car with the brake pedal in all the positions
of the selector lever (except P and N) since the power transmission
is never completely interrupted, also not when the engine is idling
- the vehicle "creeps".
Page 128 of 259
Automatic gearbox*127
Using the systemSafetyDriving TipsGeneral MaintenanceBreakdown assistanceTechnical Data
Dynamic shift programme
The automatic gearbox of your vehicle is controlled electronically. Shifting
up and down through the gears is performed automatically on the basis of
pre-defined driving programmes.
Adopting a moderate style of driving will cause the gearbox to select the
most economical driving programme. Shifting up into a higher gear as
soon as possible and shifting down as late as possible will have a favour-
able effect on your fuel consumption.
Adopting a faster style of driving with rapid movements of the acceler-
ator pedal combined with sharp acceleration and frequent changes in
speed, exploiting the top speed of the car or operating the kickdown func-
tion, will cause the gearbox to switch over to the sporty driving
programme. Shifting up later into a higher gear makes it possible to fully
exploit the power reserves of the engine. The gearbox also then shifts
down at higher engine speeds than is the case for the economy-oriented
programmes.
Selecting the most appropriate driving programme for the particular style
of driving is a continuous process. Irrespective of this it is, however,
possible to switch into a sporty driving programme by depressing the
accelerator rapidly. The gearbox shifts down into a lower gear matching
the speed of the car and this allows you to accelerate rapidly (e.g. when
overtaking) without having to depress the accelerator pedal fully into the
kickdown range. The original programme will be reactivated to match your
particular style of driving once the gearbox has shifted up again. When driving in hilly regions, the gears are selected to match uphill and
downhill sections. This avoids the gearbox frequently shifting up and down
when negotiating an uphill stretch. Depressing the brake pedal while
driving downhill causes the gearbox to shift down into the next lower gear.
This makes it possible for you to exploit the engine braking power without
the need for shifting gears manually.
WARNING
Please note that using the kickdown function can result in the
driven wheels spinning on a smooth
or slippery road surface - risk
of skidding!
Page 130 of 259

Automatic gearbox*129
Using the systemSafetyDriving TipsGeneral MaintenanceBreakdown assistanceTechnical Data
Emergency programme
An emergency programme exists in the event of a fault in
the system.
The gearbox operates in a corresponding emergency programme if there
are functional faults in the gearbox electronics. This is indicated by all of
the segments in the display lighting up or going out.
It is possible to continue to move the selector lever into all the positions.
The gearbox always shifts into 4th gear in the positions D, 4 , 3 and 2 . It is
also possible to continue to engage reverse gear in the position R.
The manual shift programme (Tiptronic) is switched off in the emergency
mode.
If the gearbox has switched over to emergency mode, drive to the
nearest Škoda dealer in order to have the fault rectified.
Tow-starting and towing vehicle
Tow-starting a vehicle
For technical reasons it is not possible to tow-start a car fitted with an auto-
matic gearbox ⇒page 239.
you can use jump-start cables connected to the battery of another vehicle
for starting your car if the vehicle battery is flat ⇒page 237. Towing a vehicle
Please pay attention to the following information if it comes necessary to
tow-in your car
⇒page 238.
WARNING
Never move the selector lever into position R or P when driving -
risk of an accident!
Page 132 of 259
Communicating and Navigating131
Using the systemSafetyDriving TipsGeneral MaintenanceBreakdown assistanceTechnical Data
– If you release the pushbutton when the vehicle is travelling at
a speed of less than 30 km/h, the speed is not stored and the
memory is erased. It is then necessary to again store the
speed with the pushbutton in the position SET after an
increase in speed of the vehicle to more than 30 km/hour.
– You can increase the stored speed by pressing the button in the position RES+. Pressing and holding down the slide
switch will cause the speed of the vehicle to be increased
continuously. Once the car has reached the desired speed,
release the button. The set speed is then stored in the
memory.
Switching cruise control system off temporarily
– On the version not fitted with a mobile phone, the cruise control system is switched off temporarily with the button
⇒page 130, fig. 115 in the position CANCEL, on the version
fitted with mobile phone, by pushing the switch into the
intermediate position ahead of the position OFF ⇒ page 122.
– You can resume the stored speed by pressing the button in the position RES+.
For further methods of temporarily switching off the cruise control system
⇒page 122.
Please refer to the following guidelines ⇒page 120.
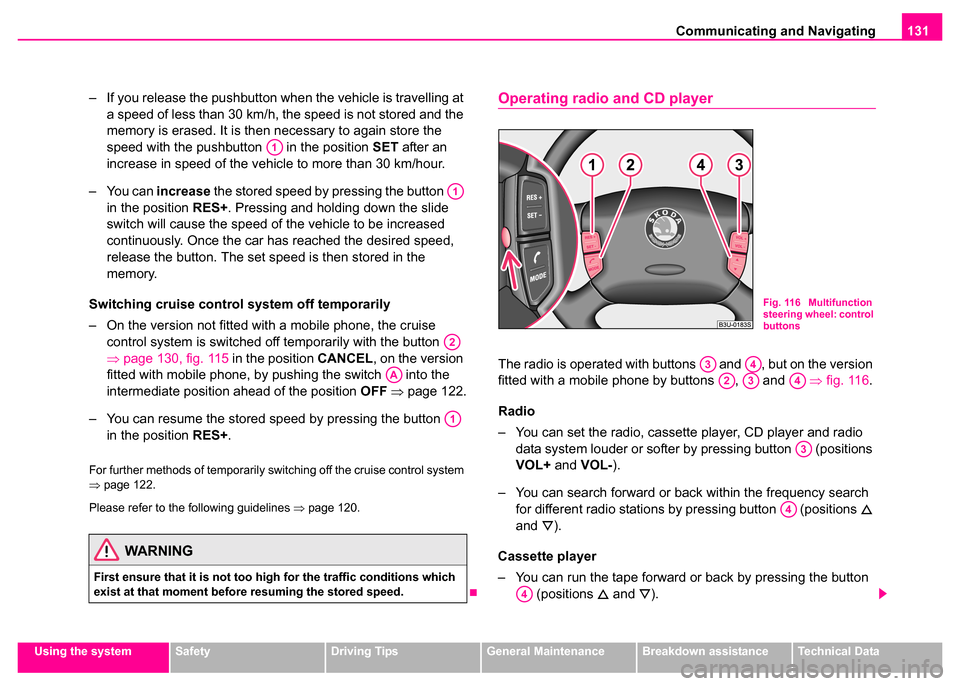
Operating radio and CD player
The radio is operated with buttons and , but on the version
fitted with a mobile phone by buttons , and ⇒fig. 116 .
Radio
– You can set the radio, cassette player, CD player and radio data system louder or softer by pressing button (positions
VOL+ and VOL- ).
– You can search forward or back within the frequency search for different radio stations by pressing button (positions
and
).
Cassette player
– You can run the tape forward or back by pressing the button (positions
and ).
WARNING
First ensure that it is not too high for the traffic conditions which
exist at that moment before resuming the stored speed.
A1
A1
A2
AA
A1
Fig. 116 Multifunction
steering wheel: control
buttons
A3A4
A2A3A4
A3
A4
A4
Page 134 of 259
Communicating and Navigating133
Using the systemSafetyDriving TipsGeneral MaintenanceBreakdown assistanceTechnical Data
Initialisation
– Withdraw the ignition key.
– First insert the adapter without the mobile phone into the
mount in the direction of arrow ⇒page 132, fig. 117
until the adapter is touching the stop. Press the adapter
slightly in the direction of arrow until it locks into position.
– Plug the adapter cable into the mobile phone socket. The socket is located on the mobile phone mount below.
– Switch on the ignition.
– Wait approximately 20 seconds, switch off the ignition and pull the ignition key out of the ignition lock.
– Insert the mobile phone into the adapter (as specified in manufacturer's instructions) and switch on the ignition.
Removing the mobile phone and adapter
– Press the button and remove the mobile telephone.
An initialisation must be carried out:
•after the first connection of the adapter
•after reconnecting the battery
•after pulling out the adapter cable from the power socket for the mobile
phone
This enables you to make full use of the advantages of a normal carphone
(“handsfree system” using a microphone integrated in the vehicle, optimal
transmission of signals using an external aerial etc.). The battery of the
mobile phone is also constantly charged. Please contact your Škoda dealer If there are any points which are not
clear.
Please also refer to the additional instructions
⇒page 135.
ABA1
A2
AA
AC
Page 136 of 259
Communicating and Navigating135
Using the systemSafetyDriving TipsGeneral MaintenanceBreakdown assistanceTechnical Data
Note
For technical reasons it is not possible to use simultaneously the front and
rear mobile phone. Ensure that the adapter is always inserted only in
the bracket .
Mobile phones and two-way radio systems
The installation of mobile phones and two-way radio systems in a vehicle
should generally be undertaken by a Škoda dealer.
Škoda Auto permits the operation of mobile phones and two-way radio
systems with a professionally installed external aerial and a maximum
transmission power of up to 10 watts.
Our Skoda dealers are also happy to inform you about the possibilities
available for installing and operating mobile telephones and radio trans-
mitters which have an output greater than 10 watts. The Skoda dealers
can provide you with details about the technical possibilities for retrofitting
of mobile telephones and radio transmitters.
The operation of commercially available mobile phones or two-way radio
systems may cause operational problems in the electronic systems of
your car. The reasons for this may be:
•no external aerial
•external aerial incorrectly installed
•transmission power greater than 10 watts.
You should therefore not operate a mobile phone or two-way radio
system inside the vehicle without the use of an external aerial, or with
an external aerial which has been incorrectly installed.
You should also note that only an external aerial makes it possible to
achieve the optimal range of such equipment.
Note
Please also refer to the operating instructions of the mobile phones and
two-way radio systems.
Navigation system*
The controls for the navigation system, radio, CD player are located in the
centre console on both sides of the monitor screen. Navigation data is
also shown in the information display.
Please refer to the relevant operating instructions for a detailed descrip-
tion of the navigation system.
AAAB
WARNING
•If a mobile phone or two-way radio system is operated inside
the vehicle without using an external aerial, or with an external
aerial which has been incorrectly installed, the result can be exces-
sive electromagnetic fields which may cause harm to your health.
•Please always pay full attention to the traffic situation around
you!
•You must not install two-way radio systems, mobile phones or
mounts on the covers of the airbags or within the immediate
deployment range of airbags. This might result in injuries to the
occupants in the event of an accident.
Page 138 of 259
Passive Safety137
Using the systemSafetyDriving TipsGeneral MaintenanceBreakdown assistanceTechnical Data
Safety
Passive Safety
Driving the safe way
Passive safety measures reduce the risk of injury in acci-
dent situations.
In this section you will find important information, tips and notes on the
subject of passive safety in your vehicle. We have combined everything
here which you should be familiar with, for example, regarding seat belts,
airbags, child seats and safety of children. It is therefore important, in
particular, to comply with the notes and warnings in this section for your
own interest and in the interest of all those travelling with you.
The information provided in this section applies to all models of your type
of vehicle. It is also possible that equipment is described here which does
not necessarily apply to your vehicle.
Requirements for maximum safety
What you have to pay attention to in order to obtain the
maximum protection from the passive safety measures.
It is important that you comply with the following requirements in order to
ensure that the seat belts and the airbag systems offer you and the occu-
pants of your vehicle maximum protection:
•front seats correctly adjusted ⇒page 69, “Front seats”,
•head restraints adjusted to match your body size ⇒page 74,
•seat belts correctly fastened and adjusted ⇒page 141,
•adopting a correct seated position
WARNING
Please do not forget to give the new owner the complete vehicle
documentation, if you sell your vehicle, including the service
schedule and documents relating to the possible deactivation of
airbags.
Page 140 of 259
Seat belts139
Using the systemSafetyDriving TipsGeneral MaintenanceBreakdown assistanceTechnical Data
The physical principle of a frontal
collision
The physical principle of a frontal accident can be explained quite simply: As soon as the vehicle is moving, so-called kinetic energy (the energy of
motion) is produced both in terms of the car as well as in terms of the
occupants. The magnitude of this kinetic energy depends essentially on
the speed at which the vehicle is travelling and on the weight of the vehicle
and the occupants. The greater the speed and weight increase, the
greater the amount of energy which has to be absorbed in the event of an
accident.
The speed of the vehicle is, nevertheless, the most important factor.
Doubling the speed of the vehicle from 25 km/h up to 50 km/hour
increases the kinetic energy four times.
The common opinion that it is possible to support your body in a minor
accident with your hands, is incorrect. Even in a collision at only a low
speed, the forces acting on the body are such that it is no longer possible
to support your body.
Even if you only drive at a speed within the range from 30 km/hour to 50
km/hour, the forces which are produced on your body in the event of an
accident can easily exceed 10,000 N (Newton). This equals a weight of
one tonne (1 000 kg).
In the event of a frontal collision, occupants of the car not wearing a seat
belt, are thrown forward and strike in an uncontrolled way parts of the inte-
rior of the car, such as steering wheel, dash panel, windscreen,
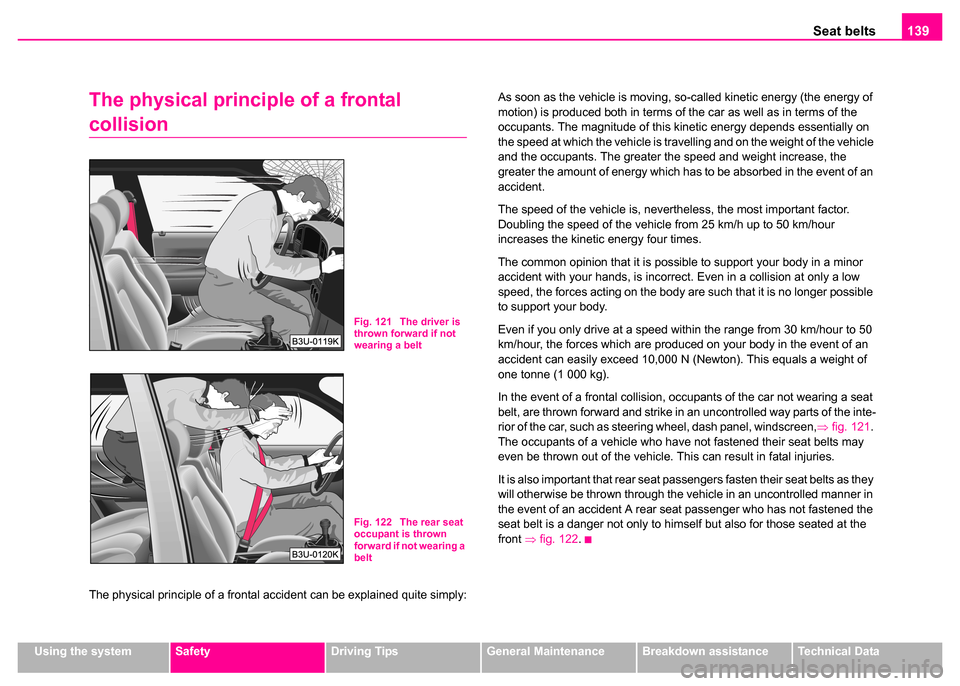
⇒fig. 121 .
The occupants of a vehicle who have not fastened their seat belts may
even be thrown out of the vehicle. This can result in fatal injuries.
It is also important that rear seat passengers fasten their seat belts as they
will otherwise be thrown through the vehicle in an uncontrolled manner in
the event of an accident A rear seat passenger who has not fastened the
seat belt is a danger not only to himself but also for those seated at the
front ⇒fig. 122 .
Fig. 121 The driver is
thrown forward if not
wearing a belt
Fig. 122 The rear seat
occupant is thrown
forward if not wearing a
belt
Page 142 of 259

Seat belts141
Using the systemSafetyDriving TipsGeneral MaintenanceBreakdown assistanceTechnical Data
How are seat belts correctly fastened?
Fastening a three-point seat belt
Fasten your seat belt before starting!
– Correctly adjust the front seat and the head restraint before
fastening your seat belt ⇒page 69, “Front seats”.
– Slowly pull the belt webbing at the tongue of the lock over your chest and pelvis ⇒.
– Insert the tongue of the lock into the seat belt buckle belonging to the seat until it is heard to lock in place.
– Pull on the belt to check that it has also reliably engaged in the lock.
Each three-point seat belt is equipped with an inertia reel. This inertia reel
offers you complete freedom of movement if the belt is unreeled slowly. If
the brakes are applied suddenly, the inertia reel will block. It also blocks
the belts when the car accelerates, when driving uphill and when
cornering.
Expectant mothers must also wear the seat belt ⇒.
Fig. 123 Routing of
webbing over the
shoulders and the lap
belt
Fig. 124 Routing of
belt webbing for an
expectant mother
WARNING
•The shoulder part of the seat belt must never run across your
neck but must run approximately over the middle of the shoulder
and fit snugly against the chest. The lap part of the belt must run
across the hip and must never be routed across the stomach. It
must always fit snugly ⇒fig. 123. Adjust the belt webbing as
required.
•The lap part of the belt should be positioned as low as possible
at the pelvis of an expectant mother in order to avoid exerting any
pressure on the lower abdomen.
•Always ensure that the webbing of the seat belts is properly
routed. Seat belts which are not correctly adjusted can themselves
cause injuries even in minor accidents.
Page 144 of 259
Seat belts143
Using the systemSafetyDriving TipsGeneral MaintenanceBreakdown assistanceTechnical Data
– Press the red button in the belt lock ⇒fig. 126. The spring
force causes the tongue of the lock to jump out.
– Guide the belt back with your hand to enable the inertia reel to wind up the belt webbing more easily.
A plastic knob in the belt webbing holds the belt tongue in a position which
is easy to get hold of.
Three-point safety belt for the middle rear seat
Your car is equipped as standard with the three-point seat belt in the
middle rear seat. It is used in the same way as the three-point seat belts
on the left and right (at front and rear). The three-point seat belt for the rear
middle seat must be put on first to allow the pelvic part of the belt to run
between the belt lock for the right three-point seat belt and the backrest,
while avoiding crossing the belt webbing of the right and middle seat
belts.
Blocking seat belts
The three-point seat belts for the front passenger and for the rear seats
can be blocked for attaching a child safety seat ⇒page 164, “Attaching
child safety seat”. Blocking the belt in this way ensures that the child seat
is held firmly in position in the car.
Belt tensioners
Safety for the driver and passengers wearing their seat belts, is
enhanced by the belt tensioners fitted to the inertia reels of the front and
rear side three-point seat belts, in addition to the protection afforded by
the airbag system.
The fastened three-point seat belts are automatically tensioned in the
event of a frontal collision of a certain severity. The rear outside belt
tensioners are also deployed if the seat belt is not fastened.
The belt tensioner is deployed in the event of a frontal collision of major
severity. A powder charge is ignited in the inertia reels during deployment.
The belt webbing is pulled into the inertia reels by a mechanical system
and the belt is tensioned.
Belt tensioners are not activated in the event of minor frontal collisions,
side and rear-end collisions, in the case of a rollover and also not in acci-
dents in which no major forces are produced from the front.
WARNING
Never attach a child safety seat on the front passenger seat if the
child is seated with its back facing in direction of travel when the
front passenger airbag is still activated ⇒page 158, “Use of child
safety seats on the front passenger seat”. Risk of severe or even
fatal injuries!