ECO mode SKODA SUPERB 2004 1.G / (B5/3U) User Guide
[x] Cancel search | Manufacturer: SKODA, Model Year: 2004, Model line: SUPERB, Model: SKODA SUPERB 2004 1.G / (B5/3U)Pages: 270
Page 109 of 270
Heating and air conditioning system
108
Air outlet vents
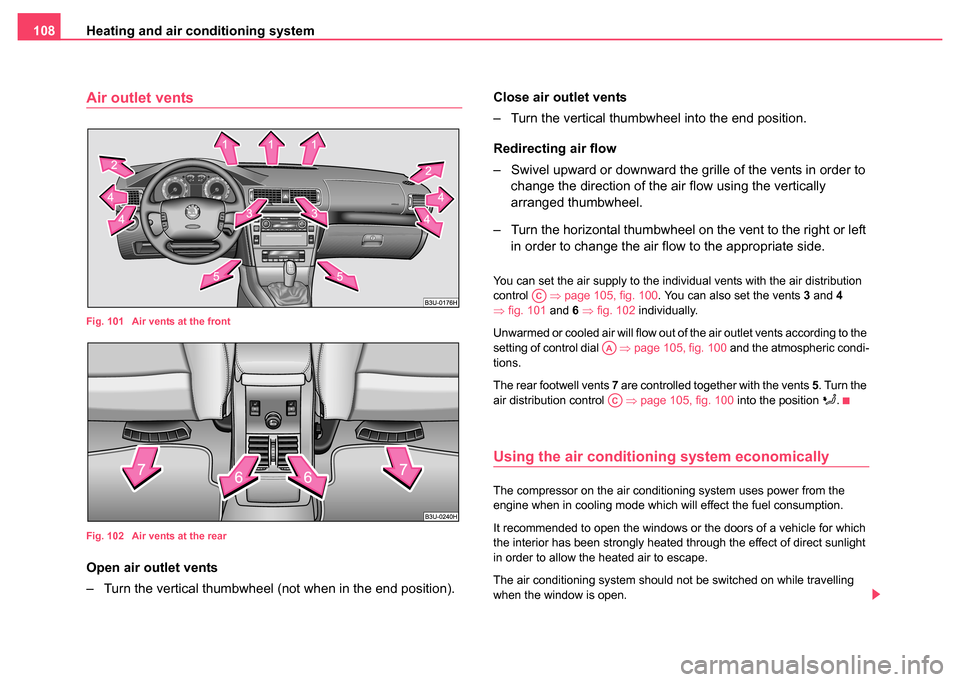
Fig. 101 Air vents at the front
Fig. 102 Air vents at the rear
Open air outlet vents
– Turn the vertical thumbwheel (not when in the end position). Close air outlet vents
– Turn the vertical thumbwheel into the end position.
Redirecting air flow
– Swivel upward or downward the gr
ille of the vents in order to
change the direction of the air flow using the vertically
arranged thumbwheel.
– Turn the horizontal thumbwheel on the vent to the right or left in order to change the air flow to the appropriate side.
You can set the air supply to the individual vents with the air distribution
control ⇒page 105, fig. 100 . You can also set the vents 3 and 4
⇒ fig. 101 and 6 ⇒ fig. 102 individually.
Unwarmed or cooled air will flow out of the air outlet vents according to the
setting of control dial ⇒ page 105, fig. 100 and the atmospheric condi-
tions.
The rear footwell vents 7 are controlled together with the vents 5. Turn the
air distribution control ⇒page 105, fig. 100 into the position
.
Using the air conditioning system economically
The compressor on the air conditioning system uses power from the
engine when in cooling mode which will effect the fuel consumption.
It recommended to open the windows or the doors of a vehicle for which
the interior has been strongly heated through the effect of direct sunlight
in order to allow the heated air to escape.
The air conditioning system should not be switched on while travelling
when the window is open.
AC
AA
AC
Page 110 of 270
Heating and air conditioning system 109
Using the systemSafetyDriving TipsGeneral MaintenanceBreakdown assistanceTechnical Data
The desired interior temperature can also be achieved without switching
in the air conditioning system just by switching to fresh air mode.
For the sake of
the environment
When you economize on fuel, you also reduce pollutant emissions.
Operational problems
If the cooling system does not operate at outside temperatures higher
than +5°C, there is a problem in the system. The reasons for this may be:
•The fuse of the air conditioning system is defective ⇒page 250.
Check the fuse, replace it if necessary.
•The cooling system has switched off automatically for a short time
because the coolant temperature of the engine is too hot.
If you are not able to rectify the operational problem yourself, or if the
cooling capacity decreases, switch the air conditioning system off. Please
contact your Škoda dealer.
Climatronic* (automatic air conditioning)
Description
The Climatronic system is a combination of an automatic heating, fresh air
and cooling system which provides optimal comfort for the occupants of
the car.
The Climatronic maintains a constant temperature fully automatically,
once it has been set. This is achieved by automatically varying the temperature of the outflowing air, the blower stages and the air distribu-
tion. It is not necessary to manually alter the settings. The
automatic
mode ⇒ page 111 ensures maximum wellbeing of the occupants at all
times of the year.
Description of Climatronic system
The Climatronic can only operate if the following conditions are met:
•engine running
•outside temperature above +5 °C,
•the button is not pressed.
If the Climatronic system is switched on, the temperature and air humidity
drops in the vehicle. The wellbeing of the occupants of the car is enhanced
as a result of this particularly at high outside temperatures and a high air
humidity. The system prevents the windows misting up during the cold
season of the year.
It is possible to briefly activate recirculated air mode in order to enhance
the cooling effect ⇒.
The heating effect is dependent upon the coolant temperature, thus full
heat output only occurs when the engine has reached its operating
temperature.
Puddle of water below car
After switching on the air conditioning Condensation from the evaporator
of the air conditioning may drip down and form a puddle below the vehicle.
This is quite normal and not an indication of a leak!
Switching over from degrees Celsius to degrees Fahrenheit and vice
versa
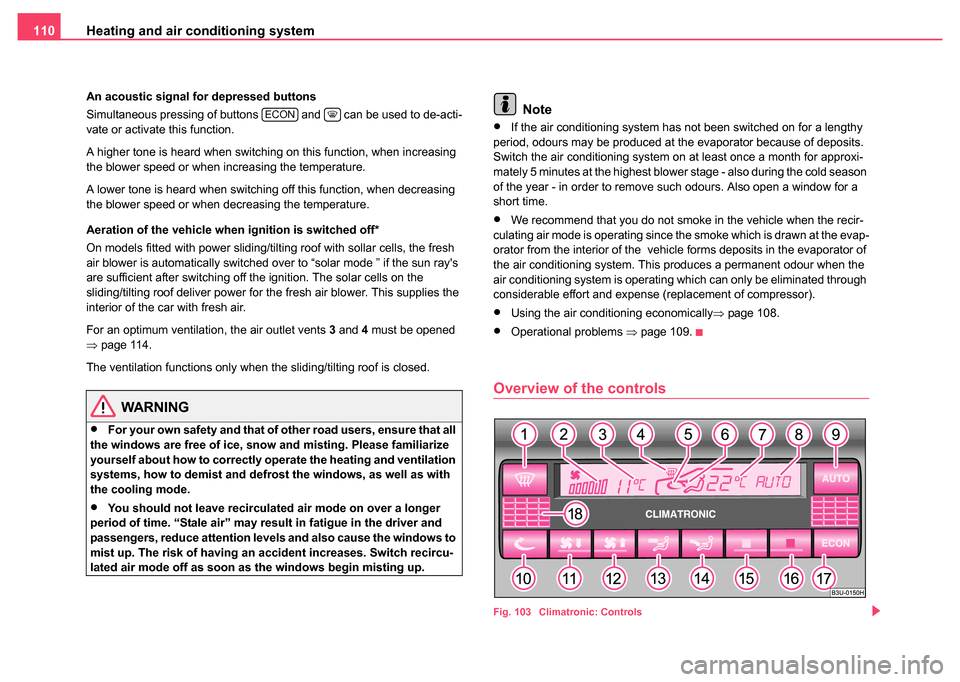
First of all press and hold the button ⇒ page 110, fig. 103 and then
press the button . The temperature measuring unit appears in the
display.ECON
ECONAUTO
Page 111 of 270
Heating and air conditioning system
110
An acoustic signal for depressed buttons
Simultaneous pressing of buttons and can be used to de-acti-
vate or activate this function.
A higher tone is heard when switching on this function, when increasing
the blower speed or when increasing the temperature.
A lower tone is heard when switching off this function, when decreasing
the blower speed or when decreasing the temperature.
Aeration of the vehicle when ignition is switched off*
On models fitted with power sliding/tilting roof with sollar cells, the fresh
air blower is automatically switched over to “solar mode ” if the sun ray's
are sufficient after switching off the ignition. The solar cells on the
sliding/tilting roof deliver power for the fresh air blower. This supplies the
interior of the car with fresh air.
For an optimum ventilation, the air outlet vents 3 and 4 must be opened
⇒ page 114.
The ventilation functions only when the sliding/tilting roof is closed.
WARNING
•For your own safety and that of other road users, ensure that all
the windows are free of ice, snow and misting. Please familiarize
yourself about how to correctly operate the heating and ventilation
systems, how to demist and defrost the windows, as well as with
the cooling mode.
•You should not leave recirculated air mode on over a longer
period of time. “Stale air” may result in fatigue in the driver and
passengers, reduce attention levels and also cause the windows to
mist up. The risk of having an accident increases. Switch recircu-
lated air mode off as soon as the windows begin misting up.
Note
•If the air conditioning system has not been switched on for a lengthy
period, odours may be produced at the evaporator because of deposits.
Switch the air conditioning system on at least once a month for approxi-
mately 5 minutes at the highest blower stage - also during the cold season
of the year - in order to remove such odours. Also open a window for a
short time.
•We recommend that you do not smoke in the vehicle when the recir-
culating air mode is operating since the smoke which is drawn at the evap-
orator from the interior of the vehicle forms deposits in the evaporator of
the air conditioning system. This produces a permanent odour when the
air conditioning system is operating which can only be eliminated through
considerable effort and expense (replacement of compressor).
•Using the air conditioning economically ⇒page 108.
•Operational problems ⇒page 109.
Overview of the controls
Fig. 103 Climatronic: Controls
ECON
Page 112 of 270
Heating and air conditioning system 111
Using the systemSafetyDriving TipsGeneral MaintenanceBreakdown assistanceTechnical Data
The buttons
Defrosting the windscreen
The displays Display of blower stages
Display of outside temperature, here: +11 °C
Defrosting the windscreen
Display for recirculated air mode
Direction of air flow
Display of selected inside temperature, here: +22 °C
Display for:
− Automatic mode ( AUTO) or
− Cooling system switched off ( ECON) or
− Climatronic switched off ( OFF)
The buttons Automatic mode
Recirculated air mode
Button for:
−Reducing blower speed or
− Switching off Climatronic ( OFF)
Increasing blower speed button or switching Climatronic on
Air flow button to chest (ventilation mode)
Air flow button to footwell at front and rear (heating mode)
Button for decreasing temperature
Button for increasing temperature
Button for switching off cooling system
The sensor Interior temperature sensor
Buttons , and can also be pressed in combination.
Automatic mode
The automatic mode is used in order to maintain a
constant temperature and to demist the windows in the
interior of the car.
Switching automatic mode on
– Set a temperature between +18 °C (64 °F) and +29 °C (86 °F).
– Move the air outlet vents 3 and 4 ⇒ page 114, fig. 104
upwards
– Press the button .
When the automatic mode is operating, AUTO appears in the display.
Automatic mode operates only within the control temperature range from
+18 °C (64 °F) up to 29 °C (86 °F). If you select the temperature below
+18 °C (64 °F), LO appears in the display. If you select a temperature
higher than + 29 °C (86 °F), HI appears in the display. In both limit posi-
tions the Climatronic operates at maximum cooling or heating capacity,
respectively. The temperature is not controlled in this case.
If you press when the automatic mode is operating a desired button
(except buttons 15 and 16 ), the automatic mode is switched off.
ECON mode
The cooling system is switched off in the ECON mode -
heating and ventilation are regulated automatically.
Switching ECON mode on
– Press the button .
A1
A2
A3
A4
A5
A6
A7
A8
A9AUTO
A10
A11
A12
A13
A14
A15
A16
A17ECON
A18
A1A13A14
AUTO
ECON
Page 113 of 270

Heating and air conditioning system
112
– Set a temperature between +18 °C (64 °F) and +29 °C (86 °F).
Recirculated air mode in ECON mode
– Press the button .
– After this, press the button .
When the ECON mode is operating, ECON appears in the display. ECON
mode operates only within the control temperature range from +18 °C (64
°F) up to +29 °C (86 °F).
Once a temperature has been set, it is maintained constant fully automat-
ically. This is achieved by automatically varying the temperature of the
outflowing air, the blower stages and the air distribution. The system also
takes into account bright sunlight which eliminates the need to alter the
settings manually.
The ECON mode is switched off when pressing button , or .
Please note that, in the ECON mode, the interior temperature cannot be
lower than the outside temperature. The interior is not cooled and the air
is not dehumidified.
If you select the temperature below +18 °C (64 °F), LO appears in the
display. If you select a temperature higher than + 29 °C (86 °F), HI
appears in the display. In the position LO the recirculated air is not
warmed up. In the HI position, the system operates continuously with
maximum heating capacity.
Please refer to the information regarding recirculated air mode
⇒ page 112.
Recirculated air mode
In recirculated air mode air is sucked out of the interior of
the vehicle and then fed back into the interior.
Recirculated air mode prevents polluted air outside the vehicle
from getting into the vehicle, for example when driving through a
tunnel or when standing in a traffic jam.
Switching recirculated air mode on
– Press button , the symbol
lights up on the display.
Switching recirculated air mode off
– Once again press the button or the button , the symbol
goes out on the display.
WARNING
You should not leave recirculated air mode on over a longer period
of time. “Stale air” may result in fatigue in the driver and passen-
gers, reduce attention levels and also cause the windows to mist
up. The risk of having an accident increases. Switch recirculated
air mode off as soon as the windows begin misting up.
Note
If the windscreen is misted up, first of all press the button and then
the button . After the windscreen has been demisted, once again press
the button .
ECON
AUTO
AUTO
AUTOAUTO
Page 123 of 270
Starting-off and Driving
122
The handbrake warning is activated if you drive at a speed of more than 5
km/h for more than 3 seconds.
WARNING
•Please note that the handbrake must be fully released. A hand-
brake which is only partially released can result in the rear brakes
overheating which will have a negative effect on the operation of
the brake system - risk of accident! In addition this can result in
premature wear of the rear brake pads.
•Never leave children unattended in the vehicle. The children
might, for example, release the handbrake or take the vehicle out of
gear. The vehicle might then move off - risk of accident!
Caution
After the car has come to a stop, always first of all apply the handbrake
firmly before then additionally engaging a gear (manual gearbox) or
moving the selector lever into position P (automatic gearbox).
Parking aid*
The parking aid provides a warning of obstacles behind
the vehicle.
The audible parking aid determines the distance between the rear bumper
and an obstacle located behind the vehicle with the aid of ultrasound
sensors. The sensors are integrated in the rear bumper.
The parking aid is activated automatically when reverse gear is engaged
and the ignition is turned on. This is confirmed by a brief signal. The clearance warning begins at a distance of about 160 cm from the
obstacle. The interval between the warning signals becomes shorter as
the clearance is reduced.
A continuous tone sounds from a clearance of just 30 cm - danger area.
You should not reverse any further after this signal sounds.
WARNING
•The parking aid is not a substitute for the driver paying proper
attention. It is always the driver's responsibility to take care when
parking the vehicle or carrying out similar manoeuvres.
•You should therefore satisfy yourself, before reversing, that
there is no small obstacle, such as a rock, thin post, trailer drawbar
etc., behind your vehicle. Such an obstacle might not be within the
range detected by the sensors.
Note
•The parking aid does not operate if you are towing a trailer (applies to
models which feature a factory-fitted towing device*).
•A system fault is indicated if a warning signal sounds for about 5
seconds after switching the ignition on and engaging reverse gear and
there is no obstacle close to your vehicle. Have the fault rectified by a
Škoda dealer.
•The sensors must be kept clean and free of ice to enable the parking
aid to operate properly.
Page 131 of 270

Automatic gearbox*
130
Dynamic shift programme
The automatic gearbox of your vehicle is controlled electronically. Shifting
up and down through the gears is performed automatically on the basis of
pre-defined driving programmes.
Adopting a moderate style of driving will cause the gearbox to select the
most economical driving programme. Shifting up into a higher gear as
soon as possible and shifting down as late as possible will have a favour-
able effect on your fuel consumption.
Adopting a faster style of driving with rapid movements of the acceler-
ator pedal combined with sharp acceleration and frequent changes in
speed, exploiting the top speed of the car or operating the kickdown func-
tion, will cause the gearbox to switch over to the sporty driving
programme. Shifting up later into a higher gear makes it possible to fully
exploit the power reserves of the engine. The gearbox also then shifts
down at higher engine speeds than is the case for the economy-oriented
programmes.
Selecting the most appropriate driving programme for the particular style
of driving is a continuous process. Irrespective of this it is, however,
possible to switch into a sporty driving programme by depressing the
accelerator rapidly. The gearbox shifts down into a lower gear matching
the speed of the car and this allows you to accelerate rapidly (e.g. when
overtaking) without having to depress the accelerator pedal fully into the
kickdown range. The original programme will be reactivated to match your
particular style of driving once the gearbox has shifted up again.
When driving in hilly regions, the gears are selected to match uphill and
downhill sections. This avoids the gearbox frequently shifting up and down
when negotiating an uphill stretch. Depressing the brake pedal while
driving downhill causes the gearbox to shift down into the next lower gear.
This makes it possible for you to exploit the engine braking power without
the need for shifting gears manually.
Tiptronic
The Tiptronic allows the driver to also shift gears manually.
Fig. 115 Selector
lever: Manual shifting
of gears
Fig. 116 Information
display: Manual
shifting of gears
Page 134 of 270
Communicating and Navigating133
Using the systemSafetyDriving TipsGeneral MaintenanceBreakdown assistanceTechnical Data
– If you release the pushbutton when the car is travelling at a
speed of less than 30 km/h, the speed is not stored, the
memory is erased. It is then necessary to again store the
speed with the pushbutton in the position SET after an
increase in speed of the vehicle to more than 30 km/hour.
– You can increase the stored speed by pressing the button
in the position RES+ . Pressing and holding down the slide
switch will cause the speed of the vehicle to be increased
continuously. Once the car has reached the desired speed,
release the button. This stores the current speed.
Switching cruise control system off temporarily
– On the version not fitted with a mobile phone, the cruise control system is switched off temporarily with the button
⇒page 132, fig. 117 in the position CANCEL, on the version
fitted with mobile phone, by pushing the switch into the
intermediate position ahead of the position OFF ⇒ page 124.
– You can resume the stored speed by pressing the button in the position RES+ .
For further methods of temporarily switching off the cruise control system
⇒page 124.
Please refer to the following guidelines ⇒page 123.
WARNING
First ensure that it is not too high for the traffic conditions which
exist at that moment before resuming the stored speed.
Operating radio and CD player
The radio is operated with buttons and , but on the version
fitted with a mobile phone by buttons , and ⇒page 132,
fig. 117 .
Radio
– You can set the radio, cassette player, CD player and radio data system louder or softer by pressing button (positions
VOL+ and VOL- ).
– You can search forward or back within the frequency search for different radio stations by pressing button (positions
and
).
Cassette player
– You can run the tape forward or back by pressing the button (positions
and ).
CD-player
– You can select the titles forward or back by pressing the button (positions
and ).
Radio data system (RDS)*
You can select the recorded radio traffic messages by moving forward or
back in stages by pressing the button (positions
and ).
On the version fitted with mobile phone, you must press button in the
position MODE in order to switch over to the radio mode.
A1
A1
A2
AA
A1
A3A4
A2A3A4
A3
A4
A4
A4
A4
A2
Page 135 of 270
Communicating and Navigating
134
Operating mobile phone
– You can operate the mobile phone with buttons , and
⇒fig. 118 .
– You can switch over from the radio mode to the phone mode (or back again) by pressing the button in the position
MODE .
– You can accept or end a telephone call or select from the phonebook by briefly pressing the button in the position
.
– You can refuse a telephone call by pressing the button in the position
for more than 2 seconds.
– You can make the volume of the telephone call louder or softer by pressing the button in the positions VOL+ and VOL- .
– You call scroll through the telephone memory for names by briefly pressing the button in the position
or . – You can scroll alphabetically upward (A to Z) or downward (Z
to A) within the telephone memory by pressing for some
considerable time the button in the positions
and .
If you switch over with the button MODE on the multifunction steering
wheel ⇒page 132, fig. 117 to phone mode and the mobile phone is not in
the adapter, INSERT PHONE appears in the display. After inserting the
mobile phone, PHONE IN appears on the display.
Afterwards PHONE STARTUP appears on the display and the system
transmits the data from the mobile phone to the information display. The
following is shown in stages on the display:
•DIALED CALLS LOADING: xxx
•RCVD CALLS LOADING: xxx
•MISSED CALLS LOADING: xxx
•PHONEBOOK LOADING
One cannot scroll through the phonebook during data transfer out of the
mobile phone. After the data transfer has ended, the first name out of the
phonebook is shown on the display
You can scroll through the individual menus by pressing the button in
the position
and ⇒ fig. 118 .
Select the entry you want by pressing the button in the position
.
You will reach one level higher in the menu by pressing the button in
the position MODE.
In the main menu you can select the following entries:
•PHONEBOOK
•SETUP
•LAST CALLS
•RECEIVED CALLS
•MISSED CALLS
Fig. 118 Multifunction
steering wheel: control
buttons
A2A3A4
A2
A2
A2
A3
A4
A4
A4
A2
A2
Page 136 of 270
Communicating and Navigating135
Using the systemSafetyDriving TipsGeneral MaintenanceBreakdown assistanceTechnical Data
In the menu
SETUP you can select the following entries:
•LANGUAGE - Here you can set in which language the messages
should be displayed. You can select one of the following languages:
Czech, English, German, Italian, French, Spanish. The set language is
displayed inversely.
•MEMORY - Here you can set which telephone memory should be
transmitted into the information display after inserting the mobile phone in
the adapter. You can choose between the phonebook PHONE
PHONEBOOK and the memory of the SIM card SIM PHONEBOOK The
set memory is displayed inversely.
•Certain mobile phones do not have any phone phonebook, but only a
phonebook in the memory of the SIM card.
•Overview of the next possible functions and read outs:
Note
•If the setting of the memory is changed, you must take the mobile
phone out of the adapter and insert it again in order to transmit the data
from the newly set memory into the information display.
•If you do not operate the mobile phone (do not scroll in the memory, do
no call, etc.) it switches automatically over to radio mode after 60 seconds.
•If you switch the ignition off and leave the mobile phone inserted in the
adapter, the system switches off automatically the mobile phone after 30
minutes.
•If you have stored in the phonebook names with special characters
(ticks, lines, etc), the special characters will not always be correctly
displayed on the information display.
•The function of the convenience operating feature with the buttons on
the multifunction steering wheel is not available on all mobile phones and
adapters. Please contact your Škoda dealer, who will tell you which
adapter and which mobile phone you can use.
OperationRead out in display
selected call numberCALLING name
or
CALLING number
accepted callCALL name
or
CALL number
or
CALL
Call rejectedCALL REJECTED
End of callEND OF CALL
Number engagedLine Engaged
No service foundNO SERVICE
Enter PIN codeENTER PIN CODE