air conditioning SKODA SUPERB 2004 1.G / (B5/3U) User Guide
[x] Cancel search | Manufacturer: SKODA, Model Year: 2004, Model line: SUPERB, Model: SKODA SUPERB 2004 1.G / (B5/3U)Pages: 270
Page 111 of 270
Heating and air conditioning system
110
An acoustic signal for depressed buttons
Simultaneous pressing of buttons and can be used to de-acti-
vate or activate this function.
A higher tone is heard when switching on this function, when increasing
the blower speed or when increasing the temperature.
A lower tone is heard when switching off this function, when decreasing
the blower speed or when decreasing the temperature.
Aeration of the vehicle when ignition is switched off*
On models fitted with power sliding/tilting roof with sollar cells, the fresh
air blower is automatically switched over to “solar mode ” if the sun ray's
are sufficient after switching off the ignition. The solar cells on the
sliding/tilting roof deliver power for the fresh air blower. This supplies the
interior of the car with fresh air.
For an optimum ventilation, the air outlet vents 3 and 4 must be opened
⇒ page 114.
The ventilation functions only when the sliding/tilting roof is closed.
WARNING
•For your own safety and that of other road users, ensure that all
the windows are free of ice, snow and misting. Please familiarize
yourself about how to correctly operate the heating and ventilation
systems, how to demist and defrost the windows, as well as with
the cooling mode.
•You should not leave recirculated air mode on over a longer
period of time. “Stale air” may result in fatigue in the driver and
passengers, reduce attention levels and also cause the windows to
mist up. The risk of having an accident increases. Switch recircu-
lated air mode off as soon as the windows begin misting up.
Note
•If the air conditioning system has not been switched on for a lengthy
period, odours may be produced at the evaporator because of deposits.
Switch the air conditioning system on at least once a month for approxi-
mately 5 minutes at the highest blower stage - also during the cold season
of the year - in order to remove such odours. Also open a window for a
short time.
•We recommend that you do not smoke in the vehicle when the recir-
culating air mode is operating since the smoke which is drawn at the evap-
orator from the interior of the vehicle forms deposits in the evaporator of
the air conditioning system. This produces a permanent odour when the
air conditioning system is operating which can only be eliminated through
considerable effort and expense (replacement of compressor).
•Using the air conditioning economically ⇒page 108.
•Operational problems ⇒page 109.
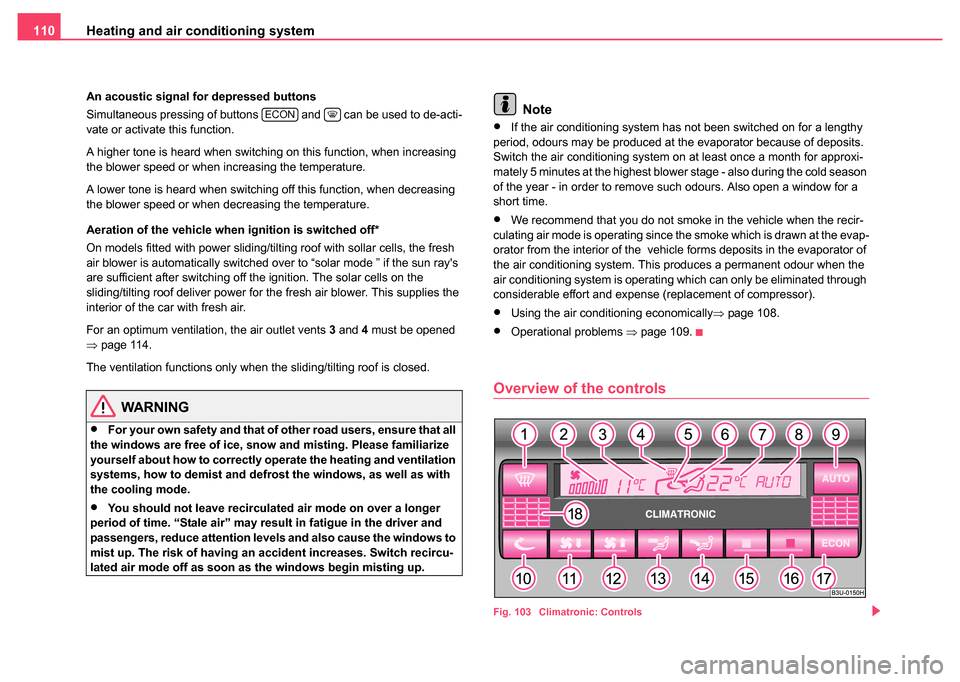
Overview of the controls
Fig. 103 Climatronic: Controls
ECON
Page 112 of 270
Heating and air conditioning system 111
Using the systemSafetyDriving TipsGeneral MaintenanceBreakdown assistanceTechnical Data
The buttons
Defrosting the windscreen
The displays Display of blower stages
Display of outside temperature, here: +11 °C
Defrosting the windscreen
Display for recirculated air mode
Direction of air flow
Display of selected inside temperature, here: +22 °C
Display for:
− Automatic mode ( AUTO) or
− Cooling system switched off ( ECON) or
− Climatronic switched off ( OFF)
The buttons Automatic mode
Recirculated air mode
Button for:
−Reducing blower speed or
− Switching off Climatronic ( OFF)
Increasing blower speed button or switching Climatronic on
Air flow button to chest (ventilation mode)
Air flow button to footwell at front and rear (heating mode)
Button for decreasing temperature
Button for increasing temperature
Button for switching off cooling system
The sensor Interior temperature sensor
Buttons , and can also be pressed in combination.
Automatic mode
The automatic mode is used in order to maintain a
constant temperature and to demist the windows in the
interior of the car.
Switching automatic mode on
– Set a temperature between +18 °C (64 °F) and +29 °C (86 °F).
– Move the air outlet vents 3 and 4 ⇒ page 114, fig. 104
upwards
– Press the button .
When the automatic mode is operating, AUTO appears in the display.
Automatic mode operates only within the control temperature range from
+18 °C (64 °F) up to 29 °C (86 °F). If you select the temperature below
+18 °C (64 °F), LO appears in the display. If you select a temperature
higher than + 29 °C (86 °F), HI appears in the display. In both limit posi-
tions the Climatronic operates at maximum cooling or heating capacity,
respectively. The temperature is not controlled in this case.
If you press when the automatic mode is operating a desired button
(except buttons 15 and 16 ), the automatic mode is switched off.
ECON mode
The cooling system is switched off in the ECON mode -
heating and ventilation are regulated automatically.
Switching ECON mode on
– Press the button .
A1
A2
A3
A4
A5
A6
A7
A8
A9AUTO
A10
A11
A12
A13
A14
A15
A16
A17ECON
A18
A1A13A14
AUTO
ECON
Page 113 of 270

Heating and air conditioning system
112
– Set a temperature between +18 °C (64 °F) and +29 °C (86 °F).
Recirculated air mode in ECON mode
– Press the button .
– After this, press the button .
When the ECON mode is operating, ECON appears in the display. ECON
mode operates only within the control temperature range from +18 °C (64
°F) up to +29 °C (86 °F).
Once a temperature has been set, it is maintained constant fully automat-
ically. This is achieved by automatically varying the temperature of the
outflowing air, the blower stages and the air distribution. The system also
takes into account bright sunlight which eliminates the need to alter the
settings manually.
The ECON mode is switched off when pressing button , or .
Please note that, in the ECON mode, the interior temperature cannot be
lower than the outside temperature. The interior is not cooled and the air
is not dehumidified.
If you select the temperature below +18 °C (64 °F), LO appears in the
display. If you select a temperature higher than + 29 °C (86 °F), HI
appears in the display. In the position LO the recirculated air is not
warmed up. In the HI position, the system operates continuously with
maximum heating capacity.
Please refer to the information regarding recirculated air mode
⇒ page 112.
Recirculated air mode
In recirculated air mode air is sucked out of the interior of
the vehicle and then fed back into the interior.
Recirculated air mode prevents polluted air outside the vehicle
from getting into the vehicle, for example when driving through a
tunnel or when standing in a traffic jam.
Switching recirculated air mode on
– Press button , the symbol
lights up on the display.
Switching recirculated air mode off
– Once again press the button or the button , the symbol
goes out on the display.
WARNING
You should not leave recirculated air mode on over a longer period
of time. “Stale air” may result in fatigue in the driver and passen-
gers, reduce attention levels and also cause the windows to mist
up. The risk of having an accident increases. Switch recirculated
air mode off as soon as the windows begin misting up.
Note
If the windscreen is misted up, first of all press the button and then
the button . After the windscreen has been demisted, once again press
the button .
ECON
AUTO
AUTO
AUTOAUTO
Page 114 of 270
Heating and air conditioning system 113
Using the systemSafetyDriving TipsGeneral MaintenanceBreakdown assistanceTechnical Data
Setting temperature
– Press the button or ⇒page 110, fig. 103 and continue
pressing until the desired temperature is set.
You can set the interior temperature between +18 °C (64 °F) and +29 °C
(86 °F). The interior temperature is regulated automatically within this
range. If you select the temperature below 18 °C (64 °F), “LO” appears in
the display. If you select the temperature higher than 29 °C (86 °F), “ HI”
appears in the display. In both limit positions the Climatronic operates at
maximum cooling or heating capacity, respectively. The temperature is not
controlled in this case.
Lengthy and uneven distribution of the air flow out of the vents (in partic-
ular at the leg area) and large differences in temperature, for example
when getting out of the vehicle, can result in chills in sensitive persons.
Controlling blower
There are a total of seven blower stages available.
The Climatronic system controls the blower stages automatically
in line with the interior temperature. You can also, however, adapt
the blower stages manually to suit your particular needs.
Setting blower stages
– Press the button or the button to set the blower stage.
The number of dashes in the display ⇒page 110, fig. 103 indicates
the blower stage.
If OFF is shown in the display, this indicates that the Climatronic system
is switched off ⇒ page 114.
WARNING
•“Stale air” may result in fatigue in the driver and occupants,
reduce attention levels and also cause the windows to mist up. The
risk of having an accident increases.
•Do not switch the Climatronic system off for longer than neces-
sary.
•Switch the Climatronic system on as soon as the windows mist
up.
A15A16
A2
Page 115 of 270

Heating and air conditioning system
114
Air outlet vents
Fig. 104 Air vents at the front
Fig. 105 Air vents at the rear
You can also set the vents 3 and 4 ⇒ fig. 104 and 6 ⇒ fig. 105
individually. Open air outlet vents
– Turn the vertical thumbwheel (not when in the end position).
Close air outlet vents
– Turn the vertical thumbwheel into the end position.
Redirecting air flow
– Swivel upward or downward the gr
ille of the vents in order to
change the direction of the air flow using the vertically
arranged thumbwheel.
– Turn the horizontal thumbwheel on the vent to the right or left in order to change the air flow to the appropriate side.
Switching Climatronic system off
If the symbols in the display flash for about 15 seconds
after the ignition is switched on, switch the Climatronic
system off as this indicates an operational fault.
– Continue pressing the button until OFF is shown in the
display ⇒ .
– Drive to the nearest Škoda Dealer and have the Climatronic system checked.
WARNING
•If the Climatronic system is switched off (OFF), there is no
supply of fresh air from the outside. “Stale air” may result in fatigue
Page 116 of 270

Heating and air conditioning system 115
Using the systemSafetyDriving TipsGeneral MaintenanceBreakdown assistanceTechnical Data
in the driver and occupants, reduce attention levels and also cause
the windows to mist up. The risk of having an accident increases.
•Do not switch the Climatronic system off for longer than
necessary.
WARNING (continued)
Page 190 of 270

Driving and the Environment189
Using the systemSafetyDriving TipsGeneral MaintenanceBreakdown assistanceTechnical Data
your vehicle causes it to use about 1 l more fuel than normal at a speed
of 100 - 120 km/h, even when you are not carrying a load on the roof.
Saving electricity
Generating electricity costs fuel.
– Switch off electrical components as soon as you no longer
need them.
When the engine is running, the alternator generates and supplies elec-
trical power. The greater the load on the alternator as a result of having a
large number of electrical components switched on, the more fuel will be
consumed for operating the alternator.
Keeping a log of your fuel consumption
If you really wish to keep a close check on your fuel consumption, it is
best to enter the figures in a logbook. This does not take much time but is
a very worthwhile exercise. It enables you to detect any change (positive
and negative) at an early stage and to take any appropriate action.
If you find that your fuel consumption is too high, you should reflect on
how, where and in what conditions you have driven the vehicle since you
last refuelled.
Environmental compatibility
Environmental protection has played a major role in the design, selection
of materials and manufacture of your new Škoda. Particular emphasis has
been paid to a number of aspects, including:
Design measures
•Joints designed to be easily detached
•Simplified disassembly due to the modular structure system
•Improved purity of different classes of materials
•Identification of all plastic parts in accordance with VDA Recommen-
dation 260
•Reduced fuel consumption and exhaust emission CO2
•Minimum fuel leakage during accidents
•Reduced noise
Choice of materials
•Extensive use of recyclable material
•Air conditioning filled with CFC-free refrigerant
•No cadmium
•No asbestos
•Reduction in the “vaporisation” of plastics
Manufacture
•Solvent-free cavity protection
•Solvent-free protection of the vehicle for transportation from the
production plant to the customer
•Use of solvent-free adhesives
•No CFCs used in the production process
•Without use of mercury
•Use of water-soluble paints
Page 252 of 270
Fuses and light bulbs251
Using the systemSafetyDriving TipsGeneral MaintenanceBreakdown assistanceTechnical Data
Caution
•Never attempt to “repair” fuses and also do not replace them with a
fuse of a higher amperage - risk of fire! This may also cause damage at
another part of the electrical system.
•Have the electrical system checked as quickly as possible by a Škoda
dealer if a newly inserted fuse blows again after a short time.
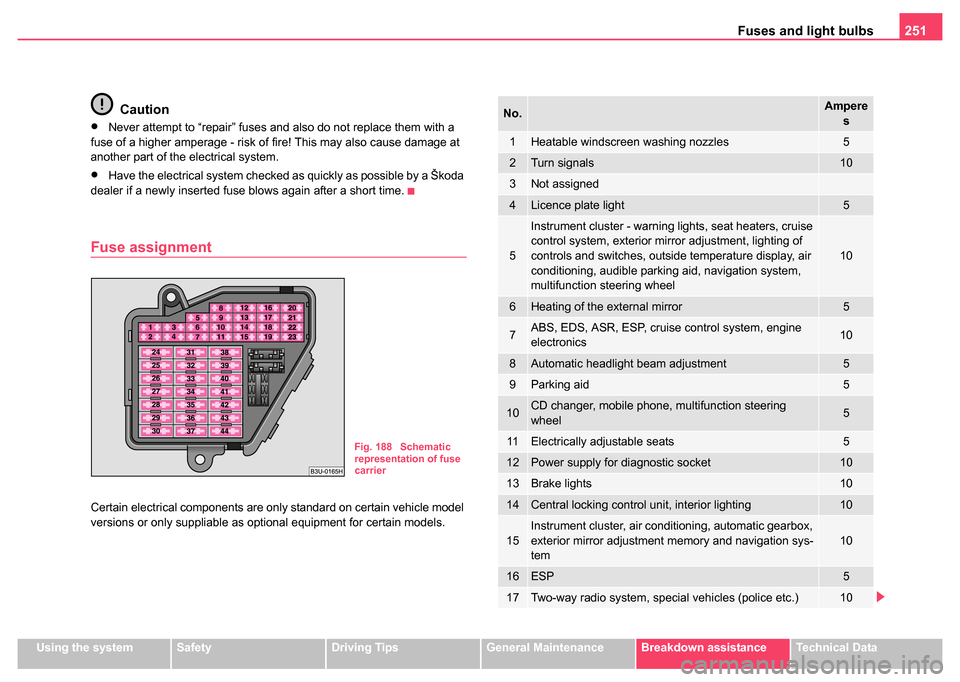
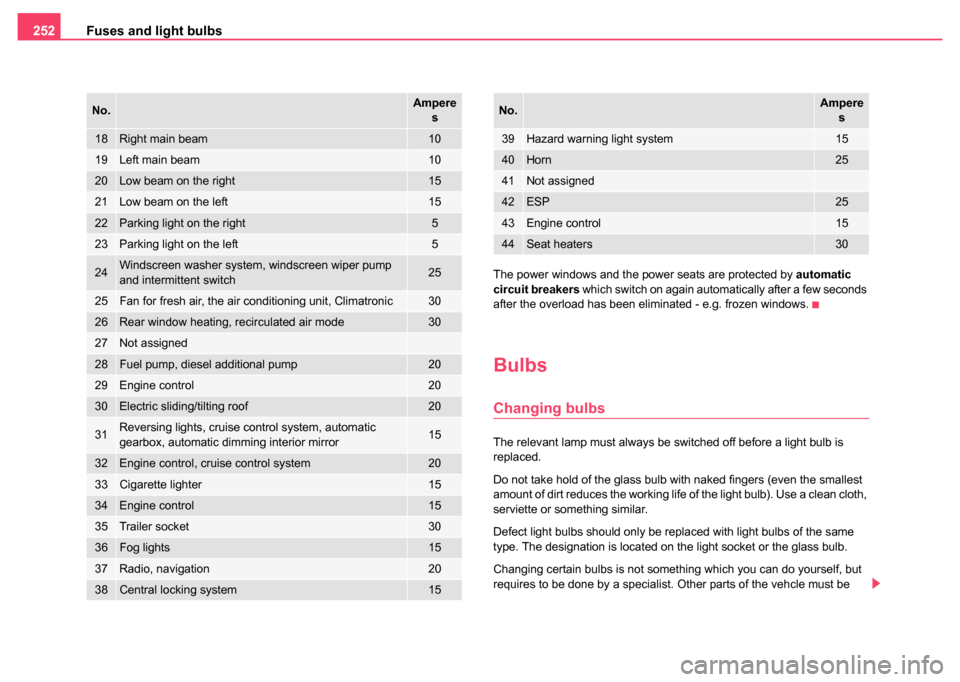
Fuse assignment
Certain electrical components are only standard on certain vehicle model
versions or only suppliable as optional equipment for certain models.
Fig. 188 Schematic
representation of fuse
carrier
No.Ampere s
1Heatable windscreen washing nozzles5
2Turn signals10
3Not assigned
4Licence plate light5
5
Instrument cluster - warning lights, seat heaters, cruise
control system, exterior mirror adjustment, lighting of
controls and switches, outside temperature display, air
conditioning, audible parking aid, navigation system,
multifunction steering wheel
10
6Heating of the external mirror5
7ABS, EDS, ASR, ESP, cruise control system, engine
electronics10
8Automatic headlight beam adjustment5
9Parking aid5
10CD changer, mobile phone, multifunction steering
wheel5
11Electrically adjustable seats5
12Power supply for diagnostic socket10
13Brake lights10
14Central locking control unit, interior lighting10
15Instrument cluster, air conditioning, automatic gearbox,
exterior mirror adjustment memory and navigation sys-
tem10
16ESP5
17Two-way radio system, special vehicles (police etc.)10
Page 253 of 270
Fuses and light bulbs
252
The power windows and the power seats are protected by automatic
circuit breakers which switch on again automatically after a few seconds
after the overload has been eliminated - e.g. frozen windows.
Bulbs
Changing bulbs
The relevant lamp must always be switched off before a light bulb is
replaced.
Do not take hold of the glass bulb with naked fingers (even the smallest
amount of dirt reduces the working life of the light bulb). Use a clean cloth,
serviette or something similar.
Defect light bulbs should only be replaced with light bulbs of the same
type. The designation is located on the light socket or the glass bulb.
Changing certain bulbs is not something which you can do yourself, but
requires to be done by a specialist. Other parts of the vehcle must be
18Right main beam10
19Left main beam10
20Low beam on the right15
21Low beam on the left15
22Parking light on the right5
23Parking light on the left5
24Windscreen washer system, windscreen wiper pump
and intermittent switch25
25Fan for fresh air, the air conditioning unit, Climatronic30
26Rear window heating, recirculated air mode30
27Not assigned
28Fuel pump, diesel additional pump20
29Engine control20
30Electric sliding/tilting roof20
31Reversing lights, cruise control system, automatic
gearbox, automatic dimming interior mirror15
32Engine control, cruise control system20
33Cigarette lighter15
34Engine control15
35Trailer socket30
36Fog lights15
37Radio, navigation 20
38Central locking system15
No.Ampere
s
39Hazard warning light system15
40Horn25
41Not assigned
42ESP25
43Engine control15
44Seat heaters30
No.Amperes
Page 263 of 270
Index
262
Child safety seats
ISOFIX system . . . . . . . . . . . . . . . . . . . 173
Child seat . . . . . . . . . . . . . . . . . . . . . . . . . . 168 attach . . . . . . . . . . . . . . . . . . . . . . . . . . 171
Child seat protection . . . . . . . . . . . . . . . 171
Classification into groups . . . . . . . . . . . 168
on the front passenger seat . . . . . . . . . 166
Safety instructions . . . . . . . . . . . . . . . . . 164
Use of child seats . . . . . . . . . . . . . . . . . 168
Children and safety . . . . . . . . . . . . . . . . . . . 164
Chrome parts . . . . . . . . . . . . . . . . . . . . . . . 198
Cigarette lighter . . . . . . . . . . . . . . . . . . . . . . 95
Cleaning . . . . . . . . . . . . . . . . . . . . . . . . . . . 195
Climatronic Air outlet vents . . . . . . . . . . . . . . . . . . . 114
Blower . . . . . . . . . . . . . . . . . . . . . . . . . . 113
Defrosting windows . . . . . . . . . . . . . . . . 110
economic use . . . . . . . . . . . . . . . . . . . . 110
Keeping windows demisted . . . . . . . . . . 111
Operational problems . . . . . . . . . . . . . . 110
Recirculated air mode . . . . . . . . . . . . . . 112
Setting temperature . . . . . . . . . . . . . . . . 113
Climatronic (automatic air conditioning) . . . 109
Clock . . . . . . . . . . . . . . . . . . . . . . . . . . . . . . . 15
Clothes hooks . . . . . . . . . . . . . . . . . . . . . . . 103
Cockpit An overview . . . . . . . . . . . . . . . . . . . . . . . 11
Coming Home . . . . . . . . . . . . . . . . . . . . . . . . 60
Compartments . . . . . . . . . . . . . . . . . . . . . . . 97
Computer . . . . . . . . . . . . . . . . . . . . . . . . . . . 18
Convenience operation . . . . . . . . . . . . . . . . . 52 Converting/masking over headlights . . . . . . 184
Cool box . . . . . . . . . . . . . . . . . . . . . . . . . . . . 84
Coolant . . . . . . . . . . . . . . . . . . . . . . . . . . . . 214
replenishing . . . . . . . . . . . . . . . . . . . . . . 216
Warning light . . . . . . . . . . . . . . . . . . . . . . 31
Coolant level Warning light . . . . . . . . . . . . . . . . . . . . . . 31
Coolant temperature gauge . . . . . . . . . . . . . 14
Coolant temperature/coolant level Warning light . . . . . . . . . . . . . . . . . . . . . . 31
Cooling Climatronic . . . . . . . . . . . . . . . . . . . . . . . 109
The air conditioning system . . . . . . . . . . 104
Correct seated position . . . . . . . . . . . . . . . . 141
Counter for distance driven . . . . . . . . . . . . . . 16
Cruise control . . . . . . . . . . . . . . . . . . . . . . . 123
Cruise control system . . . . . . . . . . . . . . . . . 123
D
Deactivating an airbag . . . . . . . . . . . . . . . . 161
Defrosting rear window . . . . . . . . . . . . . . . . . 62
Defrosting windows The air conditioning system . . . . . . . . . . 106
De-icing windows . . . . . . . . . . . . . . . . . . . . 198
Detachable towing device . . . . . . . . . . . . . . 192
Diesel . . . . . . . . . . . . . . . . . . . . . . . . . . . . . 204
Diesel engines Starting engine . . . . . . . . . . . . . . . . . . . 119
Differential Lock (EDL) . . . . . . . . . . . . . . . . 177 Digital clock . . . . . . . . . . . . . . . . . . . . . . . . . . 15
Dipstick . . . . . . . . . . . . . . . . . . . . . . . . . . . . 212
Direction indicators . . . . . . . . . . . . . . . . . . . . 59
Warning light . . . . . . . . . . . . . . . . . . . . . . 29
Display . . . . . . . . . . . . . . . . . . . . . . . . . . . . . . 22
Distance driven . . . . . . . . . . . . . . . . . . . . . . . 21
distance driven . . . . . . . . . . . . . . . . . . . . . . . 16
Door Child safety locks . . . . . . . . . . . . . . . . . . . 41
Warning light . . . . . . . . . . . . . . . . . . . . . . 33
Drinks can holder at the front . . . . . . . . . . . . . . . . . . . . . . . . 92
at the rear . . . . . . . . . . . . . . . . . . . . . . . . . 92
Driving economically . . . . . . . . . . . . . . . . . . 185
Driving time . . . . . . . . . . . . . . . . . . . . . . . . . . 21
Dynamo Warning light . . . . . . . . . . . . . . . . . . . . . . 36
E
EDL . . . . . . . . . . . . . . . . . . . . . . . . . . . . . . . 177
Electric sliding/tilting roof . . . . . . . . . . . . . . . . 53
Electrically adjustable rear mirror . . . . . . . . . 67
Electrically adjustable seats . . . . . . . . . . . . . 71
Electronic Differential LockWarning light . . . . . . . . . . . . . . . . . . . . . . 34
Electronic Differential Lock (EDL) . . . . . . . . 177
Electronic immobiliser Warning light . . . . . . . . . . . . . . . . . . . . . . 35
Electronic stability programme (ESP) . . . . . 175 Warning light . . . . . . . . . . . . . . . . . . . . . . 34