SKODA SUPERB 2004 1.G / (B5/3U) Manual PDF
Manufacturer: SKODA, Model Year: 2004, Model line: SUPERB, Model: SKODA SUPERB 2004 1.G / (B5/3U)Pages: 270
Page 71 of 270
Seats and Stowage
70
Adjusting front seats manually
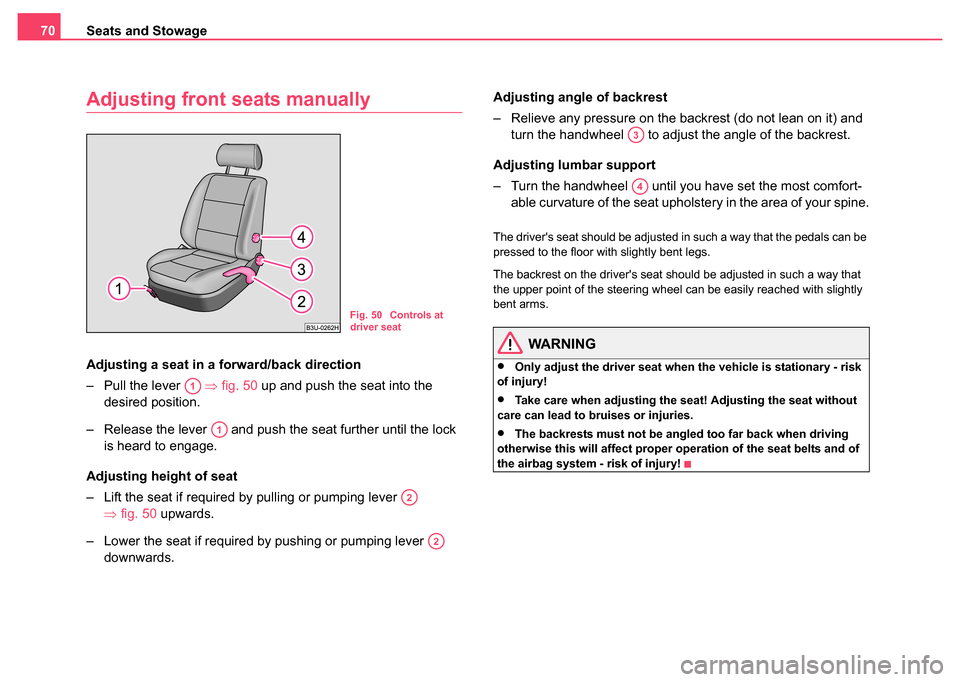
Adjusting a seat in a fo rward/back direction
– Pull the lever ⇒fig. 50 up and push the seat into the
desired position.
– Release the lever and push the seat further until the lock is heard to engage.
Adjusting height of seat
– Lift the seat if required by pulling or pumping lever ⇒fig. 50 upwards.
– Lower the seat if required by pushing or pumping lever downwards. Adjusting angle of backrest
– Relieve any pressure on the backrest (do not lean on it) and
turn the handwheel to adjust the angle of the backrest.
Adjusting lumbar support
– Turn the handwheel until you have set the most comfort- able curvature of the seat upholstery in the area of your spine.
The driver's seat should be adjusted in such a way that the pedals can be
pressed to the floor with slightly bent legs.
The backrest on the driver's seat should be adjusted in such a way that
the upper point of the steering wheel can be easily reached with slightly
bent arms.
WARNING
•Only adjust the driver seat when the vehicle is stationary - risk
of injury!
•Take care when adjusting the seat! Adjusting the seat without
care can lead to bruises or injuries.
•The backrests must not be angled too far back when driving
otherwise this will affect proper operation of the seat belts and of
the airbag system - risk of injury!
Fig. 50 Controls at
driver seat
A1
A1
A2
A2
A3
A4
Page 72 of 270
Seats and Stowage71
Using the systemSafetyDriving TipsGeneral MaintenanceBreakdown assistanceTechnical Data
Adjusting front seats electrically*
Adjusting seats
Adjusting seat
– Adopt the correct seated position ⇒page 69.
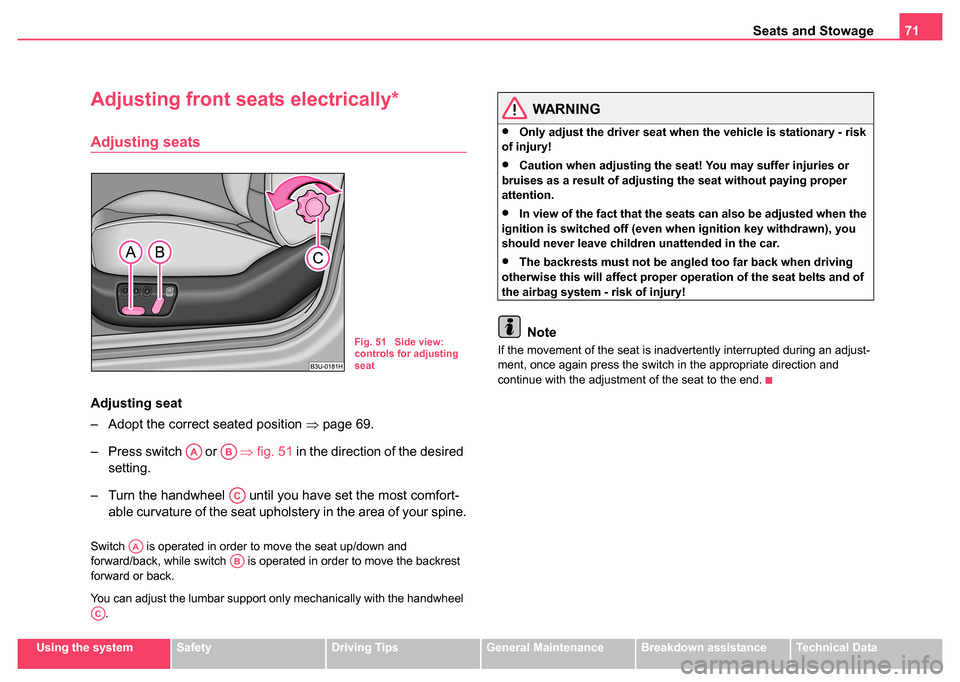
– Press switch or ⇒fig. 51 in the direction of the desired
setting.
– Turn the handwheel until you have set the most comfort- able curvature of the seat upholstery in the area of your spine.
Switch is operated in order to move the seat up/down and
forward/back, while switch is operated in order to move the backrest
forward or back.
You can adjust the lumbar support only mechanically with the handwheel
.
WARNING
•Only adjust the driver seat when the vehicle is stationary - risk
of injury!
•Caution when adjusting the seat! You may suffer injuries or
bruises as a result of adjusting the seat without paying proper
attention.
•In view of the fact that the seats can also be adjusted when the
ignition is switched off (even when ignition key withdrawn), you
should never leave children unattended in the car.
•The backrests must not be angled too far back when driving
otherwise this will affect proper operation of the seat belts and of
the airbag system - risk of injury!
Note
If the movement of the seat is inadvertently interrupted during an adjust-
ment, once again press the switch in the appropriate direction and
continue with the adjustment of the seat to the end.Fig. 51 Side view:
controls for adjusting
seat
AAAB
AC
AAAB
AC
Page 73 of 270
Seats and Stowage
72
Memory for the seat
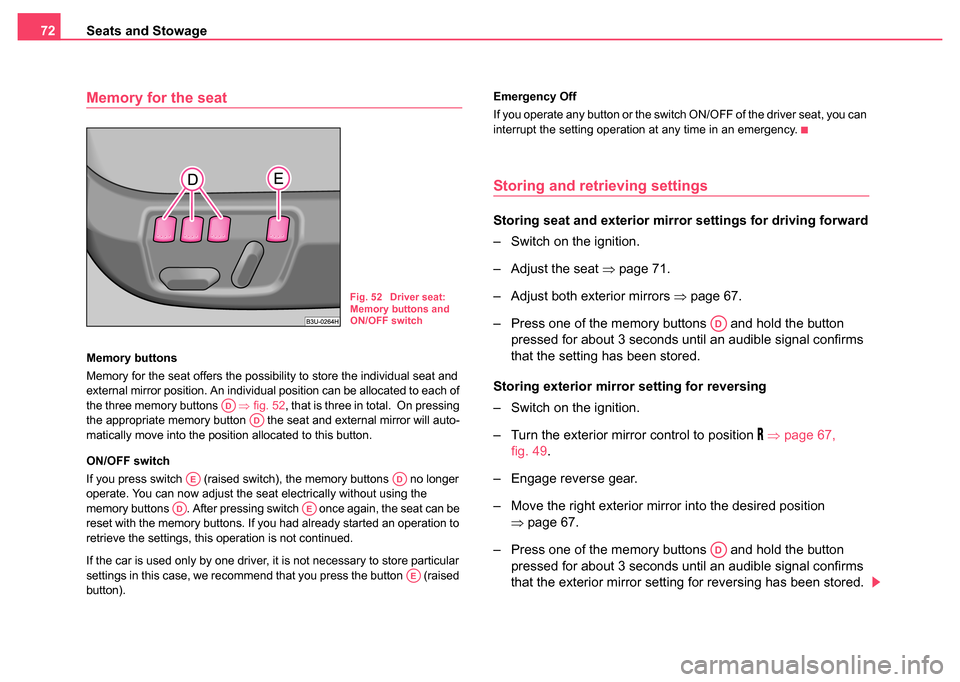
Memory buttons
Memory for the seat offers the possibility to store the individual seat and
external mirror position. An individual position can be allocated to each of
the three memory buttons ⇒ fig. 52, that is three in total. On pressing
the appropriate memory button the seat and external mirror will auto-
matically move into the position allocated to this button.
ON/OFF switch
If you press switch (raised switch), the memory buttons no longer
operate. You can now adjust the seat electrically without using the
memory buttons . After pressing switch once again, the seat can be
reset with the memory buttons. If you had already started an operation to
retrieve the settings, this operation is not continued.
If the car is used only by one driver, it is not necessary to store particular
settings in this case, we recommend that you press the button (raised
button). Emergency Off
If you operate any button or the switch ON/OFF of the driver seat, you can
interrupt the setting operation at any time in an emergency.
Storing and retrieving settings
Storing seat and exterio
r mirror settings for driving forward
– Switch on the ignition.
– Adjust the seat ⇒page 71.
– Adjust both exterior mirrors ⇒page 67.
– Press one of the memory buttons and hold the button pressed for about 3 seconds until an audible signal confirms
that the setting has been stored.
Storing exterior mirror setting for reversing
– Switch on the ignition.
– Turn the exterior mirror control to position
⇒ page 67,
fig. 49 .
– Engage reverse gear.
– Move the right exterior mirror into the desired position ⇒page 67.
– Press one of the memory buttons and hold the button pressed for about 3 seconds until an audible signal confirms
that the exterior mirror setting for reversing has been stored.
Fig. 52 Driver seat:
Memory buttons and
ON/OFF switch
ADAD
AEAD
ADAE
AE
AD
AD
Page 74 of 270
Seats and Stowage73
Using the systemSafetyDriving TipsGeneral MaintenanceBreakdown assistanceTechnical Data
Note
•When storing settings with the memory buttons, we recommend that
you begin with the front button and assign a memory button to each addi-
tional driver.
•Each new setting stored with the same button erases the previous
setting.
•Each time you store the seat and exterior mirror settings for driving
forward you also have to re-store the individual setting of the exterior
mirror on the passenger side for reversing.
Assigning remote control to the memory buttons
After storing the settings of the seat and exterior mirrors, you
have 10 seconds in order to assign the remote control to the
appropriate memory button.
– Withdraw the ignition key.
– Press the release button ⇒page 47 and hold it pressed for 1
second until an audible signal confirms that the setting has
been stored. The setting is stored with the memory button
which you have selected.
If you wish to be able to retrieve the settings which are stored in the
memory by also using the remote control, you have to assign the remote
control to a memory button in each case.
We recommend that you assign one of the two remote controls supplied
with your car, to the front memory button, and the other remote control key
to the middle memory button. If you wish, you can obtain an additional key with radio remote control from
a Škoda dealer and then assign the radio remote control to the rear
memory button.
Note
•If the remote control had previously been assigned to another memory
button, this setting is then erased by the new assignment.
•If you assign the remote control to a memory button which has already
been assigned to a remote control, the old assignment is also replaced by
a new assignment in this case.
•The assignment of the remote control to a memory button is retained,
however, after reassigning the seats and exterior mirrors.
Retrieving seat and exterior mirror settings for driving
forward
You can retrieve the stored settings either with the
memory buttons or with the remote control*.
Retrieving settings with memory buttons
– For safety reasons, you can only retrieve the seat and mirror
settings if the ignition is switched off. You have a choice of two
different ways of retrieving the settings:
– One-touch automatic memory: with the driver door open,
operate the desired memory button ⇒ page 72, fig. 52
with one-touch. The seat and the exterior mirrors now move
automatically into the stored position.
AD
Page 75 of 270
Seats and Stowage
74
–Memory keying : with the driver door open or closed, press
and hold the desired memory button until the seat and the
exterior mirrors have moved into the stored position.
Retrieving settings with remote control
– If the driver door is closed and the ignition is switched off, briefly press the unlock button of the remote control
⇒page 47 and then open the door.
– The seat and exterior mirrors now move automatically into the stored positions.
Retrieving setting of exterior mirror for reversing*
– Turn the rotary knob for the exterior mirror setting into the position
⇒ page 67 before engaging the reverse gear.
Emergency Off
You can interrupt any memory retrieval operation in an emergency by
pressing the switch ⇒page 72, fig. 52 , by one-touch of a memory
button or by pressing the seat setting switch.
Head restraintsAD
AE
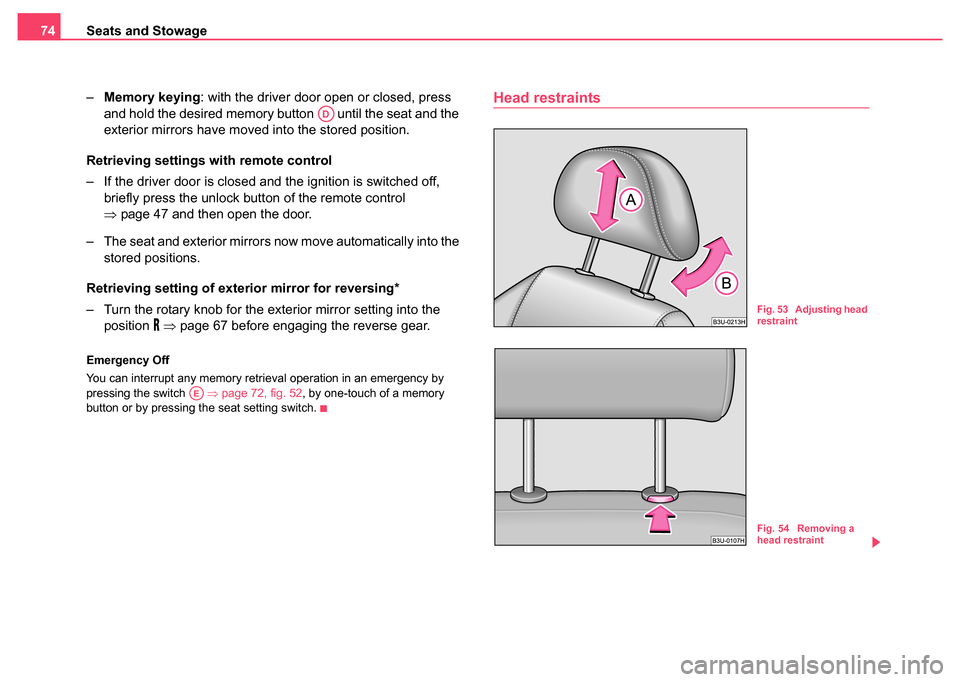
Fig. 53 Adjusting head
restraint
Fig. 54 Removing a
head restraint
Page 76 of 270
Seats and Stowage75
Using the systemSafetyDriving TipsGeneral MaintenanceBreakdown assistanceTechnical Data
Adjusting the height of a head restraint
– Grasp the side of the head restraint with both hands and push
it up or down in direction of arrow ⇒page 74, fig. 53 . Best
protection is achieved if the top edge of the head restraint is at
the same level as the upper part of your head ⇒page 141,
fig. 123.
Adjusting the angle of a head restraint
– The head restraint can be matched to the head of the occu- pant by adjusting the angle in the direction of the arrow .
Adjusting the angle of the head restraint provides enhanced
comfort for the user.
Removing and installi ng a head restraint
– Pull the head restraint out of the backrest of the seat as far as the stop.
– Press the locking button in the direction of arrow ⇒page 74,
fig. 54 and pull the head restraint out.
– To re-insert the head restraint, push it down into the backrest of the seat far enough until you hear the locking button
engage.
The head restraints of the front seats can be adjusted for angle and height
⇒page 74, fig. 53 , the outer head restraints at the rear can be adjusted
for height (about 15 mm). The middle rear head restraint is fixed.
The head restraints must be adjusted to match the size of the seat occu-
pant. Correctly adjusted head restraints together with the seat belts offer
effective protection for the occupants.
WARNING
•The head restraints must be correctly adjusted in order to offer
effective protection for the occupants in the event of an accident.
•Do not drive under any circumstance with removed head
restraints - risk of injury!
AA
AB
Page 77 of 270
Seats and Stowage
76
Front passenger seat with a folding
central back rest*
Folding out and setting
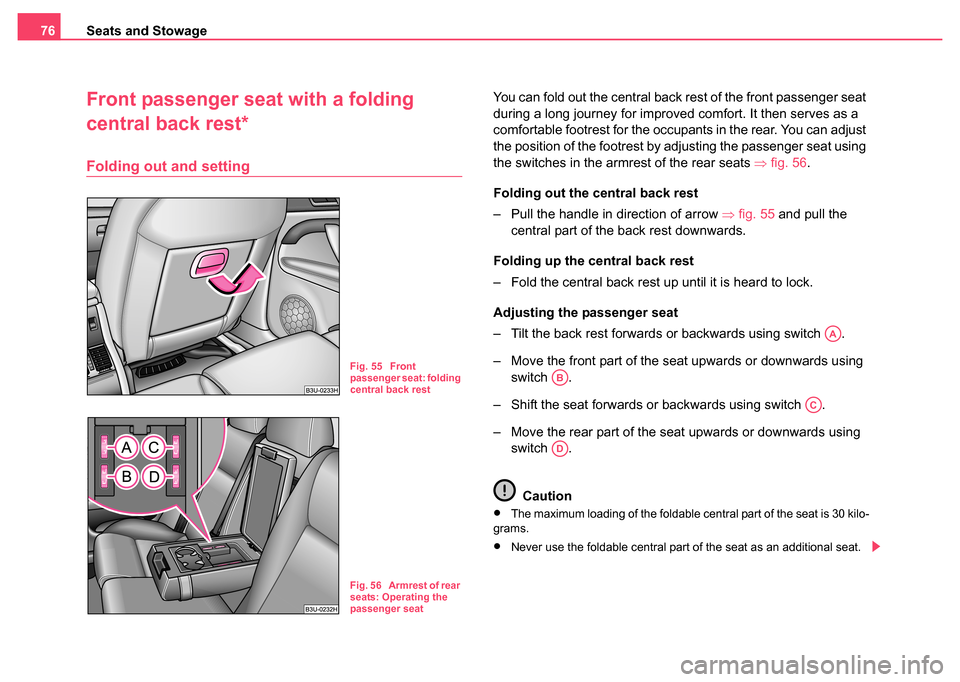
You can fold out the central back rest of the front passenger seat
during a long journey for improved comfort. It then serves as a
comfortable footrest for the occupants in the rear. You can adjust
the position of the footrest by adjusting the passenger seat using
the switches in the armrest of the rear seats ⇒fig. 56.
Folding out the central back rest
– Pull the handle in direction of arrow ⇒fig. 55 and pull the
central part of the back rest downwards.
Folding up the central back rest
– Fold the central back rest up until it is heard to lock.
Adjusting the p assenger seat
– Tilt the back rest forwards or backwards using switch .
– Move the front part of the seat upwards or downwards using switch .
– Shift the seat forwards or backwards using switch .
– Move the rear part of the seat upwards or downwards using switch .
Caution
•The maximum loading of the foldable central part of the seat is 30 kilo-
grams.
•Never use the foldable central part of the seat as an additional seat.
Fig. 55 Front
passenger seat: folding
central back rest
Fig. 56 Armrest of rear
seats: Operating the
passenger seat
AA
AB
AC
AD
Page 78 of 270
Seats and Stowage77
Using the systemSafetyDriving TipsGeneral MaintenanceBreakdown assistanceTechnical Data
Note
You can use a protective sack ⇒page 77 in order to prevent any dirt
getting onto the passenger seat.
Protective sack*
When using the foldable central part of the back rest the
protective sack reduces dirt getting on the passenger seat.
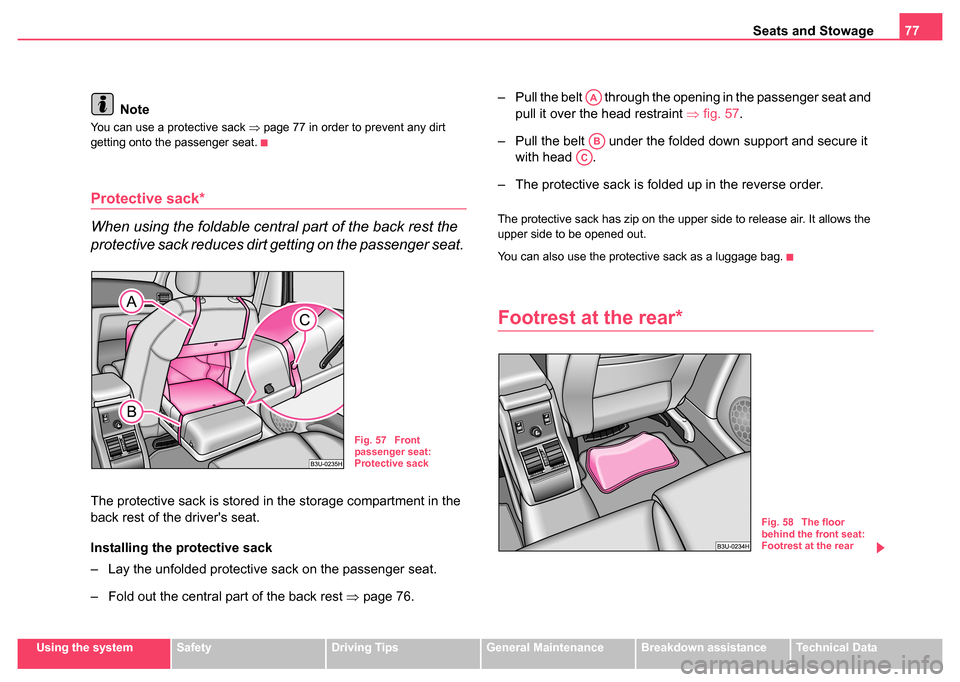
The protective sack is stored in the storage compartment in the
back rest of the driver's seat.
Installing the protective sack
– Lay the unfolded protective sack on the passenger seat.
– Fold out the central part of the back rest ⇒page 76. – Pull the belt through the opening in the passenger seat and
pull it over the head restraint ⇒fig. 57 .
– Pull the belt under the folded down support and secure it with head .
– The protective sack is folded up in the reverse order.
The protective sack has zip on the upper side to release air. It allows the
upper side to be opened out.
You can also use the protective sack as a luggage bag.
Footrest at the rear*
Fig. 57 Front
passenger seat:
Protective sack
AA
AB
AC
Fig. 58 The floor
behind the front seat:
Footrest at the rear
Page 79 of 270
Seats and Stowage
78
The occupants sitting in the rear of the car can use ⇒page 77,
fig. 58 the foot rest for increased comfort. The foot rest is
attached to the carpet by a velcro fastener.
Seat heaters*
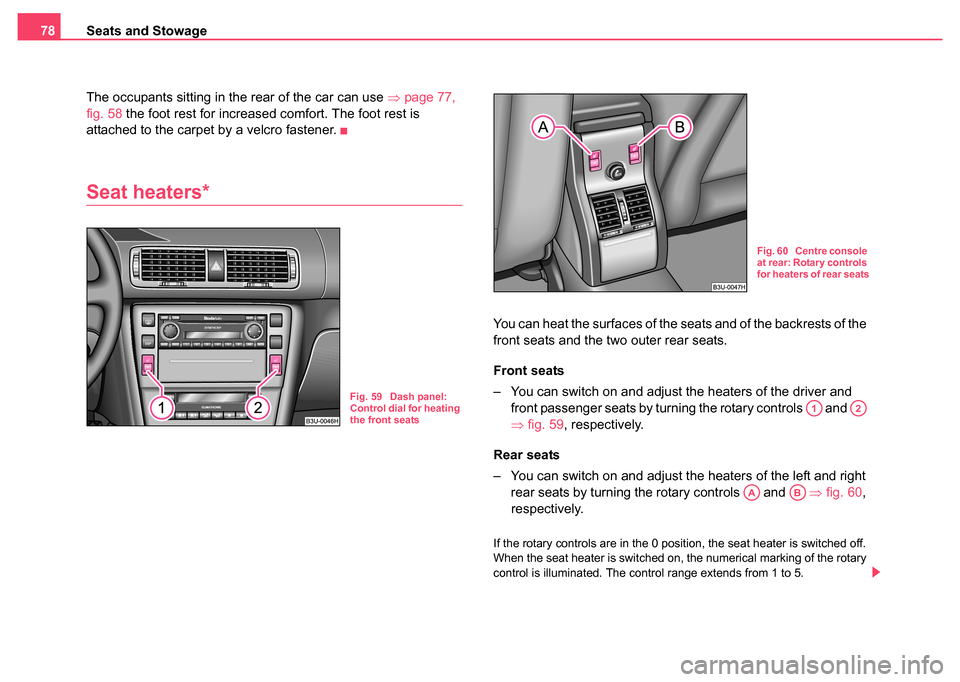
You can heat the surfaces of the seats and of the backrests of the
front seats and the two outer rear seats.
Front seats
– You can switch on and adjust the heaters of the driver and front passenger seats by turning the rotary controls and
⇒fig. 59, respectively.
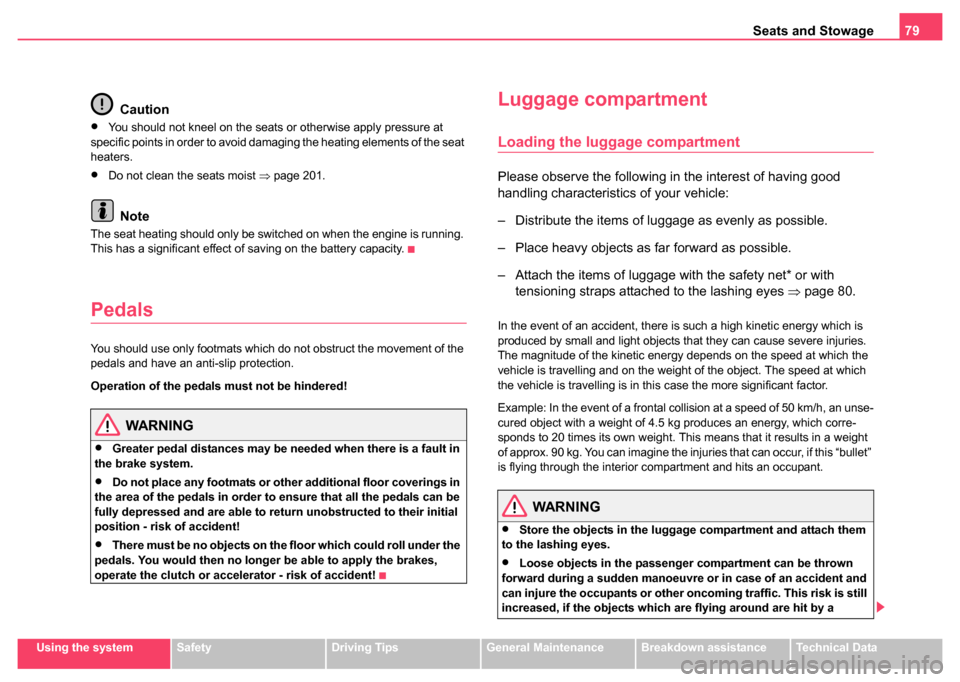
Rear seats
– You can switch on and adjust the heaters of the left and right rear seats by turning the rotary controls and ⇒fig. 60 ,
respectively.
If the rotary controls are in the 0 position, the seat heater is switched off.
When the seat heater is switched on, the numerical marking of the rotary
control is illuminated. The control range extends from 1 to 5.
Fig. 59 Dash panel:
Control dial for heating
the front seats
Fig. 60 Centre console
at rear: Rotary controls
for heaters of rear seats
A1A2
AAAB
Page 80 of 270
Seats and Stowage79
Using the systemSafetyDriving TipsGeneral MaintenanceBreakdown assistanceTechnical Data
Caution
•You should not kneel on the seats or otherwise apply pressure at
specific points in order to avoid damaging the heating elements of the seat
heaters.
•Do not clean the seats moist ⇒page 201.
Note
The seat heating should only be switched on when the engine is running.
This has a significant effect of saving on the battery capacity.
Pedals
You should use only footmats which do not obstruct the movement of the
pedals and have an anti-slip protection.
Operation of the pedals must not be hindered!
WARNING
•Greater pedal distances may be needed when there is a fault in
the brake system.
•Do not place any footmats or other additional floor coverings in
the area of the pedals in order to ensure that all the pedals can be
fully depressed and are able to return unobstructed to their initial
position - risk of accident!
•There must be no objects on the floor which could roll under the
pedals. You would then no longer be able to apply the brakes,
operate the clutch or accelerator - risk of accident!
Luggage compartment
Loading the luggage compartment
Please observe the following in the interest of having good
handling characteristics of your vehicle:
– Distribute the items of luggage as evenly as possible.
– Place heavy objects as far forward as possible.
– Attach the items of luggage with the safety net* or with tensioning straps attached to the lashing eyes ⇒page 80.
In the event of an accident, there is such a high kinetic energy which is
produced by small and light objects that they can cause severe injuries.
The magnitude of the kinetic energy depends on the speed at which the
vehicle is travelling and on the weight of the object. The speed at which
the vehicle is travelling is in this case the more significant factor.
Example: In the event of a frontal collision at a speed of 50 km/h, an unse-
cured object with a weight of 4.5 kg produces an energy, which corre-
sponds to 20 times its own weight. This means that it results in a weight
of approx. 90 kg. You can imagine the injuries that can occur, if this “bullet”
is flying through the interior compartment and hits an occupant.
WARNING
•Store the objects in the luggage compartment and attach them
to the lashing eyes.
•Loose objects in the passenger compartment can be thrown
forward during a sudden manoeuvre or in case of an accident and
can injure the occupants or other onc oming traffic. This risk is still
increased, if the objects which are flying around are hit by a