SKODA SUPERB 2004 1.G / (B5/3U) Manual Online
Manufacturer: SKODA, Model Year: 2004, Model line: SUPERB, Model: SKODA SUPERB 2004 1.G / (B5/3U)Pages: 270
Page 81 of 270
Seats and Stowage
80
deployed airbag. In this case, the objects which are thrown back
can injure the occupants - hazard!
•Please note that the handling properties of your vehicle may be
affected when transporting heavy objects as a result of the
displacement of the centre of gravity. The speed and style of
driving must be adjusted accordingly.
•The items carried in the luggage compartment should be stored
in such a way that no objects are able to slip forward if there are any
sudden driving or braking manoeuvres undertaken - risk of injury!
•Never drive with the boot lid slightly ajar or even fully opened
otherwise exhaust gases may get into the interior of the vehicle -
risk of poisoning!
•On no account exceed the permissible axle loads and the
permissible gross weight of the vehicle - risk of accident!
•Never transport occupants in the luggage compartment!
Note
•Tyre pressure must be adjusted to the load ⇒page 226, fig. 169 .
•The air circulation in the interior of the car helps to prevent the
windows from misting up. Stale air is diverted via the outlet nozzles into
the lateral trim panels of the luggage compartment. Check for yourself that
the outlet nozzles are not covered.
•On vehicles fitted without foldable backrest but with fixed backrest, the
luggage compartment cannot be enlarged.
Lashing eyes
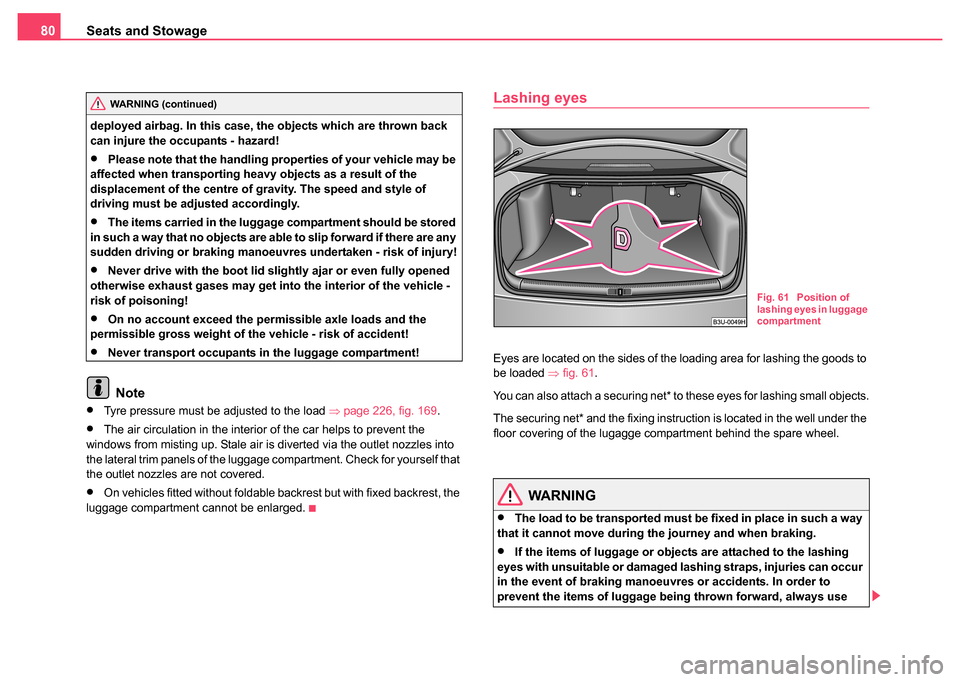
Eyes are located on the sides of the loading area for lashing the goods to
be loaded ⇒fig. 61 .
You can also attach a securing net* to these eyes for lashing small objects.
The securing net* and the fixing instruction is located in the well under the
floor covering of the lugagge compartment behind the spare wheel.
WARNING
•The load to be transported must be fixed in place in such a way
that it cannot move during the journey and when braking.
•If the items of luggage or objects are attached to the lashing
eyes with unsuitable or damaged lashing straps, injuries can occur
in the event of braking manoeuvres or accidents. In order to
prevent the items of luggage being thrown forward, always use
WARNING (continued)
Fig. 61 Position of
lashing eyes in luggage
compartment
Page 82 of 270
Seats and Stowage81
Using the systemSafetyDriving TipsGeneral MaintenanceBreakdown assistanceTechnical Data
suitable lashing straps which are
firmly attached to the lashing
eyes. Never attach a child seat to the lashing eyes!
Folding double hooks
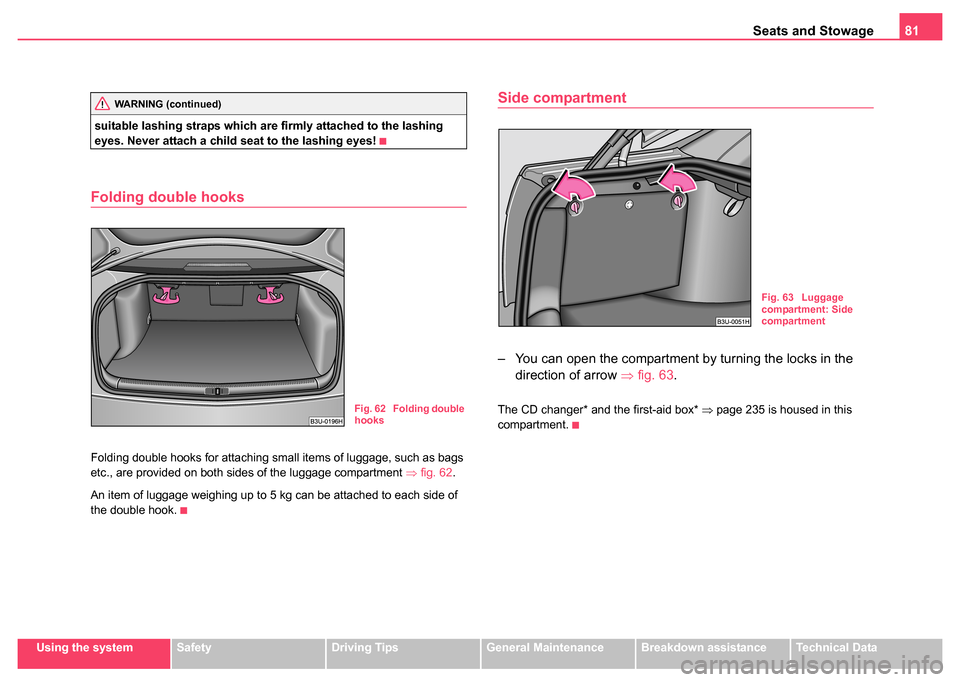
Folding double hooks for attaching small items of luggage, such as bags
etc., are provided on both sides of the luggage compartment ⇒fig. 62 .
An item of luggage weighing up to 5 kg can be attached to each side of
the double hook.
Side compartment
– You can open the compartment by turning the locks in the direction of arrow ⇒fig. 63.
The CD changer* and the first-aid box* ⇒page 235 is housed in this
compartment.
WARNING (continued)
Fig. 62 Folding double
hooks
Fig. 63 Luggage
compartment: Side
compartment
Page 83 of 270
Seats and Stowage
82
Folding down the backr est of the rear seats*
The luggage compartment can be enlarged if necessary by
folding one or both seat backrests forward. Folding the seat
backrest forwards
– Before folding the seat backrest forwards, the front seats must be adjusted so that the front seats are not damaged when
folding the seat backrest forwards.
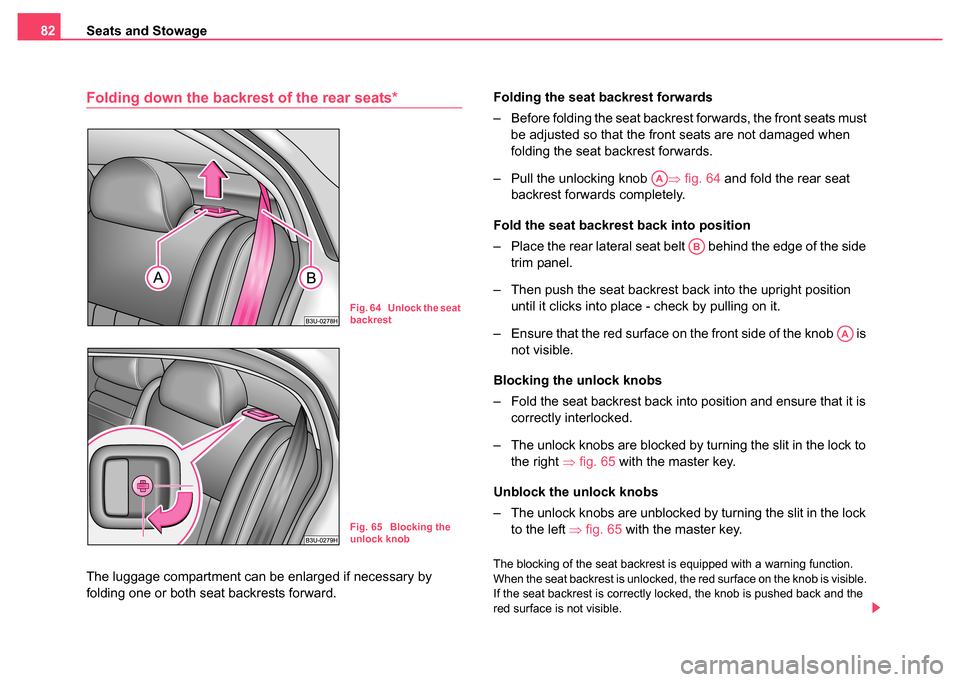
– Pull the unlocking knob ⇒fig. 64 and fold the rear seat
backrest forwards completely.
Fold the seat backrest back into position
– Place the rear lateral seat belt behind the edge of the side trim panel.
– Then push the seat backrest back into the upright position until it clicks into place - check by pulling on it.
– Ensure that the red surface on the front side of the knob is not visible.
Blocking the unlock knobs
– Fold the seat backrest back into position and ensure that it is correctly interlocked.
– The unlock knobs are blocked by turning the slit in the lock to the right ⇒fig. 65 with the master key.
Unblock the unlock knobs
– The unlock knobs are unblocked by turning the slit in the lock to the left ⇒fig. 65 with the master key. The blocking of the seat backrest is equipped with a warning function.
When the seat backrest is unlocked, the red surface on the knob is visible.
If the seat backrest is correctly locked, the knob is pushed back and the
red surface is not visible.
Fig. 64 Unlock the seat
backrest
Fig. 65 Blocking the
unlock knob
AA
AB
AA
Page 84 of 270
Seats and Stowage83
Using the systemSafetyDriving TipsGeneral MaintenanceBreakdown assistanceTechnical Data
WARNING
•The belt locks and the pelvic belt must be in their original posi-
tion after folding back the seat backrest - they must be ready to use.
•The seat backrests must be securely interlocked in position so
that no objects in the luggage compartment can slide forward if
there is sudden braking - risk of injury!
•Pay attention that the rear seat backrest is correctly interlocked.
It is only then that the three-point seat belt for the middle seat can
reliably fulfil its function.
•Before folding the seat backrest back into the secure position,
place the rear lateral seat belt behind the edge of the side trim
panel. Take suitable measures to prevent that the seat belt is
jammed between the side trim panel and the seat backrest and is
thus damaged.
The luggage compartment cover
You can use the luggage compartment cover behind the head restraints
of the rear seats for storing light and soft items.
WARNING
No objects should be placed on the luggage compartment cover,
the vehicle occupants could be endangered if there is sudden
braking or the vehicle co llides with something.
Caution
Please ensure that the heating elements of the rear window heater are not
damaged as a result of objects placed in this area.
Through-loading bag*
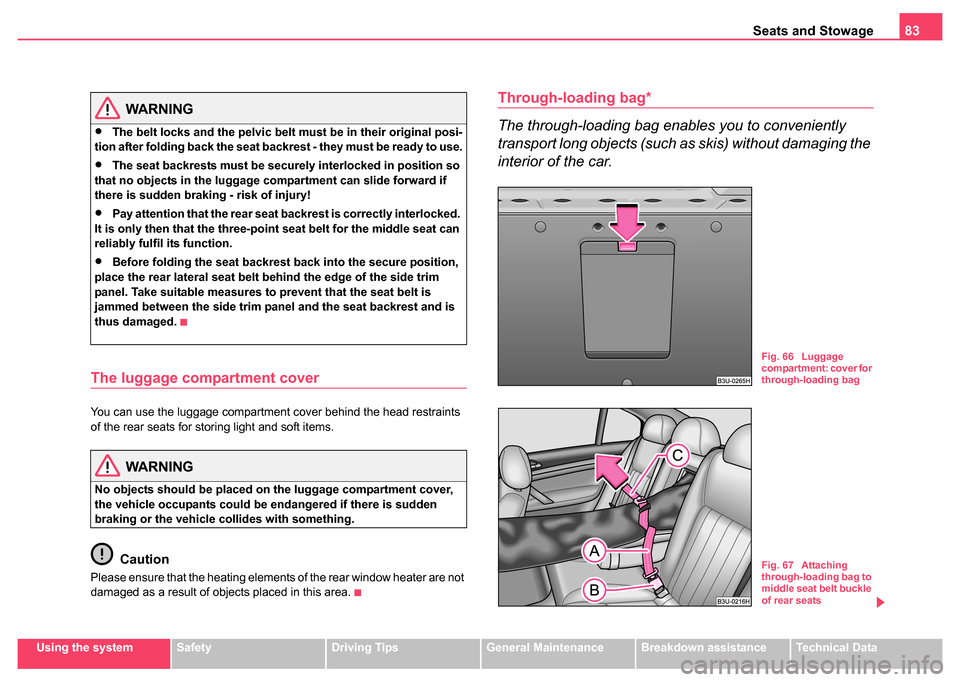
The through-loading bag enables you to conveniently
transport long objects (such as skis) without damaging the
interior of the car.
Fig. 66 Luggage
compartment: cover for
through-loading bag
Fig. 67 Attaching
through-loading bag to
middle seat belt buckle
of rear seats
Page 85 of 270
Seats and Stowage
84
Loading
– Fold down the armrest of the rear seats to the front.
– Press the unlock button for the cover of the through-loading bag in the interior of the car and swivel it down.
– Pull the bag out and unfold it.
– Open the boot lid/luggage compartment door.
– Press the unlock button for the cover of the through-loading bag ⇒page 83, fig. 66 and swivel it down.
– Push the objects into the through-loading bag from the boot ⇒ .
Securing
– Insert the belt ⇒page 83, fig. 67 into the middle seat belt
buckle .
– Pull the seat belt tight in direction of arrow ⇒page 83,
fig. 67.
Stowing
– Close the cover for the through-loading bag in the boot.
– Carefully fold the through-loading bag together (approx. 11 cm packet).
– Close the cover in the interior of the car.
– Move the armrest back into its original position.
WARNING
After placing items into the through-loading bag, you must secure
the bag with the belt .
Note
Never fold the though-loading bag together if it is moist.
The cool box in the armrest of rear seats*
Using the system
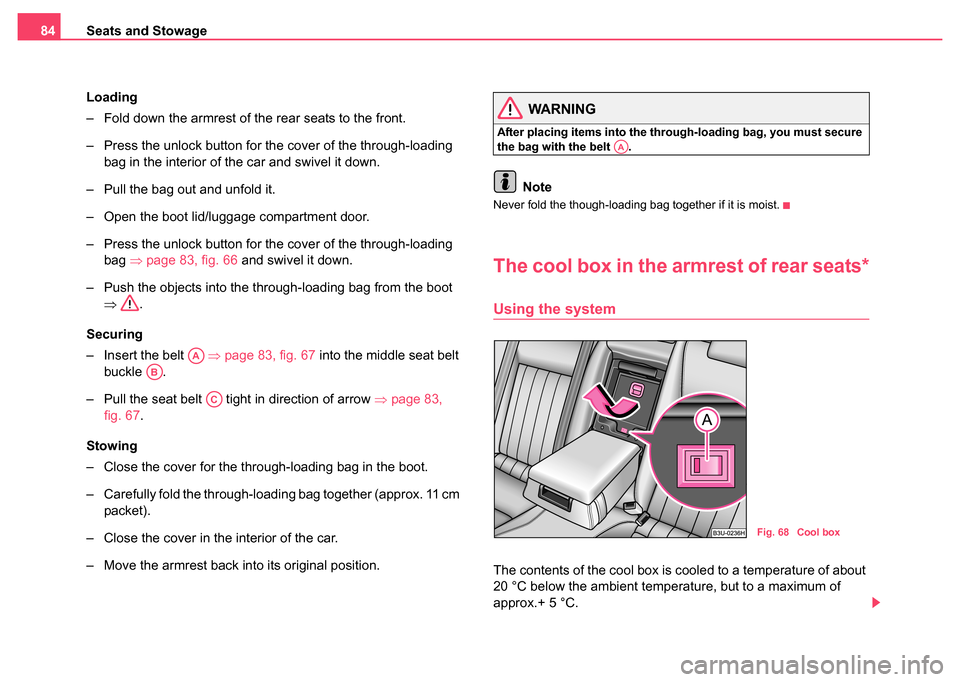
The contents of the cool box is cooled to a temperature of about
20 °C below the ambient temperature, but to a maximum of
approx.+ 5 °C.
AA
AB
AC
AA
Fig. 68 Cool box
Page 86 of 270

Seats and Stowage85
Using the systemSafetyDriving TipsGeneral MaintenanceBreakdown assistanceTechnical Data
Opening and Closing
– Pull the handle ⇒page 84, fig. 68 and pull the lid downwards.
– Open up the lid of the cool box upwards until it is heard to lock.
Switching on and off
– The cooling action of the cool box is switched on and off using switch ⇒page 84, fig. 68 . It is signalised by the lighting up
of the indicator light on the switch.
You can remove the cool box if necessary ⇒page 86. You can replace the
cool box with a storage net ⇒fig. 69 .
Caution
Never cover the ventilator on the cool box otherwise it will overheat and
could be damaged.
Note
The cool box also operates if the ignition is switched off. The battery will
not run down fully, however, since the system is fitted with a device which
monitors the battery charge level. The cool box will be automatically
switched off when it is threatening to empty the battery.
Partition with storage net
If the cool box is removed, install the partition with the storage net
⇒fig. 69 which is fixed with a velcro fastener to the side wall of
the cool box.
– The partition is installed and removed in a similar way to the cool box ⇒ page 86.
AA
Fig. 69 Partition with
storage net
Page 87 of 270
Seats and Stowage
86
Removing and installing the cool box
Removing
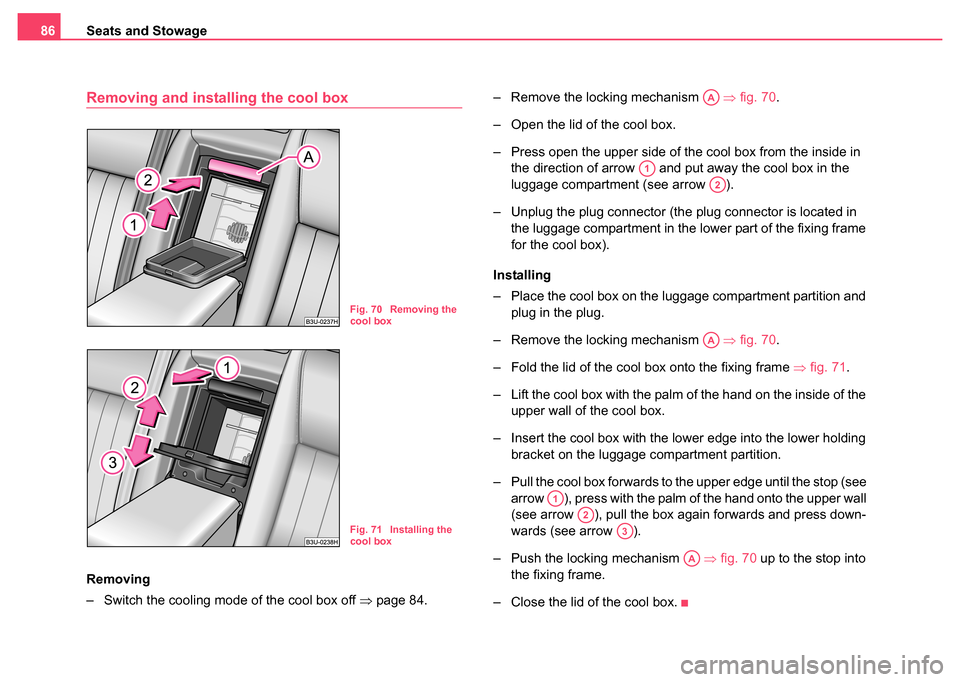
– Switch the cooling mode of the cool box off ⇒page 84. – Remove the locking mechanism
⇒fig. 70 .
– Open the lid of the cool box.
– Press open the upper side of the cool box from the inside in the direction of arrow and put away the cool box in the
luggage compartment (see arrow ).
– Unplug the plug connector (the plug connector is located in the luggage compartment in the lower part of the fixing frame
for the cool box).
Installing
– Place the cool box on the luggage compartment partition and plug in the plug.
– Remove the locking mechanism ⇒fig. 70 .
– Fold the lid of the cool box onto the fixing frame ⇒fig. 71 .
– Lift the cool box with the palm of the hand on the inside of the upper wall of the cool box.
– Insert the cool box with the lower edge into the lower holding bracket on the luggage compartment partition.
– Pull the cool box forwards to the upper edge until the stop (see arrow ), press with the palm of the hand onto the upper wall
(see arrow ), pull the box again forwards and press down-
wards (see arrow ).
– Push the locking mechanism ⇒fig. 70 up to the stop into
the fixing frame.
– Close the lid of the cool box.
Fig. 70 Removing the
cool box
Fig. 71 Installing the
cool box
AA
A1
A2
AA
A1
A2
A3
AA
Page 88 of 270
Seats and Stowage87
Using the systemSafetyDriving TipsGeneral MaintenanceBreakdown assistanceTechnical Data
CargoFlex folding box*
Lowering and securing folding box
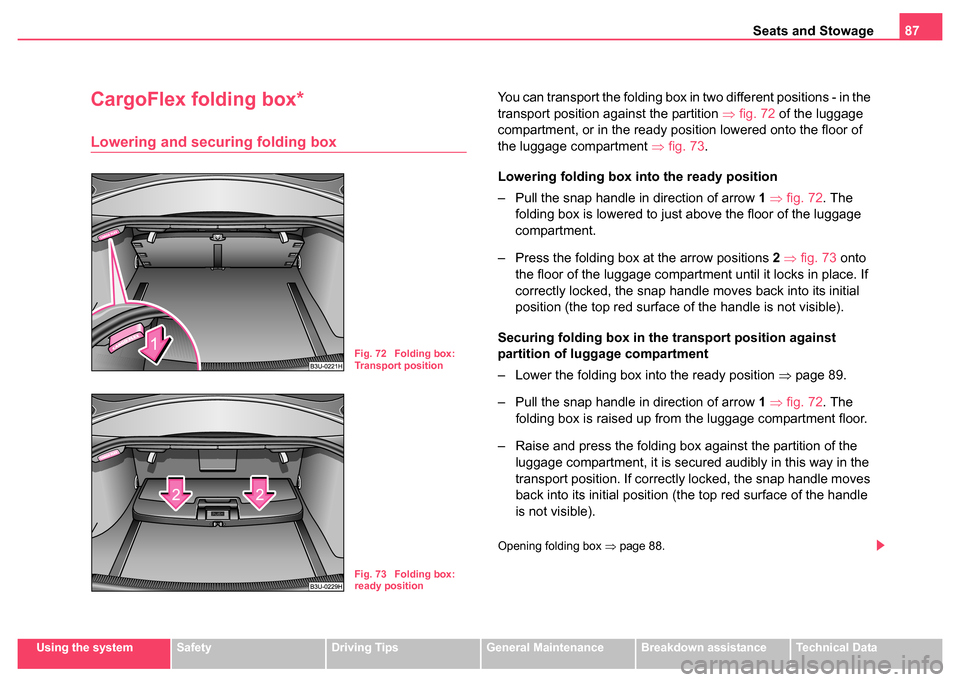
You can transport the folding box in two different positions - in the
transport position against the partition ⇒fig. 72 of the luggage
compartment, or in the ready position lowered onto the floor of
the luggage compartment ⇒ fig. 73.
Lowering folding box in to the ready position
– Pull the snap handle in direction of arrow 1 ⇒ fig. 72 . The
folding box is lowered to just above the floor of the luggage
compartment.
– Press the folding box at the arrow positions 2 ⇒ fig. 73 onto
the floor of the luggage compartment until it locks in place. If
correctly locked, the snap handle moves back into its initial
position (the top red surface of the handle is not visible).
Securing folding box in the transport position against
partition of luggage compartment
– Lower the folding box into the ready position ⇒page 89.
– Pull the snap handle in direction of arrow 1 ⇒ fig. 72 . The
folding box is raised up from the luggage compartment floor.
– Raise and press the folding box against the partition of the luggage compartment, it is secured audibly in this way in the
transport position. If correctly locked, the snap handle moves
back into its initial position (the top red surface of the handle
is not visible).
Opening folding box ⇒page 88.
Fig. 72 Folding box:
Transport position
Fig. 73 Folding box:
ready position
Page 89 of 270

Seats and Stowage
88
Caution
The parts of the folding box can be damaged if handled roughly or in an
unprofessional way.
Opening folding box
You can transport the opened folding box in the secured end or
middle position against the partition of the luggage compartment.
Opening folding box
– Lower the folding box into the ready position ⇒page 87.
– Press the button marked “PUSH” ⇒fig. 74 .
– Grasp the folding box at the handle and push it in direction of arrow 1 against the partition of the luggage compartment
into the secured position. The lock below the button must be
heard to engage. If correctly locked, the button marked
“PUSH” moves back into its initial position.
– Raise the lid in direction of arrow 2 ⇒ fig. 75 .
Fig. 74 Luggage
compartment: folding
box
Fig. 75 Opening
folding box
AB
AA
AB
Page 90 of 270

Seats and Stowage89
Using the systemSafetyDriving TipsGeneral MaintenanceBreakdown assistanceTechnical Data
– Press on the bottom part of the handle and open the
compartments in the direction of arrow 3. The compartment
wall must be heard to engage in the slot in the bottom part of
the box.
Moving folding box into secured middle position
– Press on the button marked “PUSH” ⇒page 88, fig. 75
and carefully push the folding box into the secured middle
position. If correctly locked, the button marked “PUSH” is
moved back into its initial position. You can now use the space
which has become available for stowing further items of
luggage.
Caution
•The parts of the folding box can be damaged if handled roughly or in
an unprofessional way.
•The maximum weight of goods to be loaded should not exceed 25
kg.
Lowering folding box
– Press the bottom part of the handle ⇒fig. 76 and fold the
compartments in direction of arrow 1. The compartments must
be heard to engage in the lid.
AC
AD
AD
Fig. 76 Lowering
folding box
Fig. 77 Securing
folding box
AA