warning light SKODA SUPERB 2004 1.G / (B5/3U) Manual PDF
[x] Cancel search | Manufacturer: SKODA, Model Year: 2004, Model line: SUPERB, Model: SKODA SUPERB 2004 1.G / (B5/3U)Pages: 270
Page 214 of 270
Inspecting and Replenishing213
Using the systemSafetyDriving TipsGeneral MaintenanceBreakdown assistanceTechnical Data
The warning light in the instrument cluster will indicate whether the oil
level is too low
⇒page 28. In this case, check the oil level as soon as
possible. Top up with an appropriate quantity of oil.
WARNING
Read and observe the warning notes ⇒page 209, “Working in the
engine compartment” before working in the engine compartment.
Caution
•The oil level must on no account extend beyond the range . Danger
of damaging the catalytic converter.
•Do not continue your journey if for some reason it is not possible
under the conditions prevailing to top up with oil. Switch of the engine
and obtain professional assistance from a Škoda dealer.
Replenishing engine oil
– Inspect the oil level ⇒page 212.
– Unscrew the cap of the engine oil filler opening.
– Pour in a suitable grade of oil in portions of 0.5 litres ⇒page 211, “Engine oil specifications”.
– Inspect the oil level ⇒page 212.
– Carefully screw on the cap of the filler opening and push the dipstick in fully.
The location of the engine oil filler opening is shown in the illustration of
the engine compartment ⇒page 210.
WARNING
•Avoid dripping oil onto hot parts of the engine when topping up
will oil - a risk of fire!
•Read and observe the warning notes ⇒page 209, “Working in
the engine compartment” before working in the engine compart-
ment.
For the sake of the environment
The oil level must on no account be above the range ⇒page 212,
fig. 161 . Oil will otherwise be drawn in through the crankcase ventilation
and may pass through the exhaust system to atmosphere. The oil may
combust in the catalytic converter and damage it.
Changing engine oil
The engine oil must be changed at the intervals stated in the Service
Schedule or according to the service interval indicator ⇒page 16.
WARNING
•Only carry out the engine oil change, if you have the required
professional knowledge!
•Read and observe the warning notes ⇒page 209, “Working in
the engine compartment” before working in the engine compart-
ment.
•Let the engine cool down - risk of burning from hot oil.
Aa
Aa
Page 216 of 270
Inspecting and Replenishing215
Using the systemSafetyDriving TipsGeneral MaintenanceBreakdown assistanceTechnical Data
Your Škoda dealer can also supply you with the correct coolant additives.
Caution
•Other coolant additives may cause operational problems which,
in particular, involves significantly reducing the anticorrosion effect.
•Any faults or problems resulting from corrosion may cause a loss
of coolant and, as a consequence of this, result in major engine
damage.
Inspecting the coolant level
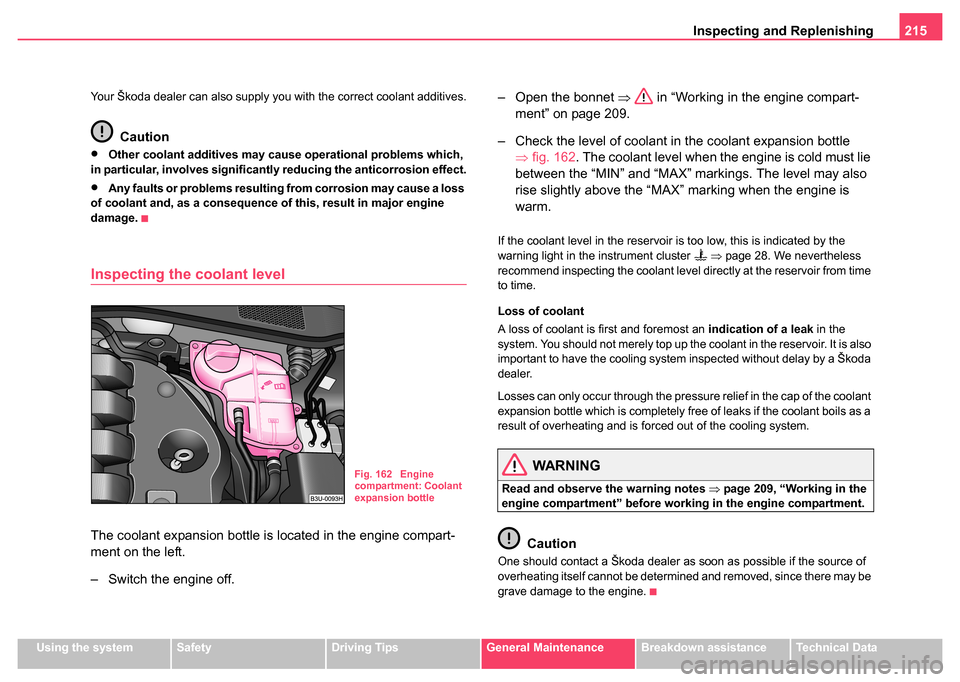
The coolant expansion bottle is located in the engine compart-
ment on the left.
– Switch the engine off. – Open the bonnet
⇒ in “Working in the engine compart-
ment” on page 209.
– Check the level of coolant in the coolant expansion bottle ⇒fig. 162. The coolant level when the engine is cold must lie
between the “MIN” and “MAX” markings. The level may also
rise slightly above the “MAX” marking when the engine is
warm.
If the coolant level in the reservoir is too low, this is indicated by the
warning light in the instrument cluster ⇒ page 28. We nevertheless
recommend inspecting the coolant level directly at the reservoir from time
to time.
Loss of coolant
A loss of coolant is first and foremost an indication of a leak in the
system. You should not merely top up the coolant in the reservoir. It is also
important to have the cooling system inspected without delay by a Škoda
dealer.
Losses can only occur through the pressure relief in the cap of the coolant
expansion bottle which is completely free of leaks if the coolant boils as a
result of overheating and is forced out of the cooling system.
WARNING
Read and observe the warning notes ⇒page 209, “Working in the
engine compartment” before working in the engine compartment.
Caution
One should contact a Škoda dealer as soon as possible if the source of
overheating itself cannot be determined and removed, since there may be
grave damage to the engine.
Fig. 162 Engine
compartment: Coolant
expansion bottle
Page 218 of 270
Inspecting and Replenishing217
Using the systemSafetyDriving TipsGeneral MaintenanceBreakdown assistanceTechnical Data
•the warm engine compartment is heated up additionally by strong
sunlight.
WARNING
You must therefore be aware when working in the engine compart-
ment that the fan may switch on suddenly - risk of injury!
Brake fluid
Inspecting the brake fluid level
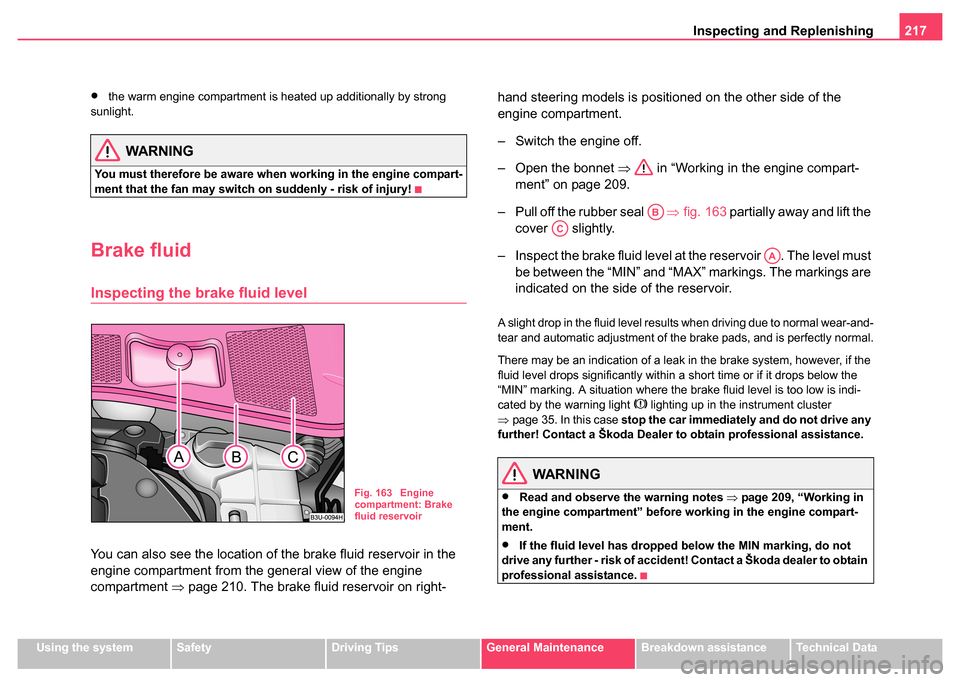
You can also see the location of the brake fluid reservoir in the
engine compartment from the general view of the engine
compartment ⇒page 210. The brake fluid reservoir on right- hand steering models is positioned on the other side of the
engine compartment.
– Switch the engine off.
– Open the bonnet
⇒ in “Working in the engine compart-
ment” on page 209.
– Pull off the rubber seal ⇒fig. 163 partially away and lift the
cover slightly.
– Inspect the brake fluid level at the reservoir . The level must be between the “MIN” and “MAX” markings. The markings are
indicated on the side of the reservoir.
A slight drop in the fluid level results when driving due to normal wear-and-
tear and automatic adjustment of the brake pads, and is perfectly normal.
There may be an indication of a leak in the brake system, however, if the
fluid level drops significantly within a short time or if it drops below the
“MIN” marking. A situation where the brake fluid level is too low is indi-
cated by the warning light
lighting up in the instrument cluster
⇒ page 35. In this case stop the car immediately and do not drive any
further! Contact a Škoda Dealer to obtain professional assistance.
WARNING
•Read and observe the warning notes ⇒page 209, “Working in
the engine compartment” before working in the engine compart-
ment.
•If the fluid level has dropped below the MIN marking, do not
drive any further - risk of accident! Contact a Škoda dealer to obtain
professional assistance.
Fig. 163 Engine
compartment: Brake
fluid reservoir
AB
AC
AA
Page 220 of 270
Inspecting and Replenishing219
Using the systemSafetyDriving TipsGeneral MaintenanceBreakdown assistanceTechnical Data
WARNING
•The battery acid is strongly corrosive and must, therefore, be
handled with the greatest of care. Always wear protective gloves,
eye and skin protection when handling batteries. Corrosive fumes
in the air irritate the air passages and lead to conjunctivitis and
inflammation of the air passages in the lungs. Battery acid
corrodes dental enamel and creates deep wounds after contact
with the skin which take a long time to heal. Repeated contact with
diluted acids causes skin diseases (inflammations, ulcers, slin
cracks). Acids coming into contact with water are diluted accompa-
nied by significant development of heat.
•Do not tilt the battery otherwise battery electrolyte may flow out
of the battery vent openings. Protect the eyes with safety glasses
or a shield! There is the danger of suffering blindness! If any
battery electrolyte gets into your eye, rinse out your eye immedi-
ately with clear water for several minutes. Contact a doctor without
delay.
•Splashes of acid on your skin or clothes should be neutralised
as soon as possible using soap suds and then rinsed with plenty
of water. Contact a doctor immediately if you swallow battery elec-
trolyte.
•Keep batteries out of the reach of children.
•Hydrogen is released when you charge a battery and a highly
explosive gas mixture is produced. An explosion can be caused
through sparkling over during unclamping or loosening of the
cable plug while the ignition is on.
•Bridging of the poles will create a short circuit (e.g. through
metal objects, cables). Possible consequences of a short circuit:
Melting of lead struts, explosion and burning of the battery, jets of
acid spurting out.
•It is prohibited to work with a naked flame and light, to smoke or
to carry out any activities which produce sparks. Avoid creating sparks when working with cables and electrical devices. Strong
sparking represents a risk of injury.
•Before carrying out any work on the electrical system, switch
off the engine, the ignition as well as all electrical components and
disconnect the negative cable (-) on the battery (please pay atten-
tion to the following instructions) ⇒page 223. If you wish to
replace a bulb it is sufficient to switch off the appropriate light.
•Never charge a frozen or thawed battery - risk of explosion and
caustic burns! Replace a frozen battery.
•Never use a battery which is damaged - risk of explosion! Imme-
diately replace a damaged battery.
Caution
•You must only disconnect the battery if the ignition is switched on,
otherwise the electrical system (electronic components) of the vehicle
may be damaged. When disconnecting the battery from the electrical
system of the vehicle, first disconnect the negative terminal (-) of the
battery. Then disconnect the positive terminal (+).
•When reconnecting the battery, first connect the positive terminal (+)
and only then the negative terminal (-) of the battery. You must on no
account connect the cables wrongly - risk of a cable fire!
•Ensure that battery acid does not come into contact with the vehicle
body otherwise damage could occur to the paintwork.
•Do not place the battery in direct daylight in order to protect the battery
housing from the effects of ultra-violet light.
For the sake of the environment
A removed battery is a special type of waste which is harmful to the envi-
ronment - contact your Škoda dealer regarding disposing of the battery.
WARNING (continued)
Page 225 of 270
Inspecting and Replenishing
224
The windshield washer reservoir contains the cleaning fluid for the wind-
screen and for the headlamp cleaning system*. The reservoir is located at
the front left of the engine compartment ⇒ page 223, fig. 168.
The reservoir has a capacity of 4 liters.
Clear water is not sufficient to intensively clean the windscreen and head-
lights. We therefore recommend using clean washing water together with
the screen cleaner from Škoda genuine accessories (in winter additionally
with antifreeze) which is capable of removing stubborn dirt. Follow the
instructions for use on the packaging when using screen cleaning prod-
ucts.
You should always add antifreeze to the cleaning water in winter even if
your vehicle is fitted with heated windscreen washer nozzles*.
It is also possible in exceptional cases to use methylated spirits when no
screen cleaner with antifreeze is available. The concentration of methyl-
ated spirits must not be more than 15 %. Please note, however, that the
antifreeze protection at this concentration is only adequate down to -5°C.
WARNING
Read and observe the warning notes ⇒page 209, “Working in the
engine compartment” before working in the engine compartment.
Caution
•On no account should you add radiator antifreeze or other additives to
the windscreen washer fluid.
•If the vehicle is fitted with headlight cleaning system, you should only
add cleaning products which do not attack the polycarbonate coating of
the headlights to the windscreen washer fluid. Please contact your Škoda
dealer, who will tell you which cleaning agent you can use.
Note
Do not take the filter out of the windscreen wash container when filling it
up again with liquid otherwise dirt can get into the liquid transportation
system and can lead to faults in operation of the windscreen wash
system.
Page 231 of 270
Wheels and Tyres
230
Wheel bolts
Wheels and wheel bolts are matched to each other in terms of design.
Each time you fit other wheels - e.g. light alloy wheels or wheels with
winter tyres - you must therefore also use the matching wheel bolts of the
correct length and shape of spherical cap. This is essential to ensure that
the wheels are tightly fitted and that the brake system operates properly.
If you retrofit wheel trims (or have this done), please also ensure that an
adequate flow of air remains assured for cooling the brake system.
Škoda dealers are instructed in the technical possibilities which exist
regarding converting or retrofitting wheels, tyres and wheel trim.
WARNING
•In case of incorrect treatment of the wheel bolts, the wheel can
loosen when the car is moving - risk of accident!
•The wheel bolts must be clean and must turn easily. However,
they must never be treated with grease or oil.
•If the wheel bolts are tightened to a too low tightening torque,
the rim can lossen when the car is moving - risk of accident! A tight-
ening torque which is too high can damage the bolts and threads
and this can result in perman ent deformation of the contact
surfaces on the rims.
Caution
The prescribed tightening torque of the wheel bolts for steel and light alloy
wheels is 120 Nm.
Winter tyres
The handling of your vehicle will be significantly improved when driving on
wintry roads and at temperatures below 7 °C if you fit winter tyres.
Summer tyres do not offer the same grip on ice and snow because of their
construction (width, rubber blend, tread pattern). This applies in particular
to vehicles which are equipped with low-profile tyres or high-speed
tyres (code index V, W or Y on wall of tyre).
Winter tyres must be mounted on all four wheels to obtain the best
handling characteristics.
Only use radial winter tyres.
You must only fit those types of winter tyre which are approved for your
vehicle. The permissible sizes of winter tyres are stated in your vehicle
documents. Approvals may differ because of national legislation.
Please remember that the tyres should be inflated to 20 kPa (0.2 bar)
more than is the case for summer tyres ⇒page 226.
Winter tyres no longer offer the same winter performance once the tyre
tread has worn down to a depth of about 4 mm.
Ageing also causes winter tyres to lose most of their winter performance
properties - even in cases where the remaining tread depth is still clearly
more than 4 mm.
Speed restrictions apply to winter tyres as well as to summer tyres
⇒ .
You can fit winter tyres of a lower speed category to your vehicle provided
that you also do not drive faster than the permissible maximum speed for
such tyres, even if the possible maximum speed of your vehicle is higher.
The corresponding tyre category can damage the tyres when exceeding
the permissible maximum speed.
Please pay attention to the notes if you decide to fit winter tyres
⇒ page 225.
Page 239 of 270

Breakdown assistance
238
•Do not drive with this spare wheel at more than 80 km/h - risk of acci-
dent. Avoid accelerating at full throttle, sharp braking and fast cornering.
•The inflation pressure for this spare wheel is identical to the inflation
pressure of the standard tyres.
•Use this spare wheel only to reach the nearest service station as it is
not intended for continuous use.
Changing a wheel
Preliminary work
The following steps should be carried out before actually
changing the wheel.
– If it is necessary to change a wheel, park the vehicle as far away as possible from the traffic flow. The place you choose
should be level.
– Have all the occupants get out. While changing a wheel, the
occupants of the vehicle should not stand on the road (it is
better behind a crash barrier).
– Apply the handbrake firmly.
– Engage 1st gear or if your vehicle is fitted with an automatic
gearbox, position the selector lever into position P .
– If a trailer is coupled, uncouple it.
– Take the vehicle tool kit and the spare wheel ⇒ page 237
out of the luggage compartment.
WARNING
•If you find yourself in flowing traffic switch on the hazard
warning lights system and place the warning triangle on the side of
the road at the prescribed distance from your vehicle while
observing all national legal provisions. In this way you are
protecting not only yourself but also other road users.
•Never start the engine with the vehicle sitting on the raised jack
- danger of suffering injury!
Caution
If you have to change a wheel on a slope first block the opposite wheel
with a stone or similar object in order to secure the vehicle from unexpect-
edly rolling away.
Note
Comply with the national legal regulations.
Changing a wheel
Always change a wheel on a level surface as far as possible.
– Take off the full wheel trim* ⇒page 239 or the caps
⇒ page 241.
– In the case of light alloy wheels remove the wheel trim cap ⇒page 240.
– Slacken the wheel bolts ⇒page 241.
Page 240 of 270
Breakdown assistance239
Using the systemSafetyDriving TipsGeneral MaintenanceBreakdown assistanceTechnical Data
– Jack up the vehicle until the wheel is clear of the ground
⇒page 242.
– Unscrew the wheel bolts and place them on a clean surface (cloth, paper etc.).
– Take off the wheel.
– Fit on the spare wheel and tighten the wheel bolts slightly.
– Lower the car.
– Tighten the wheel bolts firmly, alternately and diagonally using the wheel wrench ⇒page 241.
– Mount the full wheel trim/wheel trim cap or the caps.
Note
•All bolts must be clean and must turn easily.
•You must never grease or oil the wheel bolts!
•When fitting on unidirectional tyres, ensure that the tyres rotate in the
correct direction ⇒page 225.
Subsequent steps
After changing the wheel, you must perform the following steps.
– Stow and attach the replaced wheel in the spare wheel well.
– Stow the vehicle tool kit in the space provided. –
Check the tyre pressure on the spare wheel just mounted as
soon as possible.
– Have the tightening torque of the wheel bolts checked with
a torque wrench as soon as possible. The tightening torque for
steel and light alloy wheels must be 120 Nm.
– Have the defective tyre repaired as soon as possible.
WARNING
It is necessary to observe the guidelines given on ⇒page 228,
“New tyres and wheels” if the vehicle is subsequently fitted with
tyres which are different to those it was fitted with at the works.
Note
•If you find, when changing the wheel, that the wheel bolts are corroded
and difficult to turn, the bolts must be replaced before checking the tight-
ening torque.
•Drive cautiously and only at a moderate speed to a workshop where
the tightening torque can be checked.
Full wheel trim*
Removing
– Hook the clamp (found in the vehicle toolkit) into the reinforced edge of the full wheel trim.
– Push the wheel key through the clamp, support the wheel key at the tyre and pull off the wheel trim.
Page 248 of 270
Breakdown assistance247
Using the systemSafetyDriving TipsGeneral MaintenanceBreakdown assistanceTechnical Data
out the battery being ignited by the strong spark which results from
the engine being started.
•Do not affix the cable end to parts of the fuel and brake
system.
•Run the jump-start cables so that they cannot be caught by any
rotating parts in the engine compartment.
•Do not bend over the batteries - risk of caustic burns!
•The vent screws of the battery cells must be tightened firmly.
•Keep any sources of ignition (naked flame, smouldering ciga-
rettes etc.) away from the battery - risk of an explosion!
Tow-starting and towing vehicle
General
Please pay attention to the following instructions if you are going
to use a tow rope:
Driver of the towing vehicle
– Do not drive off until the tow rope is taught.
– Release the clutch particularly gently when starting off or depress the accelerator particularly gently if your vehicle is
fitted with an automatic gearbox. Driver of the towed vehicle
– Switch the ignition on so that the steering wheel is not blocked
and you can also operate the turn signal lights, the headlight
flasher, the windscreen wipers and windscreen washer
system.
– Take the vehicle out of gear or move the selector lever into position N if your vehicle is fitted with an automatic gearbox.
– Note that the brake servo unit and power steering only operate if the engine is running. You will require significantly greater
physical force to depress the brake pedal and to steer the
vehicle if the engine is not running.
– Ensure that the tow rope is always kept taught.
Tow rope or tow bar
A tow bar is safest way of towing a vehicle and also minimizes any
shocks. You can use a tow rope only if a suitable tow bar is not available.
The tow rope must be elastic to protect the vehicle. Thus one should only
use plastic fibre rope or a rope made out of a similarly elastic material.
Attach the tow rope or the tow bar only to the towing eyes provided for
this purpose ⇒page 248, “Front towing eye” and ⇒page 248, “Rear
towing eye”.
Driving style
Towing another vehicle requires a certain amount of practice. Both drivers
should be familiar with the particular points about towing a vehicle.
Unskilled drivers should not attempt to tow in another vehicle or to be
towed in.
One should be constantly vigilant not to allow impermissibly high towing
forces or jerky loadings. There is always a risk of excessive stresses and
WARNING (continued)
A4
Page 252 of 270
Fuses and light bulbs251
Using the systemSafetyDriving TipsGeneral MaintenanceBreakdown assistanceTechnical Data
Caution
•Never attempt to “repair” fuses and also do not replace them with a
fuse of a higher amperage - risk of fire! This may also cause damage at
another part of the electrical system.
•Have the electrical system checked as quickly as possible by a Škoda
dealer if a newly inserted fuse blows again after a short time.
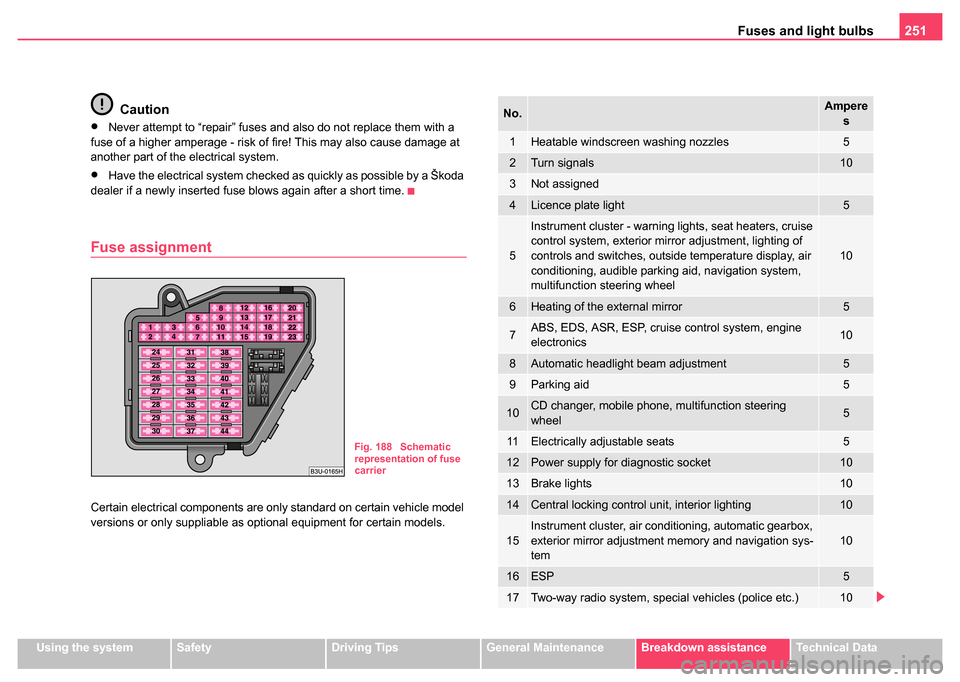
Fuse assignment
Certain electrical components are only standard on certain vehicle model
versions or only suppliable as optional equipment for certain models.
Fig. 188 Schematic
representation of fuse
carrier
No.Ampere s
1Heatable windscreen washing nozzles5
2Turn signals10
3Not assigned
4Licence plate light5
5
Instrument cluster - warning lights, seat heaters, cruise
control system, exterior mirror adjustment, lighting of
controls and switches, outside temperature display, air
conditioning, audible parking aid, navigation system,
multifunction steering wheel
10
6Heating of the external mirror5
7ABS, EDS, ASR, ESP, cruise control system, engine
electronics10
8Automatic headlight beam adjustment5
9Parking aid5
10CD changer, mobile phone, multifunction steering
wheel5
11Electrically adjustable seats5
12Power supply for diagnostic socket10
13Brake lights10
14Central locking control unit, interior lighting10
15Instrument cluster, air conditioning, automatic gearbox,
exterior mirror adjustment memory and navigation sys-
tem10
16ESP5
17Two-way radio system, special vehicles (police etc.)10